


Instant Print Digital Camera
Appareil photo numérique avec impression instantanée | Fotocamera digitale con stampa immediata | Sofortbild-Digitalkamera | Cámara digital de impresión instantánea | Câmera Digital com Impressão Instantânea
USER GUIDE
MANUEL DE L’UTILISATEUR | MANUALE DELL’UTENTE | BEDIENUNGSANLEITUNG | GUÍA PARA EL USUARIO | GUIA DO USUÁRIO
EN Download the detailed user manual at polaroidsnapcamera.com.
To enhance your experience, download the free Polaroid Print App for iOS and Android.
FR Téléchargez la version complète du manuel de l’utilisateur sur polaroidsnapcamera.com. Pour améliorer l’expérience, téléchargez l’app gratuite Polaroid Print pour iOS et Android.
IT Scaricate il manuale utente dettagliato su polaroidsnapcamera.com.
Per migliorare la vostra esperienza, scaricate l’app gratuita Polaroid Print per iOS e Android.
DE Laden Sie die ausführliche Bedienungsanleitung unter polaroidsnapcamera.com herunter. Um das Meiste aus Ihrem Gerät herauszuholen, laden Sie sich die kostenlose Polaroid Print App für iOS und Android herunter.
ES Descargue el manual para el usuario detallado en polaroidsnapcamera.com.
Para mejorar su experiencia, descargue la aplicación de impresión gratuita Polaroid para iOS y Android.
PT Faça download do manual do usuário detalhado em polaroidsnapcamera.com.
Para aprimorar a sua experiência, faça download do Polaroid Print App gratuito para iOS e Android.
Table of Contents
EN |
|
DE |
|
What’s in the Box |
4 |
Lieferumfang |
48 |
Get to Know Your Camera |
5 |
Machen Sie sich mit Ihrer Kamera vertraut |
49 |
Using Your Camera |
7 |
Verwendung Ihrer Kamera |
51 |
FR |
|
ES |
|
Contenu de la boîte |
20 |
Contenido de la caja |
60 |
Familiarisez-vous avec votre appareil photo |
21 |
Conozca su cámara |
61 |
Comment utiliser votre appareil photo |
23 |
Cómo usar su cámara |
63 |
IT |
34 |
PT |
74 |
Contenuto della confezione |
Conteúdo da caixa |
||
Composizione della fotocamera |
35 |
Conheça a sua câmera |
75 |
Utilizzo della fotocamera |
37 |
Como usar a câmera |
77 |
3

|
What’s in the Box |
|
|
Get to Know Your Camera |
|
|
||||
|
|
|
1 |
|
|
|
2 |
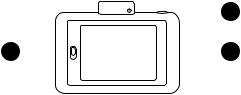
1. |
Pop-up flash/power |
|
|
|
|
|
|
|
2. |
button |
|||
|
|
|
|
|
|
|
|
Selfie mirror |
||
|
|
|
|
|
|
|
|
3. |
Lens with magnetic cap |
|
Polaroid SNAP Touch™ |
Camera strap |
Micro USB cable |
|
|
|
4 |
4. |
Photo print exit slot |
||
|
|
|
5. |
Microphone |
||||||
Instant Print Camera |
|
|
3 |
|
|
|
||||
|
|
|
|
|
|
6. |
Speaker |
|||
|
|
|
|
|
|
|
||||
|
|
|
|
|
|
|
5 |
7. |
MicroSD card slot |
|
|
|
|
|
|
|
|
8. |
Tripod connector |
||
|
|
|
|
|
|
|
|
9. |
Micro USB port |
|
|
|
|
|
|
|
|
|
10. |
Reset button* |
|
Polaroid ZINK® Paper |
User guide |
6 7 |
8 |
9 10 |
*To reset camera, insert a pin and hold for |
|||||
10-pack |
& warranty |
|||||||||
about 2 seconds. |
||||||||||
|
|
|
|
|
|
|
||||
4 | EN |
EN | 5 |
|
|
|
Back View |
|
Using Your Camera |
|||||
|
|
|
|
|
12 |
|
Turning On & Off |
1. |
Slide the lever on the left side of the LCD |
|
|
|
|
|
Gently press the pop-up flash mechanism. |
|
screen. The screen will pop up. |
||||
|
|
|
|
|||||||
|
|
|
|
|
|
|
11. Paper compartment |
|
2. |
Insert the entire pack of paper, making |
|
|
|
|
|
|
|
door latch |
Memory Storage |
|
sure the blue ZINK Smart Sheet is on the |
11 |
|
|
|
|
|
13 |
12. Shutter button |
The camera’s internal memory can hold up to |
|
bottom, barcode facing down. |
|
|
|
|
|
13. Touchscreen LCD |
10 images and can accommodate a microSD |
3. |
Close the paper compartment. |
||
|
|
|
|
|||||||
|
|
|
|
|
|
|
viewfinder |
card up to 128GB. |
4. |
The blue ZINK Smart Sheet will be |
|
|
|
|
|
|
|
|
|
|
processed and ejected before you print a |
|
|
|
|
|
|
|
|
Loading Photo Printing Paper |
|
photo. |
|
|
|
|
|
|
|
|
The Polaroid Snap Touch™ camera uses only |
|
|
|
|
|
|
|
|
|
|
Premium ZINK® Zero Ink® Paper to print 2 x |
First-Time Setup |
|
|
|
|
|
|
|
|
|
3” photos on adhesive-backed paper. |
Turn the camera on to begin setup. Follow the |
|
|
|
|
|
|
|
|
|
|
screen prompts. |
|
6 | EN |
EN | 7 |

Taking Pictures and Video
Choose the photo, video, or photobooth mode by tapping the capture mode icon.
Photo mode Video mode Photobooth mode
Press the shutter button to take still images or to start and stop recording video. Holding down the shutter button in the photo capture mode will take burst shots (rapid succession of still shots.) Note: Pressing the shutter button in views other than the live viewfinder will return you to the live viewfinder.
You can personalize your photos with borders, filters, and digital stickers. Tap on the EXTRAS icon to begin.
Extras
Borders |
Filters |
Stickers |
Tap on the photobooth capture mode icon to take shots for a 2-, 3-, or 4-photo layout. You can also add filters, borders or stickers to your layout.
Touchscreen Controls
Tap anywhere on the viewfinder to hide/show controls.
STATUS INDICATORS
Displays the SD card, printing, battery, and Bluetooth® connection status.
DEVICE SETTINGS
Tap icon to open device settings.
CAPTURE SETTINGS
Tap to open the photo, video, or photobooth capture settings menu.
Capture settings
HDR, FLASH AND TIMER
Displays settings for HDR, flash, and timer
HDR on |
Flash on |
Timer :3 |
8 | EN |
EN | 9 |

GALLERY
Tap to go to the gallery.
ZOOM
Tap + or - to zoom in and out in the live viewfinder.
TAP AND HOLD TO FOCUS
Press and hold the screen to set the focus area.
To enhance your experience, download the free Polaroid Print App for iOS and Android.
For more detailed information, downloadable manual, FAQs, and technical support, please visit polaroidsnapcamera.com.
Customer Service: cspolaroid@camarketing.com
800-226-6534
LIMITED WARRANTY TO ORIGINAL CONSUMER
This Product (including any accessories |
Product( |
Territory( |
( |
Parts(Warranty( |
Labor(Warranty( |
included in the original packaging) as |
( |
( |
|
( |
( |
supplied and distributed new by an |
Camera& |
North&America& |
|
1&Year |
1&Year |
authorized retailer is warranted by the |
& |
& |
|
|
|
Distributor to the original consumer |
Camera& |
Central&and&South& |
1&Year& |
1&Year& |
|
purchaser against defects in material and |
& |
America& |
|
|
|
workmanship (“Warranty”) as follows: |
& |
& |
|
|
|
|
Camera& |
Asia,&Africa,&Australia,& |
1&Year& |
1&Year& |
|
|
& |
New&Zealand |
|
|
|
|
& |
|
|
|
|
|
Camera& |
Europe |
|
2&Years |
2&Years |
|
& |
|
|
|
|
|
Camera |
Russia |
|
2&Years |
2&Years |
10 | EN |
EN | 11 |
To obtain Warranty Service and Troubleshooting contact information: Visit our website at www.polaroidsnapcamera.com.
To receive Warranty service, the original consumer purchaser must contact the
Distributor, or an authorized service provider of the Distributor, for problem determination and service procedures. Proof of purchase in the form of a bill of sale or receipted invoice, evidencing that the Product is within the applicable Warranty period(s), MUST be presented to Distributor, or an authorized service provider of the Distributor, in order to obtain the requested service.
Shipping expenses to the Distributor’s service center or Return Facility are not covered by this warranty, and must be paid by the consumer.
Exclusions and Limitations
This Warranty covers manufacturing defects in materials and workmanship encountered in the normal, noncommercial use of the
Product, and does not cover consumer instruction, delivery, installation, set-up, adjustments, cosmetic damage or damage due to acts of nature, accident, misuse, abuse, negligence, commercial use or modification of, or to any part of the Product.
In addition, this Warranty does not cover
images “burnt” into the screen.
This Warranty applies to the original consumer only and does not cover products sold AS IS or WITH ALL FAULTS, sold as Reconditioned, Refurbished or Remanufactured, or consumables (e.g., fuses, batteries, bulbs etc.). The Warranty is invalid if the factory-applied serial number has been altered or removed from the Product. This Warranty is valid only in the country where the consumer purchased the product, and only applies to products purchased and serviced in that country.
NO WARRANTIES, WHETHER EXPRESS
OR IMPLIED, INCLUDING, BUT NOT LIMITED TO, ANY IMPLIED WARRANTIES
OF MERCHANTABILITY OR FITNESS FOR
A PARTICULAR PURPOSE, OTHER THAN THOSE EXPRESSLY DESCRIBED ABOVE SHALL APPLY. DISTRIBUTOR FURTHER DISCLAIMS ALL WARRANTIES AFTER THE EXPRESS WARRANTY PERIOD STATED ABOVE. NO OTHER EXPRESS WARRANTY OR GUARANTY GIVEN BY ANY PERSON, FIRM OR ENTITY WITH RESPECT TO
THE PRODUCT SHALL BE BINDING ON
DISTRIBUTOR. REPAIR, REPLACEMENT,
OR REFUND OF THE ORIGINAL PURCHASE PRICE – AT DISTRIBUTOR’S SOLE
DISCRETION – ARE THE EXCLUSIVE
12 | EN |
EN | 13 |
REMEDIES OF THE CONSUMER. IN NO EVENT WILL DISTRIBUTOR, ITS
MANUFACTURERS, OR PLR IP HOLDINGS, LLC BE LIABLE FOR ANY INCIDENTAL, DIRECT, INDIRECT, SPECIAL, PUNITIVE
OR CONSEQUENTIAL DAMAGES (SUCH
AS, BUT NOT LIMITED TO, DAMAGES FOR LOSS OF PROFITS, BUSINESS, SAVINGS,
DATA OR RECORDS) CAUSED BY THE
USE, MISUSE OR INABILITY TO USE THE
PRODUCT. EXCEPT AS STATED HEREIN, NO OTHER WARRANTIES SHALL APPLY.
NOTWITHSTANDING THE FOREGOING, CONSUMER’S RECOVERY AGAINST
DISTRIBUTOR SHALL NOT EXCEED THE PURCHASE PRICE OF THE PRODUCT
SOLD BY DISTRIBUTOR. THIS WARRANTY SHALL NOT EXTEND TO ANYONE OTHER
THAN THE ORIGINAL CONSUMER WHO
PURCHASED THE PRODUCT AND IS NOT TRANSFERABLE.
Some countries, states or provinces do not allow the exclusion or limitation of incidental or consequential damages or
allow limitations on warranties, so limitation or exclusions may not apply to you. This warranty gives you specific legal rights, and you may have other rights that vary from state to state or province to province.
Contact your authorized retailer to determine if another warranty applies.
14 | EN |
EN | 15 |
Compliance
Warning: Changes or modifications to this unit not expressly approved by the party responsible for compliance could void the user’s authority to operate the equipment.
NOTE: This equipment has been tested and found to comply with the limits for a Class B digital device, pursuant to Part 15 of the
FCC Rules. These limits are designed to provide reasonable protection against harmful interference in a residential installation. This equipment generates, uses and can radiate radio frequency energy and, if not installed and used in accordance with the instructions, may cause harmful interference to radio
communications.
However, there is no guarantee that interference will not occur in a particular installation. If this equipment does cause harmful interference to radio or television reception, which can be determined by turning the equipment off and on, the user is encouraged to try to correct the interference by one or more of the following measures:
Reorient or relocate the receiving antenna.
Increase the separation between the equipment and receiver.
Connect the equipment into an outlet on a circuit different from that to which the receiver is connected.
Consult the dealer or an experienced radio/TV technician for help.
The device must not be co-located or operating in conjunction with any other antenna or transmitter.
And the following additional information shall be contained in the user or instruction manual:
1)The Responsible party information: Name, Address, Telephone Number
2) The name and model number of the product
Notes: For systems incorporating several digital devices, the above statement needs to be contained only in the user manual for the main control unit.
If shielded cables or special accessories are required for compliance, a statement must be included which instructs the user to employ them, for example:
Shielded cables must be used with this unit to ensure compliance with the Class B FCC limits.
16 | EN |
EN | 17 |
This device complies with RSS247 of Industry Canada. This device complies with Industry
Canada license-exempt RSS standard(s).
Operation is subject to the following two conditions: (1) this device may not cause interference, and (2) this device must accept any interference, including interference that may cause undesired operation of the device. Radiation Exposure Statement: The product comply with the Canada portable RF exposure limit set forth for an uncontrolled environment and are safe for intended operation as described in this manual.
The further RF exposure reduction can be achieved if the product can be kept as far as
possible from the user body or set the device to lower output power if such function is available.
Déclaration d’exposition aux radiations : Le produit est conforme aux limites d’exposition pour les appareils portables RF pour les
Etats-Unis et le Canada établies pour un environnement non contrôlé.
Le produit est sûr pour un fonctionnement tel que décrit dans ce manuel. La réduction aux expositions RF peut être augmentée si l’appareil peut être conservé aussi loin que possible du corps de l’utilisateur ou que le
dispositif est réglé sur la puissance de sortie la
plus faible si une telle fonction est disponible.
This Class B digital apparatus complies with
Canadian ICES-003.
Users have to use the connection to USB interfaces with USB 2.0 version or higher.
Caution:
Risk of explosion if battery replaced by an incorrect type.
Dispose of used batteries according to the instructions.
Hereby, C&A Marketing Inc. declares that
this Snap Touch is in compliance with the essential requirements and other relevant provisions of Directive 1999/5/EC.
18 | EN |
EN | 19 |
Contenu de la boîte |
|
Familiarisez-vous avec votre appareil photo |
||||
|
|
1 |
2 |
1. |
Flash escamotable/ |
|
|
|
|
bouton d'alimentation |
|||
|
|
|
|
2. |
Miroir à selfie |
|
|
|
|
|
3. |
Objectif avec cache magnétique |
|
Appareil photo numérique avec |
Sangle |
Micro câble USB |
4 |
4. |
Fente de sortie de l'impression |
|
5. |
Microphone |
|||||
impression instantanée Polaroid |
|
3 |
||||
|
6. |
Haut-parleur |
||||
SNAP Touch™ |
|
|
||||
|
|
|
5 |
7. |
Port pour carte MicroSD |
|
|
|
|
8. |
Connecteur pour tripode |
||
|
|
|
|
9. |
Port micro USB |
|
|
|
|
|
10. Bouton de réinitialisation* |
||
Pack de 10 feuilles Polaroid |
Manuel de l'utilisateur |
ZINK® Zero Ink® |
& garantie |
20 | FR
6 |
|
7 |
|
8 |
|
9 |
|
10 |
* Pour réinitialiser la caméra, utilisez une |
|
|
|
|
aiguille et maintenez appuyé pendant |
|||||
|
|
|
|
|
|
|
|
|
environ deux secondes.
FR | 21

|
|
|
Vue arrière |
|
Comment utiliser votre appareil photo |
|||||
|
|
|
|
|
12 |
|
Marche/arrêt |
Ink® pour imprimer des photos au format |
||
|
|
|
|
Appuyez doucement sur le mécanisme du |
2 x 3", sur un papier à dos adhésif |
|||||
|
|
|
||||||||
|
|
|
|
|
|
|
11. Loquet de protection |
flash escamotable. |
|
|
|
|
|
|
|
|
|
du compartiment à |
|
1. |
Faites glisser le curseur se trouvant sur le |
11 |
|
|
|
|
|
13 |
papier |
Stockage de la mémoire |
|
côté gauche de l'écran LCD. L'écran |
|
|
|
|
|
12.Bouton du déclencheur |
La mémoire interne de l'appareil photo peut |
|
apparaîtra. |
||
|
|
|
|
|
||||||
|
|
|
|
|
|
|
13.Viseur LCD à écran |
contenir jusqu'à 10 images et peut accueillir |
2. |
Insérez le pack entier de papier, en vous |
|
|
|
|
|
|
|
tactile |
une carte MicroSD d'une capacité allant |
|
assurant que la feuille Zink Smart Sheet soit en |
|
|
|
|
|
|
|
|
jusqu'à 128 Go. |
|
bas, le code-barres face vers le bas. |
|
|
|
|
|
|
|
|
|
3. |
Fermez le compartiment à papier. |
|
|
|
|
|
|
|
|
Chargement du papier d'impression photo |
4. |
La feuille bleue ZINK Smart Sheet sera traitée |
|
|
|
|
|
|
|
|
L'appareil photo Polaroid Snap Touch™ utilise |
|
puis éjectée avant d'imprimer une photo. |
|
|
|
|
|
|
|
|
uniquement du papier Premium ZINK® Zero |
|
|
22 | FR |
FR | 23 |

Réglages de la première mise en marche
Mettez l'appareil photo en marche pour commencer les réglages. Suivez les indications à l'écran.
Prendre des photos et des vidéos
Choisissez le mode photo, vidéo ou photomaton en appuyant légèrement sur l'icône du mode de capture.
Mode Photo Mode Vidéo Mode Photomaton
Appuyez sur le bouton du déclencheur pour capturer des images fixes ou débuter/arrêter
l'enregistrement de vidéos. Maintenir appuyé le bouton du déclencheur en mode Photo prendra des images en rafale (succession rapide d'images fixes). Remarque : Appuyer sur le bouton du déclencheur lorsque l'on est dans un mode autre que le viseur temps réel vous renverra sur le viseur temps réel.
Vous pouvez personnaliser vos photos avec des bordures, des filtres et des autocollants numériques. Appuyez sur l'icône EXTRAS pour commencer.
Extras
Bordures |
Filtres |
Autocollants |
Appuyez sur l'icône du mode photomaton pour prendre des photos disposées en 2,3 ou 4 images. Vous pouvez également ajouter des filtres, des bordures et des autocollants à vos ensembles de photos.
Commandes de l'écran tactile
Appuyez n'importe où sur l’écran du viseur numérique pour afficher/masquer les commandes.
INDICATEURS D'ÉTAT
Affiche l'état de l'impression, de la batterie, de la carte SD et de la connexion Bluetooth®. Appuyez sur l'icône pour ouvrir le menu des réglages de l'appareil.
Paramètres de l'appareil
24 | FR |
FR | 25 |

RÉGLAGES DE CAPTURE
Appuyez pour ouvrir le menu des modes de capture : photo, vidéo ou photomaton.
RÉGLAGES DE CAPTURE
HDR, FLASH ET RETARDATEUR
Affiches les réglages du mode HDR, du flash et du retardateur
HDR activé Flash activé Timer :3
GALERIE
Appuyez pour aller dans la galerie.
ZOOM
Appuyez sur + et - pour effectuer un zoom avant ou arrière dans le viseur, ou lors de la visualisation d'un fichier.
MAINTENEZ APPUYÉ POUR LA MISE AU POINT
Appuyez et maintenez appuyé l'écran pour définir la zone de mise au point.
Pour améliorer l'expérience, téléchargez l'app
gratuite Polaroid Print pour iOS et Android.
Pour des informations supplémentaires, télécharger le manuel, consulter la foire aux questions et l'assistance technique, veuillez vous rendre sur le site polaroidsnapcamera. com.
Service à la clientèle : cspolaroid@camarketing.com
800-226-6534
26 | FR |
FR | 27 |
 Loading...