


User Guide
1

CONTENTS
|
Introduction |
3 |
|
||
|
Safety Instructions |
4 |
|
||
|
Box Contents |
5 |
|
||
|
Printer Set Up |
6 |
|
||
|
Loading and Unloading Filament |
8 |
|
||
|
How to Print |
9 |
|
||
|
Other LCD functionality |
11 |
|
||
|
Installing the Polaroid SmartPrep Software onto your PC |
13 |
|
||
|
Polaroid SmartPrep Software |
13 |
|
||
|
Desktop Functions |
14 |
|
||
|
Technical Speciications |
21 |
|
||
|
Cleaning and Maintenance |
21 |
|
||
|
Manufacturer’s Guarantee |
22 |
|
||
|
Certiications and Compliance |
23 |
|
||
|
FAQs and Troubleshooting |
24 |
|
||
|
2

INTRODUCTION
The following User Guide provides you with all of the information you need to get started printing with your Polaroid PlaySmart 3D Printer.
It will guide you through the simple installation of your printer, starting with getting it out of the box, right through to each of the fantastic features of the Polaroid SmartPrep printing software and the easy-to-use touchscreen LCD on the printer itself.
The Polaroid 3D team hope that you have many happy hours printing with your new PlaySmart 3D printer, but if you have any questions at all, please don’t hesitate in contacting the team via polaroid3d.com/contact

SAFETY INSTRUCTIONS
WARNING (Heated surface)
WARNING (Electrical component)
CAUTION
Whilst in operation, the extruder on your Polaroid PlaySmart 3D printer becomes very hot. Always allow time for the extruder to cool down before you reach into the printer for any reason.
This product is not to be serviced by anyone other than a Polaroid 3D approved engineer. Any unapproved servicing may also void your guarantee.
Polaroid 3D printers include moving parts, which may cause injury if interfered with whilst in use. Never reach into your Polaroid 3D printer whilst it is in use.
Please ensure that the printer is located in an area that is:
•close to the intended power supply and that the socket is easily accessible
•well ventilated
•clean and dry
•a consistent and stable temperature and humidity
•positioned away from any lammable items
•positioned away from any liquids
•a lat and stable surface
Any damage caused by improper use of the printer or its component and consumable parts, which is in contradiction with this User Guide becomes the full responsibility of the user and will void your guarantee.
This printer is not suitable for children. Anyone under the age of 16 must be supervised by an adult.
Never turn off your Polaroid PlaySmart 3D printer during printing; please wait until the job has completed and the print bed and extruder have returned to the Home Position before turning off the power.
4

BOX CONTENTS
A B C
Polaroid PlaySmart 3D Printer |
1x 1kg Polaroid Universal |
Power Cable |
|
Premium PLA Filament |
|
D E F
Heated Print Bed |
PTFE Tube |
PolaroidPreciseFilament |
|
|
Holder&Scale |
G H I
|
|
|
|
|
|
|
|
|
|
|
|
|
|
|
|
|
|
|
|
|
|
|
|
|
|
|
|
|
|
|
|
|
|
|
|
|
|
|
|
|
|
|
|
|
|
|
|
|
|
|
|
|
|
|
|
|
|
|
|
|
|
|
|
|
|
|
|
Quick Start Guide |
3xreplacementnozzles |
SDCard |
||||||||||||||
5

PRINTER SET UP
Please follow the steps below to get your Polaroid PlaySmart 3D printer ready for printing. Once removed from the box please ensure that your printer is positioned on a lat and stable surface, this helps to minimise vibration and produce more accurate prints.
1
2
3
4
5
Open the box and remove the top layer of protective foam. Underneath you will ind the following items:
•Polaroid Precise Filament Holder & Scale
•1 x 1kg Polaroid Universal Premium PLA Filament
•Power Cable
•PTFE Tube
•3 x replacement nozzles
•SD Card
•Polaroid PlaySmart Quick Start Guide
•Polaroid Precise Filament Holder insert
•Polaroid 3D Filaments insert
•12 Month Guarantee insert
Please lift the items, including the protective foam tray carefully from the box. Then please remove each of the items from the tray.
TIP: In order to remove the Polaroid Precise Filament Holder & Scale from the protective foam, irst please gently remove the protective foam tray from the top of the box. Then gently push the Precise Filament Holder & Scale from underneath where you will ind a hole in the foam to allow you to do this. This should allow you to completely remove the Polaroid Precise Filament Holder & Scale upwards from the protective foam.
Once you have removed all of the items from the tray, please carefully remove the PlaySmart 3D Printer from the box.
Please make a note of your serial number (which can be found on the base of your printer) before placing on a lat and stable surface.
Carefully remove the blue tape that is holding the Heated Print Bed in place.
Place the Polaroid Precise Filament Holder & Scale on the lat and stable surface to the right-hand side of your Polaroid PlaySmart 3D Printer and make sure that the ilament cartridge is sat securely on the Polaroid Precise Filament Holder & Scale.
6 |
Follow the set-up process for the Polaroid Precise Filament Holder & Scale as |
|
outlined in the User Manual found here: |
||
|
||
|
www.polaroid3d.com/sv/support-polaroid-precise/ |
6
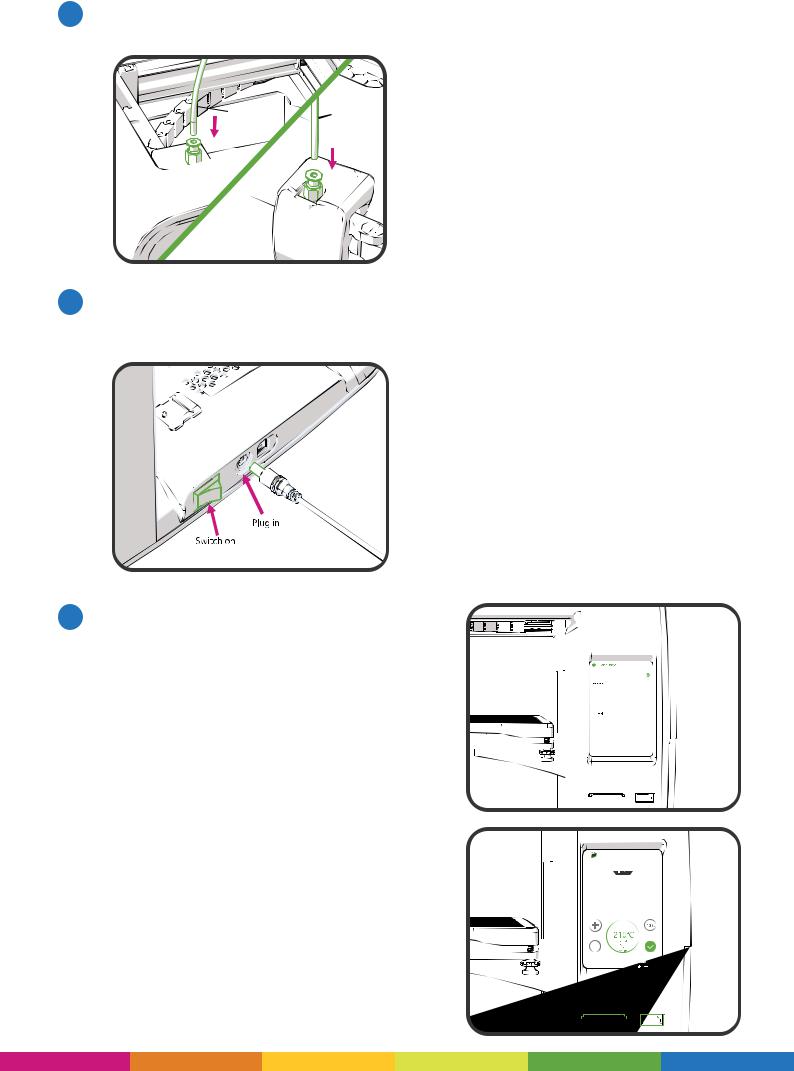
7 |
Set-up your printer by irst attaching the PTFE tube. Place one end into the |
|
printer head and the other end into the extruder. |
8 |
Connect the power cable to the back of the printer and then to the wall, and |
|
turn on the printer using the power switch (also on the back of the printer). |
||
|
||
|
Be careful not to damage the cables. |
9 |
Follow the instructions on the LCD screen |
|
|
|
|
||
to complete set-up: |
|
|
|
|
|||
|
|
|
|
|
|||
|
1. |
Select your language. |
|
|
|
|
|
|
|
|
|
|
|||
|
|
|
|
|
|||
|
2. |
Press ‘Start’. |
|
|
|
|
|
|
|
|
|
|
|||
|
|
|
|
|
|||
|
3. |
Ensure WLAN is turned on (showing |
|
|
|
|
|
|
|
|
|
|
|||
|
|
|
|
|
|||
|
|
green) and then select a Wi-Fi network |
|
|
|
|
|
|
|
|
|
|
|
||
|
|
to connect your Polaroid PlaySmart 3D |
|
|
|
|
|
|
|
Printer to (or alternatively skip this step |
|
|
|
|
|
|
|
– you can set-up at any point later). |
|
|
|
|
|
|
4. |
Once connected, click ‘Next’. |
|
|
|
|
|
|
5. |
Download the Polaroid PlaySmart |
|
|
|
|
|
|
|
App to your mobile phone from the |
|
|
|
|
|
|
|
App Store or Google Play Store (or |
|
|
|
|
|
|
|
|
|
|
|
|
|
|
|
alternatively skip this step – you can |
|
|
|
|
|
|
|
|
|
|
|
|
|
|
|
set-up at any point later). |
|
|
|
|
|
|
6. |
Select ‘Next’ once installed. |
|
|
|
|
|
|
|
|
|
|
|
||
|
7. |
Check for irmware updates and |
|
|
|
|
|
|
|
ensure that you have the latest version |
|
|
|
|
|
|
|
|
|
|
|
|
|
|
|
installed. |
|
|
|
|
|
|
|
|
|
|
|
|
|
|
8. |
Click ‘Finish’ to complete the set-up |
|
|
|
|
|
|
|
process. |
|
|
|
|
|
7

LOADING AND UNLOADING FILAMENT
Before you can print you must install a ilament cartridge.
In order to do this you must either use the menu on the touchscreen LCD (on the front of the printer), or the Polaroid PlaySmart mobile App (which can be downloaded from the App Store or Google Play).
When using the LCD screen on the printer, please follow the process below:
1 |
Firstly, ensure that the Polaroid Precise |
|
||||||||||||||||||||||||||||||||||||||||
Filament Holder & Scale is positioned next to |
|
|
|
|
|
|
|
|
|
|
|
|
|
|
|
|
|
|
|
|
|
|
|
|
|
|
|
|
|
|
|
|
|
|
|
|
|
|
|
|||
|
|
|
|
|
|
|
|
|
|
|
|
|
|
|
|
|
|
|
|
|
|
|
|
|
|
|
|
|
|
|
|
|
|
|
|
|
|
|
||||
|
|
|
|
|
|
|
|
|
|
|
|
|
|
|
|
|
|
|
|
|
|
|
|
|
|
|
|
|
|
|
|
|
|
|
|
|
|
|
|
|||
|
|
|
|
|
|
|
|
|
|
|
|
|
|
|
|
|
|
|
|
|||||||||||||||||||||||
|
the printer on the right hand side, and with |
|
||||||||||||||||||||||||||||||||||||||||
|
the ilament cartridge securely in place. |
|
||||||||||||||||||||||||||||||||||||||||
|
|
|
|
|
|
|
|
|
|
|
|
|
|
|
|
|
|
|
|
|
|
|
|
|
|
|
|
|
|
|
|
|
|
|
|
|
|
|
|
|
|
|
|
|
|
|
|
|
|
|
|
|
|
|
|
|
|
|
|
|
|
|
|
|
|
|
|
|
|
|
|
|
|
|
|
|
|
|
|
|
|
|
|
|
|
|
|
|
|
|
|
|
|
|
|
|
|
|
|
|
|
|
|
|
|
|
|
|
|
|
|
|
|
|
|
|
|
|
|
|
|
|
|
|
|
|
|
|
2
3
Find the end of the ilament on the reel and twist around until it breaks.
While keeping the ilament straight, slightly squeeze the levers on the side of the extruder together and slide the ilament up from the bottom until approximately 2cm is visible in the PTFE tube.
4 |
Press ‘Filament’ and then ‘Load’ on the LCD |
|
screen. Once the target temperatures are |
||
|
||
|
reached the ilament will automatically be pulled through the PTFE tube into the |
|
|
extruder. (You can cancel this process whilst the target temperatures are being |
|
|
reached by pressing the ‘X’ on the LCD screen).You should see the ilament appear |
|
|
from the extruder, if you do not, please press the ‘10mm more’ button. Continue |
|
|
until ilament is extruded from the nozzle. If changing a cartridge (as opposed to |
|
|
installing for the irst time) please ensure that the previous colour or ilament is |
|
|
completely extruded and the new ilament is lowing freely before completing the |
|
|
process. Complete the process by pressing ‘Conirm’ on the LCD. |
|
|
NOTE: If ilament is not lowing freely from the nozzle at this point, please press |
|
|
‘Conirm’ and then ‘Unload’ to uninstall the ilament. Please completely remove the |
|
|
ilament from the printer, cut off the end of the ilament again at an angle and then |
|
|
re-insert. Follow the installation process again and this time you should see the |
|
|
ilament extruding correctly. If this is not the case please contact our support team |
|
|
at polaroid3d.com/contact for further advice. |
|
5 |
To unload ilament, please select ‘Filament’ from the home screen on the LCD |
|
followed by ‘Unload’. Once the target temperatures have been reached the ilament |
||
|
||
|
will automatically unload. Once completed, please click ‘Finish’ and remove the |
|
|
ilament from the printer by squeezing the levers on the side of the extruder and |
|
|
gently pulling the ilament from the bottom. |
|
|
NOTE: Part-used cartridges should be stored in a cool and dry environment whilst |
|
|
not in use. |
8
HOW TO PRINT
There are two different ways in which you can print via your Polaroid PlaySmart 3D Printer; either via the LCD screen or via the Polaroid PlaySmart Mobile App.
NOTE: You must irst have the ile of your model that has been sliced and is ready for printing. For instructions on how to do this, please see below:
‘Polaroid SmartPrep Software’.
1Printing via the LCD screen
1.EnsureyourmodelissavedtoeitherSDcardorUSBandtheninsertintothecorresponding slot on the front of the printer.
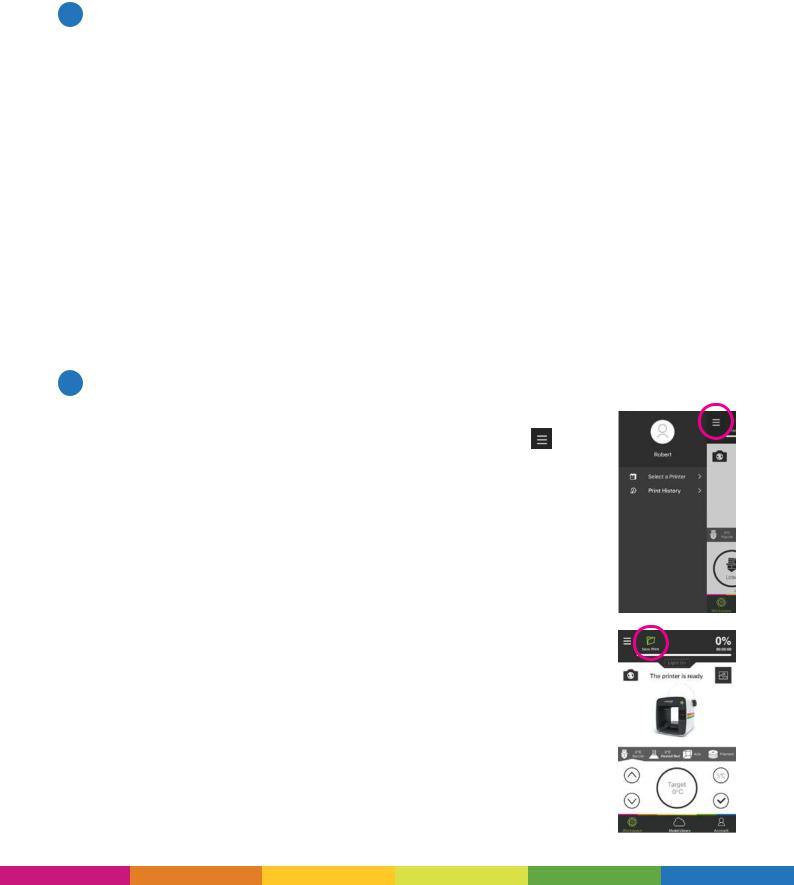
2.Select ‘New Print’ from the top left corner of the LCD screen.
3.Next, select SD card or USB depending on where your ile is saved.
4.Select the model that you wish to print.
5.Select ‘Conirm’ to verify you have selected the correct model and wish to start printing.
6.The printer will then begin automatically. The print bed will rise towards the top of the printer and the print head will position itself in its home position (towards the front left corner of the printer). The nozzle and bed temperature will then start to increase and printing will begin once the target temperatures have been reached. NOTE: This may take a few minutes so please be patient; you can watch the progress of the temperatures via the LCD screen.
NOTE: You can monitor the progress of your print via the green progress bar at the top of the screen which shows the percentage (%) of printing that has passed and the remaining time in minutes and seconds.
2 Printing via the Polaroid PlaySmart Mobile App
NOTE: Before printing via the Mobile App you must irst pair your printer with your phone. To do this, press the menu button in the top left corner of the screen in the App and choose ‘Select a printer’. Any previously paired printers will appear here. To add a new printer, click the ‘+ Add printer’ button at the bottom.You will be asked for your serial number or to scan the QR Code which can be found via the LCD screen on the printer, under ‘Settings’ and ‘Pair the Printer’. When completed please click ‘Conirm’ to complete the process.
Your Wi-Fi must be turned on and connected for the pairing to complete. Please do so by selecting ‘WLAN’ from ‘Settings’ on the home screen of your printer LCD and then selecting your network.
After following the process above, please follow the steps below to print via the Mobile App:
1.Whilst in the ‘Workspace’ screen on your mobile, select ‘New Print’ from the top left-hand corner.
2.You can then choose a model from the SD Card, USB or Mobile Library. Selecting SD Card or USB will show the models available on those devices if installed. Selecting Model Library will open up our online catalogue of models to choose from.
9
 Loading...