


8GB
Music & Video Player with 2.8” LCD Display
PMP282-8
User Guide
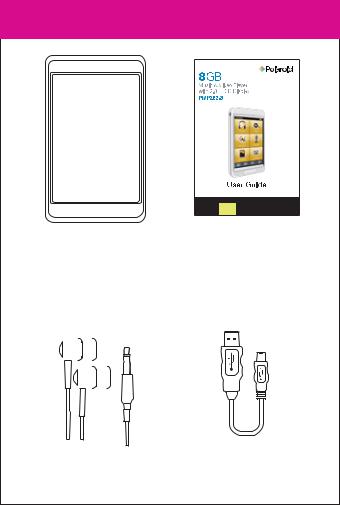
In the box
|
|
|
|
|
|
|
|
|
|
|
|
|
|
|
|
|
|
|
|
|
|
|
|
|
|
|
|
|
|
|
|
|
|
|
|
|
|
|
|
|
|
|
|
|
|
|
|
|
|
|
|
|
|
|
|
|
|
|
|
|
|
|
|
|
|
|
|
|
|
|
|
Touch MP3 Video Player |
User Guide |
||||||||||||||||
|
|
|
|
|
|
|
|
|
|
|
|
|
|
|
|
|
|
|
|
|
|
|
|
|
|
|
|
|
|
|
|
|
|
|
|
|
|
|
|
|
|
|
|
|
|
|
|
|
|
|
|
|
|
|
|
|
|
|
|
|
|
|
|
|
|
|
|
|
|
|
|
|
|
|
|
|
|
|
|
|
|
|
|
|
|
|
|
|
|
|
|
|
|
|
|
|
|
|
|
|
|
|
|
|
|
|
|
|
|
|
|
|
|
|
|
|
|
|
|
|
|
|
|
|
|
|
|
|
|
|
|
|
|
|
|
|
|
|
|
|
|
|
|
|
|
|
|
|
|
|
|
|
|
|
|
|
|
|
|
|
|
|
|
|
|
|
|
|
|
|
|
|
|
|
|
|
|
|
|
Pro Headphones |
USB Cable |
|
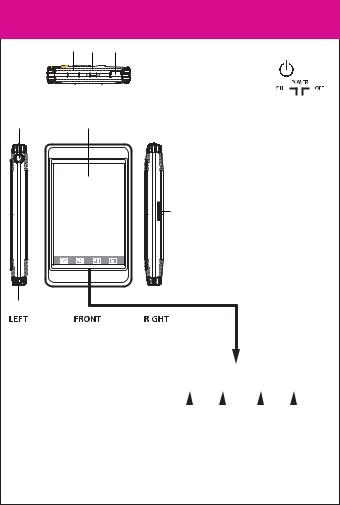
Location of controls
2 |
3 |
4 |
1. Headphone jack |
|
|
|
|
|
|
|
|
|
2. Power button [ |
] |
|
TOP |
|
3. Power switch [ |
] |
|
|
(quicklyturntheplayero ) |
||
|
|
|
||
1 |
6 |
|
4. USB port |
|
|
|
|
5. Stylus - Useasanother |
|
|
|
|
optiontonavigatetouch |
|
|
|
|
screen |
|
|
|
|
6.Touch display |
|
|
|
|
7 7. Micro SD slot |
|
5
|
|
|
|
|
|
|
|
|
Features: |
|
|
|
|
|
|
|
|
|
|
|
|
|
|
|
||
• 4GB Memory |
|
|
|
|
|
|
|
|
|
|
|
|
|
|
|
||
•Touch 2.8”display |
|
|
|
|
|
|
|
|
|
|
|
|
|
|
|
||
• Built-in speaker |
|
|
|
|
|
|
|
|
|
|
|
|
|
|
|
||
• Stores and plays music, |
MAIN MENU VOLUME |
LOCK/UNLOCK |
||||||
video & pictures |
|
|
UP/DOWN |
BUTTON |
||||
|
|
|
|
|
|
|
||
• Digital voice recorder

Inserting the Micro SD card
TheplayersupportsMicroSDcards(notincluded),whichallow youtoaddupto16GBadditionalmemorytoyourMP3Player.
To insert the Micro SD card:
1. Insert the Micro SD card into the card
slotwiththe metal contacts facing up |
|
|
|
|
|
|
|
|
|
|
|
|
|
|
|
|
|
towards the front of the player, and |
|
|
|
|
|
|
|
|
gently push it in until it clicks. Do not |
|
|
|
|
|
|
|
|
apply excessive force, as this may |
|
|
|
|
|
|
|
|
damage your MP3 Player and Micro |
|
|
|
|
|
|
|
|
SD card. |
|
|
|
|
|
|
|
|
|
|
|
|
|
|
|||
|
|
|
|
|
|
|||
2.To view files on your Micro SD card, |
|
|
|
|
|
|
|
|
|
|
|
|
|
|
|
|
|
|
|
|
|
|
|
|||
|
|
|
|
|
|
|||
|
|
|
|
|
|
|||
|
|
Micro SD |
||||||
touch“Browser”,fromthemainmenu |
|
|
|
|
|
|
|
|
and select“SD CARD”. |
|
|
|
|
|
|
|
|
3.To remove the Micro SD card, gently |
|
|
|
|
|
|
|
|
push it in until it pops out. |
|
|
|
|
|
|
|
|
|
|
|
|
|
|
|
|
|
 •DonotuseforcewhileinsertingorremovingtheMicroSDcard.
•Donotremovethecardduringfiletransfers.
•Makesuretheplayeristurnedo beforeinsertingortaking outthecard.

Charging the battery
YourMP3PlayerhasanintegratedrechargeableLi-ionbattery. Itisrecommendedtofullychargetheplayerbeforeusingitfor the first time. Recharge the battery by connecting the player toacomputerusingtheincludedUSBcable.Chargingtimeis between 3-5 hours, depending if the player is powered o or working.Tokeepthebatteryingoodcondition,werecommend not charging it for more than 8 hours.
Charging Charged
 Fullychargetheplayerbeforeusingitforthefirsttime.

Basic operation |
|
|
|
|
||
|
|
|
|
|
|
|
Turning on/o |
|
|
|
|
||
• Toturnontheplayerplacethe[ |
|
|
|
|
|
]switchtothe“ON |
position,andpressandHOLD the[ |
|
|
|
]buttonfor3seconds |
||
until the LCD screen lights up. |
|
|
|
|
||
After turning on your MP3 Player, you will see the main menu.
Touch an option to select it.
music video
photos record
browser settings
• To turn the player o , press and hold the [ ] button until theLCDscreenshutso ,orplacethe[


 ]switchtoth “OFF” position.
 Ifyoupowero thedevicedirectlywiththe[


 ] switch,yourlastchangesinthesettingswill belost,and theplayerwillnotremember thelastsongplayed.
 Loading...