


ACTION CAMERA
Appareil Photo-Vidéo Sport Haute Définition Videocamera Sport ad Alta Definizione Hochauflösungs-Sport-Videokamera
Cámara de Video Deportiva de Alta Definición XS20
USER GUIDE
MANUEL D’UTILISATION
MANUALE UTENTE
BENUTZERHANDBUCH
MANUAL DEL USUARIO
www.polaroidaction.com
POLAROID XS20 USER GUIDE
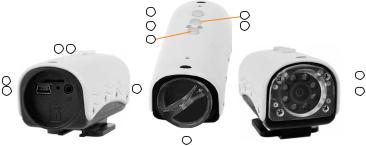
Parts Familarization • PRÉSENTATION DES PIÈCES • FAMILIARIZZARE CON I COMPONENTI • EINWEISUNG DER TEILE • CONOCIMIENTO DE LAS PIEZAS
|
|
|
|
|
|
|
|
|
|
8 |
|
|
|
|
|
|
|
7 |
|
|
|
|
|
|
|
|
|
|
|
|
|
|
|
|
|
|
|
|
|
|
|
|
|
|
|||
|
|
|
|
|
|
|
|
|
|
|
|
|
|
|
|
|
|
|
|
|
|
||
|
|
|
|
|
|
|
|
|
|
9 |
|
|
|
|
|
|
|
|
6 |
|
|
|
|
|
|
|
|
|
|
|
|
|
|
|
|
|
|
|
|
|
|
|
|
|
|||
|
|
|
|
|
|
|
|
|
|
10 |
|
|
|
|
|
|
|
|
|
|
|
|
|
|
3 |
5 |
|
|
|
|
|
|
|
|
|
|
|
|
|
|
|
|
|||||
|
1 |
|
|
|
|
|
|
|
4 |
|
|
|
|
|
|
|
|
|
|
|
|
|
11 |
|
|
|
|
|
|
|
|
|
|
|
|
|
|
|
|
|
|
|
|
|
|||
|
|
|
|
|
|
|
|
|
|
|
|
|
|
|
|
|
|
|
|
|
|
||
|
2 |
|
|
|
|
|
|
|
|
|
|
|
|
|
|
|
|
|
|
|
|
12 |
|
|
|
|
|
|
|
|
|
|
|
|
|
|
|
|
|
|
|
|
|
|
|||
|
|
|
|
|
|
|
|
|
|
|
|
|
|
|
|
|
|
|
|
|
|
||
|
|
|
|
|
|
|
|
|
|
|
|
|
|
|
|
|
|
|
|
|
|
|
|
|
|
|
|
|
|
|
|
|
|
|
|
13 |
|
|
|
|
|
|
|
|
|
||
1 |
MicroSDcardslot |
1 |
LecteurdecarteMicroSD |
1 |
|
SlotperschedeMicroSD |
1 |
MicroSD-Kartenschlitz |
1 |
Ranuraparatarjetas |
|||||||||||||
2 |
USB2.0connector/ |
2 |
Connexionetchargeur |
2 |
|
PresaUSB2.0 |
2 |
USB2.0Verbindungs-/ |
|
MicroSD |
|||||||||||||
|
chargingreceptacle |
|
|
USB2.0 |
|
|
compatibileconcavidi |
|
Aufladebuchse |
2 |
Conector/receptáculode |
||||||||||||
3 |
Chargingindicator(red) |
3 |
Indicateurdechargement |
|
|
connessione/ricarica |
3 |
Aufladeanzeige(rot) |
|
cargaUSB2.0 |
|||||||||||||
4 |
Audio/Visualoutputjack |
|
|
(rouge) |
3 |
|
Indicatorediricarica |
4 |
Audio/VideoOutput- |
3 |
Indicadordecarga(rojo) |
||||||||||||
5 |
Resetbutton& |
4 |
Sortieaudioetvidéo |
|
|
(rosso) |
|
Anschlussbuchse |
4 |
Conectordesalidade |
|||||||||||||
|
microphone |
5 |
Touchederéinitialisation |
4 |
|
Jackd'uscitaaudio-video |
5 |
Zurücksetzungsknopf& |
|
Audio/Visual |
|||||||||||||
6 |
LED(redandblue) |
|
|
µphone |
5 |
|
Pulsante"Reset"e |
|
Mikrofon |
5 |
Botóndereinicioy |
||||||||||||
7 |
Record/Play/Execute |
6 |
LED(rougeetbleue) |
|
|
microfono |
6 |
LED(rotundblau) |
|
micrófono |
|||||||||||||
8 |
Lightswitch(8LEDs, |
7 |
Enregistrement/Lecture/ |
6 |
|
LED(rossoeblu) |
7 |
Aufnehmen/Abspielen/ |
6 |
LED(rojoyazul) |
|||||||||||||
|
4LEDs,OFF)/down |
|
|
Exécution |
7 |
|
Registra/Play/Esegui |
|
Ausführen |
7 |
Grabar/Reproducir/ |
||||||||||||
9 |
LED(yellow) |
8 |
Interrupteurdelumière(8 |
8 |
|
Pulsanteper |
8 |
Lichtschalter(8LEDs,4 |
|
Ejecutar |
|||||||||||||
10 |
Power/modetransfer/ |
|
|
LED,4LED,OFF)/bas |
|
|
l'accensione/modifica |
|
LEDs,AUS)/reduzieren |
8 |
Interruptordeluz(8LED, |
||||||||||||
|
upbutton |
9 |
LED(jaune) |
|
|
dellemodalitàdeiLED(8 |
9 |
LED(gelb) |
|
4LED,OFF)/abajo |
|||||||||||||
11 |
LEDlightingpanel |
10 |
boutond'alimentation/ |
|
|
LED,4LED,OFF)/giù |
10 |
Anschalten/Modus |
9 |
LED(amarillo) |
|||||||||||||
12 |
Lens(wide-angle) |
|
|
modetransfert/haut |
9 |
|
LED(giallo) |
|
Übertragung/aufwärts |
10 |
Encendido/modode |
||||||||||||
13 |
WaterproofPlug |
11 |
TableaudeborddeLED |
10 |
Pulsantediaccensione/ |
|
Knopf |
|
transferencia/botónhacia |
||||||||||||||
|
|
|
|
|
|
12 |
Lentille(grandangle) |
|
|
modificamodalità/su |
11 |
LEDBeleuchtungstafel |
|
arriba |
|||||||||
|
|
|
|
|
|
13 |
Priseétanche |
11 |
Pannellodiilluminazione |
12 |
Objektiv(Weitwinkel) |
11 |
PaneldeiluminaciónLED |
||||||||||
|
|
|
|
|
|
|
|
|
|
|
|
aLED |
13 |
WasserdichterStopfen |
12 |
Lentes(granangular) |
|||||||
|
|
|
|
|
|
|
|
|
|
12 |
Obiettivo(grandangolare) |
|
|
|
|
13 |
Enchufeimpermeable |
||||||
|
|
|
|
|
|
|
|
|
|
13 |
Sigilloimpermeabile |
|
|
|
|
|
|
|
|||||
2
POLAROID XS20 USER GUIDE
Welcome
Thank you for your purchase of the Polaroid XS20 camera. As supplied herein, the XS20 can be mounted on all kinds of helmets and any many types of handlebars. Additional mounts like suction cups will soon be available at polaroidaction.com. Check the site frequently for new accessories.
What’s Included in the Box?
•Camera
•Bike mount
•Helmet mounts
•Pouch
•USB cable
•AV cable
•Manual
•CD
PRECAUTIONS
1.Make sure the XS20 back cover is inserted fully and completely sealed before use. If foreign objects or water enter the camera, turn the power off. Continued use may cause an injury.
2.If the camera has been dropped or its case has been damaged, turn the power off. Continued use may cause permanent damage and/or personal injury.
3.There are no user serviceable parts in the camera: DO NOT DISASSEMBLE! Do not place the camera on unstable surfaces.This may cause the camera to fall or tilt over, causing damage.
4.For repair, visit polaroidaction.com for customer service information.
5.A camera is a precision instrument. Do not drop, strike, or use excessive force when handling the camera. Doing so may render the camera inoperative.
6.Do not leave the camera in places where the temperature may rise significantly such as inside a car. High temperatures may adversely affect the case or internal parts of the camera.
7.Before you move the camera, disconnect cords and cables. Failure to do so may damage the cords and cables.
8.This is an extreme sports video product. Please be careful that you don’t mount the camera in a fixed position where, in the event of an accident, you subject yourself to bodily contact with the camera.
3
POLAROID XS20 USER GUIDE
Waterproof Plug
The waterproof housing allows the camera to operate as deep as 60 feet under water. In order to protect the camera when using it in wet conditions, you must seal the camera’s operation panel with the Waterproof plug.
Failure to properly seal your camera can result in leaks that may damage or destroy your camera.Your warranty does not cover water damage resulting from user neglect.
Charging the Battery
1.Remove the Water Seal from the rear of the camera.
2.Insert the USB cable into your computer and the other end of the cord into the camera’s USB 2.0 connector .
3.The Charging Indicator Light will light red.
4.Charging is completed when the the charging indicator light turns off. Note: A completely discharged battery will take approximately 3 hours to charge.To lessen charge times, it is recommended that the battery be charged after every use.
5.When the USB Data Cable is connected between the camera and a computer, the battery will charge, but the charge rate is very low.Therefore, it is recommended that you charge the camera battery using a Power Adapter (not included).
Camera Power Up
1.Insert a MicroSD card (1GB - 32GB) into the MicroSD card slot.
2.Depress the Power Button for 2 seconds and release.
3.The blue LED indicators light up and the camera's body will vibrate. When the vibrating stops, the camera will enter its Standby Mode. Note: If the blue LEDs flash during the turn-on procedure, it indicates that there is no MicroSD card in the slot.
Turn the power off and insert a flash card.There is no internal memory. All images are recorded on the flash card which you provide.
4.To turn the camera off, depress the Power Button for 2 seconds and release.
5.The blue LED blinks 3 times and then goes out; the camera shakes twice, and then it shuts off. Note:The camera will shut off automatically if the flash card becomes full and the loop function is off.
Selecting Image-Taking Modes
1.Depress the Power Button for 2 seconds and release.
2.The blue LED indicators light and the camera body will vibrate. When the vibrating stops, the camera will enter its Standby Mode.
4
POLAROID XS20 USER GUIDE
3.Power Button now becomes the ModeTransfer Button and loops through four distinctive modes. Each time you press the button you can select the following modes: Mode 1: Manual video recording (Blue LED)
Mode 2: Manual photo-taking (red LED)
Mode 3: Motion-detect video recording (blue and yellow LEDs) Mode 4: Motion-detect photo-taking (red and yellow LEDs)
4.After each mode is selected, the camera will vibrate once indicating that the mode has been entered, but be patient.The mode will not ready itself until the LED indicator lights change from blinking to constant on.
Recording Still Images
1.Power up the camera and set it to the manual photo-taking mode. (See section titled “Selecting Image-Taking Modes” to select Mode 2.)
2.Press the Execute Button once.
3.Hold the camera still until it shakes once.
4.A photo will be taken immediately after the vibration stops.
5.The red LED will turn off while taking a picture.
Video Recording
1.Power up the camera and set it to the manual video recording mode. (See section titled “Selecting Image-Taking Modes” to select Mode 1.)
2.In the manual video recording mode, press the Execute Button once.The camera will shake once and the blue LED flashes slowly indicating that video is being recorded.
3.To stop video recording press the Execute Button again.The blue LED will return to constant on indicating that recording has stopped and the camera is waiting in its standby mode.
4.Video recording can occur for a period of 20 minutes at which time the camera will save the clip and recording will automatically resume in a new file.
Motion-Detect Video Recording
1.Power up the camera and set it to the Motion-Detect Video Recording mode. (See section titled “Selecting Image-Taking Modes” to select Mode 3.)
2.In this mode, the camera will automatically take video clips of moving objects for a preset length of 10 seconds, 1 minute, 5 minutes or 10 minutes. It will save each clip in its own file and immediately continue recording another clip of the same length; it will be saved in its own file, and the process will repeat until you stop the recording process.
3.If the flash card becomes full, the camera will delete the first recorded clip and overwrite it with the most current video.This procedure is called “loop recording” and
5
POLAROID XS20 USER GUIDE
it will affect previously recorded video clips and still photos.
4.To prevent the camera from looping (writing over previously recorded images), you can program it to stop all recording when the flash card is full.To do this, advance to the section in this manual titled “SettingThe System Parameters.”
Motion-Detect Photo-Taking
1.Power up the camera and set it to the motion-detect photo-taking mode. (See section titled “Selecting Image-Taking Modes” to select Mode 4.)
2.Press the Execute Button once.The camera will take a still photo each time it senses subject movement.
3.The camera will continue to shoot stills of moving subjects in a looping mode; if the flash card becomes full, additional photos will be saved over previously recorded image files.
4.Recording photos of subjects in motion will continue until the user presses the Execute Button .
5.As with video recording, you can stop loop recording.To do this, advance to the section in this manual titled “SettingThe System Parameters.”
Operating the Light Panel
1.The camera includes 8 bright-white LEDs to illuminate your subject.To operate the LEDs, press the Light Button .
2.The first time Light Button is pressed, all 8 LEDs will switch on.
3.The second use of Light Button will reduce the light output to 4 LEDs.
4.The third use of Light Button will return the light panel to its off position.
5.The light panel will operate in any of the four picture-taking modes; it will not work while in theTV-Out Playback Mode.
Downloading Your Images
Method 1: Using the camera to view the files
1.With the camera in its “Off” mode, connect the USB Cable between your computer and the camera’s USB2.0 Connector .
2.The camera will turn on automatically, and Windows Explorer will recognize a new removable disk.
3.You can review the photos and videos in the folders labeled “DCIM/100DSCIM” and play them using Windows Media Player or an equivalent program. Note: If your computer is equipped with USB version 1.1, copy the video files to your computer desktop and then play them to avoid ragged playback.
6
POLAROID XS20 USER GUIDE
Method 2:Viewing files directly from the flash card
1.Remove the memory card from the camera’s MicroSd Card Slot 0 .
2.Insert the MicroSD card into an SD card adapter (not supplied).
3.Insert the card adapter into the SD card slot of your computer’s integrated card reader or external card reader (not supplied).
4.Open Windows Explorer and click on the removable disk letter assigned to your card reader’s SD slot and double click the files you wish to view.
PC Camera Function
1.Install the driver program from the CD Software Disk.
2.Turn the camera on; after the vibration stops, connect the camera to your computer using the USB Cable .
3.When the cable is inserted, a camera icon will appear in “My Computer.”The camera becomes an active PC camera.
4.Using third-party application software, such as the freeware program AMcap 9.20, you can view and save real-time video to your computer. Note:The camera’s LED Lighting Panel can be used to enhance video quality.
Taking Videos While Charging
1.Insert the USB cable into your computer and the other end of the cord into the camera’s USB 2.0 connector .
2.The camera will turn itself on and enter its Standby Mode.The camera can be used as described in previous sections. NOTE: If the camera turns turns itself off due to nonuse, remove the USB charging cord, wait 5 seconds and reconnect the cable.
TV Out Function
1.Connect the A/V Cable to the camera’s A/V Out Jack and the other end to the video input of aTV receiver as follows:Yellow to theTV’s video input jack and White to the TV’s audio input jack.
2.Change theTV’s input to select the composite Video In terminals. (If in doubt, consult theTV’s user’s manual.)
3.Turn the camera on and both the red and blue button lights will turn on; the last photo or video will be displayed.
4.To play the recorded files manually, press the Up Button or Down Button to navigate through the images.
5.When a video camera icon appears on the upper-right of theTV screen, and you want to view the video, press the Execute Button .
6.To play the recorded files automatically, press the Execute Button . When photos are
7
POLAROID XS20 USER GUIDE
played, they will appear as a slide show, each one lasting 5 seconds.
7.If the next file is a video, it will play once in its entirety. NOTE: If the video clip is lengthy, a delay will be experienced as the video loads for playback.
8.To stop auto play, press the Execute Button.
9.To exit auto play, press the Power Button.
Motion Detect Monitor Mode
1.Connect the A/V Cable to the camera’s A/V Out Jack 0 and the other end to the video input of aTV receiver as follows:Yellow to theTV’s video input jack and White to the TV’s audio input jack.
2.Change theTV’s input to select the composite Video In terminals. (If in doubt, consult theTV’s user’s manual.)
3.Press the ModeTransfer Button ; the yellow and blue lights will turn on together.
4.Video should appear on theTV and the camera sets itself to the motion detect mode.
5.If a subject in the camera’s view should move, the camera will automatically record for the length of time programmed into the system settings (10-seconds, 1-minute, 5-minutes or 10minutes).
6.Press the ModeTransfer Button again; the button lights will change to yellow and red, and the camera will enter the motion detect photo-taking mode.
7.Now, if the camera detects motion, it will take a still image of the subject.
8.The motion detect mode of the camera loops its recordings. When the memory card becomes full, this mode will erase previously recorded files and replace them with new ones. (Loop recording can be turned off in the system settings procedure described next.
9.To end the motion detect recording mode, press the Power Button
Setting The System Parameters
1.Connect the A/V Cable to the camera’s A/V Out Jack and the other end to the video input of aTV receiver as follows:Yellow to theTV’s video input jack and White to the TV’s audio input jack.
2.Change theTV’s input to select the composite Video In terminals. (If in doubt, consult theTV’s user’s manual.)
3.Press the Execute Button for 3 seconds.
4.A list of system items that you can set will appear on theTV screen.
5.To choose an item, quickly press the Execute Button .
6.Use the Up Button and Down Button to choose a parameter setting.
7.After making your selection, quickly press the Execute Button to record your choice.
8.Repeat steps 6 and 7 to set parameters for the following items: QUALITY-Fine, Standard, Economy (This sets the video resolution. Fine consumes the most memory; Economy creates the smallest files but has the
8
POLAROID XS20 USER GUIDE
lowest video quality.)
MOTION DETECT CAPTURETIME-10 seconds, 1 minute, 5 minutes, 10 minutes
MOTION DETECT AUTO DELETE-When ON, previous files will be overwritten when the memory card becomes full; when OFF, the camera will turn itself off when the memory card becomes full and nothing is erased.
DATA INPUT-Set the correct date and time.
LIGHT FREQUENCY-Set this to the frequency of your country’s electrical supply (USA=60).
TV OUTPUT-Set this to your country’s television video format (USA=NTSC). LANGUAGE-Select a language.
SYSTEM RESET-Cancel/Execute (If you want to reset the system, choose “Execute,” and quickly press the Execute Button .
TIME STAMP- Choose “date and time” or “off.”
VERSION-allows you to view the software version and related information.
Setting System Time via Computer
1.Turn the camera off.
2.Using the USB Cable connect the camera to one of your computer’s USB ports.
3.Open U-disk (from the supplied CD).
4.Create a new “time.txt” file.
5.Open “time.txt” file and input the following time and date format: “year.month.date hour:minute:second on/off” Note: Be certain to leave a space between the words “date” and “hour” and between “second” and “on” as shown above.
6.Use the following format to enter the actual date and time: (Example is for May 15, 2012 at 3:25 & 20 sec)
For video with time stamp: 2012.05.15 15:25:20Y
For video without the time stamp: 2012.05.15 15:25:20 N
Note:The time is entered in the 24-hour format where 15:00 hours is 3 p.m.
7.Save the time.txt file and safely exit the program and remove the USB cable from both the computer and camera.
8.The next time you turn on the camera, its system information will be updated. Note: If the camera is left unused for a long period of time and the battery is completely run down, the SystemTime Stamp settings will revert back to the factory default values. Repeat steps 1-6 to update it again.
Performing a System Reset
If the camera battery is known to be adequately charged, but the camera does not respond in any way, use a small pin to press the reset button located in the microphone hole.
Bike Mount
9
POLAROID XS20 USER GUIDE
1.Loosen the handlebar clamp bolt until it swings free and allows clamp to fully open
2.Wrap handlebar clamp around your actual handlebar of your bike etc.
3.After positioning the Handlebar Clamp where you want it, close the clamp, slide the bolt down and tighten the Clamp Bolt into place.
4.To remove handlebar mount reverse steps above.
5.Slide camera onto top of the mount until you hear a click
6.To remove camera lower the level and remove camera
Helmet Mount
1.Clean surface of helmet where you want to put helmet mount
2.Attach firmly 3M adhesive sticker
3.Attach helmet mount onto other side of sticker – For best results leave overnight so it will bond stronger
4.Two joints are included, a regular and L shaped version this allows you to use helmet mount either on top of helmet or on side.
5.Slide joint through nut and into mount until you hear a click, then tighten nut.
6.Slide camera onto top of the mount until you hear a click
7.To remove camera lower the level and remove camera
10
POLAROID XS20 USER GUIDE
Specifications
Images sensor: Photo:
Video:
Photo Format:
Video Format:
Audio Format: Auto-Motion record times: 3Video Qualities:
FOV:
Video Output format: Battery Capacity: Recording time: Charge time: Illumination:
USB: Memory Card:
Memory capacity: Water depth: Weight: Dimensions:
5MP CMOS Sensor 5MP
720p (1280X720p), FPS 30 JPG (2560X1920)
AVI HD
PCM
10sec, 1-5-10min High, Standard, Low 120
NTSC, PAL 3.7V, 850mah
3 hr (without LED lights on)
3 hr
4 or 8 Bright LED lights USB 2.0
Micro SD
1-32gb (class 6 or Higher)
20 meters 2.65oz 3.5”x1.61”x1.42”
PLR IP Holdings, LLC, its licensees and affiliates, fully support all electronic waste initiatives. As responsible stewards of the environment, and to avoid violating established laws, you should properly dispose of this product in compliance with all applicable regulations, directives or other governances in the area where you reside. Please check with local authorities or the retailer where you purchased this product to determine a location where you can appropriately dispose of the product.
You may also go to www.polaroid.com to learn more about the specific laws in your area to locate a collection facility near your home.
If your electronic device has internal memory on which personal or other confidential data may be stored, you may want to perform a data sanitization process before you dispose of your device to assure another party cannot access you personal data. Data sanitization varies by the type of product and its software, and you may want to research the best sanitization process for your device before disposal.You may also check with your local recycling facility to determine their data sanitization procedures during the recycling process.
Polaroid, Polaroid & Pixel, and Polaroid Classic Border Logo are trademarks of PLR IP Holdings, LLC, used under license. All other trademarks are the property of the respective owner, who has not sponsored, endorsed or approved this product. PLR IP Holdings, LLC does not manufacture this product or provide any Manufacturer’s Warranty or support.
Distributed by: C&A Licensing LLC, 2 BergenTurnpike, Ridgefield Park, NJ 07660 © 2012 All Rights Reserved
MADE IN CHINA
Product features, specifications and appearances are subject to change without notice. www.polaroidaction.com
11
POLAROID XS20 MANUEL D’UTILISATION
INTRODUCTION
Merci d'avoir acheté le caméscope Polaroid XS20. Grâce à ses différentes pièces, il peut être monté sur tous types de casques et n'importe quel guidon. De nouveaux supports comme les ventouses seront bientôt disponibles sur polaroidaction.com. Visitez le site régulièrement pour découvrir les nouveaux accessoires.
Contenu de l'Emballage
•Caméscope
•Support vélo
•Supports casque
•Étui
•Câble USB
•Câble AV
•Manuel d'utilisateur
•CD
Avertissements & Mises en Garde
1.Veillez bien à ce que le couvercle arrière du XS20 soit entièrement inséré et complètement fermé avant utilisation. Si des corps étrangers ou de l'eau s'infiltraient dans le caméscope, éteignez l'appareil. Une utilisation prolongée pourrait causer des blessures à l'utilisateur.
2.Si le caméscope est tombé ou que sa housse a été endommagée, éteignez l'appareil.
3.Une utilisation prolongée pourrait causer des dégâts permanents à l'appareil et/ou des blessures à l'utilisateur.
4.Le caméscope ne possède aucune pièce réparable par l'utilisateur. NE PAS DÉMONTER ! Ne pas poser le caméscope sur une surface instable. Celui-ci pourrait tomber ou se renverser, causant ainsi des dégâts.
5.Pour toute réparation, visitez polaroidaction.com afin de contacter le service clientèle.
6.Un caméscope est un instrument de précision. Ne pas laisser tomber, frapper ou ne pas manipuler brutalement pour ne pas l'endommager.
7.Avant de déplacer le caméscope, déconnectez cordons et câbles pour ne pas les endommager.
8.Ce produit vidéo est destiné aux sports extrêmes. Veillez bien à ne pas fixer le caméscope dans une position fixe où, en cas d'accident, vous rentrez en contact physique avec l'appareil.
Prise étanche
L'étanchéité du caméscope lui permet de fonctionner jusqu'à 60 pieds (18 mètres) de profondeur. Afin de protéger le caméscope en cas d'utilisation dans des conditions humides,
12
POLAROID XS20 MANUEL D’UTILISATION
vous devez sceller le tableau de bord avec la prise étanche.
Si vous ne scellez pas votre caméscope, des fuites pourraient l'endommager ou le détruire. Votre garantie ne couvre pas les dégâts des eaux résultant de la négligence de l'utilisateur.
Chargement de la Batterie
1.Retirez le joint étanche du dos du caméscope.
2.Branchez le câble USB de l'ordinateur sur le port USB 2.0 du caméscope.
3.Le voyant indicateur de chargement deviendra vert.
4.Le chargement sera terminé quand le voyant s'éteindra. Note : une batterie complètement déchargée demande environ 3 heures de chargement. Afin de réduire le temps de chargement, il est recommandé de recharger la batterie après chaque utilisation.
5.Quand le câble USB est connecté entre le caméscope et l'ordinateur, la batterie se chargera mais son taux de chargement sera très faible. Il est donc recommandé de charger la batterie du caméscope avec un chargeur sur secteur (non fourni).
Démarrage du Caméscope
1.Insérez la carte MicroSD (1 GB - 32 GB) dans le lecteur de carte MicroSD.
2.Maintenez le bouton de démarrage enfoncé pendant 2 secondes puis relâchez.
3.Les indicateurs LED bleus s'allumeront et le corps du caméscope vibrera. Quand la vibration s'arrêtera, le caméscope entrera en mode veille. Note : si les voyants bleus clignotent pendant la procédure de démarrage, ils indiquent qu'il n'y a pas de carte
MicroSD dans le lecteur. Éteignez l'appareil et insérez la carte. En effet, l'appareil ne possède pas de mémoire interne, toutes les images sont enregistrées sur une carte mémoire que vous fournissez.
4.Maintenez le bouton de démarrage enfoncé pendant 2 secondes puis relâchez pour
éteindre l'appareil.
5.Le voyant bleu clignotera 3 fois puis s'éteindra ; le caméscope vibrera deux fois puis s'éteindra. Note : le caméscope s'éteindra automatiquement si la carte mémoire est pleine et la fonction enregistrement en boucle est désactivée.
Sélection des Modes de Prise d'Images
1.Maintenez le bouton de démarrage enfoncé pendant 2 secondes puis relâchez.
2.Le voyant bleu s'allumera et le caméscope vibrera. Quand la vibration s'arrêtera, le caméscope entrera en mode veille.
3.Le bouton de démarrage devient maintenant le bouton de changement de modes
13
POLAROID XS20 MANUEL D’UTILISATION
et de boucles et il est à présent possible de sélectionner parmi les quatre modes suivants :
Mode 1: Enregistrement vidéo manuel (LED bleue) Mode 2: Prise de photos manuelle (LED rouge)
Mode 3: Enregistrement vidéo si détection de mouvements (LED bleue et jaune) Mode 4: Prise de photos si détection de mouvements (LED rouge et jaune)
4.À chaque changement de mode, le caméscope vibrera une fois pour indiquer que le mode a été pris en compte mais soyez patient. Le mode ne sera prêt que quand la LED aura fini de clignoter et sera allumée.
Enregistrement d'Images Statiques
1.Allumez le caméscope et choisissez le mode Prise de photos manuelle. (Voir la section intitulée "Sélection des modes de prise d'images" pour sélectionner le mode 2.)
2.Pressez le bouton Exécution une fois.
3.Maintenez le caméscope immobile jusqu'à ce qu'il vibre une fois.
4.Une photo sera prise immédiatement après la fin de la vibration.
5.La LED rouge s'éteindra pendant que la photo sera prise.
Enregistrement vidéo
1.Allumez le caméscope et choisissez le mode d'enregistrement vidéo manuel. (Voir la section intitulée "Sélection des modes de prise d'images" pour sélectionner le mode 1.)
2.Une fois dans le mode d'enregistrement manuel, pressez le bouton Exécution. Le caméscope vibrera une fois et la LED bleue clignotera lentement pour indiquer que l'enregistrement vidéo s'effectue.
3.Pour arrêter l'enregistrement de la vidéo, pressez le bouton Exécuter à nouveau. La LED bleue redeviendra constante pour indiquer que l'enregistrement s'est arrêté et que le caméscope est passé en mode veille.
4.L'enregistrement vidéo durera pendant 20 minutes puis le caméscope sauvegardera le fichier et continuera l'enregistrement dans un nouveau fichier.
Enregistrement Vidéo si Détection de Mouvements
1.Allumez le caméscope et choisissez le mode Enregistrement vidéo si détection de mouvements. (Voir la section intitulée "Sélection des modes de prise d'images" pour sélectionner le mode 3.)
2.Dans ce mode, le caméscope enregistrera automatiquement des clips vidéos de sujets mobiles pendant une durée présélectionnée de 10 secondes, 1 minute, 5 minutes ou 10 minutes. Il sauvegardera chaque clip dans son propre fichier et
enregistrera immédiatement un nouveau clip de la même durée qui sera sauvegardé dans son propre fichier et ainsi de suite jusqu'à ce que vous arrêtiez le processus
14
POLAROID XS20 MANUEL D’UTILISATION
d'enregistrement.
3.Quand la carte mémoire sera pleine, le caméscope effacera le premier clip enregistré et le remplacera avec la vidéo la plus récente. Ce procédé est appelé "Enregistrement en boucle" et affectera les vidéos et photos précédemment enregistrées.
4.Afin d'empêcher le caméscope d'enregistrer en boucle (enregistrer par-dessus des images déjà sauvegardées), vous pouvez le programmer pour arrêter d'enregistrer quand la carte mémoire est pleine. Pour ce faire, consultez la section de ce manuel intitulée "Réglage des paramètres système".
Prise de photos si détection de mouvements
1.Allumez le caméscope et choisissez le mode Prise de photos si détection de mouvements. (Voir la section intitulée "Sélection des modes de prise d'images" pour sélectionner le mode 4.)
2.Pressez le bouton Exécuter une fois. L'appareil prendra une photo à chaque fois qu'il détectera un mouvement.
3.L'appareil-photo continuera de prendre des photos de sujets en mouvement dans un mode d'enregistrement en boucle ; quand la carte mémoire sera pleine, les photos supplémentaires seront enregistrées par-dessus les photos déjà sauvegardées.
4.La prise de photos de sujets en mouvement continuera jusqu'à ce que l'utilisateur presse le bouton Exécuter à nouveau.
5.Comme pour l'enregistrement vidéo, vous pouvez arrêter l'enregistrement en boucle. Pour ce faire, consultez la section de ce manuel intitulée "Réglage des paramètres système".
Utilisation du panneau de lumière
1.Le caméscope comprend 8 LED blanches pour éclairer votre sujet. Afin d'utiliser les LED, pressez le bouton Lumière.
2.Quand vous pressez le bouton Lumière la première fois, les 8 LED s'allument.
3.Appuyez sur le bouton Lumière une deuxième fois et le nombre de LED se réduira à 4.
4.Appuyez une troisième fois sur le bouton Lumière et les lumières s'éteindront.
5.Les lumières fonctionneront dans n'importe lequel des quatre modes de prises d'images mais pas en mode lecture de vidéo.
Téléchargement de vos images
Méthode 1:Visionner les fichiers sur le caméscope
1.Quand le caméscope est éteint, branchez le câble USB entre votre ordinateur et le port USB 2.0 du caméscope.
2.Le caméscope s'allumera automatiquement et Windows Explorer reconnaîtra un nouveau disque amovible.
15
 Loading...