


DMC Ie
Installation Quickstart
Schnelleinstieg
Guía de instalación rápida
Guide de démarrage rapide
Guida rapida

Polaroid DMC Ie
English_______________________________3
Deutsch _____________________________13
Español _____________________________23
Français _____________________________33
Italiano _____________________________43

Installation Quickstart
1 Unpack the Box
Make sure you have the following components. Contact your dealer if any is missing or damaged
1 2
3 |
4 |
5 |
6 |
7 |
1DMC Ie camera
2Power supply and cord (may differ from illustration for some locations)
3SCSI host adapter installation kit for PCs (optional; contact your dealer)
4SCSI cable adapter (HD50 to DB25)
5SCSI cable (2-meter)
6Polaroid DMC Software CD containing
•TWAIN driver and Polaroid DMC Ie software for Windows 95, 98 and NT
•Adobe Photoshop plug-in and Polaroid DMC Ie software for Power MAC and PowerPC systems
•Online user’s guide
7Optional image-reporting software (available in some regions)
Warning: Nothing inside the camera or power supply is user serviceable. Do not disassemble the camera. Doing so could result in severe electrical shock and damage to the camera. This action may also void your warranty. Contact Polaroid Technical Support or your dealer if the camera is malfunctioning. (To contact Polaroid from within the U.S.A., call 1-800-432-5355. Outside the U.S.A., see Obtaining Technical Assistance in the online user’s guide or visit www.polaroid.com on the World Wide Web.)
English  3
3

English  4
4
2 Install the Software
1Turn the computer on.
2Close any applications that may be running.
3Insert the Polaroid DMC Ie software CD into the drive.
Power Mac or |
Windows 95, 98 or NT |
PowerPC |
|
|
|
Select Polaroid |
Wait for the DMC install pro- |
DMC Installer. |
gram to start. |
|
If it does not, select Run from |
|
the Windows Start menu. |
|
Click Browse and select |
|
SETUP.EXE on the CD-ROM. |
|
Click OK. |
|
|
4Follow instructions on the screen.
5Remove the CD from the drive.
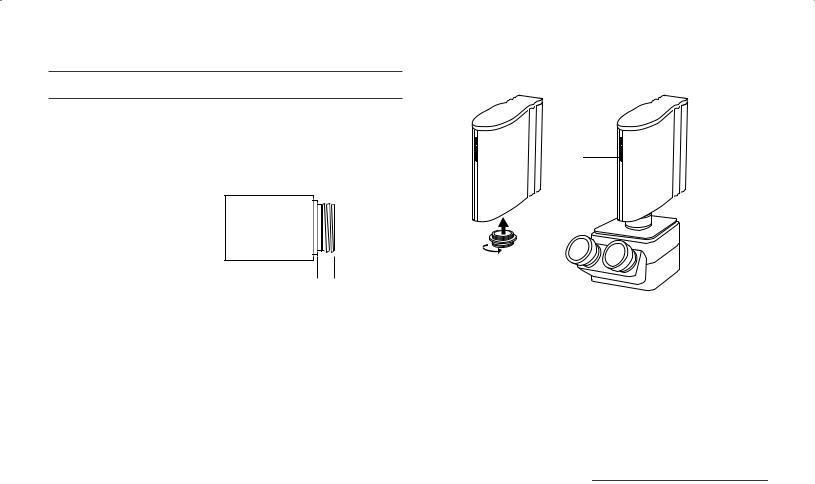
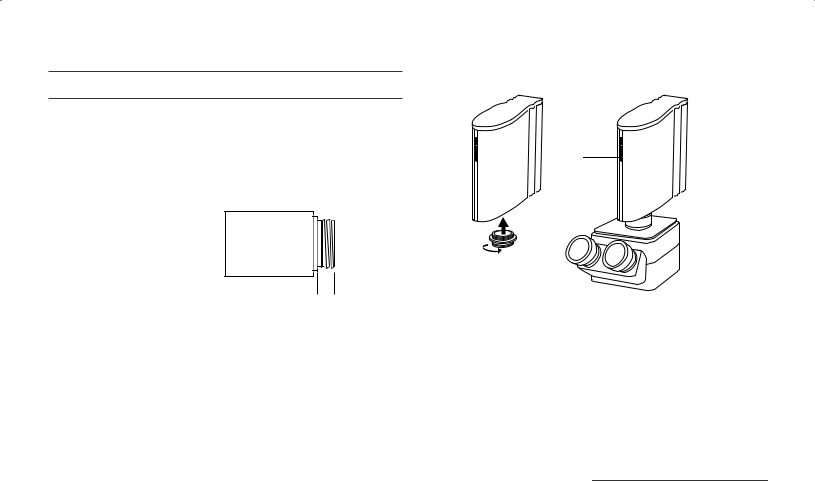
3 Attach the Camera to the Microscope
You need a 0.63 or 1:1 c-mount adapter (not provided) compatible with your microscope. (Do not use a 0.5 c-mount adapter.) Refer to your microscope manual for more information about c- mounts.
Caution: Verify that the threaded end of the c-mount adapter does not exceed 0.25 in. (6.3mm). Longer adapters can damage the camera.
0.25 in. 
 (6.3mm)
maximum
Connecting the camera to the microscope:
Indicator
LEDs
1Screw the c-mount adapter into the camera.
Note: Finger-tighten the adapter. Do not use tools.
2Insert the c-mount adapter into the microscope. The camera indicator LEDs should face toward the front of the microscope.
English  5
5

4 Connect the Camera to the Computer
The DMC Ie camera requires a SCSI host adapter in your computer. If your computer does not have an adapter, you must install one (see page 11). If your computer is a PC-compatible with a SCSI adapter, but the adapter is connected to a hard drive or CDROM drive, installing a second adapter is recommended.
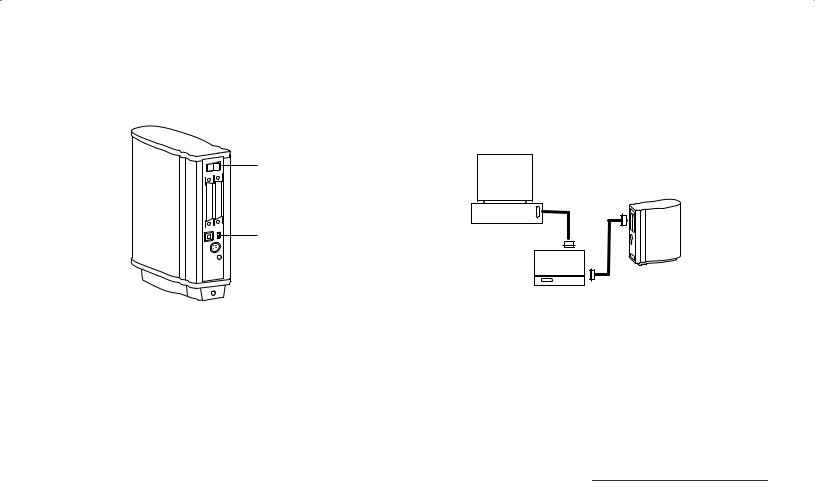
Set the camera SCSI address:
Each device connected to a SCSI host adapter must have a unique address from 0-6. To assure a unique address for the camera, determine the addresses of any other SCSI devices:
English  6
6
Turn the camera power switch to off (0) and set the SCSI address switch to a value not used by any other device.
Power switch?
(off=0)
 SCSI address switch
Do not use 7, 8 or 9? (not valid addresses)
Power Mac or PowerPC |
Windows 95, 98 or NT |
|
|
|
|
• Run Apple System Profiler, |
• Look at the SCSI |
|
usually on the Apple menu. |
address switch on each |
|
If it is not, it may be avail- |
SCSI device connected |
|
able from www.apple.com/ |
to your system. If nec- |
|
swupdates. |
essary, see the instruc- |
|
• Click Devices and Volumes |
tions provided with the |
|
devices. |
||
to view the SCSI device |
||
|
||
addresses. |
|
|
|
|
Note: The address is preset to 4. Do not change it unless another device is using 4. Other addresses typically available are 2, 5 and 6.
Connect the SCSI cables:
Place the DMC camera at the end of the SCSI chain as shown or between the computer and other SCSI devices. Use the shortest possible cables.
Set termination:
The last device in a SCSI chain must be terminated (or have termination on), while all other devices must be unterminated (or have termination off).
DMC Ie camera termination on (1)
Computer |
Termination |
|
switch |
Other SCSI device (not terminated)
Note: Turn the computer, camera and all other SCSI devices off before connecting or disconnecting any cables. Do not connect the camera to the parallel connector on your computer. Doing so could damage the camera or computer.
If the camera is the only device connected to your SCSI host adapter or the last device in a SCSI chain, set the camera termination to on (1). Otherwise, set termination to off (0). Termination instructions for your other SCSI devices are provided with the devices.
Note: Do not use an external, passive terminator to terminate the camera. If another device is at the end of the SCSI chain, that device must be terminated with an active terminator for proper camera operation.
English  7
7

5Connect the Camera to AC Power and Turn On
1Connect the camera to AC power and turn the power switch on.
2Verify that the green and yellow LEDs are on, indicating AC and termination power are on.
3Turn the computer on.
4Wait for the system to install the camera driver and display the normal desktop.
English  8
8
1
 Power switch (on=1)
To AC power
Green LED
2
Yellow LED

6 Take a Test Picture
1 Start the DMC Ie program:
Power Mac or PowerPC |
Windows 95, 98 or NT |
|
|
• Double-click |
• Select Programs from the |
Polaroid DMC Ie. |
Start menu. |
|
• Point to Polaroid Digital |
|
Microscope Camera and |
|
select Polaroid DMC Ie. |
|
|
2Place a specimen under the microscope and focus it through the microscope eyepiece.
3Click Preview in the DMC Ie main window. If necessary, adjust the c-mount on the microscope to focus the image on the computer screen. (Refer to your microscope manual for instructions.)
4In the DMC Ie main window, choose the appropriate exposure, sensitivity and color temperature settings for the image being captured.
5Select 8-Bit Color from the Image Type box for the test.
6Click Capture & Transfer to capture and save the image to disk.
7Open the saved image with an image-processing application, verifying that it was captured satisfactorily.
English  9
9

English  10
10
7Capture, Enhance and Save Additional Images
Follow instructions in the on-line user’s guide to capture, enhance and save additional images.
Viewing the online DMC User’s Guide:
Power Mac or PowerPC |
Windows 95, 98 or NT |
|
|
|
|
1 Double-click DMC Ie, |
1 |
Select DMC Help from the |
launching the DMC Ie |
|
Help menu. |
program. |
|
|
|
2 |
Select Programs from the |
|
|
Start menu. |
|
3 |
Point to Polaroid Digital |
|
|
Microscope Camera and |
|
|
select User's Guide. |
|
|
|
Installing a SCSI Host Adapter
The DMC Ie camera connects to a SCSI host adapter in your computer. Most Macintosh computers have a SCSI adapter built in, but most IBM PC compatible computers do not.
If you must install a SCSI adapter, turn the computer off and follow instructions provided by the adapter manufacturer. (The procedure usually includes software installation. If your PC uses the Windows NT operating system, log in as an administrator before installation.)
Note: A SCSI host adapter may be provided as an option with the camera. If necessary, obtain an adapter from your computer dealer. (Adapters are not available for iMac computers.)
© Copyright Polaroid Corporation, 1999. All rights reserved.
“Polaroid” is a registered trademark of Polaroid Corporation, Cambridge, MA, U.S.A. All other product names may be trademarks of their respective owners.
PN 1BH207C (PU-20854M-1)
English  11
11

Kurzanleitung für die Installation
1 Auspacken des Kartons
Überprüfen Sie zunächst den Inhalt der Verpackung. Sollte eines der nachfolgend genannten Teile fehlen oder beschädigt sein, wenden Sie sich an Ihren Händler.
1 2
1DMC Ie-Kamera
2Netzteil und -kabel (in einigen Regionen werden möglicherweise andere als die hier dargestellten Modelle verwendet)
3SCSI-Hostadapter-Installationskit für PCs (als Option erhältlich; wenden Sie sich diesbezüglich an Ihren Händler)
4Adapter für SCSI-Kabel (HD50 zu DB25)
5SCSI-Kabel (2 m)
6Polaroid DMC-Software-CD mit:
•TWAIN-Treiber und Polaroid DMC Ie-Software für Windows 95, 98 und NT
•Adobe Photoshop-Plugin und Polaroid DMC Ie-Software für Power MACund PowerPC-Systeme
•Online-Benutzerhandbuch
7optionale Image-Reporting-Software (in einigen Regionen verfügbar)
3 |
4 |
5 |
6 |
7 |
|
|
|
|
|
|
|
|
|
|
|
|
|
Deutsch  13
13

Warnung: Die Kamera und das Netzteil enthalten keine Komponenten, die durch den Benutzer gewartet werden können. Nehmen Sie die Kamera nicht auseinander, da dies gefährliche elektrische Schläge und eine Beschädigung der Kamera sowie einen Verfall Ihrer Garantieansprüche zur Folge haben könnte. Wenden Sie sich bei Funktionsstörungen der Kamera an die technische Unterstützung von Polaroid bzw. an Ihren Händler. (Innerhalb der USA können Sie Polaroid unter der Rufnummer 1-800-432-5355 erreichen. Kunden außerhalb der USA können die Kontaktrufnummern dem Abschnitt Obtaining Technical Assistance im Online-Benutzerhandbuch oder der Polaroid-Web- Site unter www.polaroid.com entnehmen.)
Deutsch  14
14
2 Installieren der Software
1Schalten Sie den Computer ein.
2Schließen Sie alle Anwendungen.
3Legen Sie die CD mit der Polaroid DMC Ie-Software in das CD- ROM-Laufwerk ein.
Power Mac oder PowerPC |
Windows 95, 98 oder NT |
|
|
Wählen Sie den Polaroid |
Warten Sie, bis das DMC- |
DMC-Aktualisierer. |
Installationsprogramm |
|
automatisch gestartet wird. |
|
Sollte dies nicht eintreten, |
|
wählen Sie aus dem |
|
Windows-Menü Start den |
|
Befehl Ausführen. Klicken Sie |
|
auf die Schaltfläche |
|
Durchsuchen, und wählen |
|
Sie auf der CD-ROM die |
|
Datei SETUP.EXE. Klicken Sie |
|
auf OK. |
|
|
4Folgen Sie den Anweisungen auf dem Bildschirm.
5Nehmen Sie die CD aus dem Laufwerk.
3 Befestigen der Kamera am Mikroskop
Dazu benötigen Sie einen für Ihr Mikroskop geeigneten C-Adapter (1:0,63 oder 1:1). Ein solcher Adapter ist nicht im Lieferumfang enthalten. (Verwenden Sie keine C-Adapter mit einer Umsetzung von 1:0,5.) Weitere Informationen über C-Fassungen finden Sie in dem Handbuch, das Sie mit Ihrem Mikroskop erhalten haben.
Vorsicht: Die Gewindelänge des C-Adapters darf 6,3 mm nicht überschreiten. Bei Verwendung längerer Adapter kann es zu einer Beschädigung der Kamera kommen.
maximal 
 6,3 mm
So befestigen Sie die Kamera am Mikroskop:
LEDs
1Schrauben Sie den C-Adapter in die Kamera.
Hinweis: Ziehen Sie den Adapter nur mit der Hand fest, und verwenden Sie dazu keine Werkzeuge.
2Setzen Sie den C-Adapter in das Mikroskop ein. Drehen Sie die Kamera so, daß sich die LEDs auf der Vorderseite des Mikroskops befinden.
Deutsch  15
15

4 Anschließen der Kamera an den Computer
Zum Anschließen der DMC Ie-Kamera benötigen Sie in Ihrem Computer einen SCSI-Hostadapter. Dieser muß gegebenenfalls nachinstalliert werden (siehe Seite 22). Wenn es sich bei Ihrem Computer um ein PC-kompatibles Gerät mit SCSI-Adapter handelt, dessen Adapter an das Festplattenoder CD-ROM- Laufwerk angeschlossen ist, empfiehlt sich die Installation eines zweiten Adapters.
Festlegen der SCSI-Adresse der Kamera:
Jedem an einen SCSI-Hostadapter angeschlossenen Gerät muß eine eindeutige Adresse im Bereich von 0 bis 6 zugeordnet werden.
Deutsch  16
16
Um Konflikte mit anderen Geräten auszuschließen, sollten Sie zunächst die Adressen aller anderen SCSI-Geräte ermitteln:
Power Mac oder PowerPC |
Windows 95, 98 oder NT |
|
|
|
|
• Führen Sie den Apple |
• Überprüfen Sie an |
|
System Profiler aus. In der |
jedem Gerät, das an Ihr |
|
Regel finden Sie dieses |
System angeschlossen |
|
Programm im Apple-Menü. |
ist, den SCSI- |
|
Andernfalls können Sie das |
Adressenschalter. |
|
Programm von |
Nähere Informationen |
|
www.apple.com/swupdates |
finden Sie |
|
herunterladen. |
gegebenenfalls in den |
|
• Klicken Sie auf Geräte und |
Unterlagen, die Sie mit |
|
den entsprechenden |
||
Volumes, um die Adressen |
||
Geräten erhalten |
||
der SCSI-Geräte anzuzeigen. |
||
haben. |
||
|
||
|
|
Schalten Sie die Kamera mit Hilfe des Netzschalters aus (Position 0), und stellen Sie den SCSI-Adressenschalter auf einen Wert, der noch von keinem anderen Gerät belegt ist.
Anschließen der SCSI-Kabel:
Schließen Sie die DMC-Kamera am Ende der SCSI-Kette (siehe Abbildung) oder zwischen dem Computer und einem anderen SCSI-Gerät an. Verwenden Sie nach Möglichkeit kurze Kabel.
Netzschalter?
(Aus=0)
SCSIAdressenschalter
7, 8 und 9 sind keine gültigen Adressen und dürfen nicht verwendet werden
Hinweis: Standardmäßig ist die Adresse 4 voreingestellt. Ändern Sie diesen Wert nur dann, wenn er bereits von einem anderen Gerät belegt ist. In der Regel sind auch die Adressen 2, 5 und 6 verfügbar.
DMC Ie-Kamera
Terminierung ein (1)
Computer
anderes SCSI-Gerät (nicht terminiert)
Hinweis: Vor dem Anschließen und Abziehen von Kabeln sollten Sie den Computer, die Kamera und alle anderen SCSI-Geräte grundsätzlich abschalten. Verbinden Sie die Kamera auf keinen Fall mit dem Parallelanschluß Ihres Computers, da dies zu einer Beschädigung der Kamera bzw. des Computers führen kann.
Deutsch  17
17
 Loading...