


Operating Instructions
Memory Card Camera-Recorder
Model No. AG-AC7P
Before connecting, operating or adjusting this product, please read the instructions completely.
VQT3Q78
Dear Customer,
Thank you for choosing Panasonic!
You have purchased one of the most sophisticated and reliable products on the market today. Please take time to fill in the information on the right.
The serial number is on the tag located on the underside of your camera. Be sure to retain this manual as your convenient camera information source.
Date of Purchase
Dealer Purchased From
Dealer Address
Dealer Phone No.
Model No.
Serial No.
Safety Precautions
WARNING:
TO REDUCE THE RISK OF FIRE, ELECTRIC SHOCK OR PRODUCT DAMAGE,
≥DO NOT EXPOSE THIS APPARATUS TO RAIN, MOISTURE, DRIPPING OR SPLASHING AND THAT NO OBJECTS FILLED WITH LIQUIDS, SUCH AS VASES, SHALL BE PLACED ON THE APPARATUS.
≥USE ONLY THE RECOMMENDED ACCESSORIES.
≥DO NOT REMOVE THE COVER (OR BACK); THERE ARE NO USER SERVICEABLE PARTS INSIDE. REFER SERVICING TO QUALIFIED SERVICE PERSONNEL.
CAUTION!
DO NOT INSTALL OR PLACE THIS UNIT IN A BOOKCASE, BUILT-IN CABINET OR IN ANOTHER CONFINED SPACE. ENSURE THE UNIT IS WELL VENTILATED. TO PREVENT RISK OF ELECTRIC SHOCK OR FIRE HAZARD DUE TO OVERHEATING, ENSURE THAT CURTAINS AND ANY OTHER MATERIALS DO NOT OBSTRUCT THE VENTILATION VENTS.
The following mark and symbols are located on bottom of the AC adaptor.
CAUTION
RISK OF ELECTRIC SHOCK
DO NOT OPEN
CAUTION: TO REDUCE THE RISK OF ELECTRIC SHOCK, DO NOT REMOVE SCREWS. NO USER-SERVICEABLE PARTS INSIDE.
REFER SERVICING TO QUALIFIED SERVICE PERSONNEL.
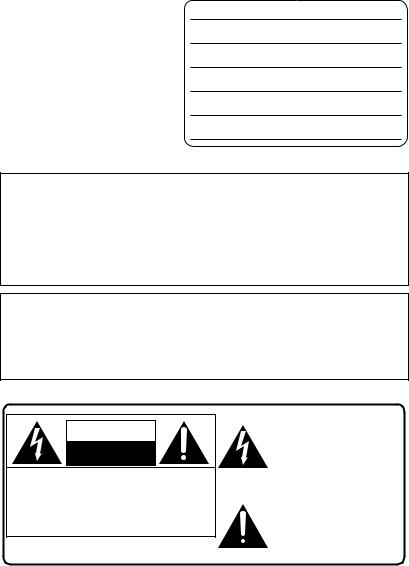
The lightning flash with arrowhead symbol, within an equilateral triangle, is intended to alert the user to the presence of uninsulated “dangerous voltage” within the product’s enclosure that may be of sufficient magnitude to constitute a risk of electric shock to persons.
The exclamation point within an equilateral triangle is intended to alert the user to the presence of important operating and maintenance (servicing) instructions in the literature accompanying the appliance.
2
VQT3Q78

FCC NOTICE (USA)
Declaration of Conformity
Model Number: |
AG-AC7P |
Trade Name: |
Panasonic |
Responsible Party: |
Panasonic Corporation of North America |
|
One Panasonic Way, Secaucus, NJ 07094 |
Support contact: |
1-800-524-1448 |
This device complies with Part 15 of FCC Rules. Operation is subject to the following two conditions:
(1) This device may not cause harmful interference, and (2) this device must accept any interference received, including interference that may cause undesired operation. To assure continued compliance, follow the attached installation instructions and do not make any unauthorized modifications.
CAUTION:
This equipment has been tested and found to comply with the limits for a Class B digital device, pursuant to Part 15 of the FCC Rules. These limits are designed to provide reasonable protection against harmful interference in a residential installation. This equipment generates, uses and can radiate radio frequency energy and, if not installed and used in accordance with the instructions, may cause harmful interference to radio communications. However, there is no guarantee that interference will not occur in a particular installation. If this equipment does cause harmful interference to radio or television reception, which can be determined by turning the equipment off and on, the user is encouraged to try to correct the interference by one of the following measures:
≥Reorient or relocate the receiving antenna.
≥Increase the separation between the equipment and receiver.
≥Connect the equipment into an outlet on a circuit different from that to which the receiver is connected.
≥Consult the dealer or an experienced radio/TV technician for help.
The user may find the booklet “Something About Interference” available from FCC local regional offices helpful.
FCC Warning:
To assure continued FCC emission limit compliance, the user must use only shielded interface cables with ferrite core when connecting to host computer or peripheral devices. Also, any unauthorized changes or modifications to this equipment could void the user’s authority to operate this device.

 indicates safety information.
AG-AC7P
3
VQT3Q78

AC adaptor
This AC adaptor operates on AC between 110 V and 240 V.
But
≥In the U.S.A. and Canada, the AC adaptor must be connected to a 120 V AC power supply only.
≥When connecting to an AC supply outside of the U.S.A. or Canada, use a plug adaptor to suit the AC outlet configuration.
≥When connecting to a supply of greater than AC 125 V, ensure the cord you use is suited to the voltage of the AC supply and the rated current of the AC adaptor.
≥Contact an electrical parts distributor for assistance in selecting a suitable AC plug adaptor or AC cord set.
The unit should be installed near an accessible AC power outlet, with the power cord connected directly to it.
To completely disconnect power from the unit, unplug the power cord from the AC power outlet.
∫ Concerning the battery
Battery pack (Lithium ion battery pack)
≥Use the specified unit to recharge the battery pack.
≥Do not use the battery pack with equipment other than the specified unit.
≥Do not get dirt, sand, liquids, or other foreign matter on the terminals.
≥Do not touch the plug terminals (i and j) with metal objects.
≥Do not disassemble, remodel, heat or throw into fire.
If any electrolyte should come into contact with your hands or clothes, wash it off thoroughly with water.
If any electrolyte should come into contact with your eyes, never rub the eyes. Rinse eyes thoroughly with water, and then consult a doctor.
Warning
Risk of fire, explosion and burns. Do not disassemble, heat above 60 oC (140 oF) or incinerate.
CAUTION
Danger of explosion if battery is incorrectly replaced. Replace only with the same or equivalent type recommended by the manufacturer. Dispose of used batteries according to the manufacturer’s instructions.
4
VQT3Q78

∫ Product identification marking
Product |
Location |
Memory Card Camera-Recorder |
Bottom |
|
|
AC adaptor |
Bottom |
|
|
U.S.A. CONSUMERS: ATTENTION:
A lithium ion battery that is recyclable powers the product you have purchased. Please call 1-800-8-BATTERY for information on how to recycle this battery.
5
VQT3Q78

IMPORTANT SAFETY
INSTRUCTIONS
Read these operating instructions carefully before using the unit. Follow the safety instructions on the unit and the applicable safety instructions listed below. Keep these operating instructions handy for future reference.
1)Read these instructions.
2)Keep these instructions.
3)Heed all warnings.
4)Follow all instructions.
5)Do not use this apparatus near water.
6)Clean only with dry cloth.
7)Do not block any ventilation openings. Install in accordance with the manufacturer’s instructions.
8)Do not install near any heat sources such as radiators, heat registers, stoves, or other apparatus (including amplifiers) that produce heat.
9)Do not defeat the safety purpose of the polarized or grounding-type plug. A polarized plug has two blades with one wider than the other. A grounding-type plug has two blades and a third grounding prong. The wide blade or the third prong are provided for your safety. If the provided plug does not fit into your outlet, consult an electrician for replacement of the obsolete outlet.
10)Protect the power cord from being walked on or pinched particularly at plugs, convenience receptacles, and the point where they exit from the apparatus.
11)Only use attachments/accessories specified by the manufacturer.
12)Use only with the
cart, stand, tripod, bracket, or table specified by the
manufacturer, or
sold with the apparatus. When a
cart is used, use caution when moving the cart/apparatus combination to avoid injury from tip-over.
13)Unplug this apparatus during lightning storms or when unused for long periods of time.
14)Refer all servicing to qualified service personnel. Servicing is required when the apparatus has been damaged in any way, such as power-supply cord or plug is damaged, liquid has been spilled or objects have fallen into the apparatus, the apparatus has been exposed to rain or moisture, does not operate normally, or has been dropped.
6
VQT3Q78

Precautions
USE & LOCATION
 WARNING
≥TO AVOID SHOCK HAZARD ... Your camera and power supply should not be exposed to rain or moisture. Do not connect the power supply or operate your camera if it gets wet. Your camera has been designed for outdoor use, however it is not designed to sustain direct exposure to water, rain, sleet, snow, sand, dust, or a direct splashing from a pool or even a cup of coffee. This action could permanently damage the internal parts of your camera. Do not attempt to disassemble this unit. There are no user serviceable parts inside. Unplug your camera from the power supply before cleaning.
≥AS WITH ANY SMALL OBJECT, SD CARDS CAN BE SWALLOWED BY YOUNG CHILDREN. DO NOT ALLOW CHILDREN TO HANDLE THE SD CARD.
 CAUTION
≥DO NOT AIM YOUR CAMERA AT THE SUN OR OTHER BRIGHT OBJECTS
≥DO NOT LEAVE THE CAMERA WITH THE EVF AIMED DIRECTLY AT THE SUN AS THIS MAY CAUSE DAMAGE TO THE INTERNAL PARTS OF THE EVF
≥DO NOT EXPOSE YOUR CAMERA TO EXTENDED HIGH TEMPERATURE ...
Such as, in direct sunlight, inside a closed car, next to a heater, etc... This action could permanently damage the internal parts of your camera.
≥AVOID SUDDEN CHANGES IN TEMPERATURE ... If the unit is suddenly moved from a cold place to a warm place, moisture may form on the SD card and inside the unit.
≥DO NOT LEAVE YOUR CAMERA OR THE POWER SUPPLY TURNED ON WHEN NOT IN USE.
≥STORAGE OF YOUR CAMERA ... Store and handle your camera in a manner that will not subject it to unnecessary movement (avoid shaking and striking). Your camera contains a sensitive pick-up device which could be damaged by improper handling or storage.
CARE
≥TO CLEAN YOUR CAMERA ... Do not use strong or abrasive detergents when cleaning your camera body.
≥TO PROTECT THE LENS ... Do not touch the surface of the lens with your hand. Use a commercial camera lens solution and lens paper when cleaning the lens. Improper cleaning can scratch the lens coating.
≥TO PROTECT THE FINISH OF YOUR CAMERA ... Before handling your camera, make sure your hands and face are free from any chemical products, such as suntan lotion, as it may damage the finish.
7
VQT3Q78

-If you see this symbol-
Information on Disposal in other Countries outside the European Union
This symbol is only valid
in the European Union. If you wish to discard
this product, please contact your local
authorities or dealer and ask for the correct
method of disposal.
8
∫Indemnity about recorded content
Panasonic does not accept any responsibility for damages directly or indirectly due to any type of problems that result in loss of recording or edited content, and does not guarantee any content if recording or editing does not work properly. Likewise, the above also applies in a case where any type of repair is made to the unit.
∫ Cards that you can use with this unit
SD Memory Card, SDHC Memory Card and SDXC Memory Card
≥4 GB or more Memory Cards that do not have the SDHC logo or 48 GB or more Memory Cards that do not have the SDXC logo are not based on SD Memory Card Specifications.
≥Refer to page 21 for more details on SD cards.
∫ For the purposes of these operating instructions
≥SD Memory Card, SDHC Memory Card and SDXC Memory Card are referred to as the “SD card”.
≥Functions that can be used for motion picture recording/motion picture playback
are indicated by 


 in these operating instructions.
≥Functions that can be used for still picture recording (including the still picture recording in motion picture recording mode)/still picture playback are indicated
by 


 in these operating instructions.
≥Pages for reference are indicated by an arrow, for example: l 00
VQT3Q78

Contents |
|
|
Accessories............................................ |
11 |
|
|
Preparation |
|
Before using |
|
|
[1] |
Parts identification and |
|
|
handling ...................................... |
12 |
|
About the supplied accessories...... |
16 |
Setup |
|
|
[1] |
Power supply.............................. |
17 |
|
Charging the battery .................... |
17 |
|
Inserting/removing the battery ..... |
18 |
|
Charging and recording time........ |
19 |
|
Connecting to the AC outlet ......... |
20 |
[2] Recording to a card ................... |
21 |
|
|
Cards that you can use with |
|
|
this unit......................................... |
21 |
|
Inserting/removing an SD card .... |
22 |
[3] Turning the unit on/off ............... |
23 |
|
|
Turning the unit on and off with the |
|
|
power switch ................................ |
23 |
[4] |
Selecting a mode ....................... |
24 |
[5] About the LCD monitor/ |
|
|
|
viewfinder ................................... |
25 |
|
How to use the touch screen ....... |
25 |
|
Viewfinder adjustment.................. |
26 |
|
Recording showing the contents |
|
|
to a partner................................... |
26 |
[6] Setting date and time................. |
27 |
|
|
Basic |
|
Recording/Playback |
|
|
[1] |
Before recording ........................ |
28 |
[2] |
Recording motion pictures ....... |
30 |
[3] |
Recording still pictures ............. |
32 |
|
Recording still pictures in motion |
|
|
picture recording mode ................ |
33 |
[4] |
Intelligent auto mode................. |
34 |
[5] |
Motion picture/Still picture |
|
|
playback...................................... |
36 |
Setup |
|
|
[1] Using the menu screen ............. |
39 |
|
[2] Using the Setup Menu ............... |
40 |
|
Advanced
Recording (Advanced)
|
Optical image stabilizer lock ........ |
47 |
Preparation |
|
[1] |
Zoom in/out function ................. |
45 |
|
|
|
Extra optical zoom ....................... |
45 |
|
|
[2] |
Image stabilizer function........... |
46 |
|
|
[3] |
Power LCD.................................. |
48 |
|
|
[4] Recording functions of operation |
|
|||
|
||||
|
icons ........................................... |
49 |
|
|
|
Operation icons............................ |
49 |
Basic |
|
[5] |
Recording functions of |
|
||
[6] |
menus ......................................... |
53 |
||
Manual recording....................... |
63 |
|
||
|
White balance .............................. |
64 |
|
|
|
Manual shutter speed/ |
|
|
|
|
|
|
||
|
..............................iris adjustment |
65 |
|
|
[7] Recording with manual focus .... |
66 |
Advanced |
||
Playback (Advanced) |
|
|||
|
|
|||
[1] |
Playback Operations ................. |
67 |
|
|
|
Motion picture playback using |
|
|
|
|
operation icon .............................. |
67 |
|
|
|
Creating still picture from motion |
|
|
|
|
|
|
||
|
picture .......................................... |
68 |
Copy/Dubbing |
|
|
Time frame index |
69 |
||
|
|
|||
|
Repeat playback .......................... |
69 |
|
|
|
Resuming the previous |
|
|
|
|
playback....................................... |
70 |
|
|
[2] |
Various playback functions ...... |
71 |
|
|
|
Playing back motion pictures/still |
|
|
|
|
|
|
||
|
...........................pictures by date |
71 |
|
|
|
Changing the playback settings and |
PC |
||
|
playing back the slide show |
72 |
||
|
a |
|||
Editing |
|
|||
|
With |
|||
[1] |
Deleting scenes/still pictures |
74 |
||
|
||||
|
Dividing a scene to partially |
|
|
|
|
delete |
76 |
|
|
|
|
|||
|
Protecting scenes/still pictures...... |
77 |
|
|
|
|
|
Others |
|
|
|
|
|
|
9
VQT3Q78

With a TV |
|
|
[1] |
Watching Video/Pictures on |
|
|
your TV........................................ |
78 |
|
Connecting with a HDMI cable..... |
81 |
|
Connecting with the component |
|
|
cable ............................................ |
81 |
[2] Playback using VIERA Link™ |
|
|
|
(HDAVI Control™) ....................... |
82 |
|
Copy/Dubbing |
|
With this unit/other products |
|
|
[1] Dubbing images onto other video |
||
|
devices........................................ |
85 |
|
With a PC |
|
With a PC |
|
|
[1] Connecting to a PC (for non-linear |
||
|
editing/file transfer) ................... |
86 |
|
Operating environment |
|
|
(mass storage) ............................. |
86 |
|
Connecting to a PC...................... |
88 |
|
About the PC display ................... |
89 |
|
Others |
|
Indications |
|
|
[1] |
Indications .................................. |
90 |
[2] |
Messages.................................... |
92 |
|
About recovery............................. |
92 |
Troubleshooting..................................... |
93 |
|
Cautions for use..................................... |
99 |
|
About copyright ................................... |
104 |
|
Recording modes/approximate |
|
|
recordable time .................................... |
105 |
|
Approximate number of recordable |
|
|
pictures................................................. |
106 |
|
Specifications....................................... |
107 |
|
Optional accessories........................... |
111 |
|
Limited Warranty (ONLY FOR U.S.A. |
|
|
AND PUERTO RICO) ............................ |
112 |
|
Index |
..................................................... |
114 |
10
VQT3Q78
Accessories
Check the accessories before using this unit.
Keep the accessories out of reach of children to prevent swallowing.
Battery pack |
Lens cap |
|
|
AC adaptor |
Shoulder strap |
AC cable
DC cable
AV cable
Component cable
USB cable
Stylus pen
11
VQT3Q78

Preparation
Before using |
1 |
Parts identification and |
|
handling
1 |
2 |
3 |
4 5 |
6 |
1 LCD monitor (Touch screen) (l 25)
≥ It can open up to 90o.
|
|
|
≥ It can rotate up to 180o A towards the lens |
|
|
|
|
or 90o B towards the opposite direction. |
|
7 |
|
|
Due to limitations in LCD production |
|
|
|
technology, there may be some tiny bright |
||
8 |
9 |
10 |
or dark spots on the LCD monitor screen. |
|
However, this is not a malfunction and |
||||
|
|
|
does not affect the recorded picture. |
|
|
|
MANUAL |
2 |
Viewfinder (l 26) |
|
|
FOCUS |
Due to limitations in LCD production |
|
|
|
|
||
POWER |
|
MENU |
technology, there may be some tiny bright |
|
LCD |
|
|
or dark spots on the viewfinder screen. |
|
|
|
|
||
11 |
12 |
|
However, this is not a malfunction and |
|
|
|
|
does not affect the recorded picture. |
|
|
|
|
3 |
Eyecup |
|
|
|
4 |
Sub recording start/stop button (l 28) |
|
|
|
≥ This button functions in the same manner |
|
|
|
|
as the recording start/stop button. |
|
|
|
|
5 |
Sub zoom lever (l 45) |
|
|
|
≥ This lever functions in the same manner |
|
|
|
|
as the zoom lever. |
|
|
|
|
6 |
Speaker |
|
|
|
7 |
Sub menu button [MENU] (l 39) |
|
|
|
≥ This button functions in the same manner |
|
|
|
|
as the menu button. |
|
|
|
|
8 |
Mode switch (l 24) |
|
|
|
9 |
Intelligent auto/Manual/Manual focus |
|
|
|
|
switch [iA/MANUAL/FOCUS] |
|
|
|
|
(l 34, 63, 66) |
|
|
|
10 |
Cursor button |
|
|
|
11 |
Power LCD button [POWER LCD] (l 48) |
|
|
|
12 |
Menu button [MENU] (l 39) |
12
VQT3Q78

13 |
14 |
13 |
Focus ring (l 66) |
|
14 |
Accessory shoe (l 111) |
|||
|
|
|||
|
|
15 |
Recording lamp (l 42) |
|
|
|
16 |
Lens |
|
|
|
17 |
Lens hood |
≥ This will reduce the extra light entering the lens in bright sunlight or backlight etc., making it possible to take clearer pictures.
18 Lens hood attachment knob
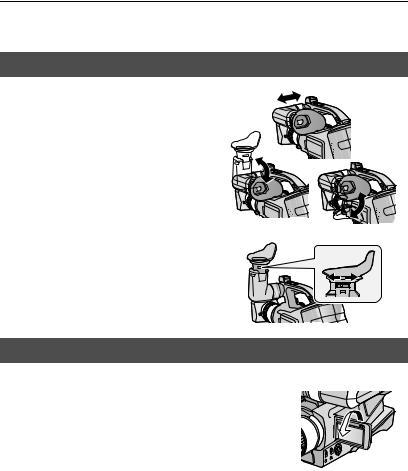
≥ When you remove the lens hood, first of all, loosen the lens hood attachment knob.
≥ When you attach the lens hood back, unite the mark A and fasten the lens hood attachment knob.
15 16 17 18
≥ If you use the filter kit (optional) or the conversion lens (optional), remove the lens hood. (l 111)
|
19 |
Eyepiece corrector knob (l 26) |
|
20 |
Tripod receptacle |
19 |
≥ If you attach a tripod which has 5.5 mm |
|
(0.22q) screw or larger, it may damage this |
||
|
unit. |
|
20
13
VQT3Q78

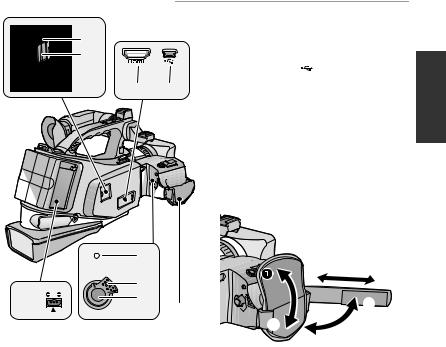
21 22 |
23 |
24 |
26 |
|
27 28 |
COMPONENT |
VIDEOOUT |
L–AUDIO–R |
|
|
OUT |
29 30 31
21Battery holder (l 18)
22Battery release button [PUSH] (l 18)
23Shoulder strap fixture (l 16)
24External microphone terminal [EXT MIC]
≥This unit is not compatible with a plug-in powered microphone.
≥When the unit is connected with the AC 25 adaptor, sometimes noise may be heard
depending on the microphone type. In this case, please switch to the battery for the power supply and the noise will stop.
25 Internal microphones
26 Headphone terminal [PHONES] (l 52)
≥Excessive sound pressure from earphones and headphones can cause hearing loss.
≥Listening at full volume for long periods
may damage the user’s ears.
27Photoshot button [  ] (l 32)
28Zoom lever [W/T] (In motion picture recording mode or still picture recording mode) (l 45)
Thumbnail display switch [ 
 /
/  ]/ Volume lever [sVOLr] (In playback mode) (l 38)
29Component connector [COMPONENT] (l 78)
≥Use the component cable (only the supplied cable).
30Video output connector [VIDEO OUT] (l 78, 85)
≥ Use the AV cable (only the supplied cable).
31Audio output connector [AUDIO OUT] (l 78, 85)
≥Use the AV cable (only the supplied cable).
14
VQT3Q78
32Access lamp [ACCESS] (l 22)
33Card slot (l 22)
32 |
34 |
HDMI connector [HDMI] |
33 |
|
(l 78, 82) |
|
35 |
USB terminal [ ] (l 88) |
34 35 |
36 |
DC input terminal [DC IN] (l 20) |
≥ Always use the supplied AC adaptor or a |
||
|
genuine Panasonic AC adaptor |
|
|
(VW-AD21PP-K; optional). |
|
|
37 |
Status indicator (l 23) |
|
38 |
Power switch (l 23) |
|
39 |
Recording start/stop button (l 30) |
|
40 |
Grip belt |
|
Adjust the length of the grip belt so that it fits |
|
|
your hand. |
|
OFF
DC IN
36 
O
37 |
|
|
N |
|
|
|
|
|
38 |
|
|
39 |
40 |
|
|
||
|
|
|
|
|
1, 2 Flip the belt. |
|
|
3 Adjust the length. |
|
|
4, 5 Replace the belt. |
15
VQT3Q78

About the supplied accessories
∫ About the Lens cap
When not using the unit, attach the lens cap to protect the lens.
≥When recording, always remove the lens cap before turning the unit on.
∫ About the Shoulder strap
We recommend that you attach the shoulder strap before going out of doors to record so as to avoid dropping this unit.
1 Pull the end of the shoulder strap through the shoulder strap fixture on the unit. 
16
2Fold the tip of the shoulder strap, run it through the shoulder strap length adjuster, and pull it.


≥Pull it out more than 2 cm (0.79 q) 1 from the shoulder strap length adjuster so that it cannot slip off.
VQT3Q78

Preparation
Setup |
1 Power supply |
|
∫ About batteries that you can use with this unit
The battery that can be used with this unit is VW-VBG130/VW-VBG260/VW-VBG6.
≥The unit has a function for distinguishing batteries which can be used safely. The dedicated battery (VW-VBG130/VW-VBG260/VW-VBG6) supports this function. The only batteries suitable for use with this unit are genuine Panasonic products and batteries manufactured by other companies and certified by Panasonic. (Batteries which do not support this function cannot be used). Panasonic cannot in any way guarantee the quality, performance or safety of batteries which have been manufactured by other companies and are not genuine Panasonic products.
It has been found that counterfeit battery packs which look very similar to the genuine product are made available to purchase in some markets. Some of these battery packs are not adequately protected with internal protection to meet the requirements of appropriate safety standards. There is a possibility that these battery packs may lead to fire or explosion. Please be advised that we are not liable for any accident or failure occurring as a result of use of a counterfeit battery pack. To ensure that safe products are used we would recommend that a genuine Panasonic battery pack is used.
Charging the battery
When this unit is purchased, the battery is not charged. Charge the battery before using this unit.
Important:
If the DC cable is connected to the AC adaptor, then the battery will not charge. Remove the DC cable from the AC adaptor.
Charging lamp [CHARGE] A
Lights up:
Charging (Battery charging time: l 19)
Goes off:
Charging completed
Flashing:
Be sure to connect the unit correctly (l 101)
1 Connect the AC cable to the AC adaptor and the AC outlet. 2 Insert the battery into the AC adaptor by aligning the arrows.
17
VQT3Q78

≥We recommend using Panasonic batteries (l 17).
≥If you use other batteries, we cannot guarantee the quality of this product.
≥Do not heat or expose to flame.
≥Do not leave the battery(ies) in an automobile exposed to direct sunlight for a long period of time with doors and windows closed.
Inserting/removing the battery
Install the battery by inserting it in the direction shown in the figure and slide it until it clicks and locks.
Removing the battery
Be sure to set the power switch to OFF and the status indicator goes off. Then remove the battery while supporting the unit to prevent it dropping.
While pushing the PUSH button, slide the battery in the direction indicated by the arrow.
CAUTION
Danger of explosion if battery is incorrectly replaced. Replace only with the same or equivalent type recommended by the manufacturer. Dispose of used batteries according to the manufacturer’s instructions.
18
VQT3Q78

Charging and recording time
∫ Charging/Recording time
≥ Temperature: 25 oC (77 oF)/humidity: 60%RH
|
|
|
|
|
|
|
Battery model number |
Charging |
Recording |
Maximum |
Actual |
|
|
continuously |
recordable |
|
|
|||
[Voltage/Capacity] |
time |
mode |
|
|
||
recordable time |
time |
|
|
|||
|
|
|
|
|
||
Supplied battery/ |
|
HA |
4 h 35 min |
2 h 50 min |
|
|
|
|
|
|
|
|
|
|
HG |
4 h 40 min |
2 h 50 min |
|
|
|
VW-VBG260 (optional) |
4 h 40 min |
|
|
|||
[7.2 V/ |
HX/HE |
4 h 40 min |
2 h 55 min |
|
|
|
|
|
|
||||
2640/2500 (typ./min.) mAh] |
|
|
|
|
|
|
|
SA/SX |
5 h |
3 h 5 min |
|
|
|
|
|
|
|
|||
VW-VBG130 (optional) |
|
HA/HG/ |
2 h 25 min |
1 h 30 min |
|
|
[7.2 V/ |
2 h 35 min |
HX/HE |
|
|
||
|
|
|
|
|||
1320/1250 (typ./min.) mAh] |
|
SA/SX |
2 h 35 min |
1 h 35 min |
|
|
|
|
HA |
11 h 25 min |
7 h 5 min |
|
|
VW-VBG6 (optional) |
|
|
|
|
|
|
|
HG |
11 h 30 min |
7 h 5 min |
|
|
|
[7.2 V/ |
9 h 25 min |
|
|
|||
|
|
|
|
|
||
HX/HE |
11 h 35 min |
7 h 10 min |
|
|
||
5800/5400 (typ./min.) mAh] |
|
|
|
|||
|
|
|
|
|
|
|
|
|
SA/SX |
12 h 20 min |
7 h 40 min |
|
|
|
|
|
|
|
|
|
≥These times are approximations.
≥The indicated charging time is for when the battery has been discharged completely. Charging time and recordable time vary depending on the usage conditions such as high/low temperature.
≥The actual recordable time refers to the recordable time when repeatedly starting/stopping recording, turning the unit on/off, moving the zoom lever etc.
≥The batteries heat up after use or charging. This is not a malfunction.
Battery capacity indication
≥The display changes as the battery capacity reduces.
 #
#  #
#  #
#  #
# 
If there is less than 3 minutes remaining, then  will become red. If the battery discharges, then
  will flash.
≥The remaining battery capacity is displayed when using the Panasonic battery that you can use for this unit. The actual time can vary depending on your actual use.
≥If the actual remaining time exceeds 9 hours 59 minutes, the indication will stay green and will not change until the remaining time falls below 9 hours 59 minutes.
≥When using the AC adaptor or batteries made by other companies, the remaining battery capacity will not be shown.
19
VQT3Q78

Connecting to the AC outlet
The unit is in the standby condition when the AC adaptor is connected. The primary circuit is always “live” as long as the AC adaptor is connected to an electrical outlet.
Important:
While the DC cable is connected to the AC adaptor, the battery will not charge.
≥Do not use the AC cable with any other equipment as it is designed only for this unit. Also, do not use the AC cable from other equipment with this unit.
DC IN
|
A |
DC output terminal |
|
|
B DC input terminal |
||
|
|
Insert the DC cable matching the |
|
|
|
[ |
] mark of the DC input |
|
|
terminal. |
|
1 Connect the AC cable to the AC adaptor and the AC outlet. 2 Connect the DC cable to the AC adaptor.
3 Connect the DC cable to the DC input terminal [DC IN].
≥When removing the AC adaptor, be sure to set the power switch to OFF and the status indicator goes off. Then remove the AC adaptor.
20
VQT3Q78
Preparation
Setup |
2 Recording to a card |
|
This unit (an SDXC compatible device) is compatible with SD Memory Cards, SDHC Memory Cards and SDXC Memory Cards. When using an SDHC memory card/SDXC memory card with other equipment, check the equipment is compatible with these memory cards.
Cards that you can use with this unit
Use SD cards conforming to Class 4 or higher of the SD Speed Class Rating* for motion picture recording.
Card type |
Capacity |
|
Motion picture recording |
Still picture |
|
|
recording |
||||
|
|
|
|
||
|
8 MB/16 MB |
Cannot be used. |
Cannot be |
||
SD |
32 MB/64 MB/ |
Cannot be guaranteed in operation. |
guaranteed in |
||
Memory |
128 MB/256 MB |
operation. |
|||
|
|
||||
Card |
|
|
|
|
|
512 MB/1 GB/ |
|
|
|
||
|
|
|
|
||
|
2 GB |
|
|
|
|
SDHC |
4 GB/6 GB/8 GB/ |
Can be used. |
Can be used. |
||
Memory |
12 GB/16 GB/ |
||||
Card |
24 GB/32 GB |
|
|
|
|
SDXC |
48 GB/64 GB |
|
|
|
|
Memory Card |
|
|
|
||
|
|
|
|
||
* SD Speed Class Rating is the speed |
e.g.: |
|
|||
standard regarding continuous writing. |
|
||||
|
|
||||
Check via the label on the card, etc. |
|
|
|||
≥4 GB or more Memory Cards that do not have the SDHC logo or 48 GB or more Memory Cards that do not have the SDXC logo are not based on SD Memory Card Specifications.
≥ When the write-protect |
|
switch A on SD card is |
|
locked, no recording, |
32 |
deletion or editing will |
be possible on the card.
≥Keep the Memory Card
out of reach of children to prevent swallowing.
21
VQT3Q78
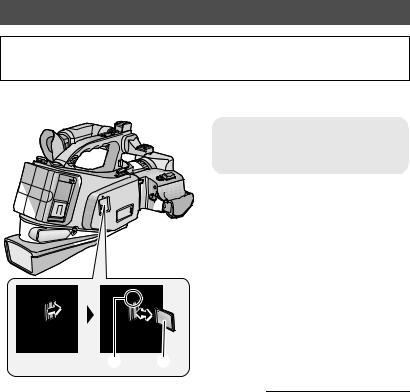
Inserting/removing an SD card
When using an SD card not from Panasonic, or one previously used on other equipment, for the first time on this unit, format the SD card. (l 43) When the SD card is formatted, all of the recorded data is deleted. Once the data is deleted, it cannot be restored.
Caution:
Check that the access lamp has gone off.
|
|
Access lamp [ACCESS] A |
|
|
≥ When this unit is accessing the SD |
|
|
card, the access lamp lights up. |
|
|
1 Open the SD card cover and |
|
|
insert (remove) the SD card |
|
|
into (from) the card slot. |
|
|
≥ Face the label side B in the direction |
|
|
shown in the illustration and press it |
|
|
straight in as far as it will go. |
|
|
≥ Press the center of the SD card and then |
|
|
pull it straight out. |
|
|
2 Securely close the SD card |
|
|
cover. |
|
|
≥ Securely close it until it clicks. |
|
|
|
≥ Do not touch the terminals on the back of |
≥ Do not expose the terminals of the SD |
|
the SD card. |
|
card to water, garbage or dust. |
≥ Do not apply strong shocks, bend, or drop |
≥ Do not place SD cards in the following |
|
the SD card. |
|
areas: |
≥ Electrical noise, static electricity or the |
jIn direct sunlight |
|
failure of this unit or the SD card may |
jIn very dusty or humid areas. |
|
damage or erase the data stored on the |
jNear a heater |
|
SD card. |
|
jLocations susceptible to significant |
≥ When the card access lamp is lit, do not: |
difference in temperature (condensation |
|
jRemove the SD card |
|
can occur.) |
jTurn the unit off |
|
jWhere static electricity or |
jInsert and remove the USB cable |
electromagnetic waves occur |
|
jExpose the unit to vibrations or shock |
≥ To protect SD cards, return them to their |
|
Performing the above while the lamp is on |
cases when you are not using them. |
|
may result in damage to data/SD card or |
≥ About disposing of or giving away the SD |
|
this unit. |
|
card. (l 102) |
22
VQT3Q78

Preparation |
|
Turning the unit on/off |
Setup |
3 |
|
|
|
|
|
|
|
|
|
|
You can turn the unit on and off using the power switch.
Turning the unit on and off with the power switch
Set the power switch to ON to turn on the unit

 ≥ Rotate the power switch if changing from OFF to ON.
≥ Align with A.
≥ Status indicator B
F
ON
The status indicator lights.
∫ To turn off the unit
Set the power switch to OFF and the status indicator goes off.
23
VQT3Q78
Preparation
Setup |
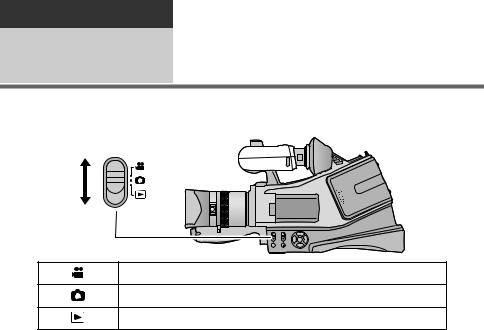
4 Selecting a mode |
|
Change the mode to recording or playback.
Operate the mode switch to change the mode to  ,
,  or
or  .
.
Motion picture recording mode (l 30)
Still picture recording mode (l 32)
Playback mode (l 36, 67)
24
VQT3Q78

Preparation
Setup |
5 |
About the LCD monitor/ |
|
viewfinder
How to use the touch screen
You can operate by directly touching the LCD monitor (touch screen) with your finger.
It is easier to use the stylus pen (supplied) for detailed operation or if it is hard to operate with your fingers.
≥The unit supports both operations using the cursor buttons and operations using the touch screen. Select the optimal method according to the situation.
≥In this operating instructions, the majority of functions are described on the basis of operations using the cursor buttons.
∫ Touch
Touch and release the touch screen to select icon or picture.
≥ Touch the center of the icon.
≥ Touching the touch screen will not operate while you are touching another part of the touch screen.
∫ Drag
Move your finger while pressing on the touch screen. Can be used during direct playback.
∫ About the operation icons
≥To operate the following icons using the cursor buttons, select the desired icon using the cursor buttons and then press the button in the center. (Excluding some functions)
 /
/ /
/ /
/ :
:
These icons are used to switch the menu and thumbnail display page, for item selection and setting etc.
 :
:
This icon is used to return to the previous screen such as when setting menus.
25
VQT3Q78
≥Do not touch the LCD monitor with hard pointed tips, such as ball point pens.
≥Perform the touch screen calibration when the touch is not recognized or wrong location is recognized. (l 44)
Viewfinder adjustment
∫ Using the viewfinder
Pull out the viewfinder and turn the viewfinder upward/downward by pinching the viewfinder extension knob.
∫ Adjusting the field of view
It adjusts the field of view to show the images on the viewfinder clearly.
Adjust the focus by sliding the eyepiece corrector knob.
≥ Close the LCD monitor to turn on the viewfinder.
Recording showing the contents to a partner
¬ Change the mode to  or
or  .
.
Rotate the LCD monitor towards the lens side.
≥ LCD monitor and viewfinder are turned on during the face-to- face recording when the LCD monitor is rotated towards the lens side.
≥ Record by viewing the image in the viewfinder during the face- to-face recording.
26
VQT3Q78

Preparation
Setup |
6 Setting date and time |
|
When the unit is turned on for the first time, a message asking you to set the date and time will appear.
Select [YES] and perform steps 2 to 3 below to set the date and time.
¬ Change the mode to  or
or  .
.
1 Select the menu.
 MENU : [SETUP] # [CLOCK SET]
2 Select the date and time to be set using the cursor button right or left, then adjust the desired value using the cursor button up or down.
A Displaying the World time setting (l 40):
 [HOME]/
  [DESTINATION]
≥The year can be set between 2000 and 2039.
≥The 12-hour system is used to display the time.
≥The date and time function is driven by a built-in lithium battery.
≥If the time display becomes [- -], the builtin lithium battery needs to be charged. To recharge the built-in lithium battery, connect the AC adaptor or attach the battery to this unit. Leave the unit as it is for approx. 24 hours and the battery will maintain the date and time for approx.
6 months. (The battery is still being recharged even if the unit is off.)
3 Select [ENTER] and press the button in the center.
≥The clock function starts at [00] seconds.
≥A message prompting for World time setting may be displayed. Perform the World time setting. (l 40)
≥Select [EXIT], then press the button in the center or press the MENU button to complete the setting.
27
VQT3Q78
Basic |
|
Before recording |
Playback |
1 |
|
Recording/ |
|
|
|
|
|
|
|
|
Check the following by trying recording before important events such as weddings in order to verify that the image recording and audio recording work properly and that you know how to use the unit.
∫ Holding the unit for recording
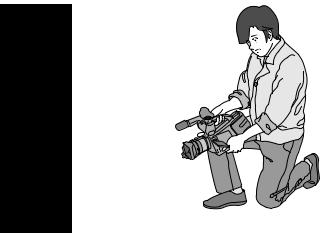
Normal recording |
Low-angle recording |
≥When walking while recording, keep both eyes open so that you can see where you are going and what is happening around you.
≥Place the unit on your right shoulder and hold it firmly with both hands.
≥Hold the eyecup of the viewfinder as close as possible to your right eye.
≥Take a firm stance with the legs slightly apart.
≥For stable images, it is recommended to use a tripod (optional) whenever possible.
Adjust the angle of the LCD monitor according to the position in which the unit is held.
≥If the unit is not held firmly in stable position, the picture in the LCD monitor cannot be watched properly.
≥For easier low-angle recording, the sub recording start/stop button and the sub zoom lever on the front of the unit can be used.
28
VQT3Q78
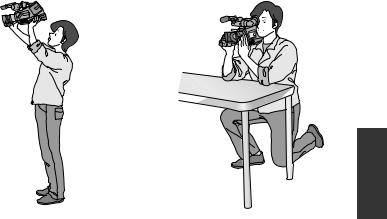
Recording from a high position |
For more stable pictures |
≥ Stabilize the unit by resting your elbows on a table or another stable horizontal surface.
∫ Basic motion picture recording
≥The unit should normally be held steady when recording.
≥If you move the unit when recording, do so slowly, maintaining a constant speed.
≥The zoom operation is useful for recording subjects you cannot get close to, but overuse of zoom in and zoom out can make the resulting motion picture less enjoyable to watch.
29
VQT3Q78

Basic
Recording/ |
2 |
Recording motion |
|
||
|
|
|
Playback |
|
pictures |
|
|
|
≥ Remove the lens cap before turning on the unit. (l 16) |
||
1 Change the mode to  .
.
2 Press the recording start/stop button to start recording.
≥When you begin recording, ; changes to ¥ on the screen.
3 Press the recording start/stop button again to pause recording.
FF
O
N
≥Still pictures can be recorded while recording the motion picture. (l 33)
≥The images recorded between pressing the recording start/stop button to start recording and pressing it again to pause recording become one scene.
≥Maximum number of recordable scenes: Approx. 3900 Maximum number of different dates: Approx. 200 (l 71)
When either of them reaches to the maximum limit, more scenes cannot be recorded. (In the case of SD cards it is the maximum number of recordable scenes per card.)
≥Put the unit in pause mode when connecting or disconnecting an external microphone with the EXT MIC terminal.
30
VQT3Q78
 Loading...