


DIGITAL CAMERA
SZ-16/DZ-105
Instruction Manual
●Thank you for purchasing an Olympus digital camera. Before you start to use your new camera, please read these instructions carefully to enjoy optimum performance and a longer service life. Keep this manual in a safe place for future reference.
●We recommend that you take test shots to get accustomed to your camera before taking important photographs.
●In the interest of continually improving products, Olympus reserves the right to update or modify information contained in this manual.
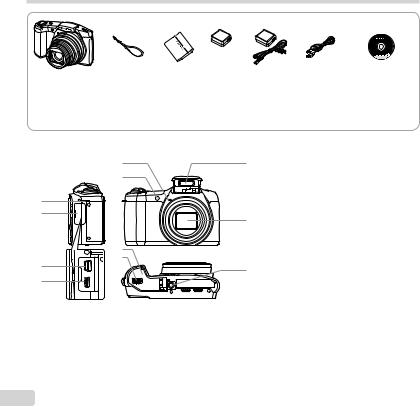
Checking the contents of the box
|
|
|
or |
|
|
|
Digital camera |
Strap |
Lithium Ion |
USB-AC adapter |
USB cable |
OLYMPUS Setup |
|
|
|
Battery |
(F-2AC) |
|
(CB-USB8) |
CD-ROM |
|
|
(LI-50B) |
|
|
|
|
Other accessories not shown: Warranty card |
|
|
|
|
||
Contents may vary depending on purchase location. |
|
|
|
|||
Names of Parts |
|
|
|
|
|
|
|
5 |
|
9 |
1 |
Strap eyelet |
|
|
6 |
|
|
2 |
Connector cover |
|
|
|
|
3 |
Multi-connector |
|
|
|
|
|
|
|
||
1 |
|
|
|
4 |
HDMI micro connector |
|
|
|
|
5 |
Microphone |
|
|
2 |
|
|
10 |
6 |
Self-timer lamp/AF illuminator |
|
|
|
|
7 |
Battery/card cover |
||
|
|
|
|
8 |
Battery/card cover lock |
|
|
7 |
|
|
9 |
Flash |
|
|
|
|
10 Lens |
|
||
3 |
8 |
|
|
11 |
Tripod socket |
|
|
|
11 |
|
|||
|
|
|
|
|
||
|
|
|
|
|
|
|
4 |
|
|
|
|
|
|
2 EN
|
3 |
|
4 |
1 |
5 |
|
|
|
6 |
2 |
7 |
|
8 |
|
9 |
|
10 |
|
11 |
|
12 |
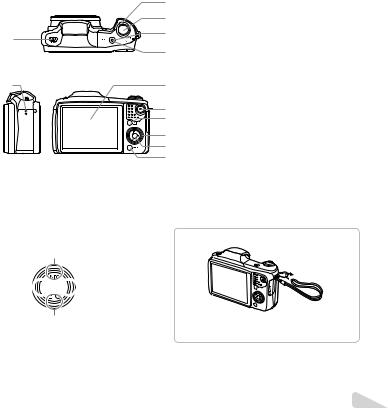
1Flash switch
2Speaker
3Zoom lever
4Shutter button
5Indicator lamp
6nbutton
7Monitor
8Rbutton (record movies)
9qbutton (switching between shooting and playback)
10Arrow pad
INFO (changing information display)
#(flash)
Y(self-timer)(erase)
11 A button (OK)
12 button
Arrow pad
F(up)
H(left) 


 I(right)
G(down)
 FGHIinstruct to press the up/down/left/right arrow pad.
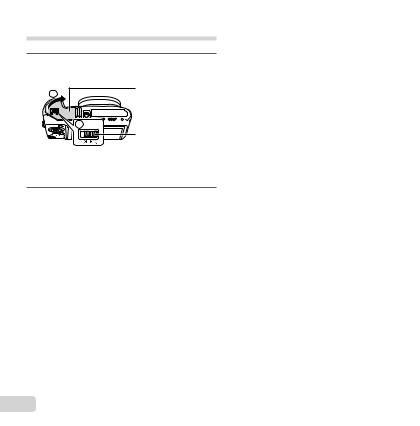
Attaching the camera strap
 Pull the strap tight so that it does not come loose.
EN 3
Inserting and removing the battery and card (commercially available)
1Follow Steps 1 and 2 to open the battery/card cover.
2 |
Battery/card cover |
|
1 

Battery/card cover lock
Turn off the camera before opening the battery/ card cover.
2Insert the battery while sliding the battery lock knob in the direction of the arrow.
 Battery lock knob
Insert the battery as illustrated with the C mark toward the battery lock knob.
Damage to the battery exterior (scratches, etc.) may produce heat or an explosion.
Slide the battery lock knob in the direction of the arrow to unlock, and then remove the battery.
3Insert the card straight until it clicks into place.

 Write-protect switch
Always use SD/SDHC/SDXC/Eye-Fi/FlashAir (with Wireless LAN function) card with this camera. Do not insert other types of memory cards. “Using the card” (p. 70)
● Do not touch the metallic parts of the card directly.
To remove the card |
|
1 |
2 |
Press the card in until it clicks and comes out slightly, then remove the card.
4 EN

4Follow Steps 1 and 2 to close the battery/card cover.
1
2 


 When using the camera, be sure to close and lock the battery/card cover.
Charging the battery
Connect the USB cable and USB-AC adapter to the camera and charge the battery.
For charging the battery abroad, see “Using your charger and USB-AC adapter abroad” (p. 70).
●The battery is not fully charged at shipment. Before use, be sure to charge the battery until the indicator lamp turns off (up to 3 hours).
Connecting the camera
Indicator lamp
On: Charging
Off: Charged
 Multi-connector
Connector cover
AC outlet
USB cable (supplied)
EN 5
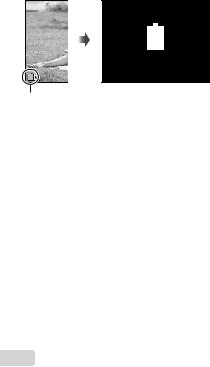
When to charge the batteries
Charge the battery when the error message shown below appears.
Error message
Battery Empty
Flashes in red
 Never use any cable other than supplied or Olympus-designated USB cable. This may cause smoking or burning.
 The included F-2AC USB-AC adapter (hereafter referred to as USB-AC adapter) differs depending on the region where you purchased the camera. If you received a plug-in type USBAC adapter, plug it directly into AC outlet.
 The included USB-AC adapter has been designed to be used for charging and playback. Do not take pictures while the USB-AC adapter is connected to the camera.
 Be sure to unplug the power plug of the USB-AC adapter from the wall outlet when the charging is complete or the playback ends.
 For details on the battery, see “Battery Handling Precautions” (p. 78). For details on the USB-AC adapter, see “USB-AC adapter” (p. 79).
●If the indicator lamp does not light, check the USB cable and USB-AC adapter connections.
●The battery can be charged while the camera is connected to the computer via USB. The charging time varies depending on the performance of the computer. (There may be cases in which it takes approx. 10 hours.)
6 EN

Turning on the camera and making the initial settings
When you turn on the camera for the first time, a screen appears enabling to set the language for the menus and messages displayed in the monitor, and the date and time.
To change the selected date and time, see “Setting the date and time d [X]” (p. 46).
1Press the nbutton to turn on the camera, press FGHI
of the arrow pad to select your language and press the A button.
2Press FGof the arrow pad to select the year for [Y].
|
X |
Back MENU |
|
|
Y M D |
Time |
|
|
|
. -- . -- |
-- :-- Y/M/D |
2013 |
|||
|
|
|
|
Date and time setting screen
3Press Iof the arrow pad to save the setting for [Y].
X |
Back MENU |
Y M D |
Time |
2013. -- . -- |
-- :-- Y/M/D |
4As in Steps 2 and 3, press FGHIof the arrow pad to set [M] (month), [D] (day), [Time] (hours and minutes), and [Y/M/D]
(date order), and then press the A button.
 For precise time setting, press the A button as the time signal strikes 00 seconds.
5Press HIof the arrow pad to select time zone and then press the A button.
●Use FGto turn daylight saving time ([Summer]) on or off.
’13.02.26 12:30 |
Back MENU |
Seoul |
Tokyo |
Summer
EN 7

Learning how to use the camera
●Press the nbutton to turn on the camera and enter the standby mode. (Press the nbutton again to turn off the camera.)
●Select the shooting mode, and press the shutter button to shoot a still image.
●To shoot a movie, press the Rbutton.
●Set the shooting functions using the function menu or the setup menu.
●To view images, press the qbutton to switch to playback mode.
●To return to standby mode, press the qbutton again, or press the shutter button halfway down and then release it.
●Press and hold the qbutton while the camera is turned off to start up the camera in the playback mode.
●In this case, pressing the qbutton again sets the camera to the standby mode.
Shooting still images
1Press the nbutton to turn on the camera.
2Select the shooting mode. (p. 13)
3Hold the camera and compose the shot.
 When holding the camera, take care not to cover the flash, microphone or other important parts with your fingers, etc.
 Take care so that the flash window is not exposed to fingerprints or dirt.
8 EN
4Press the shutter button halfway down to focus.
AF target mark
P
Press halfway
1/400 F3.4
Shutter Aperture
speed value
●The camera was unable to focus if the AF target mark flashes red. Try focusing again.
5To take the picture, gently press the shutter button all the way down while being careful not to shake the camera.
Press |
Press fully |
halfway |
|
Using the zoom
Turning the zoom lever adjusts the shooting range.
Turn the zoom lever as far as it will go to speed up the zoom operation, and turn it partway for a slow zoom operation (not applicable when shooting a movie).
W side 
 T side
Image size |
Zoom bar |
16M |
Optical zoom |
|
Super-resolution zoom*1 |
Other |
|
|
*2 |
*1 For Super-resolution zoom, see [Super-Res Zoom] (p. 34).
*2 Due to increased processing of the pixel counts, the image quality will not degrade. The magnification ratio changes depending on the image size setting.
EN 9

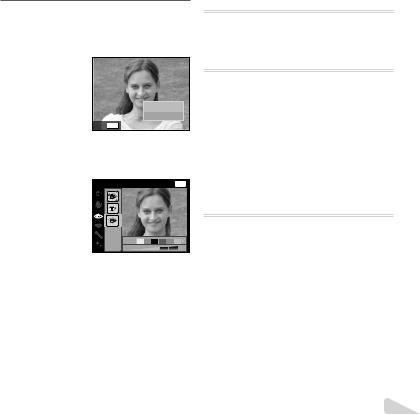
Using the flash
The flash functions can be selected to best match the shooting conditions.
1Slide the flash switch to raise the flash.
To turn off the flash
Press the flash down back into the camera.
2 Press I.
Flash Auto |
P |
 0.0
0.0
WB
AUTO
ISO
AUTO
16M
4:3
MENU
3Use HIto select the setting option, and press the A button to set.
Option |
Description |
|
Flash Auto |
The flash fires automatically in |
|
low-light or backlight conditions. |
||
|
||
|
Pre-flashes are emitted to reduce |
|
Redeye |
the occurrence of red eye in your |
|
|
photos. |
|
Fill In |
The flash fires regardless of the |
|
available light. |
||
|
||
Flash Off |
The flash does not fire. |
10 EN
Using the self-timer
After the shutter button is pressed all the way down, the picture is taken after a short delay.
1 Press G.
Y Off |
P |
12  2
2
 0.0
0.0
WB
AUTO
ISO
AUTO
16M
4:3
MENU
2Use HIto select the setting option, and press the A button to set.
|
Option |
Description |
|
|
|
|
The self-timer is deactivated. |
|
YOff |
||
|
|
|
|
|
|
|
The self-timer lamp turns on for |
|
Y12 sec |
approx. 10 seconds, then blinks |
|
|
for approx. 2 seconds, and then |
||
|
|
|
|
|
|
|
the picture is taken. |
|
|
|
The self-timer lamp blinks for |
|
Y2 sec |
approx. 2 seconds, then the |
|
|
|
|
picture is taken. |
|
|
|
When your pet (cat or dog) turns |
|
Auto |
its head towards the camera, its |
|
|
Release*1 |
face is recognized and the picture |
|
|
|
|
is taken automatically. |
*1 [Auto Release] is displayed only when the mode is [U] or [t].
To cancel the self-timer after it starts
Press the button.
EN 11

Shooting screen displays
|
|
|
1 |
|
24 |
|
|
P |
2 |
|
|
|
||
|
|
|
|
3 |
23 |
|
|
0.0 |
4 |
|
|
WB |
||
|
|
AUTO |
5 |
|
|
|
|
ISO |
|
|
|
|
AUTO |
6 |
22 |
|
|
16M |
7 |
|
|
4:3 |
8 |
|
21 |
4 NORM DATE |
z |
0:34 |
9 |
|
20191817 16 15141312 11 |
10 |
||
|
|
|||
|
1/100 |
F3.4 |
|
|
27 26 25
When the shutter button is pressed halfway down
Reading a histogram
If the peak fills too much of the frame, the image will appear mostly white.
If the peak fills |
too much of the |
frame, the image |
will appear mostly |
black. |
The green section  shows luminance distribution within the screen’s center.
Switching the displays
The displays change in the order of Normal → Detailed → No info. each time F(INFO) is pressed.
12 EN
No. |
Name |
Normal |
Detailed |
No info. |
1 |
Shooting mode |
R |
R |
– |
2 |
Flash |
R |
R |
– |
3 |
Self-timer |
R |
R |
R |
4 |
Exposure |
R |
R |
– |
|
compensation |
|||
5 |
White balance |
R |
R |
– |
6 |
ISO sensitivity |
R |
R |
– |
7 |
Drive |
R |
R |
– |
8 |
Image size (still |
R |
R |
– |
|
images) |
|
|
|
9 |
Aspect |
R |
R |
– |
10 |
Recording with |
|
|
|
|
sound/wind noise |
R |
R |
– |
|
reduction |
|
|
|
11 |
Image size (movies) |
R |
R |
– |
12 |
Movie recording |
R |
R |
– |
|
length |
|
|
|
13 |
Movie recording |
R |
R |
– |
|
icon |
|
|
|
14 |
World time |
– |
R |
– |
15 |
Image stabilization |
– |
R |
– |
16 |
Metering |
– |
R |
– |
17 |
Date stamp |
R |
R |
– |
18 |
Compression |
R |
R |
– |
19 |
Number of storable |
R |
R |
– |
|
still pictures |
|
|
|
20 |
Current memory |
R |
R |
– |
21 |
Battery check |
R |
R |
– |
22 |
Histogram |
– |
R |
– |
23 |
AF target mark |
R |
R |
R |
24 |
Grid Guide |
– |
R |
– |
25 |
Aperture value |
R |
R |
R |
26 |
Shutter speed |
R |
R |
R |
27 |
Camera shake |
R |
R |
R |
|
warning |
|
|
|

Selecting the shooting mode
The default settings of the function are highlighted in |
|
. |
|||||||
|
|
|
|
|
|
|
|
|
|
Shooting mode |
|
|
|
|
|
|
|
|
Submode |
P (P mode) |
|
|
|
|
|
|
|
|
– |
M(Mmode) |
|
|
|
|
|
|
|
|
– |
Q(Qmode) |
|
|
|
|
|
|
1/Set 2/Set 3 |
||
|
Recommended/Set |
||||||||
|
|
|
|
|
|
|
|
|
|
a(Super Macro mode) |
|
|
|
|
|
|
|
|
– |
( mode) |
|
B |
|
FLandscape/iHand-Held Starlight/GNight Scene/ |
|||||
|
Portrait/ |
||||||||
|
|
M |
Night+Portrait/CSport/NIndoor/RSelf Portrait/SSunset/ |
||||||
|
|
XFireworks/VCuisine/dDocuments/qBeach & Snow/ |
|||||||
|
|
UPet Mode - Cat/tPet Mode - Dog/hBacklight HDR |
|||||||
P(Pmode) |
|
Pop Art/Pin Hole/Fish Eye/Soft Focus/Punk/Sparkle/Watercolor/ |
|||||||
|
|
Reflection/Miniature/Fragmented/Dramatic |
|||||||
p(Panorama mode) |
|
Auto/Manual |
|
||||||
|
|
|
|
|
|
|
|
|
|
(Photo with A Clip mode) |
|
/ / / / |
|
/ |
|
||||
|
|
|
|
|
|
|
|
|
|
●“List of settings available in each shooting mode” (p. 65), “List of settings” (p. 66), “List of Psettings” (p. 68)
●In certain shooting modes, the camera may take a few moments for image processing after taking a picture.
EN 13

1Press Hof the arrow pad in the standby mode screen to select shooting mode.
 To select the Q, , P, pand submodes, press Gof the arrow pad first to display the submodes, then press HIof the arrow pad to select the submode, and press the Q button.
Scene Mode
16M
4:3
MENU
To select a submode
Portrait
16M
4:3
MENU
Icon indicating the submode that is set 
16M
4:3
4 NORM |
0:34 |
Learning about the shooting modes
P (P mode)
The camera will select the appropriate aperture value and shutter speed for the subject. Changes can also be made to various shooting settings, such as exposure compensation, as needed.
M(Mmode)
The camera will automatically select the optimal shooting mode for the scene. The shooting condition is decided by the camera and settings cannot be changed, excepting some functions.
Q(Qmode)
You can shoot with Beauty Fix effects.
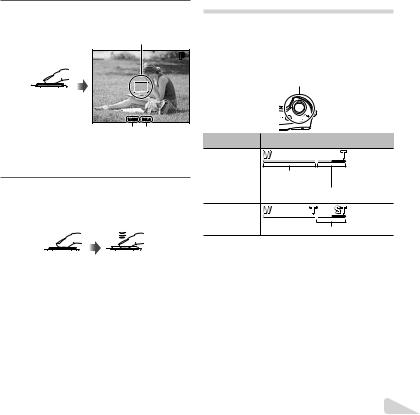
1Point the camera toward the subject. Check the frame appearing around the face detected by the camera, and then press the shutter button to take the picture.
14 EN
2To save the image, select [OK] on the review screen and press the Q button. To retouch the image additionally, select [Beauty Fix].
OK
Beauty Fix
Back MENU
Beauty Fix
1 Use FGHIto select a retouching item, and press the Q button.
Eye Color |
Back MENU |
|
Off |
2 Check the retouched effects on the review screen, then press the Q button to start the retouch process and save.
●Settings for Beauty Fix can be registered.
●Depending on the picture, the editing may not be effective.
a(Super Macro mode)
Images can be taken from up to 3cm away from the subject.
( mode)
You can shoot with the best mode for the subject and shooting scene. The best shooting settings for various scenes are pre-programmed as
submodes. Note that functions may be limited in some modes.
Refer to the descriptions displayed on the submode selection screen, and select the desired submode.
P(Pmode)
You can shoot with special effects.
Refer to the sample images displayed on the submode selection screen, and select the desired submode.
The best shooting settings for each effect are pre-programmed, so some function settings cannot be changed.
●Note that some effects may not be applied to movies.
EN 15
p (Panorama mode)
You can shoot and combine multiple images to create an image with a wide angle of view (panoramic image).
|
Submenu |
Application |
|
|
|
|
Panorama images are |
|
|
|
automatically combined just |
|
Auto |
|
|
|
|
by swinging the camera in the |
|
|
|
|
|
|
|
|
shooting direction. |
|
|
|
Three frames are taken and |
|
|
|
combined by the camera. The |
|
Manual |
user composes the shots using |
|
|
|
|
the guide frame and manually |
|
|
|
releases the shutter. |
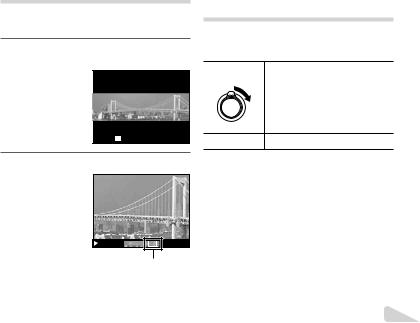
●Move the camera as if rotating it around a vertical axis through the center of the lens to take better panorama images.
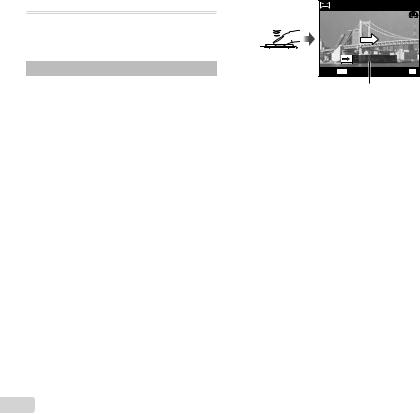
Taking pictures with [Auto]
1 Select [Auto] in the submenu, and use HIto select the angle of view (STD:180°, FULL:360°) and then press the A button.
2 Point the camera to the start position.
3 Press the shutter button to begin shooting.
AUTO
FULL
Cancel MENU |
Save OK |
Guide
4 Start panning. When the arrow reaches the end of the guide, recording ends automatically.
●The camera automatically processes the images and the combined panorama image is displayed.
●To stop shooting in the middle, press the shutter button or A button. If the camera pauses for a while, shooting automatically finishes.
●If the message [Image was not created.] is displayed, shoot again.
●To cancel the panorama function, press the button.
●If the shutter does not automatically release, try [Manual].
16 EN
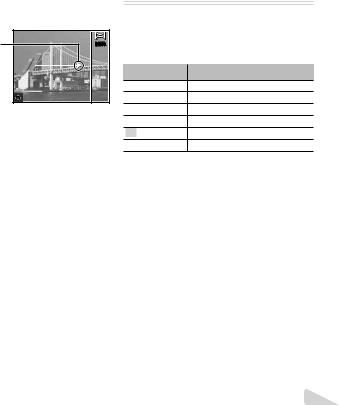
Taking pictures with [Manual]
1 Use FGHIto specify at which edge the next picture is to be connected.
Direction for |
MANUAL |
combining frames |
|
2 Press the shutter button to take the first frame.
3 Compose the next shot so that the edge of the first frame displayed faintly on the screen overlaps the subject of the second frame, and press the shutter button.
● To combine only two frames, press the A button.
4 Repeat step 3 to take a third frame. The camera automatically combines the frames into a single panorama image.
(Photo with A Clip mode)
When shooting a still image, a movie clip that includes before and after the shutter release is recorded simultaneously.
Submenu |
Description |
7 sec / 3 sec
5 sec / 3 sec
3 sec / 3 sec
7 sec / 0 sec
5 sec / 0 sec
3 sec / 0 sec
●Shooting may not be available in the following conditions; right after entering the shooting mode (such as right after turning power on) or right after a picture is shot.
●The image size of the movie is set to VGA.
EN 17

Viewing images
1 Press the q button.
Number of frames/ Total number of images
 4/30
4/30
’13/02/2610
 12:30
12:30
Playback image
●Pictures taken using Qmode or sequential shooting function are displayed as a group. Turn the zoom lever to the T side to play back the image in the group.
2 Use HIto select an image.
Displays |
Displays |
|
previous |
||
next image |
||
image |
||
|
●Hold Ito fast forward and hold Hto reverse.
●Press the qbutton again to return to the shooting screen.
To play sound recordings
To play sound recorded with an image, select the image and press the A button.
● Press FGto adjust volume.
Index view and close-up view
Index view enables quick selection of a desired image. Close-up view (up to 10× magnification) allows checking of image details.
1 Turn the zoom lever.
Single-image view |
|
Close-up view |
||
|
4/30 W |
|
4/30 |
|
’13/02/26 |
12:30 |
T |
’13/02/26 |
12:30 |
|
||||
W 
 T
T
Index view
’13/02/26 12:30
18 EN
To select an image in index view
Use FGHIto select an image, and press the A button to display the selected image in single-image view.
To scroll an image in close-up view
Use FGHIto move the viewing area.
Playing back panorama images
Panorama images that were combined together using [Auto] or [Manual] can be scrolled for viewing.
1Select a panorama image during playback.
 4/30
4/30
Replay OK |
’13/02/26 12:30 |
2 Press the A button.
Viewing area
To control panorama image playback
Stop playback: Press the button. Pause: Press the A button.
Control while paused
Press FGHIto scroll the image in the direction of the pressed button.
Turn the zoom lever to enlarge/shrink the image. Press the A button to restart scrolling.
Playing back grouped images
With Q, Sequential or Photo with A Clip, the taken images are displayed as a group during playback.
T side |
Expands (except for Photo with |
|
A Clip). |
||
|
||
|
• Select the image and press the |
|
|
A button to display the images |
|
|
respectively. |
|
|
• Use HIto view the previous/ |
|
|
next frame. |
A button Playback/pauses playback.
EN 19

Sequential images frame
●The sequentially shot images are played back automatically.
●Expand to view the images in index view.
|
|
4/30 |
Expand T |
’13/02/26 |
12:30 |
Play OK |
Sequential images frame
(Photo with A Clip) frame
●The movie clip and the still images are played back.
 4/30
4/30
Play OK |
’13/02/26 12:30 |
frame
20 EN
Playback mode display
● Normal
2 3 4 5 6 |
7 |
8 |
9 |


 10
10  4/30
4/30
22
 ’13/02/26 12:30
 21
21
Still image
● Detailed
1 2 3 4 5 6 |
7 |
|
8 |
9 |
1011 |
12 |
1314 |
|
|
|
|
10 |
|
|
4/30 |
|
MAGIC |
|
|
15 |
|
|
|
|
|
|
|
|
|
|||
|
MAGIC |
|
|
|
1/1000 |
F3.9 |
2.0 |
16 |
||
|
|
|
|
|
ISO |
WB |
1 |
17 |
||
|
1/1000 |
F3.9 |
2.0 |
|
NORM |
|||||
|
|
100 |
AUTO |
|||||||
|
NORM |
ISO |
WB |
1 |
|
4608 |
3456 |
|
18 |
|
|
100 |
AUTO |
|
|
19 |
|||||
|
4608 |
3456 |
|
|
100-0004 |
|
20 |
|||
|
100-0004 |
|
|
|
||||||
|
|
22 |
’13/02/26 12:30 |
21 |
||||||
|
’13/02/26 12:30 |
|||||||||
●No information
2
22
Switching the displays
The displays change in the order of Normal → Detailed → No info. each time F(INFO) is pressed.
No. |
Name |
Normal |
Detailed |
No info. |
1 |
Battery check |
– |
R |
– |
2 |
Photo with |
R |
R |
R |
|
movie clip |
|
|
|
3 |
Eye-Fi transfer |
R |
R |
– |
|
data |
|
|
|
4 |
Protect |
R |
R |
– |
5 |
Adding sound |
R |
R |
– |
6 |
Upload order |
R |
R |
– |
7 |
|
|
|
|
|
reservation/ |
R |
R |
– |
|
number of |
|||
|
prints |
|
|
|
8 |
Current |
R |
R |
– |
|
memory |
|||
|
|
|
|
|
9 |
Frame number/ |
|
|
|
|
total number of |
R |
R |
– |
|
images |
|
|
|
10 |
Compression |
– |
R |
– |
11 |
Shutter speed |
– |
R |
– |
12 |
Shooting mode |
– |
R |
– |
13 |
ISO sensitivity |
– |
R |
– |
14 |
Aperture value |
– |
R |
– |
15 |
Histogram |
– |
R |
– |
16 |
Exposure |
– |
R |
– |
|
compensation |
|||
|
|
|
|
|
17 |
Shooting |
– |
R |
– |
|
submode |
|||
|
|
|
|
|
18 |
White balance |
– |
R |
– |
19 |
Image size |
– |
R |
– |
20 |
File name |
– |
R |
– |
21 |
Recording |
R |
R |
– |
|
date and time |
|||
22 |
Grouped |
R |
R |
R |
|
images |
|
|
|
EN 21
Erasing images during playback Shooting movies
1Display the image you want to erase and press G( ).
Erase |
Back MENU |
 4/30
4/30
Erase
Cancel
100-0004
2 Press FGto select [Erase], and press the A button.
●Grouped images are erased as a group. If you want to delete images from the grouped images, you can expand the group and delete the images individually.
●Multiple images or all images can be erased at a time (p. 38).
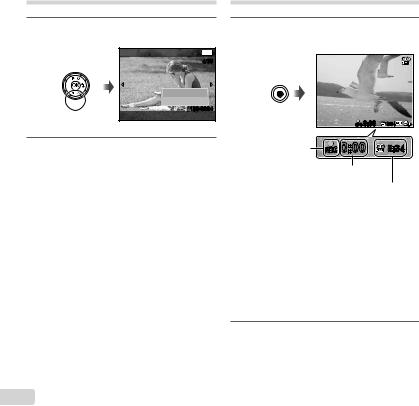
1Press the Rbutton to start recording.
|
REC 0:00 |
0:34 |
Lights up red when |
REC 0:00 |
0:34 |
recording |
|
|
|
Recording time |
|
|
Recording length (p. 72) |
|
●The movie is shot in the set shooting mode. Note that the shooting mode effects may not be obtained for some shooting modes.
●Sound is also recorded.
●When using a camera with a CMOS image sensor, moving objects may appear distorted due to the rolling shutter phenomenon. This is a physical phenomenon whereby distortion occurs in the filmed image when shooting a fast-moving subject or due to camera shaking. In particular, this phenomenon becomes more noticeable when using a long focal length.
2Press the Rbutton again to stop recording.
22 EN

Playing back movies
Select a movie, and press the A button.


 4/30
4/30
Movie Play OK 
 ’13/02/26 12:30
Movie
00:12/00:34 |
During playback
Pausing and |
Press the A button to pause |
|
playback. During pause, fast |
||
restarting |
||
forward or reverse, press the A |
||
playback |
||
button to restart playback. |
||
|
||
|
|
|
Fast forward |
Press Ito fast forward. Press |
|
Iagain to increase the fast |
||
|
forward speed. |
|
Rewind |
Press Hto rewind. Press H |
|
again to increase the rewind |
||
|
speed. |
|
Adjusting the |
Use FGto adjust the volume. |
|
volume |
||
|
Operations while playback is paused
Elapsed time/ Total shooting time
00:14/00:34 |
During pause
Cueing |
Use Fto display the first frame |
and press Gto display the last |
|
|
frame. |
Advancing and |
Press Ior Hto advance or |
rewind one frame at a time. Hold |
|
rewinding one |
Ior Hpressed for continuous |
frame at a time |
advance or rewind. |
|
|
Resuming |
Press the A button to resume |
playback |
playback. |
To stop movie playback
Press the button.
●To play back movies on the computer, the supplied PC software is recommended. For the first use
of the PC software, connect the camera to the computer, then launch the software.
EN 23

Menu settings
For details, refer to “List of settings available in each shooting mode” (p. 65).
Function menu
Program Auto |
P |
1 |
|
|
|
|
|
|
|
2 |
|
|
0.0 |
3 |
|
|
WB |
4 |
|
|
AUTO |
5 |
|
|
ISO |
|
|
|
AUTO |
6 |
|
|
16M |
7 |
|
|
4:3 |
8 |
Setup menu (p. 28) |
|
MENU |
|
|
Function menu |
|
|
|
1 Flash |
|
|
5 ISO sensitivity |
2 Self-timer |
|
|
6 Drive |
3 Exposure compensation |
|
|
7 Image Size |
4 White balance |
|
|
8 Aspect |
Using the function menu
1Use Hof the arrow pad to display the function menu.
2Use FGof the arrow pad to select the function to be set.
3Use HIof the arrow pad to select the setting value, and then press the A button to enter the setting.
24 EN
Example: Exposure compensation
Exposure Comp. ± 0.0 |
|
|
|
P |
2 |
1 |
0 |
1 |
2 |
|
|
|
|
WB |
|
|
|
|
AUTO |
|
|
|
|
ISO |
|
|
|
|
AUTO |
|
|
|
|
16M |
|
|
|
|
4:3 |
|
|
|
|
MENU |

Flash |
|
Sets the flash firing method. |
_ Flash Auto |
The flash fires automatically in low-light or backlight conditions. |
|
! Redeye |
Pre-flashes are emitted to reduce the occurrence of red eye in your photos. |
|
# |
Fill In |
The flash fires regardless of the available light. |
$ |
Flash Off |
The flash does not fire. |
Self-timer |
Sets the time after the shutter button is pressed until the picture is taken. |
|
b |
YOff |
The self-timer is deactivated. |
|
|
|
c |
Y12 sec |
The self-timer lamp turns on for approx. 10 seconds, then blinks for approx. |
|
|
2 seconds, and then the picture is taken. |
d |
Y2 sec |
The self-timer lamp blinks for approx. 2 seconds, then the picture is taken. |
Auto Release |
When your pet (cat or dog) turns its head towards the camera, its face is recognized |
|
|
|
and the picture is taken automatically. |
Exposure |
Compensates the brightness (appropriate exposure) adjusted by the camera. |
|
compensation |
|
|
–2.0 to +2.0 Value |
Set a larger negative (–) value to adjust darker, or a larger positive (+) value to |
|
|
|
adjust brighter. |
White balance |
Sets an appropriate color scheme for the light of the shooting scene. |
|
e |
WB Auto |
The camera automatically adjusts the white balance. |
f |
Sunny |
Suitable for shooting outdoors under a clear sky. |
g |
Cloudy |
Suitable for shooting outdoors under a cloudy sky. |
h |
Incandescent |
Suitable for shooting under tungsten lighting. |
|
Fluorescent |
Suitable for shooting under white fluorescent lighting. |
One Touch 1 For manually adjusting the white balance according to the light when shooting. Set
a piece of white paper or other white object so that it fills the entire screen, and
One Touch 2 press the button to set the white balance. For how to register one touch white balance, see “Registering one touch white balance” (p. 27).
EN 25

ISO sensitivity |
Sets the ISO sensitivity. |
|
l |
ISO Auto |
The camera automatically sets the sensitivity with priority on image quality. |
m |
High ISO |
The camera automatically sets the sensitivity with priority on minimizing blur caused |
|
Auto |
by a moving subject or by camera shake. |
Qto P Value |
Set a smaller value to reduce noise in the picture, or a larger value to reduce blur. |
|
Drive |
|
Sets the sequential shooting function. |
o |
Single |
One frame is shot each time the shutter button is pressed. |
Sequential 1 The camera takes sequential shots at approximately 1.5 frames/sec.
Sequential 2 The camera takes up to 3 sequential shots at approximately 3 frames/sec.
c High-Speed1 |
The camera takes up to 28 sequential shots at approximately 10 frames/sec. |
d High-Speed2 |
The camera takes up to 28 sequential shots at approximately 30 frames/sec. |
Image size |
Sets the number of recording pixels. |
4608×3456 Suitable for printing pictures over A3 (11×17 in.).
4 |
3200×2400 |
Suitable for printing pictures up to A3 (11×17 in.). |
3 |
1920×1440 |
Suitable for printing pictures up to A4 size (8.5×11 in.). |
7 |
640×480 |
Suitable for using pictures on emails. |
Aspect |
Sets the horizontal-to-vertical ratio of images. |
|
u 4:3 |
|
|
v 16:9 |
Change the horizontal-to-vertical ratio when taking pictures. |
|
|
|
|
w3:2
x1:1
●In certain shooting modes, some functions cannot be set. Refer to “List of settings available in each shooting mode” (p. 65).
●Examples of image size when the aspect ratio is 4:3.
26 EN
 Loading...