


DIGITAL CAMERA
Advanced
Manual
Detailed explanations of all the functions for getting the most out of your camera.
Basic Operation
Basic Shooting
Advanced Shooting
Playing Back
Printing
Online Pictures
Camera Settings
Thank you for purchasing an Olympus digital camera. Before you start to use your new camera, please read these instructions carefully to enjoy optimum performance and a longer service life. Keep this manual in a safe place for future reference.
We recommend that you take test shots to get accustomed to your camera before taking important photographs.
In the interest of continually improving products, Olympus reserves the right to update or modify information contained in this manual.

How to use this manual
(Basic and Advanced Manuals
The instruction manual accompanying this camera is divided into two parts: the Basic Manual and the Advanced Manual (this document).
Basic |
This manual gives you easy-to-follow explanations on how to take |
Manual |
pictures and view them so that you can get started quickly. Go ahead |
|
and take some pictures! You will also find information on the camera’s |
|
main functions as well as how to make prints and enjoy your pictures |
|
on a computer. |
Advanced |
This manual introduces you to the camera’s many functions after you |
Manual |
have mastered the basics. It will help you to use the camera’s |
|
capabilities to take much more creative pictures, with more fun! |
(Indications used in this manual
Below is an explanation of how to read the instructions in this manual. Please read it carefully before proceeding.
 Note
Note
Important information on factors which may lead to a malfunction or operational problems. Also warns of operations that should be absolutely avoided.
 TIPS
TIPS
Useful information and hints that will help you get the most out of your camera.
g
Reference pages describing details or associated information.
2

Composition of the manual
You’ll find important points for getting the most out of your camera here.
Read this part before taking pictures.
Explanations of techniques from basics to advanced, giving you an understanding of all the functions related to taking pictures.
To view, edit and sort the pictures you have taken.
Settings to make your camera easier to use.
To print the pictures you have taken.
To enjoy the pictures you have taken on a computer. To use OLYMPUS Master.
Troubleshooting.
For when you want to know the names of parts, see a list of menus, or find what you are looking for.
Basic operation
Tips before you start taking pictures
Basic shooting functions
Additional shooting functions
Playback
Settings
Printing pictures
Connecting the camera to a computer
Appendix
P. 8
P. 20
P. 33
P. 45
P. 62
P. 84
P. 98
P. 111
P. 127
Miscellaneous |
P. 147 |
The title page of each chapter gives a short description of the contents. Be sure to check it out.
1
2
3
4
5
6
7
8
9
10
3

Table of Contents |
|
How to use this manual....................................................................... |
2 |
Composition of the manual ................................................................. |
3 |
1 Basic operation - - - - - - - - - - - - - - - - - - - - - - -8
Mode dial............................................................................................. |
9 |
Direct buttons.................................................................................... |
11 |
Using the direct buttons in shooting mode.................................. |
11 |
Using the direct buttons in playback mode ................................. |
12 |
Menus ............................................................................................... |
13 |
About the menus......................................................................... |
13 |
Using the menus ......................................................................... |
16 |
Using the GUIDE function ........................................................... |
18 |
How to read the procedure pages..................................................... |
19 |
2 Tips before you start taking pictures - - - - - -20
Turning the camera on and off .......................................................... |
21 |
If the correct focus cannot be obtained............................................. |
22 |
How to focus (focus lock) ............................................................ |
22 |
Subjects that are difficult to focus on .......................................... |
24 |
Record mode ............................................................................. |
25 |
Still picture record modes............................................................ |
25 |
Movie record modes.................................................................... |
26 |
Number of storable still pictures/remaining recording time ......... |
26 |
Changing the record mode .................................................. |
28 |
The internal memory and memory card ............................................ |
29 |
The card...................................................................................... |
30 |
Inserting and removing the card.................................................. |
31 |
3 Basic shooting functions- - - - - - - - - - - - - - -33
Selecting a scene according to the situation ( |
) ........................ |
34 |
||
Zooming in on your subject ............................................................... |
|
38 |
||
Using the zoom ........................................................................... |
|
38 |
||
Using the digital zoom................................................................. |
|
39 |
||
Using macro/super macro mode ..................................... |
|
40 |
||
Flash shooting .............................................................................. |
|
41 |
||
Self-timer shooting ..................................................................... |
|
43 |
||
Recording movies |
|
....................................................................... |
|
44 |
4
Table of Contents
4 Additional shooting functions - - - - - - - - - - -45
Shooting pictures using image blur reduction ............................ |
46 |
Changing the shutter speed for shooting pictures ....................... |
47 |
Changing the aperture value for shooting pictures ...................... |
48 |
Changing picture brightness ....................................................... |
49 |
Adjusting the color of a picture ................................................. |
50 |
Changing the area for measuring the brightness of |
|
a subject (ESP/ ) .............................................................. |
51 |
Sequential shooting ........................................................ |
52 |
Changing ISO sensitivity (ISO) ......................................................... |
53 |
Changing the focusing area (AF MODE) .......................................... |
54 |
Remote control shooting (optional) ............................................... |
55 |
Panorama shooting ........................................................................... |
57 |
Taking two-in-one pictures ................................................................ |
59 |
Recording sound with still pictures ............................................... |
60 |
Changing the monitor display (DISP)................................................ |
61 |
5 Playback - - - - - - - - - - - - - - - - - - - - - - - - - - -62
Playing back still pictures ........................................................... |
63 |
Changing the number of thumbnails .................................... |
64 |
Picture rotation ...................................................................... |
64 |
Playing back movies ................................................................... |
65 |
Viewing an album ........................................................................ |
66 |
Adding pictures to an album (ALBUM ENTRY)........................... |
67 |
Viewing pictures in albums (SEL. ALBUM) ................................. |
69 |
Selecting an album cover (SELECT TITLE IMAGE) ................... |
70 |
Undoing album entries (UNDO ENTRY) ..................................... |
70 |
Erasing pictures from albums ................................................ |
72 |
Slideshow .................................................................................. |
73 |
Adding sound to still pictures ....................................................... |
74 |
Editing still pictures (REDEYE FIX/BLACK & WHITE/SEPIA/ |
) ... 76 |
Making an index picture from a movie (INDEX) ................................ |
77 |
Playing back pictures on a TV........................................................... |
78 |
Video output ................................................................................ |
79 |
Protecting pictures ...................................................................... |
80 |
Copying pictures in the internal memory to the card (BACKUP)....... |
80 |
Erasing pictures .................................................................... |
81 |
Single-frame erase ................................................................ |
81 |
All-frame erase .................................................................... |
82 |
5

Table of Contents |
|
Formatting the internal memory or card |
|
(MEMORY FORMAT/FORMAT) ................................ |
83 |
6 Settings- - - - - - - - - - - - - - - - - - - - - - - - - - - |
-84 |
Saving camera settings (ALL RESET) .............................................. |
85 |
Selecting a display language .................................................. |
86 |
Changing the startup screen and volume (PW ON SETUP)............. |
86 |
Registering the startup screen (SCREEN SETUP)..................... |
87 |
Setting screen colors (COLOR) ........................................................ |
88 |
Setting camera sounds ( /SHUTTER SOUND/VOLUME) ........... |
89 |
Viewing pictures immediately (REC VIEW)....................................... |
90 |
Resetting file names (FILE NAME) ................................................... |
90 |
Adjusting the monitor brightness ............................................... |
91 |
Setting the date and time .......................................................... |
92 |
Setting the date and time in another time zone |
|
(DUALTIME SETUP) ...................................................... |
93 |
Setting alarms (ALARM CLOCK) ................................................ |
94 |
Adjusting the image processing function (PIXEL MAPPING) ........... |
97 |
7 Printing pictures - - - - - - - - - - - - - - - - - - - - |
-98 |
Direct printing (PictBridge) ................................................................ |
99 |
Using the direct printing function................................................. |
99 |
Printing pictures ........................................................................ |
100 |
Other print modes and print settings ......................................... |
103 |
If an error message is displayed ............................................... |
105 |
Print settings (DPOF) ................................................................ |
106 |
How to make print reservations................................................. |
106 |
Single-frame reservation ..................................................... |
107 |
All-frame reservation .......................................................... |
109 |
Resetting print reservation data .......................................... |
109 |
8 Connecting the camera to a computer - - - - |
111 |
Flow................................................................................................. |
112 |
Using OLYMPUS Master ................................................................ |
113 |
What is OLYMPUS Master?...................................................... |
113 |
Installing OLYMPUS Master ..................................................... |
114 |
Connecting the camera to a computer ............................................ |
118 |
Starting up OLYMPUS Master ........................................................ |
119 |
Displaying camera images on a computer ...................................... |
121 |
Downloading and saving images .............................................. |
121 |
6

|
Table of Contents |
Viewing still pictures and movies .................................................... |
123 |
Printing pictures .............................................................................. |
124 |
To download and save images to a computer without |
|
using OLYMPUS Master ..................................................... |
126 |
9 Appendix- - - - - - - - - - - - - - - - - - - - - - - - - - 127
Troubleshooting .............................................................................. |
128 |
Error messages......................................................................... |
128 |
Troubleshooting ........................................................................ |
130 |
Camera care ................................................................................... |
137 |
Battery and charger......................................................................... |
138 |
AC adapter (optional) ...................................................................... |
139 |
Safety Precautions .......................................................................... |
140 |
Glossary of terms ............................................................................ |
144 |
10 Miscellaneous - - - - - - - - - - - - - - - - - - - - - 147
Menu list.......................................................................................... |
148 |
List of factory default settings.......................................................... |
153 |
Functions available in shooting modes and scenes........................ |
155 |
Names of parts................................................................................ |
158 |
Camera ..................................................................................... |
158 |
Monitor indications .................................................................... |
160 |
Index ............................................................................................... |
163 |
7
1 |
Basic operation |
|
Are you ever overwhelmed by all of the advanced shooting and editing functions? Professional photographers use these functions to achieve a variety of effects. Now you too can achieve such effects simply
by pressing the buttons on your digital camera. You can use the various functions available to adjust the brightness and white balance of your pictures, alter the focusing range, and much more.
Just display a menu on the monitor and use the buttons to choose a setting. Familiarize yourself with the buttons and menus before reading the explanations of the various functions.
MODE MENU |
WB |
MEMCAM |
ALL RESET |
ON |
|
ENGLISH |
|
SETUP |
PW ON SETUP |
|
COLOR |
STANDARD |
|
|
|
LOW |
00:36
Movies |
Sequential shooting |
|
8
Mode dial
This camera features shooting modes and playback modes. Use the mode dial to make settings. Set the desired mode and turn the camera on.
Shooting modes
Set the mode dial to one of these positions to take pictures or movies.
Playback modes
Set the mode dial to these positions to view pictures or movies.
(About the mode dial
Suitable for general situations. Simply press the shutter button, and the camera determines optimum conditions and shoots the
Kpicture. The camera automatically sets the optimum aperture value and shutter speed for the brightness of the subject (P: Program auto).
This function reduces the blur incurred by a moving subject or
hcamera movement when taking pictures. g“Shooting pictures using image blur reduction” (P. 46)
Shooting |
This function allows you to select from 19 situation-related |
f modes set to the shooting conditions. g“Selecting a scene |
|
modes |
according to the situation (f)” (P. 34) |
|
This function allows you to set the shutter speed manually. The
Scamera sets the aperture automatically. g“Changing the shutter speed for shooting pictures” (P. 47)
This function allows you to set the aperture manually. The
Acamera sets the shutter speed automatically. g“Changing the aperture value for shooting pictures” (P. 48)
|
n |
This function lets you record movies. Audio is recorded with the |
|
|
movie. g“Recording movies” (P. 44) |
|
q |
This function allows you to play back still pictures or movies. You |
Playback |
|
can also play back sound. g“Playback” (P. 62) |
modes |
- |
You can play back still pictures or movies saved in an album. |
|
|
g“Viewing an album” (P. 66) |
1
operation Basic
9
1
Basic operation
Mode dial
TIPS
•Direct button functions and menu contents vary depending on the position of the mode dial. g“Direct buttons” (P. 11), “Menus” (P. 13), “Menu list”
(P. 148)
•You can change the mode before and after turning the camera on.
Mode dial notation
In this manual, the following icons indicate the position of the mode dial necessary for operating functions.
This indicates an operation when the mode dial is set to n.
This indicates an operation when the mode dial is be set to any of the following modes: KhfSAn.
10
Direct buttons
This camera features buttons for setting functions directly.
The direct buttons have different functions in shooting mode and in playback mode.
Using the direct buttons in shooting mode
g
c |
|
|
d |
|
|
e |
|
h |
f |
|
|
|
|
|
|
|
i |
c |
QUICK VIEW button |
gP. 63 |
|
The last picture taken is displayed on the monitor. All the functions in |
|
|
playback mode are available. To return to shooting mode, press the |
|
|
QUICK VIEW button or press the shutter button halfway. |
|
d |
GUIDE button |
gP. 18 |
|
Displays a shooting guide describing shooting methods for various |
|
|
purposes. Select a menu, and press the GUIDE button to display an |
|
|
explanation of its function. |
|
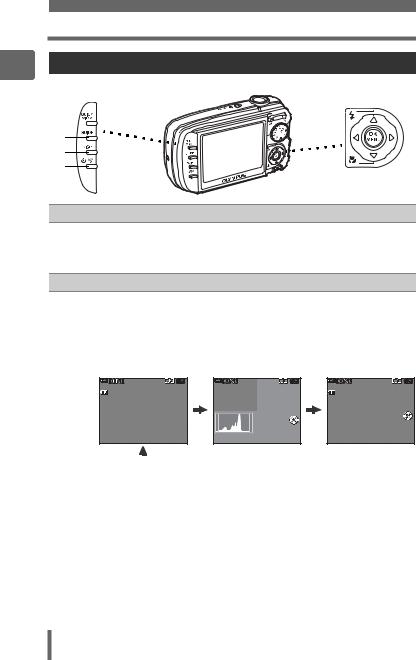
e |
DISP button |
gP. 61 |
|
Press the DISP button repeatedly to toggle the display of shooting |
|
|
information, composition lines, and histogram. |
|
f |
Y(Self-timer/Remote control) button |
gP. 43, 55 |
|
For switching between self-timer and remote control. |
|
g |
O#(Flash mode) button |
gP. 41 |
|
For selecting the flash mode. |
|
h |
Zbutton |
gP. 13 |
|
Displays the top menu of shooting mode. |
|
i |
N&(Macro) button |
gP. 40 |
Enables macro mode or super macro mode.
1
operation Basic
11
1
Basic operation
Direct buttons
Using the direct buttons in playback mode
c |
|
|
d |
f |
|
e |
||
|
||
c GUIDE button |
gP. 18 |
Displays a shooting guide describing shooting methods for various purposes. Select a menu item, and press the GUIDE button to display an explanation of its function.
dDISP button
Press the DISP button to change the display in the following order. The histogram is not displayed while displaying movies.
|
|
|
|
|
Detailed camera |
|
|
|
|
|
|
informationisdisplayed. |
|
The playback screen |
The histogram is |
|
g“Monitor |
|
||
is displayed. |
|
displayed. |
|
|
indications” (P. 160) |
|
1000004 |
HQ |
|
|
HQ |
1000004 |
HQ |
|
|
|
F4.0 |
SIZE: 3264×2448 |
||
|
|
|
1/100 |
|||
|
|
|
|
+2.0 |
||
|
|
|
+2.0 |
|
||
|
|
|
|
|
||
|
|
|
ISO400 |
|
ISO400 |
|
’05. 08. 26 |
12:30 |
|
’05. 08. 26 |
12:30 |
||
|
|
|
||||
|
4 |
’05. 08. 26 |
12:30 |
4 |
|
4 |
|
|
|
|
|
|
|
|
|
|
|
|
|
|
|
|
|
|
e |
S(Erase) button |
gP. 72, |
81 |
||
|
Erases pictures displayed on the monitor. |
|
|
|
|
|
|
|
|
|
|
f |
Zbutton |
gP. |
13 |
||
|
Displays the top menu of playback mode. |
|
|
|
|
12
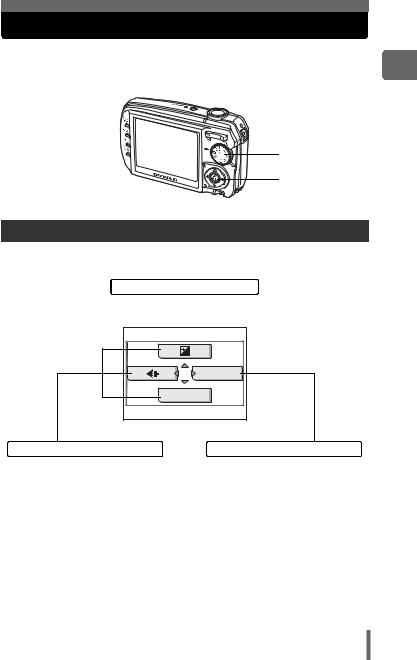
Menus
Set the mode dial to any mode and press Zto display the menus on the monitor. Menus are used to make each camera setting.
Mode dial
Press Z
1
operation Basic
About the menus
The menu items displayed in shooting mode and playback mode differ.
Top menu
Menus are divided into shortcut menus and mode menus.
MODE MENU |
WB
Shortcut menus |
Mode menu |
For setting menu items directly.
Settings are categorized by function into tabs.
13

1
Basic operation
Menus
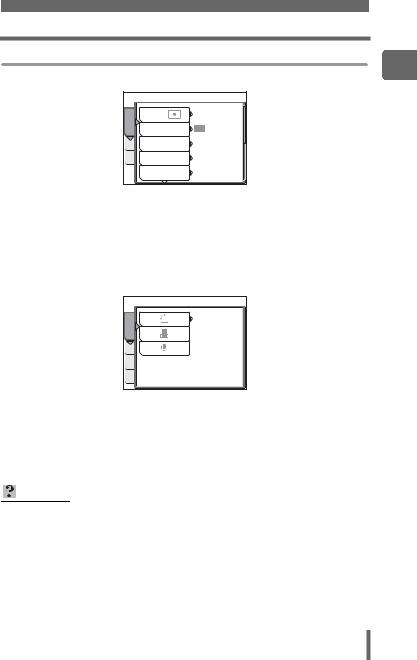
Shortcut menus
(Shooting mode
|
gP. 49 |
|
MODE MENU |
WB |
gP. 50 |
|
gP. 25 |
(Playback mode
For still pictures
ALBUM ENTRY |
MODE MENU |
For still pictures
UNDO ENTRY |
ALBUM MENU |
|
For movies |
|
|
gP. 73 |
MOVIE PLAY |
gP. 65 |
|
|
ALBUM ENTRY |
MODE MENU |
|
gP. 80 |
|
|
gP. 80 |
gP. 67 |
|
gP. 67 |
|
|
For movies |
|
|
gP. 73 |
MOVIE PLAY |
gP. 65 |
|
|
UNDO ENTRY |
ALBUM MENU |
|
gP. 80 |
|
|
gP. 80 |
gP. 70 |
|
|
gP. 70 |
14
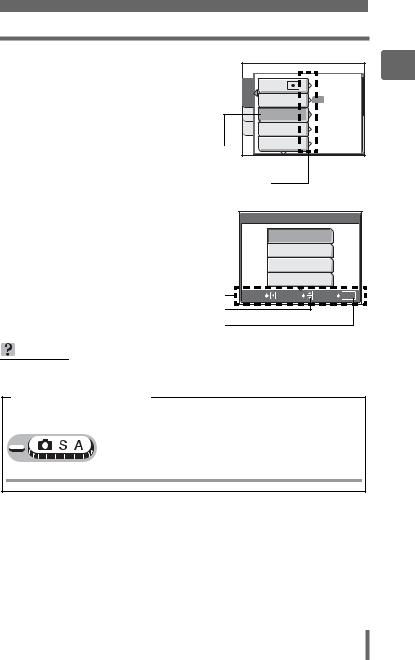
Mode menu
(Shooting mode
CAMERA |
ESP/ |
ESP |
DRIVE |
|
|
MEM |
ISO |
AUTO |
SET |
DIGITAL ZOOM |
OFF |
|
AF MODE |
SPOT |
Menus
1
operation Basic
CAMERA tab |
For setting shooting-related functions. |
MEMORY/ |
For formatting internal memory or cards. Also saves internal |
CARD tab |
memory data onto cards. |
SETUP tab |
For setting basic camera functions and settings that make the |
|
camera easier to use. |
(Playback mode
PLAY |
0° |
|
|
SET MEM EDIT |
|
PLAY tab |
For setting playback-related functions. |
EDIT tab |
For editing saved pictures. |
MEMORY/ |
For formatting internal memory or cards, and erasing all image data. |
CARD tab |
Also saves internal memory data onto cards. |
SETUP tab |
For setting basic camera functions and settings that make the |
|
camera easier to use. |
TIPS
•The [MEMORY] tab is displayed when the internal memory is in use. The [CARD] tab is displayed when a card is inserted in the camera.
•For a list of mode menu items, see “Menu list” (P. 148).
15

1
Basic operation
Menus
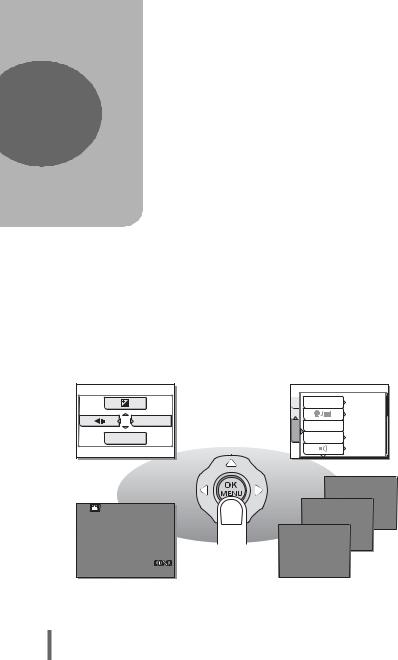
Using the menus
Use the arrow pad and Zto set menu items.
Follow the operation guide and arrows on the screen to select and change settings.
Ex: Setting [ISO]
|
|
Mode dial |
|
|
ONXYbuttons |
|
|
Zbutton |
1 |
Set the mode dial to any of the following modes: KSA. |
|
2 |
Press Z. |
Top menu |
3 |
• The top menu is displayed. |
|
Press Yto select [MODE MENU]. |
|
|
|
|
MODE MENU |
|
This refers to the arrow |
|
|
pad (ONXY). |
WB |
4 Press ON to select the [CAMERA] tab, and press Y.
•Refer to the arrows on the screen to select and make settings with the arrow pad.

 SET MEM CAMERA
ESP/ |
ESP |
DRIVE |
|
ISO |
AUTO |
DIGITAL ZOOM |
OFF |
AF MODE |
SPOT |
This refers to the arrow pad (YN).
16
Menus
5
6
Press ONto select the [ISO], and |
|
|
|
1 |
press Y. |
SETMEM CAMERA |
ESP/ |
ESP |
operationBasic |
displayed in a different |
||||
• Refer to the arrows on the screen to |
|
DRIVE |
|
|
select and make settings with the arrow |
|
ISO |
AUTO |
|
pad. |
|
|
||
• Unavailable settings cannot be selected. |
DIGITAL ZOOM |
OFF |
|
|
The selected item is |
|
AF MODE |
SPOT |
|
|
|
|
|
|
color. |
|
|
|
|
Press Yto go on to |
|
|
||
the following setting. |
|
|
||
Press ON to select [AUTO], |
|
ISO |
|
|
[64], [100], [200], [400], [800], or |
|
AUTO |
|
|
[1600], and press Z. |
|
|
|
|
|
64 |
|
|
|
• Follow the operation guide at the |
|
|
|
|
|
100 |
|
|
|
bottom of the screen to set or change |
|
|
|
|
|
|
|
|
|
settings using the arrow pad. |
|
200 |
|
|
Operation guide |
CANCEL |
SELECT |
GO |
OK |
Press ON to select a setting. |
|
|
|
|
Press Zto finalize the setting.
TIPS
• Menu items common to different modes apply to the same setting.
Menu operation notation
In this manual, procedures for using the menus are expressed as follows:
• Ex: Steps 1 to 5 for setting [ISO]
Top menu  [MODE MENU]
  [CAMERA]
  [ISO]
[ISO]
17

1
Basic operation
Menus
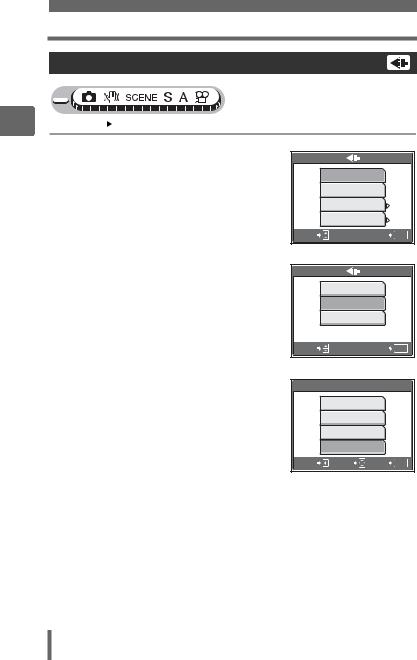
Using the GUIDE function
This camera has a GUIDE function. There is a shooting guide explaining shooting methods for various shooting situations, purposes, and effects, and a menu guide explaining the menus. Pressing the GUIDE button automatically displays the shooting guide or the menu guide.
(Displaying the shooting guide
1 Press the GUIDE button.
• The [SHOOTING GUIDE] is displayed.
2 Press ONto select the shooting guide to display, and press Y.
• The shooting guide detail is displayed.
3 Press ON to select the item to display, and press Y.
•The operating method for the selected item is displayed.
•To display another shooting guide or item, press Xto return to the previous screen.
•To close the shooting guide display, press the GUIDE button.
(Displaying the menu guide
1 With a menu selected, hold down the GUIDE button.
•The menu explanation is displayed.
•Release the GUIDE button to close the menu guide.
SHOOTING GUIDE
1 BRIGHTENING SUBJECT
2 SHOOTING INTO BACKLIGHT
3 ADJUSTING COLORATION
4 BLURRING BACKGROUND
5 ADJUSTING AREA IN FOCUS
SELECT

 EXIT
EXIT GUIDE
GUIDE
BRIGHTENING SUBJECT
1 METERING
2 EXPOSURE COMPENSATION
3 FLASH MODE
CANCEL
 SELECT
 EXIT
EXIT GUIDE
GUIDE
METERING
Press MENUOK ,
and select MODE MENU . Open the ESP/ , from the CAMERA tab, and set to
  .
.
CANCEL |
EXIT GUIDE |
FILE NAME
Sets the format for naming folders and files that are to be saved to a new card.
With [FILE NAME] selected
18
How to read the procedure pages
A sample of a procedure page is shown below explaining the notation. Look at it carefully before taking or viewing pictures.
This indicates the position of the mode dial.
If multiple icons are displayed, the described function can be used in any of these modes.
g“Mode dial” (P. 9), “Mode dial notation” (P. 10)
Select the menus in the order indicated by  . g“Using the menus” (P. 16), “Menu operation notation” (P. 17)
 Procedures differ for album playback mode.
Available languages may vary according to where you purchased the camera. The displayed language can be changed. g“Selecting a display language” (P. 86)
This sample page is only for your reference. It may differ from the actual page in this manual.
1
operation Basic
19

|
Tips before you |
2 |
start taking pictures |
|
Your pictures are almost guaranteed to come out well just by setting the mode dial to K and pressing the shutter button. But occasionally, you can’t focus on your subject, the subject is too dark, or the picture doesn’t come out the way you want.
Just knowing which button to press or which setting to change can help you solve these problems.
And did you know that by selecting an image size according to how you plan to use the pictures afterwards, you can store more pictures in the internal memory and on the memory card? These are just some of the hints provided in this chapter.
Online applications
 Ideas SQ2
SHQ
Printing applications
20
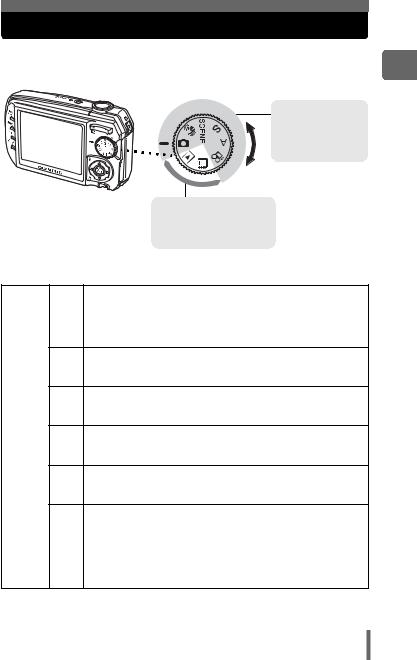
Turning the camera on and off
Press the POWER button to turn the camera on.
Power lamp |
|
|
|
POWER button |
|
|
|||
|
|
|
|
|
|
|
|
|
|
Mode dial
Monitor
(Turning the camera on
Set the mode dial to any mode, and press the POWER button.
•The power lamp on the camera lights green.
•The monitor turns on.
•When you turn on the camera in shooting mode, the lens extends.
(Turning the camera off
Press the POWER button.
• The monitor turns off.
• The lens retracts and the lens barrier closes.
• The power lamp turns off.
TIPS
• The screen on the right is displayed when the |
|
|
date and time setting has returned to the factory |
|
|
default setting. Setting the date and time makes |
|
|
your pictures easier to manage, such as when |
|
|
you view them with calendar display. g“Setting |
Y/M/D |
|
the date and time” (P. 92) |
||
|
2
pictures taking start you before Tips
21
2
Tips before you start taking pictures
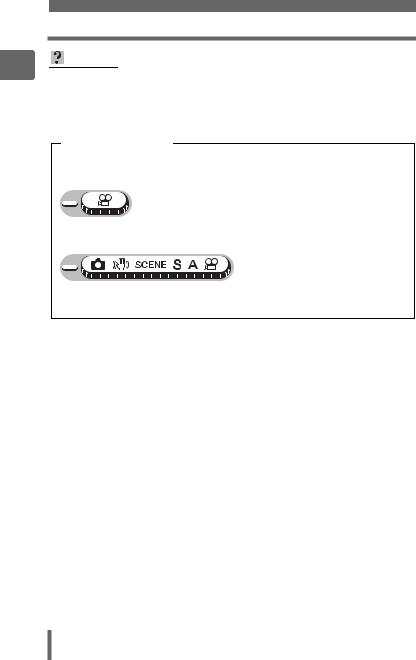
If the correct focus cannot be obtained
When the subject you want to focus on is not in the center of the frame and you cannot position the AF target mark on it, you can focus the camera on another point at roughly the same distance (focus lock) and take the picture as explained below.
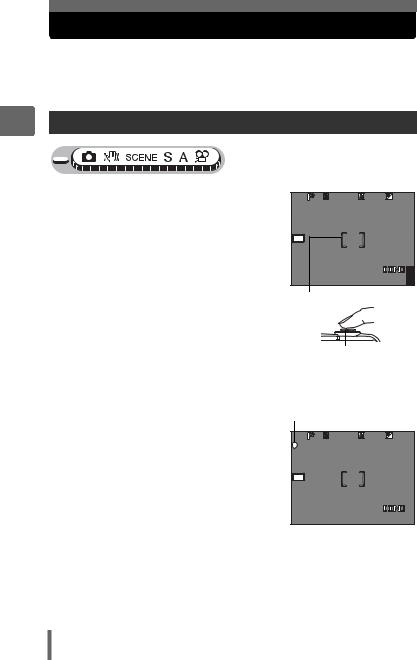
How to focus (focus lock)
1 Position the AF target mark on the subject you want to focus on.
•When shooting a hard-to-focus or fastmoving subject, focus the camera on an object about the same distance away as the subject.
2 Press the shutter button halfway until the green lamp lights.
1/200 |
F4.0 |
+2.0 |
HQ3264×2448 |
|
4 |
AF target mark
|
• The green lamp lights when the focus |
|
|
and exposure are locked. |
Shutter button |
|
• When the green lamp blinks, the focus |
|
|
and exposure are not locked. Release your finger from the shutter button, |
|
|
re-position the AF target mark on the subject and press the shutter button |
|
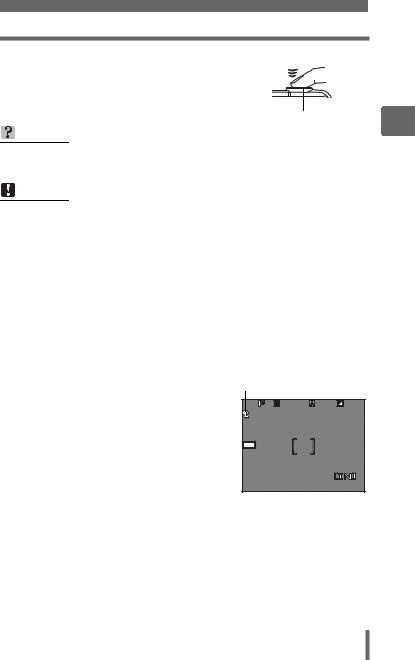
3 |
halfway again. |
|
Keeping the shutter button |
Green lamp |
|
|
pressed halfway, recompose |
1/200 F4.0 +2.0 |
|
your shot. |
|
HQ3264×2448 4
22
If the correct focus cannot be obtained
4 Press the shutter button fully.
• The camera takes the picture. The card access lamp blinks while the picture is recorded.
Shutter button
TIPS
To focus on a subject not in the center of the frame g“Changing the focusing area (AF MODE)” (P. 54)
Note
•Press the shutter button gently. If it is pressed forcefully, the camera may move causing the picture to blur.
•Never open the card cover, remove the battery or disconnect the AC adapter while the card access lamp is blinking. Doing so could destroy stored pictures and prevent storage of pictures you have just taken.
•Recorded pictures are saved in the camera regardless of whether the camera is turned off or the battery are replaced or removed.
•When taking pictures against strong backlight, the area of the picture in shadow may appear colored.
(AF lock
The focus position can be locked. AF lock refers to locking the focus position. Position the AF target mark on the subject you want to focus on, and with the shutter button pressed halfway, press Z.
• The focus is locked, and the AF lock mark is displayed.
• To reset AF lock, press Zagain to cancel AF lock, relock the focus, and press Z.
• When the AF lock is active, press the shutter button fully to take the picture.
HQ 3264×2448 4
2
pictures taking start you before Tips
23

2
Tips before you start taking pictures
If the correct focus cannot be obtained
Subjects that are difficult to focus on
Under certain types of conditions, the auto focus may not work properly.
The green lamp |
|
|
|
blinks. |
|
|
|
The subject cannot |
|
|
|
be brought into |
Subject with |
Subject with an |
Subject without |
focus. |
|||
|
low contrast |
extremely |
vertical lines |
|
|
bright area in |
|
|
|
the center of |
|
|
|
the frame |
|
The green lamp |
|
|
|
lights, but the |
|
|
|
subject cannot be |
|
|
|
brought into focus. |
Subjects at |
Fast-moving |
The subject is |
|
|||
|
different |
subject |
not in the center |
|
distances |
|
of the frame |
In these cases, focus (focus lock) on an object with high contrast at the same distance as the intended subject, recompose your shot and then take the picture. If the subject has no vertical lines, hold the camera vertically and focus the camera using the focus lock function by pressing the shutter button halfway, then return the camera to the horizontal position while keeping the button pressed halfway and take the picture.
24

Record mode
You can select a record mode in which to take pictures or shoot movies. Select the best record mode for your purpose (printing, editing on a computer, website editing, etc.). For information on the image sizes for each record mode and the number of storable still pictures/movie recording time, see the tables on P. 26 and 27.
Still picture record modes
Still pictures are recorded in JPEG format.
Record mode depicts the image size and compression rate of your pictures.
Pictures are made from thousands of dots (pixels). If a picture with relatively few pixels is enlarged, it looks like a mosaic. Pictures with more pixels are denser and clearer but require more space (larger file size), thus decreasing the number of pictures that can be saved. Though a high compression rate results in a small file size, this also produces a grainy look.
|
|
|
|
|
|
|
|
|
Picture with high number of |
|
|
|
|
|
|
|
|
|
|
pixels |
|
|
|
|
|
|
|
|
|
|
||
|
|
|
|
|
|
|
|
|
Picture with low number of pixels |
|
|
|
|
|
|
|
|
|
|
||
|
|
|
|
|
|
|
|
|
||
|
|
|
|
|
|
|
|
|
||
|
|
|
|
|
|
|
|
|
|
|
|
|
|
|
|
|
|
|
|
|
|
Record |
Image size |
Compression |
|
Application |
||||||
mode |
|
|||||||||
|
|
|
|
|
|
|
|
|||
|
|
|
|
Low |
The number of storable still pictures is |
|||||
SHQ |
3264 × 2448 |
|
lower, and recording pictures takes |
|||||||
compression |
||||||||||
|
|
|
longer, but it is useful for creating |
|||||||
|
|
|
|
|
|
|
|
|||
|
|
|
|
|
|
|
|
beautiful prints on full-size paper and for |
||
|
|
|
|
|
|
|
|
|||
|
|
|
|
High |
performing computer image processing, |
|||||
HQ |
3264 × 2448 |
|
such as contrast adjustment and red- |
|||||||
compression |
||||||||||
|
|
|
eye correction. |
|||||||
|
|
|
|
|
|
|
|
|||
|
|
|
|
|
|
|
|
|
|
|
|
|
2560 × 1920 |
|
High |
This is useful for post-card sized prints, |
|||||
SQ1 |
2272 × 1704 |
|
or for computer editing such as rotating |
|||||||
compression |
||||||||||
|
|
|
or adding text to a picture. |
|||||||
|
|
2048 × 1536 |
|
|
|
|
|
|||
|
|
|
|
|
|
|
|
|
||
|
|
|
|
|
|
|
|
|
|
|
|
|
1600 × 1200 |
|
|
|
|
|
Standard image quality with a high |
||
|
|
|
|
|
|
|
|
number of pictures to shoot. This is |
||
|
|
1280 × 960 |
Standard |
useful for viewing pictures on a |
||||||
|
|
compression |
computer. |
|||||||
SQ2 |
|
|||||||||
1024 × 768 |
|
|
|
|
|
Standard image quality. This is useful for |
||||
|
|
|
|
|
|
|
||||
|
|
|
|
|
|
|
|
|||
|
|
|
|
|
|
|
|
sending as e-mail attachments. |
||
|
|
640 × 480 |
|
Low |
||||||
|
|
|
|
|
||||||
|
|
compression |
|
|
||||||
|
|
|
|
|
||||||
2
pictures taking start you before Tips
25

2
Tips before you start taking pictures
Record mode
Image size
The number of pixels (horizontal × vertical) used when saving an image. You can save your pictures at a large image size to get clearer prints. However, as the image size increases, the file size (data size) also increases, which decreases the number of pictures that can be saved.
Compression
Pictures are compressed and saved. The higher the compression, the less clear the image will be.
Movie record modes
Movies are recorded in Motion-JPEG format.
Number of storable still pictures/remaining recording time
For still pictures
|
|
|
Number of storable still pictures |
||||
Record mode |
Image size |
Internal memory |
Using a 128 MB card |
||||
|
|
|
With |
Without |
With |
Without |
|
|
|
|
sound |
sound |
sound |
sound |
|
SHQ |
3264 |
× 2448 |
4 |
4 |
31 |
31 |
|
HQ |
3264 |
× 2448 |
9 |
9 |
61 |
62 |
|
|
2560 |
× 1920 |
15 |
15 |
102 |
105 |
|
SQ1 |
2272 |
× 1704 |
19 |
19 |
126 |
130 |
|
|
2048 |
× 1536 |
23 |
24 |
156 |
163 |
|
|
1600 |
× 1200 |
28 |
29 |
185 |
194 |
|
SQ2 |
1280 |
× 960 |
42 |
46 |
285 |
307 |
|
1024 |
× 768 |
63 |
70 |
420 |
469 |
||
|
|||||||
|
640 |
× 480 |
96 |
114 |
614 |
726 |
|
26
|
|
|
|
|
|
|
|
Record mode |
|
|
|
|
|
|
For movies |
|
|
|
|
|
|
|
|
|
Record mode |
Image size |
Remaining recording time (sec.) |
||
Internal memory |
Using a 128 MB card |
|||
|
|
|||
SHQ |
640 × 480 |
15 |
110 |
|
(15 frames/sec.) |
||||
|
|
|
||
HQ |
320 × 240 |
50 |
320 |
|
(15 frames/sec.) |
||||
|
|
|
||
SQ |
160 × 120 |
125 |
800 |
|
(15 frames/sec.) |
||||
|
|
|
||
1/200 |
F4.0 |
+2.0 |
HQ 3264×2448 |
|
4 |
Number of storable still pictures
|
+2.0 |
HQ |
00:36 |
|
Remaining recording time
TIPS
•When a picture is transferred to a computer, the size of the picture on the computer screen varies depending on the computer’s monitor setting. For instance, a picture taken with an image size of 1,024 × 768 fills the screen if you set the picture to 1× when the monitor setting is 1,024 × 768. However, if the monitor setting is over 1,024 × 768 (such as 1,280 × 1,024), the picture only takes up part of the screen.
Note
•The number of storable still pictures and remaining recording time listed in the tables are approximate.
•The number of storable still pictures may change according to the subject or factors like whether print reservations or album entries have been made or not. In certain instances, the number of remaining pictures does not change even when you take new pictures or erase stored pictures.
2
pictures taking start you before Tips
27
2
Tips before you start taking pictures
Record mode
Changing the record mode
Top menu [K] |
g“Using the menus” (P. 16) |
1
2
3
For still pictures, select from [SHQ], [HQ], [SQ1] or [SQ2].
For movies, select from
[SHQ 640 × 480], [HQ 320 × 240], and [SQ 160 × 120].
When [SQ1] or [SQ2] is selected, press Yto select the image size.
Press Z.
SHQ 3264×2448
HQ 3264×2448
SQ1 2048×1536
SQ2 640×480
SELECT |
GO OK |
For still pictures
SHQ 640×480
HQ 320×240
SQ 160×120
SELECT |
GO OK |
For movies
SQ2
1600×1200
1280×960
1024×768
640×480
CANCEL SELECT |
GO OK |
When [SQ2] is selected
28

The internal memory and memory card
Pictures taken are recorded in the internal memory.
Pictures can also be recorded on the optional xD-Picture Card (“card”). The card can be used to record more pictures than is possible with the internal memory of the camera. A card can be convenient when taking many pictures while on a trip.
(Internal memory basics
The internal memory is the camera’s media for recording pictures, similar to film in a film camera.
Pictures recorded to the internal memory can be easily erased on the camera or processed using a computer. Unlike portable storage media, the internal memory cannot be removed or exchanged.
(Using the internal memory with a card
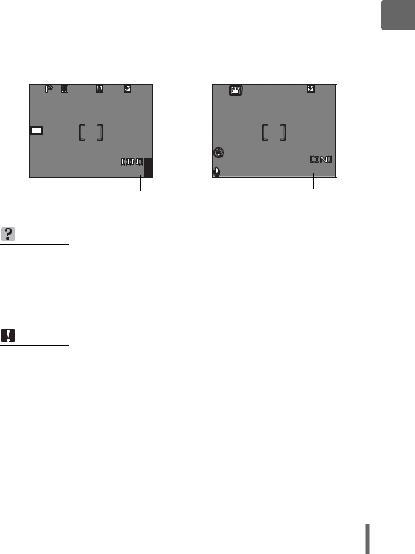
You can confirm on the monitor whether the internal memory or card is being used during shooting and playback operations.
Shooting mode |
Playback mode |
 1/200
1/200  F4.0
F4.0  +2.0
+2.0
HQ 3264×2448 4
1000004 |
HQ |
’05. 08. 26 |
12:30 |
|
4 |
Memory indicator
Monitor |
Shooting mode |
Playback mode |
|
indication |
|||
|
|
||
[IN] |
Pictures are recorded to the |
Pictures are being played back |
|
internal memory. |
from the internal memory. |
||
|
|||
[xD] |
Pictures are recorded to a card. |
Pictures are being played back |
|
|
from a card. |
||
|
|
•The internal memory and a card cannot be used at the same time.
•The internal memory cannot be used for shooting or playback operations when a card is inserted in the camera. Remove the card before using the internal memory.
•Pictures recorded to the internal memory can be copied to a card. g“Copying pictures in the internal memory to the card (BACKUP)” (P. 80)
2
pictures taking start you before Tips
29

2
Tips before you start taking pictures
The internal memory and memory card
The card
The card is a medium for recording pictures, similar to film in a film camera. Pictures recorded to the card can be easily erased on the camera or processed using a computer. The number of recordable pictures can be increased by using a card with a larger capacity.
cIndex area
You can use this space to write the contents of the
card.
 c
c
d |
Contact area |
|
|
|
|
|
|
|
|
|
|
|
|
|
|
|
|
|
d |
|
|
|
|
|
|
|
|
|
|
|
|
|
|
|
|
|
|||
|
The part where the data transferred from the camera |
|
|
|
|
|
|
|
|
|
|
|
|
|
|
|
|
|
|
|
|
|
|
|
|
|
|
|
|
|
|
|
|
|
|
|
|
|
|
|
enters the card. |
|
|
|
|
|
|
|
|
|
|
|
|
|
|
|
|
|
|
Compatible cards
xD-Picture Card (16MB – 1GB)
Note
•This camera may not recognize a non-OLYMPUS card or a card that was formatted on another device (such as a computer, etc.). Make sure to format the card on this camera before use. g“Formatting the internal memory or card (MEMORY FORMAT/FORMAT)” (P. 83)
30
 Loading...