


CONTENTS |
|
CHAPTER 1 – INTRODUCTION ......................................................... |
3 |
NOTICE................................................................................................. |
3 |
SAFETY TIPS ....................................................................................... |
4 |
CHAPTER 2 – WORKING WITH DAVINCI ......................................... |
5 |
BATTERY INSTALLATION................................................................... |
5 |
RESET INITIALIZATION....................................................................... |
6 |
HOME AND WORLD TIME................................................................... |
6 |
SETTING DATE AND TIME.................................................................. |
7 |
DAILY ALARM ...................................................................................... |
9 |
PASSWORD ....................................................................................... |
10 |
CHAPTER 3 – GETTING TO KNOW YOUR DAVINCI ...................... |
11 |
PART NAMES AND FUNCTIONS...................................................... |
11 |
APPLICATION ICON TOUCH MENU................................................. |
12 |
CONTROL TOUCH KEYS.................................................................. |
13 |
QUICKKEYS™ ................................................................................... |
13 |
DISPLAY INDICATORS...................................................................... |
14 |
OPENING AN APPLICATION............................................................. |
15 |
THE DAVINCI CRADLE...................................................................... |
15 |
CHAPTER 4 – TOOLS MENU........................................................... |
16 |
USING THE ‘ADD NEW RECORD’ FEATURE .................................. |
16 |
USING ‘EDIT RECORD’ FEATURE ................................................... |
17 |
USING ‘SEARCH RECORD’ FUNCTION........................................... |
18 |
USING ‘DELETE RECORD’ FUNCTION............................................ |
18 |
CHAPTER 5 – ON-SCREEN KEYBOARD DATA ENTRY ................ |
19 |
USING THE ON-SCREEN VIRTUAL KEYBOARD ............................ |
19 |
INTERNATIONAL CHARACTERS ..................................................... |
19 |
CHAPTER 6 – PHONE BOOK .......................................................... |
20 |
PHONE LIST MODE........................................................................... |
20 |
CREATING, EDITING AND DELETING PHONE RECORDS ............ |
21 |
FINDING PHONE RECORDS ............................................................ |
22 |
VIEWING PHONE RECORDS............................................................ |
23 |
1
CHAPTER 7 – PLANNER ................................................................. |
24 |
CALENDAR FUNCTION..................................................................... |
24 |
SCHEDULE FUNCTION..................................................................... |
26 |
CREATING, EDITING AND DELETING SCHEDULE RECORDS ..... |
26 |
ANNIVERSARY FUNCTION............................................................... |
27 |
CHAPTER 8 – TO DO ....................................................................... |
28 |
TO DO LIST MODE ............................................................................ |
28 |
CREATING, EDITING AND DELETING TO DO RECORDS ............. |
29 |
FINDING TO DO RECORDS.............................................................. |
30 |
VIEWING TO DO RECORDS ............................................................. |
30 |
CHAPTER 9 – NOTES (MEMOS) ..................................................... |
31 |
CHAPTER 10 – CALCULATOR....................................................... |
32 |
CHAPTER 11 – CONVERSIONS ...................................................... |
33 |
METRIC CONVERSION ..................................................................... |
33 |
CURRENCY CONVERSION .............................................................. |
34 |
EURO CONVERSION ........................................................................ |
35 |
CHAPTER 12 – MENU...................................................................... |
36 |
TIME AND ALARM.............................................................................. |
36 |
ANNIVERSARY .................................................................................. |
36 |
PC SYNCRONIZATION...................................................................... |
36 |
SYSTEM PREFERENCES ................................................................. |
40 |
MEMORY ............................................................................................ |
40 |
DEFRAGMENTATION (DEFRAG) ..................................................... |
40 |
APPENDICES ................................................................................... |
41 |
A. DAVINCI FOLDABLE KEYBOARD INSTRUCTIONS .................. |
41 |
B. TROUBLESHOOTING DAVINCI.................................................. |
42 |
C. TROUBLESHOOTING DAVINCI SYNCHRONIZATION.............. |
43 |
2
CHAPTER 1 – INTRODUCTION
Thank you for purchasing the daVinci PDA. Please read this manual carefully to familiarize yourself with the PDA’s many features, and to ensure years of reliable operations.
NOTICE
We assume no responsibility for any damage or loss resulting from the use of this manual.
We strongly recommend that separate, permanent printed records be kept of all data. Under certain circumstances, such as exposure to an electrostatic discharge, data may be lost or altered, or the unit may become inoperative until reset. Therefore, we assume no responsibility for data lost or otherwise rendered unusable, whether as a result of improper use, repair, battery replacement, or use after the specified battery life has expired from similar causes.
We assume no responsibility, directly or indirectly, for financial losses or claims from third persons resulting from the use of this product and all of its functions, such as stolen credit card numbers, the loss or alteration of stored data, etc.
3
This product was not designed to bend or survive extreme pressure. Do not carry it in your trouser pockets. When in a bag or briefcase, make sure that it is stationary and well padded and protected.
To provide a longer product life, a lid cover is provided with the daVinci in order to avoid scratches or damage when carrying the product. Do not apply harsh chemicals or water to the display. Do not store the product in environments where temperature ranges can be extreme.
The information provided in this manual is subject to change without notice.
SAFETY TIPS
∙Be careful not to scratch the touch screen. Use only the supplied stylus or other plastic-tipped pens designed for the touch-sensitive screen. Never use an actual pen or pencil, fingernails or other sharp objects on the surface of the touch screen.
∙The daVinci should be protected from rain and moisture. Treat the daVinci as you would other electronic devices.
∙Do not drop your daVinci or subject it to strong impacts.
∙Protect your daVinci from extreme temperatures.
∙The touch screen can be cleaned with a soft cloth lightly moistened with a window cleaning solution. Commercial cleaners are sold separately.
4
CHAPTER 2 – WORKING WITH DAVINCI
BATTERY INSTALLATION
Before you start using the daVinci, you must install the two included AAA alkaline batteries.
The battery door, located on the back of the unit, is locked into place.
1.Remove the battery cover by pressing the hinge down and pulling the battery cover open.
2.Insert the two new batteries, following the signs inside the battery compartment.
3.Carefully place the battery cover in its place and press the cover gently into its location until cover is locked in position.
DO NOT APPLY UNNECCESARY FORCE WHEN REMOVING OR REPLACING THE BATTERY COVER. THE COVER SHOULD EASILY FIT INTO ITS PLACE IN THE BACK OF THE UNIT.
NOTE: Battery voltages are constantly monitored; a low battery warning message will show when power level gets too low. Replace the batteries when this message is displayed. You can change the battery without losing any information. Do not try to operate or synchronize the daVinci with a low battery; data can be corrupted or lost.
The data that has been synchronized to the computer can be restored to the daVinci by synchronizing again. For detailed software use instructions, see the “help and instruction files” provided with the synchronization software.
YOU MUST RESET THE DAVINCI BEFORE USING IT FOR THE FIRST TIME. FOLLOW THESE RESET INSTRUCTIONS:
5

RESET INITIALIZATION
1.Insert an open paper clip into the reset opening on the backside of the unit. The daVinci language selection screen is displayed.
2.Tap the desired language.
3.Tap Yes to clear all data (necessary when using the daVinci for the first time only).
NOTE: RESET WILL CLEAR THE MEMORY OF ALL DATA AND SETTINGS.
When the initialization is complete, the display switches to the clock screen.
Adjust the display contrast by turning the display contrast knob located on the left side of the unit.
HOME AND WORLD TIME
This screen is used to select and set the Home City, Home Time and World City. Display this screen at anytime by tapping Menu and then
Time.
6
NOTE: An image of a house on the left side of the time indicates Home Time mode.
SETTING DATE AND TIME
To set the correct time in the Home Time mode, tap the set prompt located at the lower left part of the display. Tap the date, time, city and DST fields frame to edit that field.
Editing Date
1.In the Home Time setting mode, tap the date for the date selection view.
2.Change the year by tapping on the right or left arrows next to the year.
3.Select the desired month and date from the provided lists.
4.Verify that the date and year at the upper part of the display corresponds to the desired date and year.
5.Tap ok to confirm.
Editing time
1.In the Home Time setting mode, tap the time frame for the time selection view.
2.Select the desired hour and minute from the lists. If in 12-hour clock mode, tap AM or PM as preferred. In the minute field, tap the up or down arrows for one-minute increments.
3.Verify that the time at the upper part of the display corresponds to the desired time.
4.Tap ok to confirm.
7
Selecting Home City
To select a country and city for Home Time mode:
1.Tap on Set and then on the city name, New York U.S.A., to enter the Country and City list selection.
2.Tap any of the letter tabs on the lower part of the display to quickly access and display a city and country. Use the up/down touch keys or push QuickKeys™ to scroll through the country and city list. Tap the City tab on the lower right to sort world cities alphabetically, tap the Country tab to sort world countries in alphabetical order.
3.Tap the selected City in the list to make it the city showing in the Home Time mode or enter a city not listed.
To define a home city that is not listed, follow these instructions:
1.Tap on Set and then on the city name listed, example city: New York country: U.S.A., to enter the Country and City list selection. Select a listed city that is within the same time zone as your desired home city.
2.Tap on Set and then on Tools to edit the city and country/state fields. Enter a new city and/or country name to replace the current country and the city, example: city: Bridgewater, state: N.J.
3.Tap Enter or ok to save the entry. The screen returns to the time setting screen. The new country/state and city are displayed.
Setting Daylight Savings (DST)
In the home time setting screen, tap DST to turn Daylight Savings on or off. When turning DST on, the displayed time will increase one hour.
8
Setting World City
1.Tap Time.
2.Tap home on the lower right side of the display. A globe is now displayed on the left side of the time indicating World Time mode.
3.Follow same procedure used for the home city to select world city.
Viewing Home Time and World Time
Home time and world time can be viewed from any function by pressing the Menu and then Time key. Tap home/world on the lower right part of the display to toggle between Home Time or World Time modes.
DAILY ALARM
To set the daily alarm:
1.Tap Menu, Alarm for the daily alarm screen.
2.Touch set to enter a new alarm.
3.Select the alarm time as in Editing Time above.
4.Tap the On/ Off key to activate/deactivate the alarm time.
5.Tap ok to save the settings.
When home time reaches the time set for the daily alarm, the alarm tone will beep for 1 minute and the alarm reminder screen will come up. Tap anywhere on the screen to stop the sound.
The alarm is activated if the daVinci is off or on.
9
PASSWORD
You can assign a password to the daVinci. For security purposes, the entire unit can be locked from normal view or use unless the proper password is entered. Keep a record of your password!
IF YOU FORGET YOUR PASSWORD THERE IS NO WAY TO ACCESS ANY HIDDEN RECORDS. THERE IS NO "BACK DOOR" INTO THE SYSTEM. YOU MUST RESET THE DAVINCI AND CLEAR ALL MEMORY.
Assigning a Password
1.Tap Menu, Password.
2.The daVinci will prompt you to enter a new password.
3.Use the virtual keyboard to enter the password. The characters will be shown as ** during entry.
4.Tap Enter or ok.
5.The daVinci will prompt you to confirm the new password by entering the password again.
6.After entering password again, tap ok. Password is now assigned.
Entering password is required every time the daVinci is turned on.
Tap the box with the word off in the System Preference to deactivate the password protection. Tap the box with the word on in the System Preference to activate password protection again.
Changing a Password
1.Tap Menu, Password.
2.The daVinci will prompt you to enter your existing password.
3.Use the virtual keyboard to enter the password.
4.Tap Enter or ok.
5.The daVinci will prompt you to enter a new password.
10
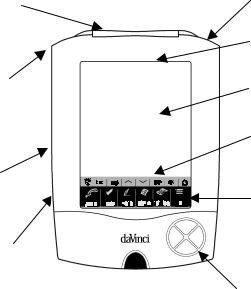
CHAPTER 3 – GETTING TO KNOW YOUR DAVINCI
PART NAMES AND FUNCTIONS
Display Protection |
Stylus |
|
Cover |
Housing |
|
|
Display |
|
|
Indicators |
|
QuickKeys™ |
Touch |
|
include |
Panel Area |
|
Up/Down |
|
|
and Enter |
Control |
|
keys |
||
Touch keys |
||
|
||
Contrast |
Application |
|
Control |
||
Icon Touch |
||
|
||
|
Menu |
|
Keyboard |
|
|
Connector |
|
|
|
Directional |
|
|
Arrows |
11

APPLICATION ICON TOUCH MENU
The daVinci has a variety of built-in applications that can be selected by using the stylus to tap the application icon on the touch menu.
Phone is a database of contact information, including name, address, phone numbers, etc. Information of each person will be stored as a record. Phone records can be grouped into Business or Personal categories for easy access.
To Do is used to store a list of tasks. It can record the description, priority and deadline of the task.
Planner allows you to plan your schedule and store it in memory. It provides the flexibility of planning a schedule with reference to monthly calendars and daily times.
Notes stores alphanumeric notes with the virtual on-screen keyboard or the external keyboard.
Calc is a full function 12-digit calculator. You can easily access the currency and metric conversion features through the calculator mode.
Menu displays additional functions that can be used by tapping the icon that represents that function. Current functions include: Time, Alarm, Anniversary, Password, PC Synchronization and more.
12
CONTROL TOUCH KEYS
The control touch keys are located above the Application Icon Touch Menu. This touch-sensitive area provides control of the data input and program operations.
Glo |
Turns the backlit on for low light or night viewing. |
(Light-Bulb) |
|
Esc |
Cancels entries. |
Tools |
The Tools menu displays the commands: Add new |
|
record, Edit record, Search record or Delete |
|
record. See further information in Chapter 4: TOOLS |
|
MENU. |
Up/Down |
Used when the information in a record exceeds the |
|
screen length. The icons are tapped to move the |
|
display a page at a time. |
B/P |
Selects the category: Business, Personal or both. |
OK |
Confirms entries and operation selections. |
On/Off |
Turns the unit on or off. |
Symbol |
|
QUICKKEYS™
The QuickKeys™ are designed to enable access to phone records using one hand operation:
Up/Down Control Keys
Scrolls one line at a time.
Enter Key
Confirms entries and operation selections.
Left/Right and Page Up/Page Down Directional Keypad
Used to scroll a list in Phone, To Do, Planner and Memo functions.
13

DISPLAY INDICATORS
Different symbols will appear on the top of the screen to indicate a status and special actions that can be taken.
The upper line’s display Indicators specify which application is currently active. The lower lines’ display Indicators specify if the unit is in List, Edit or Data view, in the Search mode, if the alarm is on, if the password is activated, which category is viewed (Business, Personal or both) and if there is additional data available by scrolling up or down.
Scrolling Status Indicator
When using the full length of the screen, the display will show up to 9 lines of data. If one or both of the arrows appear in the top title section, it indicates there is more to see in the direction of the arrow.
To see the data, use the stylus and tap the point of the up/down control icons or the up/down control keys to move the screen a page at a time or press the up/down keys on the directional keypad to move the screen information one line at a time.
14
 Loading...