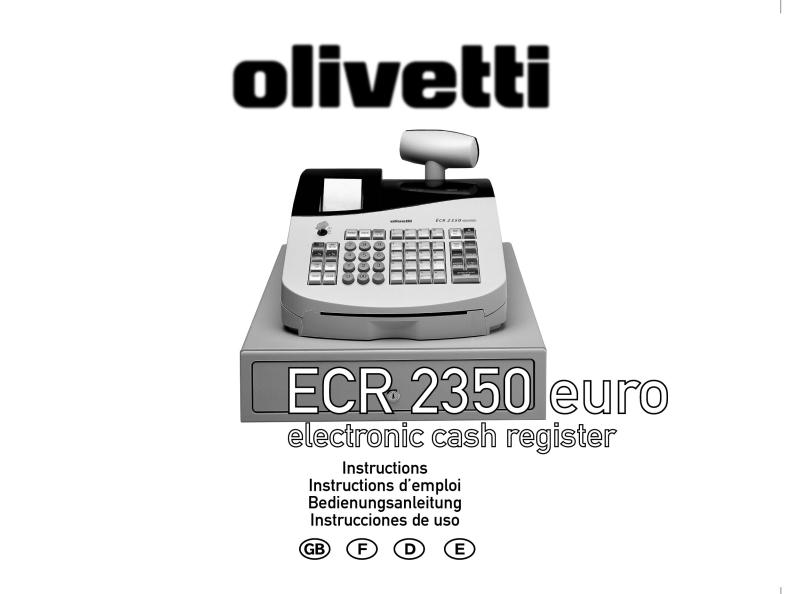
Olivetti ECR 2350 INSTRUCTIONS Manual
506524K

Olivetti Lexikon, S.p.A.
Divisione Home/Office
77, Via Jervis - 10015 Ivrea (Italy)
Copyright © 2001, by Olivetti
All rights reserved
ENGLISH
The  mark affixed to the product certifies that the product satisfies the basic quality requirements.
Your attention is drawn to the following actions that could compromise the characteristics of the product:
•incorrect electrical supply;
•incorrect installation; incorrect or improper use, or, in any case, not in accordance with the warnings given in the User Manual supplied with the product;
•replacement of original components or accessories with others of a type not approved by the manufacturer, or carried out by unauthorized personnel.
WARNING: THIS EQUIPMENT MUST BE EARTHED.
ATTENTION: CETTE UNITE DOIT ETRE CONNECTEE A LA TERRE. ACHTUNG: DIESES GERÄT MUSS EINEN ERDUNGSANSCHLUSS HABEN.
ATENCION: ESTE EQUIPO DEBE ESTAR CONECTADO A UNA TOMA DI TIERRA.
APPARATET MÅ KUN TILKOPLES JORDET STIKKONTACT. APPARATEN SKALL ANSLUTAS TILL JORDAT NÄTUKKAT. LAITE ON LITTETTÄVÄ SUKO-RASIAAN.
Lederen med grøn/gul isolation ma kun tilsluttes en klemme maerkrt eller .
To disconnect the cash register from the line voltage, unplug its power cord from the power outlet. The power outlet must be located on a wall, near the cash register and easily accessible.

Preface
The electronic cash register described in this manual is designed to help your business function smoothly by providing efficient register operations and accurate management reports. Startup is quick and easy, yet there are many options that can be added and revised so that you can customize your operations for optimum productivity. Here are just a few of the cash register’s many valuable features:
•40 departments and 999 Price Look-Up (PLU) settings;
•15 clerk numbers to monitor the sales of individual employees;
•possibility of assigning a three-digit security code to prevent unauthorized access to individual clerk transactions (during register mode only);
•possibility of defining manager passwords to prevent unauthorized access to the machine's programming mode (PRG), Z mode and X mode;
•printer with journal record and receipt printing capabilities;
•possibility of reserving two departments for registering credit sales paid with two different types of credit cards;
•Euro exchange rate programming;
•possibility of programming the machine to work with one of two base currencies, Local or Euro, so that cash register computes in the currency set and automatically converts the related transaction totals into the other currency;
•rear customer display and front operator display each consisting of a 10-character transaction and message line;
•automatic tax computations for 4 different VAT rates;
•department-linked entry options that streamline and speed-up operation;
•periodic management and financial reports which provide up-to-date sales analysis;
•battery back-up protection for the records and programming data stored in memory;
•automatic time display after a period of system inactivity;
•automatic time and date printing on receipt and journal records.
ENGLISH
I
Table of Contents |
|
GETTING ACQUAINTED WITH YOUR CASH |
|
REGISTER ..................................................................... |
1 |
Standard Accessories ..................................................... |
2 |
Using this Manual ........................................................... |
2 |
Unpacking and Setting Up the Cash Register ................ |
3 |
Maintaining the Cash Register ....................................... |
3 |
THE KEYPAD ................................................................ |
4 |
Keypad Functions........................................................... |
5 |
THE CONTROL SYSTEM ............................................. |
6 |
The Control Lock ............................................................ |
6 |
Cash Drawer with Removable Cash Bin ........................ |
7 |
Deposit Drawer ............................................................... |
7 |
Operator and Customer Displays ................................... |
7 |
Time Display .................................................................. |
7 |
Special Symbol Indicators .............................................. |
7 |
Positioning the Customer Display .................................. |
8 |
ERROR CONDITIONS .................................................. |
8 |
The Error Alarm ............................................................. |
8 |
Clearing an Error ............................................................ |
8 |
General Clearance ......................................................... |
8 |
Voiding Errors ................................................................. |
9 |
BACK-UP BATTERY SYSTEM ..................................... |
9 |
Inserting/Replacing Batteries ......................................... |
9 |
PRINTER COMPARTMENT ........................................ |
10 |
The Inked Ribbon ......................................................... |
10 |
Installing the Inked Ribbon ............................................ |
11 |
Re-inking the Thank You Stamp................................... |
12 |
Paper Tape ................................................................... |
12 |
Loading Single-Ply and Dual-Ply Paper ....................... |
12 |
QUICK START ............................................................. |
14 |
Helpful Hints for a Successful Start-Up ........................ |
14 |
TRAINING MODE ........................................................ |
15 |
Activating the Training Mode ....................................... |
15 |
Exiting the Training Mode ............................................ |
15 |
CASH REGISTER PROGRAMMING .......................... |
15 |
Setting Cash Register Features ................................... |
16 |
Making Changes to Cash Register Programming ........ |
16 |
Entering the Program Mode ......................................... |
16 |
Exiting the Program Mode ........................................... |
16 |
Clearing Errors ............................................................. |
16 |
Clerk Numbers and Secret Codes ................................ |
17 |
Machine Numbers ........................................................ |
18 |
Date and Time .............................................................. |
18 |
Percent Discount (-%) .................................................. |
19 |
Percent Plus Rate (+%) ................................................ |
19 |
Fraction Rounding ........................................................ |
20 |
Decimal Point Position ................................................. |
20 |
Value Added Tax (VAT) Rates ...................................... |
21 |
II

High Digit Lock Out (HDLO) and Tax Status |
|
Assigned to the Minus Key (-) ...................................... |
21 |
Tax Status, High Digit Lock Out, Pos./Neg. |
|
Single/Multiple Item Sale and Price Linked to a |
|
Defined Department ..................................................... |
22 |
Price Look-Ups (PLUs) ................................................. |
23 |
Euro Exchange Rate Programming ............................. |
23 |
Department Programming for Credit 1, Credit 2 |
|
Tenders ......................................................................... |
24 |
Programming System Options ..................................... |
24 |
PLU Programming Dump Report ................................. |
26 |
Overall Programming Dump Report ............................ |
27 |
Programming Manager Passwords .............................. |
28 |
Using the Cash Register in a Password Protected |
|
Mode ............................................................................ |
28 |
TRANSACTION EXAMPLES ...................................... |
29 |
Entering the Register Mode .......................................... |
29 |
Exiting the Register Mode ............................................ |
29 |
Clearing Errors ............................................................. |
29 |
Transaction Symbols .................................................... |
29 |
Sample Receipt ............................................................ |
30 |
Standard Transactions in Local Base Currency ........... |
30 |
Examples of Transactions in Euro Base Currency ....... |
40 |
Minus (-) Key Transactions........................................... |
45 |
Percent Discount (-%) Transactions ............................. |
46 |
Percent Plus (+%) Transactions ................................... |
51 |
PLU Codes ................................................................... |
55 |
Voids and Refunds ....................................................... |
57 |
Other Transactions ....................................................... |
60 |
MANAGEMENT REPORTS ......................................... |
64 |
X and Z Reports ........................................................... |
65 |
Cash-In-Drawer Report ................................................ |
65 |
Hourly Report ............................................................... |
65 |
Clerk Report ................................................................. |
67 |
All PLU Report ............................................................. |
68 |
PLU Range Report ....................................................... |
69 |
Department Range Report ........................................... |
70 |
Cash Declaration .......................................................... |
70 |
PLU Periodic Term Report ........................................... |
71 |
Z1 and X1 Financial Report ......................................... |
72 |
Z2 and X2 Financial Report ......................................... |
73 |
Duplicate Z Report ....................................................... |
74 |
Balancing Formulas ..................................................... |
74 |
APPENDIX ................................................................... |
74 |
Totalizers and Counters Table ...................................... |
74 |
Cash Register Specifications and Safety ..................... |
75 |
ENGLISH
III
Getting Acquainted with Your Cash Register
1
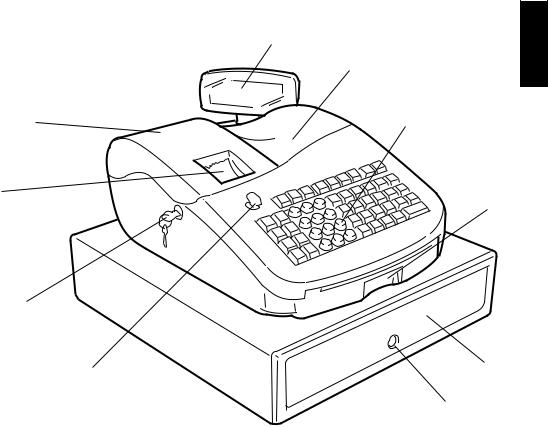
The figure below shows an overall view of your cash register.
2
10 |
3 |
9
8
|
|
|
7 |
1. |
Customer Display |
7. |
6 |
Control Lock |
|||
2. |
Operator Display |
8. |
Printer Compartment Lock |
3. |
Keypad |
9. |
Customer Receipt Output Window |
4. |
Item Deposit Drawer |
10. |
Printer Compartment Cover |
5.Cash Drawer
6.Cash Drawer Lock
4
5
ENGLISH
1
Standard Accessories
Your cash register comes with the following items:
•One black plastic journal winder spindle
•One roll of standard paper tape
•One inked ribbon (already installed)
•Four standard "AA" batteries for the battery back-up system
•This User Manual
•A set of keys for locking the cash drawer and printer compartment
•A set of PRG keys for access to the PRG and X functions
•A set of REG keys for access to the REG, X and Z functions
•A "Thank You" stamp (already installed).
Make sure that the cash register and all of the above items are included in the shipping carton.
Using this Manual
Your cash register manual is organized for easy reference. The front portion contains general information on all the features and functions of the cash register. Instructions for setting the optional programs come next. Transaction examples for operating the cash register are at the back of the manual along with a Totalizers and Counters Table. At the back of the manual you will also find your cash register's techinical specifications and some safety information. Use the Table of Contents to locate a particular item.
Getting Started
Before you begin to operate or program the cash register, read the section entitled Unpacking and Setting Up the Cash Register for information on how to get yourself ready to work. Read also Keypad Functions, The Control System and Operator and Customer Displays to become familiar with their operations.
NOTE: Programs and transaction information for management reports are stored in the memory of the cash register. Batteries are provided to save this information in the event of a power failure or if the cash register is unplugged from the power outlet.
Programming the Cash Register
Simple step-by-step instructions are included for each program. Also provided are examples which can be used for practice.
Carrying Out Sales Transactions
Transaction examples provide steps for key operations. Sample receipts are included.
2

Unpacking and Setting Up the Cash Register
NOTE: Please read this section carefully before attempting to program the cash register or perform sales transactions.
As soon as you receive the cash register, open its shipping carton and carefully withdraw each component. Make sure that the cash register and all of its accessories, listed in the section entitled Standard Accessories, are present in order to setup the cash register by following these guidelines:
1.Place the cash register on a level, stable, vibration-free and dustfree surface. Make sure it is near a grounded power outlet.
2.Plug the cash register into a grounded power outlet.
3.Insert the batteries as explained in the section entitled Inserting/ Replacing Batteries. Do not install batteries unless the register is plugged in.
WARNING: Before inserting the memory backup batteries, make sure that the cash register is plugged into an electrical wall outlet. The machine must be plugged into an electrical outlet before you insert the batteries.
4.Load the paper tape as explained in the section entitled Loading Single-Ply and Dual-Ply Paper.
5.Set the desired program options as explained in the section Cash Register Programming.
6.Once the desired program options have been set, turn the control key to the REG position and you are ready to perform sales transactions.
Maintaining the Cash Register
Provided below is information on how to maintain your cash register.
NOTE: Before cleaning the cash register, make sure it is powered off and/or unplugged from the wall outlet. Before unplugging the cash register from the wall outlet, make sure that four charged AA standard backup batteries are installed in the battery compartment. All data stored in memory will be cancelled if you unplug the cash register from the electrical wall outlet without back-up battery supply.
1.Keep all liquids away from the cash register so as to avoid spills which could damage the electronic components.
2.To clean the cash register firstly turn it off and/or unplug it from the wall outlet (be sure the back-up batteries are installed), then use just a damp cloth. Do not use corrosive substances such as solvents, alcohol, petrol, or abrasive components.
3.If the cash register is stored in extreme hot or cold temperatures (below 32 degrees or above 104 degrees Fahrenheit), allow the temperature inside the cash register to reach room temperature before turning it on.
4.DO NOT attempt to pull the paper tape when the cash register is printing or when you are loading paper. Always use the [Feed] key to feed paper. Pulling the paper tape could damage the print mechanism.
ENGLISH
3
The Keypad
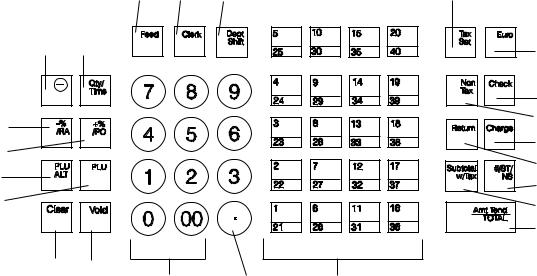
Your cash register is equipped with a 52-key keypad by means of which you can perform all cash register functions.
The figure below shows the keypad layout.
12
11
5
6
1 |
2 |
7 |
10 |
14 3
22
19
9
20
8
4
21
23
15 13
17 |
16 |
18 |
4

Keypad Functions
1.[Feed] (Paper Feed) - Advances the receipt or journal paper one line feed; advances the paper continuously when held down.
2.[Clerk] - Confirms an entered clerk number and three-digit security code. Also used to print a Clerk Report.
3.[QtyTime] (Dual function: Multiply and time display) - Multiplies [DEPARTMENT], [PLU] or [-] key entries; also displays the current time, if set, and is used to print the Cash-In-Drawer Report.
4.[#/ST/NS] (Dual function: ST - Subtotal and NS - No Sale) - As the No Sale key, opens the cash drawer without registering any amount or when changing cash for a non-sales transaction. As the Subtotal key, calculates a subtotal during a transaction consisting of a number of items to be individually discounted or increased by a fixed percentage and prints this on the receipt.
5.[PLU ALT] - Temporarily overwrites a price which was assigned to a PLU number.
6.[PLU] (Price Look Up) - Registers a preset price of an individual item to the appropriate department. Also used to print PLU Reports.
7.[Dept Shift] (Department Shift) - Allows price entries for departments 21-40. Press this key before entering applicable department keys 21-40.
8.[Return] - Issues refunds for returned merchandise. Refund totals are printed in the management report.
9.[Non Tax] - Used when no tax is to be registered for a department which is programmed for tax.
10.[Tax Set] - Used to program VAT rates.
11.[+%/PO] (Dual function: Percent Plus and Paid Out) - When used as the +% key, adds a percentage to an item or to the sales total. Total percent plus amounts are shown in the management report. When used as the PO key, registers any money paid out. Paid out totals appear in the management report. Also used to set a machine number.
12.[-%/RA] (Dual function: Percent Discount and Received On Account) - When used as the -% key, subtracts a percentage from an item or from the sales total. Total discount amounts are shown in the management report. When used as the RA key, registers any payment made to the cash drawer. Amounts are added to the received on account total in the management report.
13.[Void] - Deletes the last item entered and used for correcting a particular entry after it is processed and printed. Void totals are reported in the management report. Also used during cash register options programming.
14.[-] - Subtracts an amount from an item or the sales total. Minus key totals are printed in the management report.
15.[Clear] - Clears an entry made from the numeric keypad or with the [Qty/Time] key before finalizing a transaction with a Department or function key. This key is also used to clear error conditions.
16.[.] (Decimal Point) - Used to enter fractional quantities of items being sold. In all modes, the decimal point is not to be used when entering a price.
17.[0 - 9/00] - Input amounts, indicate how many times a particular item repeats, add and subtract percentage rates, input department code numbers, handle figures which require a decimal point. The double zero key allows the quick entry of numbers with two or more zeros.
18.[1-40] (Departments 1 through 40) - Used to enter single or multiple item sales to a particular department. A VAT rate is automatically added, if set. Department totals are shown in the management report.
19.[Check] - Totals sales paid by check. Check totals are printed in the management report.
20.[Charge] - Totals sales that are charged. Charge totals are printed in the management report.
ENGLISH
5

21.[Subtotal w/Tax] - Displays the subtotal of a sale with sales tax.
22.[Euro] - When the cash register is in its default Local base currency, this key is used to program the Euro exchange rate and to automatically calculate and display the value in Euro of the total amount of a sale or of a particular amount registered. When the cash register is programmed to work in the Euro base currency, pressing this key converts the sales total to the Local currency.
23.[Amt Tend/TOTAL] (Amount Tendered/TOTAL) - Totals exact cash transactions, computes change and totals check and charge transactions.
The Control System
The Control Lock
The control lock is located on the upper left-hand side of the keypad. The PRG or REG key must be properly inserted in the Control Lock in order for you to be able to use the different cash register functions available. The following figure shows the Control Lock and the different modes that can be used.
Depending on the desired operation, insert the appropriate key in the Control Lock and turn it to the following positions:
OFF |
The cash register is turned off and cannot be used. |
PRG |
Used to program the cash register according to your |
|
specific needs. |
REG |
The cash register can perform the standard sales transac- |
|
tions, including preset options. |
XPrints the X management report, Cash-in-Drawer report, PLU report, clerk report, cash declaration and periodical financial reports.
ZPrints the Z management report and resets totals (except the grand total) to zero. Prints the PLU report, clerk report, cash declaration and periodical financial reports.
Control Keys
A set of each of the following keys is provided along with a set of keys to open the cash drawer and printer compartment:
PRG |
The PROGRAM key works in all modes (PRG, REG, X |
|
and Z). It is usually used by the Supervisor to program the |
|
cash register, access cash register functions and print X |
|
and Z management reports. |
REG |
The REGISTER key only works in the REG and X modes, |
|
granting both Clerk and Supervisor access to the cash |
|
register functions. This key cannot be used to access the |
|
PRG and Z modes. |
6

Cash Drawer with Removable Cash Bin
The cash drawer features a cash bin with slots for banknotes and slots for coins. Pressing the [#/ST/NS] with the control key in the REG position opens the drawer. If a clerk number and secret code have been set, pressing this key will open the cash drawer only after the clerk number and code have been specified. This drawer can be locked for security to prevent accidental opening when moving the cash register by using the printer compartment key.
If desired, the cash bin inside the cash drawer can be completely removed from the cash register. To do so, gently lift the bin and pull it out.
Deposit Drawer
This extra drawer provides sufficient space for miscellaneous items.
Operator and Customer Displays
Your cash register offers two displays which provide easy viewing for both the customer and operator during a sales transaction. The customer display shows entry amounts and related transaction information through the use of numbers and special symbols. The operator display shows specific operator messages or the same transaction data as shown on the customer display. Both displays are read from left to right.
Time Display
You can display the current time by simply pressing the [Qty/Time] key with the cash register in the REG mode. Press the [Clear] key to stop displaying the time and re-enable the keypad to start a transaction.
NOTE: Trying to use this feature during a transaction will result in an error tone. If this occurs, press the [Clear] key to clear the error and the tone.
Special Symbol Indicators
Special symbols appear at the far left-hand side of the displays during cash register operation. These symbols identify the amount shown, or warn of an error condition. They include:
C (Change) |
Indicates that the displayed |
amount is the |
change due |
|
to the customer. |
|
|
E (Error) |
Indicates when an error |
is made during |
operation or |
when programming the cash register. An error tone sounds to alert the operator.
S (Sub-total) Indicates that the amount shown is the subtotal of a transaction, including sales tax if applicable.
= (Total) |
Indicates that the amount shown is the transaction total. |
|
- (Minus) |
Displays a negative entry. Also displays if subtotal or cash |
|
|
|
tendered total is a negative number due to a return or |
|
|
refund. |
|
|
Indicates when the journal paper is low. |
|
|
|
CA (Cash) |
Indicates when the total displayed refers to a sales |
|
|
|
transaction paid by cash. |
Ch (Check) |
Indicates when the total displayed refers to a sales |
|
|
|
transaction paid by check. |
Cr (Charge) |
Indicates when the total displayed refers to a sales |
|
|
|
transaction paid by charge. |
|
|
Displayed when the Euro key is pressed to indicate that |
|
|
the amount is displayed in the Euro currency. |
These symbols clear automatically when you start the next entry or press the [Clear] key.
ENGLISH
7
Positioning the Customer Display
To position the customer display, simply pull it up from its slot on the casing and rotate it to the position desired.
Error Conditions
The Error Alarm
The error alarm warns of an operator error (usually when a wrong key is pressed for a specific type of entry) or of an error made during cash register programming. The error alarm can also indicate that the Control Lock is in the wrong position for the current operation. In case of error, the error tone sounds, the letter E is displayed on the customer and operator displays and the keypad locks.
Clearing an Error
Press the [Clear] key to clear an error. The tone ends, the displays clear and the keypad unlocks, allowing you to continue with the transaction or restart the program.
If an error condition cannot be cleared, perform a general clearance. Bear in mind, however, that one of the two general clearance procedures, explained in the next section, will set all counters and totals to zero and will cancel all programmed functions.
NOTE: The [Clear] key also clears an incorrect entry from the display prior to pressing a registration key. Once an entry is printed, the [Void] key must be used to correct an error.
General Clearance
If the cash register does not function, for example while programming and the error signal cannot be stopped by pressing the [Clear] key, perform a general clearance. There are two ways of performing a general clearance, whereby the second method resets all totals and counters and cancels the programming. Use this method only as last resort.
General Clearance without Clearing Totals and the Programming
1.Turn the Control Key to the OFF position.
2.Make sure four charged AA batteries are inserted in the battery compartment.
3.Unplug the cash register from the power socket.
4.Wait ten seconds and then reconnect the cash register to the power socket and resume your operation.
If the cash register remains in an error condition, proceed with the second general clearance method.
General Clearance with the Clearing of Totals and all Cash Register Programming
NOTE: Be careful that this procedure erases all totals and counters, and cancels the programming of the cash register.
1.Turn the control key to the OFF position.
2.Open the printer compartment cover and remove the back-up batteries.
3.Unplug the cash register from the power socket.
4.Wait for 15 minutes and then plug the cash register back to the electrical power outlet.
5.Insert the batteries once again.
6.Reprogram the cash register.
8
Voiding Errors
Once an entry is printed, the [Clear] key cannot be used to clear an error. Press the [Void] key to correct an error already registered.
Voiding the Entry Just Completed
Simply press the [Void] key. The entry is reprinted with a "-" symbol followed by the amount and erased from the transaction.
Voiding an Earlier Entry
To void an earlier entry, register it again and then cancel it using the [Void] key. When a transaction including the error is completed, proceed with the following steps to void the error.
1.Retype the incorrect information, exactly as originally entered, and press the [Void] key.
2.Enter the correct amount.
3.Total the transaction by pressing the [Amt Tend/TOTAL] key.
Back-up Battery System
During cash register operations, all transaction data for the management report is stored in the register's memory. This memory also holds all optional programming information. The memory back-up system keeps this information stored in memory when the cash register is turned off.
The memory is protected by four "AA" batteries that come with your cash register. In order to guarantee continuous back-up protection, insert the batteries before beginning to program the cash register.
The machine must be plugged into an electrical outlet before you insert the batteries.
Inserting/Replacing Batteries
NOTE: Before inserting the batteries, make sure that the cash register is plugged into the power socket and that the control key is switched to the OFF position.
Proceed as follows to insert or replace the batteries:
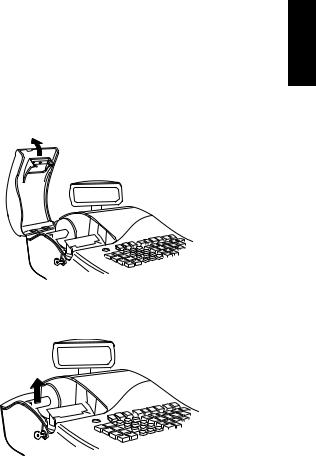
1.Unlock the printer compartment cover, grip the left side of the compartment cover, gently pull it back and then lift it off the cash register.
2.Lift the paper journal winder spindle out of the printer compartment.
ENGLISH
9
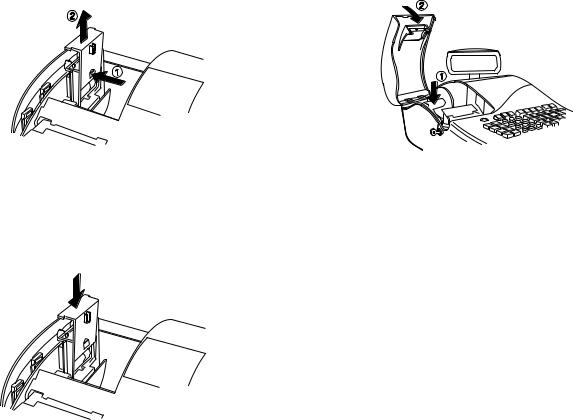
3.Remove the battery compartment cover by pressing on the arrow impressed on the cover and lifting upwards, as shown by the arrows in the figure.
4.Remove the discharged batteries if you are replacing the batteries.
5.Position the new batteries making sure that the positive and negative poles are aligned correctly. Drawings inside the battery compatment show how the batteries must be positioned.
6.Replace the battery compartment cover by sliding it down until it clicks into place.
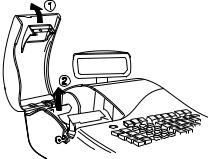
7.Reposition the journal winder spindle, then reposition, close and lock the printer compartment cover.
NOTE: If the cash register will not be used for an extended period of time, you may want to remove the back-up batteries to prolong their usage. Doing this will erase all transaction and programming data stored.
Printer Compartment
The printer compartment is on the top left-hand side of the cash register. It houses the paper tape, journal winder spindle, inked ribbon, back-up batteries and the printer.
The Inked Ribbon
This cash register uses a standard inked ribbon which needs replacing when faded characters are printed. The next section explains how to install the inked ribbon when printing becomes light.
10

Installing the Inked Ribbon
Proceed as follows to install the inked ribbon:
1.Unlock, open and remove the printer compartment cover.
2.Remove the paper tape from the print mechanism by sliding it backwards towards the rear of the cash register.
If dual-ply paper is loaded in the cash register, lift the plastic journal winder out of the cash register and unwind and free the journal record from the winder spindle. Then remove the paper tape from the print mechanism by sliding it backwards towards the rear of the cash register.
3.Remove the "THANK YOU" stamp as explained in the next section.
4.Remove the used ribbon by lifting the two spools from their related spindles and the ribbon out of the print mechanism.
5.Place a full spool of ribbon on the left spindle and unwind approximately three inches of ribbon.
6.Place the ribbon along the outside of the metal brackets and through the printer mechanism as shown in the following figure.
7.Place the take up spool on the right spindle and then turn it to take up the slack in the ribbon.
8.Refit the "THANK YOU" stamp.
9.Load the paper tape back into the printer and through the print mechanism. If the cash register was using dual-ply paper, load the paper tape back through the print mechanism, and wind the journal back onto the plastic journal winder spindle. Instructions on how to load dual-ply paper are provided further on.
10.Reposition, close and lock the printer compartment cover.
ENGLISH
11
Re-inking the Thank You Stamp
Your cash register is equipped with a pre-inked rubber stamp that automatically prints "YOUR RECEIPT THANK YOU" on every receipt.
If the print becomes unclear or faint, you will need to re-ink the stamp as follows:
1.Unlock, open and remove the printer compartment cover.
2.The Thank You stamp is located directly in front of the printer. Grasp the stamp pad on both ends and pull upward.
3.On the reverse side of the stamp pad is a small hole. Feed one drop of ink into the hole.
4.Replace the stamp pad. Be sure that it snaps into place securely.
5.Reposition, close and lock the printer compartment cover.
Paper Tape
This cash register uses standard 2 1/4" (57 mm) paper. The paper needs to be changed when a red line appears on the tape. You can use either single-ply or dual-ply paper. Use dual-ply paper whenever you want to print customer receipts and journal records, single-ply when just customer receipts need to be printed.
Loading Single-Ply and Dual-Ply Paper
Proceed as follows to load the cash register with either single-ply or dual-ply paper.
1.Make sure the cash register is plugged into a grounded power outlet and that the control key is in the REG position.
2.Unlock, open and remove the printer compartment cover, then remove the plastic journal winder spindle.
3.With a pair of scissors, cut the end of the paper tape to create a straight, even edge so that the paper can be properly fed through the print mechanism.
12
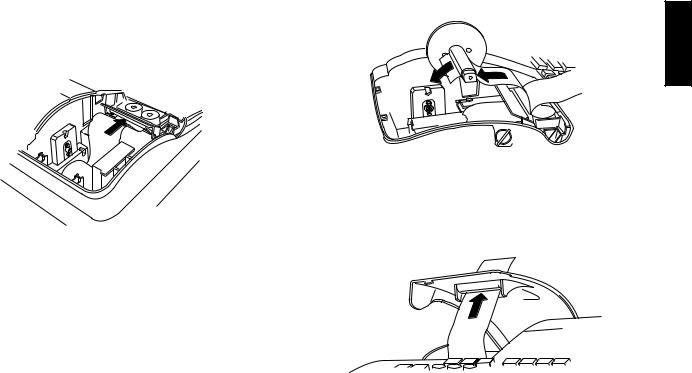
4.Set the paper roll in the bottom of the printer compartment so that the paper feeds out from the bottom of the roll.
5.Insert the edge of the paper into the paper slot as shown in the figure.
6.Press the [Feed] key and manually feed the paper into the slot until the paper catches and advances approximately six to ten inches above the print mechanism.
NOTE: If the paper does not feed properly, check the alignment of the paper in the slot and/or for the straight edge on the end of the paper roll.
7.If you are loading dual-ply paper for a journal record, slide the top edge of the inner ply through the slots on the plastic journal winder spindle and manually roll the winder toward the rear of the rear of the cash register to take up slack in the tape. Make sure that the two wheels on the spindle are positioned towards the right-hand side.
8.Replace the journal winder spindle in the printer compartment (the two wheels must be positioned towards the right-hand side).
9.Pass the edge of the customer receipt (or the outer ply when using dual-ply paper) through the receipt window on the compartment cover.
10. Reposition, close and lock the printer compartment cover.
ENGLISH
13
Quick Start
Quick Start is a brief but complete start-up procedure that allows you to begin using your new cash register as quickly as possible. Carefully follow the steps listed below:
1.Make sure cash register is plugged into a grounded power outlet.
2.Insert the PRG key into the Control Lock and turn it to the PRG position.
3.Set the current date in the day/month/year format by typing the corresponding numeric keys and then pressing [#/ST/NS]. Single digits must be preceded by a zero. For example, to set January 10, 2001, type [100101] and then press the [#/ST/NS] key to store your entry.
If you wish that the date just entered be printed in the month/day/year format, type [40] and then press the [Void] Key.
4.Set the current time using the 24-hour (military) format and then pressing [Qty/Time]. Also in this case single digits must be preceded by a zero. For example, to set 1:05 P.M., type [1305] and then press the [Qty/Time] to store your entry. To set 9:15 A.M., type [0915] and then press [Qty/Time].
If you wish that the time just entered be printed in the 24-hour format, type [220] and then press the [Void] Key.
5.Set a machine number by entering a four digit number and then pressing [+%/PO]. For example, to set machine number 5, type [0005] and then press [+%/PO].
6.Set the first of up to four possible VAT rates. For example, to set a VAT1 rate of 16%, type [1] and then press the [Tax Set] key, type [16000] (three digits must be entered after the desired decimal point) and then confirm with the [Amt Tend/TOTAL] key.
7.Program standard Department 1 as VAT1 to a multiple positive item price sale. For example, to assign VAT1, multiple single item cash sale and a price of £3.00 to standard Department 1, type [000001] and then press [Subtotal w/Tax], type [300] and then press
[Department 1/21].
8.When programming is complete, exit the program mode by turning the PRG key to the OFF position.
9.Practice normal sales transactions by switching the cash register into the Training Mode. This mode is very useful to new users as it allows them to simulate sales transactions without recording these trials in the X or Z management reports. More information on this mode is give in the section entitled Training Mode.
Once you have mastered the Quick Start operations, you will undoubtedly want to expand your use of the machine by studying other sections of this manual and incorporating new programming into your personalized cash management system. For example, other valueable functions include Percent Discount Rate, Percent Plus Rate, Price Look-Ups (PLUs), Euro Currency Conversions, and many more.
Helpful Hints for a Successful Start-Up
This cash register has up to 40 departments available. You may assign the taxable status to any other department by repeating the tax assignment procedure used for Department 1. For departments 21-40, press the [Dept Shift] key before the applicable department key. For example, to select Department 26 press [Dept Shift] followed by the
[Department 6/26] key.
14

Training Mode
The optional training mode is designed to help you become better acquainted with the register mode and offers an ideal place for beginners to practice transaction examples. Once the training mode is activated, you cannot operate in the PRG, X or Z modes. The transactions made in the training mode are not recorded in the X or Z reports and are not summed to machine totals. Receipt numbers are not counted either.
Activating the Training Mode
Proceed as follows to switch the cash register into the training mode:
1.Turn the PRG control key to the PRG position.
2.Type [666666] and press the [Amt Tend/TOTAL] key. A dot indicating the Training Mode On condition is displayed on the lefthand side of the operator and customer displays.
3.Turn the key to the REG position to perform normal cash register operations.
Exiting the Training Mode
Proceed as follows to exit the training mode and therefore re-enable the cash register to record all sales transactions in the X and Z management reports and in the machine totals.
1.Turn the PRG control key to the PRG position.
2.Type [555555] and press the [Amt Tend/TOTAL] key.
3.Turn the key to the desired operating position.
Cash Register Programming
This cash register can be programmed to tailor its features according to your specific needs. This programming facility allows you to:
•Define three-digit secret codes for each of the 15 programmable clerks
•Set a machine number
•Set the date and time
•Set percent discount (-%) rates
•Set percent plus (+%) rates
•Define fraction rounding
•Define decimal point positions
•Define up to four VAT rates
• Define Price Look-Ups (PLUs) for individual items
•Define tax status and High Digit Lock Out to the minus key
•Define tax status, High Digit Lock Out, Positive/Negative Single/ Multiple item sale and relative price to a defined and activated department
•Define a normal department for negative price registrations
•Set an exchange rate for the Euro currency
•Program time reports
•Program the different system options available
•Define manager passwords for the PRG, X and Z modes.
Set some of or all of the above features, depending on your business needs. These program settings will reside in the cash register's memory until you change them or deactivate the battery back-up system.
ENGLISH
15
Setting Cash Register Features
All cash register features are programmed by first switching the cash register into the program (PRG) mode by using the PRG key.
This chapter provides simple step-by-step procedures on how to program the cash register. An example is provided after each procedure. It is suggested that you first run through all the examples to become familiar with the cash register's programming facilities, then program the cash register according to your own specific needs.
NOTE: Program all the desired features at the same time in order to create a single receipt of all selections. Keep the receipt in a safe place for future reference.
Exiting the Program Mode
Proceed as follows to exit the program mode once you have finished programming the cash register:
1.Print a Program Tape by pressing [999999] followed by the [Amt Tend/TOTAL] key, as explained in the section entitled Overall Programming Dump Report, for a printed report on how the cash register is currently programmed.
2.Store the program tape in a safe place for future reference.
3.Turn the PRG key or REG key to the REG position if you wish to carry out sales transactions, or to the OFF position if you wish to exit.
Making Changes to Cash Register Programming
Once the cash register is programmed to satisfy your specific needs, there is no need to reprogram the entire machine to make single program changes or corrections. If you wish to make a change (such as an update to VAT rates, PLUs or Euro exchange rates), be sure you are in the program mode, re-do the program in question and finalize when you are ready to exit the programming mode. A new program entry will automatically overwrite a previous entry for the same program.
Entering the Program Mode
To enter into the program mode simply insert the PRG key into the Control Lock and turn it to the PRG position.
Clearing Errors
To clear an error made during the programming phase, simply press the [Clear] key. The error tone ends, the display clears and the keypad unlocks.
In case an error condition cannot be cleared, perform one of the two general clearance methods explained in the section entitled General Clearance. Remember that the second general clearance sets all counters and totals to zero, and cancels all features programmed.
16

Clerk Numbers and Secret Codes
Clerk codes are a special security feature to control access to the register. You can program up to 15 individual clerk numbers linked to secret entry codes of three digits each. By enabling the Clerk System Active option as indicated in the Programming System Options section, the register assigns the default security [000] to all clerks.
Programming a Secret Code Linked to a Clerk Number
1.Insert the PRG key into the Control Lock and turn it to the PRG position.
2.Type [171] and then press the [Void] Key to activate the Clerk system.
3.Type [444444] and press the [Amt Tend/TOTAL] key. The message "CLERK SE.C" is displayed.
4.Type a number to which the secret code will be linked.
5.Set a three-digit secret code by typing three [numeric keys].
6.Press the [Clerk] key.
Repeat the above operations (from step 4 to step 6) to assign a secret code to the remaining 14 Clerks or use the [Clear] key to exit from Clerk Secret Code programming.
If you wish to change the clerk's secret code and the Clerk system is already activated, there is no need to perform step 2 above.
Example: Assign secret code 106 to Clerk 1 for the first time.
Type/Press:
[171] + [Void] + [444444] + [Amt Tend/TOTAL] + [1106] + [Clerk]
Deactivating the Clerk System
Proceed as follows if for any reason you wish to deactivate the Clerk system, in other words if you no longer want to enter a clerk number and related secret code to perform sales transactions.
1.Insert the PRG key into the Control Lock and turn it to the PRG position.
2.Type [170] and then press the [Void] key.
Entering a Clerk Number/Secret Code Before Cash
Register Operations
Proceed as follows to enter a defined Clerk number and secret code before using the cash register in the REG operating mode.
1.Turn the Control Lock to the REG position.
2.Type a Clerk number [1, 2, ... or 15].
3.Type the corresponding three-digit code.
4.Press the [Clerk] key.
A small bar appears on the far left-hand side of the displays to indicate that it is now possible to carry out transactions. During sales transactions the clerk number is printed on the receipt, under the date and alongside the machine number.
ENGLISH
17
Machine Numbers
The machine number is a four-digit number used to identify the cash register. The machine number is printed on all receipts, journal records and management report.
Proceed as follows to set a machine number:
1.Turn the PRG key to the PRG position.
2.Type the [numeric keys] corresponding to the machine number to be assigned (up to 4 digits, 0-9999).
3.Press the [+%/PO] key.
4.Program another feature or exit program mode by turning the PRG key to the OFF position.
Example: Program machine number 1234.
Type/Press:
[1234] + [+%/PO]
Date and Time
Set the date option to print the current date at the top of each receipt, journal record or management report. The date will print in the day/ month/year format unless otherwise programmed as explained in the section entitled Programming System Options.
Set the time option to print the current time at the bottom of the receipt. The time prints in the hour:minutes format. You can display the time by pressing the [Qty/Time] key when the cash register is in the REG mode. The keypad is locked when the time is displayed; to unlock the keypad simply press one of the numeric keys (0-9/00) or press the
[Clear] key.
The date and time change automatically as long as the cash register is plugged into the wall outlet or the battery back-up system remains active.
Setting the Date
Proceed as follows to set the current date:
1.Turn the PRG key to the PRG position.
2.Type the [numeric keys] representing the current date. Remember to use the DDMMYY format. Single digit numbers for months and days must be preceded by a zero (0).
3.Press the [#/ST/NS] key to store the date.
4.Program another feature or exit program mode by turning the PRG key to the OFF position.
Example: Set a date of January 10, 2001.
Type/Press:
[100101] + [#/ST/NS]
NOTE: If you wish that the date just entered be printed and displayed in the month/day/year format, type [40] and then press the [Void] Key. More information on how to change the cash register's basic programming is explained in the section Programming System Options.
Setting the Time
Proceed as follows to set the correct time in the hour:minutes format:
1.Turn the PRG key to the PRG position.
2.Type the [current time] using the HH:MM format.
NOTE: Time is set according to international, or military time (24-hour clock format). To correctly enter this time, simply add 12 to all hours in the PM. For example, to set the time to 9:00 AM, type [0900]; to set the time to 2:15 PM, type [1415].
3.Press the [Qty/Time] key to store the entered time.
4.Program another feature or exit program mode by turning the PRG key to the OFF position.
18
 Loading...