


NEC SB-03TM User Manual
User's Manual
Manuel Utilisateur
Manual del usuario
DTV & IPTV Tuner Module
SB-03TM
English
EnglishFrançaisEspañol
Français
Español

Index
Important Information ······························································································English-2
Declaration ··············································································································English-2
Installation ···············································································································English-3
Part Names ··············································································································English-4
Connections ············································································································English-5
Basic Operation ·······································································································English-6
OSD (On-Screen-Display) Controls ·········································································English-7
Channel Search ······························································································English-7
Auto Scan ·······································································································English-7
Check DTV Signal ··························································································English-8
Network Settings ····························································································English-8
IP Program Settings ·······················································································English-8
Channel Edit ···································································································English-9
Menu Language ·····························································································English-9
Time Zone ······································································································English-9
Parental Control ·····························································································English-9
Closed Caption Options ···············································································English-10
Channel Lock ·······························································································English-10
Password Setting ·························································································English-10
Sound ···········································································································English-10
Setting Copy ································································································English-11
Information OSD ··························································································English-11
System Information ······················································································English-12
Software Update ··························································································English-12
Reset ············································································································English-12
Controlling the module via LAN Control ································································English-13
Troubleshooting ····································································································English-14
Specifications ········································································································ English-15
Limited Warranty ···································································································English-16
English-1

Important Information
Refer to the “Safety Precautions, Maintenance & Recommended Use” of the LCD Monitor in the User’s
Manual for notes on handing.
Declaration
FCC Information
This equipment has been tested and found to comply with the limits for a Class B digital device,
pursuant to part 15 of the FCC Rules. These limits are designed to provide reasonable protection against
harmful interference in a residential installation. This equipment generates, uses, and can radiate radio
frequency energy, and, if not installed and used in accordance with the instructions, may cause harmful
interference to radio communications. However, there is no guarantee that interference will not occur in
a particular installation. If this equipment does cause harmful interference to radio or television reception,
which can be determined by turning the equipment off and on, the user is encouraged to try to correct
the interference by one or more of the following measures:
• Reorient or relocate the receiving antenna.
• Increase the separation between the equipment and receiver.
• Connect the equipment into an outlet on a circuit different from that to which the receiver is connected.
• Consult your dealer or an experienced radio/TV technician for help.
If necessary, the user should contact the dealer or an experienced radio/television technician for additional
suggestions.
The user may find the following booklet, prepared by the Federal Communications Commission, helpful:
“How to Identify and Resolve Radio-TV Interference Problems.” This booklet is available from the U.S.
Government Printing Office, Washington, D.C., 20402, Stock No. 004-000-00345-4.
English
English-2
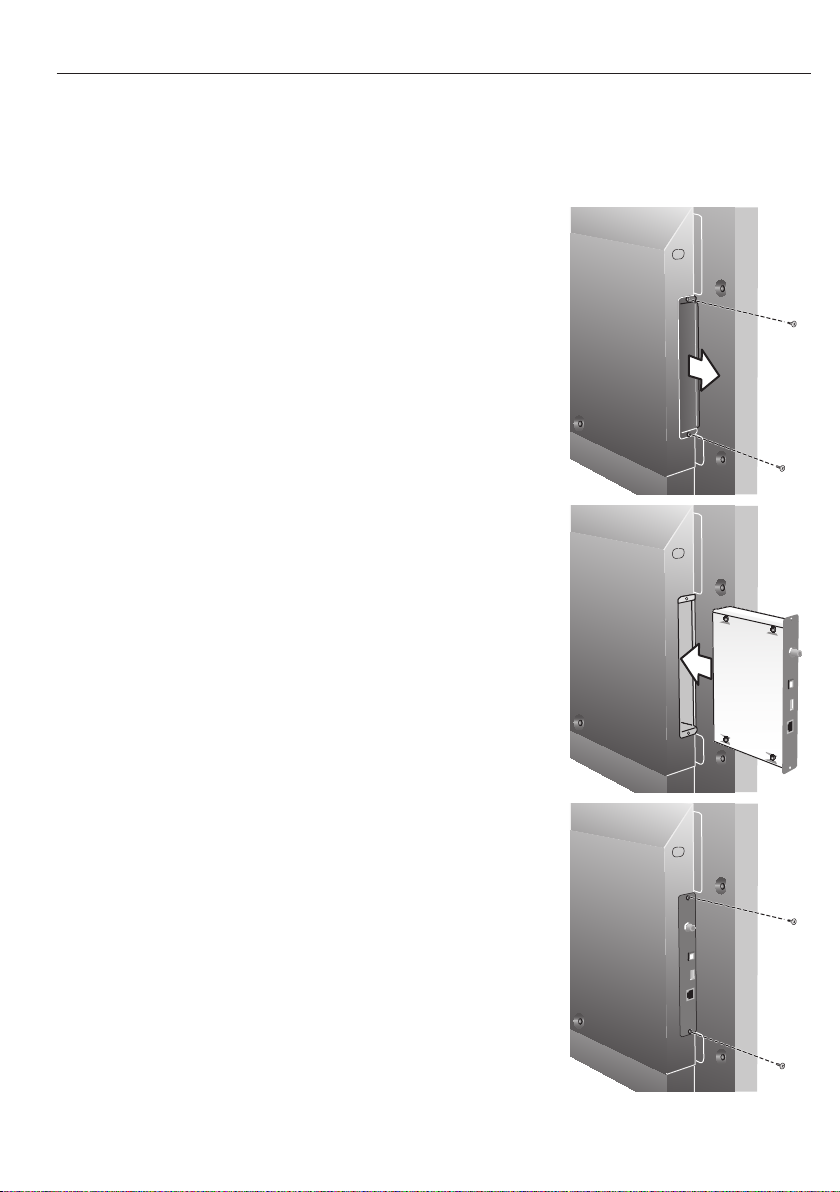
Installation
NOTE: Depending on your LCD monitor, you need to install this module with the optional “SB-02AM” adapter.Refer to the SB-02AM’s Quick
Start Guide for the installation.
WARNING: Do not insert foreign objects inside th e cabinet du ring i nstallation.
Do not drop this module, optional slot cover an d screws during installation.
1. Turn off the main power to the LCD monitor.
2. Remove the LCD monitor’s screws (x2 on the outside), and then
remove the optional slot cover.
3. Insert this module into the LCD monitor.
4. Secure this module by using the two screws from step 2.
(Recommended Fasten Force: 49.0 N·cm - 68.6 N·cm
(5 kgf·cm - 7 kgf·cm))
English-3
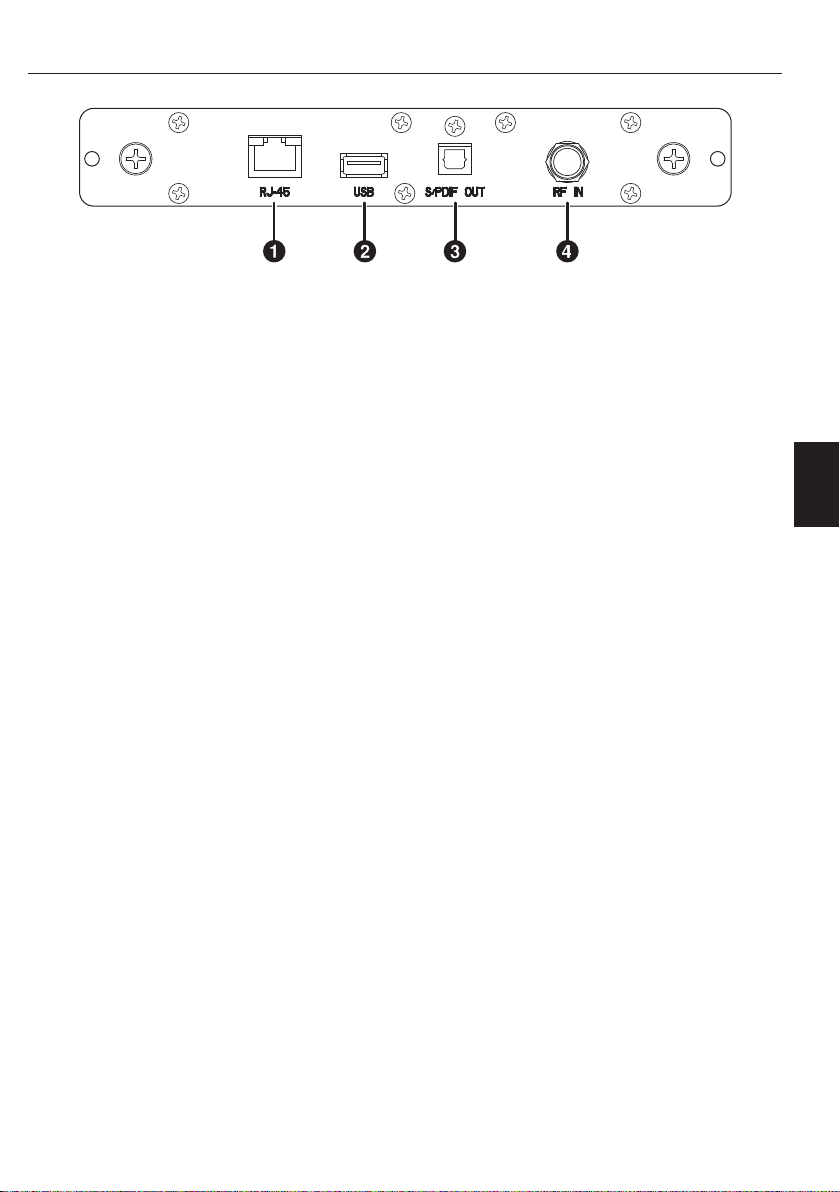
Part Names
1. Ethernet port (RJ-45)
Ethernet port for used IPTV input.
2. USB
USB 2.0 Type A port for USB flash drive.
Insert a USB flash device when you execute Setting Copy function.
3. S/PDIF OUT (optical)
Digital audio output for connection to external digital audio system.
4. RF IN (F Type)
RF input that connects to your VHF/UHF Antenna or Cable T V Service.
English
English-4
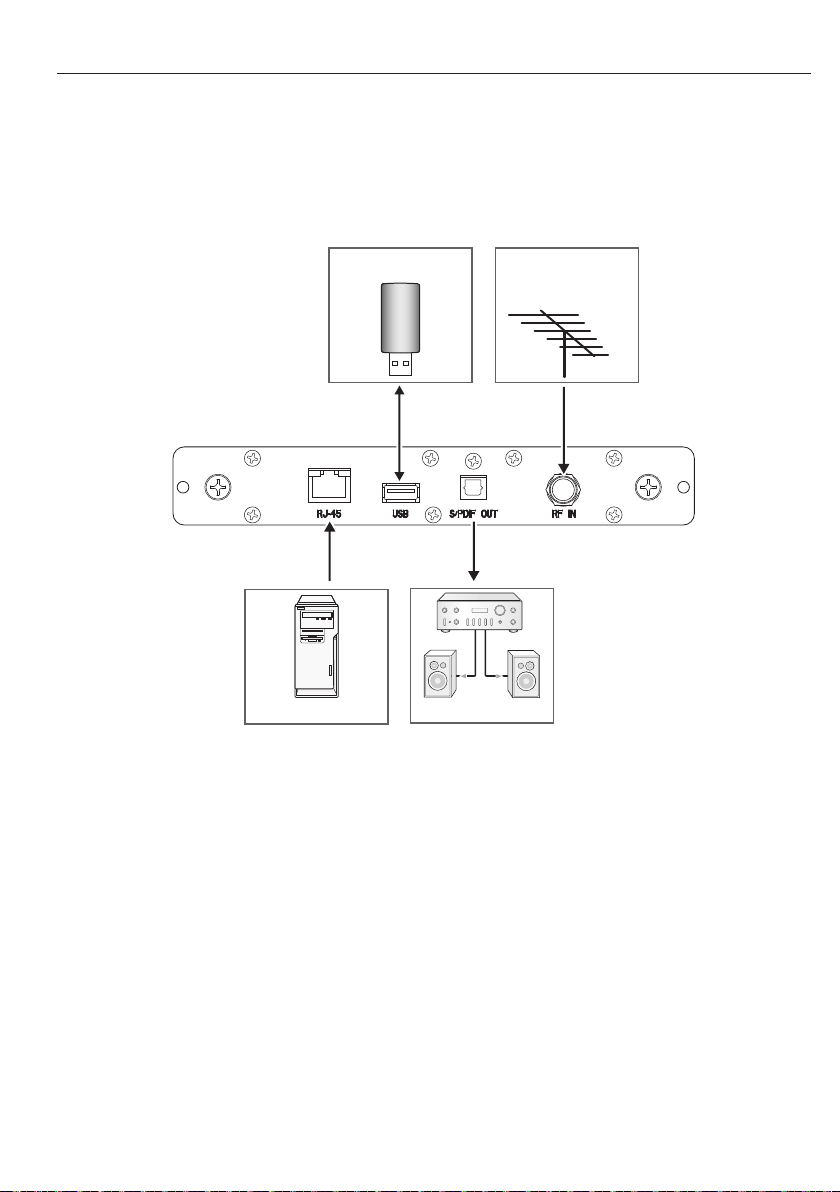
Connections
NOTE: Do not connect/disconnect cables when turning on the monitor or other external equipment as this may result in a loss of the monitor
image.
Before making connections:
* First turn off the power of all the attached equipment and make connections.
* Refer to the user manual included with each separate piece of equipment.
Wiring Diagram
USB Flash Drive
Streaming Server
VHF/UHF Antenna
or Cable TV
Digital Audio System
English-5
 Loading...