


Speakers ...............................................................................
PX-60SP3U
Instruction Manual
Thank you for choosing to purchase NEC PX-60SP3U speakers.
In order to ensure that you are able to make the fullest possible use of this product, please be sure to read this Instruction
Manual before use.
After reading, place this manual in a easily accessed location for future reference.
This product is designed for use exclusively with the following plasma monitor.
¶¶
¶ 60-inch Plasma Monitor: PX-60XM5
¶¶
English
— Checking materials included in package —
Please be sure to check that all of the following items are included in the package with your product. If for any reason there
are any items missing or items which fail to work properly, please contact NEC or the retailer at which you purchased the
product immediately for assistance.
Cushions (2)
Speaker cords (2)
TL TR BL BR
Cord clampers (2)
Left speaker
Right speaker
Speaker units (2)
Attachment pieces (4)
Screws M5 x 12 mm (12)
lish
Eng
n
io
t
c
u
r
t
s
n
I
s
i
h
t
d
..
a
..
e
r
o
....
t
.
..
e
r
..
u
..
s
e
....
b
..
e
..
s
..
a
e
..
l
.
p
,
...
t
..
c
.
u
..
r.
s
d
r
o
o
t
r
e
i
p
.
......
k
n
e
a
..
e
...
p
..
U
s
...
U
.
e
al
s
3
..
u
u
3
...
SP
le
..
.
b
0
i
.
6
s
-
s
...
P
X
o
..
Man
p
P
n
n
t
...
o
s
i
C
S
t
...
le
E
l
a
tio
c
u
...
N
f
c
o
..
l
e
e
..
0
d
h
s
t
e
a
tru
s
s
e
r
h
s
s
k
c
e
e
a
r
c
k
In
m
c
u
a
a
p
o
-6
t
e
y
l
e
o
i
e
t
p
l
s
iv
b
a
S
g
a
e
n
us
i
e
X
l
a
r
s
c
a
n
5
i
x
o
l
u
e
o
M
a
o
P
h
X
e
y
u
c
t
0
s
n
a
a
r
6
u
-
h
o
t
m
r
f
X
s
e
i
P
r
.
u
fo
h
u
e
t
o
d
r:
s
s
y
e
n
u
o
c
e
ne
k
it
e
a
l
r
g
n
o
n
i
t
p
o
a
f
o
s
r
,
e
h
e
e
g
M
b
T
d
n
d
i
l
r
a
d
a
o
s
a
u
m
i
n
e
n
I
t
s
r
c
r
Ma
u
e
t
Pla
f
d
A
o
r
ch
p
n
i
s
-
i
0
h
6
T
mat
g
n
i
ck
e
e
r
h
u
s
e
m
b
e
—C
e
t
i
s
y
a
n
e
l
t
a
P
c
e
u
r
d
a
o
r
p
e
s
r
i
c
o
e
h
n
t
e
h
m
e
t
f
h
r
t
o
a
e
n
f
d
o
e
m
e
s
r
s
s
a
e
a
a
e
r
l
r
h
c
p
tu
y
r
u
n
u
f
a
p
r
ng
r
i
o
u
f
o
f
o
w
f
y
I
o
l
.
t
h
l
c
c
i
u
fo
h
d
e
w
o
r
t
th
a
p
r
r
h
u
t
le
o
i
i
y
a
t
w
h
e
t
r
i
y
l
w
e
h
e
t
g
r
a
o
k
c
C
a
E
p
N
e
t
h
—
c
t
a
t
n
e
i
n
g
d
o
c
e
a
d
e
k
u
l
s
c
c
a
a
n
e
i
l
p
e
p
r
,
a
ly
n
r
i
s
e
p
m
o
e
t
ed
r
i
p
d
g
k
n
r
i
lu
o
w
c
w
o
l
l
o
in
o
t
f
l
i
e
a
ls
f
h
t
h
f
c
ria
i
o
l
l
h
e
.
a
w
e
t
c
s
a
n
h
m
t
a
t
e
k
t
s
i
i
c
r
s
e
s
o
h
a
c
g
)
r
2
n
o
i
(
o
t
R
f
s
s
B
s
y
i
n
l
o
e
i
m
t
h
a
s
s
i
u
d
L
C
e
B
m
m
i
TR
4
(
s
e
c
e
i
L
p
T
t
n
e
m
h
c
a
t
t
A
r
c
e
S
k
a
e
p
s
t
h
)
g
i
2
(
R
s
t
i
n
u
r
e
k
a
e
p
S
r
e
k
a
e
p
s
t
f
e
L
Instruction manual (1)
)
2
(
s
d
r
o
c
r
e
k
a
e
p
)
S
2
(
s
r
e
p
m
a
l
c
d
r
o
C
)
1
(
l
a
u
n
a
m
n
o
i
t
c
u
r
t
s
n
I
)
)
2
1
(
m
m
2
1
x
5
M
s
w
e
r
Safety Precautions
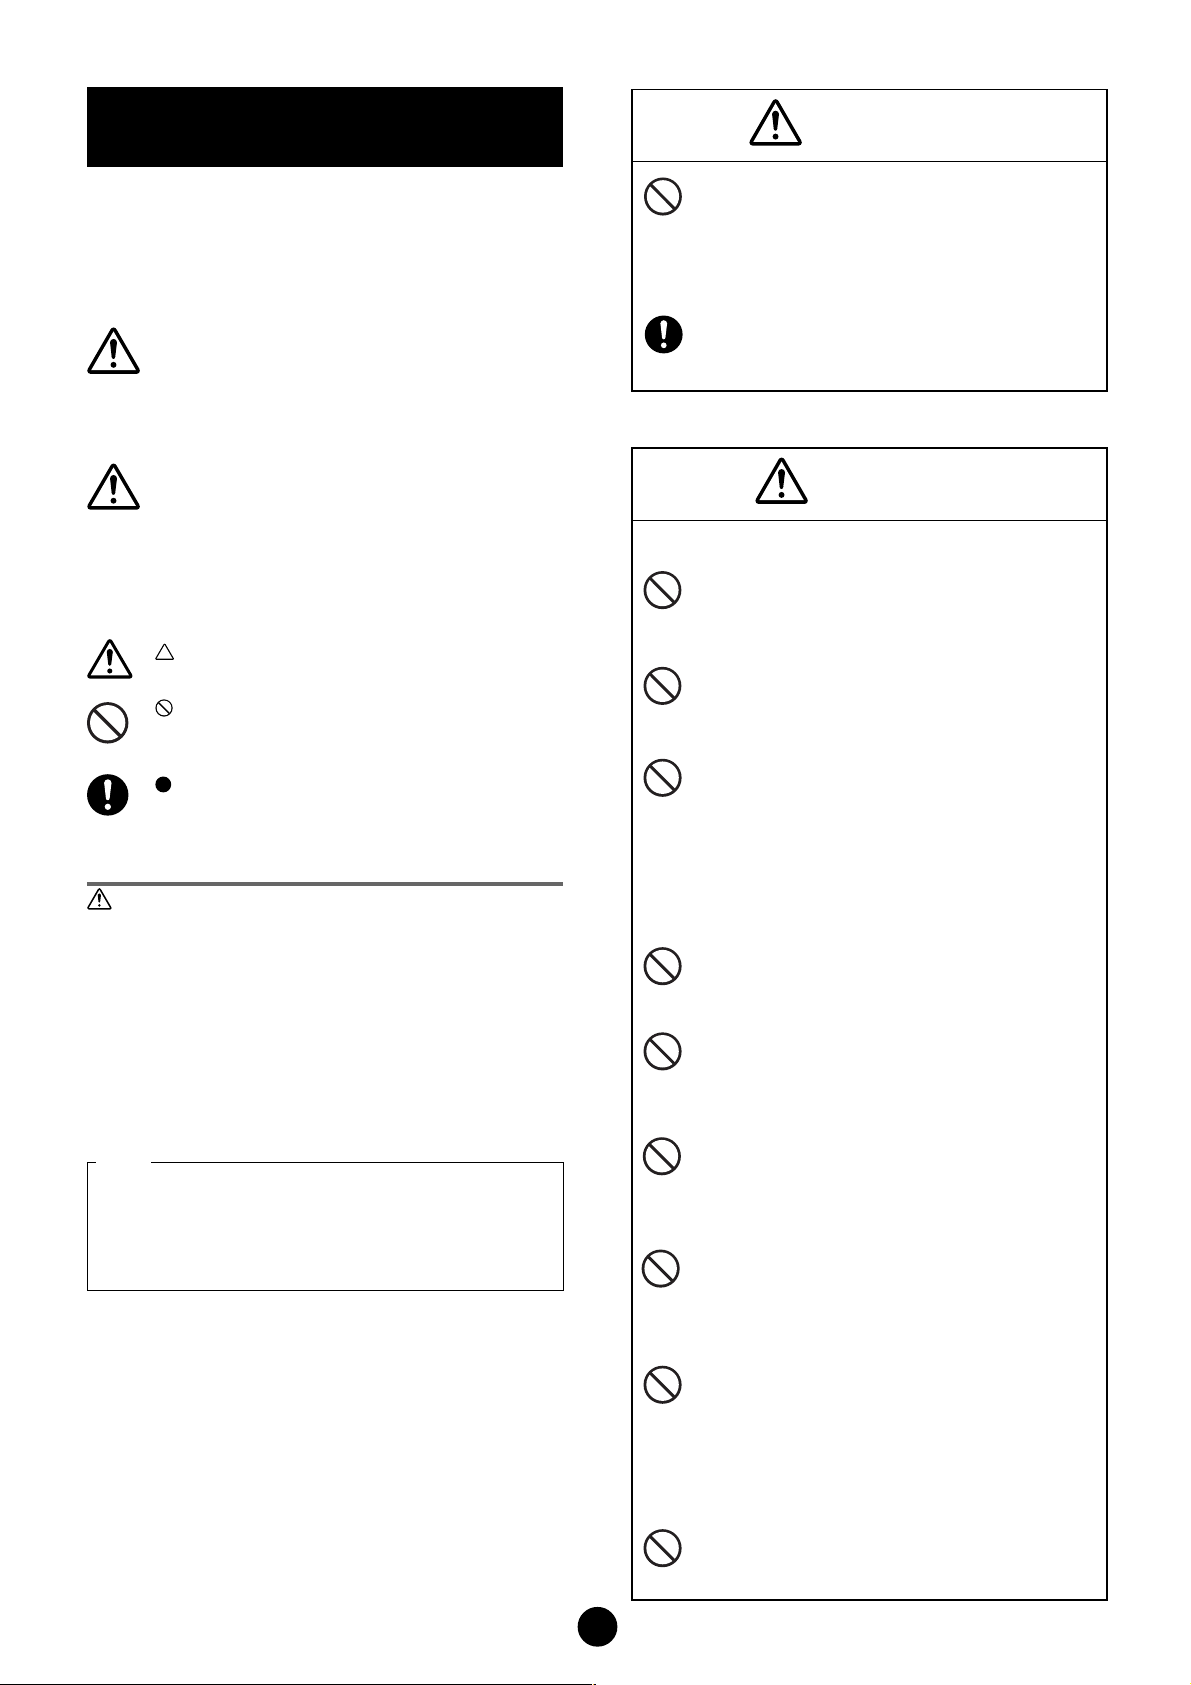
(A note on symbols used herein)
Warning
In order to ensure that the product is used properly and safely, a
number of different symbols are used to mark items designed to
prevent bodily injury to yourself or any third parties or to prevent any
damage to property from occurring. The meaning of these symbols
is as explained below. Be sure to read the following descriptions
carefully before reading the main text.
Warning
Items marked with this symbol indicate items containing instructions
which, if ignored or improperly followed, might result in death or bodily
injury.
Caution
Items marked with this symbol indicate items containing instructions
which, if ignored or improperly followed, might result in bodily injury
or damage to property.
Examples of symbols used herein
This symbol is used to mark cautions (and warnings)
containing instructions which must be followed.
This symbol is used to mark items containing instructions
about actions which are prohibited (i.e., which must never
be performed).
This symbol is used to mark items containing instructions
or other content requiring the user to take certain actions.
Before use
Be sure to follow the instructions below to protect your speakers
from damage from excessive input levels.
÷ Never play signals at a level exceeding maximum input.
÷ When connecting this product or any other audio or visual
equipment to an amplifier, be sure the power to the amplifier is
turned off.
÷ Avoid raising the volume too high when using an graphic equalizer
to greatly amplify high-frequency sounds.
÷ Never raise the volume too high when using a low-output amplifier.
(Doing so would result in increased distortion in the amplifier's
high-frequency range, and thus result in damage to the speakers.)
Note
Depending on the manner of installation, there may be times when
colors blur or other effects appear on screen if the speaker is
placed in close proximity to any other type of plasma monitor.
If this happens, place the speakers at a distance from the monitor
during use.
÷ Never use the speakers to hold the plasma monitor
when moving the plasma monitor, as doing so might
cause the plasma monitor to fall and result in personal
injury. When moving the plasma monitor, always be
sure to hold the bottom of the main body of the
plasma monitor.
÷ Make sure that all nuts, bolts, and screws are properly
tightened to ensure safety. Failing to do so may result
in the speakers falling, thus resulting in bodily injury.
Caution
Installation
÷ Never place the speakers or plasma monitor on an
unsteady platform or uneven surface, as doing so
might result in their falling and this in turn might result
in bodily injury.
÷ Never place the speakers or plasma monitor in a
location subjected to direct sunlight or excessively
high temperatures, as doing so might result in fires
occurring.
÷ Never place the speakers or plasma monitor in a
location where they would be subjected to excessive
levels of dust or humidity or in a location subject to
steam or smoke from oil (e.g., next to a stove or
heating plate), as doing so might result in fires
occurring.
Instructions for use
÷ Avoid using over long periods of time when significant
levels of sound distortion occur, as doing so might
cause the speakers to heat up excessively and this
could in turn result in fire.
÷ Never sit on or hang from the product. Particular care
should be taken around children, as doing so might
result in the product toppling over and this could in
turn result in damage to the product or bodily injury.
÷ Never insert water into the speakers or otherwise
allow them to become wet, as doing so might result in
fire or exposure to electrical shock. Also never use
this product outdoors, as doing so might similarly
result in fire or exposure to electrical shock.
÷ Never place any heavy objects on the speaker cords
or allow the speaker cords to be caught under the
plasma monitor. Doing so could result in damage to
the cords and this in turn might result in fire or
exposure to electrical shock.
÷ Never drop or insert any metallic objects, easily
flammable materials, or other foreign objects in the
mouths or other openings of the speakers, as doing
so might result in fire or exposure to electrical shock.
Special care should also be taken when using the
product in a home or other location where there are
small children.
÷ Never attach the speakers to any devices other than
the specified plasma monitors, as doing so might
result in fire or damage to the product.
2
Attaching speakers to a plasma monitor
The speakers are divided into a right (R) and left (L) speaker.
When attaching the speakers, be sure to check the labels located on the rear of the speakers as well as the markings (R/L)
written on the attachment plates.
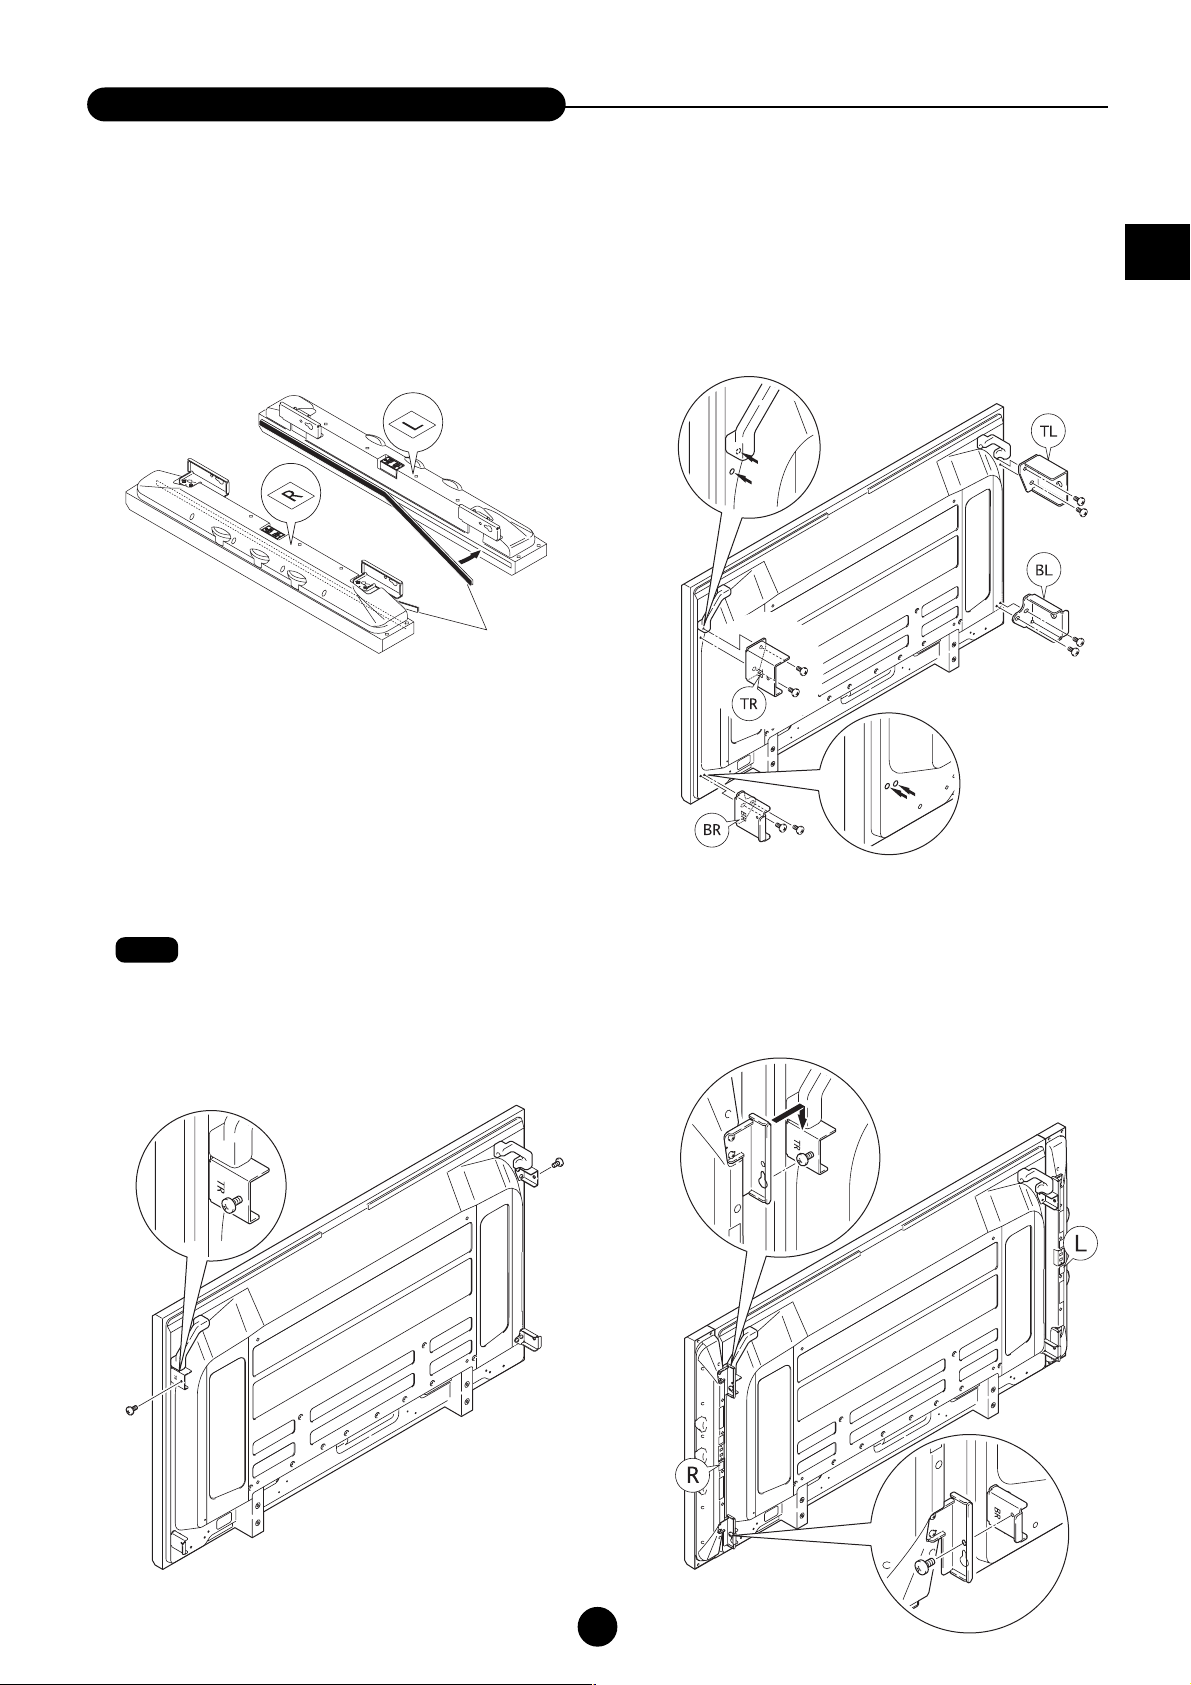
1 Remove the protective tape from the cushions and then
attach the cushions to the sides of the speakers in the
locations indicated in the diagram below.
Cushions
2 Attaching the attachment pieces to the locations shown
in the drawing of the plasma monitor with screws (M5 ×
12 mm) (8 locations).
Check the marks on the attachment pieces (TL, TR, BL,
BR) and the plasma monitor attachment locations.
English
3 Loosely screwing the screws (M5 × 12 mm) into place on
the top attachment pieces (2 locations).
Note
To install the plasma monitor on a wall, first attach the
attachment pieces to the plasma monitor then install it on
the wall. After installing the plasma monitor on the wall, it
may be impossible to tighten the screws on the attachment
pieces.
4 1 Attaching the screws (M5 × 12 mm) that have been
loosely screwed into place on the hooks on top of the
speakers.
2 Loosely screw the screws (M5 × 12 mm) into place
with the screw holes on the attachment pieces on the
bottom aligned with the holes in the hooks on the
bottom of the speakers.
3
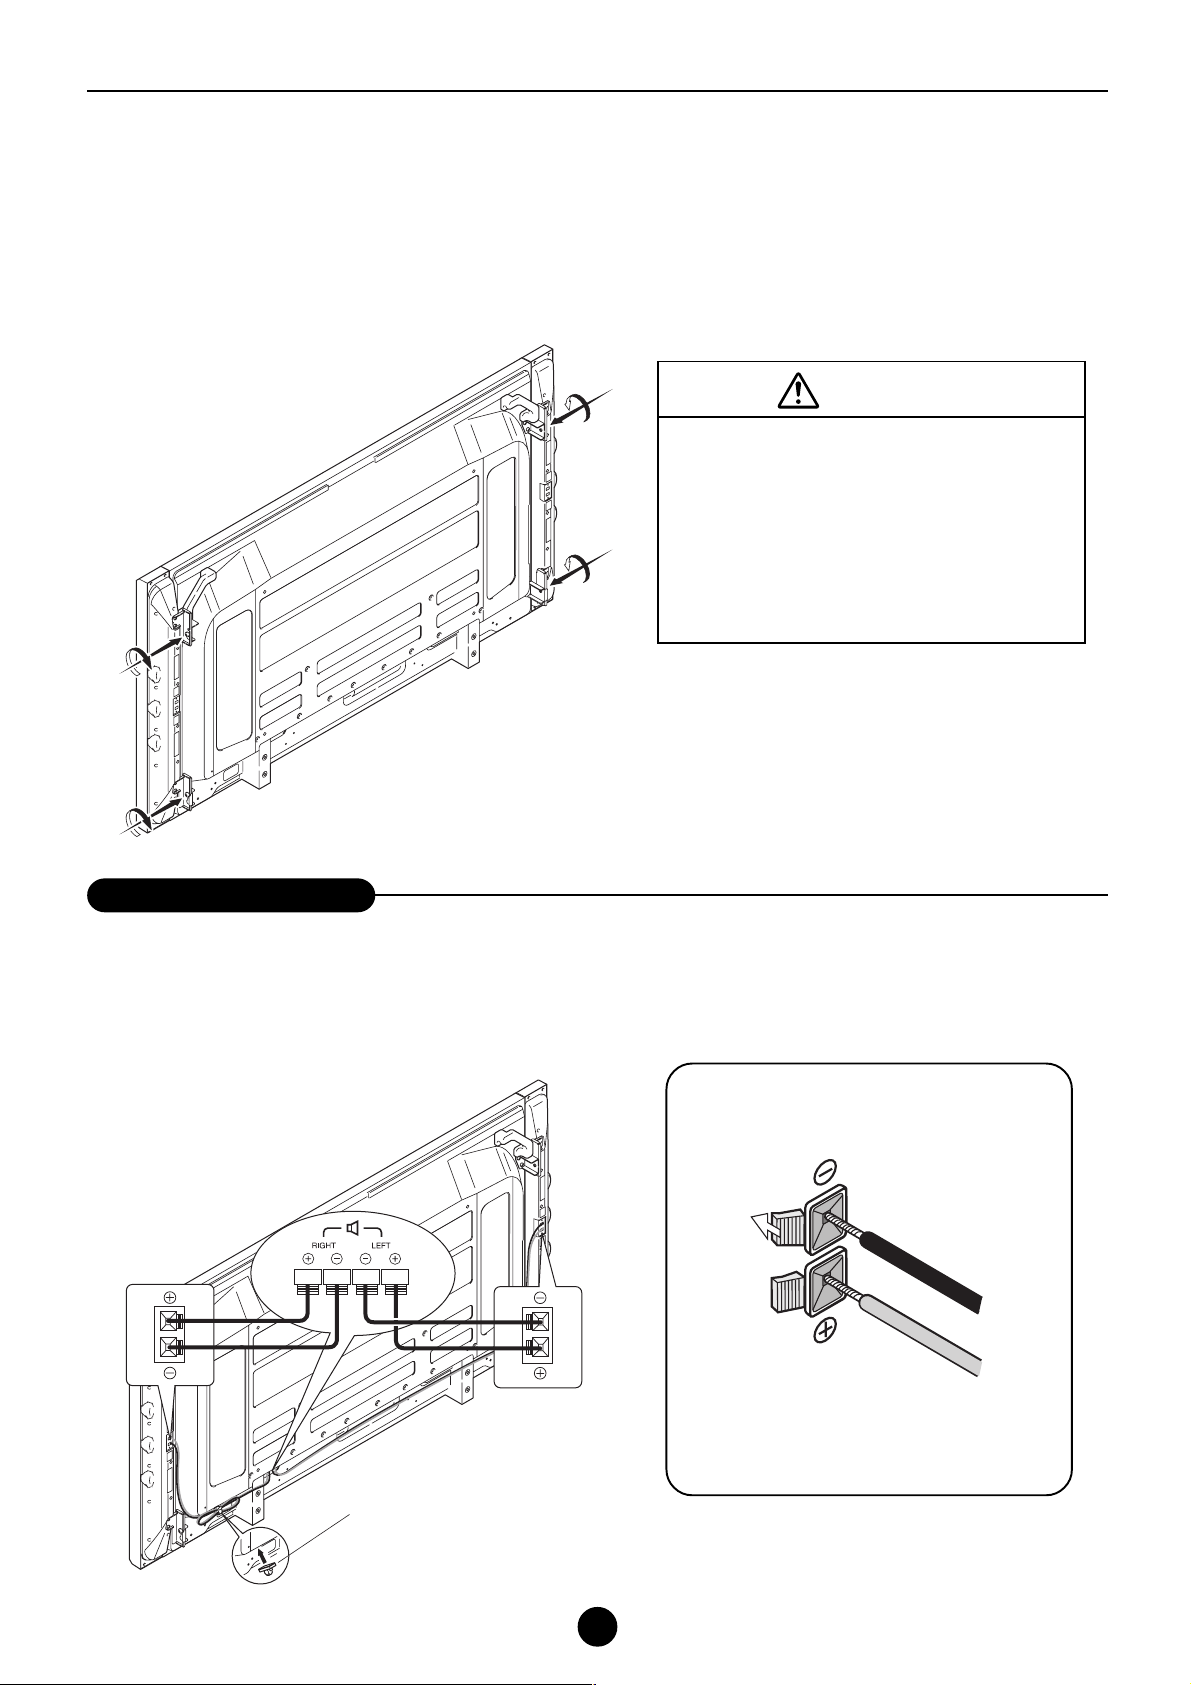
5 Tighten the loosely inserted screws in 4 locations fully into place.
¶ Tighten the screws while pushing the speakers lightly against the plasma monitor.
Check to be sure that all four screws have been screwed firmly into place.
¶ If there is a large gap between the plasma monitor and the speakers, adjust them after slightly loosening the screws that
were tightened in step 2. After adjustment, re-tighten the screws.
¶ To install the plasma monitor on a wall, it is recommended that you first remove the speaker units, then after the plasma
monitor has been installed on the wall, re-attach the speaker units to the plasma monitor.
Warning
¶ Never hold the speakers when speakers are
attached to the plasma monitor to move the
plasma monitor. Doing so might result in the
plasma monitor falling, and this in turn might
result in bodily injury.
¶ Be sure to screw the screws firmly into place.
Failing to do so might result in the speakers
falling, and this in turn might result in bodily injury.
Connecting speaker cords
Be sure to turn off the power to the plasma monitor before connecting the speakers.
Use the provided speaker cords to connect the R/L speaker jacks of the plasma monitor to the speaker jacks of the speakers.
Once the cords have been connected, pull on the cords lightly to make sure that they have been connected firmly to the speaker
jacks. An improper connection might result in the sound being interrupted or the appearance of noise in the output sound.
Note that the speaker cords have positive
and negative ends, and that you should be
sure to insert them correctly.
Black
Red
Press the button of the speaker jack and
keep it pressed down as you insert the wire
of the speaker cord and then release the
button.
Cord clampers
Remove the protective tape from the rear of the cord clampers, attach the
clampers in the desired position, and clamp the cords into place.
4

Cleaning cabinets
Before cleaning, always be sure to remove the power plug from its socket.
¶ Wipe with a soft, dry cloth with a relatively flat pile.
If soiling is particularly bad, wet the cloth in a mixture of neutral detergent thinned with water, wring the cloth dry, wipe, and
then finish with a dry cloth.
If using a chemically treated cleaning cloth, be sure to follow any and all instructions on its use.
¶ Wiping with a mixture containing benzene, paint thinner, or other volatile materials may result in warping or the peeling of the
cabinet coating.
¶ To remove dust from the speaker mesh protectors, use a vacuum cleaner with a brush adapter.
Note that you should never attempt to clean the speakers by applying a vacuum directly to the speaker mesh protectors or by
using nozzle adaptor.
¶ Scratching the cabinet or the speaker mesh protectors with a fingernail or the application of force using any other hard object
may result in scratching.
Also note that inserting any sharp object into the speaker mesh protectors may result in the opening of holes.
Never apply insecticide or any other volatile materials on the cabinet. Also avoid leaving any rubber or plastic materials
on the cabinet for any extended period of time, as doing so may result in warping or the peeling of the cabinet coating.
Disposing of your used product
EU-wide legislation as implemented in each Member State requires that used electrical and electronic products carrying the mark (left) must be disposed of separately from normal household waste.
This includes plasma monitors and their electrical accessories. When you dispose of such products, please follow the
guidance of your local authority and/or ask the shop where you purchased the product.
After collecting the used products, they are reused and recycled in a proper way. This effort will help us reduce the wastes as well
as the negative impact to the human health and the environment at the minimum level.
The mark on the electrical and electronic products only applies to the current European Union Member States.
English
Specifications
Description : 2-way, 3-speaker system (Bass reflex speaker system; Qty: 1)
Impedance : 6 Ω
Rated input : 20 W
Maximum input : 60 W
External dimensions : 90 mm (W) x 880 mm (H) x 96 mm (D)
3.5 in. (W) x 34.6 in. (H) x 3.8 in. (D)
(Not including attachment plates; Qty: 1)
Weight : 6.8 kg (15.0 lbs) (2 speakers)
Usage environment
Temperature : 0 °C to 40 °C/32 °F to 104 °F
Humidity : 20 % to 80 %
Storage environment
Temperature : –10 °C to 50 °C/14 °F to 122 °F
Humidity : 10 % to 90 %
¶ The specifications and/or design of this product may be subject to change at any time without prior notice.
NEC and the NEC logo are registered trademarks of NEC Corporation.
5

Enceintes ..............................................................................
PX-60SP3U
Mode d’emploi
Merci d’avoir acheté les enceintes NEC PX-60SP3U.
Pour être sûr(e) de faire une utilisation optimale de ce produit, lisez ce manuel dans son intégralité.
Après avoir lu le manuel, rangez-le de façon à pouvoir le consulter à nouveau si le besoin s’en fait sentir.
Ce produit est conçu exclusivement pour les écrans à plasma suivants :
¶¶
¶ écrans à plasma 60 pouces : PX-60XM5
¶¶
— Contrôle des pièces incluses dans le paquet —
Vérifiez bien que tous les éléments ci-dessous sont inclus dans la boîte du produit que vous avez acheté. Si, pour
quelque raison que ce soit, il manque des pièces ou certaines pièces ne fonctionnent pas correctement, contactez NEC
ou votre revendeur pour obtenir immédiatement de l’aide.
Coussinets (x 2)
Cordons (x 2)
TL TR BL BR
Colliers de cordon (x 2)
Enceintes (x 2)
Enceinte gauche
Enceinte droite
Pièces de fixation (x 4)
Vis M5 x 12 mm (x 12)
h
lis
ng
E
n
io
t
c
u
r
t
s
n
I
s
i
h
t
d
..
a
e
r
o
......
t
.
..
e
r
..
u
..
s
..
e
..
b
..
e
..
s
..
a
e
..
l
p
,
....
t
..
c
.
u
..
r.
s
d
r
o
o
t
r
e
i
p
.
k
n
e
a
........
e
p
.....
U
s
U
e
al
s
3
u
u
.........
e
SP
l
n
..
b
0
i
..
a
6
s
-
s
P3
X
o
M
p
P
n
n
t
........
o
s
i
C
t
le
E
l
a
tio
c
u
N
f
c
o
........
l
e
e
..
0S
d
h
s
t
e
a
s
s
e
r
h
s
stru
k
c
e
e
a
r
c
k
In
m
c
u
a
a
p
o
-6
t
e
y
l
e
o
i
e
t
p
l
v
s
i
b
a
S
g
s
a
e
n
u
i
e
X
l
a
r
s
c
a
n
5
i
x
o
l
u
e
o
M
a
o
P
h
X
e
y
u
t
0
s
n
a
a
r c
u
-6
h
o
t
m
r
f
X
s
e
i
P
r
.
u
fo
h
u
:
e
t
o
d
r
s
s
y
e
n
u
o
c
e
ne
k
it
e
a
l
r
g
n
o
n
i
t
p
o
a
f
o
s
r
,
e
h
e
e
g
M
b
T
d
n
d
i
l
r
a
d
a
o
s
a
u
m
i
n
e
n
I
t
s
r
c
r
Ma
u
e
t
f
d
Pla
A
o
h
r
c
p
in
s
-
i
0
h
6
T
m
g
n
i
ck
e
e
r
h
u
s
C
e
m
b
e
—
e
t
i
s
y
a
n
e
l
t
a
P
c
e
u
r
d
a
o
r
p
e
s
r
i
c
o
e
h
n
t
e
h
m
e
t
f
h
r
t
o
a
e
n
f
d
o
e
m
e
s
r
s
s
a
e
a
e
r
la
r
h
u
c
p
t
y
r
u
n
u
f
a
p
r
ng
r
i
o
u
f
o
f
o
w
f
y
I
o
l
.
t
h
l
c
c
i
u
fo
h
d
e
w
o
r
t
p
th
a
r
r
h
u
t
le
o
i
i
y
a
t
w
h
e
t
r
i
y
l
w
e
h
e
t
g
r
a
o
k
c
C
a
E
p
N
e
t
h
—
c
t
a
t
n
e
i
n
g
d
o
)
c
2
e
a
(
d
e
k
s
u
l
s
c
a
p
in
e
t
ed
i
d
g
n
i
lu
w
c
w
o
l
l
o
in
o
t
f
l
i
e
a
ls
f
h
t
h
f
c
ria
i
o
l
l
h
e
.
a
w
e
t
at
c
s
a
n
h
m
t
a
t
e
k
t
s
i
i
c
r
s
e
s
o
h
a
c
g
r
n
o
i
o
t
f
s
s
y
i
l
e
m
t
a
s
i
d
e
m
m
i
d
r
c
a
o
n
e
i
l
c
p
r
e
r
,
e
y
k
a
l
a
r
s
e
e
p
p
m
o
r
p
k
r
o
)
S
2
(
s
r
e
p
m
a
l
c
d
r
o
C
)
1
(
l
a
u
n
a
m
n
o
)
i
t
2
(
c
R
u
s
B
r
t
n
s
o
i
n
I
h
s
u
L
C
B
)
TR
4
(
s
e
c
e
i
p
TL
t
n
e
)
m
2
h
1
c
(
a
t
t
m
A
m
2
1
x
5
M
s
w
e
r
r
c
e
S
k
a
e
p
s
t
h
)
g
i
2
(
R
s
t
i
n
u
r
e
k
a
e
p
S
r
e
k
a
e
p
s
t
f
e
L
Mode d’emploi [ce document] (x 1)

Consignes de sécurité
(explication des symboles utilisés
dans le manuel)
Pour vous permettre d’utiliser le produit correctement et en toute
sécurité, différents symboles sont utilisés pour signaler des points
importants pour éviter tout dommage corporel ou matériel. La
signification de ces symboles est expliquée ci-dessous. Lisez
attentivement ces explications avant de passer au texte principal.
Avertissement
Les paragraphes accompagnés de ce symbole contiennent des
instructions qui, si elles sont ignorées ou mal suivies, présentent un
risque de dommages corporels voire de décès.
Avertissement
¶ Lorsque vous déplacez l’écran à plasma, ne le prenez
jamais par les enceintes. L’écran pourrait tomber et
blesser quelqu’un. Lorsque vous déplacez l’écran à
plasma, tenez-le toujours par le dessous.
¶ Veillez à ce que tous les écrous, boulons et vis soient
bien serrés pour un maximum de sécurité. Si tel
n’était pas le cas, les enceintes risqueraient de
tomber et de blesser quelqu’un.
Attention
Les paragraphes accompagnés de ce symbole contiennent des
instructions qui, si elles sont ignorées ou mal suivies, présentent un
risque de dommages corporels voire de décès.
Exemples de symboles utilisés dans le manuel
Ce symbole signale les paragraphes de mise en garde
(et d’avertissement) qui contiennent des instructions qui
doivent être observées.
Ce symbole signale les paragraphes qui contiennent des
instructions sur ce qu’il est interdit de faire (c’est-à-dire ce
qu’il ne faut jamais faire).
Ce symbole signale les paragraphes qui contiennent des
instructions ou autres remarques qui obligent l’utilisateur à
faire quelque chose.
Avant d’utiliser vos enceintes
Suivez attentivement les instructions ci-dessous pour protéger
vos enceintes de toute détérioration due à des niveaux de
puissance absorbée excessifs.
¶ Ne lisez jamais des signaux à un niveau supérieur à la puissance
absorbée maximale.
¶ Lorsque vous raccordez les enceintes ou un autre appareil audio
ou visuel à un amplificateur, veillez à ce que l’amplificateur ne
soit pas sous tension.
¶ Evitez de trop monter le volume lorsque vous utilisez un égaliseur
graphique pour beaucoup amplifier des sons haute fréquence.
¶ Ne montez jamais trop le volume lorsque vous utilisez un
amplificateur de performance modeste (cela augmenterait la
distorsion dans la gamme haute fréquence de l’amplificateur, ce
qui endommagerait les enceintes).
Remarque
Selon le mode d’installation choisi, les couleurs peuvent devenir
floues ou d’autres effets peuvent apparaître sur l’écran si l’enceinte
est placée trop près d’un autre écran. Si cela se produit, éloignez
les enceintes de l’écran pendant l’utilisation.
Attention
Installation
¶ N’installez jamais les enceintes ou l’écran sur une
plate-forme instable ou une surface irrégulière, ils
risqueraient de tomber et de blesser quelqu’un.
¶ N’installez jamais les enceintes ou l’écran à un
endroit exposé à la lumière directe du soleil ou à des
températures excessives, un incendie pourrait
survenir.
¶ N’installez jamais les enceintes ou l’écran à un
endroit où ils seraient exposés à une poussière ou à
une humidité excessives ou encore à un endroit
soumis à la vapeur ou à des dégagements de fumée
générés par du pétrole (par exemple à proximité d’un
poêle ou d’une table chauffante), un incendie pourrait
survenir.
Consignes d’utilisation
¶ Evitez toute utilisation prolongée en cas de distorsion
importante du son, les enceintes risqueraient de
chauffer de façon excessive et de prendre feu.
¶ Ne vous asseyez jamais sur le produit et ne vous y
suspendez pas. Veillez en particulier à ce que des
enfants ne le fassent pas. Ceci risquerait
d’endommager le produit ou quelqu’un pourrait se
blesser.
¶ N’introduisez jamais de l’eau dans les enceintes et ne
les mettez jamais en contact avec un liquide, ceci
pourrait provoquer un incendie ou un choc électrique.
N’utilisez jamais le produit en extérieur, ceci pourrait
également provoquer un incendie ou un choc
électrique.
¶ Ne placez jamais d’objets lourds sur les fils des
enceintes et veillez à ne jamais coincez ces derniers
sous l’écran à plasma. Cela pourrait endommager les
fils et provoquer un incendie ou un choc électrique.
¶ Ne glissez et n’introduisez jamais d’objets
métalliques, de matières facilement inflammables ou
autres corps étrangers dans la bouche ou toute autre
ouverture des enceintes, ceci pourrait provoquer un
incendie ou un choc électrique. L’utilisation du
produit en présence de jeunes enfants doit en outre
faire l’objet d’une attention particulière.
¶ Ne fixez jamais les enceintes sur des appareils autres
que les écrans plasma spécifiés, ceci pourrait
provoquer un incendie ou endommager le produit.
Français
2

Monter les enceintes sur un écran à plasma
Le système se compose d’une enceinte droite (R) et d’une enceinte gauche (L).
Pour les monter, reportez-vous aux étiquettes (R/L) situées à l’arrière des enceintes.
1 Retirez les bandes de protection des coussinets puis fixez
les coussinets sur le côté des enceintes comme indiqué
sur le schéma ci-dessous.
Coussinets
2 Posez les pièces de fixation sur l’écran à plasma à l’aide
de vis (M5 x 12 mm) aux endroits indiqués sur le schéma
(8 endroits).
Vérifiez les inscriptions qui figurent sur les pièces de
fixation (TL, TR, BL, BR) et sur les points de fixation situés
sur l’écran à plasma.
3 Vissez légèrement les vis (M5 x 12 mm) sur les pièces de
fixation du haut (2 endroits).
Remarque
Pour installer l’écran à plasma contre un mur, commencez
par poser les pièces de fixation sur l’écran puis installez
l’écran au mur. Une fois l’écran à plasma installé au mur, il
peut s’avérer impossible de serrer les vis des pièces de
fixation.
4 1 Fixez les vis (M5 x 12 mm) qui ont été légèrement
vissées sur les crochets situés en haut des enceintes.
2 Superposez les trous situés sur les pièces de fixation
du bas avec les trous situés en bas des enceintes, et
vissez légèrement les vis (M5 x 12 mm) dans ces trous.
3

5 Serrer complètement les 4 vis.
¶ Serrez les vis tout en poussant légèrement les enceintes contre l’écran à plasma.
Vérifiez que les quatre vis ont été complètement vissées.
¶ S’il y a un grand espace entre l’écran à plasma et les enceintes, réglez ces dernières après avoir légèrement desserré les vis
que vous avez vissées à l’étape 2. Une fois que vous avez ajusté la position des enceintes, resserrez les vis.
¶ Pour fixer l’écran à plasma contre un mur, il est recommandé de retirer les enceintes puis de les remettre en place une fois
que l’écran est fixé au mur.
Avertissement
¶ Une fois que les enceintes ont été fixées sur
l’écran, ne déplacez jamais l’écran en le prenant
par les enceintes. L’écran risquerait de tomber et
de blesser quelqu’un.
¶ Serrez bien les vis. Les enceintes risqueraient
de tomber et de blesser quelqu’un.
Français
Raccorder les cordons des enceintes
Veillez à mettre l’écran hors tension avant de raccorder les enceintes.
A l’aide des cordons inclus, branchez les prises enceintes des enceintes sur les prises d’enceintes R/L de l’écran.
Une fois que les enceintes sont branchées, tirez légèrement sur les cordons pour vérifier qu’ils sont bien insérés fermement dans
les prises d’enceintes. Si le raccordement était mal fait, cela pourrait entraîner des interruptions du son ou l’apparition de bruit dans
le son de sortie.
Il est à noter que les cordons des enceintes
ont des polarités négative et positive. Vous
devez donc les mettre en place correctement.
Noir
Rouge
Appuyez sur le bouton de la prise d’enceinte et
tenez-le enfoncé pendant que vous insérez le fil
du cordon d’enceinte. Quand vous avez fini,
relâchez le bouton.
Colliers de cordon
Retirez la bande protectrice située au dos des colliers de cordon, fixez les
colliers à l’endroit souhaité puis mettez les cordons en place.
4

Nettoyer les boîtiers
Veillez à débrancher la prise d’alimentation avant de nettoyer les boîtiers.
¶ Essuyez le boîtier avec un chiffon doux et sec à la texture relativement régulière.
Si le boîtier est particulièrement sale, imprégnez le chiffon de détergent neutre allongé à l’eau, essorez-le bien, passez-le sur
le boîtier et essuyez avec un chiffon sec.
Si vous utilisez une lingette nettoyante traitée chimiquement, suivez toutes les instructions du fabricant sur son utilisation.
¶ L’utilisation d’un mélange contenant du benzène, un diluant ou autre liquide volatil peut provoquer un gondolement ou un
décollement du revêtement.
¶ Pour débarrasser les protections en filet des enceintes de leur poussière, utilisez un aspirateur avec un embout en forme de
brosse.
Il est à noter que toute tentative de nettoyage en appliquant l’embout de l’aspirateur ou un suceur directement sur les
protections en filet des enceintes est à proscrire.
¶ Tout frottement vigoureux de l’ongle ou d’un objet dur sur le boîtier peut en érafler la surface ou, dans le cas des protections
en filet des enceintes, les déchirer. Il est également à noter que l’introduction d’objets tranchants à l’intérieur des enceintes
peut entraîner une ouverture des trous.
Ne vaporisez jamais d’insecticide ou d’autres produits volatiles sur le boîtier. Evitez également de laisser des objets en
plastique ou en caoutchouc sur le boîtier pendant des périodes prolongées, son revêtement pourrait gondoler ou se
décoller.
Mise au rebut de votre produit usagé
La législation européenne, appliquée dans tous les Etats membres, exige que les produits électriques et électroniques
portant la marque (à gauche) doivent être mis au rebut séparément des autres ordures ménagères. Ceci inclus les
moniteurs plasma et leurs accessoires électriques.
Lorsque vous mettez au rebut ces produits, veuillez suivre les recommandations des autorités locales et/ou demandez conseil
au magasin qui vous a vendu le produit. Une fois ces produits mis au rebut, ils sont recyclés et de manière appropriée.
Cet effort nous aidera à réduire les déchets et à maintenir au niveau minimum leurs conséquences négatives sur la santé
humaine et sur l’environnement. La marque figurant sur les produits électriques et électroniques ne s’applique qu’aux Etats
membres actuels de l’Union Européenne.
Spécifications
Description : Système 2 voies 3 hauts-parleurs (système d’enceintes basse reflex ; Qté : 1)
Impédance : 6 Ω
Puissance
absorbée normale : 20 W
Puissance
absorbée maximale : 60 W
Dimensions
extérieures : 90 mm (L) x 880 mm (H) x 96 mm (P)
3,5 pouces (L) x 34,6 pouces (H) x 3,8 pouces (P)
(hors plagues de fixation ; Qté : 1)
Poids : 6,8 kg (15,0 lbs) (2 enceintes)
Conditions d’utilisation
Température : 0 °C à 40 °C / 32 °F à 104 °F
Humidité : 20 % à 80 %
Conditions d’entreposage
Température : –10 °C à 50 °C / 14 °F à 122 °F
Humidité : 10 % à 90 %
¶ Les spécifications et la conception de ce produit peuvent être modifiées en vue de leur amélioration sans avis préalable.
NEC and the NEC logo are registered trademarks of NEC Corporation.
5

スピーカ .................................................................................
PX-60SP3U
取扱説明書
このたびはスピーカ PX-60SP3U をお買い上げいただき、ありがとうございました。
ご使用の前に、本機の機能を十分生かしてご利用いただくために、この「取扱説明書」を最後までお読みください。
お読みになったあとは、いつでも見られる所に大切に保存してください。
本機は NEC 製 60V 型プラズマディスプレイ(PX-60XM5J)専用です。
―パッケージ内容のご確認―
お買い上げの商品には、下記のものが同梱されていますのでご確認ください。
万一、不足品や不良品などがございましたら、すみやかにお買い上げの販売店
までご連絡ください。
日本語
クッション(2本)
TL TR BL BR
右用
スピーカユニット(2台)
取付ピース (4個)
.
.
.
.
s
r
e
k
a
e
p
S
PX-60SP3U
.
..
..
.
.
.
..
.
.
.
.
.
ha
T
左用
ネジM5×12mm(12本)
製品保証書
形名
PX-60SP3U
ふりがな
★
お名前
お
ご住所
客
様
〒
製造番号
電話番号
お客様にご記入いただいた保証書は、保証期間内のサービス活 動および
その後の安全点検活動のために記載内容を利用させていただく場合が
ございます の で 、ご了承ください 。また 、当該目的の範囲内において、記載
内容を当社の委託先に提供する場合もございます。
この保証書は、本書記載内容で無料修理をお約束するものです。
(裏面をご覧ください。)
お買い上げの日から上記期間中、故障が発生した場合、本書をご提示の上、
お買い上げの販売店または当社指定のサービス窓口にご連絡ください。
本書は、再発行致しませんので、紛失しないよう大切に保存してください。
★印欄に記載のない場合は無効となりますので、必ず記入の有無をご確認くだ
さい。もし、記入がない場合は直ちにお買い上げの販売店にお申し出ください 。
※この保証書は、日本国内のみで有効です。ThiswarrantyisvalidonlyinJapan.
★お買い上げ日
(お買い上げ日より)
本体1ヵ年
保証責任者
NECパーソナルプロダクツ株式会社
〒141- 0032 東京都品川区大崎一丁目11-1
(ゲートシティ大崎 ウエストタワー)
保証履行者(サービス窓口)
NECフィールディング株式会社
パーソナルコールセンター TEL0120-95-0009
営業時間:9:00〜18:00
h
lis
ng
E
n
ctio
.
.
.
.
.
read this Instru
.
.
..
.
.
.
.
.
.
.
.
.
.
.
.
.
.
.
.
.
.
.
.
.
.
.
.
.
.
..
r
.
s
.
r
o
.
t
.
e
i
.
.
.
k
n
.
a
.
is product, please be sure to
o
.
e
.
.
.
.
..
.
.
.
al
.
.
.
.
.
.
.
anu
n M
C
E
N
e
uctio
s
r
ha
st
c
r
In
u
p
o
t
g
n
i
re able to make the fullest pos
os
o
h
c
anual in a easily accessed locat
r
o
f
.
u
ure that you a
o
y
e
n
k
g
n
i
s
, place this m
e
g
d
a
s
i
m
In order to ens
t
s
anual before use
c
a
l
M
u
P
fter readin
d
A
o
h
r
c
p
n
i
s
-
i
0
h
6
T
e
p
m
there
rence
s
a
U
m
3
sed th
s
P
a
reason
S
cha
pl
0
6
sible use of th
g
any
-
n
i
X
for future refe
or
f
P
w
If
lo
.
ion
l
o
f
hich you pur
e
w
product
th
h
t
our
i
y
w
ith
y
l
w
e
e
v
i
g
s
or the retailer at
u
l
c
5
packa
x
e
M
—
X
e
the
0
s
in
6
u
-
ge
r
X
a
o
f
P
k
:
c
d
r
a
included
to
i
p
, please contact NEC
n
are
n
o
i
M
g
n
i
k
c
e
h
sure
C
—
y items missin
lease be
P
are an
product immedia
e
p
d
S
e
items
d
properly
g
u
rk
in
l
c
wo
n
i
follow
il to
s
l
fa
the
a
i
of
r
hich
e
.
all
t
w
a
m
k that
or items
g
)
r assistance
2
(
to chec
R
fo
s
B
n
io
tely
h
s
u
L
C
B
R
)
T
4
(
s
e
c
ie
L
T
p
t
n
e
m
h
c
a
tt
A
2
1
x
5
M
s
w
e
r
cr
e
S
k
a
e
p
s
t
h
)
g
i
2
(
R
its
n
r u
e
k
a
e
p
S
r
e
k
a
e
p
t s
f
e
L
取扱説明書(1冊)
年 月 日
保証期間
接続コード(2本)
コードクランパ (2個)
表
覧
一
口
窓
ス
)
2
(
s
d
r
o
r c
e
k
a
)
(2
rs
e
p
m
la
c
d
r
o
C
)
1
(
l
a
u
n
a
m
n
io
t
c
u
r
t
s
n
I
)
2
1
(
m
m
ビ
ー
サ
サービス窓口一覧表(1冊)
持込修理
★取扱販売店名・住所・電話番号
但し、日、祝日および指定日は除く。
印

安全上のご注意(絵表示について)
警告
この取扱説明書および製品への表示は、製品を安全に正し
くお使いいただき、あなたや他の人々への危害や財産への
損害を未然に防止するために、いろいろな絵表示をしてい
ます。その表示と意味は次のようになっています。内容を
よく理解してから本文をお読みください。
警告
この表示を無視して、誤った取り扱いをすると、人が死亡
または重傷を負う可能性が想定される内容を示していま
す。
注意
この表示を無視して、誤った取り扱いをすると、人が傷害
を負う可能性が想定されるか、物的損害の発生が想定され
る内容を示しています。
絵表示の例
記号は注意(警告を含む)しなければならない内
容であることを示しています。
記号は禁止(やってはいけないこと)を示して
います。
記号は行動を強制したり指示する内容を示して
います。
ご使用の前に
スピーカを過大入力による破損から守るため下記の注
意事項をお守りください。
÷ 最大入力以上の信号を加えない。
÷ 本機を含むAV機器をアンプへ接続するときはアンプの電
源をOFFにする。
÷ グラフィックイコライザーで高音を大幅に増強する場
合、音量を上げすぎない。
÷ 小出力アンプで無理に大きな音を出さない(アンプの高
調波歪が増え、スピーカを破損することがある)。
÷ スピーカを持ってプラズマディスプレイを移動
しないでください。プラズマディスプレイが落
下してけがの原因となります。プラズマディス
プレイを動かすときは、プラズマディスプレイ
本体の下側を持って持ち上げてください。
÷ 安全確保のため、ネジ類は確実に締めつけてく
ださい。スピーカが落下してけがの原因となり
ます。
注意
設置
÷ ぐらついた台の上や傾いたところなど不安定な
場所に置かないでください。落ちたり、倒れた
りしてけがの原因となることがあります。
÷ 直射日光が当たる場所など異常に温度が高くな
る場所に置かないでください。火災の原因とな
ることがあります。
÷ 湿気やほこり、油煙や湯気の当たるようなところ
(調理台や加湿器のそばなど)に設置しないでく
ださい。火災の原因となることがあります。
使用方法
÷ 長時間音が歪んだ状態で使わないでください。
スピーカが発熱し、火災の原因となることがあ
ります。
÷ 本機に乗ったり、ぶら下がったりしないでくだ
さい。特にお子様はご注意ください。倒れた
り、壊れたりしてけがの原因になることがあり
ます。
÷ スピーカに水を入れたり、濡らさないでくださ
い。火災・感電の原因となります。また、屋外
では使用しないでください。火災・感電の原因
となります。
1.取扱説明書、本体添付ラベル等の注意書に基づくお客様の正常な
使用状態のもとで保証期間内に万一故障した場合、無料にて故障箇
所を当社所定の方法で修理させていただきますので、お買い上げ販
売店、または当社が指定するサービス窓口にご連絡ください。
修理を行うために交換された旧部品、または、機械の一部にはお
返しできないものがあります。
なお、本製品のハードウェア部分の修理に限らせていただきます。
2.本製品の故障、またはその使用によって生じた直接、間接の損害に
ついては当社にその責任を負わないものとします。
3.次のような場合には、保証期間中でも有料修理になります。
本保証書のご提示がない場合。
(1)
本保証書に保証期間、形名または品名、および製造番号または
(2)
保証番号、販売店名の記入のない場合、または字句を書き替えら
れた場合。
お客様による輸送、移動時の落下、衝撃等、お客様の取り扱い
(3)
が適性でないために生じた故障、損傷の場合。
お客様による使用上の誤り、あるいは不当な改造、修理による
(4)
故障および損傷。
火災、塩害、ガス害、地震、落雷、および風水害、その他天災地変、
(5)
あるいは異常電圧などの外部要因に起因する故障および損傷。
保 証 規 定
本製品に接続している当社指定以外の機器および消耗品に起因する
(6)
故障および損傷。
正常なご使用方法でも消耗部品が自然消耗、摩耗、劣化した場合。
(7)
4.ご不明の点は、お買い上げの販売店または当社指定のサービス窓口
にご相談ください。
5.本保証書は日本国内においてのみ有効です。
This warranty is valid only in Japan.
2
年月日 サービス内容
この保証書は本書に明示した期間、条件のもとにおいて無料修理を
お約束するものです。
この保証書による保証のほかに、販売店はお客様に対して瑕疵担保責任
等法律上の責任を負っており、本保証書の発行によって、こうした販売
店の責任を軽減したり免除したりといった影響を及ぼ すものではありま
せん。保証期間経過後の修理などについてご不明の場合は、お買い上げ
の販売店、または当社指定のサービス窓口にお問い合わせください。
サービス店
担 当

注意
使用方法
÷ 接続コードの上に重いものをのせたり、コード
がプラズマディスプレイの下敷きにならないよ
うにしてください。コードに傷がついて火災・
感電の原因となります。
÷ スピーカの開口部などから内部に金属類や燃え
やすいものなど異物を差し込んだり、落とし込
んだりしないでください。火災・感電の原因と
なります。特に小さなお子様のいるご家庭や場
所ではご注意ください。
÷ スピーカを指定のプラズマディスプレイ以外に
接続して使用しないでください。故障・火災の
原因になることがあります。
スピーカをプラズマディスプレイに取り付ける
スピーカは右用(R)・左用(L)に分かれています。
取り付けの際には、スピーカの背面に書かれている文字(R・
L)でご確認ください。
1 クッションのはくり紙をはがして、スピーカの側面、下
図の位置に貼り付けます。
お願い
プラズマディスプレイ以外のディスプレイに近づけた場
合、設置の仕方によっては、画面に色ムラなど影響が生
じる場合があります。その際は、スピーカをディスプレ
イから離してご使用ください。
クッション
2 プラズマディスプレイの図の位置に取付ピースをネジ
(M5 × 12mm)で取り付けます。(8 カ所)
取付ピースのマーク(TL、TR、BL、BR)とプラズマ
ディスプレイの取り付け位置を確認してください。
日本語
3

3 上側の取付ピースにネジ(M5 × 12mm)を仮留めし
ます。(2 カ所)
ご注意
プラズマディスプレイを壁に設置する場合は、取付ピースをプ
ラズマディスプレイに取り付けてから壁に設置してください。
プラズマディスプレイを壁に設置してからでは、取付ピースを
ネジ留めできない場合があります。
4 1 仮留めしたネジ(M5× 12mm)にスピーカ上部の
フックを引っかけます。
2 下部の取付ピースのネジ穴にスピーカ下部のフックの
穴を合わせてネジ(M5×12mm)で仮留めします。
5 仮留め状態の 4 カ所のネジを締めつけます。
スピーカを軽くプラズマディスプレイに押しつけながらネジを締めつけてください。
4 カ所のネジが確実に締めつけられていることを確認してください。
プラズマディスプレイとスピーカの間に隙間が大きく開く場合には、手順2で締めたネジを少し緩めて調整してください。
調整後は、再度ネジを締めてください。
プラズマディスプレイを壁に設置する場合は、一度スピーカユニットを取り外し、プラズマディスプレイを壁に取り付
けた後、再度スピーカユニットを取り付けることをお勧めします。
警告
● スピーカをプラズマディスプレイに取り付けた状態
で、スピーカを持って移動しないでください。プラ
ズマディスプレイが落下してけがの原因となります。
● ネジは確実に締めつけてください。スピーカが落下し
てけがの原因となります。
4

コードを接続する
接続する際は接続機器の電源を切ってから行ってください。
付属の接続コードで、プラズマディスプレイの SPEAKERR/L 端子とスピーカの端子を接続します。
端子に接続したあとは、コードを軽く引いて、
コードの先端が端子へ確実に接続されていること
を確かめてください。接続が不完全だと、
音がとぎれたり、雑音の出る原因
となります。
コードクランパ
コードクランパの裏のはくり紙をはがし、お好みの位置に
取り付け、コードを束線してください。
極性 がありますので、正しく挿入し
てください。
スピーカ端子のボタンを指で押したまま、
接続コードの芯線を入れ指を離します。
+
−
日本語
キャビネットのお手入れ
お手入れの前に必ず電源プラグをコンセントから抜いてください。
● 毛羽立ちの少ない柔らかい乾いた布で拭いてください。
汚れのひどいときは、水で薄めた中性洗剤に浸した布をよく絞って拭き取り、乾いた布で仕上げてください。
化学ぞうきんを使用する場合は、その注意書に従ってください。
● シンナーやベンジンなどの溶剤で拭いたりしますと、変質したり、塗料がはげることがあります。
● スピーカネット部のほこりを取り除く場合は、掃除機のブラシ付きのアダプタを使用してください。
なお、アダプタを付けずに直接当てたり、ノズルアダプタを使用することは避けてください。
● キャビネットやスピーカネット部を爪や硬いもので強くひっかいたり、当てたりすると、傷の原因となります。
また、スピーカネット部を鋭利なもので突き刺すと穴があく恐れがあります。
キャビネットに殺虫剤など揮発性のものをかけたりしないでください。また、ゴムやビニール製品などを長時間接触させたまま
にしないでください。変質したり、塗料がはげるなどの原因となります。
5

仕 様
型 式 : 2 ウェイ・3 スピーカシステム(バスレフ方式)/ 1 本
インピーダンス : 6Ω
定 格 入 力 : 20W(JEITA)
最 大 入 力 : 60W(JEITA)
外 形 寸 法 : 90mm(W)× 880mm(H)× 96mm(D)(取付金具を除く/ 1 本)
質 量 : 6.8kg(2 本)
使 用 条 件 : 温度 0℃〜 40℃ 湿度 20%〜 80%
保 管 条 件 : 温度 − 10℃〜 50℃ 湿度 10%〜 90%
●この仕様・意匠は予告なく変更することがあります。
NEC and the NEC logo are registered trademarks of NEC Corporation.
保証と修理サービス(必ずお読みください)
保証書
この「取扱説明書」には、保証書
を添付しております。
保証書は、必ず「お買い上げ日・
販売店名」などの記入をお確かめ
のうえ、販売店から受け取って
いただき内容をよくお読みのあと
大切に保存してください。
保証期間
お買い上げ日から1年間です。
修理を依頼されるときは 持込修理
補修用性能部品の最低保有期間
当社は、この製品の補修用性能部
品を製造打切後最低5年保有して
います。
注)補修用性能部品とは、その製品
の機能を維持するために必要な
部品です。
ご不明な点や修理に関するご相談は
修理に関するご相談ならびにご不明
な点は、お買い上げの販売店または
お近くの「NECサービス窓口」にお問
い合わせください。
異常があるときは、電源を切り、必ず電源プラグをコンセントから抜いて、お買い上げの販売店にご連絡ください。
保証期間中は
修理に際しましては保証書をご提示ください。
保証書の規定に従って修理させていただきます。
修理すれば使用できる場合には、ご希望により有料で
修理させていただきます。
保証期間がすぎているときは
ご連絡していただきたい内容 修理料金の仕組み
品名
形名
お買い上げ日
故障の状況
ご住所
お名前
スピーカ
PX-60SP3U
年 月 日
できるだけ具体的に
付近の目印なども合わせてお知らせください
技術料
部品代
故障診断、故障箇所の修理、部品交換、調整修理
完了時の点検などの作業にかかる料金です。
修理に使用した部品代金です。その他修理に付帯
する部材などを含む場合もあります。
お電話番号
べんりメモ お買い上げ店名
()ー
出張料
製品のある場所へ技術者を派遣する場合の
費用です。別途、高速・駐車料金をいただ
く場合があります。
Printed in China / Imprimé en Chine <AZR1194-A>
6
 Loading...