

Media Player
(SB-L008KU)
User's Manual Ver.1.10
Introduction
•What is Media Player?
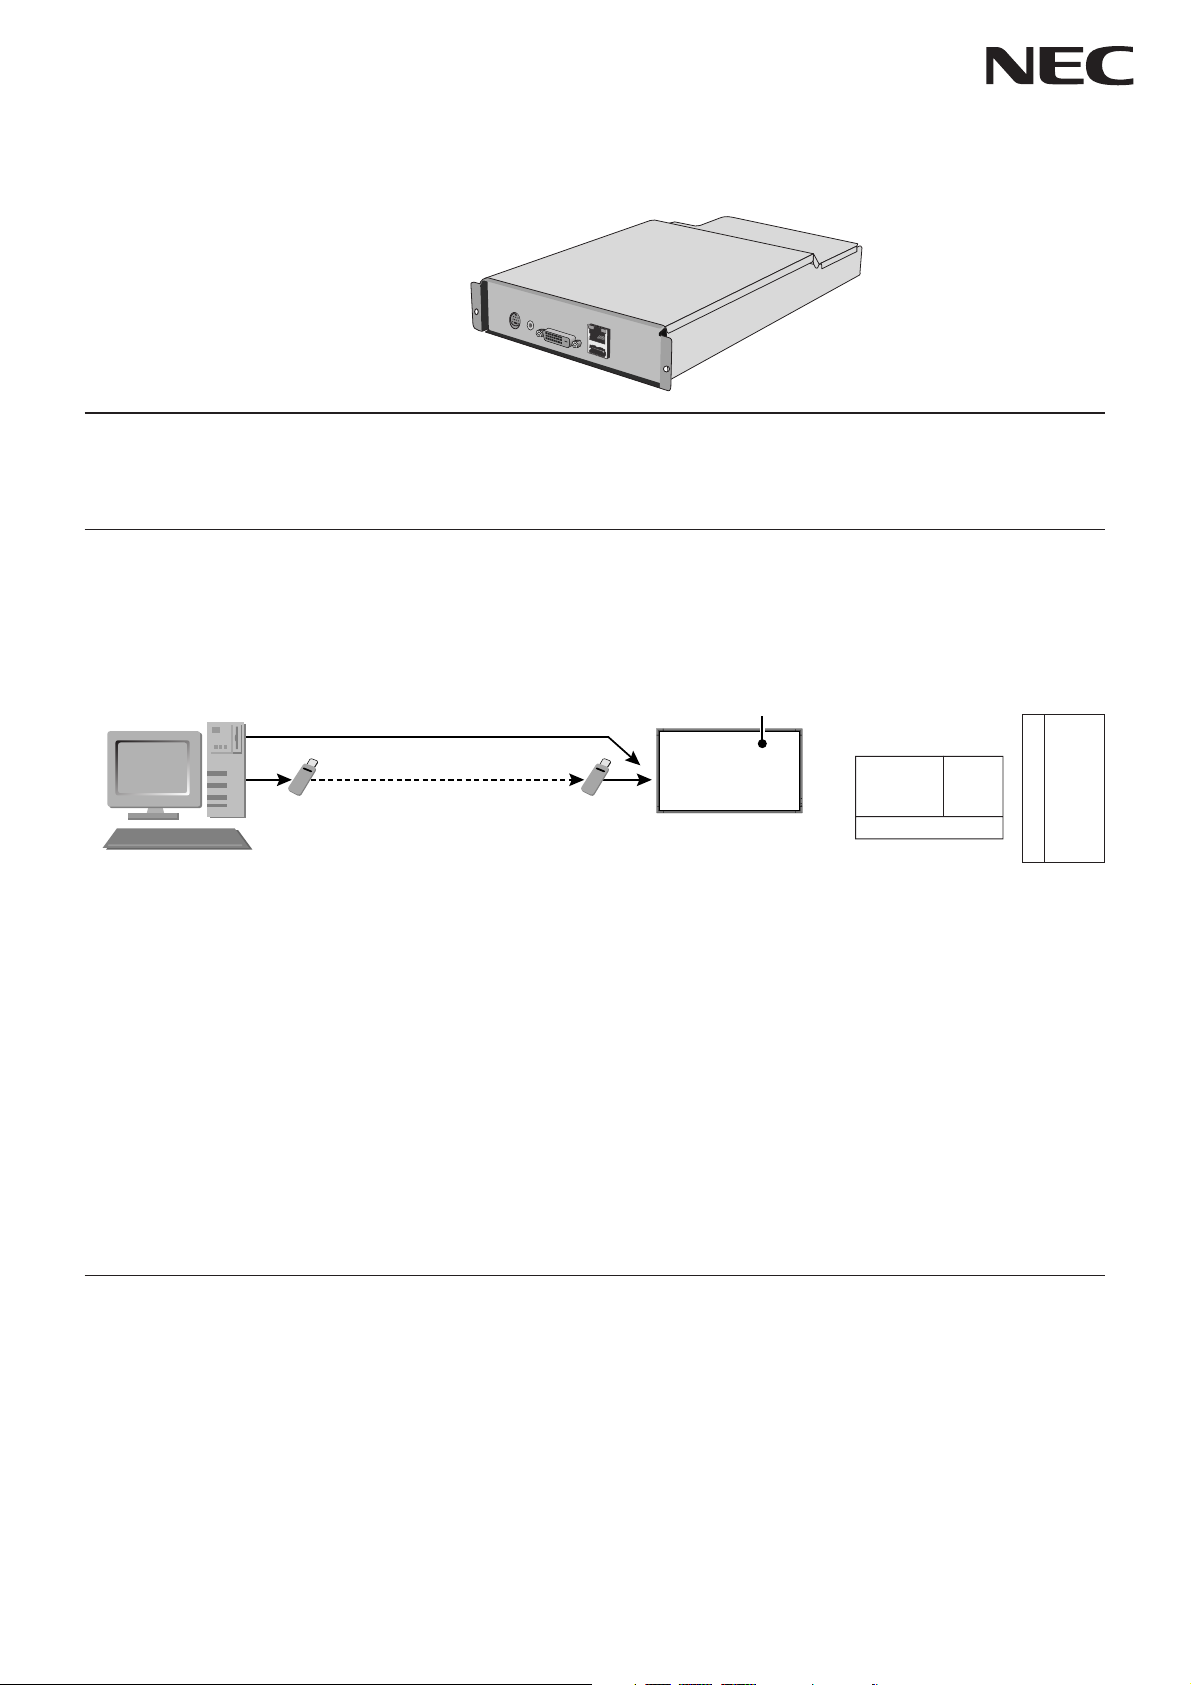
Media Player is a tool for showing programs created from the combination of graphics and sound contents on a display. Programs are created
using the attached authoring software and distributed via LAN or USB memory.
Computer
+
Authoring software
LAN
USB memory USB memory
Display
Message
Movie Still image
Message
Still image
•What is Authoring Software?
Layout setting
The desired layout can be set by combining movies, still images, and messages.
Scheduling function
This function displays the program at the designated time. You can set the daily program start and end time or the program start and end time for a
particular day.
Distribution function
Program data is distributed via USB memory or to a maximum of 20 Media Players via LAN.
Important Information
This equipment is a Class A Information Technology Equipment certified by the Voluntary Control Council for Interference by Information Technology Equipment (VCCI).
In a domestic environment this product may cause radio interference, in which case the user may be required to take corrective actions.
This equipment conforms to the VCCI standard when the enclosed signal cable is connected.
CAUTION
This device is certified as VCCI class A. When this equipment is attached to a Class B LCD display, the display’s VCCI mark will be changed from Class B to
Class A.
Refer to the “Safety Precautions, Maintenance & Recommended Use” of the LCD Monitor in the User’s Manual for notes on handling.
1
Declaration of conformity
For USA
FCC Information
1. Use the attached specified cables with SB-L008KU(L008KU) Media Player so as not to interfere with radio and television reception.
(1) Please use a good quality shielded video signal cable.
Use of other cables and adapters may cause interference with radio and television reception.
2. This equipment has been tested and found to comply with the limits for a class A digital device, pursuant to Part 15 of the FCC Rules. These limits
are designed to provide reasonable protection against harmful interference when the equipment is operated in a commercial environment. This
equipment generates, uses, and can radiate radio frequency energy and, if not installed and used in accordance with the instruction manual, may
cause harmful interference to radio communications.
Operation of this equipment in a residential area is likely to cause harmful interference in which case the user will be required to correct the
interference at his own expense.
If necessary, the user should contact the dealer or an experienced radio/television technician for additional suggestions.
The user may find the following booklet, prepared by the Federal Communications Commission, helpful: “How to Identify and Resolve Radio-TV
Interference Problems.” This booklet is available from the U.S. Government Printing Office, Washington, D.C., 20402, Stock No. 004-000-00345-4.
For Canada
Canadian Department of Communications Compliance Statement
DOC: This Class A digital apparatus meets all requirements of the Canadian Interference-Causing Equipment Regulations.
Declaration
Declaration of the Manufacturer
We hereby certify that Media Player
SB-L008KU(L008KU) is in compliance with
Council Directive 2006/95/EC:
– EN 60950-1
Council Directive 2004/108/EC:
– EN 55022
– EN 61000-3-2
– EN 61000-3-3
– EN 55024
This is a class A product. In a domestic environment this product may cause radio interference in
Intel and Intel Pentium are trademarks of Intel Corporation in the United States and other countries. The SD logo is a trademark. Microsoft®, MS, Windows®,
PowerPoint
®
, Windows Media®, Internet Explorer® and the Internet Explorer® logo are registered trademarks or trademarks of the Microsoft Corporation in the
which case the user may be required to take adequate measures.
Warning
United States and other countries. All other brands and product names are trademarks or registered trademarks of their respective owners.
and marked with
NEC Display Solutions, Ltd.
4-13-23, Shibaura,
Minato-Ku
Tokyo 108-0023, Japan
2
Installation
WARNING:
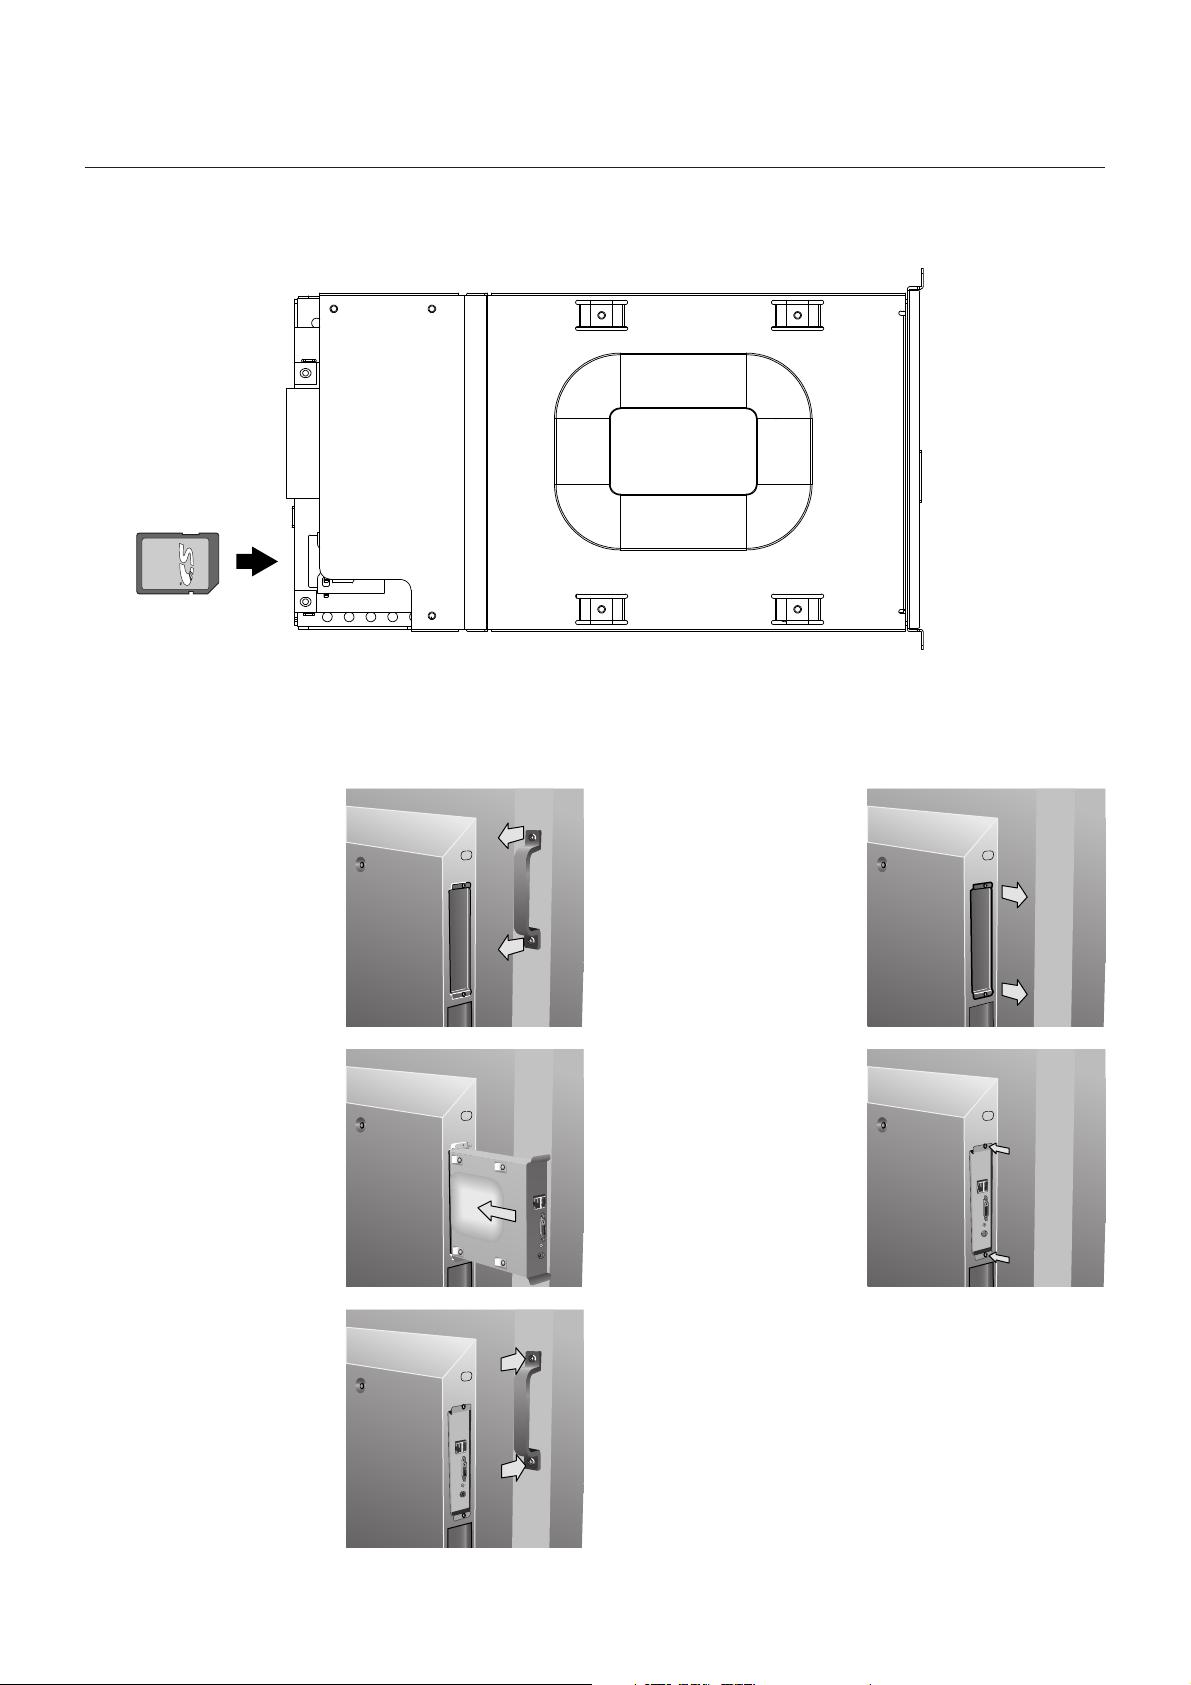
Do not insert foreign objects inside the cabinet during installation.
1
Insert the enclosed SD Memory Card firmly into the Media Player’s memory card connector with the label side facing up.
Caution
Confirm that the write-protect switch is not at LOCK position.
2
Turn off the main power of the
Display.
Unscrew the 2 screws (ScrewA) and remove the handle.
4
Insert Media Player in the
Display.
6
Secure the handle by 2 screws
(Screw-A).
3
Unscrew the 2 screws (ScrewB) and remove the cover from
the OPTION Slot.
5
Secure Media Player to the
monitor with 2 screws (ScrewB).
3

Contents
•Memory card
•USB extension cable
•Setup guide
Terminal panel
•Utility discs (Attached Software and User’s Manual)
•Component input conversion cable
7
6543
1
2
1Slot interface
Connector to connect to the display.
2Memory card connector
Insert the enclosed memory card.
3Video input connector
Connect video devices such as DVD players to distribute movies,
telop or still images from the video devices.
Video devices with a component output can be connected with either
the S terminal output or the attached component input conversion
cable.
4Audio input connector
Connects the sound output from the video device when using the
video input connector.
5DVI output connector (DVI-D)
This is connected to the DVI input connector of the external
display.
Media Player images can be displayed on an external display.
NOTE
* Programs using external video images from video input connector cannot
be output to the DVI output connector. They can only be output to the
display connected to this device.
6USB memory connector
Connects the USB memory containing program data. Use
the attached USB extension cable when the connector cannot
be easily fitted, such as in difficult to reach locations.
7LAN connector
Connects the LAN cable when program data is distributed via the LAN.
4
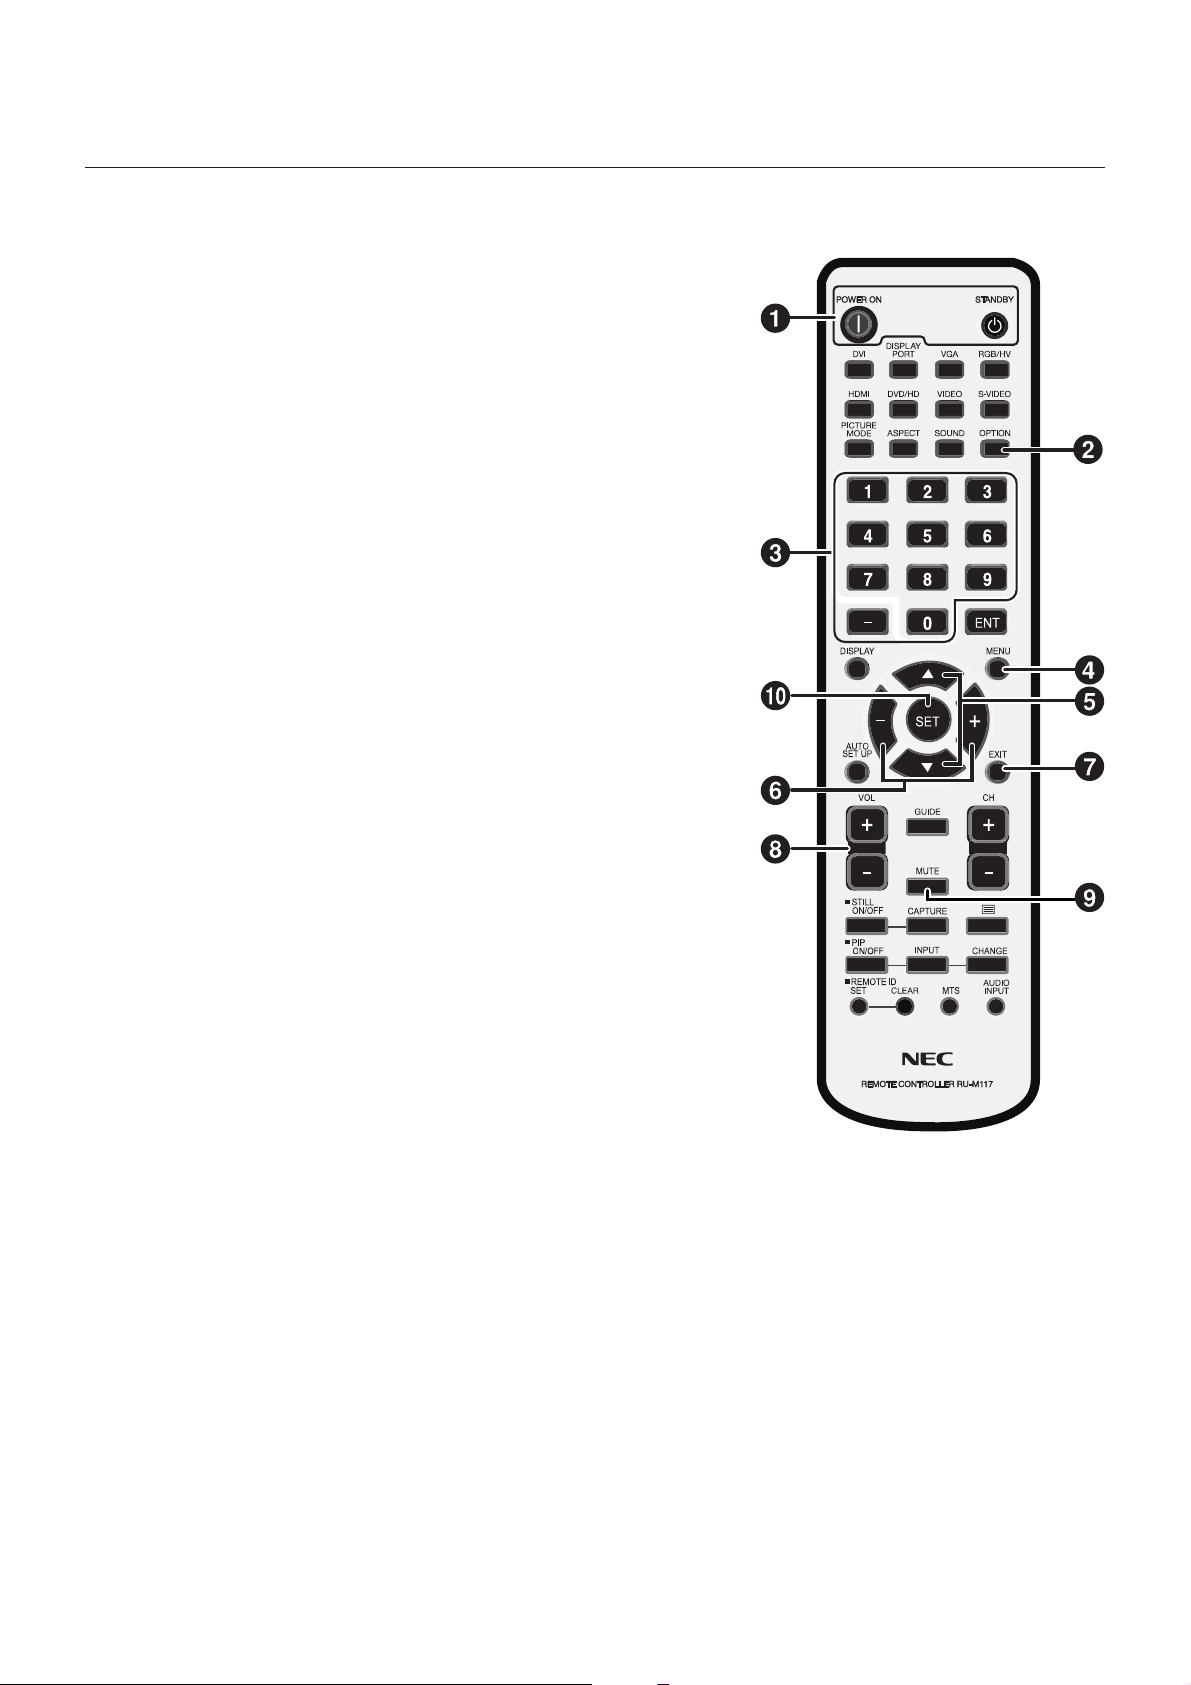
Basic Operation
To operate this device, use the remote control enclosed with the display.
Selecting Media Player
Press the “OPTION” button on the remote.
Opening Media Player OSD menu
When the input signal of the monitor is “OPTION”, press the “OPTION” button to turn on/off
the Media Player OSD.
Wireless Remote Control
NOTE :
For details about procedures other than those listed below, see the display user manual.
1. POWER button
Switches the power on/standby.
2. OPTION button
Set Input signal to “Media Player”. When “Media Player” is set, turn on/off the Media Player
OSD.
3. KEYPAD
Enter settings such as date and time.
4. MENU button
Turn on/off the monitor OSD menu.
5. UP/DOWN button
Select setting items at the OSD menu.
6. MINUS/PLUS (-/+) button
Select setting items at the OSD menu.
7. EXIT button
Returns to previous menu within OSD menu.
8. VOLUME UP/DOWN button
Increases or decreases audio output level.
9. MUTE button
Turn on/off the audio mute.
10. SET button
This button saves the selection on the OSD menu.
5
Connection
When using LAN, after finishing the “Connection/Setting” in this chapter, refer to the “LAN Connection/Setting” (page 14).
Preparation
In order to use the Media Player to display the program on the Display, the enclosed authoring software, a computer, and a USB memory
(if the program is distributed using USB memory ) are required.
Authoring software
The authoring software is on the enclosed CD-ROM. Install the authoring software on your computer when using it for the first time. Refer to the
authoring software User’s Manual for the installation procedure.
USB memory
Encoded USB memory cannot be used.
Connection when using USB memory to distribute programs
1. Insert the attached memory card into the memory card connector. (Page 2)
CAUTION:
Insert the memory card with the label
side up. Check to make Sure that the
write protect switch in riot in the look
position.
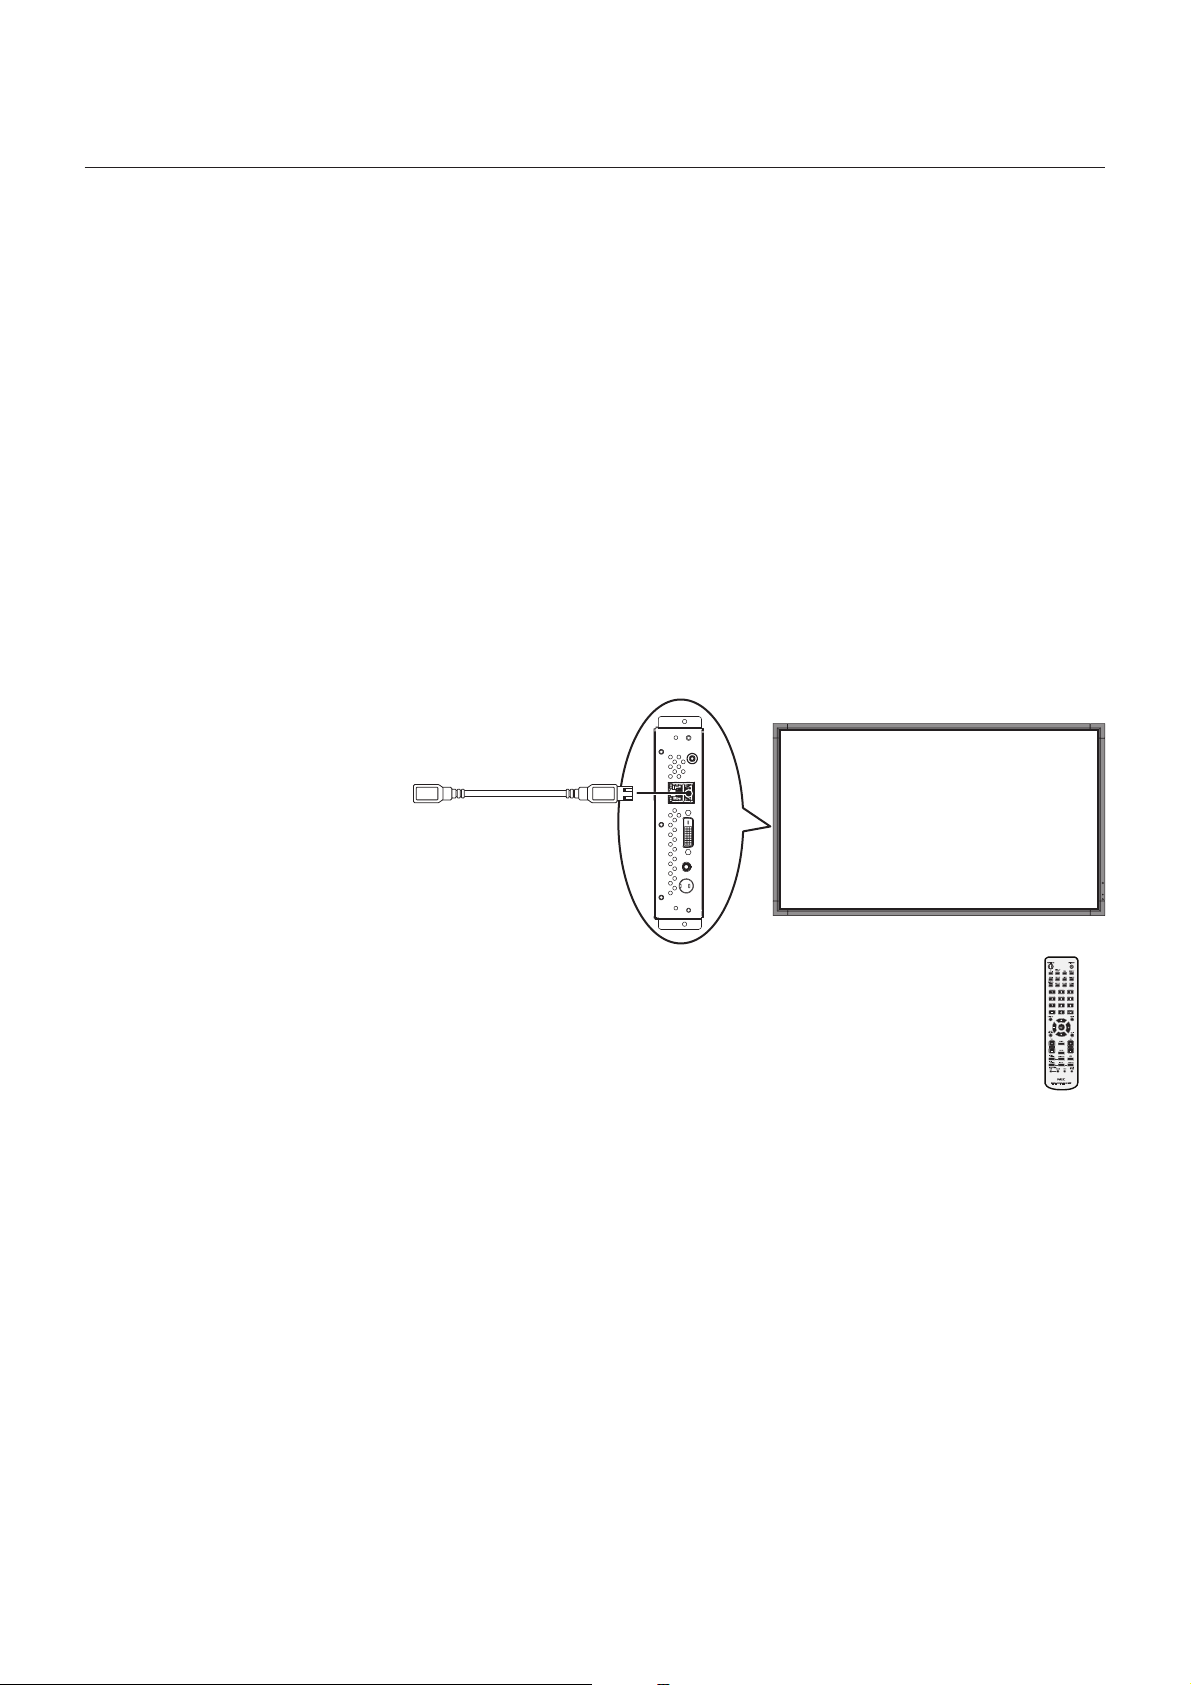
USB extension cable
2. Attach the Media
Player to the display.
3. Insert a USB cable extension into the USB
connector.
(When the program is distributed using a
USB memory )
Remote control enclosed
with the display
6
Connection and setting (continued)
Setting the Media Player
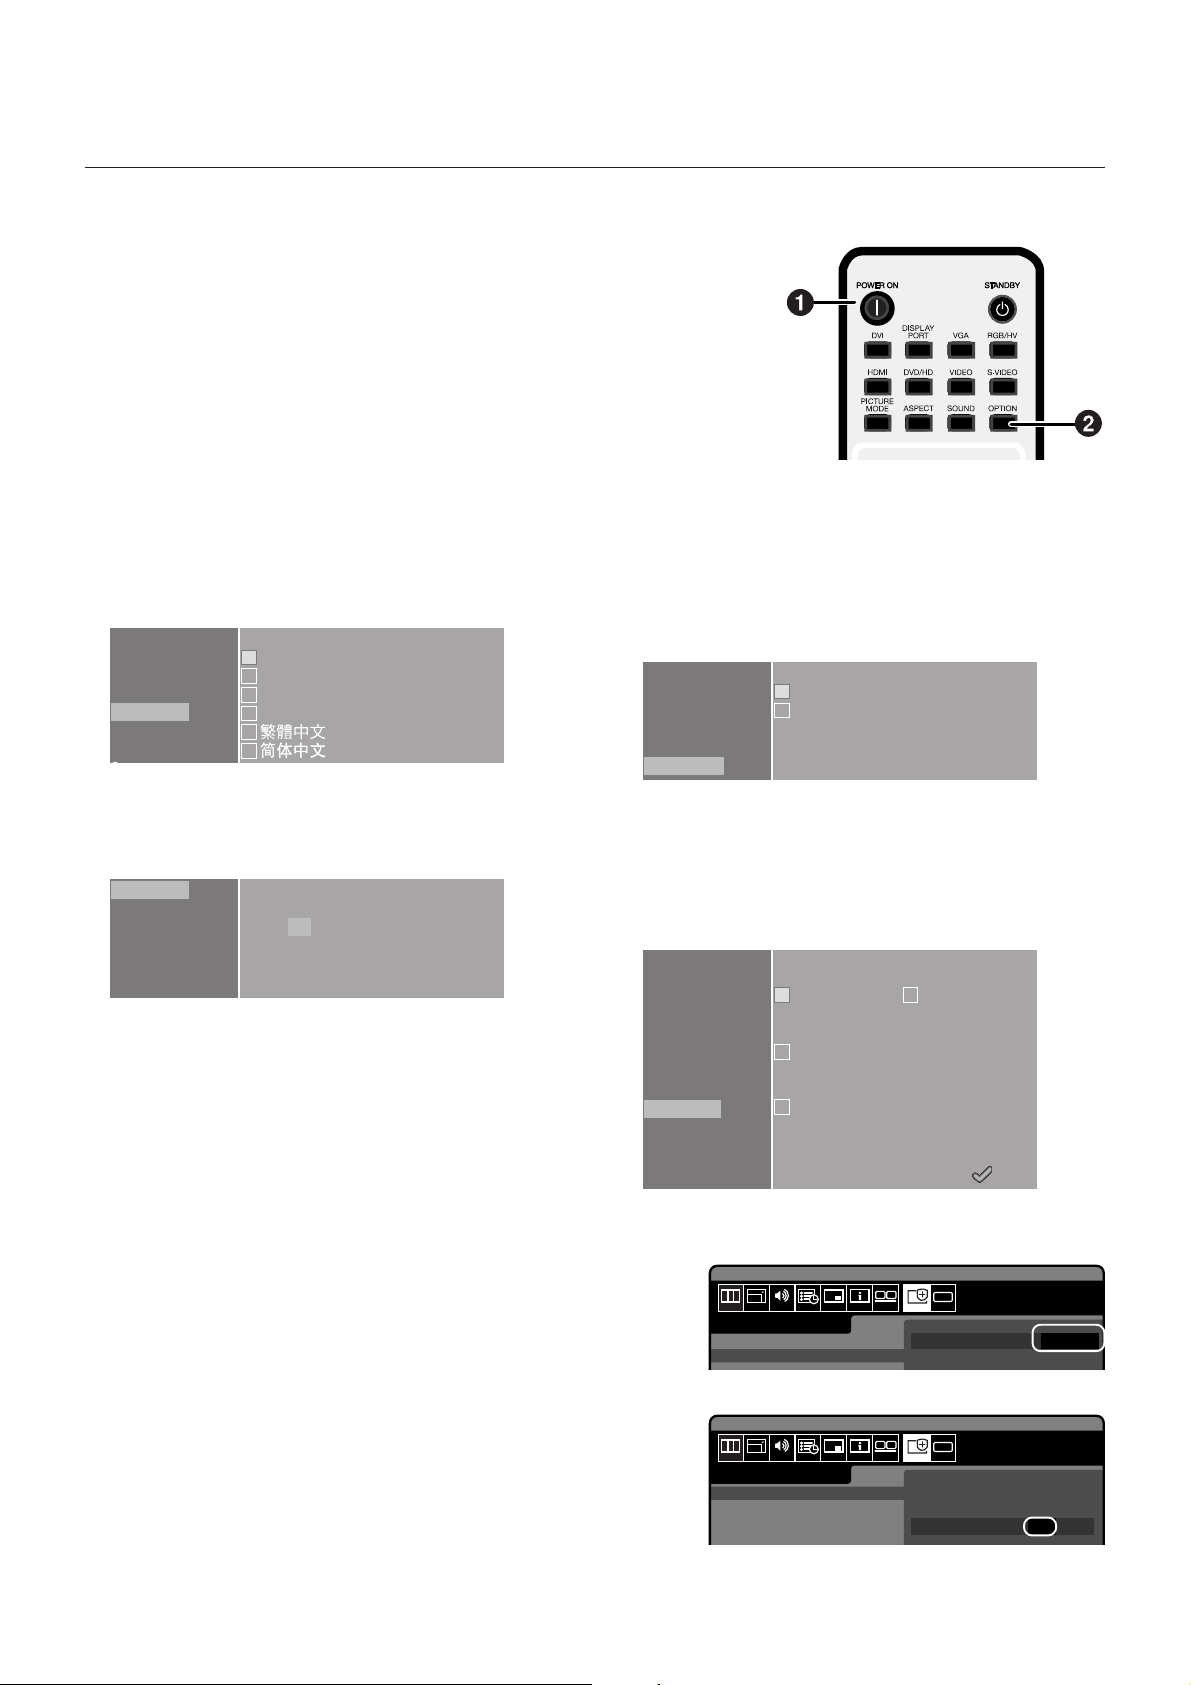
1. Turn on the main power supply of the display.
2. Press the “POWER ON” button of the remote control to
switch the display on.
3. Press the “OPTION” button of the remote control to select
“OPTION” for video input. The Media Player will start up in
approximately 1 minute.
4. After the Media Player has started, press the “OPTION”
key to display the OSD Menu of Media Player, and carry
out settings 1 to 4.
1LANGUAGE setting
Select the language for the OSD menu.
DATE/TIME
NETWORK
PREVIEW
TIMER
LANGUAGE
VIDEO OUT
MEMORY CARD
Select Language
English
Deutsch
Français
日本語
2DATE/TIME setting
Set the date and time and select the “Apply” button.
DATE/TIME
NETWORK
PREVIEW
TIMER
LANGUAGE
VIDEO OUT
DATE:
mm/ dd / yyyy
05 / 05 / 2008
TIME:
hh : mm: ss
06 : 12 : 25
3VIDEO OUT
Set the “VIDEO OUT” to select the optimal image resolution for
the display.
DATE/TIME
NETWORK
PREVIEW
TIMER
LANGUAGE
VIDEO OUT
Select Video Output Timing:
DVI 1920x1080@60
DVI 1360x768@60
4Media Player’s Power supply
From the “ADVANCED” menu, set the power supply to “Enable”
and select the “Apply” button.
* The factory default setting is “Disable”.
DATE/TIME
NETWORK
PREVIEW
TIMER
LANGUAGE
VIDEO OUT
MEMORY CARD
SLIDE SHOW
ADVANCED
Power supply
(In Display Power OFF / Power SAVE)
Enable Disable
Power-Off Timer
Display power Off
Power-On Timer
Select diaplay input to player
Display settings
Perform steps 5 to 9.
5 Switch the display power OFF and then ON again.
6 Open the display’s OSD menu with the “MENU”
button.
7 Select “STANDBY” from “STANDBY MODE” in the
“DISPLAY PROTECTION”.
8 Select “POWER SAVE” from “DISPLAY
PROTECTION”, and select “ON” from “OPTION”.
9 Close the OSD menu with the MENU button.
7
HDMI
RGB
ADJUST AUDIO SCHEDULE PIP
PICTURE
DISPLAY PROTECTION :
POWER SAVE
STANDBY MODE
HDMI
RGB
ADJUST AUDIO SCHEDULE PIP
PICTURE
DISPLAY PROTECTION :
POWER SAVE
STANDBY MODE
HEAT STATUS
FAN CONTROL
Apply
12
12
PRO
PROTECT
ADVANCED
ECO STANDBY / STANDBY
PRO
PROTECT
ADVANCED
RGB
VIDEO
OPTION
ON / OFF
ON / OFF
ON / OFF
OSD
MULTI DSP
OSD
MULTI DSP
Power States and Operations
•Power ON
Press the “POWER ON” button of the remote control. Media Player and the display will turn on at the same time.
Note
The Media Player takes approximately 1 minute to start up after it is turned on. During the start up, a message stating that there is no signal may be
displayed on the player.
•Power OFF
Press the “STANDBY” button of the remote control. Media Player and the display both switch off.
•Power Save Mode
When the Media Player is started up in a time slot when the program is not specified, a message “There is no scheduled program at current
time.” will appear, and after approximately 1 minute, the display will go into power save mode.
The power light of the display blinks in orange.
When a program starts, the device automatically switches from power save mode to power on and the program is displayed.
To display the OSD menu of the Media Player in the power save mode, press the “POWER ON” button of the remote control to turn on the
power, and then press “OPTION” button.
Note
The display does not enter power save mode in the following situations.
To display the OSD screen of the Media Player, press the OPTION button.
• When the “Power save setting in the OPTION setting” of the display is set to OFF.
• When Power Supply in the advanced menu of Media Player is set to [Do not supply].
Possible Operations in Power Modes
The following chart shows the possible operations.
Power Modes
Operations
Program distribution via LAN
Scheduled program display
Power ON
Green*
○
○
Power OFF
Orange*
○
×
O: Enable, X: Disable
Power save mode
Flashing orange*
○
○
* Power Indicator
8
How to create program data
Preparing content
First, prepare the content you want to display.
Content files available for use with the authoring software are as follows:
File format Extension
Still image (JPEG, PNG, BMP)
MPEG1, MPEG2
Movie
Windows Media Video 9
Audio
CAUTION:
Depending on the file, it may not be used. For details, refer to the “Content Specifications.”
NOTE:
Data created using PowerPoint® presentation software (*.ppt) can be used on this equipment by converting it to still images (*.jpg, *.png, *.bmp) using the
conversion software Viewer PPT Converter on the enclosed utility disc.
However, animations and movies cannot be converted.
.jpg, *.jpeg, *.png, *.bmp
*
.mpeg, *.mpg, *.m2p, *.m2v, *.vob
*
.wmv
*
.mp3
*
Create program data using authoring software
Click on the authoring software in the computer to start the program. For details on how to use authoring software, refer to authoring software
User’s Manual.
Save the program data created on a USB memory connected to the computer using the distribution function of the authoring software.
9

Copy the program data on the memory card of the Media Player
1. Prepare USB memory containing program data.
2.
Press the “STANDBY” button of the remote control to switch off the power of the Media
Player, and then set the USB memory containing the program into the USB cable extension.
NOTE:
If the USB cable extension is not used, set the USB memory directly into the USB memory connector on the main body of the Media Player.
CAUTION:
When the program is updated, the program data in the Media Player will be overwritten. Please be aware that the old program data will be lost.
3. Press the “POWER ON” button of the remote control to switch the Media Player on. The
update confirmation screen will be displayed, so press the “SET” button.
The file on the USB memory will be copied onto the memory card in the equipment.
CAUTION:
While the “Now updating... Important!!!” message is displayed, do not remove the USB memory or switch off the power source. The data on the USB memory
or memory card may be damaged.
4. After the files are copied, the equipment will automatically restart. After the equipment
completes initialization (approx. 1 minute) the update confirmation screen is displayed
again. Press the EXIT button and cancel the screen.
5. Remove the USB memory from the USB cable extension.
CAUTION:
The maximum capacity of the program data is 1.8 Gbytes (in the case of the enclosed SD card (2 Gbytes)).
When copying the program data onto the Media Player, make sure the content data capacity in the USB memory does not exceed this size. The maximum
capacity of the SD card set in the Media Player can be confirmed on the “MEMORY CARD” of the OSD screen.
The update time of the program data is about 15 minutes (maximum) when the data capacity is 1.8 Gbytes.
10

OSD
Main Menu
DATE/TIME
NETWORK
PREVIEW
TIMER
LANGUAGE
VIDEO OUT
MEMORY CARD
SLIDE SHOW
ADVANCED
Sub Menu
Date
Time
NTP Server
Time Zone
Static IP/DHCP
IP
Netmask
Gateway
DNS
MAC
Proxy
Update Mode from LAN
Power-ON/Power-OFF
Free
Available
Delete All Content Files
Normal Mode
Slide Show Mode
Video Repeat Mode
Power supply
(Display power OFF/Power save)
Power-OFF Timer
Turn off the display power
Power-ON Timer
Switch display input to the Media Player
Component video input frequency
Description
Set the current Date and Time.
This is not used in this equipment.
This is not used in this equipment.
Select the IP Address setting method.
Set the IP Address used when selecting a Static IP. The default setting is
(192.168.0.2)
Set the Netmask used when selecting the Static IP. The default setting is
(255.255.255.0)
This is not used in this equipment. Leave the default setting at (192.168.0.1)
This is not used in this equipment. Leave the default setting at (0.0.0.0)
This is the MAC address for this equipment.
This is not used in this equipment. Leave the default setting at (0.0.0.0)
Set it to “Push Mode” (default setting). The “Pull Mode” is not used with this equipment.
Preview the selected program. Select the program to preview on the “Program List”.
During preview, push any button on the remote control to display the review end menu.
The preview will be displayed repeatedly until it is ended up manually.
* If the OSD menu is selected while displaying the “Slide Show Mode”, the “PREVIEW” is not displayed.
Switches the equipment ON/OFF. If there is program data that set the time for power
on/off, the setting of the program data is valid, and the timer setting is void. The time
set in the program is displayed.
Select the language for the OSD menu.
Select the optimal visual output for the display in use.
This is the remaining area available for use.
This is the maximum capacity of content that can be used. As a rough guide, it should
be about 90% of the memory card capacity. (In the case of the enclosed memory card
(2 Gbytes), it is displayed at around 1.8 Gbytes.)
All content will be deleted.
The program is displayed according to the schedule set in the authoring
software.
This sets the mode in which the images (*.jpg, *.jpeg, *.png, *.bmp) on the connected USB
memory are displayed continuously in the order of the file names.
This sets the mode in which the moving file (*.wmv, *.mpg) on the connected USB
memory are displayed continuously in the order of the file names.
Set whether to supply power to Media Player when the display is turned OFF or
in power save mode.
[Enable]
Normally, use this setting for most situations.
*Display settings are also required. See the “Settings” on page 7.
[Disable]
Neither the power timer function nor program distribution via LAN can be
used.
*This setting can reduce power consumption when the display is off.
(Enable)
Turns off both the Media Player and the display when the timer for
the Media Player is OFF.
(Disable)
Turns off the Media Player only when the timer for the Media Player is OFF.
*The factory default setting is “Disable”.
(Enable)
Switches the display input to Media Player when the timer for the
Media Player is ON.
(Disable) The display input will not switch when the timer for the Media Player is ON.
*The factory default setting is “Disable”.
Select 50Hz or 60Hz according to the component video input source
.
11

Slide Show Mode/Video Repeat Mode
These functions continuously display still image data (*.jpg, *.jpeg, *.png, *.bmp) or movie files (WMV9, MPEG1, MPEG2) in the USB
memory in the order of the file names.
The still image data or movie data can be displayed without using authoring software.
How to set the Slide Show Mode
1. Set the USB memory containing the still image data you wish to display in the Media Player.
NOTE:
• Change the name of the folder containing the still images to something other than “media.”
2. Select “Slide Show Mode” in the “SLIDE SHOW” item of the OSD menu.
3. The time can be set from 3 seconds to 60 seconds. If it is set to “Manual,” the display can
be switched using the remote control direction buttons , .
CAUTION:
The setting for the display time will become valid after a restart.
4.
Press the SET button in “Folder,” and select the folder containing the still images you wish to display.
CAUTION:
Folders located lower than 2 levels cannot be selected. The selection of the folder name becomes valid after a restart.
5. Select the “Apply” and select “Yes” on the confirmation screen, and the equipment will
automatically restart.
NOTE:
• While displaying still images, press the direction buttons , and the previous or next still image will be displayed.
How to set the Video Repeat Mode
1.
Set the USB memory containing the movie file you wish to display in the Media Player.
NOTE:
• Change the name of the folder containing the movie file to something other than “media.”
2. Select “Video Repeat Mode” in the “SLIDE SHOW” item of the OSD menu.
CAUTION:
• Select full screen and the image will always be shown in full screen.
3. Press the SET button in the “Folder,” and select the name of the folder that contains the
movies you wish to display.
CAUTION:
Folders located lower than 2 levels cannot be selected. The selection of the folder name becomes valid after a restart.
4. Select the “Apply” and select “Yes” on the confirmation screen and the equipment will
automatically restart.
How to release the Slide Show Mode/Video Repeat Mode
1. When displaying the slide show or movie play, press the MENU button on the remote
control and display the OSD menu.
2. After selecting ”Normal Mode” in “SLIDE SHOW” on the OSD menu, select “Yes” on the
confirmation screen and the equipment will automatically restart in Normal Mode.
12

How to create program data using external video
External video image from the S TERMINAL input connector can be displayed with still
images and messages. (For details refer to the authoring software UserÅfs Manual.)
The following shows the connection with commercially available AV equipment.
Connecting to the AV device with an S terminal output
External AV equipment
Output
VIDEO S-VIDEO
AUDIO
LR
Audio output
S Terminal video output
Audio cable (Commercially available)
S Terminal input connector
AUDIO IN
Program layout example
External video image Still image
Message
Video, game machines, etc.
Connecting to the AV device with Component outputs
RBG
RBG
Audio output
Compornent output
R
R
B
B
G
G
Compornent cable (commercially available) Compornent input conversion cable
R : Red
B : Blue
External AV equipment
Output
AUDIO
LR YPbPr
Video, game machines, etc.
G : Green
S Terminal video cable (commercially available)
Audio cable (Commercially available)
R
R
B
B
G
G
R
R
B
B
G
G
AUDIO IN
S Terminal input connector
NOTE:
Programs using external video images cannot be output to
the DVI output connector. They can only be output to the
display which this device is connected.
13

<Using LAN>
LAN Connection and setting
Introduction
When distributing program data via LAN, LAN connection and setting are required.
There are two methods for setting the IP Address, one for Static IP Address and one using DHCP servers.
In the case of Static IP Address, refer to “LAN connection/setting: When using Static IP Address,” and when using DHCP server refer to “LAN
connection/setting: When using DHCP server.”
NOTE:
The DHCP server provides IP Addresses to equipment on the NETWORK. Normally, they are built-in with routers.
The procedure for LAN setting is as follows.
Media Player LAN setting
The Media Player name setting of the
Media Player
(required only in the DHCP mode)
* Not required for Static IP.
Authoring software LAN setting
LAN connection test
Open the OSD of the Media Player using the enclosed remote control and
conduct settings.
From Internet Explorer on the computer, call out the Media Player
setting screen via LAN and conduct settings.
Conduct setting using the panel setting wizard from “panel management” of the authoring software.
To confirm the LAN setting, conduct the connection test.
14

LAN Connection and setting (continued)
•When connecting directly to a computer
Computer
+
Authoring software
LAN straight cable
•When connecting with several computers via a hub
LAN connector
Media Player
<Using LAN>
Media Player
Computer
+
Authoring software
LAN straight cable
Hub
LAN straight cable
LAN connector
•When using a DHCP server (built into routers)
NOTE:
Refer to “LAN connection/setting: Use DHCP servers.”
Computer
+
Authoring software
LAN straight cable
LAN connector
Media Player
Media Player
LAN connector
Hub
Routers
LAN straight cable
NOTE:
A maximum of 20 Media Players can be connected.
CAUTION:
Connect the computer and Media Player to the LAN terminal, not the WAN terminal of the routers.
Use commercially available routers, LAN cables, and hub.
Use LAN cables that are category 5 or higher.
15
LAN connector
Media Player

<Using LAN>
LAN Connection and setting: When using Static IP Address
1. Static IP Address setting of the Media Player
1) Switch on the power of the Media Player and Display.
2) Display the OSD screen using the menu buttons on the remote control, and open the
“NETWORK.”
3) Set the IP Address.
1 Use the left and right direction buttons on the remote control to select the “Static
IP.”
2 Select “Push Mode”.
3 Use the number buttons on the remote control and conduct settings as shown
in the table below. Write down the set IP Address and keep it for reference.
4 Select “Apply”.
5 Close the OSD menu using the EXIT buttons.
DATE/TIME
NETWORK
PREVIEW
TIMER
LANGUAGE
VIDEO OUT
MEMORY CARD
SLIDE SHOW
ADVANCED
Static IP
IP: 192 .168 .0 .2
Netmask: 255 .255 .255.0
Gateway: 192 .168 .0 .1
DNS: 0 .0 .0 .0
MAC:
Proxy
Update Mode from LAN:
Push mode Pull mode
Static IP Address setting
1
3
00:50:41:80:02:A9
2
4
Apply
IP
Netmask
Gateway
DNS
Find out the IP Address of the computer, change only the last digit of the address, and set the address with the IP Address that is not the
same as other Media Players.
Ex) IP Address of the computer: In the case of 192.168.0.10,
set the first Media Player as 192.168.0.2.
Set the second Media Player as 192.168.0.3.
Set the same value as the Netmask of the computer. The default setting is (255.255.255.0)
Leave it at the default setting. The default setting is (192.168.0.1)
Leave it at the default setting. The default setting is (0.0.0.0)
CAUTION:
Set the computer’s IP Address according to the network environment.
NOTE:
To confirm the IP Address and Netmask of the computer, startup the “command prompt” (In the Start menu>All programs>Accessories.) in
Windows XP/Vista/7 and run C:\> ipconfig.
16

<Using LAN>
LAN Connection and setting: When using Static IP Address
2. Authoring software panel registration
Panel setting wizard startup button of the
(continued)
Click the panel setting button in the “Panel Control” menu of the
authoring software.
1 Distribution list setting
If no changes are required, click “Next.”
2 Set to LAN (Static IP) in the connection type setting.
3 Input the IP Address that was set in 1.
4 ~ 6 Set if necessary and then click “Next.”
7 Confirm the details of the setting and then click “Complete.”
For all Media Players, implement steps 1 to 7, then reconfirm the setting details in the
“Panel Control” menu. Setting is completed.
IP Address setting of the authoring
NOTE:
The settings above can be changed in the “Panel Property” of the “Panel Control”.
Example: Register 2 Media Players
authoring software
software
3. LAN connection test
1) Startup the Internet Explorer on the computer, and input the
Static IP address set in the authoring software after the “http://”
in the address bar.
2) If the user name and password screen are displayed, input the
user name: default and password: 0000.
3) Confirm that the setting screen is displayed.
NOTE:
The Media Player setting can be confirmed on the WEB setting screen.
CAUTION:
It may not be properly displayed on a browser other than Internet Explorer.
User name, password screen
WEB setting screen
17

<Using LAN>
LAN Connection and setting: When using the DHCP server
1.
Set the Media Player to DHCP mode.
1) Switch on the power of the Media Player, Display,
hub, and routers.
2) Use the menu button on the remote control to
display the OSD screen, and open “NETWORK.”
3) Set the OSD screen as shown below.
1Select “DHCP” using the left and right buttons of the remote control.
2Select “Push Mode”.
3Select “Apply”.
DATE/TIME
NETWORK
PREVIEW
TIMER
LANGUAGE
VIDEO OUT
MEMORY CARD
SLIDE SHOW
ADVANCED
DHCP
IP: 192 .168 .0 .3
Netmask: 255 .255 .255.0
Gateway: 192 .168 .0 .1
DNS: 192 .168 .0 .1
MAC:
Proxy
Update Mode from LAN:
Push mode Pull mode
1
00:50:41:80:01:34
2
DHCP setting
3
Apply
2. Confirm and set the Media Player name
The Media Player name is required in the panel setting of the authoring software.
1) Connect the computer, Media Player, and DHCP server (or routers) on the NETWORK, and
switch on the power.
2) Open “NETWORK” on the OSD screen of the Media Player, confirm that the IP address is
properly set on the DHCP server, and keep a memo of the IP address.
(It can be set to anything other than 0.0.0.0.)
3) Confirm that the computer’s IP Address is set.
NOTE:
IP Address is set when the DHCP is set in OSD or during startup.
4) Startup Internet Explorer on the computer, input the IP Address of the Media Player
confirmed in 2) in the address bar after “http: // ,” and click the “Go” button.
5) The input screen for the user name and password will be displayed. Input the username in
Input the user name and password in the
setting screen
Ex. http: //192.168.0.2
one-byte characters and the default password, 0000, then click
“OK.”
CAUTION:
•Prepare routers that have a DHCP server or DHCP server function.
•In the case of routers, make the DHCP server function valid.
•Set the computer’s IP Address according to the network environment.
NOTE:
To confirm the IP Address and Netmask of the computer, startup the “command prompt” (In the Start menu>All programs>Accessories.) in
Windows XP/Vista/7 and run C:\> ipconfig.
18

<Using LAN>
LAN Connection and setting: When using DHCP server
6) After displaying the setting screen, confirm the
Media Player name on the setting screen
(continued1)
Media Player name (player Name).
To change the name, click the Change Player Name
button, input the name using 15 or less one-byte
characters starting with an alphabet, then click the
“Submit” button. (Do not use symbols or spaces.)
Keep a memo of the Media Player name.
7) Close Internet Explorer.
CAUTION:
Change Media Player Name
Set it so that it is not the same as other Media Players.
It does not differentiate between uppercase and lowercase alphabets.
NOTE:
The default setting value of the Media Player name is DS34XXXXXX.
XXXXXX is the last 6 digits of the MAC address of the Media Player.
The MAC address can be confirmed in the “MAC” of the “NETWORK” of the OSD.
Example
In the case of MAC: 0050418000e9, the Media Player name is DS348000e9.
It can be used without changing the name.
3. Authoring software panel registration
Click the panel setting wizard in the “Panel Control” menu of the
Authoring Software, and startup the wizard.
1 Distribution list name setting
If no changes are necessary, click “Next.”
2 Set to LAN (DHCP) in the connection type setting.
3 Input the set Media Player name.
4 ~ 6 Conduct the following settings as required, then click “Next.”
7 Confirm the setting details and click “Complete.”
Conduct 1-7 for all Media Players.
Reconfirm the setting details on the “Panel Control” menu.
The setting is complete.
NOTE:
The above setting can be changed in the “Panel Property” of the “Panel Control”.
Startup button of the panel setting of the
authoring software
Media Player name setting
Example: Register two Media Players
19

<Using LAN>
LAN Connection and setting: When using a DHCP server (continued 2)
4. LAN connection test
User name, password screen
1) Startup Internet Explorer on the computer, input the Media
Player name set in the authoring software in the address column
after the “http://.”
Ex. http: //DS3440314b
NOTE:
The uppercase and lowercase alphabets in the Media Player name are not differentiated.
2) When the user name and password screen are displayed, input “user name: default and
password: 0000”
WEB setting screen
3) Confirm that the setting screen is displayed.
NOTE:
The Media Player setting can be confirmed in the WEB setting screen.
CAUTION:
I It may not be properly displayed on a browser other than Internet Explorer.
20

<Using LAN>
Distribute program data to the Media Player
1. Use authoring software to create a program.
Refer to the “SB-L008KU Quick Reference Guide” on the enclosed CD-ROM.
2.
Switch on the power to the devices on the network such as Media Players, computers, hubs, and routers.
3. Click the “Distribution” button in the authoring software.
4. Select the recipient (Media Player) in “Distribution List”.
5. Select the program that is necessary.(When selecting the recipient, the program registered
in the schedule will be selected.)
6. Click the execute distribution button.
7. The program data will be distributed to the selected recipients on
Select recipients and program
the distribution list. After the program is distributed to all
recipients, it will end.
NOTE:
The error information and distribution program can be confirmed on the distribution log.
8. When distribution starts, the Media Player will stop displaying the program and receive the
program data. While receiving the data, the following message will be displayed.
Content Updating... Please do not power-off.
CAUTION:
•If the data is received while a program is not displayed, the message is not displayed and the screen remains black.
9. After receiving the program data, the Media Player will generate the program data.
10. Media Player will restart (it will take approx. 1 minute), and afterwards, the program will be
displayed according to the schedule.
CAUTION:
• Once distribution is conducted, the old programs in the SD Memory Card are erased.
• To distribute a 100 MB program to one Media Player,
1) it takes approx. 1 minute to distribute the authoring software, and 2) 1 minute to generate the program data on the Media Player side after distribution.
*The time differs depending on the performance of the PC and the program details.
*After 2), it takes approx. 1 minute for the Media Player to restart.
• Do not switch off the power while the data is being distributed or while the program data is being generated.
• While the Media Player is generating the program data, if you distribute the content from Authoring Software to (the procedures of steps 9. and 10. above), a
distribution error will occur. Distribute after the Media Player is restarted.
21

<Using LAN>
About distributing the difference of the program data
For programs that are redistributed via LAN in order to reduce time, only the newly added movies, still images, and audio files in the program are
distributed.
Program Type
Program to be newly distributed
Program to be re-distributed
Note 1)
Note 1) Redistribution means a program with the same name was previously distributed to the Media Player.
Note 2) The message data and schedule file are always distributed.
Note 3) After distribution, Media Player generates new program from new files and existing files. Unnecessary old files and old programs are deleted.
All files registered in the program
Distribute only the movie, still image, and audio files that were added. Note 2)
Distribution file
Maximum program data capacity
For the maximum program data capacity of one Media Player, refer to the table below.
If an insufficient SD card memory capacity error (Error code 441) is displayed during distribution, reduce the program data or increase the SD
Memory Card capacity.
Distribution method
USB memory
LAN
Note 1) The program data capacity is the total of capacity for each program data.
The capacity of one program data is the total capacity of the movie, still image, and audio data registered.
Ex) When the program distributed to one Media Player registers program 1 (still image 1 and movie 1) and program 2 (still image 2 and movie 1), the program data capacity
will be the total capacity for still image 1 + movie 1 + still image 2 + movie 1.
Note 2) After distribution, the SD card occupied area can be confirmed in the “Memory Card” items of the OSD.
Note 3) Depending on the structure of the program, the maximum capacity may increase.
Within 90% of the SD Memory card capacity Note 1), Note 2)
As a guideline, it should be less than 45% of the SD Memory card capacity.
Note 3), Note 2)
Maximum program data capacity
Ex)
In the case of 2 Gbytes SD card, up to 1.8
Gbytes.
In the case of a 2 Gbytes SD card, up to 0.9
Gbytes as a guideline.
22

Troubleshooting (startup, video audio output, remote control, OSD)
Problem
No power
No images or sound
The remote control is unresponsive
The device does not enter power save mode, when no programs are scheduled.
The timer function is not operating
properly.
During startup, the caution screen is
displayed.
Content cannot be updated
OSD timer function will not operate
The power is switched off automatically.
Slide Show Mode or Video Repeat
Mode will not operate.
Condition
The power LED on the display is not on.
No images are displayed on the screen.
No images are output from the DVI output connector
No sound
The device does not power on
The device does not power off
The message “It failed to access the memory card” is displayed.
The message “It failed to recover library (.img) file.
There is no library file in the memory card” is
displayed.
The message “There is no scheduled program at
current time.” is displayed.
The message “A content folder is found in USB memory. Press
[Set] to update content from USB memory.” is displayed.
The message “Please plug in USB memory for Slide
Show mode.” or “Please plug in USB memory for
Video Repeat mode.” is displayed.
“There is no file in USB memory for Slide Show
mode.” or “There is no file in USB memory for Video
Repeat mode. Please plug in another USB memory.” is
displayed.
Even when the power is switched on with the USB
memory mounted, the message “A content folder is
found in USB memory. Press [Set] to update content
from USB memory.” is not displayed.
The message “No content file is found. Updating is
aborted.” is displayed.
The message “Content size is too large. Please reduce
it then update again.” is displayed.
During startup, the slide show starts
The timer setting in the OSD menu cannot be set
When starting up the power, the messarge “There is no
file in USB memory for Slide Show mode.” or “There
is no file in USB memory for Video Repeat mode.
Please plug in another USB memory.” is displayed.
The USB memory is mounted, but when starting up the power, the
message “Please plug in USB memory for Slide Show mode.” or
“Please plug in USB memory for Video Repeat mode.” is displayed.
During startup, the confirmation screen for content update
is displayed or the existing program is displayed.
Causes and Remedies
See "Troubleshooting" in the display User's Manual
When no programs are scheduled, the device enters power save mode.
When a programs starts, the power switches on automatically and the program is displayed.
Check that OPTION input is selected for the display. It can be selected by pressing the
OPTION button on the remote control.
Check that Media Player is completely inserted into the display.
Programs that use external video images cannot be output from the DVI output connector.
See "Troubleshooting" in the display User's Manual
See "Troubleshooting" in the display User's Manual
Check that the power save mode - option setting for the display is ON.
When the power supply setting in the advanced menu of the OSD menu is [Do not
supply], the device does not enter power save mode.
Check that the [Standby mode] setting for the display is [Standby].
Check that the [Power supply] setting for Media Player is [Supply].
Check that the [Power OFF timer] setting in the Advanced menu is set to [Valid].
The Memory card may be dislodged. Confirm that the memory card is securely mounted.
Remove the memory card, and confirm that there is a file with the .img extension on the
computer. If such a file does not exist, obtain a file from the enclosed CD-ROM and copy
the file.
Confirm that the date and time setting is correct.
Confirm the schedule setting of the authoring tool to make sure there are no errors. If
there is an error, correct the schedule and conduct content update.
This is displayed when a USB memory has been mounted. If a content update is not to be
conducted, press the EXIT button and remove the USB memory.
It is the Slide Show Mode or Video Repeat Mode. Connect a USB memory that contains
still images or movies. If you do not wish to use this mode, press the EXIT button and
end it, and set the Slide Show Mode or Video Repeat Mode to “Normal Mode” in the
Slide Show menu of the OSD screen.
Use the computer to confirm that there is a folder named media on the USB memory. If
there is no folder named media, use the authoring software to save the program data on
the USB memory.
Confirm the connection of the USB cable extension.
Make sure that the USB memory format is not NTFS format.
Confirm that the USB memory is not encrypted.
Try a different USB memory.
Use authoring software to save the program data on the USB memory.
Use the authoring software to reduce the program so the size is smaller. The maximum
capacity for content is 1.8 Gbytes (for the enclosed Memory card (2 Gbytes)).
It is set to the “Slide Show Mode”. While displaying the slide show, press the MENU
button to display the OSD menu, change the setting from slide show to “Normal Mode”
and then restart.
When power control is set with content update, the timer function becomes void.
Confirm that the power control is not set in the TIMER or authoring software. If it is set,
release if necessary. For details on releasing power control in the authoring software,
refer to the power management section of the authoring software User’s Manual.
Confirm that there are still images or movies on the USB memory, or confirm the folder
setting from “SLIDE SHOW” on the OSD menu.
Confirm that the still image file or movie file is a file that is supported by Media Player.
Confirm the connection of the USB cable extension.
Try a different USB memory.
Confirm that the “Slide Show Mode” is selected in the “SLIDE SHOW” menu of the OSD
screen.
Reference page
—
P8
P5
P3
P13
—
—
P7
P11
P7
P11
P3
P26
P7, 11
—
—
P11, 12
—
P6
—
—
—
—
—
P11, 12
P11
—
P11, 12
P28
P6
—
P11, 12
23

Troubleshooting (program, content display)
Symptoms
The movie is not properly displayed.
The still images are not properly
displayed.
The Message is not properly displayed.
Programs using external video cannot be output to the DVI output connector.
There is nothing displayed between the programs.
It is not displayed according to the schedule setting.
Conditions
The message “The codec in not supported” is
displayed, nothing is displayed or
displayed.
The message “The codec in not supported” is
displayed, nothing is displayed or
is displayed.
The message “The codec in not supported” is
displayed, nothing is displayed or
displayed.
The movie is displayed but the sound does not come out.
When the program is displayed on the Media Player,
the movie will not rotate 90 degrees in the vertical
layout.
The message “The image items are not supported” is
displayed, there are images that are not displayed or
is displayed.
Nothing is displayed.
Specified characters are not displayed.
When the vertical layout is selected, specified
characters are not rotated.
It takes time for the message to be displayed.
It takes time for the telop to be displayed.
or
Cause and measures
is
is
Confirm that the codec of the movie file you are trying to display is supported by this
equipment.
The file cannot be open or played.
The file format may not be supported. Confirm the format details on the “Content
Specifications”.
Or the file may be broken. Confirm that it can be played on the computer.
If the movie bit rate exceeds the maximum value, it will not be displayed. Use the movie
editing software to reduce the bit rate.
Reference: movies with
(movie file size (Bytes)/Play Time (Sec.)) x 8-bit ) that is larger than the maximum bit rate
will not be displayed.
Confirm that the audio in the movie file is a file supported by this equipment.
The movies are not automatically rotated in the vertical layout on Media Player. Before
using the authoring software, use the movie editing software and rotate the image.
The movies that include a copyright protection function cannot be played.
Confirm that the format of image file you are trying to display can be displayed with this
equipment.
Confirm that the codec of the image file you are trying to display can be displayed with
this equipment.
The file may be damaged. Confirm that it can be displayed on the computer.
Confirm the message setting of the authoring software.
One-byte “ <“ and “> “ symbols are not displayed. Make the characters two-bytes.
A small number of special characters may not be displayed.
(=),(,),(“ “) are not rotated.
As the number of characters in a message increases, the time until it is displayed
becomes longer. It takes about 7 seconds to display 100 characters.
Set the height of telop less than 30% whole display.
Programs using external video cannot be output to the DVI output connector.
When switching the movie, there is about 10 to 20 seconds where there is no image or
audio, however this is not an error or malfunction.
Confirm that there are no errors in the schedule setting of the authoring tool. If there are
any errors, correct the schedule and update the content.
Confirm that the date and time setting are correct.
Reference page
P28
P28
—
—
P28
P28
—
—
—
—
—
—
—
—
P7, 11
Troubleshooting (when using LAN)
Symptoms
•Cannot be distributed.
•Cannot be connected with the
connection test.
The WEB setting screen cannot be
opened.
Conditions
In the case of
Static IP settings
In the case of
DHCP setting
Common
Static IP/DHCP setting
In case of off-line
(when using USB memory)
Error occurred when inputting user name and password
The Media Player name cannot be set.
The selection button is not displayed.
NOTE:
If there is a problem with the connection test, refer to the next page.
Authoring software
error code
Error code: -1
Error code: 102
Error code: -1
Error code: 100
Error code: 102
Error code: -1
Error code: 100
Error code: 101
Error code: 102
Error code: 434
Error code: 441
Error code: 501
Error code: 507
Cause and measures
Confirm that the IP Address set in the Authoring software is correct.
Confirm that the network setting of the Media Player is correct.
Confirm that the IP Addresses of the Media Players are not overlapped.
Confirm the network setting of the computer.
Confirm that the DHCP servers of the routers are valid.
Confirm that the Media Player name of the Media Player is correct.
Confirm that the Media Player name of the authoring software is correct.
Confirm that the Media Player names are not overlapped.
* The uppercase and lowercase alphabets in the Media Player name are not differentiated.
Confirm the LAN cable connection.
Confirm that the power of the Router, hub are turned ON.
Confirm that the port number is not closed by firewall or security software.
This device is used port 137, 138 or 1900 when sending from the Media Player.
An optional port is used when sending from Authoring software.
Media Player is starting up. Let some time pass before redistributing.
Media Player is updating. Let some time pass before redistributing.
The SD Memory Card has insufficient capacity. Reduce the program data or change the
SD Memory Card to one with a larger capacity.
It may not able to recognize the USB memory. Load the USB memory again.
The USB memory may be coded. It cannot be used by this device.
Confirm the capacity of 1 file does not exceed 4G byte of the upper limit.
Input user name: default, password : 0000
Set 15 or less one-byte characters (alphabets or numbers) starting with alphabets.
Spaces and symbols cannot be used. After input, click the Submit button.
This may occur when using a browser other than Internet Explorer.
Reference page
P16, 17
P18, 19, 20
P15
—
—
—
—
P26
P18, 20
P18, 19
—
24

Troubleshooting
(Using Ping command to conduct a LAN connection test)
If the data cannot be distributed via LAN, use the Ping command on the computer to conduct a LAN connection test.
In the case of a Static IP Address
1 Look up the IP Address in “NETWORK” on the OSD.
DATE/TIME
NETWORK
PREVIEW
Static IP
IP: 192 .168 .0 .2
Netmask: 255 .255 .255.0
2 Startup the command prompt in Windows on the computer.
3 Enter C: \>ping <IP Address>.
4 If a reply is returned, the connection is made.
When using a DHCP server
1 Look up the IP Address in “NETWORK” on the OSD.
DATE/TIME
NETWORK
PREVIEW
TIMER
DHCP
IP: 192 .168 .0 .3
Netmask: 255 .255 .255.0
Gateway: 192 .168 .0 .1
Command prompt screen
C:\>ping 192.168.0.2
Pinging 192.168.0.2 with 32 bytes of data:
Reply from 192.168.0.2: bytes=32 time<1ms TTL=64
Reply from 192.168.0.2: bytes=32 time<1ms TTL=64
Reply from 192.168.0.2: bytes=32 time<1ms TTL=64
Reply from 192.168.0.2: bytes=32 time<1ms TTL=64
Ping statistics for 192.168.0.2:
Packets: Sent = 4, Received = 4, Lost = 0 (0% loss),
Approximate round trip times in milli-seconds:
Minimum = 0ms, Maximum = 0ms, Average = 0ms
3
4
2 Open Internet Explorer on the computer and enter “http: //<IP Address>” in the address bar.
3 Confirm the Media Player name when the WEB setting screen is displayed.
Command prompt screen
C:\>nbtstat -R
Successful purge and preload of the NBT Remote
Cache Name Table.
C:\>ping ds348000e9
Pinging ds3440314b [192.168.0.3] with 32 bytes of data:
4 Startup the command prompt in Windows.
5 Enter C: \>nbtstat-R.
6 Enter C: \>ping <Media Player name> .
Reply from 192.168.0.3: bytes=32 time<1ms TTL=64
Reply from 192.168.0.3: bytes=32 time<1ms TTL=64
Reply from 192.168.0.3: bytes=32 time<1ms TTL=64
Reply from 192.168.0.3: bytes=32 time<1ms TTL=64
7 Confirm that an IP Address is displayed.
8 Confirm that it matches the IP Address in 1.
9 If a reply is returned, the connection is made.
Ping statistics for 192.168.0.3:
Packets: Sent = 4, Received = 4, Lost = 0 (0% loss),
Approximate round trip times in milli-seconds:
Minimum = 0ms, Maximum = 0ms, Average = 0ms
NOTE:
If it cannot be connected, reconfirm the LAN cable connection, Media
Player and computer settings, and power supply of the display.
If it can be connected with this test but cannot distribute, confirm that the
firewall or security software is not set to block the FTP transmission.
5
6
7
9
25

Maximum Play Time for movies
In the case of the enclosed Memory card (2 Gbytes), it would be as follows.
*The Play Time will differ depending on the SD Memory card capacity, and the VIDEO and AUDIO bit rate. Does not include still images and
messages.
SD Memory card capacity
2Gbytes
2Gbytes
2Gbytes
VIDEO
25Mbps
10Mbps
6Mbps
bit rate
AUDIO
128kbps
128kbps
128kbps
Play Time (Min.)
10
25
40
Remarks
1920 x 1080 MPEG2
1920 x 1080 WMV9
720 x 480 MPEG2
The approximate time can be calculated using the following formula.
Play Time (Sec.) = (SD Memory card capacity (Gbyte) x 0.9) x 1024 (Mb) x 1024 (kb) x 8-bit / ((VIDEO bit rate (Mbps) x 1024 (kb)) + AUDIO bit
rate (kbps))
Ex) SD Memory card: 2 Gbytes, VIDEO bit rate: 10 Mbps, AUDIO bit rate: 128 kbps
(2G x 0.9 x 1024 x 1024 x 8) / (10 x 1024 + 128) = 25 min.
Concerning Memory cards
The firmwares (Files with .img extension) are pre-written on the enclosed memory card. If it is mistakenly erased, use the computer to copy the
firmware from the firmware_folder in the enclosed CD-ROM to the memory card.
26

Specifications
SB-L008KU Media Player compatible displays
P401, P461, M401, M406, P521, X431BT, P701
Media Player (SB-L008KU) Specifications
Items Specifications
Internal
interface
External
interface
Time function backup battery
External
memory device
Enclosed
software
External dimensions
Power supply
Power
consumption
Regulation
Packaging dimensions
Weight
Temperature
Humidity
*Note1) Programs using external video images cannot be output to the DVI output connector. They can only be
Internal image output
Audio Output
DC power input
SD card interface
Visual output
(Outputs same signals as internal visual output)
USB memory interface
LAN
Video input
Audio input
SD memory card
USB memory
Authoring software
Viewer PPT converter
Standard
Standby or power
save mode *2
output to the display which this device is connected.
When “Enable” is selected in the “Power supply” display of
the OSD “ADVANCED” menu. *3
When “Disable” is selected in the “Power supply” display
of the OSD “ADVANCED” menu. *4
Resolution
Analog audio output
Resolution
Interface
DC input
Electromagnetic Interference
Individual box
Device only
Incl. individual box
Operating temperature
Storage environmental temperature
Operating temperature
Storage environmental temperature
1920 x 1080 / 60 Hz (factory default settings)
1360 x 768 / 60 Hz
Line output L/R x 1
+16V
SD card interface x 1 Maximum capacity: 8 Gbyte (enclosed SD card: 2 Gbyte)
1920 x 1080 / 60 Hz (factory default settings)
1360 x 768 / 60 Hz
DVI-D
Compatible with USB memory only. Maximum USB memory capacity: 8 Gbyte
Connector : RJ45 x 1, 10/100BASE-TX *Note 1)
Connector : Mini DIN 7P
S video: NTSC / PAL
Component input *1
1080i,720p:60Hz,50Hz, 480p,480i:60Hz, 576p,576i:50Hz
Line input L/R x 1, Stereo 3.5ø mini jack
BR2032 coin-type lithium battery
2 Gbyte SD memory card enclosed* Recommended product : listed on our website
Conforms to Interface USB2.0. Separate preparations are required. *Recommended product: listed on our website
Software to create program data
OS : Windows XP, Vista
Software to convert PowerPoint files to still images
OS : Windows XP, Vista
247.6 (W) x 143.6 (D) x 33.7 (H).
+16 V ±5%
Media Player : 12 W (DC power)
Media Player : 11 W (DC power)
Total power consumption including display: approx. 35 W
Media Player : 0 W (DC power)
Total power consumption including display: approx. Same as power of display in standby mode
VCCI-A
376.0 mm (W) x 85.0 mm (H) x 225.0 mm (D)
1.0kg
1.5kg
0 - 40 °C
–10 - 60 °C
10 - 80% (without condensation)
10 - 90% (without condensation)
*Note 2) Power save mode
When no program is specified, Media Player goes into power save mode to save power.
To return, press the power ON button to start.
*Note3) In most situations, set [Supply]
*Note4) When set to [Do not supply], neither the power timer function nor program distribution via LAN can be used.
Authoring software specifications
Layout function
Create Message
Create schedule
Distributing Programs
CPU
Memory
Resolution
Recommended
system requirements Compatible OS
Others
Layout the movie file (or video input image), still image
file, and message on the screen.
Japanese, English
Set schedule for the created program daily or individually
•
•
Setting to control power ON/OFF on the Media Player weekly
Number distributed via LAN: maximum 20
Output to USB memory
INTEL Pentium 3 1.0 GHz or higher recommended
256 Mbytes or more
1024 x 768, 65,536 colors or more
Microsoft Windows Vista Ultimate 32-bit Ver.
Microsoft Windows Vista Business 32-bit Ver.
Microsoft Windows XP Professional 32-bit Ver.
Microsoft Windows XP Home Edition 32-bit Ver.
Microsoft Windows 7 Professional 32-bit Ver.
Microsoft Windows 7 Home Premium 32-bit Ver.
For Windows XP, Microsoft .NET Framework Version 2.0
or 3.5
Viewer PPT Converter Software
Specifications
Source file
Conversion output file
CPU
Memory
Maximum Resolution
Recommended
computer conditions
PowerPoint
Restrictions
• PowerPoint Add-in function
This equipment does not support add-in functions, so do not register them.
• Use the equipment without changing the “Slide switch method” option setting. Even if the “Switching Time” is
selected, it will be void.
• Still image format
When selecting a file to output, be sure to select only still image formats supported by this equipment. The formats
supported are jpeg, BMP full color, and PNG full color.
Compatible OS
27
Microsoft PowerPoint file (*.PPT)
Conversion format: JPEG/PNG/BMP
Resolution: Up to maximum 1920 x 1080 dots
INTEL Pentium 3 1.0 GHz or higher recommended
256 Mbytes or more
1024 x 768, 65,536 colors or more
Microsoft Windows Vista Ultimate 32-bit Ver.
Microsoft Windows Vista Business 32-bit Ver.
Microsoft Windows XP Professional 32-bit Ver.
Microsoft Windows XP Home Edition 32-bit Ver.
Microsoft Windows 7 Professional 32-bit Ver.
Microsoft Windows 7 Home Premium 32-bit Ver.
Microsoft Windows 7 Ultimate 32-bit Ver.
One of the following software must be installed.
PowerPoint 2000
PowerPoint 2002
PowerPoint 2003
PowerPoint 2007

Specifications (continued)
Content Specifications
(1) Movie file
Type
WMV9
Note 6)
MPEG1
Note 6)
MPEG2
Note 6)
Video
/Audio
Video
Audio
Video
Audio
Video
Audio
Detailed Specifications
•Codec
Windows Media Video 9 (WMV3)
•Bit rate
Normal resolution (Up to 720 x 480): maximum 20 Mbps
High-resolution (1920 x 1080 or 1280 x 720): maximum 35 Mbps
•maximum resolution
1920 x 1080 25p (progressive)
1280 x 720 30p (progressive)
•Codec
Windows Media Video 9 Advanced Profile (WMVA)
•Bit rate
Normal resolution (up to 720 x 480): maximum 20 Mbps
High-resolution (1920 x 1080 or 1280 x 720): maximum 35 Mbps
•Maximum resolution
1920 x 1080 25p (progressive), 50i (interlace)
1280 x 720 30p (progressive), 60p (progressive)
•codec
Windows Media Audio 9 (maximum 2ch)
Windows Media Audio 9 Professional (maximum 2ch)
Codec: MPEG-1 Video
•Codec: MPEG-1 Audio layer2
•Bit rate: Maximum 384 kbps
•No. of channels: 2ch
•Sampling grade: 16-bit/24-bit, 32 kHz/44.1 kHz/48 kHz
•Bit rate
Normal resolution (Up to 720 x 480): Maximum 20 Mbps
High-resolution (1920 x 1080 or 1280 x 720): Maximum 35 Mbps
•Maximum resolution
1920 x 1080 25p (progressive), 60i (interlace)
1280 x 720 60p (progressive)
•Codec
MPEG-1 Audio layer 2, MPEG-2 Audio layer 2,
MPEG-1 Audio layer 3, MPEG-2 Audio layer 3
•Bit rate
Layer 2: Maximum 384 kbps
Layer 3: Maximum 320 kbps
•No. of channels: 2ch
•Sampling grade
16bit/24bit, 32kHz/44.1kHz/48kHz
Note 1)
Note 4)
Note 2)
Note 4)
Note 5)
Note 4)
Note 3)
Note 4)
Extension
.wmv
.mpg
.mpeg
.mpg
.mpeg
.m2p
.m2v
.vob
Maximum capacity
/Movie file
FAT16:2Gbytes
FAT32:4Gbytes
Note 7)
Note 1) MP@HL (Main Profile, High Level): Up to 1280 x 720 30p or 1920 x 1080 25p
The following are not supported.
•Complex Profile
•Interlace mode
•File created using the WMV9 BETA encoder
•WMV1 or WMV2
Note 2) MP@HL (Main Profile, High Level): Up to 1280 x 720 30p or 1920 x 1080 25p
AP@L3 (Advanced Profile, L3 Level): Up to 1920 x 1080 50i or 1920 x 1080 25p or 1280 x 720 60p
The following are not supported.
•Complex Profile
•File created using the WMV9 BETA encoder
•WMV1 or WMV2
Note 3) MP@HL (Main Profile, High Level): Up to 1920 x 1080 25p or 1920 x 1080 60i or 1280 x 720 60p
(2) Still image file
Type
JPEG
PNG
BMP
Supports baseline JPEG
Supports RGB 24 bit format
Supports 24 bpp (bit/pixel)
Does not support 8 bpp, 16 bpp, or 32 bpp.
Details
Extension
.jpeg, .jpg
.png
.bmp
• One image/screen
Maximum 2047 x 2047 dots
• Two images/screen
Maximum 1920 x 1080 dots
or 1080 x 1920 dots
Resolution
Note 4) Files that include copyright protection function cannot be played.
Movies with (movie file size (Byte)/Play Time (seconds)) x 8bit > Maximum bit rate cannot be displayed.
Note 5) WMA files recorded in Windows Media Audio Lossless are not compatible.
Note 6) The movie files that are not compatible with the written specifications will be skipped and the next movie file
will be displayed. If there are no other movie files that can be displayed, an error message is displayed. And
if the codec of the video is compatible to the specifications, and the audio codec is not compatible, the video
is displayed but the audio is not output.
Note 7) It differs depending on the format of the SD memory card.
The enclosed memory card is format to FAT16.
(3) Audio file
Details
28
Type
•Codec
MPEG-1 Audio layer 2, MPEG-2 Audio layer 2, MPEG-1
Audio layer 3, MPEG-2 Audio layer 3
•Bit rate
Layer 2: Maximum 384 kbps
MP3
Layer 3: Maximum 320 kbps
•No. of channels: 2ch
•Sampling grade
16bit/24bit, 32kHz/44.1kHz/48kHz
Extension
.mp3

WEEE Mark (European Directive 2002/96/EC)
Within the European Union
EU-wide legislation, as implemented in each Member State, requires that waste electrical and electronic
products carrying the mark (left) must be disposed of separately from normal household waste. This includes
monitors and electrical accessories, such as signal cables or power cords. When you need to dispose of your
NEC display products, please follow the guidance of your local authority, or ask the shop where you purchased
the product, or if applicable, follow any agreements made between yourself and NEC.
The mark on electrical and electronic products only applies to the current European Union Member States.
Outside the European Union
If you wish to dispose of used electrical and electronic products outside the European Union, please contact your
local authority so as to comply with the correct disposal method.
29

Software license information
This product contains open source software. For the use conditions of the open source software, refer to the following. Also, refer to the official
website of each open source software.
GNU Lesser General Public License (“GNU LGPL”): (“Software license information.pdf”
p.3 - p.16)
•DirectFB
GNU General Public License version 2 (“GNU GPL v.2”): (“
Software license information.pdf
p.17 - p.26)
•The Linux operation system kernel
•BusyBox
•FreeType
•Wget
•Linux fusion
•Dosfstools
Refer to the page below for information on the license for the following software.
•Intel® SDK for UPnPTM Devices (“Software license information.pdf” p.27)
•Net-SNMP (“Software license information.pdf” p.28 - p.34)
•Thttpd (“Software license information.pdf” p.35)
•Pure-FTPd (“Software license information.pdf” p.36)
•Libjpeg (“Software license information.pdf” p.37 - p.39)
•Libpng (“Software license information.pdf” p.40 - p.43)
•TinyXML (“Software license information.pdf” p.44)
Refer to the page below for information on the copyright for the following software.
•Ntpdate (“Software license information.pdf” p.45)
”
The software above each has a copyright owner..
This product uses GPL/LGPL application software, and our customers reserve the right
to obtain, alter and redistribute the source code of the software in question. Please refer
to the URL below to obtain source codes.
http://www.coretronic.com/digisign/691/index.html
30
 Loading...