


MultiSync LCD1970V
MultiSync LCD1970NX
MultiSync LCD1970NXp
User’s Manual
UÏivatelská pfiíruãka
Bedienerhandbuch
δηγίες ρήσης
Manual del usuario
Manuel Utilisateur
Manuale utente
Gebruikershandleiding
Podr´cznik u˝ytkownika
Руководство пользователя
Kullan∂c∂ Klavuzu
00Cover_all.p65 |
1 |
07/05/2005, 10:46 |

Canadian Department of Communications Compliance
Statement
DOC: This Class B digital apparatus meets all requirements of the Canadian Interference-Causing Equipment Regulations.
C-UL: Bears the C-UL Mark and is in compliance with Canadian Safety Regulations according to CAN/CSA C22.2 No. 60950-1.
FCC Information
1.Use the attached specified cables with the MultiSync LCD1970V (L194RK)/MultiSync LCD1970NX (L194RH)/ MultiSync LCD1970NXp (L194RH) colour monitor so as not to interfere with radio and television reception.
(1)The power supply cord you use must have been approved by and comply with the safety standards of U.S.A., and meet the following condition.
Power supply cord |
Non shield type, 3-conductor |
Length |
2.0 m |
Plug shape |
|
U.S.A
(2)Please use the supplied shielded video signal cable. Use of other cables and adapters may cause interference with radio and television reception.
2.This equipment has been tested and found to comply with the limits for a Class B digital device, pursuant to part 15 of the FCC Rules. These limits are designed to provide reasonable protection against harmful interference in a residential installation. This equipment generates, uses, and can radiate radio frequency energy, and, if not installed and used in accordance with the instructions, may cause harmful interference to radio communications. However, there is no guarantee that interference will not occur in a particular installation. If this equipment does cause harmful interference to radio or television reception, which can be determined by turning the equipment off and on, the user is encouraged to try to correct the interference by one or more of the following measures:
• Reorient or relocate the receiving antenna.
• Increase the separation between the equipment and receiver.
• Connect the equipment into an outlet on a circuit different from that to which the receiver is connected.
• Consult your dealer or an experienced radio/TV technician for help.
If necessary, the user should contact the dealer or an experienced radio/television technician for additional suggestions. The user may find the following booklet, prepared by the Federal Communications Commission, helpful: “How to Identify and Resolve Radio-TV Interference Problems.” This booklet is available from the U.S. Government Printing Office, Washington, D.C., 20402, Stock No. 004-000-00345-4.
Declaration of Conformity
This device complies with Part 15 of FCC Rules. Operation is subject to the following two conditions. (1) This device may not cause harmful interference, and (2) this device must accept any interference received, including interference that may cause undesired operation.
U.S. Responsible Party: |
NEC Display Solutions of America, Inc. |
|
Address: |
500 Park Blvd, Suite 1100 |
|
|
Itasca, Illinois 60143 |
|
Tel. No.: |
(630) 467-3000 |
|
|
|
|
Type of Product: |
Display Monitor |
|
Equipment Classification: |
Class B Peripheral |
|
Model: |
MultiSync LCD1970V (L194RK)/MultiSync LCD1970NX (L194RH)/ |
|
|
MultiSync LCD1970NXp (L194RH) |
|
We hereby declare that the equipment specified above conforms to the technical standards as specified in the FCC Rules.
00Cover_all.p65 |
2 |
07/05/2005, 10:46 |
TCO’03
Congratulations!
The display you have just purchased carries the TCO’03 Displays label. This means that your display is designed, manufactured and tested according to some of the strictest quality and environmental requirements in the world. This makes for a high performance product, designed with the user in focus that also minimizes the impact on our natural environment.
Some of the features of the TCO’03 Display requirements:
Ergonomics
•Good visual ergonomics and image quality in order to improve the working environment for the user and to reduce sight and strain problems. Important parameters are luminance, contrast, resolution, reflectance, colour rendition and image stability.
Energy
•Energy-saving mode after a certain time – beneficial both for the user and the environment
•Electrical safety
Emissions
•Electromagnetic fields
•Noise emissions
Ecology
•The product must be prepared for recycling and the manufacturer must have a certified environmental management system such as EMAS or ISO 14 001.
•Restrictions on:
-chlorinated and brominated flame retardants and polymers
-heavy metals such as cadmium, mercury and lead.
The requirements included in this label have been developed by TCO Development in cooperation with scientists, experts, users as well as manufacturers all over the world. Since the end of the 1980s TCO has been involved in influencing the development of IT equipment in a more user-friendly direction. Our labelling system started with displays in 1992 and is now requested by users and IT-manufacturers all over the world.
For more information, please visit
www.tcodevelopment.com
00Cover_all.p65 |
3 |
07/05/2005, 10:46 |

Manufacturer’s Recycling and Energy Information
NEC DISPLAY SOLUTIONS is strongly committed to environmental protection and sees recycling as one of the company’s top priorities in trying to minimize the burden placed on the environment. We are engaged in developing environmentallyfriendly products, and always strive to help define and comply with the latest independent standards from agencies such as ISO (International Organisation for Standardization) and TCO (Swedish Trades Union).
For more information, and for help in recycling your old NEC monitors, please visit our website at
http://www.nec-display-solutions.com (in Europe) or
http://www.nec-display.com (in Japan) or
http://www.necdisplay.com (in USA).
Country-specific recycling programmes can also be found at:
Sweden - http://www.el-retur.se
Germany - http://www.recyclingpartner.de/
Holland - http://www.mirec.nl/
Japan - http://www.diarcs.com/
Energy saving:
This monitor features an advanced energy saving capability. When a VESA Display Power Management Signaling (DPMS) Standard signal is sent to the monitor, the Energy Saving mode is activated. The monitor enters a single Energy Saving mode.
LCD1970V
Mode |
Power consumption |
LED colour |
|
|
|
Normal Operation |
Approx. 36W |
Green |
|
|
|
Energy Saving Mode |
Less than 2W |
Amber |
|
|
|
Off Mode |
Less than 1W |
Unlit |
|
|
|
LCD1970NX/NXp |
|
|
|
|
|
Mode |
Power consumption |
LED colour |
|
|
|
Normal Operation |
Approx. 38W |
Green |
|
|
|
Energy Saving Mode |
Less than 2W |
Amber |
|
|
|
Off Mode |
Less than 1W |
Unlit |
|
|
|
Disposing of your old NEC product
Within the European Union
EU-wide legislation, as implemented in each Member State, requires that waste electrical and electronic products carrying the mark (left) must be disposed of separately from normal household waste. This includes monitors and electrical accessories, such as signal cables or power cords. When you need to dispose of your NEC display products, please follow the guidance of your local authority, or ask the shop where you purchased the product, or if applicable, follow any agreements made between yourself and NEC.
The mark on electrical and electronic products only applies to the current European Union Member States.
Outside the European Union
If you wish to dispose of used electrical and electronic products outside the European Union, please contact your local authority so as to comply with the correct disposal method.
00Cover_all.p65 |
4 |
07/05/2005, 10:46 |

Index
Warning, Caution ............................... |
English-1 |
Declaration ......................................... |
English-1 |
Contents ............................................. |
English-2 |
Quick Start ......................................... |
English-3 |
Controls .............................................. |
English-7 |
Recommended use ............................ |
English-9 |
Varování, Upozornûní ........................... |
âesky-1 |
Prohlá‰ení ............................................ |
âesky-1 |
Obsah .................................................. |
âesky-2 |
Rychl˘ start .......................................... |
âesky-3 |
Ovládací prvky ..................................... |
âesky-7 |
Provozní pokyny ................................... |
âesky-9 |
Warnung, Vorsicht ............................. |
Deutsch-1 |
Erklärung ........................................... |
Deutsch-1 |
Inhalt der Verpackung ....................... |
Deutsch-2 |
Kurzanleitung .................................... |
Deutsch-3 |
Bedienelemente ................................ |
Deutsch-7 |
Einsatzempfehlungen ........................ |
Deutsch-9 |
ΠΡ ΕΙ∆ Π ΙΗΣΗ, ΠΡ Σ Η ..... |
Ελληνικά-1 |
∆ήλωση ......................................... |
Ελληνικά-1 |
Περιε µενα ................................. |
Ελληνικά-2 |
Γρήγ$ρη Εκκίνηση ....................... |
Ελληνικά-3 |
Πλήκτρα Ελέγ $υ ........................ |
Ελληνικά-7 |
Συνιστώµενη ρήση ..................... |
Ελληνικά-9 |
Advertencia, Peligro .......................... |
Español-1 |
Declaración ....................................... |
Español-1 |
Contenido .......................................... |
Español-2 |
Inicio rápido ....................................... |
Español-3 |
Controles ........................................... |
Español-7 |
Uso recomendado ............................. |
Español-9 |
Avertissement, Attention .................. |
Français-1 |
Déclaration ....................................... |
Français-1 |
Contenu ........................................... |
Français-2 |
Mise en marche rapide .................... |
Français-3 |
Commandes ..................................... |
Français-7 |
Conseils d’utilisation ........................ |
Français-9 |
Avvertenza, Attenzione ...................... |
Italiano-1 |
Dichiarazione ..................................... |
Italiano-1 |
Indice ................................................. |
Italiano-2 |
Guida rapida ...................................... |
Italiano-3 |
Comandi ............................................. |
Italiano-7 |
Raccomandazioni per l’uso ................ |
Italiano-9 |
Waarschuwing, Let op! ................ |
Nederlands-1 |
Kennisgeving ............................... |
Nederlands-1 |
Inhoud ......................................... |
Nederlands-2 |
Snel aan de slag ......................... |
Nederlands-3 |
Besturingselementen .................. |
Nederlands-7 |
Aanbevolen gebruik .................... |
Nederlands-9 |
Uwagi dotyczàce zasilania monitora |
.... Polski-1 |
Ostrze˝enie, Uwaga ............................. |
Polski-2 |
Deklaracja ............................................ |
Polski-2 |
ZawartoÊç opakowania ........................ |
Polski-3 |
Pod∏àczenie monitora .......................... |
Polski-4 |
Menu regulacyjne ................................. |
Polski-8 |
Zalecenia eksploatacyjne ................... |
Polski-10 |
Предупреждение, Внимание ......... |
Русский-1 |
Заявление ....................................... |
Русский-1 |
Содержимое ................................... |
Русский-2 |
Краткое руководство |
|
по началу работы ........................... |
Русский-3 |
Органы управления........................ |
Русский-7 |
Рекомендации по эксплуатации .... |
Русский-9 |
D∂kkat, Uyari ....................................... |
Türkçe-1 |
Bildirim ................................................ |
Türkçe-1 |
∑çindekiler ............................................ |
Türkçe-2 |
H∂zl∂ Baµlama ...................................... |
Türkçe-3 |
Kontroller ............................................. |
Türkçe-7 |
Tavsiye edilen kullan∂m ....................... |
Türkçe-9 |
00Cover_all.p65 |
5 |
07/05/2005, 10:46 |

00Cover_all.p65 |
6 |
07/05/2005, 10:46 |
 English
 âesky
âesky
 Deutsch
 Ελληνικά
 Español
 Français
 Italiano
 Nederlands
 Polski
 Русский
 Türkçe
01b_XChapterOpener |
1 |
07/05/2005, 10:46 |
01b_XChapterOpener |
2 |
07/05/2005, 10:46 |
WARNING
TO PREVENT FIRE OR SHOCK HAZARDS, DO NOT EXPOSE THIS UNIT TO RAIN OR MOISTURE. ALSO, DO NOT USE THIS UNIT'S POLARIZED PLUG WITH AN EXTENSION CORD RECEPTACLE OR OTHER OUTLETS UNLESS THE PRONGS CAN BE FULLY INSERTED.
REFRAIN FROM OPENING THE CABINET AS THERE ARE HIGH VOLTAGE COMPONENTS INSIDE. REFER SERVICING TO QUALIFIED SERVICE PERSONNEL.
|
|
CAUTION |
|
CAUTION: |
TO REDUCE THE RISK OF ELECTRIC SHOCK, MAKE SURE POWER CORD IS UNPLUGGED FROM |
||
|
WALL SOCKET. TO FULLY DISENGAGE THE POWER TO THE UNIT, PLEASE DISCONNECT THE |
||
|
POWER CORD FROM THE AC OUTLET.DO NOT REMOVE COVER (OR BACK). NO USER |
||
|
SERVICEABLE PARTS INSIDE. REFER SERVICING TO QUALIFIED SERVICE PERSONNEL. |
||
This symbol warns user that uninsulated voltage within the unit may have sufficient magnitude to cause electric shock. Therefore, it is dangerous to make any kind of contact with any part inside this unit.
This symbol alerts the user that important literature concerning the operation and maintenance of this unit has been included. Therefore, it should be read carefully in order to avoid any problems.
Caution:
When operating the MultiSync LCD1970V/MultiSync LCD1970NX/MultiSync LCD1970NXp with a 220-240V AC power source in Europe, use the power cord provided with the monitor.
In the UK, a BS approved power cord with a moulded plug has a Black (five Amps) fuse installed for use with this equipment. If a power cord is not supplied with this equipment please contact your supplier.
When operating the MultiSync LCD1970V/MultiSync LCD1970NX/MultiSync LCD1970NXp with a 220-240V AC power source in Australia, use the power cord provided with the monitor. If a power cord is not supplied with this equipment please contact your supplier.
For all other cases, use a power cord that matches the AC voltage of the power outlet and has been approved by and complies with the safety standard of your particular country.
Declaration
Declaration of the Manufacturer
We hereby certify that the colour monitor MultiSync LCD1970V (L194RK)/MultiSync LCD1970NX (L194RH)/MultiSync LCD1970NXp (L194RH) are in compliance with
Council Directive 73/23/EEC:
– EN 60950-1
Council Directive 89/336/EEC:
–EN 55022
–EN 61000-3-2
–EN 61000-3-3
–EN 55024
and marked with
NEC Display Solutions, Ltd.
4-13-23, Shibaura,
Minato-Ku
Tokyo 108-0023, Japan
English
Windows is a registered trademark of Microsoft Corporation. NEC is a registered trademark of NEC Corporation. ENERGY STAR is a U.S. registered trademark.
OmniColor is a registered trademark of NEC Display Solutions Europe GmbH in the countries of EU and Switzerland.
ErgoDesign is a registered trademark of NEC Display Solutions, Ltd. in Austria, Benelux, Denmark, France, Germany, Italy, Norway, Spain, Sweden and U.K.
NaViSet is a trademark of NEC Display Solutions Europe GmbH in the countries of EU and Switzerland.
MultiSync is a registered trademark of NEC Display Solutions, Ltd. in the countries of U.K., Italy, Austria, Netherlands, Switzerland, Sweden, Spain, Denmark, Germany, Norway and Finland.
All other brands and product names are trademarks or registered trademarks of their respective owners.
As an ENERGY STAR® Partner, NEC Display Solutions of America, Inc. has determined that this product meets the ENERGY STAR guidelines for energy efficiency. The ENERGY STAR emblem does not represent EPA endorsement of any product or service.
English-1
01_English |
1 |
07/05/2005, 10:46 |
Contents
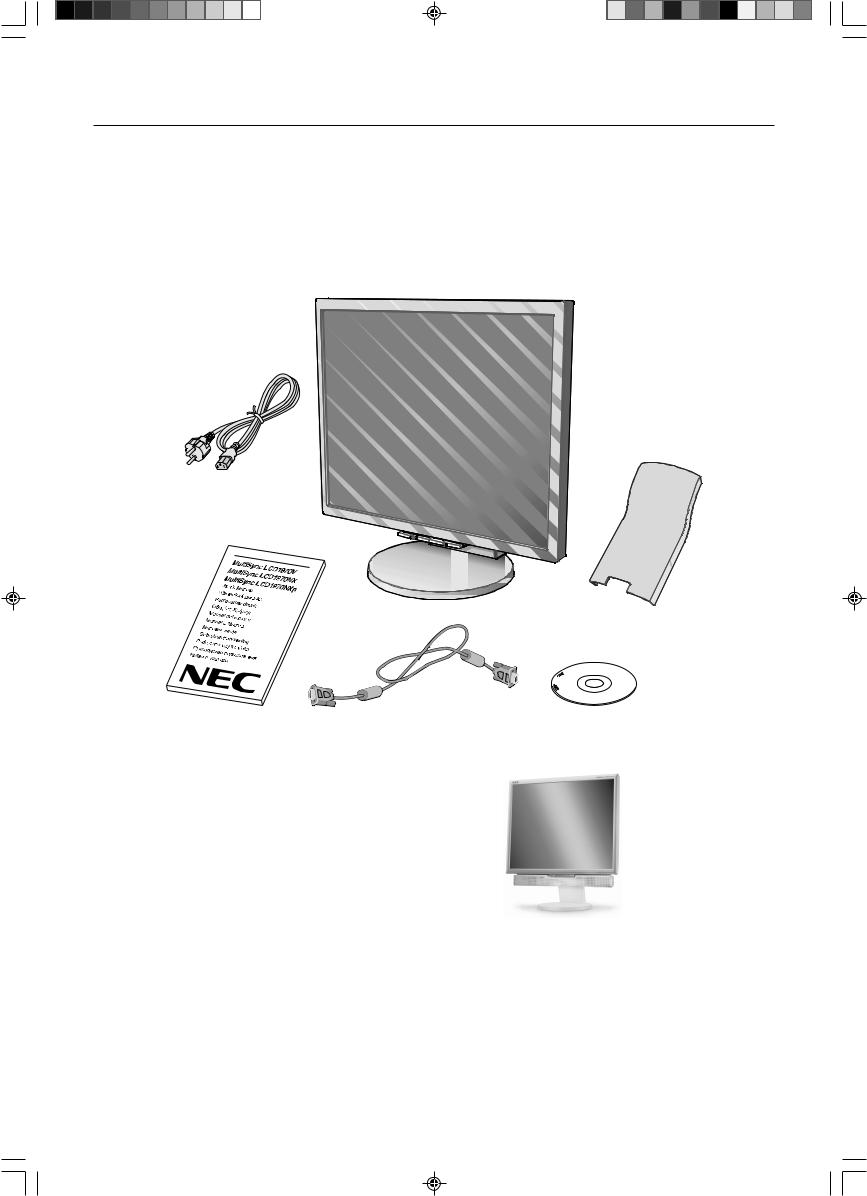
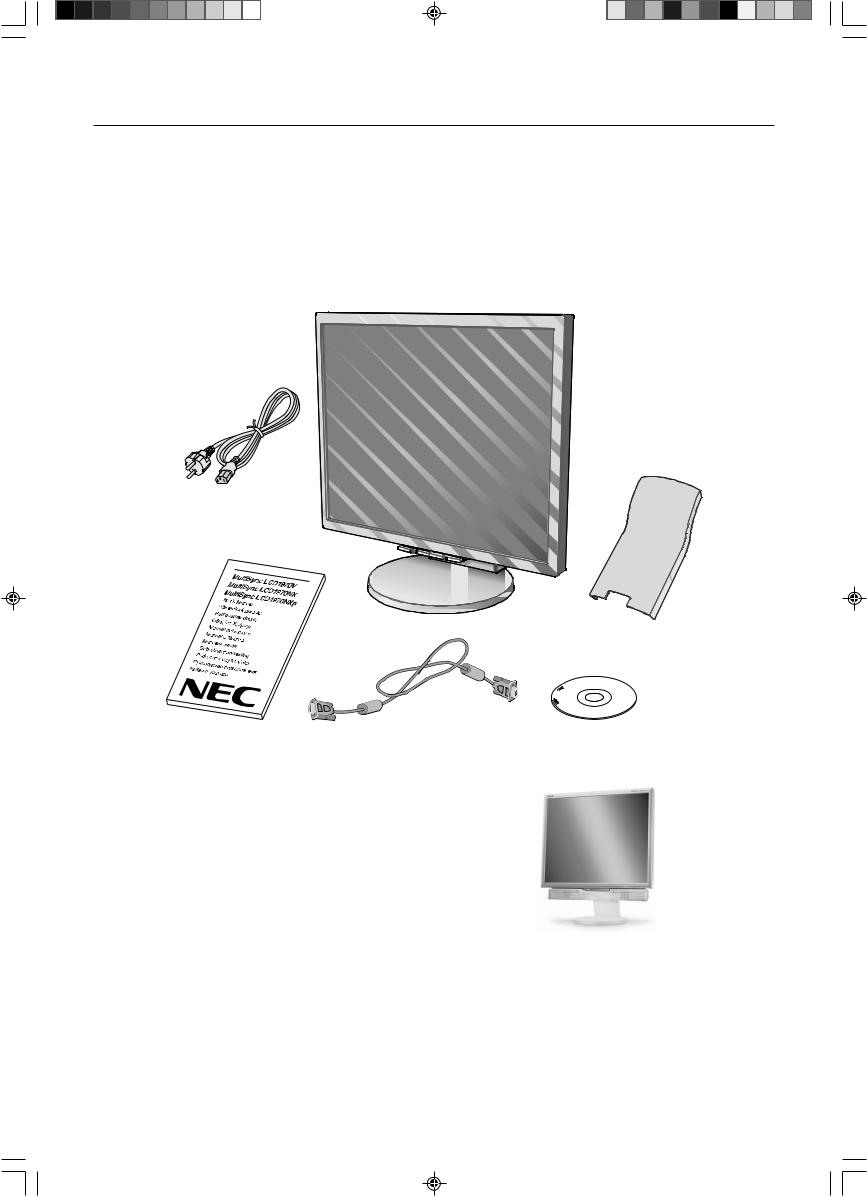
Your new NEC MultiSync LCD monitor box* should contain the following:
•MultiSync LCD monitor with tilt/swivel/height adjust stand
•Power Cord
•Cable cover
•Video Signal Cable (15-pin mini D-SUB male to 15-pin mini D-SUB male)
•User’s Manual
•CD ROM (includes complete User’s Manual in PDF format).
To see the User’s Manual, Acrobat Reader 4.0 or higher must be installed on your PC.
Power Cord
Cable cover
User’s Manual |
15-pin mini D-SUB male to |
CD-ROM |
|
15-pin mini D-SUB male |
|
NOTE: This monitor can be equipped with optional loudspeakers: “MultiSync Sound bar”. Please ask your dealer or check our website
http://www.nec-display-solutions.com
*Remember to save your original box and packing material to transport or ship the monitor.
English-2
01_English |
2 |
07/05/2005, 10:46 |

Quick Start
To attach the MultiSync LCD monitor to your system, follow these instructions:
1.Turn off the power to your computer.
2.For the PC or MAC with DVI digital output (NX/NXp only): Connect the DVI signal cable (not included) to the connector of the display card in your system (Figure A.1). Tighten all screws.
For the PC with Analog output: Connect the 15-pin mini D-SUB signal cable to the connector of the display card in your system (Figure A.2). Tighten all screws.
For the MAC: Connect the Macintosh cable adapter to the computer, then attach the 15-pin mini D-SUB signal cable to the Macintosh cable adapter (Figure B.1). Tighten all screws.
English
DVI signal cable |
Figure A.1 |
Figure A.2 |
(not included) |
Macintosh
Cable Adapter Figure B.1 (not included)
NOTE: Some Macintosh systems do not require a Macintosh cable adapter.
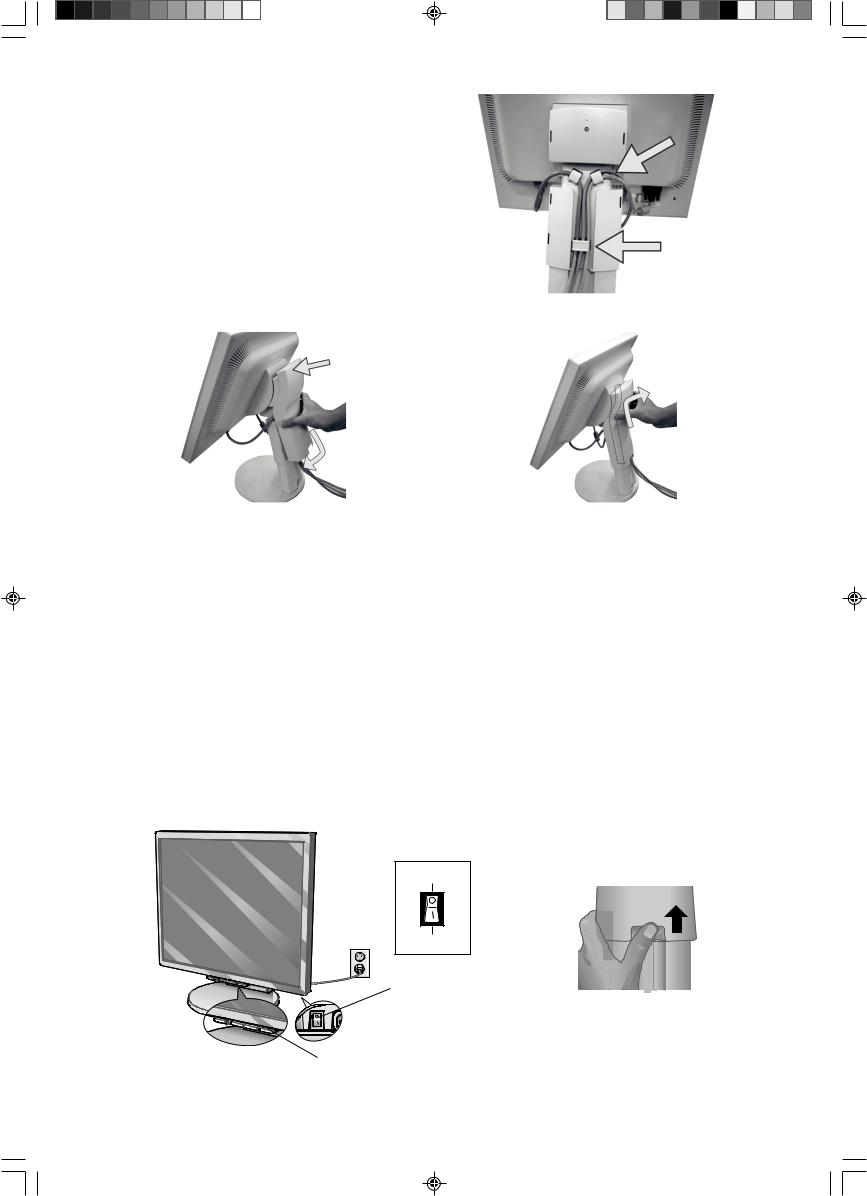
3.Place hands on each side of the monitor to tilt the LCD panel 30-degree angle and lift up to the highest position (Figure C.1).
4.Connect all cables to the appropriate connectors (Figure C.1).
5.Place power cord into the specific hooks indicated in Figure C.2.
6.Place the D-Sub into the specific hooks indicated in Figure C.2.
30˚ Tilt
|
Power Cord |
Highest |
D-SUB Cable |
|
|
Stand |
|
Position |
|
DVI Cable (not included) |
Figure C.1 |
Figure C.2 |
DC-OUT (NX/NXp only)
NEC optional product attachment.
Do not use this connector unless specified.
English-3
01_English |
3 |
07/05/2005, 10:46 |
7.Place the DVI cable into the specific hooks indicated in Figure C.3.
8.Make sure all cables are resting flat against the stand (Figure C.3).
9.Hold the all cables firmly and place the cable cover onto the stand (Figure D.1). To remove the cable cover, lift the cover off as shown in
Figure D.2.
DVI Cable (NX/NXp only)
Flat
Figure C.3
Insert Top First
Then Bottom
Figure D.1 |
Figure D.2 |
10. Connect the power cord to the power outlet (Figure E.1).
NOTE: If you have difficulty removing the cable cover, please push the lower opening upward to remove it, as show in
Figure E.2.
NOTE: Please refer to Caution section of this manual for proper selection of AC power cord.
11.The vacation switch on the back side of the monitor must be turned on (Figure E.1). Turn on the monitor with the front power button and the computer.
NOTE: The vacation switch is a true on/off switch. If this switch is on the OFF position, the monitor cannot be turned on using the front button. DO NOT switch on/off repeatedly.
12.No-Touch Auto Adjust automatically adjusts the monitor to optimal settings upon initial setup for most timings. For further adjustments, use the following OSM controls:
•Auto Adjust Contrast (Analog input only)
•Auto Adjust (Analog input only)
Refer to the Controls section of this User’s Manual for a full description of these OSM controls.
NOTE: If you have any problems, please refer to the Troubleshooting section of this User’s Manual.
OFF Position
ON Position
Vacation Switch
Figure E.2
Power Button
Figure E.1
English-4
01_English |
4 |
07/05/2005, 10:46 |
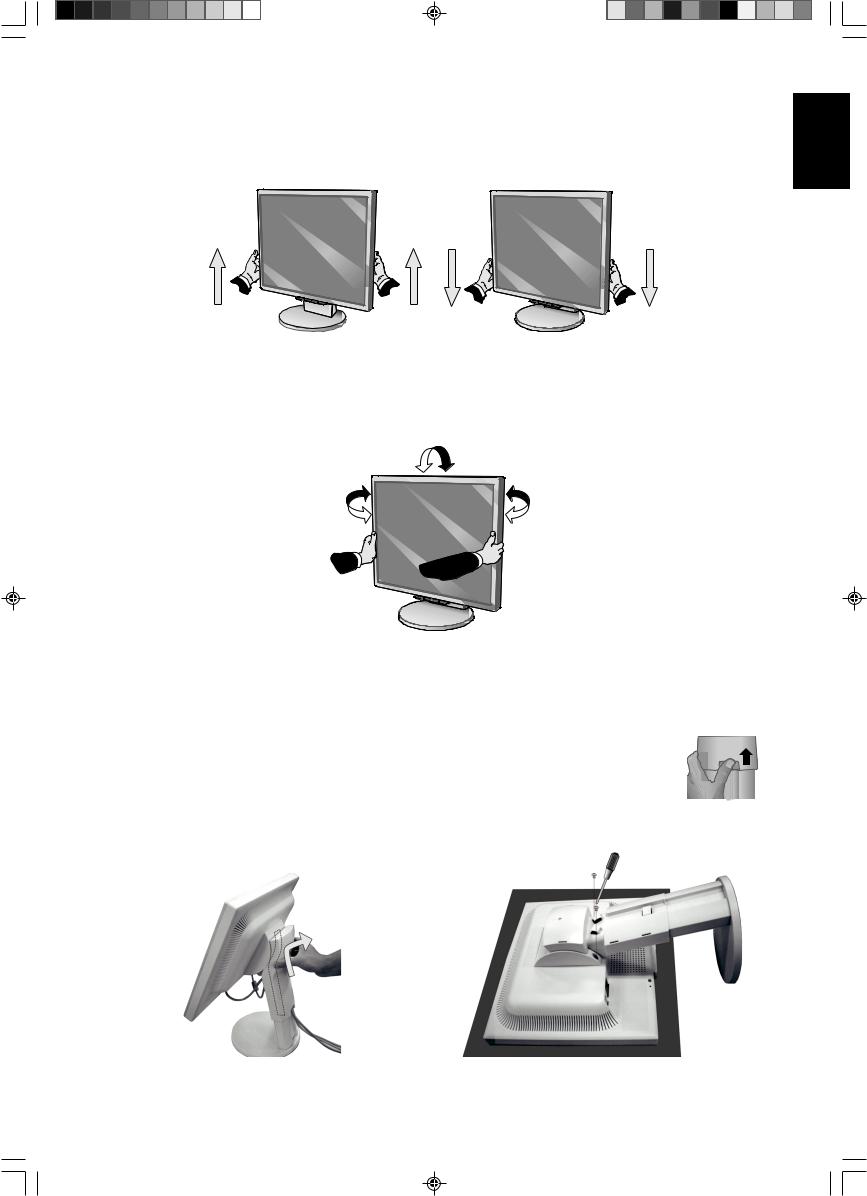
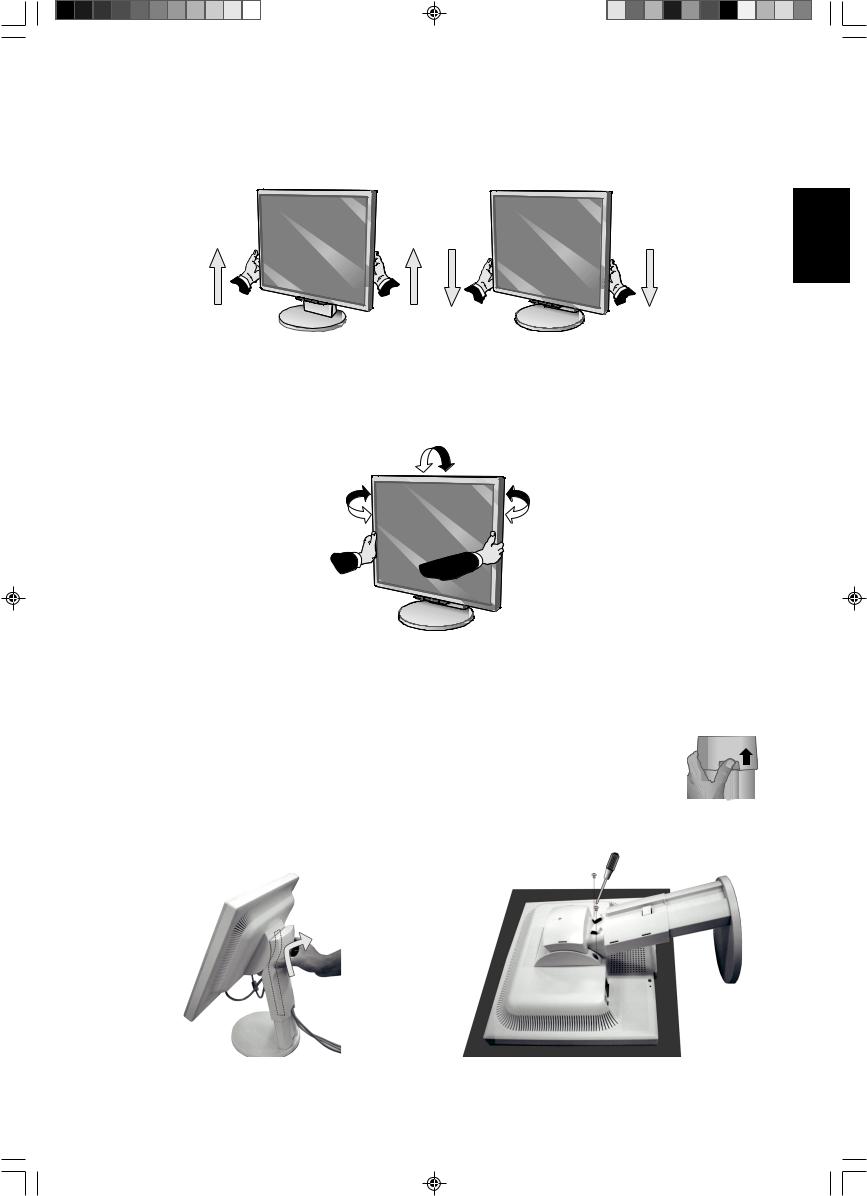
Raise and Lower Monitor Screen
The monitor may be raised or lowered. To raise or lower screen, place hands on each side of the monitor and lift or lower to the desired height (Figure RL.1).
NOTE: Handle with care when raising or lowering the monitor screen.
Figure RL.1
Tilt and Swivel
Grasp both sides of the monitor screen with your hands and adjust the tilt and swivel as desired (Figure TS.1).
NOTE: Handle with care when tilting and swivelling the monitor screen.
Figure TS.1
Remove Monitor Stand for Mounting
To prepare the monitor for alternate mounting purposes:
1. Place hands on each side of the monitor and lift up to the highest position. Remove the cable cover (Figure S.1).
NOTE: If you have difficulty removing the cable cover, please push the lower opening upward to remove it, as shown in the figure beside.
2. Disconnect all cables.
3. Place monitor face down on a non-abrasive surface (Figure S.2).
NOTE: Handle with care when monitor facing down, for avoiding the damage to the front buttons.
4. Remove the 2 screws connecting the stand to the monitor (Figure S.2).
English
Figure S.1 |
Figure S.2 |
English-5
01_English |
5 |
07/05/2005, 10:46 |
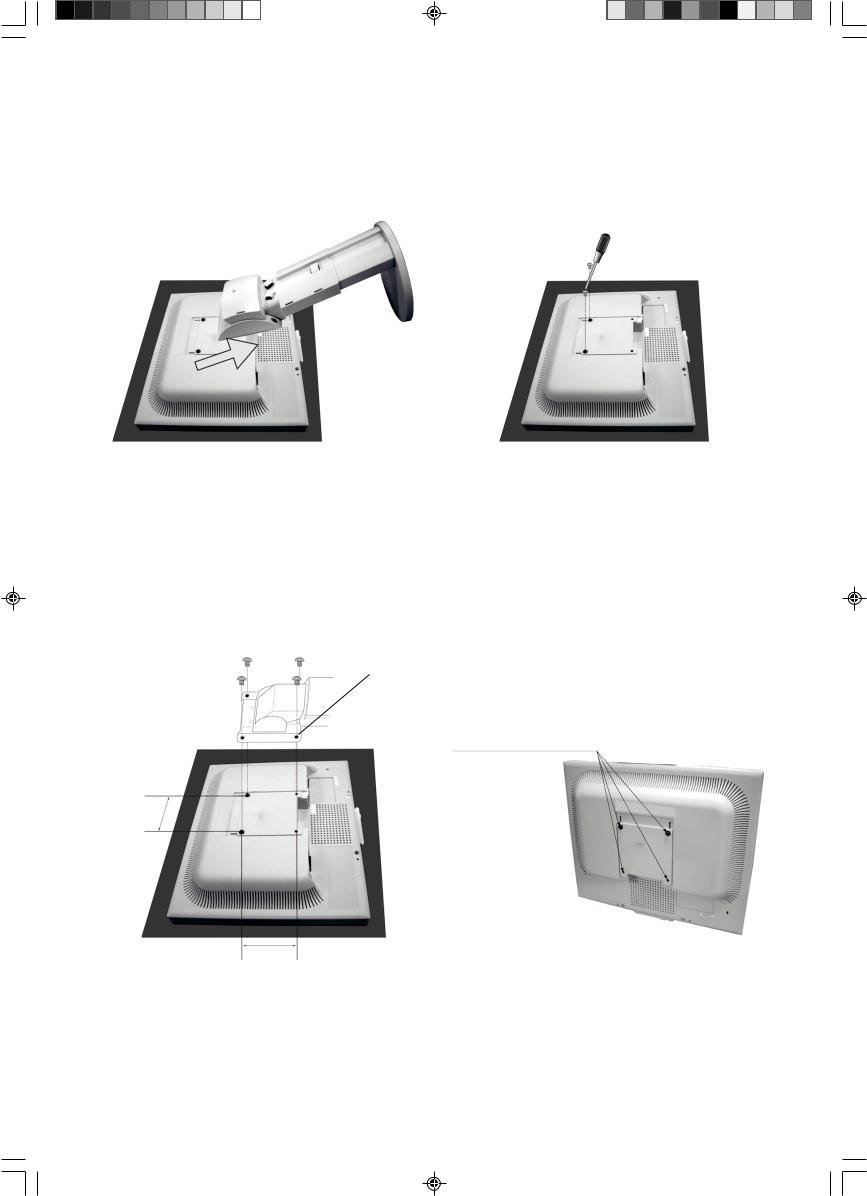
5.Lift up the stand to unlatch the upper hooks and remove the stand (Figure S.3).
6.Remove the 2 screws on the top of the monitor (Figure S.4). The monitor is now ready for mounting in an alternate manner.
7.Connect the cables to the back of the monitor.
8.Reverse this process to re-attach stand.
NOTE: Use only VESA-compatible alternative mounting method.
Handle with care when removing stand.
Figure S.3 |
Figure S.4 |
Flexible Arm Installation
This LCD monitor is designed for use with a flexible arm. To mount the monitor to a flexible arm:
1.Follow the instructions on how Remove Monitor Stand for Mounting to remove the stand.
2.Using the 4 screws from the stand removal and attach the arm to the monitor (Figure F.1).
NOTE: The LCD monitor should only be used with an approved arm (e.g. GS mark). To meet the safety requirements, the monitor must be mounted to an arm, which guaranties the necessary stability under consideration of the weight of the monitor.
Thickness of Bracket (Arm)
2.0~3.2mm
4 Screws (4M)
(Max Depth: 8.5mm)
100mm
Weight of LCD assembly: 4.9kg MAX (LCD1970V) 100mm 5.4kg MAX (LCD1970NX)
5.3kg MAX (LCD1970NXp)
Figure F.1
English-6
01_English |
6 |
07/05/2005, 10:46 |
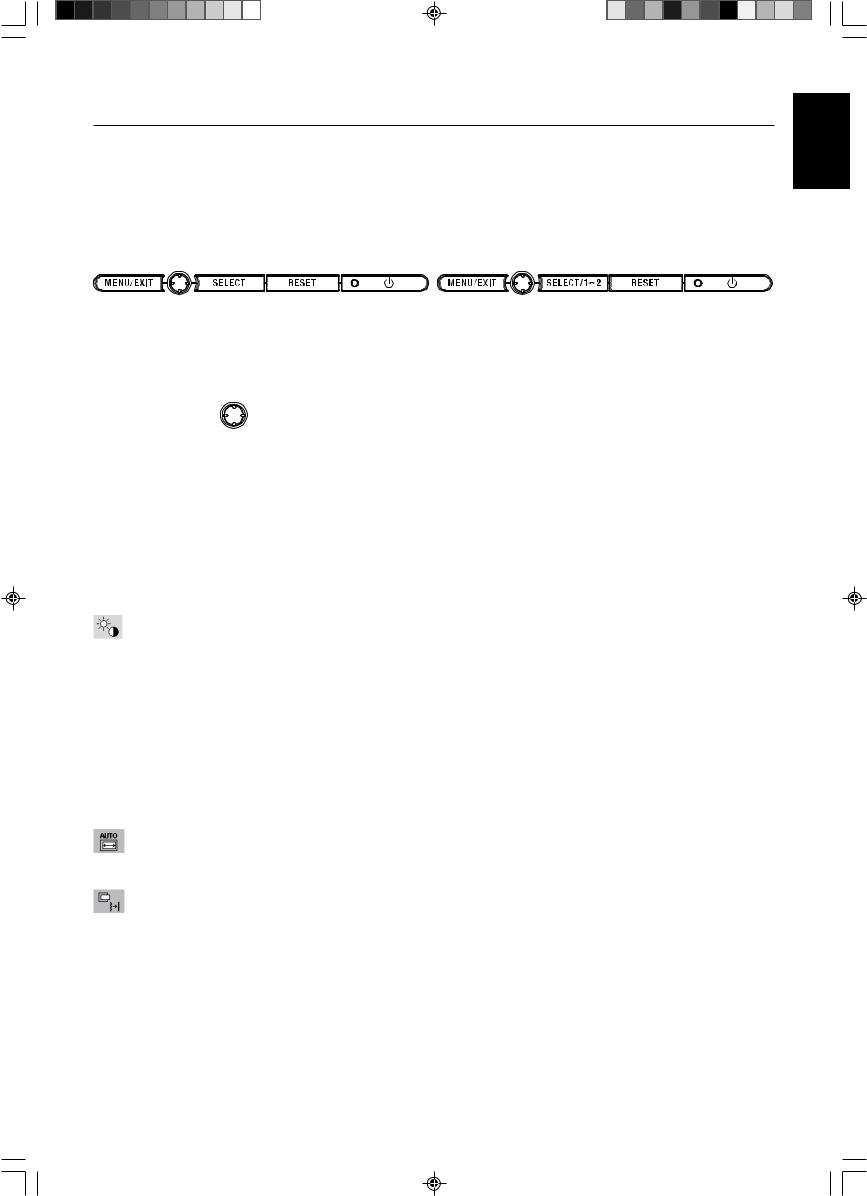
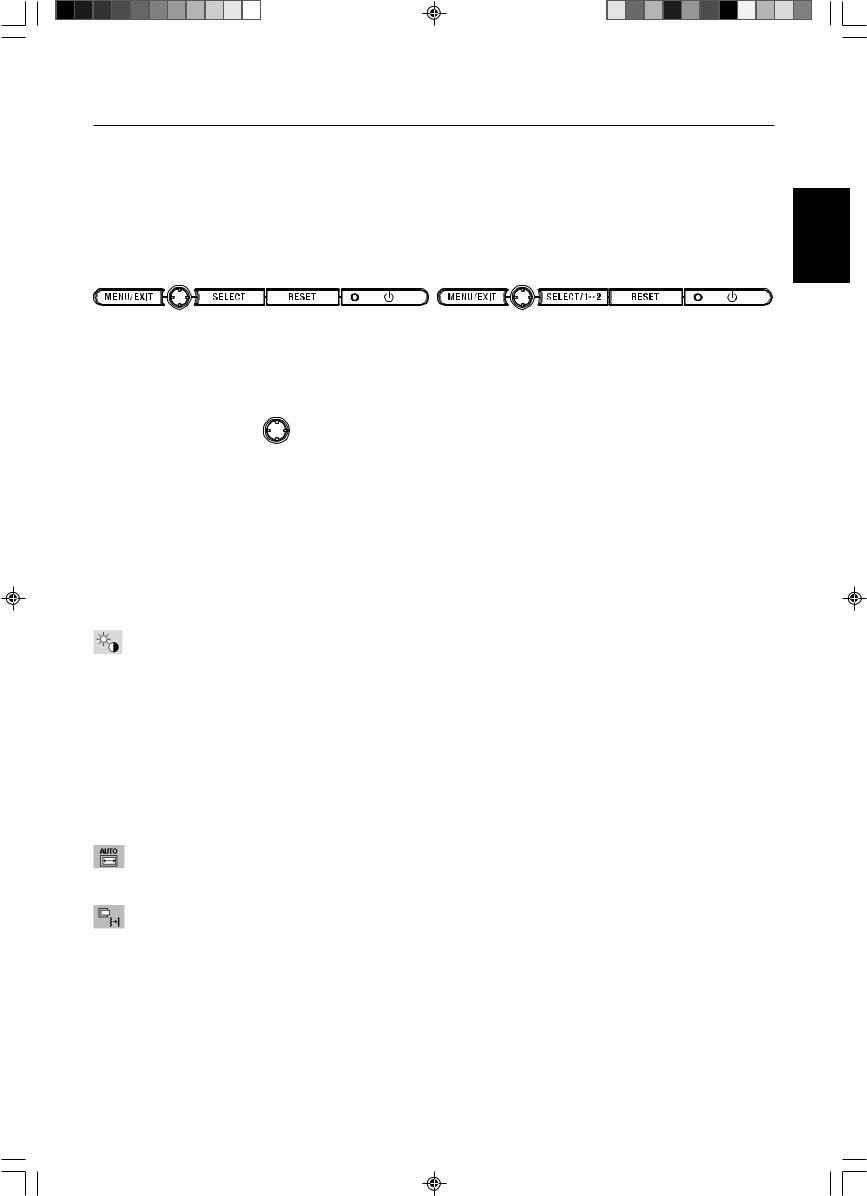
Controls
OSM (On-Screen Manager) control buttons on the front of the monitor function as follows:
To access OSM menu, press any of the control buttons (MENU/EXIT, Left, Right, Down, Up). To change signal input, press the SELECT button (NX/NXp only).
To change DV MODE, press the RESET button (NX/NXp only).
NOTE: OSM must be closed in order to change signal input.
|
|
LCD1970V |
LCD1970NX/LCD1970NXp |
Button |
Menu |
|
|
MENU/EXIT |
Open OSM main menu. Exits the OSM controls. |
|
|
|
Exits to the OSM main menu. |
|
|
4-Direction-Key |
|
Up |
|
|
Left |
Right |
|
|
|
Down |
|
Left/Right |
Moves the highlighted area left/right to select control menus. |
|
|
|
Moves the bar left/right to increase or decrease the adjustment. |
||
Down/Up |
Moves the highlighted area down/up to select one of the controls. |
||
SELECT |
Active Auto Adjust function. Enter the OSM sub menu. |
|
|
RESET |
Resets the highlighted control menu to the factory setting. |
|
|
NOTE: When RESET is pressed in the main and sub-menu, a warning window will appear allowing you to cancel the RESET function by pressing the MENU/EXIT button.
Brightness/Contrast Controls
BRIGHTNESS
Adjusts the overall image and background screen brightness.
CONTRAST
Adjusts the image brightness in relation to the background.
DV MODE (NX/NXp only)
Alows you to select the suitable setting for Movie, Picture and etc.
AUTO CONTRAST (Analog input only)
Adjusts the image displayed to optimal settings.
Auto Adjust (Analog input only)
Automatically adjusts the Image Position, H. Size and Fine settings.
Image Controls (Analog input only)
LEFT / RIGHT
Controls Horizontal Image Position within the display area of the LCD.
DOWN / UP
Controls Vertical Image Position within the display area of the LCD.
H.SIZE
Adjusts the horizontal size by increasing or decreasing this setting.
FINE
Improves focus, clarity and image stability by increasing or decreasing this setting.
English-7
English
01_English |
7 |
07/05/2005, 10:46 |
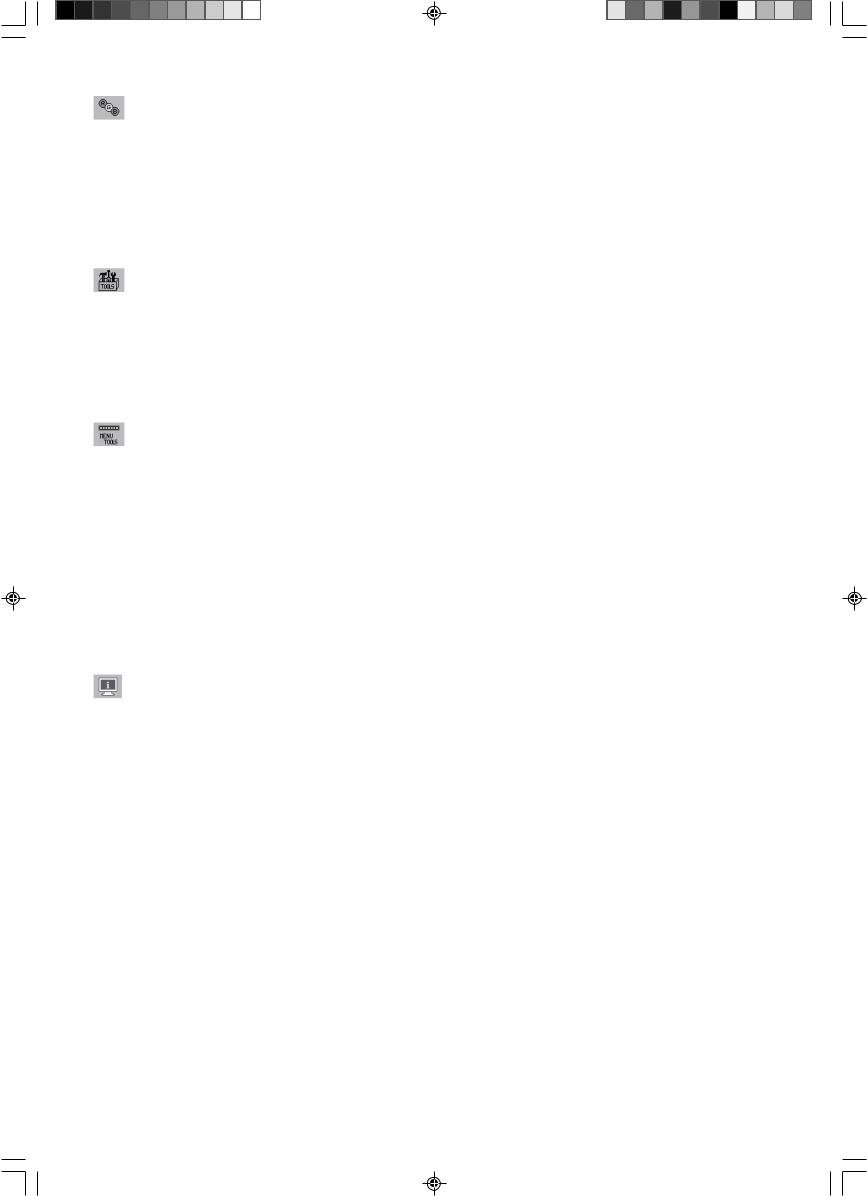
Colour Control System
Colour Control System: Six colour presets select the desired colour setting (sRGB and NATIVE colour presets are standard and cannot be changed).
R,G,B: Increases or decreases Red, Green or Blue colour depending upon which is selected. The change in colour will appear on screen and the direction (increase or decrease) will be shown by the bars.
NATIVE: Original colour presented by the LCD panel that is unadjustable.
sRGB: sRGB mode dramatically improves the colour fidelity in the desktop environment by a single standard RGB colour space. With this colour supported environment, the operator could easily and confidently communicate colour without further colour management overhead in the most common situations.
Tools
OFF TIMER: Monitor will automatically power-down when the end user has selected a predetermined amount of time.
HOT KEY: You can adjust the brightness and contrast directly. When this function is set to ON, you can adjust the brightness with left or right control and contrast with up or down control while the OSM menu is off.
FACTORY PRESET: Selecting Factory Preset allows you to reset all OSM control settings back to the factory settings. The RESET button will need to be held down for several seconds to take effect. Individual settings can be reset by highlighting the control to be reset and pressing the RESET button.
Menu Tools
LANGUAGE: OSM control menus are available in eight languages.
OSM LEFT/RIGHT: You can choose where you would like the OSM control image to appear horizontally on your screen.
OSM DOWN/UP: You can choose where you would like the OSM control image to appear vertically on your screen.
OSM Turn Off: The OSM control menu will stay on as long as it is in use. In the OSM Turn Off submenu, you can select how long the monitor waits after the last touch of a button to shut off the OSM control menu.
OSM Lock Out: This control completely locks out access to all OSM control functions without Brightness and Contrast. When attempting to activate OSM controls while in the Lock Out mode, a screen will appear indicating the OSM controls are locked out. To activate the OSM Lock Out function, press SELECT, then right control button and hold down simultaneously. To deactivate the OSM Lock Out, press SELECT, then left control button and hold down simultaneously while in the OSM menu.
RESOLUTION NOTIFIER: This optimal resolution is 1280 x 1024. If ON is selected, a message will appear on the screen after 30 seconds, notifying you that the resolution is not at 1280 x 1024.
Information
The Information menu indicates the current input, display resolution, horizontal and vertical frequency, and polarity settings of the monitor. The model and serial numbers of your monitor are also indicated.
OSM Warning
OSM Warning menus disappear with Exit button.
NO SIGNAL: This function gives a warning when there is no Horizontal or Vertical Sync. After power is turned on or when there is a change of input signal, the No Signal window will appear.
RESOLUTION NOTIFIER: This function gives a warning of use with optimized resolution. After power is turned on or when there is a change of input signal or the video signal doesn’t have proper resolution, the Resolution Notifier window will open. This function can be disabled in the Menu Tools.
OUT OF RANGE: When input signal is non-supported timing or the video signal doesn’t have proper timing, the Out of Range menu will appear.
English-8
01_English |
8 |
07/05/2005, 10:46 |
Recommended use
Safety Precautions and Maintenance
FOR OPTIMUM PERFORMANCE, PLEASE NOTE
THE FOLLOWING WHEN SETTING UP AND USING
THE MULTISYNC LCD COLOUR MONITOR:
•DO NOT OPEN THE MONITOR. There are no user serviceable parts inside and opening or removing covers may expose you to dangerous shock hazards or other risks. Refer all servicing to qualified service personnel.
•Do not spill any liquids into the cabinet or use your monitor near water.
•Do not insert objects of any kind into the cabinet slots, as they may touch dangerous voltage points, which can be harmful or fatal or may cause electric shock, fire or equipment failure.
•Do not place any heavy objects on the power cord. Damage to the cord may cause shock or fire.
•Do not place this product on a sloping or unstable cart, stand or table, as the monitor may fall, causing serious damage to the monitor.
•Do not place any objects onto the monitor and do not use the monitor outdoors.
•The inside of the fluorescent tube located within the LCD monitor contains mercury. Please follow the bylaws or rules of your municipality to dispose of the tube properly.
•Do not bend power cord.
•Do not use monitor in high temperatured, humid, dusty, or oily areas.
•Do not cover vent on monitor.
Immediately unplug your monitor from the wall outlet and refer servicing to qualified service personnel under the following conditions:
•When the power supply cord or plug is damaged.
•If liquid has been spilled, or objects have fallen into the monitor.
•If the monitor has been exposed to rain or water.
•If the monitor has been dropped or the cabinet damaged.
•If the monitor does not operate normally by following operating instructions.
•If glass is broken, handle with care.
•If monitor or glass is broken, do not come in contact with the liquid crystal and handle with care.
•Allow adequate ventilation around the monitor so that heat can properly dissipate. Do not block ventilated
openings or place the monitor near a radiator or other heat sources. Do not put anything on top of monitor.
CAUTION
• The power cable connector is the primary means of detaching the system from the power supply. The monitor should be installed close to a power outlet which is easily accessible.
• Handle with care when transporting. Save packaging for transporting.
• Image Persistence: Please be aware that LCD Technology may experience a phenomenon known as Image Persistence. Image Persistence occurs when a residual or “ghost” image of a previous image remains visible on the screen. Unlike CRT monitors, LCD monitors’ image persistence is not permanent, but constant images being displayed for a long period of time should be avoided. To alleviate image persistence, turn off the monitor for as long as the previous image was displayed. For example, if an image was on the monitor for one hour and a residual image remains, the monitor should be turned off for one hour to erase the image.
NOTE: As with all personal display devices, NEC DISPLAY SOLUTIONS recommends displaying moving images and using a moving screen saver at regular intervals whenever the screen is idle or turning off the monitor when not in use.
English-9
English
01_English |
9 |
07/05/2005, 10:46 |
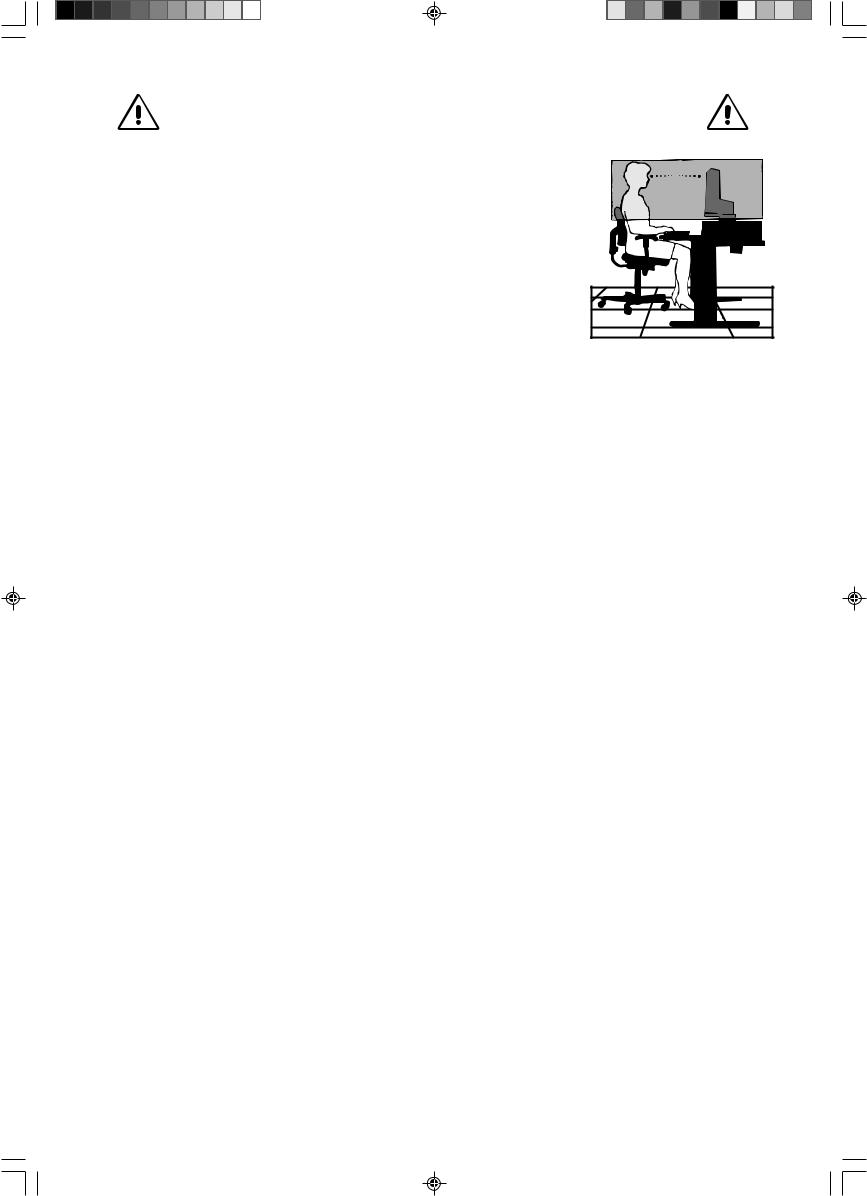
CORRECT PLACEMENT AND ADJUSTMENT OF THE MONITOR CAN
REDUCE EYE, SHOULDER AND NECK FATIGUE. CHECK THE
FOLLOWING WHEN YOU POSITION THE MONITOR:
•For optimum performance, allow 20 minutes for warm-up.
•Adjust the monitor height so that the top of the screen is at or slightly below eye level. Your eyes should look slightly downward when viewing the middle of the screen.
• Position your monitor no closer than 40 cm and no further away than 70 cm from your eyes. The optimal distance is 50 cm.
• Rest your eyes periodically by focusing on an object at least 20 feet away. Blink often.
•Position the monitor at a 90° angle to windows and other light sources to minimize glare and reflections. Adjust the monitor tilt so that ceiling lights do not reflect on your screen.
•If reflected light makes it hard for you to see your screen, use an anti-glare filter.
• Adjust the monitor’s brightness and contrast controls to enhance readability.
•Use a document holder placed close to the screen.
•Position whatever you are looking at most of the time (the screen or reference material) directly in front of you to minimize turning your head while you are typing.
•Avoid displaying fixed patterns on the monitor for long periods of time to avoid image persistence (after-image effects).
•Get regular eye checkups.
Ergonomics
To realize the maximum ergonomics benefits, we recommend the following:
•Adjust the Brightness until the background raster disappears.
•Do not position the Contrast control to its maximum setting.
•Use the preset Size and Position controls with standard signals.
•Use the preset Colour Setting.
•Use non-interlaced signals with a vertical refresh rate between 60-75 Hz.
•Do not use primary colour blue on a dark background, as it is difficult to see and may produce eye fatigue to insufficient contrast.
Cleaning the LCD Panel
•When the liquid crystal panel is stained with dust or dirt, please wipe with soft cloth gently.
•Please do not rub the LCD panel with hard material.
•Please do not apply pressure to the LCD surface.
•Please do not use OA cleaner it will cause deterioration or discolor on the LCD surface.
Cleaning the Cabinet
•Unplug the power supply
•Gently wipe the cabinet with a soft cloth
•To clean the cabinet, dampen the cloth with a neutral detergent and water, wipe the cabinet and follow with a dry cloth.
NOTE: Many plastics are used on the surface of the cabinet. DO NOT clean with benzene, thinner, alkaline detergent, alcoholic system detergent, glass cleaner, wax, polish cleaner, soap powder, or insecticide. Do not touch rubber or vinyl to the cabinet for a long time. These types of fluids and fabrics can cause the paint to deteriorate, crack or peel.
English-10
01_English |
10 |
07/05/2005, 10:46 |
VAROVÁNÍ
CHRA≈TE ZA¤ÍZENÍ P¤ED DE·TùM A VLHKEM. ZABRÁNÍTE TAK NEBEZPEâÍ POÎÁRU NEBO ÚRAZU ELEKTRICK¯M PROUDEM. POLARIZOVANOU ZÁSTRâKU JEDNOTKY NEPOUÎÍVEJTE VE SPOJENÍ SE ZÁSUVKOU
PRODLUÎOVACÍ ·≈ÒRY NEBO JIN¯MI ZÁSUVKAMI, POKUD KOLÍKY NELZE ZCELA ZASUNOUT.
UVNIT¤ ZA¤ÍZENÍ SE NACHÁZÍ VYSOKONAPùËOVÉ KOMPONENTY, PROTO SK¤Í≈ NEOTEVÍREJTE. SERVIS
SVù¤TE KVALIFIKOVANÉ OSOBù.
UPOZORNùNÍ
UPOZORNùNÍ: PRO SNÍÎENÍ RIZIKA ÚRAZU ELEKTRICK¯M PROUDEM ZKONTROLUJTE, ZDA JE NAPÁJECÍ ·≈ÒRA
ODPOJENA ZE ZÁSUVKY. PRO ÚPLNÉ ODPOJENÍ ZDROJE NAPÁJENÍ OD JEDNOTKY ODPOJTE
NAPÁJECÍ ·≈ÒRU Z ELEKTRICKÉ ZÁSUVKY (NEOSTRA≈UJTE KRYT). UVNIT¤ SE NENACHÁZEJÍ DÍLY, DO KTER¯CH UÎIVATEL MÒÎE ZASAHOVAT. SERVIS SVù¤TE KVALIFIKOVANÉ OSOBù.
Tento symbol upozorÀuje uÏivatele na neizolované napûtí v rámci jednotky, jehoÏ intenzita mÛÏe b˘t dostateãnû vysoká, aby zpÛsobila úraz elektrick˘m proudem. Jak˘koli kontakt s libovoln˘m dílem uvnitfi jednotky je proto nebezpeãn˘.
Tento symbol upozorÀuje uÏivatele na dÛleÏitou literaturu t˘kající provozu a údrÏby jednotky dodanou spoleãnû s tímto zafiízením. Chcete-li pfiedejít problémÛm, doporuãujeme peãlivé proãtení pfiíslu‰n˘ch materiálÛ.
Upozornûní:
Pfii provozu monitoru MultiSync LCD1970V/MultiSync LCD1970NX/MultiSync LCD1970NXp v síti s napûtím 220-240V v Evropû pouÏívejte síÈovou ‰ÀÛru dodávanou s monitorem.
Ve Spojeném království se smí pouÏívat k tomuto monitoru jen schválená ‰ÀÛra BS se zalitou zástrãkou a s ãernou pojistkou (5A). Není-li napájecí ‰ÀÛra dodána se zafiízením, spojte se s dodavatelem.
Pfii provozu monitoru MultiSync LCD1970V/MultiSync LCD1970NX/MultiSync LCD1970NXp v síti s napûtím 220-240V v Austrálii pouÏívejte síÈovou ‰ÀÛru dodávanou s monitorem. Není-li napájecí ‰ÀÛra dodána se zafiízením, spojte se s dodavatelem.
Ve v‰ech ostatních pfiípadech pouÏívejte napájecí ‰ÀÛru, která se shoduje se stfiídav˘m napûtím zásuvky a která vyhovuje bezpeãnostním pfiedpisÛm dané zemû.
Prohlá‰ení
Prohlá‰ení v˘robce
Tímto prohla‰ujeme, Ïe barevné monitory MultiSync LCD1970V (L194RK)/MultiSync
LCD1970NX (L194RH)/MultiSync LCD1970NXp
(L194RH) jsou v souladu s
smûrnice 73/23/EEC:
– EN 60950-1
smûrnice 89/336/EEC:
–EN 55022
–EN 61000-3-2
–EN 61000-3-3
–EN 55024
a je opatfien oznaãením
NEC Display Solutions, Ltd.
4-13-23, Shibaura,
Minato-Ku
Tokyo 108-0023, Japan
âesky
Windows je registrovaná ochranná známka spoleãnosti Microsoft Corporation. NEC je registrovaná ochranná známka spoleãnosti NEC
Corporation. ENERGY STAR je v USA registrovaná obchodní znaãka.
OmniColor je registrovaná ochranná a známka spoleãnosti NEC Display Solutions Europe GmbH v zemích Evropské Unie a ve
·v˘carsku.
Ergo Design je registrovaná ochranná známka spoleãnosti NEC Display Solutions, Ltd. v Rakousku, Beneluxu, Dánsku, Francii, Nûmecku, Itálii, Norsku, ·panûlsku, ·védsku a Velké Británii.
NaViSet je ochranná a známka spoleãnosti NEC Display Solutions Europe GmbH v zemích Evropské Unie a ve ·v˘carsku.
MultiSync je registrovaná ochranná známka spoleãnosti NEC Display Solutions, Ltd. v Velké Británii, Itálii, Rakousku, Nizozemí,
·v˘carsku, ·védsku, ·panûlsku, Dánsku, Nûmecku, Norsku a Finsku.
V‰echny ostatní znaãky a názvy produktÛ jsou obchodní známky nebo registrované obchodní známky pfiíslu‰n˘ch vlastníkÛ.
Spoleãnost NEC Display Solutions of America, Inc., jako úãastník programu ENERGY STAR®, urãila, Ïe tento produkt splÀuje poÏadavky smûrnic ENERGY STAR pro efektivní vyuÏití energie. Znak ENERGY STAR neznamená, Ïe organizace EPA odpovídá za jak˘koli produkt nebo jakoukoli sluÏbu.
âesky-1
02_Czech |
1 |
07/05/2005, 10:47 |

Obsah
Nov˘ monitor LCD NEC MultiSync* musí pfii dodání obsahovat následující poloÏky:
•monitor MultiSync LCD s podstavcem umoÏÀujícím naklonûní ve svislém smûru, sklápûní a úpravu v˘‰ky,
•napájecí ‰ÀÛra,
•kryt kabelu,
•kabel pro obrazov˘ signál (15kolíkov˘ miniaturní konektor D-SUB-D-SUB),
•uÏivatelská pfiíruãka,
•CD-ROM (zahrnuje kompletní uÏivatelskou pfiíruãku ve formátu PDF).
Pro zobrazení uÏivatelské pfiíruãky musíte mít na poãítaãi nainstalovanou aplikaci Acrobat Reader 4.0 nebo novûj‰í.
Napájecí ‰ÀÛra
Kryt kabelu
UÏivatelská pfiíruãka |
15kolíkov˘ miniaturní konektor |
CD-ROM |
|
D-SUB-D-SUB |
|
POZNÁMKA: Tento monitor muÏe b˘t vybaven doplnkov˘mi reproduktory: “MultiSync sound bar”. Informace vám poskytne prodejce nebo nav‰tivte stránku http://www.nec-display-solutions.com
*PÛvodní karton a balicí materiál si uschovejte pro pfiípadnou pfiepravu monitoru.
âesky-2
02_Czech |
2 |
07/05/2005, 10:47 |
Rychl˘ start
Monitor MultiSync LCD pfiipojíte k poãítaãi následujícím zpÛsobem: |
|
|
1. |
Vypnûte poãítaã. |
|
2. |
Pro poãítaã PC nebo Macintosh s digitálním v˘stupem DVI (jen NX/NXp): Pfiipojte jeden konec signálního kabelu DVI |
|
|
(není souãástí dodávky) ke konektoru grafické karty poãítaãe (obrázek A.1). Dotáhnûte v‰echny ‰rouby. |
|
|
Osobní poãítaã s analogov˘m v˘stupem: V poãítaãi pfiipojte 15kolíkovou minizástrãku D-SUB signálního kabelu ke |
âesky |
|
konektoru grafické karty (obrázek A.2). Dotáhnûte v‰echny ‰rouby. |
|
|
|
|
Poãítaãe Macintosh: Pfiipojte k poãítaãi adaptér Macintosh a k adaptéru pfiipojte 15kolíkov˘ konektor signálního kabelu D-SUB (obrázek B.1). Dotáhnûte v‰echny ‰rouby.
|
|
|
|
|
|
Signálov˘ kabel DVI |
|
Adaptér kabelu |
|
|
|
(není souãástí Obrázek A.1 |
Obrázek A.2 |
Macintosh (není |
Obrázek B.1 |
|
|
dodávky) |
|
souãástí v˘bavy) |
|
|
|
POZNÁMKA: U nûkter˘ch poãítaãÛ Macintosh pouÏití tohoto kabelového adaptéru není nutné.
3.Uchopte monitor za obû strany a naklopte jej o 30 stupÀÛ nahoru a zvednûte do nejvy‰‰í polohy (obrázek C.1).
4.Pfiipojte v‰echny kabely k pfiíslu‰n˘m konektorÛm (obrázek C.1).
5.ZasuÀte napájecí kabel do urãen˘ch háãkÛ (obrázek C.2).
6.ZasuÀte kabel D-Sub do urãen˘ch háãkÛ (obrázek C.2).
Náklon 30°
|
Napájecí kabel |
Nejvy‰‰í |
Kabel D-Sub |
|
|
pozice |
|
podstavce |
|
Kabel DVI (není souãástí dodávky) |
Obrázek C.1 |
Obrázek C.2 |
DC-OUT (jen NX/NXp)
Pfiipojení pfiíslu‰enství NEC.
Tento konektor je urãen jen pro nûkterá zafiízení.
âesky-3
02_Czech |
3 |
07/05/2005, 10:47 |

7.ZasuÀte kabel DVI do urãen˘ch háãkÛ (obrázek C.3).
8.V‰echny kabely musí pfiiléhat k podstavci (obrázek C.3).
9.Uchopte pevnû v‰echny kabely a nasaìte kryt kabelÛ na podstavec
(obrázek D.1). Kryt kabelÛ sejmûte podle obrázek D.2.
Kabel DVI
(jen NX/NXp)
Ploch˘
Obrázek C.3
Nejprve nasaìte horní ãást
Potom dolní
Obrázek D.1 |
Obrázek D.2 |
10. Pfiipojte napájecí kabel k napájecí zásuvce (obrázek E.1).
POZNÁMKA: Pokud máte potíÏe pfii snímání krytu kabelu, zatlaãte dolní otvor smûrem nahoru a sejmûte kryt, jak je uvedeno na obrázek E.2.
POZNÁMKA: V ãásti Upozornûní této pfiíruãky najdete pokyny k v˘bûru správné napájecí ‰ÀÛry.
11.Vypínaã pohotovostního reÏimu na zadní stranû monitoru musí b˘t zapnut˘ (obrázek E.1). Zapnûte monitor pomocí hlavního vypínaãe a zapnûte poãítaã.
POZNÁMKA: Vypínaã pohotovostního reÏimu pfiedstavuje skuteãn˘ vypínaã. Pokud je tento vypínaã v poloze OFF (Vypnuto), monitor nelze zapnout pfiedním tlaãítkem. NEP¤EPÍNEJTE vypínaãe opakovanû.
12.Funkce bezdotykového automatického sefiízení automaticky nastaví monitor pfii poãáteãní instalaci pro vût‰inu ãasování.
K dal‰ímu sefiízení pouÏijte následující ovladaãe OSM:
•Auto Adjust Contrast (Automatické sefiízení kontrastu, pouze pro analogov˘ vstup)
•Auto Adjust (Automatické sefiízení, pouze pro analogov˘ vstup)
Úpln˘ popis tûchto ovladaãÛ OSM je uveden v kapitole Ovládací prvky v této uÏivatelské pfiíruãce.
POZNÁMKA: Vyskytnou-li se potíÏe, proãtûte si kapitolu OdstraÀování problémÛ dále v této pfiíruãce.
Vypnuto
Zapnuto
Vypínaã pohotovostního reÏimu
Obrázek E.2 |
Hlavní vypínaã
Obrázek E.1
âesky-4
02_Czech |
4 |
07/05/2005, 10:47 |
Nastavení v˘‰ky monitoru
Monitor lze zvednout nebo sníÏit. Chcete-li obrazovku posunout nahoru nebo dolÛ, uchopte monitor na obou stranách a zvednûte jej nebo spusÈte do poÏadované v˘‰ky (obrázek RL.1).
POZNÁMKA: Pfii sniÏování nebo zvy‰ování polohy obrazovky monitoru buìte opatrní.
âesky
Obrázek RL.1
Naklánûní a otáãení
Uchopte obû strany obrazovky monitoru a upravte sklon a natoãení podle poÏadavkÛ (obrázek TS.1).
POZNÁMKA: Pfii naklápûní a otáãení monitoru postupujte opatrnû.
Obrázek TS.1
Odebrání podstavce pfii pfiemístûní monitoru
Pfiíprava monitoru na pfiemístûní pfii zmûnû umístûní:
1. Uchopte monitor za obû strany a zvednûte jej do nejvy‰‰í polohy. Sejmûte kryt kabelÛ (obrázek S.1).
POZNÁMKA: Pokud máte potíÏe pfii snímání krytu kabelu, zatlaãte dolní otvor smûrem nahoru a sejmûte kryt, 


 jak je uvedeno na vedlej‰í ilustraci.
2.Odpojte v‰echny kabely.
3.Monitor umístûte obrazovkou dolÛ na hladk˘ povrch (obrázek S.2).
POZNÁMKA: Pfii manipulaci s monitorem obrazovkou smûrem dolÛ buìte opatrní, aby nedo‰lo k po‰kození ãelních tlaãítek.
4. OdstraÀte dva ‰roubky uchycující monitor k podstavci (obrázek S.2).
Obrázek S.1 |
Obrázek S.2 |
âesky-5
02_Czech |
5 |
07/05/2005, 10:47 |

5.Zvednutím podstavce odjistûte horní háãky. Potom podstavec odeberte (obrázek S.3).
6.OdstraÀte 2 ‰roubky v horní ãásti monitoru (obrázek S.4). Monitor je nyní pfiipraven k pfiemístûní.
7.Pfiipojte kabely ke konektorÛm na zadní stranû monitoru.
8.Pfii upevnûní podstavce postupujte opaãnû.
POZNÁMKA: Pfii jiném upevnûní pouÏívejte pouze prostfiedky kompatibilní s normou VESA.
Pfii sejímání podstavce zacházejte se zafiízením opatrnû.
Obrázek S.3 |
Obrázek S.4 |
MontáÏ pruÏného ramene
Tento displej je navrÏen k pouÏití spolu s pruÏn˘m ramenem. Uchycení monitoru k pruÏnému rameni:
1.Postupujte podle pokynÛ k odebrání podstavce.
2.PouÏijte 4 ‰roubky, které jsou k dispozici po odebrání podstavce, a upevnûte rameno k monitoru (obrázek F.1).
POZNÁMKA: Ploch˘ monitor lze pouÏívat pouze se schválen˘m ramenem (napfi. znaãky GS). Aby byly splnûny bezpeãnostní poÏadavky, musí b˘t monitor namontován na rameno, které zaruãuje nezbytnou stabilitu s ohledem na hmotnost monitoru.
Síla konzoly (ramene)
2,0-3,2 mm
4 ‰roubky (4M)
(Max. hloubka: 8,5 mm)
100 mm
Hmotnost kompletu LCD: 4,9 kg max. (LCD1970V) 100 mm 5,4 kg max. (LCD1970NX)
5,3 kg max. (LCD1970NXp)
Obrázek F.1
âesky-6
02_Czech |
6 |
07/05/2005, 10:47 |
Ovládací prvky
Ovládací tlaãítka OSM (On-Screen Manager) na pfiední stranû monitoru mají následující funkce:
Chcete-li otevfiít nabídku OSM, stisknûte kterékoli z ovládacích tlaãítek (MENU/EXIT (Nabídka/Konec), vlevo, vpravo, dolÛ, nahoru).
Vstupní signál lze zmûnit tlaãítkem SELECT (jen NX/NXp).
ReÏim DV MODE lze zmûnit stisknutím tlaãítka RESET (jen NX/NXp).
POZNÁMKA: Chcete-li zmûnit vstup signálu, musíte nabídku OSM zavfiít.
|
LCD1970V |
LCD1970NX/LCD1970NXp |
|
Tlaãítko |
Menu |
|
|
MENU/EXIT |
Otevfiete hlavní nabídku OSM. Ukonãí ovládací prvky nabídky OSM. |
||
(Nabídka/Konec) |
Pfiejde do hlavní nabídky OSM. |
|
|
âtyrsmûrové tlaãítko |
Nahoru |
|
|
|
Doleva |
Doprava |
|
DolÛ
Vlevo a vpravo |
Posunuje vyznaãenou plochu vlevo nebo vpravo a zvolí nûkterou z nabídek ovládacích prvkÛ. |
|
Posunutím li‰ty doleva nebo doprava se zvy‰uje nebo sniÏuje hodnota nastavení. |
Nahoru a dolÛ |
Posunuje vyznaãenou oblast dolÛ / nahoru a zvolí nûkter˘ z ovládacích prvkÛ. |
SELECT (V˘bûr) |
Funkce aktivního automatického sefiízení. Otevfiení dílãí nabídky OSM. |
RESET |
Znovu nastaví zv˘raznûnou ovládací nabídku na v˘chozí hodnotu. |
POZNÁMKA: Stisknete-li RESET v hlavní nebo dílãí nabídce, objeví se dialogové okno s varováním, které umoÏní zru‰it funkci
RESET pomocí tlaãítka MENU/EXIT (Nabídka/Konec).
Brightness/Contrast Controls (Prvky pro ovládání jasu a kontrastu)
BRIGHTNESS (Jas)
SlouÏí k nastavení celkového jasu obrazu a pozadí obrazovky.
CONTRAST (Kontrast)
Nastavuje jas obrazu vzhledem k pozadí.
DV MODE (ReÏim DV (jen NX/NXp))
UmoÏÀuje volbu poÏadovaného nastavení pro film, obrázky atd.
AUTO CONTRAST (Automatické sefiízení kontrastu, pouze pro analogov˘ vstup)
Optimalizuje nastavení obrazu.
Auto Adjust (Automatické sefiízení, pouze pro analogov˘ vstup)
Automaticky nastaví pozici obrazu, vodorovn˘ rozmûr a jemné nastavení.
Image Controls (Ovládání obrazu, pouze pro analogov˘ vstup)
LEFT / RIGHT (VLEVO NEBO VPRAVO)
Ovládá vodorovnou polohu obrazu na zobrazovací plo‰e monitoru LCD.
DOWN / UP (NAHORU NEBO DOLÒ)
Ovládá svislou polohu obrazu na zobrazovací plo‰e monitoru LCD.
H.SIZE (Vodorovn˘ rozmûr)
Upraví vodorovn˘ rozmûr zv˘‰ením nebo sníÏením hodnoty tohoto nastavení.
FINE (Jemné doladûní)
Zlep‰í zaostfiení, jasnost a stabilitu obrazu zv˘‰ením nebo sníÏením hodnoty tohoto nastavení.
âesky-7
âesky
02_Czech |
7 |
07/05/2005, 10:47 |

Colour Control System (Systém ovládání barev)
Colour Control System (Systém ovládání barev): ·est pfiedvoleb poÏadovaného nastavení barev (pfiedvolby sRGB a NATIVE jsou standardní a nelze je mûnit).
R,G,B: Zv˘‰í nebo sníÏí obsah ãervené, zelené nebo modré barvy v závislosti na provedené volbû. Na obrazovce se objeví zmûna barvy a na li‰tách je vidût smûr (zv˘‰ení nebo sníÏení intenzity barev).
NATIVE: PÛvodní barva zobrazená na panelu LCD, kterou nelze upravit.
sRGB: ReÏim sRGB znaãnû zlep‰uje vûrnost barev v prostfiedí stolního poãítaãe pomocí jediného barevného prostoru RGB. S tímto prostfiedím s podporou barev mÛÏe obsluha snadno a s jistotou pfiená‰et barvy bez dal‰í správy barev nutné ve vût‰inû bûÏn˘ch situací.
Tools (Nástroje)
OFF TIMER (Nastavení ãasu vypnutí): Monitor se automaticky vypne po uplynutí ãasu nastaveného uÏivatelem.
HOT KEY (Rychlá volba): Jas a kontrast lze upravit pfiímo. Pokud je tato funkce nastavena na ON (Zapnuto), lze jas nastavit pomocí tlaãítek “vlevo” nebo “vpravo” a kontrast pomocí tlaãítek “nahoru” a “dolÛ” (kdyÏ je nabídka OSM vypnuta).
FACTORY PRESET (Nastavení z v˘roby): Volba nastavení v˘robce umoÏÀuje vrátit v‰echna nastavení ovladaãÛ OSM na hodnoty nastavené v˘robcem. Tlaãítko RESET je tfieba podrÏet stisknuté nûkolik vtefiin. Hodnotu jednotliv˘ch nastavení lze obnovit oznaãením odpovídajícího ovládacího prvku a stisknutím tlaãítka RESET.
Menu Tools (Nástroje nabídky)
LANGUAGE (Jazyk): Nabídky OSM lze zobrazit v osmi jazycích.
OSM LEFT/RIGHT (Nabídka OSM vlevo nebo vpravo): Lze urãit umístûní obrazu ovládací nabídky OSM na obrazovce (vodorovnû).
OSM DOWN/UP (Nabídka OSM nahoru nebo dolÛ): Lze urãit umístûní obrazu ovládací nabídky OSM na obrazovce (svisle).
OSM TURN OFF (Vypnutí OSM): Nabídka ovládání OSM zÛstane zobrazena, dokud se pouÏívá. V dílãí nabídce OSM
Turn Off lze nastavit prodlevu monitoru pro vypnutí nabídky ovládání OSM po posledním stisknutí tlaãítka.
OSM LOCK OUT (Uzamãení OSM): Zcela znemoÏÀuje pfiístup ke v‰em funkcím OSM, kromû jasu a kontrastu. Pfii pokusu o aktivaci ovládací nabídky OSM v reÏimu uzamãení se na obrazovce zobrazí sdûlení, Ïe funkce OSM jsou uzamãeny. Chcete-li funkce nabídky OSM uzamknout, souãasnû stisknûte a podrÏte tlaãítko SELECT a tlaãítko “vpravo”. K odemãení nabídky OSM stisknûte a podrÏte tlaãítko SELECT a souãasnû stisknûte “vlevo” (nabídka OSM musí b˘t aktivní).
RESOLUTION NOTIFIER (Oznámení o rozli‰ení): Optimální rozli‰ení je 1024 x 1280. Je-li zvolena poloÏka ON (Zapnuto), bude se po 30 sekundách objevovat na obrazovce zpráva oznamující, Ïe rozli‰ení není 1280 x 1024.
Information (Informace)
Nabídka informace uvádí aktuální vstup, rozli‰ení, kmitoãet ve vodorovném a svislém smûru a nastavení polarity monitoru. Také zobrazuje model monitoru a sériové ãíslo.
Upozornûní OSM
Nabídky upozornûní OSM zmizí po stisknutí tlaãítka Exit (Konec).
NO SIGNAL (Není signál): Tato funkce v pfiípadû nepfiítomnosti horizontální nebo vertikální synchronizace zobrazí upozornûní. Okno No Signal se zobrazí po zapnutí monitoru nebo pokud do‰lo ke zmûnû vstupního signálu.
RESOLUTION NOTIFIER (Oznámení o rozli‰ení): Tato funkce upozorní na pouÏití optimalizovaného rozli‰ení. Okno Resolution Notifier se otevfie po zapnutí monitoru nebo pokud do‰lo ke zmûnû vstupního signálu nebo pokud obrazov˘ signál není ve správném rozli‰ení. Tuto funkci lze deaktivovat v Menu Tools.
OUT OF RANGE (Mimo rozsah): Pokud není frekvence vstupního signál podporována nebo je-li jeho frekvence nesprávná, objeví se nabídka Out of Range (Mimo rozsah).
âesky-8
02_Czech |
8 |
07/05/2005, 10:47 |
Provozní pokyny
Bezpeãnostní opatfiení a údrÏba |
|
|
CHCETE-LI DOSÁHNOUT OPTIMÁLNÍ FUNKCE BAREVNÉHO |
|
|
MONITORU LCD MULTISYNC, POSTUPUJTE P¤I INSTALACI |
|
|
A NASTAVOVÁNÍ PODLE NÁSLEDUJÍCÍCH POKYNÒ: |
|
|
• MONITOR NEOTVÍREJTE. Uvnitfi monitoru nejsou Ïádné souãásti, které by mohl uÏivatel sám opravit. Pfii otvírání nebo |
âesky |
|
odstraÀování krytÛ se vystavujete nebezpeãí úrazu elektrick˘m proudem a jin˘m rizikÛm. Ve‰keré zásahy tohoto druhu |
||
|
||
pfienechejte odborníkÛm. |
|
|
• Dbejte, aby se do monitoru nedostaly tekutiny a nepouÏívejte ho v blízkosti vody. |
|
|
• Do mezer obalu nezasouvejte Ïádné pfiedmûty. Mohly by se dotknout nebezpeãn˘ch ãástí pod napûtím, coÏ mÛÏe zpÛsobit |
|
|
|
||
úraz elektrick˘m proudem, poÏár nebo selhání zafiízení. |
|
|
• Na napájecí ‰ÀÛru nepokládejte Ïádné tûÏké pfiedmûty. Po‰kození izolace mÛÏe zpÛsobit úraz elektrick˘m proudem nebo |
|
|
poÏár. |
|
|
• Produkt neumísÈujte na ‰ikmé a nestabilní vozíky, stojany nebo stoly; monitor se mÛÏe pádem váÏnû po‰kodit. |
|
|
• NeumisÈujte na monitor Ïádné pfiedmûty a nepouÏívejte monitor venku. |
|
|
• Fluorescenãní trubice v monitoru LCD obsahuje rtuÈ. |
|
|
Pfii likvidaci této trubice se fiiìte normami a pfiedpisy místních úfiadÛ. |
|
|
• Neoh˘bejte síÈovou ‰ÀÛru. |
|
|
• NepouÏívejte monitor na pfiíli‰ teplém, vlhkém nebo pra‰ném místû. |
|
|
• Nezakr˘vejte vûtrací otvory na monitoru. |
|
V níÏe popsan˘ch pfiípadech je nutno okamÏitû odpojit monitor od napájení a pfiivolat odborného technika:
•Dojde k po‰kození napájecí ‰ÀÛry.
•Do monitoru se dostane kapalina nebo monitor upadne na zem.
•Monitor byl vystaven de‰ti nebo vodû.
•Monitor upadne nebo se po‰kodí jeho obal.
•Monitor fiádnû nefunguje, pfiestoÏe jste dodrÏeli v‰echny pokyny.
•Pokus se sklo rozbije, buìte opatrní.
•JestliÏe se monitor po‰kodí nebo pokud praskne sklo, buìte opatrní a nedot˘kejte se tekut˘ch krystalÛ.
•Zajistûte kolem monitoru odpovídající odvûtrávání, aby se nepfiehfiíval. Nezakr˘vejte vûtrací otvory a neumísÈujte monitor do blízkosti topidel a jin˘ch tepeln˘ch zdrojÛ. Nepokládejte na monitor Ïádné pfiedmûty.
UPOZORNùNÍ • Konektor napájecí ‰ÀÛry je hlavním prostfiedkem pro odpojení systému od pfiívodu elektrického napûtí. Monitor je tfieba nainstalovat blízko elektrické zásuvky, k níÏ máte snadn˘ pfiístup.
•Pfii dopravû a manipulaci zacházejte se zafiízením opatrnû. Obal uschovejte pro pfiípadnou pfiepravu.
•Dosvit obrazu: U displejÛ na bázi technologie LCD se mÛÏe projevit dosvit obrazu. Dosvitem obrazu se oznaãuje zbytkov˘ obraz (“duchy”) pfiedchozího obrazu, kter˘ zÛstane viditeln˘ na obrazovce. Narozdíl od bûÏn˘ch monitorÛ není dosvit obrazu na displeji LCD trval˘, ale pfiesto by se mûlo pfiedejít zobrazení jednoho obrazu po dlouhou dobu. Chcete-li zmírnit dosvit obrazu, vypnûte monitor na stejnû dlouhou dobu, po jakou byl poslední obraz zobrazen. JestliÏe byl napfiíklad obraz na obrazovce hodinu a zÛstal po nûm zbytkov˘ obraz, znovu vypnûte monitor na jednu hodinu, aby obraz zmizel.
POZNÁMKA: Stejnû jako u v‰ech osobních zobrazovacích zafiízení doporuãuje firma NEC DISPLAY SOLUTIONS pravidelné spou‰tûní spofiiãÛ obrazovky s pohyblivou grafikou v pfiípadech, kdy se pouÏívá k zobrazování statické grafiky.
Pokud zafiízení nepouÏíváte, vypnûte jej.
âesky-9
02_Czech |
9 |
07/05/2005, 10:47 |

SPRÁVN¯M UMÍSTùNÍM A NASTAVENÍM MONITORU MÒÎETE
P¤EDEJÍT ÚNAVù OâÍ, BOLESTEM RAMEN A ·ÍJE. P¤I UMÍSËOVÁNÍ
MONITORU POSTUPUJTE PODLE NÁSLEDUJÍCÍCH POKYNÒ:
•Pro dosaÏení optimálního v˘konu nechejte monitor 20 minut zahfiát.
•Umístûte monitor do takové v˘‰ky, abyste horní ãást obrazovky mûli mírnû pod úrovní oãí. Pohled na stfied obrazovky by mûl smûfiovat mírnû dolÛ.
• Doporuãená minimální vzdálenost monitoru od oãí je 40 cm, maximální 70 cm. Optimální vzdálenost je 50 cm.
•Pfii práci zamûfiujte zrak pravidelnû na nûjak˘ pfiedmût vzdálen˘ nejménû 6 m, sníÏí tak namáhání va‰eho zraku. âasto mrkejte.
•Pro minimalizaci odleskÛ a odrazÛ monitor umístûte pod úhlem asi 90° od okna a jiného svûtelného zdroje. Monitor sklopte tak, aby se na obrazovce neodráÏela stropní svûtla.
• JestliÏe se nelze odrazu svûtla na obrazovce vyhnout, pouÏívejte filtr jako stínidlo.
•Jas a kontrast nastavte tak, aby byla zaji‰tûna optimální ãitelnost.
•Stojan na dokumenty pouÏívejte v blízkosti obrazovky.
•Obrazovku nebo referenãní materiál, se kter˘m pracujete, umístûte pfied sebe, abyste pfii psaní museli co nejménû otáãet hlavou.
•Rozhodnû nezobrazujte nehybné vzory na dlouhou dobu, abyste zabránili dosvitu obrazu (magnetické zpoÏdûní obrazu).
•Choìte pravidelnû na prohlídky k oãnímu lékafii.
Ergonomika
Pro maximální ergonomickou pohodu doporuãujeme:
•Jas nastavte tak, aby zmizel rastr na pozadí.
•Nenastavujte ovladaã kontrastu do maximální pozice.
•Pfii pouÏití standardního signálu vyuÏívejte v˘robcem nastavenou velikost a polohu (Size a Position).
•PouÏijte pfiedvolbu nastavení barev.
•PouÏívejte neprokládané signály s vertikální obnovovací frekvencí v rozsahu 60-75 Hz.
•NepouÏívejte primární modrou barvu na tmavém pozadí; je ‰patnû vidût a zpÛsobuje únavu oãí v dÛsledku nedostateãného kontrastu.
âi‰tûní displeje LCD
•Je-li displej LCD zaprá‰en˘ nebo zneãi‰tûn˘, opatrnû jej otfiete mûkkou látkou.
•K ãi‰tûní displeje nepouÏívejte tvrdé materiály.
•Na displej LCD netlaãte.
•NepouÏívejte ãisticí prostfiedek OA, mÛÏe zpÛsobit zhor‰ení povrchu displeje, a tím sníÏení kvality obrazu.
âi‰tûní skfiínû
•Odpojte napájecí kabel.
•Opatrnû otfiete skfiíÀ mûkkou látkou.
•MÛÏete pouÏít látku navlhãenou v neutrálním ãistícím prostfiedku s vodou. Potom v‰ak skfiíÀ do sucha otfiete.
POZNÁMKA: Povrch skfiínû je ãásteãnû z plastu. NEPOUÎÍVEJTE benzen, fiedidla, zásadité ãistící prostfiedky, alkohol, prostfiedky na ãi‰tûní skla, vosky, le‰tící prostfiedky, m˘dlov˘ prá‰ek ani insekticidy. SkfiíÀ nesmí pfiijít do dlouhodobého styku s pryÏí nebo vinylem. Tyto druhy tekutin a látek mohou poru‰it nátûr.
âesky-10
02_Czech |
10 |
07/05/2005, 10:47 |
WARNUNG
SETZEN SIE DAS GERÄT WEDER REGEN NOCH FEUCHTIGKEIT AUS, DA ES ANDERNFALLS ZU FEUER ODER STROMSCHLÄGEN KOMMEN KANN. VERWENDEN SIE DEN NETZSTECKER DIESES GERÄTS KEINESFALLS MIT EINEM VERLÄNGERUNGSKABEL ODER EINER STECKDOSENLEISTE, WENN DIE STECKERSTIFTE NICHT VOLLSTÄNDIG EINGEFÜHRT WERDEN KÖNNEN.
ÖFFNEN SIE DAS GEHÄUSE NICHT, DA SICH IM INNEREN KOMPONENTEN BEFINDEN, DIE UNTER HOCHSPANNUNG STEHEN. LASSEN SIE WARTUNGSARBEITEN VON QUALIFIZIERTEN WARTUNGSTECHNIKERN DURCHFÜHREN.
|
|
VORSICHT |
|
VORSICHT: |
ZIEHEN SIE DAS NETZKABEL AUS DER STECKDOSE, UM STROMSCHLÄGE ZU VERHINDERN. ERST |
||
|
NACH DEM TRENNEN DES GERÄTS VOM STROMNETZ IST GEWÄHRLEISTET, DASS AN KEINER |
||
|
GERÄTEKOMPONENTE SPANNUNG ANLIEGT. IM INNEREN BEFINDEN SICH KEINE VOM BENUTZER ZU |
||
|
WARTENDEN KOMPONENTEN. LASSEN SIE WARTUNGSARBEITEN VON QUALIFIZIERTEN |
||
|
WARTUNGSTECHNIKERN DURCHFÜHREN. |
||
Dieses Symbol weist den Benutzer auf nicht isolierte spannungsführende Komponenten im Gerät hin, die Stromschläge verursachen können. Aus diesem Grund dürfen Sie keinesfalls Kontakt mit einer Komponente im Geräteinneren herstellen.
Dieses Symbol weist den Benutzer auf wichtige Informationen zu Betrieb und Pflege dieses Geräts hin. Die Informationen sollten sorgfältig gelesen werden, um Probleme zu vermeiden.
Vorsicht:
Wird der MultiSync LCD1970V/MultiSync LCD1970NX/MultiSync LCD1970NXp in Europa an einem Wechselstromnetz mit 220-240 V betrieben, muss das mit dem Monitor gelieferte Netzkabel verwendet werden.
In Großbritannien ist ein BS-zugelassenes Netzkabel mit diesem Monitor zu verwenden. Das Netzkabel muss mit einem Spritzgussstecker mit schwarzer Sicherung (5 A) ausgestattet sein. Setzen Sie sich mit Ihrem Händler in Verbindung, wenn der Monitor ohne Netzkabel geliefert wurde.
Wird der MultiSync LCD1970V/MultiSync LCD1970NX/MultiSync LCD1970NXp in Australien an einem Wechselstromnetz mit 220-240 V betrieben, muss das mit dem Monitor gelieferte Netzkabel verwendet werden. Setzen Sie sich mit Ihrem Händler in Verbindung, wenn der Monitor ohne Netzkabel geliefert wurde.
In allen anderen Ländern ist ein für die Spannung des Stromnetzes geeignetes und zugelassenes Netzkabel zu verwenden, dass den Sicherheitsstandards des betreffenden Landes entspricht.
Erklärung
Erklärung des Herstellers
Wir bestätigen hiermit, dass der MultiSync-Monitor LCD1970V (L194RK)/LCD1970NX (L194RH)/ LCD1970NXp (L194RH) folgenden Richtlinien entspricht:
EG-Direktive 73/23/EG:
– EN 60950-1
EG-Direktive 89/336/EG:
–EN 55022
–EN 61000-3-2
–EN 61000-3-3
–EN 55024
und mit folgendem Siegel gekennzeichnet ist:
NEC Display Solutions, Ltd.
4-13-23, Shibaura,
Minato-Ku
Tokyo 108-0023, Japan
Deutsch
Windows ist eine eingetragene Marke der Microsoft Corporation. NEC ist eine eingetragene Marke der NEC Corporation. ENERGY STAR ist eine eingetragene Marke in den USA.
OmniColor ist eine eingetragene Marke der NEC Display Solutions Europe GmbH in den Ländern der EU und der Schweiz. ErgoDesign ist eine eingetragene Marke der NEC Display Solutions, Ltd. in Österreich, Benelux, Dänemark, Frankreich, Deutschland, Italien, Norwegen, Spanien, Schweden und Großbritannien.
NaViSet ist eine Marke der NEC Display Solutions Europe GmbH in den Ländern der EU und der Schweiz.
MultiSync ist eine eingetragene Marke der NEC Display Solutions, Ltd. in Großbritannien, Italien, Österreich, den Niederlanden, der Schweiz, Schweden, Spanien, Dänemark, Deutschland, Norwegen und Finnland.
Alle anderen Marken, Namen und Produkte sind Marken oder eingetragene Marken der jeweiligen Eigentümer.
NEC Display Solutions of America, Inc. hat als ENERGY STAR®-Partner festgestellt, dass dieses Gerät die ENERGY STAR-Richtlinien für Energieeffizienz erfüllt. Das ENERGY STAR-Emblem stellt keine EPA-Anerkennung eines Produkts oder einer Dienstleistung dar.
Deutsch-1
03_German |
1 |
07/05/2005, 10:47 |
Inhalt der Verpackung
Der Karton* mit Ihrem neuen NEC MultiSync LCD-Monitor sollte folgende Komponenten enthalten:
•Monitor MultiSync LCD mit neig-, schwenkund höhenverstellbarem Fuß
•Netzkabel
•Kabelabdeckung
•Signalkabel (Mini-D-SUB-Stecker mit 15 Stiften an beiden Seiten)
•Bedienungsanleitung
•CD-ROM (enthält die vollständige Bedienungsanleitung im PDF-Format).
Um die Bedienungsanleitung anzeigen und drucken zu können, muss auf dem Computer Acrobat Reader 4.0 oder eine neuere Version installiert sein.
Netzkabel
Kabelabdeckung
Bedienungsanleitung |
Mini-D-SUB-Stecker mit |
CD-ROM |
|
15 Stiften an beiden Seiten |
|
HINWEIS: Dieser Monitor kann mit optionalen Lautsprechern ausgestattet werden: „MultiSync Soundbar“. Weitere Informationen erhalten Sie bei Ihrem Händler oder auf unserer Website unter http://www.nec-display-solutions.com
*Bewahren Sie den Originalkarton und das Verpackungsmaterial für spätere Transporte des Monitors auf.
Deutsch-2
03_German |
2 |
07/05/2005, 10:47 |
 Loading...