


Doc. No. 10645
ISSUE 1.1
DT310/DT330/DT710/DT730
USER GUIDE
NEC Australia Pty Ltd
October 2008


LIABILITY DISCLAIMER
NEC shall not be liable for any direct, indirect, consequential
or incidental damages about the use of this equipment,
manual or any related materials.
The information in this technical manual is advisory in nature
and is subject to change. NEC may make improvements and
changes in the products described in this manual without
notice.
Changes is periodically made to the information in the new
editions. Efforts have been made to ensure that the contents
of this manual are correct. Should you find any error, NEC
welcomes your comments to improve our communications.
Please contact NEC on 1800 036 136.
Contents of this manual are sub ject to change without prior
notice at the discretion of NEC Australia Pty Ltd.
This document has been prepared for the use of employees
and customers of NEC Australia Pty Ltd and may not be
reproduced without prior written approval of NEC Australia
Pty Ltd.
Copyright © 2008
NEC Australia Pty Ltd
633 – 647 Springvale Road
Mulgrave Vic 3170


TABLE OF CONTENTS
1.INTRODUCTION
General................................................................................................. 1
Face Layout.......................................................................................... 2
Keys And Parts..................................................................................... 5
Icon Display.......................................................................................... 15
Menu List.............................................................................................. 16
Simple Operation by Menu Key and Cursor Key.................................. 16
2.TERMINAL SETUP
Terminal Setup With the Up/Down Key................................................ 17
Terminal Setup With the Feature Key................................................... 17
3.BASIC OPERATION
Login (DT700 Series Only)................................................................... 19
Logout (DT700 Series Only)................................................................. 19
To Originate an Outside Call ................................................................ 20
To Originate an Internal Call................................................................. 20
Multiline Appearance............................................................................ 20
To Place Call on Hold........................................................................... 21
To Place a Call on Exclusive Hold........................................................ 21
To Transfer a Call................................................................................. 22
i

TABLE OF CONTENTS
4.FEATURE OPERATION
Speed Numbers Storage and Access To Store Numbers using
(One-touch Speed Keys).................................................................. 23
To Store Numbers & Enter Name using STA (Station) Soft Keys........ 23
To Store Numbers & Enter Name using Menu Button.......................... 24
Account Code....................................................................................... 25
Forced Account Code........................................................................... 25
Authorization Code............................................................................... 26
Voice First/Tone First............................................................................ 26
Originating a Voice Call........................................................................ 26
Answer a Voice Call Hands Free.......................................................... 26
Automatic Intercom............................................................................... 27
Manual Intercom................................................................................... 27
Dial Intercom......................................................................................... 28
Conference........................................................................................... 28
To Establish a Broker Call.................................................................... 28
Call Back (Station)................................................................................ 28
To Answer a Camped-On Call.............................................................. 29
To Set a Camp-On (Transfer Method).................................................. 29
Camp-On (Call Waiting Method)........................................................... 29
Call Park (System)................................................................................ 30
Call Pickup (Group) .............................................................................. 30
Call Pickup (Direct)............................................................................... 31
Outside Line Queuing (From Extension Dial Tone).............................. 31
Timed Queuing (Outside Line Only)..................................................... 31
Executive Override ............................................................................... 31
Last Number Redial.............................................................................. 32
Call Forwarding - All Calls .................................................................... 32
Call Forwarding - Busy ......................................................................... 33
ii

TABLE OF CONTENTS
Call Forwarding - No Answer................................................................ 33
Call Forwarding Destination.................................................................. 34
To Save and Repeat a Number............................................................ 34
Internal Zone Paging with Meet-Me Page ............................................ 34
Boss/Secretary Calling ......................................................................... 35
Boss/Secretary Override....................................................................... 36
Do Not Disturb...................................................................................... 36
Return Message Schedule ................................................................... 37
Name Display (Administrator)............................................................... 38
Whisper Page....................................................................................... 39
System Clock Setup By Station Dialing (Administrator) ....................... 39
Day/Night Mode Change By Station Dialing (Administrator) ................ 39
To Change Security Password (DT700 only) ....................................... 40
Directory Operation............................................................................... 41
History Operation.................................................................................. 42
Quick Reference Guide ........................................................................ 43
iii

TABLE OF CONTENTS
This Page Intentionally Left Blank
iv
1.
1.INTRODUCTION
1
4
5
6
7
8
0
#
*
9
2
3
H
O
LD
Recall
Feature
Mic
Menu
Answer
Tra
nsfer
Spe
aker
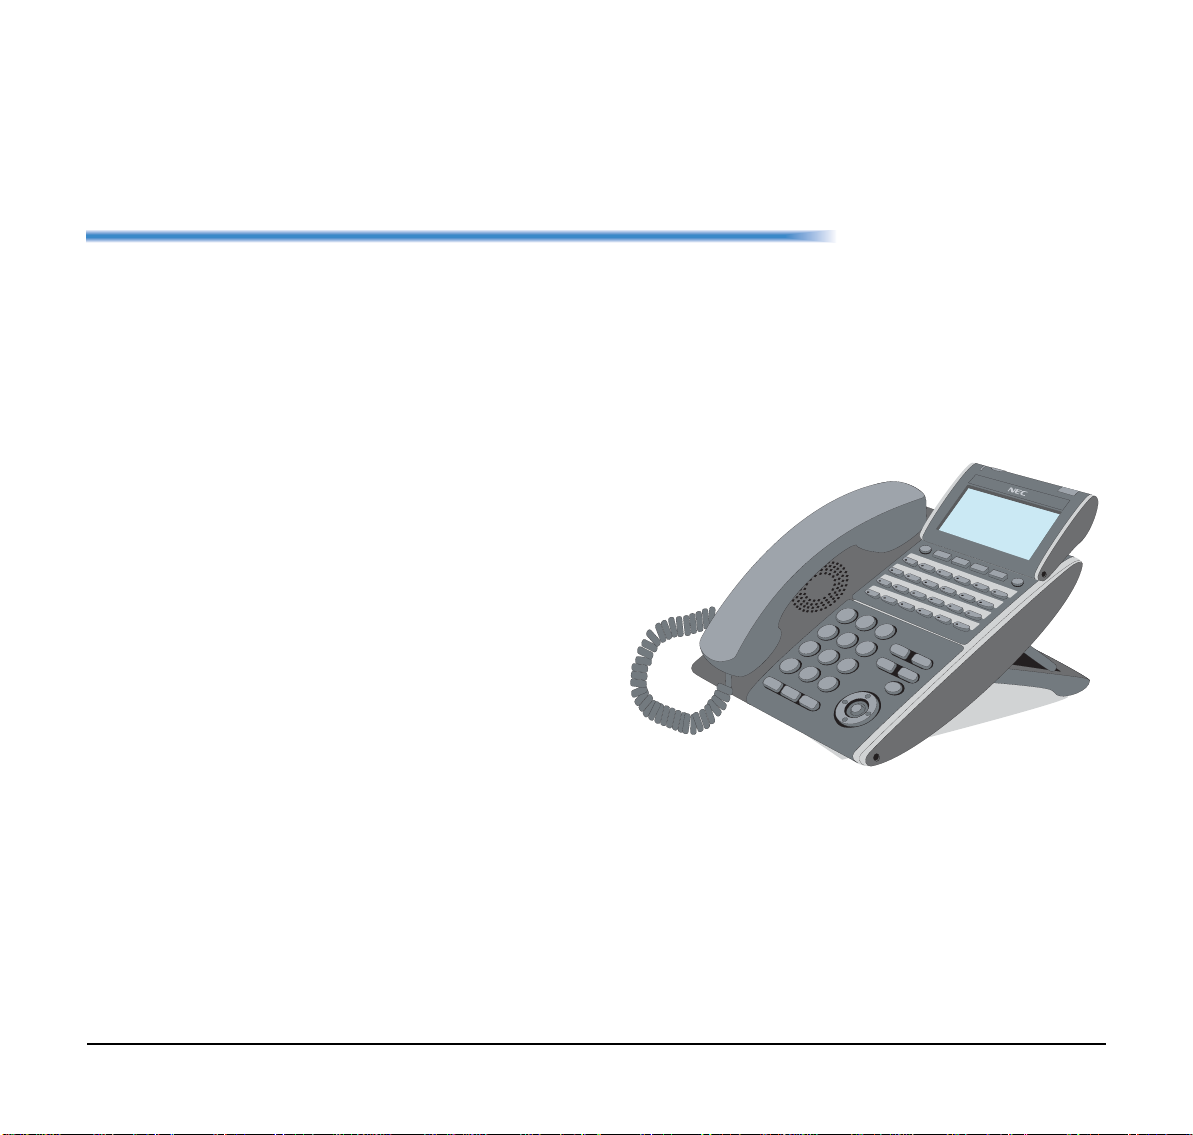
DT330/DT730
General
This guide explains how to operate DT Series (DT310/
DT710/DT330/DT730) under the following headings.
CHAPTER 1 INTRODUCTION
Explains the configuration of this guide and
contains the following information.
• Face layout of DT Series
• Keys and Parts of DT Series
• Icon Display
• Menu List
CHAPTER 2 TERMINAL SETUP
Explains the operating procedures for terminal
settings of the DT Series.
CHAPTER 3 BASIC OPERATION
Explains the basic operation of DT Series.
CHAPTER 4 FEAT URE OPERATION
Explains operating procedures for various
Telephony Server features.
1
1.
Face Layout
1
2
ABC3DEF
4
GHI5JKL6MNO
7
PQRS
8
TUV
9
WXYZ
0
#
HOLD
Transfer
Speaker
Recall
Feautre
Redial
Conf
Directory
Mic
Message
Answer
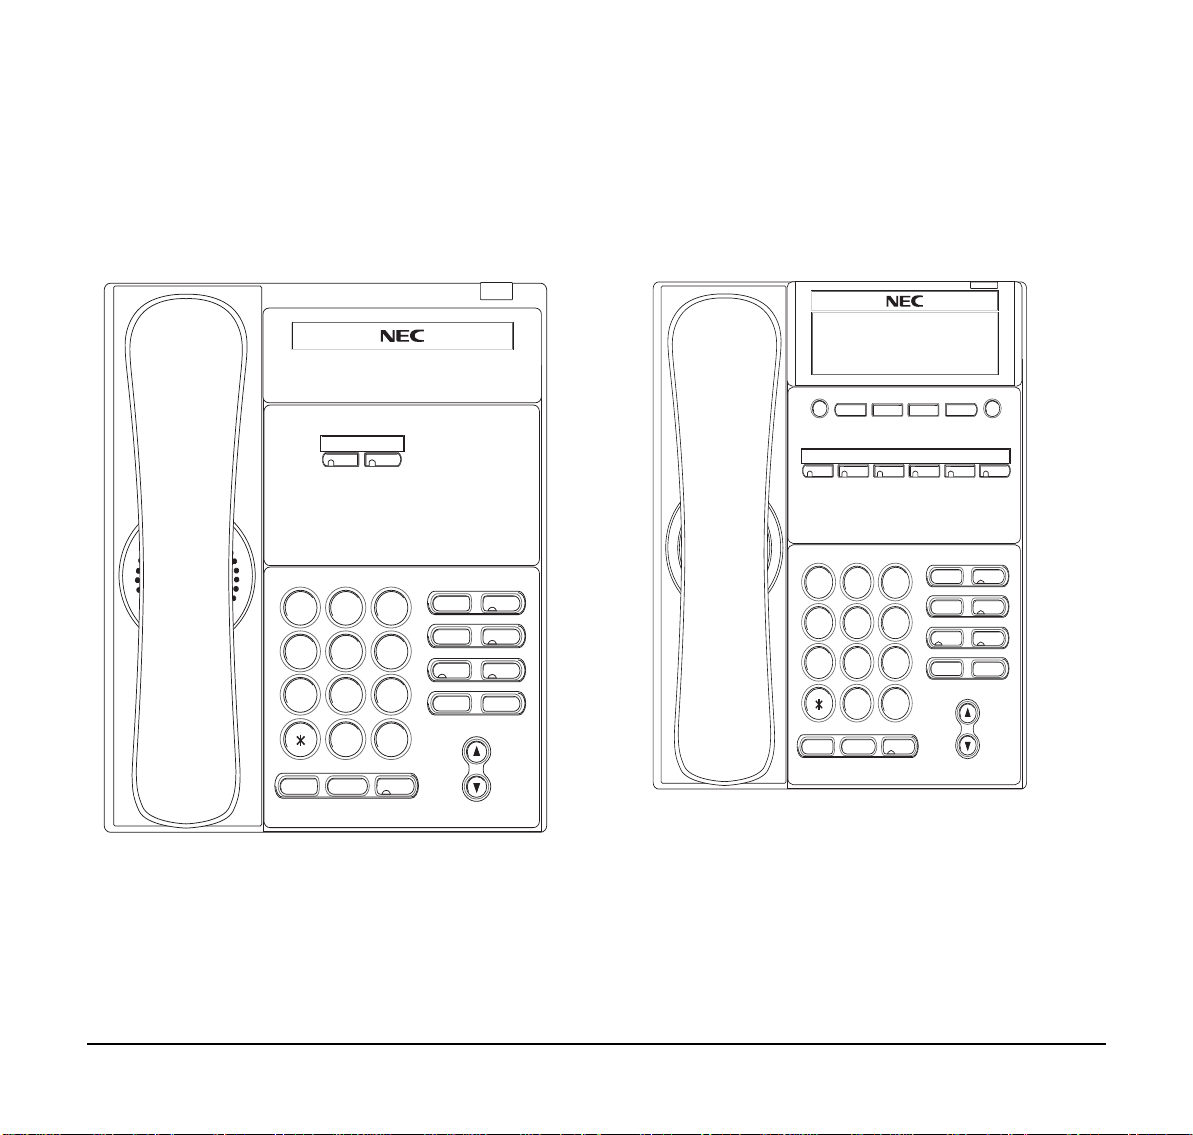
DT310/710 (2-button without LCD)
DT310/710 (6-Button with LCD)
Exit Help
Feautre
9
WXYZ
#
Speaker
Recall
Redial
Answer
Directory
Conf
Mic
Message
2
1
ABC 3 DEF
4
GHI 5 JKL 6 MNO
7
8
TUV
PQRS
0
Transfer
HOLD
2
1.
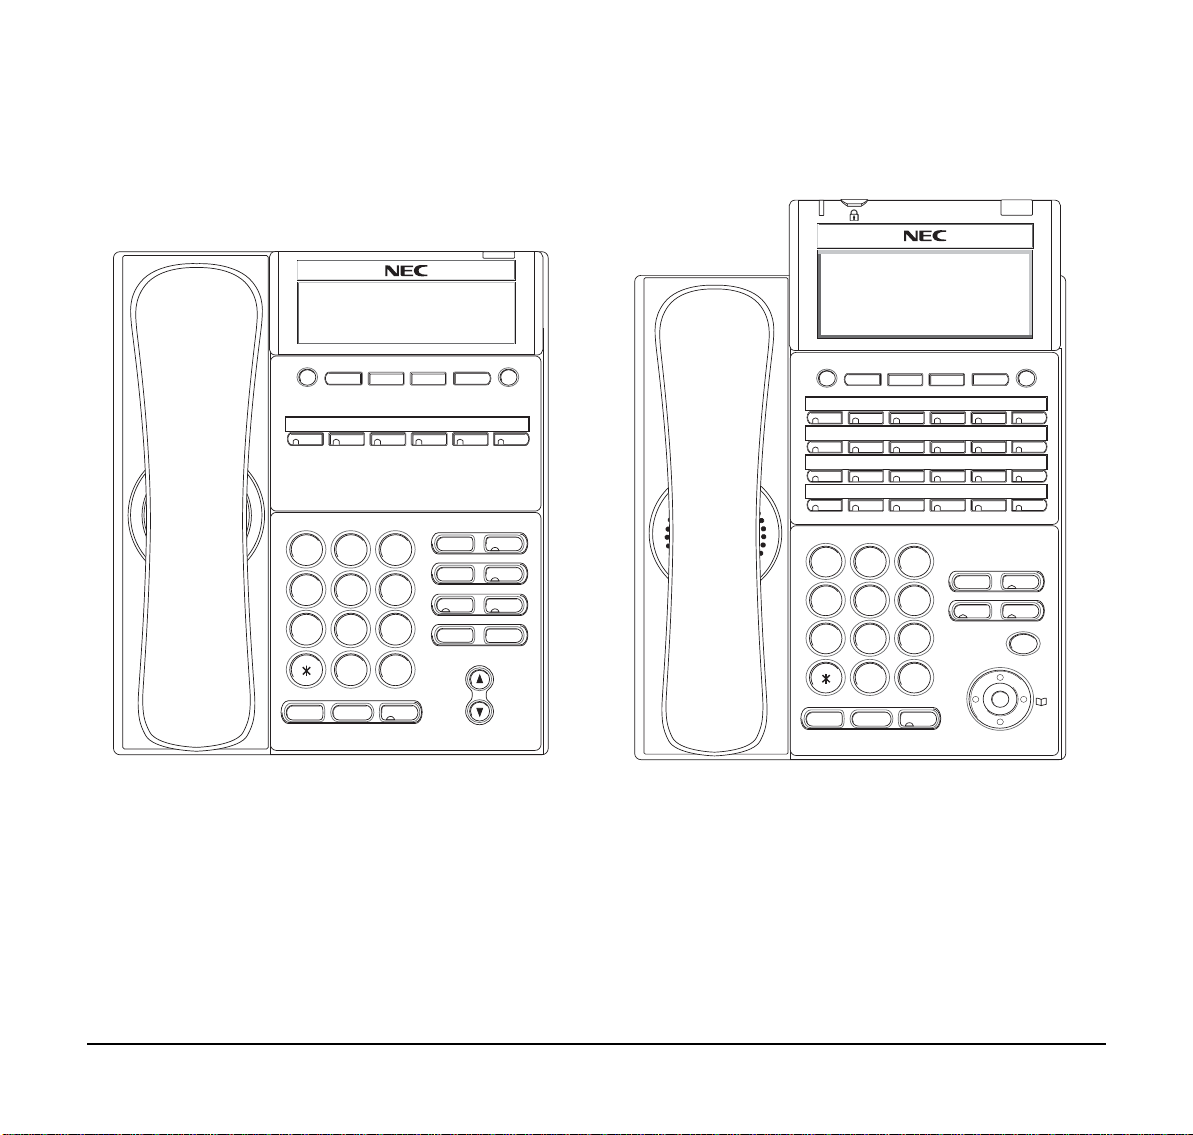
DT310 (6-Button with LCD)
1
2
ABC 3 DEF
4
GHI 5 JKL 6 MNO
7
PQRS
8
TUV
9
WXYZ
0
#
HOLD
Transfer
Speaker
Exit Help
Recall
Feautre
Redial
Conf
Directory
Mic
Message
Answer
1
2
ABC 3 DEF
4
GHI 5 JKL 6 MNO
7
PQRS
8
TUV
9
WXYZ
0
#
Menu
HOLD
Transfer
Speaker
Recall
Feautre
Answer
Mic
Exit Help
Redial
DT330/DT730 (24-Button with LCD)
Note: Security button is equipped on DT730 only.
Note: Security button is equipped on DT 73 0 only.
3
1.
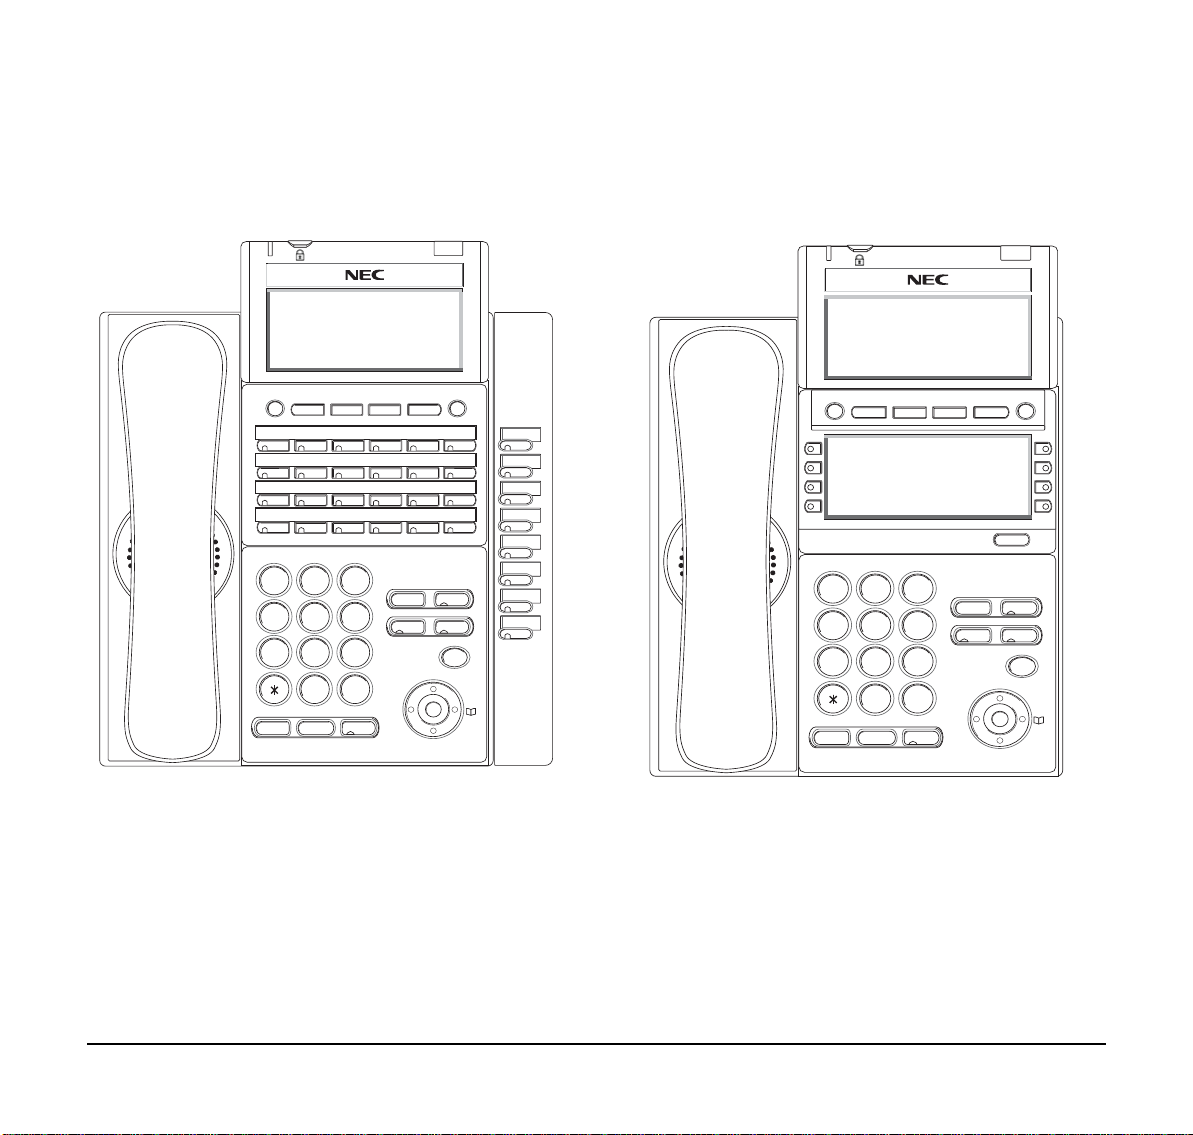
DT330/DT730 (32-Button with LCD)
1
2
ABC 3 DEF
4
GHI 5 JKL 6 MNO
7
PQRS
8
TUV
9
WXYZ
0
#
Menu
HOLD
Transfer
Speaker
Recall
Feautre
Answer
Mic
Exit Help
Redial
1
2
ABC 3 DEF
4
GHI 5 JKL 6 MNO
7
PQRS
8
TUV
9
WXYZ
0
#
Menu
HOLD
Transfer
Speaker
Recall
Feautre
Answer
Mic
Scroll
Exit Help
Redial
DT330/DT730 (DESI Less 8-Button)
Note: Security button is equipped on DT730 only.
Note: Security button is equipped on DT 73 0 only.
4
1.
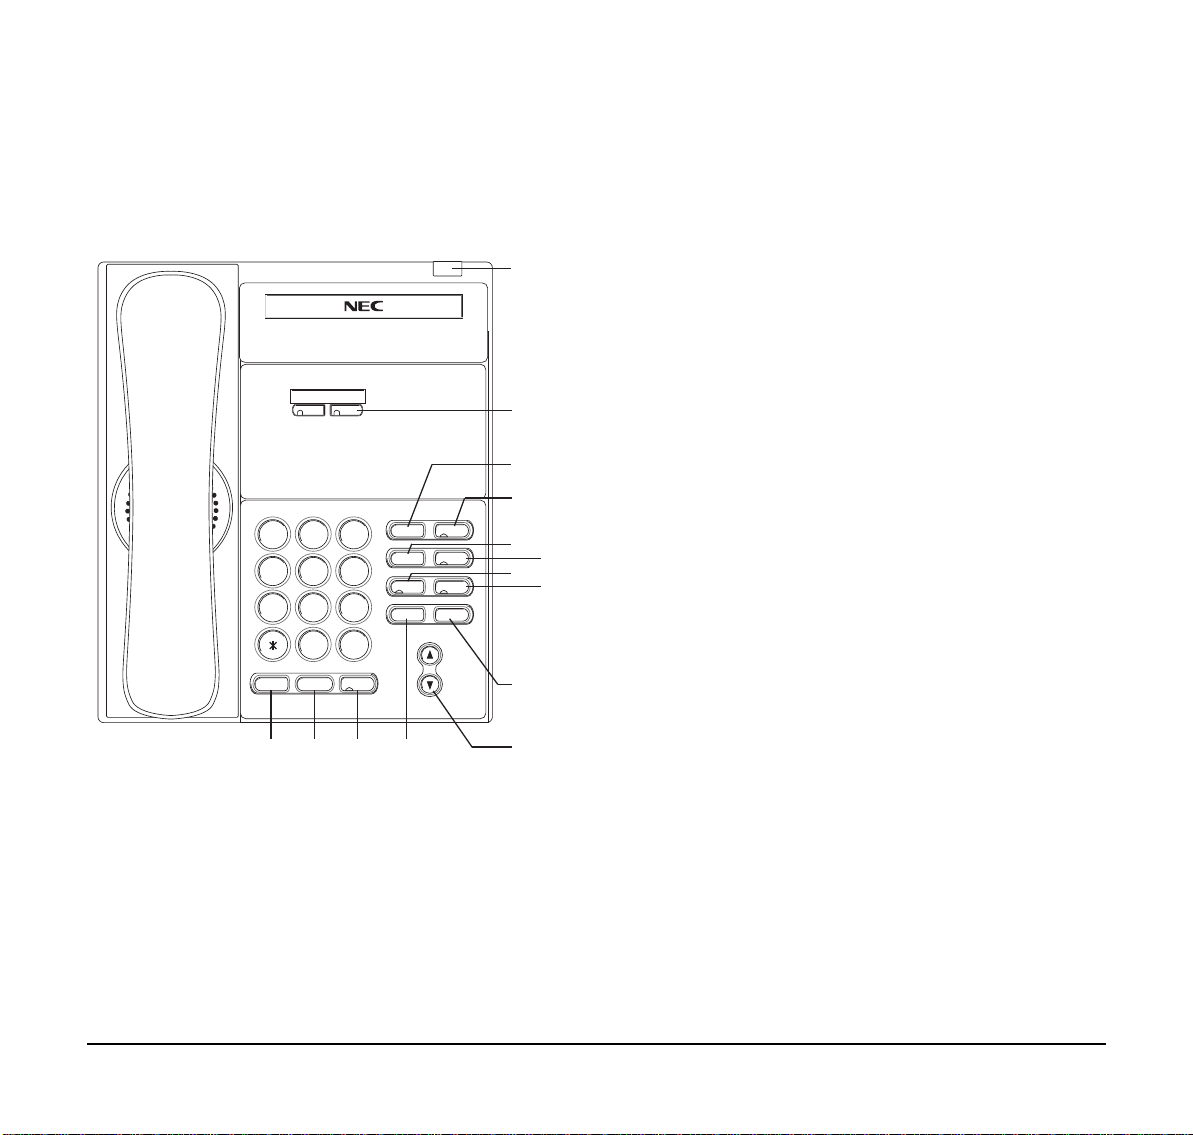
Keys And Parts
1
2
ABC3DEF
4
GHI5JKL6MNO
7
PQRS
8
TUV
9
WXYZ
0
#
HOLD
Transfer
Speaker
Recall
Feautre
Redial
Conf
Directory
Mic
Message
Answer
(3)
(2)
(1)
(4)
(5)
(8)
(6)
(7)
(9)
(10)
(14) (13) (12) (11)
DT310/DT710
(2-Button without LCD)
When the Telephony Server Administrator sets
“One-Touch Speed Dial key” on the programmab le
keys, users can assign any numbers (ex.
Telephone number, etc.) to the key (up to 24
digits).
* For the assignment of the keys, confirm with the
Telephony Server Administrator.
(3) Recall
Press key to finish the call and hear the dial tone.
(4) Feature
Used to activate any features as terminal setup
functions, etc. and to program One-Touch Speed
Dial Keys.
(5) Redial
(Last Number Call, Speed Calling-Station/Group)
Press key to activate redial feature.
(6) Conf
Press key to establish a three-way conversation.
LED on key lights when key is active.
(1) Call Indicator Lamp
Lamp at top corner of DT Series Display flashes
when a call terminates to the terminal. Lamp lights
steadily when a message has been left.
(2) Programmable Keys
These keys can be programmed as Flexible Line
key/Programmable Feature Key by the Telephony
Server Administrator.
(7) Answer
When LED on this key is lit, press key to answer a
waiting call.
(8) Mic
Press key to respond hands free. LED on this key
lights during speakerphone operation.
5

1.
(9) Message
Press key to access the voice mail system.
(10) Up/Down
(
DOWN UP)
Used to adjust speaker/receiver volume , an d
ringer volume.
• Speaker/Receiver Volu me:
Press ( ) or ( ) key during conversation.
• Ringer Volume:
Press ( ) or ( ) key during ringing.
(11) Directory
Press key to activate speed calling - system
feature. (PROGRAMMABLE)
(12) Speaker
Controls the built-in speaker which can be used for
Hands Free dialing/monitoring.
LED on key lights when key is active.
(13) Transfer
Allows the station user to transfer established calls
to another station, without attendant assistance.
(14) Hold
Press this key to place an internal or external call
on hold.
6
1.
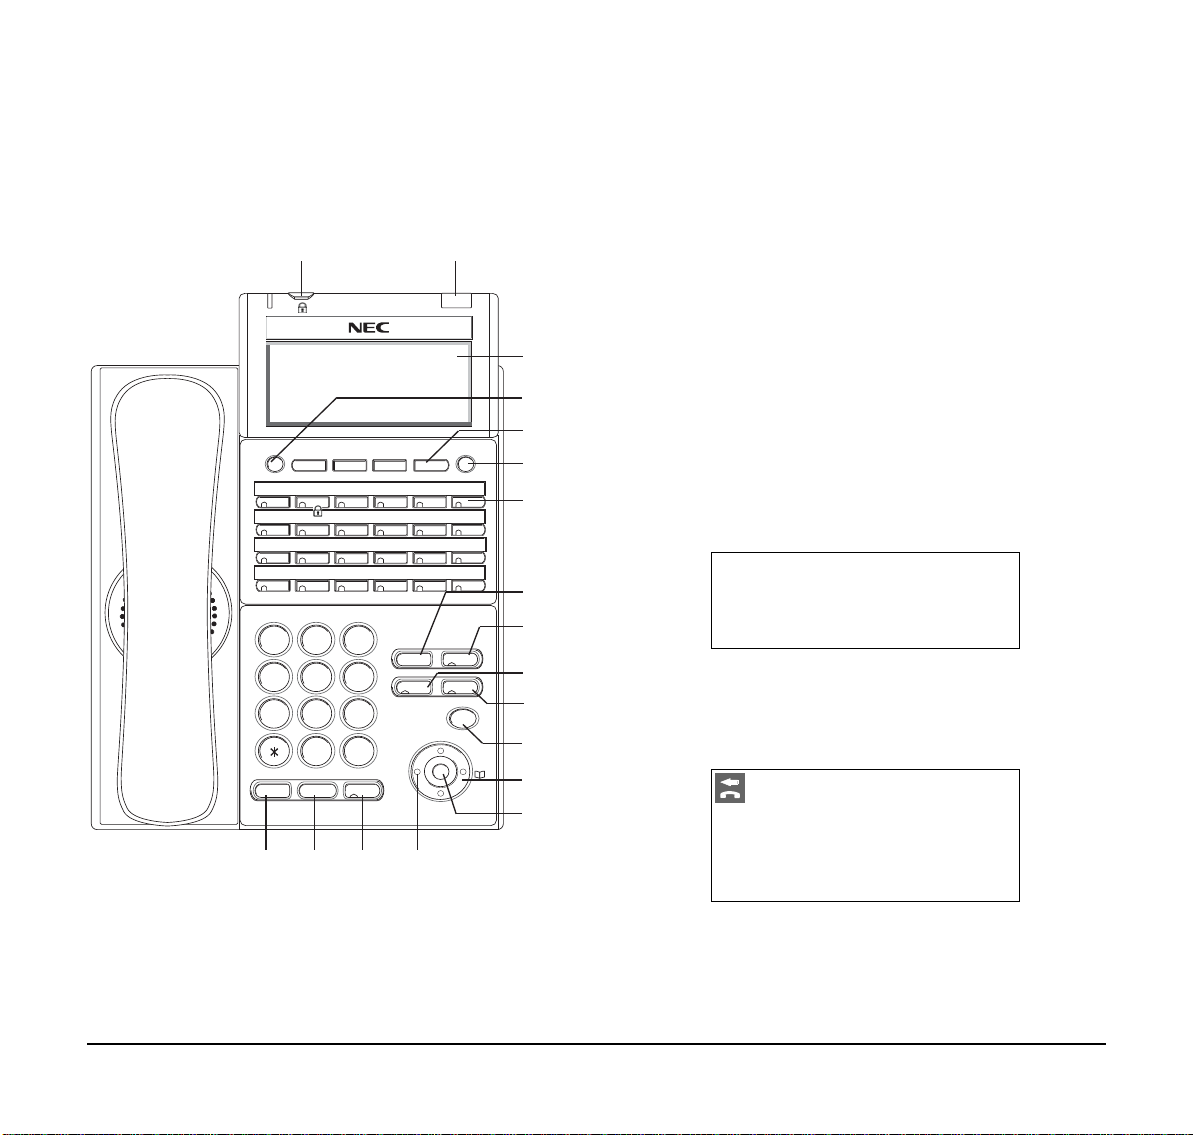
DT330/DT730
1
2
ABC 3 DEF
4
GHI 5 JKL 6 MNO
7
PQRS
8
TUV
9
WXYZ
0
#
Menu
HOLD
Transfer
Speaker
Recall
Feautre
Answer
Mic
Exit Help
Redial
(1) (2)
(3)
(4)
(6)
(5)
(7)
(8)
(9)
(10)
(11)
(12)
(14)
(13)
(18) (17) (16) (15)
15:39 AM MON 18 JUL 2007
MIC >>>VOICE
15:39 AM MON 18 JUL 2007
MIC >>>VOICE
(24-button with LCD)
(1) Security Button (DT730 only)
The user can lock the terminal preventing
unauthorized use.
(2) Call Indicator Lamp
Lamp at top corner of DT Series Display flashes
when a call terminates to the terminal. Lamp lights
steadily when a message has been left.
(3) LCD (Note 1)
LCD (Liquid Crystal Display) provides DT Series
activity information plus date, time and Soft Key
Operation.
The LCD on DT310/DT710 has 24-character,
3-line capability.
The LCD on DT330/DT730 has 24-character,
4-line capability . Top line is used exclusively for the
status icons.
(4) Exit
The user can exit from the Help key mode by
pressing this key.
7

1.
(5) Soft Keys
- Enter Key
- Shortcut Key
- 4-way Scroll DOWN key
- 4-way Scroll RIGHT key
- Directory key
- 4-way Scroll UP key
- 4-way Scroll LEFT key
- Redial key
- Volume (UP) key
- Volume (DOWN) key
Any feature shown at the bottom of the LCD is
available. The appropriate feature key is displayed
on the screen according to the call handling
process.
(6) Help
Explanations of the Soft Keys can be called up on
the LCD by pressing this key.
(11) Mic
Press key to respond hands free. LED on this key
lights during speakerphone operation.
(12) Menu
From this key , the user can access to the functions
not normally used (such as terminal settings,
downloads and access to XML applications)
easily.
(7) Programmable Keys
These keys can be programmed as Flexible Line
key/Programmable Feature Key by Telephony
Server Administrator.
When the Telephony Server Administrator sets
“One-T ouch S peed Dial key” on the programmable
keys, users can assign any numbers (ex.
Telephone number, etc.) to the key (up to 24
digits).
* For the assignment of the keys, confirm with the
Telephony Server Administrator.
(8) Recall
Press key to finish the call and hear the dial tone.
(9) Feature
Used to activate any features as terminal setup
functions, etc. and to program One- Touch Spe e d
Dial Keys.
(10)Answer
When LED on this key is lit, press key to answer a
waiting call.
(13) Cursor
By using this Key, DT Series user can access to
various features with simple operation.
Two lines of menu items can be displayed at a
time. Use "Up" or "Down" key to scroll to the item.
8
1.
Note: DT310/710 (2-Button without LCD does not
have the Cursor Key).
(14)Enter
DT330/DT730 Series has Shortcut Menu for
frequently-used features. The user can access to
Shortcut Menu by pressing Enter Key.
Note:
DT310/710 Series does not support the
Shortcut Menu.
Shortcut Menu includes the following features:
.
Feature Description
1. Missed Call Access to history of Missed Call.
2. Voice Mail Access to history of incoming Voice Mail.
3. IM Future.
4. Presence Future.
5. Bluetooth Future.
(15)Redial
(Last Number Call, Speed Calling-Station/Group)
Press key to activate redial feature. Press redial
and scroll back through numbers that have been
dialed.
When the desired number is displayed,
press the # key to activate dialing.
(16)Speaker
Controls the built-in speaker which can be used for
Hands Free dialing/monitoring.
LED on key lights when key is active.
(17)Transfer
Allows the station user to transfer established calls
to another station, without attendant assistance.
(18)Hold
Press this key to place an internal or external call
on hold.
9

1.
DT330/DT730
1
2
ABC 3 DEF
4
GHI 5 JKL 6 MNO
7
PQRS
8
TUV
9
WXYZ
0
#
Menu
HOLD
Transfer
Speaker
Recall
Feautre
Answer
Mic
(1)
(3)
(4)
(6)
(5)
(7)
(8)
(9)
(10)
(11)
(12)
(13)
(14)
(20) (19) (18)
(2)
Scroll
Exit Help
Redial
(16)
(15)
(17)
15:39 AM MON 18 JUL 2007
MIC >>>VOICE
15:39 AM MON 18 JUL 2007
MIC >>>VOICE
(DESI Less 8-Button with LCD)
(1) Security Button (DT730 only)
The user can lock the terminal preventing
unauthorized use.
(2) Call Indicator Lamp
Lamp at top corner of DT Series Display flashes
when a call terminates to the terminal. Lamp lights
steadily when a message has been left.
(3) LCD
LCD (Liquid Crystal Display) provides DT Series
activity information plus date, time and Soft Key
Operation.
The LCD on DT310/DT710 has 24-character,
3-line capability.
10
The LCD on DT330 has 24-character, 4-line
capability. Top line is used exclusively for the
status icons.
(4) Exit
The user can exit from the Help key mode by
pressing this key.

1.
(5) Soft Keys
Scroll
1
2
3
4
Ben
Rachel Julia
Paul
James
Hannah
FDA
FDN
(a) (b) (C) (b) (a)
Page Switching Key
Any feature shown at the bottom of the LCD is
available. The appropriate feature key is displayed
on the screen according to the call handling
process.
(6) Help
Explanations of the Soft Keys can be called up on
the LCD by pressing this key.
(7) 8LD Display
* Maximum 8 characters can be displayed.
** For the assignment of the keys, confirm with the
Telephony Server Administrator.
(a) Icon
Status of the Line key such as Call termination,
Call Hold or Busy, and setting on the Feature key
are shown as Icons.
User’s Status Icon
•Idle
Flashing
Pattern
32 (8 keys x 4 pages) additional programmable
keys are provided. They can be programmed as
Flexible Line/Programmable feature key by the
Telephony Server Administrator, similar to e xisting
programmable keys. When the Telephony Server
Administrator sets “One-Touch S peed Dial ke y” on
the programmable keys, users can assign any
numbers (ex. Telephone number, etc.) to the key
(up to 8 digits).
• Call Hold (Individual Hold on
Call Park Group)
• Exclusive Call Hold
• Recall (Individual Hold/Exclusive Call Hold/Call Transfer/
• Individual Hold on Call Park
Group)
• During Conversation (Individual
Use)
• Call Transfer
• Conference
Blink
Note
Blink
Note
11

1.
1
2
3
4
Scroll
Scroll
1
2
3
4
Ben
Rachel Julia
Paul
012345
Hannah
FDA
FDN
Feature Key 1
Feature Key 2
Feature Key 3
Feature Key 4
Feature Key 1
Feature Key 2
Feature Key 3
Feature Key 4
Feature Key 1
Feature Key 2
Feature Key 3
Feature Key 4
Feature Key 1
Feature Key 2
Feature Key 3
Feature Key 4
Flashing
1
2
3
4
Michael
Peter
Julia
James
Powell
Incoming Call
Press twice.
Press Feature Key 2 on Page 3
to answer incoming call.
Switch Page
Page 1
Page 3
(b) Feature Key Information
Feature Key Information displays the following s.
Maximum
Key Description
digits to be
displayed
Line Key
- Name and Number information
Up to 8 digits.
Feature Key - Feature Name Up to 8 digits.
One-Touch
Speed Dial Key
- Speed Dial Name Information
- Number Information
Up to 6 digits.
(c) Page Icon
8LD display has four pages (8 Programmable
Feature keys per page). Page Icon Key indicates
currently displayed page. The user can switch the
Feature Key display from page 1 to 4 by using the
Page Switching Key.
Black background indicates
currently displayed page.
Flashing indicates page with
event happening.
Note 1:
Feature Key 1-8
Feature Key 9-16
Feature Key 17-24
Feature Key 17-24
The icon flashes during events such as call
termination to a line key or call back.
Example:
(8) Programmable Keys
These keys can be programmed as Flexible Line
key/Programmable Feature Key by Telephony
Server Administrator.
When T elephony Server Administrator sets “Speed
Dial key” on the programmable keys, users can
assign any numbers (ex. Telephone number, etc.)
to the key (up to 24 digits).
* For the assignment of the keys, confirm to the
Telephony Server Administrator.
(9) Scroll Key
This key is used to turn over the page of 8LD
display.
(10)Recall
Press key to finish the call and hear the dial tone.
12

1.
(11)Feature
- Enter Key
- Shortcut Key
- 4-way Scroll DOWN key
- 4-way Scroll RIGHT key
- Directory key
- 4-way Scroll UP key
- 4-way Scroll LEFT key
- Redial key
- Volume (UP) key
- Volume (DOWN) key
Used to activate any features as terminal setup
functions, etc. and to program Speed Dial Keys.
(12)Answer
When LED on this key is lit, press key to answer a
waiting call.
(13) Mic
Press key to respond hands free. LED on this key
lights during speakerphone operation.
(14) Menu
From this key, the user can access the functions
not normally used easily.
(15) Cursor
By using this Key, DT Series user can access to
various features with simple operation.
For DT330 Series, two lines of menu items can be
displayed at a time. For DT730 Series, three lines
of menu items can be displayed at a time. The
following figure show the menu screen for DT 730
Series. Use "Up" or "Down" key to scroll the item.
Note:
DT310/710 (2-Button without LCD) does not
have the Cursor Key.
(16)Enter
DT330/DT730 Series has Shortcut Menu for
frequently-used features. The user can access to
Shortcut Menu by pressing Enter Key.
Note:
DT310/710 Series does not support the
ShortcutMenu.
(17)Redial
(Last Number Call, Speed Calling-Station/Group)
Press key to activate redial feature. Press redial
and scroll back through numbers that have been
dialed.
When the desired number is displayed,
press the # key to activate dialing.
13

1.
Shortcut Menu includes the following features.
Feature Description
1. Missed Call Access to history of Missed Call.
2. Voice Mail Access to history of incoming Voice Mail.
3. IM Future.
4. Presence Future.
5. Backlight Access to screen for LCD backlight settings.
6. Bluetooth Future.
(18)Speaker
Controls the built-in speaker which can be used for
Hands Free dialing/monitoring.
LED on key lights when key is active.
(19)Transfer
Allows the station user to transfer established calls
to another station, without attendant assistance.
(20)Hold
Press this key to place an internal or external call
on hold.
14

1.
Icon Display
The LCD of DT730 Series displays Desktop Icons
which provide notification when events (such as missed
call and voice mail) occur.
Note:
DT310/DT330/DT710 Series does not support
the icon display.
Icon Display
Feature Icon Description
This icon appears when there is a
Missed Call
Instant
Message
(Note1)
Presence
(Note1)
missed call. Once the user has
checked the missed call, this icon
will disappear.
This icon appears when the terminal
receives a new instant message.
Once the user has checked the
message, this icon will disappear.
This icon indicates the terminal’s
presence status.
4:26 PM TUE 13 APR 2007
MIC DND
>>>
Encryption
(Note1)
Bluetooth
(Note1)
This icon appears when using RTP
Encryption feature.
This icon appears when any
peripheral equipment is connected
via Bluetooth.
Note 1: Currently unavailable.
15

1.
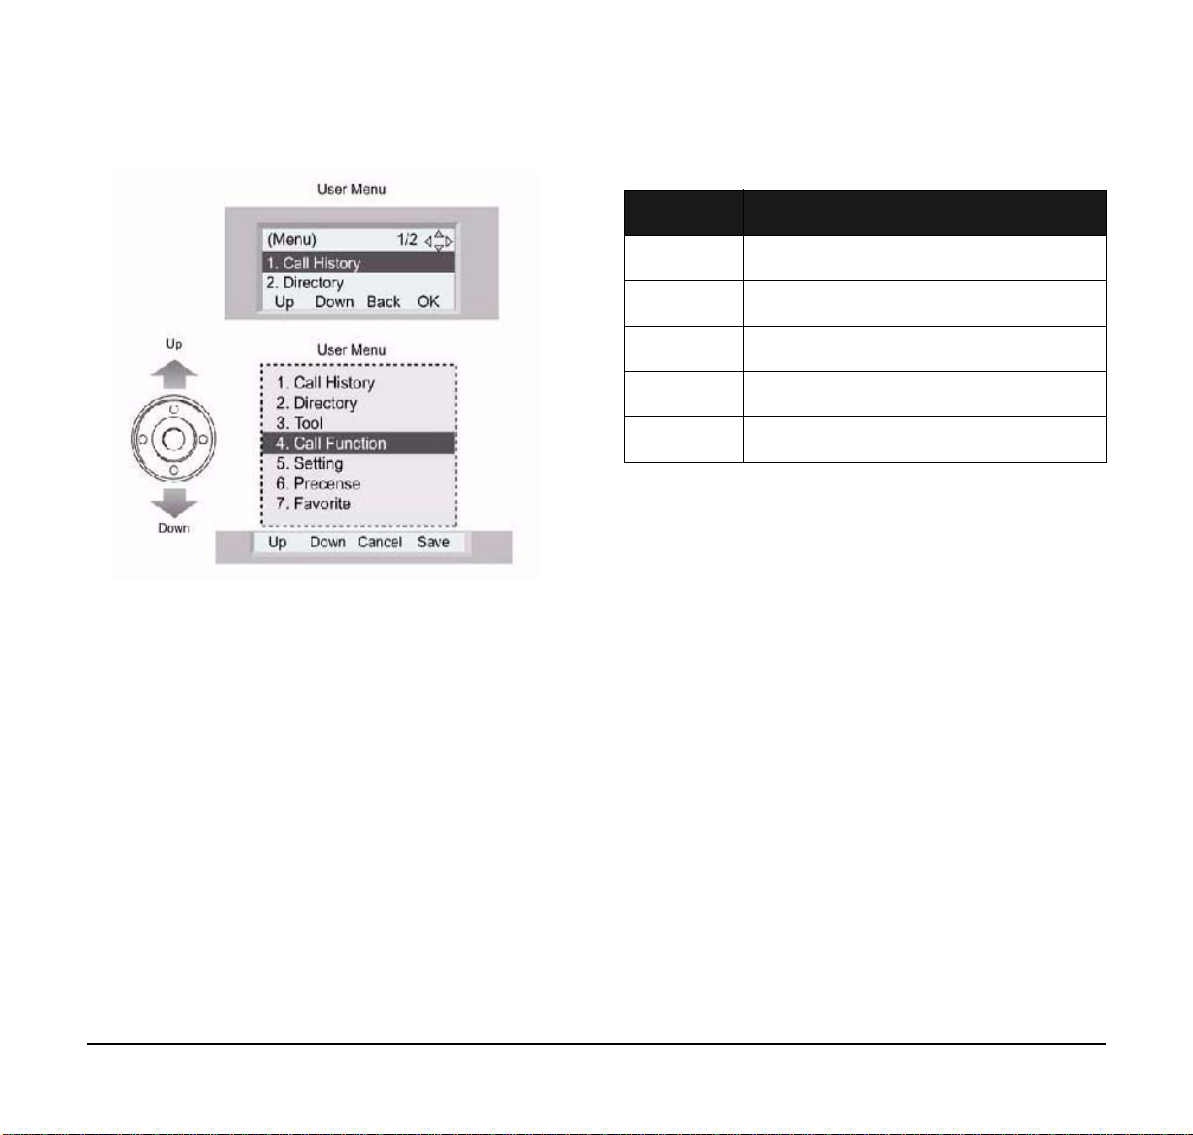
Menu List
Menu
From the Menu List, the user can use various
application features such as Directory and Call History.
To Display Menu List
Press Key. The Menu List is displayed in
LCD. Use Cursor Key to select desired Menu Item.
N
Menu Item Description
o.
Simple Operation by Menu Key and
Cursor Key
By using Menu Key and Cursor Key, DT Series user
can have access to Call History, Directory and terminal
settings with simple operation.
As an example, the following shows the operations how
to access to Directory menu.
Press Menu key
1 Call History To view Call History.
2 Directory To use Directory function.
- Uses when accessing external XML
server. For details, please contact the
3Tool
system administrator.
- Uses when sending/receiving Instant
Message. (Note1)
4 Call Function Currently Not Used (grayed out).
To set up the terminal such as ringing
5 Setting
volume control, LCD display setting and
download of Music on Hold.
6 Presence Currently Not Used (grayed out).
By registering frequently-used
# Favorite
features as favorite, the user can
access these features with simple
operation.
Terminal
0
Config
Note 1:
Operation for Instant Message (IM) is
This item is used for Configuration
setting of DT Series.
currently unavailable.
Note: Unavailable Menu items are grayed out.
9
WXYZ
#
Speaker
GHI
Redial
Answer
Mic
Menu
[Menu]
1 Hisotry
2 Directory
3 Tool
Up Down Back OK
[Directory]
1 Personal
2 System
Up Down Back OK
Press Directory key
16

2. TERMINAL SETUP
HANDSET
SPEAKER
RING
LCD
This chapter describes operating procedures for
terminal settings by the UP/DOWN Key and Feature
Keys.
Various terminal settings such as display, sounds,
password, and language are also available from Menu
Key.
Terminal Setup With the Up/Down
Key
To Adjust Ha ndset Receiver Volume
Press the Up/Down key in the off-hook status or during
the call.
To Adjust LCD Contrast
Press the Up/Down key in the on-hook status.
Note:
Terminal Setup With the Feature
Key
Microphone On/Off
The 2-Button Handset does not have a display.
To Adjust Speaker Volume
Press the Up/Down key during speakerphone
operation or during the call.
To Adjust Ringer Tone
Press the Up/Down key during ringing.
LED on Mic key shows the status of the built-in
microphone.
To Access on the 6/24/32 Button DT310/DT330/ DT710/DT730
Either press MIC Key, or press Feature and 1 or
press Soft Key associated with MIC.
To Access on the 2 Button DT310
Either press MIC Key, or press Feature and 1.
17

To Change Handset Receiver Volume
4:26 PM TUE 13 APR 2008
4:26 PM TUE 13 APR 2008
4:26 PM TUE 13 APR 2008
RINGER TONE
4:26 PM TUE 13 APR 2004
4:26 PM TUE 13 APR 2004
Press Feature and 2. The LCD displays the current
volume status.
Press Feature and 2 to alternate between Large
and Small volume.
To Select Ringer Tone
DT Series has a selection of 10 ringer tones.
Press Feature and 3. The LCD displays the
selected tone number (n=1 ~ 14).
Press 3 each time you wish to scroll through the
next tone.
TONE No.
1
2
3
4
5
6
7
8
9
10
11
12
13
14
Frequency (Hz) Modulation (Hz)
520/660 16
520/660 8
1100/1400 16
660/760 16
Melody 1
Melody 2
Melody 3
Melody 4
Melody 5
Melody 6
Melody 7
Melody 8
Melody 9
Melody 10
To Adjust Transmission/Receiving Volume
Handset volume can be changed.
Press Feature and 4. The LCD displa ys the current
volume.
Press Feature and 4 again to alternate between
Small and Large volume.
18

3. BASIC OPERATION
Passwd
Login 2000
:
:
Cancel BK Set OK
Passwd
Login 2000
:
:
Cancel BK Set OK
*****
MIC DND >>>
15:39 AM MON 18 JUL 2007
MIC DND >>>
15:39 AM MON 18 JUL 2007
L-OUT >>>
15:39 AM MON 18 JUL 2007
Login (DT700 Series Only)
When login mode is activated, following procedure is
required.
Enter login code and press Set Soft key.
(The station number is used as the Login code.)
Enter the password and press OK Soft key.
If the login code is accepted, display changes to
normal idle status.
Logout (DT700 Series Only)
Lift handset or press Speaker.
Press the preassigned Logout Feature key or Soft
key on the terminal.
Note:
Note:
Logout button is assigned by the system administrator.
Press the Logout Feature key or Soft key on the
terminal again.
It may take a few seconds for the handset to
Logout.
19

To Originate an Outside Call
4:26 PM TUE 13 APR 2004
15:39 3DDD
Elapsed
time
Trunk
type
Trunk
number
Multiline Appearance
Lift handset or press Speaker key, receive dial
tone.
Dial the Central Office access code, e.g. 0.
Dial telephone number.
Display indicates:
To Originate an Internal Call
Lift handset or press Speaker key.
Receive dial tone.
Dial station number. Display indicates digits dialed.
To Originate a Call
Press the MULTILINE APPEARANCE feature key.
Lift handset or press Speaker. Dial the Central
Office access code (i.e. 0).
Dial the number.
To Answer a Call
Press the MULTILINE APPEARANCE feature key
(ringing and flashing LED alert user to incoming
call).
Lift handset or press Speaker.
Speak with incoming party.
20

To Place Call on Hold
Held station
number
4:26 PM TUE 13 APR 2004
HOLD 2001
Held station
number
4:26 PM TUE 13 APR 2004
E_HOLD 2001
To Place a Call on Exclusive Hold
Press Hold. Held line wink flashes.
Note:
If held line appears on other DT Series
stations, the associated LED flashes red
slowly.
To Retrieve
Lift handset or press Speaker key.
Press held line. Use handset to converse.
Note:
Any station with this line appearance can
retrieve the call.
If unanswered
After preprogrammed time, Automatic Recall is
initiated.
Visual and audible signal (rapid flash and ring
burst) is sent to station that placed call on hold.
Note:
Hold shows as a flashing green LED on your
phone. The same line on other phones shows
as a flashing red LED. Recall shows as a
flashing green LED on your phone and
flashing red LED on other phones with the
same line.
Press Hold twice. Line appearance indicates
interrupted wink.
Note:
If held line appears on other DT Series
stations, LED remains steadily lit red.
To Retrieve
Lift handset or press Speaker.
Press held line. Use handset to converse.
Note:
Only the DT Series that set Exclusive Hold
option can retrieve the call.
If unanswered
After preprogrammed time, Automatic Recall is
initiated.
Visual and audible signal (rapid flash and ring
burst) is sent to station which placed call on
Exclusive Hold. Recall shows as a flashing green
LED on your phone, and solid red on other phone s
with same line.
Note:
Exclusive Hold excludes any other phone from
picking up your held call. Exclusive Hold
shows as a flashing green LED on your phone.
The same line on other phones appears as a
solid red LED.
21

To Transfer a Call
4:26 PM TUE 13 APR 2004
4:26 PM TUE 13 APR 2004
2001
Transferred station
or trunk number
Transferring station
4:26 PM TUE 13 APR 2004
2000 DDD
After conversing, ask party to hold.
Press Transfer. Receive interrupted dial tone.
Dial destination station’s exten sion, hang up or wait
for answer.
If transferring party hangs up, that station’s number
appears in the center of recipient’s display.
The display returns to the User Setting screen.
Press Back Soft Key.
22

4. FEATURE OPERATION
4:26 PM TUE 13 APR 2004
SET
4:26 PM TUE 13 APR 2004
SET
Speed Numbers Storage and Access
To Store Numbers using (One-touch
Speed Keys)
(Not available on 2 Button Terminal)
To Program
Press Feature button.
Press an available One-Touch Speed Calling key.
Enter desired telephone number or feature access
code on the keypad.
Display indicates the digits dialed.
Press Feature again to save the number.
ToAaccess
Press desired One-Touch Speed Calling key or
Press Speaker and One-Touch Speed Calling key
to call number.
To Verify
Press Feature button.
Press desired One-Touch Speed Calling key.
Display indicates digits programmed.
To Store Numbers & Enter Name
using STA (Station) Soft Keys
(Not available on 2 Button Terminal)
To Program
Press STA Soft Key.
Press ENTRY Soft Key.
Select NAME Soft Key and enter name using key
pad.
Press Set Soft Key.
Select NUMBER Soft Key and enter number using
key pad.
Press Set Soft Key.
Press OK Soft Key then press Exit button to return
to general display.
To Modify
Store numbers as abo ve and override with new
numbers.
23

To Access
4:26 PM TUE 13 APR 2004
SET
To Access
Press STA Soft Key.
Press Next or Prev Soft Key until you reach
desired number.
Lift handset or press Speaker.
To Store Numbers & Enter Name
using Menu Button
(Not available on 2 Button Terminal)
To Program
Press Menu button.
Scroll down using Cursor until the Directory option
is highlighted then press the OK Soft Key.
Select Personal option and press the OK Soft key.
Press ENTRY Soft Key.
Select NAME Soft Key and enter name using key
pad.
Press Set Soft Key.
Select NUMBER Soft Key and enter number using
key pad.
Press Set Soft Key.
Press OK Soft Key then press Exit button to return
to general display.
Press Menu button.
Select Directory option and press the OK Soft Key.
Select Personal option and press the OK Soft Key.
Press Next or Prev Soft Key until you reach
desired number.
Lift handset or press Speaker.
To Delete or Modify (STA or Menu)
Either override existing entry with new details or select
the DEL (delete) option if applicable.
To Access System Speed Numbers
(Company Directory)
Option 1 (Available for all terminals)
Lift handset or press Speaker.
Dial Speed Dialing Access Code.
Enter Abbreviated Access Call Code (e.g. 001).
Option 2 (Not available on 2 Button Terminal)
Press SYS Soft Key.
Either press Next or Prev Soft Key until you reach
desired number and lift handset or press Speaker.
or
Enter up to, the first four characters of a name
using the key pad.
Press the Next or Prev Soft Key until you reach
your desired number and lift handset or press
Speaker..
Note: Station and Menu Storage buffer is allocated by the
system administrator.
24

• Alphabetic character (Uppercase)
Digit
1234567890*#
Code
1ADGJMPTW0*#
BEHKNQUX @&
Character
CF I LORVY . (
adgjmStZ , )
behknpuw ’ [
cfiloqvx :]
23456r8y ; !
sz-?
79/
Account Code
To enter
Lift handset or press Speaker, receive dial tone.
Enter feature access code, receive service set
tone.
Enter “Account Code” (up to 16 digits). (Note)
Receive dial tone and dial desired number.
To enter account code after authorization code
Lift handset or press Speaker, receive dial tone.
Enter feature access code for “Authorization Code”,
receive service set tone.
Enter “Authorization Code”, receive second service
set tone.
Enter “Account Code”, receive dial tone, and dial
desired number.
Note: Authorization and Account Codes may be up to 20
digits combined (or 34 digits combined).
Forced Account Code
Lift handset or press Speaker, receive dial tone.
Enter feature access code, receive service set
tone.
Enter “Forced Account Code” (up to 10 digits),
receive dial tone.
25

Authorization Code
4:26 PM TUE 12 FEB 2008
VOICE
4:26 PM TUE 12 FEB 2008
TONE
4:26 PM TUE 12 APR 2008
VCL 2000
Originating a Voice Call
To enter without account code
Lift handset or press Speaker, receive dial tone.
Enter feature access code, receive service set
tone.
Enter “Authorization Code” (up to 16 digits).
Receive dial tone, dial desired number.
Voice First/Tone First
Allows incoming station calls to your Dterm to either
ring or go to voice announcement.
Press Speaker key. Receive dial tone.
Dial Voice/Tone access code, LED display shows
current mode receives feature dial tone.
Press *, LED display shows mode change, receive
feature set tone.
Lift handset.
Dial desired station number.
Press Voice or press 1.
Speak to called party.
Answer a Voice Call Hands Free
Receive incoming Voice Call.
Press the MIC Key. LED lights.
Respond hands-free.
Note: If privacy is required, lift handset.
Note: Each time * is pressed, you alternate between
TONE and VOICE.
26

Automatic Intercom
Called party
4:26 PM TUE 12 FEB 2008
ICM 2001
Calling party
4:26 PM TUE 12 FEB 2008
ICM 2001
Called party
4:26 PM TUE 12 FEB 2008
ICM 2000
Calling party
4:26 PM TUE 12 FEB 2008
ICM 2001
Manual Intercom
Note: Access to feature is based on data assignment.
To initiate
Lift handset or press Speaker key.
Press the AICM key.
Tone burst is sent.
To answer
AICM key flashes green indicating an inco ming
intercom call.
To initiate
Lift handset or press Speaker, press MICM,
ringback tone is heard.
Each press of MICM key sends tone bursts.
To answer
MICM key flashes, indicating an incoming call. Ring
tone may also be heard.
Voice Call alert tone is heard.
Press AICM, lift handset or press Speaker. LED
lights solid green.
Press MICM.
Lift handset or press Speaker, LED lights solid
green.
If called station is engaged in a non-intercom call,
the station may press MICM after placing original
caller on hold (with Hold key).
27

Dial Intercom
4:26 PM TUE 12 FEB 2008
CNF 2000 2001
To Establish a Broker Call
To initiate
Lift handset or press the Speaker key.
Press DICM key.
Dial desired intercom station number (0-9). Tone
burst is sent. (Press 1 to change to ring tone signal.
To answer
DICM LED flashes, indicating an incoming intercom
call. Tone burst or ring tone is heard.
Press DICM.
Lift handset or press Speaker. LCD shows solid
green.
Conference
With call in progress, ask party to hold.
Press Transfer, receive interrupted dial tone.
Dial desired number.
After call is answered, press Conf key. Conf LED
lights.
Three-way conference is established.
While engaged in a call and wishing to consult a
third party, press Transfer. Caller is automatically
placed on hold.
Dial desired party to consult.
Press Transfer to return to original caller. Third
party is automatically placed on hold.
By repeating these steps, it is possible to alternate
between calls.
Note: The display indicates connected station or trunk at
any given time.
Call Back (Station)
Lift handset or press Speaker.
Dial desired station number and receive busy tone
or ring back tone.
Press Call Back or dial access code and receive
service set tone.
Restore handset.
When busy station becomes idle or the station that
did not answer initiates or answers a call or
accesses a feature and then becomes idle, the
setting station is alerted by ring and flashing LED.
If one party hangs up, other two remain connected.
Conf LED goes out.
28

To Answer a Camped-On Call
Type
Outside Line
Number
Outside Line
4:26 PM TUE 12 FEB 2008
CMP WATS 3
Type
Outside Line
Number
Outside Line
4:26 PM TUE 12 FEB 2008
BUSY 2000
Camp-On (Call Waiting Method)
While engaged in a call, receive the camp-on
indication (one short tone burst). Answer LED
flashes.
Press Answer key. Call in progress is placed on
hold.
Connection to camped-on call is established.
Press Answer to return to original call. Camped-on
call is placed on hold.
Repeating depression of the Answer key allows
you to alternate between calls. Display indicates
connected station or trunk at any given time.
To Set a Camp-On (Transfer Method)
With call in progress, ask party to hold. Depress
Transfer button, feature dial tone is heard.
Dial desired station number and receive busy tone.
Dial 4 and receive service set tone. Camp-on tone
(2 tone bursts) is sent to busy station.
Restore handset.
An extension you have dialed is busy and you wish to
wait on.
To Activate Call Waiting
Press Transfer key.
Either dial Call Waiting access code or press the
CW Soft key.
The busy extension will be notified, by a double tone,
the flashing Answer key, or if the phone has a disp lay
they will also see ‘Call Waiting’.
29

To Answer Call Waiting
Called station
number
4:26 PM TUE 12 FEB 2008
CW SET 2000
4:26 PM TUE 12 FEB 2008
CW 2001
Parked station
or trunk
4:26 PM TUE 12 FEB 2008
HLD=nn 2000
station
Calling
party
Called
4:26 PM TUE 12 FEB 2008
PCK 2001
2000
To Park A Call From Terminal Without LCD
While call in progress, press Transfer key and dial
the Call Park access code, or press Call Park key.
Dial Call Park location number (00-19) and receive
service set tone. (If park location is busy, dial the
next location number.)
Restore handset.
Busy extension asks current call to ‘hold the line’
and presses Answer key.
To alternate between calls press Answer key.
When finished with one party, hang up and your
telephone will recall with the other party.
Note: Station 2000 can alternate between the two parties
by pressing Answer button.
Call Park (System)
To Park A Call From Terminal With LCD
While connected to a station or trunk, press
Transfer key and dial the Call Park access code, or
press Call Park key. Display shows HLD=(park
location number nn=00-19).
Restore handset.
.
To Retrieve A Parked Call
Dial Call Park access code and parked call location
number (00-19).
Station users connected to parked call.
Call Pickup (Group)
When Station Within Pickup Group Rings
Lift handset.
Press Call Pickup key or dial Call Pickup access
code (may be stored on-one-touch speed calling
key).
Connection to calling party is established.
30

Call Pickup (Direct)
station
Calling
party
Called
4:26 PM TUE 12 FEB 2008
PCK 2001
2000
4:26 PM TUE 12 FEB 2008
SET
station
Overridden
Override
4:26 PM TUE 12 FEB 2008
OVR 2001
2000
Lift handset.
Press Call Pickup Direct key or dial Call Pickup
Direct access code (may be stored on one-touch
key).
Dial extension number to be picked up.
Connection to calling party is established.
Outside Line Queuing (From
Extension Dial Tone)
If Outside Line is Busy
Press Speaker key or lift handset dial outgoing
access code (e.g. 0).
Press Call Pickup Direct key or dial Call Pickup
Direct access code (may be stored on one-touch
key).
Press Speaker key or lift handset. Dial tone is
heard. Dial desired number. (No outgoing access
code needed.)
Timed Queuing (Outside Line Only)
Press Speaker key, receive dial tone.
Dial Outside Line access code and desired
number.
Receive busy tone or ring no answer from distant
end.
Press Call Back key, LED flashes, leave speaker
on.
The desired number is automatically redialed.
Pick up handset and converse.
Note: When station is in Timed Queue mode callers
receive busy indication.
Executive Override
If Called Station is Busy
Press Override key and converse.
Receive a Busy indication. Press Call Back key.
Call is placed in queue for next available Outside
Line.
Replace handset.
When OUtside Line is available, setting station is
alerted by ringing and flashing red LED.
Note: Interrupted parties receive a waning tone.
31

Last Number Redial
REDIAL[#]/SPEED[ ] –1
2001
Last number dialed
REDIAL[#]/SPEED[ ] –1
2001
Last number dialed
Forwarding
station
4:26 PM TUE 12 FEB 2008
FWD 2000
4:26 PM TUE 12 FEB 2008
FWD 2000
4:26 PM TUE 12 FEB 2008
CNCL
To Recall the Last Number Dialed
Press Redial. Receive special dial tone.
Press #. The number dialed will be redialed and
displayed.
To Verify (With Multi-line Phone)
Press Speaker key. Receive extension dial tone.
Press FD-A key or dial Call Forward-All access
code.
Display indicates the station number calls are
forwarded to.
To Cancel
Note: Each time the Redial key is pressed the numbers
dialed for the last five calls are displayed
sequentially.
Call Forwarding - All Calls
To Set
Press Speaker key. Receive dial tone.
Press FD-A key or dial Call Forward-All access
code. Receive special dial tone.
Dial destination station or outside telephone
number. Receive service set tone
FD-A LED lights (at your station if FD-A key was
used).
Press Speaker key. Call Forwarding for all calls is
set.
Press Speaker key. Receive dial tone.
Press FD-A key plus * or dial Call Forward - All
cancel code. Receive serve set tone. LED goes out
at your station (or the phone of the sub line station).
Press Speaker key.
32

Call Forwarding - Busy
4:26 PM TUE 12 FEB 2008
SET
2000
Destination station
4:26 PM TUE 12 FEB 2008
SET 2000
4:26 PM TUE 12 FEB 2008
CNCL
2000
4:26 PM TUE 12 FEB 2008
SET 2000
Forwarding
station
4:26 PM TUE 12 FEB 2008
FWD 2000
Call Forwarding - No Answer
To Set
Press Speaker. Receive dial tone.
Press FDB key or dial Call Forward Busy access
code. Receive special dial tone.
Dial destination station or external telephone
number. Receive service set tone.
FD-B LED lights (at your station or at the phone of
the sub line station you are setting).
Press Speaker. Call Forward Busy is set.
To Verify (with Display Phone)
Press Speaker key. Receive dial tone.
Press FD-B or dial Call Forward Busy access code.
Display indicates the station number calls are
forwarded to.
To Set
Press Speaker. Receive dial tone.
Press FD-N or dial Call Forward No Answer access
code. Receive special dial tone.
Dial destination station or external telephone
number . Receive service set tone.
FD-N LED lights (at your station if FD-N key was
used).
Press Speaker key. Call Forward No Answer is set.
To Verify
Press Speaker key. Receive extension dial tone.
Press FD-N key or dial Call Forward No Answer
access code.
Display indicates destination number of call
forward.
To Cancel
Press Speaker. Receive dial tone.
Press FD-B key plus * or dial Call Forward Busy
cancel code. Receive service set tone. LED goes
out at your station.
Press Speaker. Call Forwarding is cancelled.
Note: Call Forwarding for Busy Line and No Answer may
be combined depending upon system programming.
33

Call Forwarding Destination
4:26 PM TUE 12 FEB 2008
SET 2000
4:26 PM TUE 12 FEB 2008
CNCL
To Save and Repeat a Number
To Set
Press Speaker key. Receive dial tone.
Press FD-DS key or dial Call Forward Destination
access code. Receive special dial tone.
Dial station number to be forwarded to this line.
Wait for service set tone.
To Cancel
Press Speaker. Receive dial tone.
Press FD-DC key or dial Call Forward Destin ation
cancel code.
Dial station number to cancel.
Press Speaker key. Call Forward Destination is
cancelled.
To Save
Press Speaker.key.
Dial desired telephone number.
Press S&R key. Dialed number is now stored. S&R
LED lights.
To Repeat
Press Speaker.
Press S&R key. Phone automatically redials the
programmed number.
S&R automatically canceled. LED goes out.
Note: If saved number is busy or no answer is received, to
save it again, press S&R key again before hanging
up.
Internal Zone Paging with Meet-Me
Page
This allows a system user to page over built-in speaker
or multi-line phone within the assigned zone or all
zones.
Example: Station A can page Station B. When Station
B dials answer code, they are connected.
34

To Page (Station A)
4:26 PM TUE 12 FEB 2008
PAGING
Paging
station
4:26 PM TUE 12 FEB 2008
2000
Calling party
4:26 PM TUE 12 FEB 2008
2001
Boss and secretary station each
display the other’s number
4:26 PM TUE 12 FEB 2008
2000
Lift Handset. Receive dial tone.
Dial Internal Paging access code for desired zone
or all zones or press key assigned for desired zone
or all zones.
Page station B.
Remain off hook.
To Answer (Station B)
Station B dia ls Meet-Me answer code , and they are
immediately connected.
Note: Access to this feature is based on data assignment.
Boss/Secretary Calling
Secretary
Lift handset, press boss’ ringing line. Ask calling
party to hold.
Press boss’ line again. Voice Call is automatically
established to boss’ extension.
Announce the call to the boss.
If Boss Accepts Call
Secretary replaces handset.
Boss lifts handset, presses flashing line.
If Boss Refuses Call
Secretary presses Transfer key to return to calling
party.
Note: Access to this feature is based on data assignment.
35

Boss/Secretary Override
Boss’ station
number
4:26 PM TUE 12 FEB 2008
CW 2000
Secretary’s station
number
4:26 PM TUE 12 FEB 2008
CW 2001
4:26 PM TUE 12 FEB 2008
SET
4:26 PM TUE 12 FEB 2008
CNCL
Example: Station 2000 is boss, Station 2001 is
secretary. Boss is connected to 2003. Incoming call on
outside line connects to secretary, but is intended for
boss.
Secretary
Lift handset to answer Outside line, ask caller to
hold.
Boss can alternate between the two parties by
pressing Answer.
Option 2
Boss does not respond to burst of tone, secretary
presses Transfer key.
Secretary is connected to the Outside line.
Option 3
Boss presses Answer and converses with
Secretary. Outside line is placed on hold.
Secretary is returned to Outside line.
Boss can alternate between the two parties by
pressing Answer.
Press Boss’ line. Outside line is placed on hold;
Boss hears burst of tone and Boss’ Answer key
flashes.
Boss
Hears bursts of tone, Answer key flashes. LCD
display indicates:
Option 1
Boss presses Answer and converses with
secretary. Outside line is placed on hold.
Secretary hangs up. Boss is connected to Outside
line.
Do Not Disturb
Press Speaker key, Receive dial tone.
Press DND key or dial DND access code.
To Cancel
Press Speaker key, Receive dial tone.
Press DND key or dial DND cancel code.
Note: When key is used the LED will light when DND
is active.
36

Return Message Schedule
4:26 PM TUE 12 FEB 2008
IN:BACK 0900
4:26 PM TUE 12 FEB 2008
AWAY:BACK 0900
4:26 PM TUE 12 FEB 2008
CNCL
Note: With Display phone, this feature allows station user
to register a r eturn schedule when leaving the office
and have the schedule display on the calling phone
LCD.
To Set
Station Speaker. Receive dial tone.
Dial Return Schedule access code.
Dial the number corresponding to desired
message.
Dial Message
0 IN:BACK HH:MM
1 OUT:BACK HH:MM
2 AWAY:BACK MM:DD
3 VACATION MM:DD
If 0 or 1: dial desired military time.
Receive dial tone.
Press Speaker key.
To Cancel
Press Speaker key, receive dial tone.
Dial Return message schedule cancel code.
Receive set tone.
Press Speaker key.
Note: Access to feature is based on data assignment.
If 2 or 3: dial month and day.
Example: June 24=0624.
37

Name Display (Administrator)
Note: Requires Display Phone
A name with up to 16 characters can be entered to
display the name on other Dterm telephones when
making a call.
Press Speaker key. Receive set tone.
Dial the Name Assignment access code and
receive special dial tone.
Using the keypad, depress the key with the desired
letter to display the first letter on the key. The
display will indicate the numerical designation.
Subsequent depressions will advance through the
letters on that key. The Dial Pad Key Table below
can be used as a guide to indicate the key and the
number of depressions required to display, letters,
spaces and periods.
DIAL PAD KEY
1234567890*#
11234567890*#
2-ADGJMPTW *#
3- BEHKNQUX * #
4-CFILORVY *#
5- S Z *#
When the desired letter is displayed, depression of
the Transfer key will change the letter to a lower
case letter (default is upper case). Depress the
Hold key to enter that letter and advance to the
next entry.
Repeat the previous two steps until the desired
name is displayed and entered.
Press Speaker key.
For example, to enter “Paul”.
77HOLD22TRFHOLD
888 TRF HOLD
5555 TRF HOLD
Note: When adding/changing/deleting name display for
an extension that appears on a key of a 16LD phone
a reset of the 16 LD phone is required and can be
accomplished by an unplug/plug-in of the phone.
For the 16LD phone using one of the line keys as
speed dial will only display 8 characters; For a
name the first 7 characters plus * for names longer
than 8 characters and the * plus last 7 digits of a
number longer than 8 digits.
Example: name display programmed is ABCDEFGHI
button will show ABCDEFG*. Number display
programmed is 123456789 button will show *3456789.
38

Whisper Page
To Initiate
Option 1
Lift handset or press Speaker key.
Dial desired station number.
Receive Busy Tone press Transfer key.
Dial Whisper Page access code or press Whisper
Page Feature Key.
Tone is heard, Listen to conversation and speak to
station only.
Option 2
System Clock Setup By Station
Dialing (Administrator)
Press Speaker key or lift handset. Receive dial
tone.
Press System Clock Setup key or feature access
code.
Dial new time in 24 hr. format using 6 digits
(HHMMSS).
Receive service set tone, replace handset or press
Speaker key.
Note: Access to feature is based on data assignment.
Lift handset or press Speaker key.
Dial Whisper Page access code or press Whisper
Page Feature Key.
Receive Feature dial tone.
Dial desired station number.
Tone is heard, Listen to conversation and speak to
station only.
To Answer
Press Answer key. Call in progress is placed on
hold.
Hold tone source is not transmitted and to the
original party.
Calling station and called station can privately
speak.
Press Answer key to return to original call.
Note: Access to feature is based on data assignment.
Day/Night Mode Change By Station
Dialing (Administrator)
Press Speaker key or lift handset. Receive dial
tone.
Press Day/Night Mode key or feature access code.
Dial 1 for Day/2 for Night/3 for Mode-a or 4 for
Mode-B.
Replace handset or press Speaker key.
Note: Access to feature is based on data assignment. If a
key is used lamp indication will be:
Night Mode = Red lamp on
Mode-A = Red lamp flashing (60 ipm)
Mode-B = Red lamp flashing (120 ipm)
39

To Change Security Password
(DT700 only)
Press Menu Key
Display reads:
Using Up/Down arrows scroll down to [5]
Press [5] for setting, then OK
Press [1] for User Setting, then OK
Using Up/Down arrows scroll down to [4]
Press [4] for change password, then OK
40

Enter default password 0000
Press Set, then enter New Password
Press Set, then enter the new password again
Press Set
Press OK
Display reads:
Directory Operation
This allows the user to access and program station
speed dials
Press Menu key
Display reads:
Press [2] for Directory
Press OK
Press Back three times to exit menu option
Programming of station speed dial memory is r equired
in the PBX. Access/operation is the same.
41

History Operation
Press HIST (History) Soft Key
Display reads:
Press OG (to view Outgoing calls) or press IC (to
view Incoming calls)
Programming is required in the PBX.
42

Quick Reference Guide
Account Code Entry * #
Assignment of Name Display # 8
Automatic Call Back Access
Cancel
Call Forwarding – All Calls Access
Cancel
Call Forwarding – Busy Access
Cancel
Call Forwarding – Destination Entr y
Cancel
Call Forwarding – No Answer/
Busy Line
Call Hold * 7
Call Pickup – Designated Group 75
Call Pickup Direct # #
Call Pickup – Group * *
Do Not Disturb/Return Schedule Cancel # 5
Internal Zone Paging Group 0
Group 1
Group 2
Group 3
Group 4
Entry
Cancel
Page 50
* 0
# 0
* 1
# 1
* 3
# 3
* 4
# 4
* 2
# 2
51
52
53
54
Message Waiting Lamp Access
Cancel
Message Waiting Lamp/Reminder Search * 9
Operator Call 9
Outside Line 0
Return Schedule Access * 5
Station Speed Dialing Originate
Entry
System Speed Dialing Originate 5
UCD Busy Out Access
Cancel
Voice Recording Memory Card
Access
Record
Replay
Delete
# * 8
# * 9
7
# 7
* 6
# 6
# * 0
# * 1
# * 2
Internal Zone Paging Group 0
Group 1
Group 2
Group 3
Group 4
Last Number Redial # 9
Answer 55
56
57
58
59
43

This Page Intentionally Left Blank
44


NEC Australia Pty Ltd
http://www.nec.com.au
NEC Australia Pty Ltd
Issue 1.1
NDA-30910
To view the latest issue of this document go to NEC Knowledgebase at http://www.kbase.cns.nec.com.au and search for NEC-10645.
 Loading...