


LCD1512/LCD1712/LCD1912
1517121912Cover.p65 |
1 |
1/31/03, 1:14 PM |

Index
Warning .................................................................................................................... |
1 |
Features .................................................................................................................. |
2 |
Contents ................................................................................................................. |
3 |
Quick Start ............................................................................................................. |
4 |
Controls ................................................................................................................... |
7 |
Recommended Use ............................................................................................... |
12 |
Specifications ...................................................................................................... |
14 |
Troubleshooting ................................................................................................... |
17 |
References ............................................................................................................. |
18 |
Limited Warranty ................................................................................................. |
19 |
Avertissement ...................................................................................................... |
21 |
Fonctions ............................................................................................................. |
22 |
Contenu ................................................................................................................. |
23 |
Mise en marche rapide ...................................................................................... |
24 |
Commandes .......................................................................................................... |
27 |
Usage recommandé ............................................................................................ |
32 |
Spécifications ...................................................................................................... |
34 |
Dépannage ............................................................................................................ |
37 |
Références ........................................................................................................... |
38 |
Garantie limitée .................................................................................................. |
39 |
1517121912Cover.p65 |
2 |
1/31/03, 1:15 PM |

WARNING
TO PREVENT FIRE OR SHOCK HAZARDS, DO NOT EXPOSE THIS UNIT TO RAIN OR MOISTURE. ALSO, DO NOT USE THIS UNIT'S POLARIZED PLUG WITH AN EXTENSION CORD RECEPTACLE OR OTHER OUTLETS UNLESS THE PRONGS CAN BE FULLY INSERTED.
REFRAIN FROM OPENING THE CABINET AS THERE ARE HIGH VOLTAGE COMPONENTS INSIDE. REFER SERVICING TO QUALIFIED SERVICE PERSONNEL.
CAUTION
CAUTION: TO REDUCE THE RISK OF ELECTRIC SHOCK, MAKE SURE POWER CORD IS UNPLUGGED FROM WALL SOCKET. TO FULLY DISENGAGE THE POWER TO THE UNIT, PLEASE DISCONNECT THE POWER CORD FROM THE AC OUTLET. DO NOT REMOVE COVER (OR BACK). NO USER SERVICEABLE PARTS INSIDE. REFER SERVICING TO QUALIFIED SERVICE PERSONNEL.
This symbol warns user that uninsulated voltage within the unit may have sufficient magnitude to cause electric shock. Therefore, it is dangerous to make any kind of contact with any part inside this unit.
This symbol alerts the user that important literature concerning the operation and maintenance of this unit has been included. Therefore, it should be read carefully in order to avoid any problems.
Canadian Department of Communications Compliance Statement
DOC: This Class B digital apparatus meets all requirements of the Canadian Interference-Causing Equipment Regulations.
C-UL: Bears the C-UL Mark and is in compliance with Canadian Safety Regulations according to CAN/CSA C22.2 No. 950.
FCC Information
1.Use the attached specified cables with the LCD1512 (K15AN), LCD1712 (K17AN), or LCD1912 (K19BN) color monitor so as not to interfere with radio and television reception.
(1)Please use the supplied power cord or equivalent to ensure FCC compliance.
Use of other cables and adapters may cause interference with radio and television reception.
(2)Please use the supplied shielded video signal cable (LCD1912).
2.This equipment has been tested and found to comply with the limits for a Class B digital device, pursuant to part 15 of the FCC Rules. These limits are designed to provide reasonable protection against harmful interference in a residential installation. This equipment generates, uses, and can radiate radio frequency energy, and, if not installed and used in accordance with the instructions, may cause harmful interference to radio communications. However, there is no guarantee that interference will not occur in a particular installation. If this equipment does cause harmful interference to radio or television reception, which can be determined by turning the equipment off and on, the user is encouraged to try to correct the interference by one or more of the following measures:
• Reorient or relocate the receiving antenna.
• Increase the separation between the equipment and receiver.
• Connect the equipment into an outlet on a circuit different from that to which the receiver is connected.
• Consult your dealer or an experienced radio/TV technician for help.
If necessary, the user should contact the dealer or an experienced radio/television technician for additional suggestions. The user may find the following booklet, prepared by the Federal Communications Commission, helpful: ”How to Identify and Resolve Radio-TV Interference Problems.“ This booklet is available from the U.S. Government Printing Office, Washington, D.C., 20402, Stock No. 004-000-00345-4.
1
15171912manual022503.p65 |
1 |
2/25/03, 7:29 AM |

Features
Congratulations for purchasing an NEC LCD1512, LCD1712, or LCD1912, a high performance color TFT LCD monitor. The LCD1512/LCD1712/LCD1912 monitor provides flicker-free and color images at optional resolutions. The LCD1512/LCD1712/LCD1912 is a TFT LCD monitor that is intelligent, microprocessor-based and ergonomically designed display, compatible with most analog RGB(Red, Green, Blue) display standards, including PS/V, PS/2, optional for Apple Macintosh Centris, Quadra, and Macintosh II family signals. The LCD monitor is capable of displaying crisp and vibrant color graphics with VGA, SVGA, XGA(non-interlaced), SXGA (LCD1712/LCD1912 only) and most Macintosh compatible color video cards.
·The monitor is able to properly function even in case of upgrade video cards or software because of the wide auto-scanning compatibility range without requiring to buy a new monitor.
·LCD1512: The internal microprocessor digitally controls auto-scanning. For horizontal scan frequencies between 31.5 kHz and 61 kHz, and vertical scan frequencies between 56 Hz and 75 Hz. In each frequency mode, the microprocessor-based circuitry allows the monitor to function at the precision of a fixed frequency.
•LCD1712: The internal microprocessor digitally controls auto-scanning. For horizontal scan frequencies between 31.5 kHz and 81 kHz, and vertical scan frequencies between 56 Hz and 75 Hz. In each frequency mode, the microprocessor-based circuitry allows the monitor to function at the precision of a fixed frequency.
•LCD1912: The internal microprocessor digitally controls auto-scanning. For horizontal scan frequencies between 31.5 kHz and 81 kHz, and vertical scan frequencies between 56 Hz and 75 Hz. In each frequency mode, the microprocessor-based circuitry allows the monitor to function at the precision of a fixed frequency.
·The resident memory allows for storing factory default settings and also additional user adjustment parameters.
·LCD1512: The maximum resolution achievable is XGA 1024 x 768.
• LCD1712/LCD1912: The maximum resolution achievable is SXGA 1280 x 1024.
·The compact and sleek cabinet design saves lot of your desk space and makes your desk look neat and tidy.
2
15171912manual022503.p65 |
2 |
2/25/03, 7:30 AM |

Contents
Your new NEC LCD monitor box* should contain the following:
•LCD1512, LCD1712, or LCD1912 LCD monitor
•Power Cord
•User’s Manual
•Video Signal Cable(LCD1912)
Power Cord
Video Signal Cable (LCD1912)
LCD1512/LCD1712/LCD1912
User’s Manual
* Remember to save your original box and packing material to transport or ship the monitor.
3
15171912manual022503.p65 |
3 |
2/25/03, 7:30 AM |
Quick Start
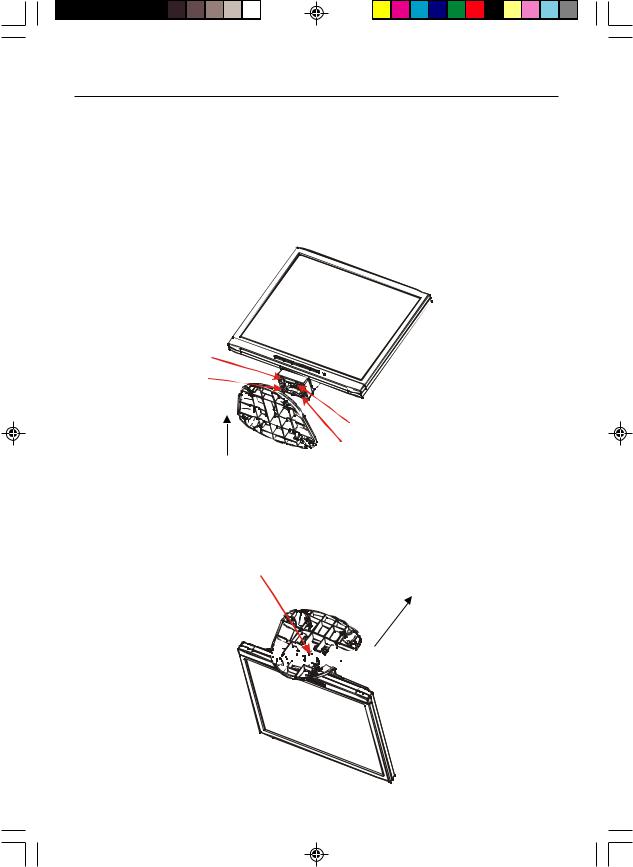
Attaching/ Removing the Base (LCD1512/LCD1712)
Install
1.Align the four hooks on the bottom of the monitor with the corresponding slots on the bottom of the base.
2.Slide the base in the direction of the arrows.
Insure the lock is hooked completely.
Remove
1.Depress the hook as indicated.
2.Remove the base in the direction of the arrows.
Hook position


 Remove direction
4
15171912manual022503.p65 |
4 |
2/25/03, 7:30 AM |
Quick Start –continued
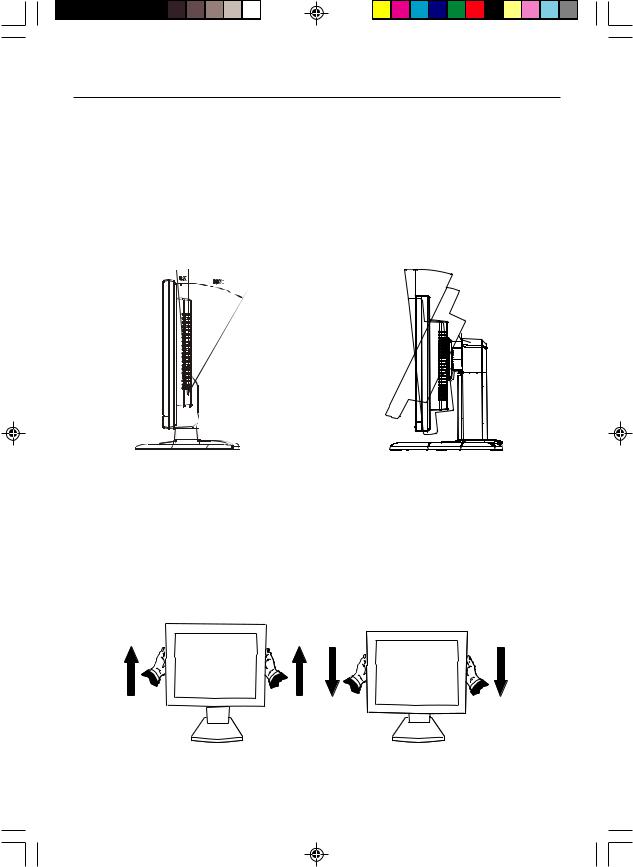
Screen Position Adjustment
In order to optimize the best viewing position, you can adjust the tilt of the monitor by using both of your hands to hold the edges of the monitor as shown in the figure below.
LCD1512/LCD1712: The monitor can be adjusted to 30 degrees up or 5 degrees down as indicated by arrow below.
LCD1912: The monitor can be adjusted to 20 degrees up or 5 degrees down as indicated by arrow below.
5X 20X
Raise and Lower Monitor Screen (LCD1912)
The monitor may be raised or lowered in either Portrait or Landscape mode.
To raise or lower screen, place hands on each side of the monitor and lift or lower to the desired height.
NOTE: Handle with care when raising or lowering the monitor screen.
5
15171912manual022503.p65 |
5 |
2/25/03, 7:30 AM |

Quick Start –continued
Connecting the Power Cord
·Check first to make sure that the power cord you use is the correct type required for your area.
·This monitor has a universal power supply that allows operation in either AC 100240 V AC voltage area. No user-adjustment is required.
·Plug one end of the power cord to the AC Inlet, plug another end to a proper AC outlet.
·If you use this monitor at AC125-240V, please refer to Recommended Use section of this manual for proper selection of an AC power cord.
Installation
To install the monitor to your host system, please follow the steps as given below:
1.Connect Video Cable
a.Make sure both the monitor and computer are powered-OFF.
b.Connect the video cable to the computer.
2.Connect power cord
Connect the power cord to the monitor, then to a properly grounded AC outlet.
3.Power-ON Monitor and Computer
Power-ON the monitor first, then power-ON the computer.
4.If the monitor still does not function properly, please refer to the troubleshooting section to diagnose the problem.
LCD1512/LCD1712 |
|
|
|
|
|
|
|
|
|
LCD1912 |
||||||||||||||||
|
|
|
|
|
|
|
|
|
|
|
|
|
|
|
|
|
|
|
|
|
|
|
|
|
|
|
|
|
|
|
|
|
|
|
|
|
|
|
|
|
|
|
|
|
|
|
|
|
|
|
|
|
|
|
|
|
|
|
|
|
|
|
|
|
|
|
|
|
|
|
|
|
|
|
|
|
|
|
|
|
|
|
|
|
|
|
|
|
|
|
|
|
|
|
|
|
|
|
|
|
|
|
|
|
|
|
|
|
|
|
|
|
|
|
|
|
|
|
|
|
|
|
|
|
|
|
|
|
|
|
|
|
|
|
|
|
|
|
|
|
|
|
|
|
|
|
|
|
|
|
|
|
|
|
|
|
|
|
|
|
|
Power cord |
Video signal cable |
6
15171912manual022503.p65 |
6 |
2/25/03, 7:30 AM |
Controls
Preset Modes
To reduce the need for adjustment for different modes, the monitor has default setting modes that are most commonly used as given in the table below. For optimum adjustment, the user is suggested to perform the Auto Setup under Windows “Full Screen” pattern. When none of the mode is matched, the user can store their preferred modes in the user modes. The monitor is capable of storing up to 9 user modes. The only condition to store as a user mode is the new display information must have 1 kHz difference for horizontal frequency or 1 Hz for vertical frequency or the sync signal polarities are different from the default modes.
LCD1512
Mode |
|
Resolution |
|
|
H. Freq. |
Band Width |
Polarity |
|
|
|
|
(kHz) |
(MHz) |
|
|
||
|
|
|
H |
V |
||||
|
|
|
|
|
||||
|
|
|
|
|
|
|
|
|
1 |
VGA |
720 x 350 |
70 |
Hz |
31.47 |
28.322 |
+ |
– |
|
|
|
|
|
|
|
|
|
2 |
VGA |
720 x 400 |
70 |
Hz |
31.47 |
28.322 |
– |
+ |
|
|
|
|
|
|
|
|
|
3 |
VGA |
640 x 480 |
60 |
Hz |
31.47 |
25.175 |
– |
– |
|
|
|
|
|
|
|
|
|
4 |
MAC |
640 x 480 |
66 |
Hz |
35.00 |
30.24 |
– |
– |
|
|
|
|
|
|
|
|
|
5 |
VESA |
640 x 480 |
72 |
Hz |
37.86 |
31.5 |
– |
– |
|
|
|
|
|
|
|
|
|
6 |
VESA |
640 x 480 |
75 |
Hz |
37.50 |
31.5 |
– |
– |
|
|
|
|
|
|
|
|
|
7 |
VESA |
800 x 600 |
56 |
Hz |
35.16 |
36.0 |
+ |
+ |
|
|
|
|
|
|
|
|
|
8 |
VESA |
800 x 600 |
60 |
Hz |
37.88 |
40.0 |
+ |
+ |
|
|
|
|
|
|
|
|
|
9 |
VESA |
800 x 600 |
75 |
Hz |
46.88 |
49.5 |
+ |
+ |
|
|
|
|
|
|
|
|
|
10 |
VESA |
800 x 600 |
72 |
Hz |
48.08 |
50.0 |
+ |
+ |
|
|
|
|
|
|
|
|
|
11 |
MAC |
832 x 624 |
75 |
Hz |
49.72 |
57.283 |
– |
– |
|
|
|
|
|
|
|
|
|
12 |
VESA |
1024 x 768 |
60 |
Hz |
48.36 |
65.0 |
– |
– |
|
|
|
|
|
|
|
|
|
13 |
VESA |
1024 x 768 |
70 |
Hz |
56.48 |
75.0 |
– |
– |
|
|
|
|
|
|
|
|
|
14 |
VESA |
1024 x 768 |
75 |
Hz |
60.02 |
78.75 |
+ |
+ |
|
|
|
|
|
|
|
|
|
7
15171912manual022503.p65 |
7 |
2/25/03, 7:30 AM |

Controls –continued
LCD1712
Mode |
|
Resolution |
|
|
H. Freq. |
Band Width |
Polarity |
|
|
|
|
(kHz) |
(MHz) |
H |
V |
||
|
|
|
|
|
||||
|
|
|
|
|
|
|
|
|
1 |
VGA |
720 x 400 |
70 |
Hz |
31.47 |
28.322 |
– |
+ |
|
|
|
|
|
|
|
|
|
2 |
VGA |
640 x 480 |
60 |
Hz |
31.47 |
25.175 |
– |
– |
|
|
|
|
|
|
|
|
|
3 |
MAC |
640 x 480 |
66 |
Hz |
35.00 |
30.24 |
– |
– |
|
|
|
|
|
|
|
|
|
4 |
VESA |
640 x 480 |
72 |
Hz |
37.86 |
31.5 |
– |
– |
|
|
|
|
|
|
|
|
|
5 |
VESA |
640 x 480 |
75 |
Hz |
37.50 |
31.5 |
– |
– |
|
|
|
|
|
|
|
|
|
6 |
VESA |
800 x 600 |
56 |
Hz |
35.16 |
36.0 |
+ |
+ |
|
|
|
|
|
|
|
|
|
7 |
VESA |
800 x 600 |
60 |
Hz |
37.88 |
40.0 |
+ |
+ |
|
|
|
|
|
|
|
|
|
8 |
VESA |
800 x 600 |
75 |
Hz |
46.88 |
49.5 |
+ |
+ |
|
|
|
|
|
|
|
|
|
9 |
VESA |
800 x 600 |
72 |
Hz |
48.08 |
50.0 |
+ |
+ |
|
|
|
|
|
|
|
|
|
10 |
MAC |
832 x 624 |
75 |
Hz |
49.72 |
57.283 |
– |
– |
|
|
|
|
|
|
|
|
|
11 |
VESA |
1024 x 768 |
60 |
Hz |
48.36 |
65.0 |
– |
– |
|
|
|
|
|
|
|
|
|
12 |
VESA |
1024 x 768 |
70 |
Hz |
56.48 |
75.0 |
– |
– |
|
|
|
|
|
|
|
|
|
13 |
VESA |
1024 x 768 |
75 |
Hz |
60.02 |
78.75 |
+ |
+ |
|
|
|
|
|
|
|
|
|
14 |
VESA |
1280 x 1024 |
60 |
Hz |
64.0 |
108.0 |
+ |
+ |
|
|
|
|
|
|
|
|
|
15 |
VESA |
1280 x 1024 |
75 |
Hz |
80.0 |
135.0 |
+ |
+ |
|
|
|
|
|
|
|
|
|
16 |
VESA |
1152 x 864 |
75 |
Hz |
67.5 |
108.0 |
+ |
+ |
|
|
|
|
|
|
|
|
|
17 |
VESA |
1280 x 960 |
60 |
Hz |
60.0 |
108.0 |
+ |
+ |
|
|
|
|
|
|
|
|
|
LCD1912
Mode |
|
Resolution |
|
|
H. Freq. |
Band Width |
Polarity |
|
|
|
|
(kHz) |
(MHz) |
|
|
||
|
|
|
H |
V |
||||
|
|
|
|
|
||||
|
|
|
|
|
|
|
|
|
1 |
VGA |
720 x 400 |
70 |
Hz |
31.47 |
28.322 |
– |
+ |
|
|
|
|
|
|
|
|
|
2 |
VGA |
640 x 480 |
60 |
Hz |
31.47 |
25.175 |
– |
– |
|
|
|
|
|
|
|
|
|
3 |
MAC |
640 x 480 |
66 |
Hz |
35.00 |
30.24 |
– |
– |
|
|
|
|
|
|
|
|
|
4 |
VESA |
640 x 480 |
72 |
Hz |
37.86 |
31.5 |
– |
– |
|
|
|
|
|
|
|
|
|
5 |
VESA |
640 x 480 |
75 |
Hz |
37.50 |
31.5 |
– |
– |
|
|
|
|
|
|
|
|
|
6 |
VESA |
800 x 600 |
56 |
Hz |
35.16 |
36.0 |
+ |
+ |
|
|
|
|
|
|
|
|
|
7 |
VESA |
800 x 600 |
60 |
Hz |
37.88 |
40.0 |
+ |
+ |
|
|
|
|
|
|
|
|
|
8 |
VESA |
800 x 600 |
75 |
Hz |
46.88 |
49.5 |
+ |
+ |
|
|
|
|
|
|
|
|
|
9 |
VESA |
800 x 600 |
72 |
Hz |
48.08 |
50.0 |
+ |
+ |
|
|
|
|
|
|
|
|
|
10 |
MAC |
832 x 624 |
75 |
Hz |
49.72 |
57.283 |
– |
– |
|
|
|
|
|
|
|
|
|
11 |
VESA |
1024 x 768 |
60 |
Hz |
48.36 |
65.0 |
– |
– |
|
|
|
|
|
|
|
|
|
12 |
VESA |
1024 x 768 |
70 |
Hz |
56.48 |
75.0 |
– |
– |
|
|
|
|
|
|
|
|
|
13 |
VESA |
1024 x 768 |
75 |
Hz |
60.02 |
78.75 |
+ |
+ |
|
|
|
|
|
|
|
|
|
14 |
VESA |
1280 x 1024 |
60 |
Hz |
64.0 |
108.0 |
+ |
+ |
|
|
|
|
|
|
|
|
|
15 |
VESA |
1280 x 1024 |
75 |
Hz |
80.0 |
135.0 |
+ |
+ |
|
|
|
|
|
|
|
|
|
16 |
VESA |
1152 x 864 |
75 |
Hz |
67.5 |
108.0 |
+ |
+ |
|
|
|
|
|
|
|
|
|
17 |
VESA |
1280 x 960 |
60 |
Hz |
60.0 |
108.0 |
+ |
+ |
|
|
|
|
|
|
|
|
|
8
15171912manual022503.p65 |
8 |
2/25/03, 7:30 AM |
Controls –continued
User Controls
|
|
|
|
|
|
|
|
|
|
|
|
|
|
|
|
|
|
|
|
|
|
|
|
|
|
|
MENU |
▼ |
– |
+/AUTO |
o |
|
|
|||||
|
|
|||||||||||
|
|
|
|
|
|
|
|
|
|
|
|
|
|
|
|
|
|
|
|
|
|
|
|
|
|
3 |
4 |
5 |
6 |
1 |
2 |
|||||||
|
|
|
|
|
|
|
|
|
|
|
|
|
1.Power Switch: To turn ON or OFF the power
2.Power LED: Lights up to indicate that the monitor power is turned ON
3.MENU: To exit and enter OSD menu
4. : To move downward in the OSD Item
5.– : To decrease the value of the parameter in the OSD, which has been selected for adjustment
–: Choose the previous OSD MENU page
6.+ : To increase the value of the parameter in the OSD, which has been selected for adjustment
+ : Choose the next OSD MENU page
AUTO: Act as AUTO adjustment hot key when OSD is not displayed
Standard OSD Operation
1.Press MENU key to activate the OSD menu, when OSD is not displayed.
2.Use Select  key to move down through the menu cyclically. The parameter will be highlighted when selected.
3.Then use ‘‘+’’ or ‘‘-’’ to increase or decrease the value of the parameter, or make selection between different options.
4.To quit the OSD screen at any time during the operation, press MENU key. If no keys are pressed for a time period, the OSD automatically disappears.
5.When OSD is not displayed, press “+” key to start Auto-Adjust.
9
15171912manual022503.p65 |
9 |
2/25/03, 7:30 AM |

Controls –continued
OSD Function Description
|
|
|
|
|
|
|
Brightness |
To increase or decrease the brightness. |
|
|
|
|
|
|
|
Contrast |
To increase or decrease the contrast. |
|
|
|
|
|
|
|
Auto Contrast |
Press “+” key to start auto contrast. |
|
|
|
|
|
|
|
Color Temperature |
Press “-” or “+” to select 5000, 6500, 7500, 9300 and USER. |
|
|
|
|
|
|
|
|
Only when selecting USER, you can make adjustments to the |
|
|
|
|
|
|
|
|
R/G/B content. |
|
|
|
|
|
|
|
Horizontal Size |
To increase or decrease the size of image. |
|
|
|
|
|
|
|
Fine |
To increase or decrease the noise of the image. |
|
|
|
|
|
|
|
||
|
|
|
|
|
|
|
||
|
|
|
|
|
|
|
Left/Right |
To move the screen toward left or right. |
|
|
|
|
|
|
|
||
|
|
|
|
|
|
|
Up/Down |
To move the screen upward or downward. |
|
|
|
|
|
|
|
||
|
|
|
|
|
|
|
Auto-Adjust |
Press “+” to turn on this function. The Auto-Adjust will |
|
|
|
|
|
|
|
||
|
|
|
|
|
|
|
|
automatically adjust V-Position, H-Position, Clock, and |
|
|
|
|
|
|
|
|
Clock-Phase, the whole process takes about 5 seconds. |
|
|
|
|
|
|
|
Flesh Tone |
To adjust flesh tone of color. |
|
|
|
|
|
|
|
||
|
|
|
|
|
|
|
Hue |
To adjust hue of color. |
|
|
|
|
|
|
|
Saturation |
To adjust saturation of color. |
|
|
|
|
|
|
|
Language |
Select among English, French, Italian, German and Spanish. |
|
|
|
|
|
|
|
||
|
|
|
|
|
|
|||
|
|
|
|
|
|
|
Factory Preset |
To return the monitor to its default settings. |
|
|
|
|
|
|
|
||
|
|
|
|
|
|
|
OSD Time Out |
To adjust the period of OSD auto turn-off time. |
|
|
|
|
|
|
|
||
|
|
|
|
|
|
|
||
|
|
|
|
|
|
|
OSD Left/Right |
To move the OSD position horizontally on the screen. |
|
|
|
|
|
|
|
||
|
|
|
|
|
|
|
|
When the “+” key is pressed, the OSD control menu will move |
|
|
|
|
|
|
|
|
to the right side of the screen. Likewise when the “–” key is |
|
|
|
|
|
|
|
|
pressed, the OSD control menu will move to the left side. |
|
|
|
|
|
|
|
OSD Up/Down |
To move the OSD position vertically on the screen. |
|
|
|
|
|
|
|
||
|
|
|
|
|
|
|
||
|
|
|
|
|
|
|
|
When the “+” key is pressed, the OSD control menu will move |
|
|
|
|
|
|
|
|
to the up side of the screen. Likewise when the |
|
|
|
|
|
|
|
|
“–” key is pressed, the OSD control menu will move to the |
|
|
|
|
|
|
|
|
lower side. |
|
|
|
|
|
|
|
Information |
Indicates the current resolution and V-Frequency. |
|
|
|
|
|
|
|
||
|
|
|
|
|
|
|
||
|
|
|
|
|
|
|
10
15171912manual022503.p65 |
10 |
2/25/03, 7:31 AM |

Controls –continued
Power Saving Mode
The monitor will be driven into “Power Saving” mode by the control signal from the display controller, as indicated by the amber-color power LED.
LCD1512
State |
Power |
LED Light |
|
Consumption |
|||
|
|
||
|
|
|
|
ON |
Normal |
Green |
|
|
|
|
|
Active OFF |
<2 W |
Amber |
|
|
|
|
LCD1712/LCD1912
State |
Power |
LED Light |
|
Consumption |
|||
|
|
||
|
|
|
|
ON |
Normal |
Green |
|
|
|
|
|
Active OFF |
<3 W |
Amber |
|
|
|
|
The power saving states will be kept until a control signal has been detected or the keyboard or mouse is activated. The recovery time from Active OFF state back to ON state is around 5 seconds.
DDC (Display Data Channel)
To make your installation easier, the monitor is able to Plug and Play with your system if your system also supports DDC protocol. The DDC(Display Data Channel) is a communication protocol through which the monitor automatically informs the host system about its capabilities, for example, supported resolutions and corresponding timing. The monitor supports DDC2B standard.
11
15171912manual022503.p65 |
11 |
2/25/03, 7:31 AM |

Recommended Use
Safety Precautions and Maintenance
FOR OPTIMUM PERFORMANCE, PLEASE NOTE THE
FOLLOWING WHEN SETTING UP AND USING
THE LCD COLOR MONITOR:
•DO NOT OPEN THE MONITOR. There are no user serviceable parts inside and opening or removing covers may expose you to dangerous shock hazards or other risks. Refer all servicing to qualified service personnel.
•Do not spill any liquids into the cabinet or use your monitor near water.
•Do not insert objects of any kind into the cabinet slots, as they may touch dangerous voltage points, which can be harmful or fatal or may cause electric shock, fire or equipment failure.
•Do not place any heavy objects on the power cord. Damage to the cord may cause shock or fire.
•Do not place this product on a sloping or unstable cart, stand or table, as the monitor may fall, causing serious damage to the monitor.
•When operating the LCD monitor with its AC 125-240V power supply, use a power supply cord that matches the power supply voltage of the AC power outlet being used. The power supply cord you use must have been approved by and comply with the safety standards of your country. (Type H05VV-F should be used in Europe)
•In UK, use a BS-approved power cord with molded plug having a black (5A) fuse installed for use with this monitor. If a power cord is not supplied with this monitor, please contact your supplier.
•Do not place any objects onto the monitor and do not use the monitor outdoors.
•The inside of the fluorescent tube located within the LCD monitor contains mercury. Please follow the bylaws or rules of your municipality to dispose of the tube properly.
Immediately unplug your monitor from the wall outlet and refer servicing to qualified service personnel under the following conditions:
•When the power supply cord or plug is damaged.
•If liquid has been spilled, or objects have fallen into the monitor.
•If the monitor has been exposed to rain or water.
•If the monitor has been dropped or the cabinet damaged.
•If the monitor does not operate normally by following operating instructions.
•Do not bend power cord.
•Do not use monitor in high temperatured, humid, dusty, or oily areas.
•If glass is broken, handle with care.
•Do not cover vent on monitor.
•If monitor or glass is broken, do not come in contact with the liquid crystal and handle with care.
•
CAUTION •
•
Image Persistence
Image persistence is when a residual or “ghost” image of a previous image remains visible on the screen. Unlike CRT monitors, LCD monitors’ image persistence is not permanent, but constant images being displayed for a long period of time should be avoided.
To alleviate image persistence, turn off the monitor for as long as the previous image was displayed. For example, if an image was on the monitor for one hour and a residual image remains, the monitor should be turned off for one hour to erase the image.
NOTE: As with all personal display devices, NEC-Mitsubishi Electronics Display recommends using a moving screen saver at regular intervals whenever the screen is idle or turning off the monitor when not in use.
12
15171912manual022503.p65 |
12 |
2/25/03, 7:31 AM |
 Loading...