


 Loading...
NEC Express Server
Express5800 Series
Express5800/GT110e, GT110e-S, R110e-1E
EXP280A, EXP281A, EXP282A
Installation Guide (Windows)
Model Number: N8100-1890F/1891F/1892F/1894F/1932F/1933F
Chapter 1 Installing Windows
Chapter 2 Installing the Bundled Software
10.020.02-102.01
July 2012, First Edition © NEC Corporation 2012

Documents Provided with This Product
Documents Provided with This Product
Documents for this product are provided as accompanying booklets ( ) and as electronic manuals ( PDF ) stored within the EXPRESSBUILDER DVD (
 ).
).
Precautions for Use |
Describes points of caution to ensure the safe use of this server. |
|
Read these cautions before using this server. |
Getting Started |
Describes how to use this server, from unpacking to operations. |
|
Refer to this guide as you begin for an overview of this server. |
|
|
|
|
EXPRESSBUILDER
User’s Guide
Chapter 1: General Description |
Overviews, names, and functions of the server’s parts |
Chapter 2: Preparations |
Installation of additional options, connection of peripheral devices, |
|
and ideal location for this server |
Chapter 3: Setting Up Your Server |
System BIOS configurations and summary of EXPRESSBUILDER |
Chapter 4: Appendix |
Specifications and other information |
|
|
Installation Guide (Windows)
Chapter 1: Installing Windows |
Installation of Windows and drivers, and important information for |
|
installation |
Chapter 2: Installing the Bundled |
Installation of bundled software, such as NEC ESMPRO and |
Software |
Universal RAID Utility |
|
|
Maintenance Guide
Chapter 1: Maintenance |
Server maintenance and troubleshooting |
Chapter 2: Convenient Features |
Useful features and the detail of system BIOS settings, RAID |
|
Configuration Utility, and EXPRESSBUILDER |
Chapter 3: Appendix |
Error messages and Windows Event Logs |
|
|
Other documents
Provides the detail of NEC ESMPRO, Universal RAID Utility, and the other features.
2 |
Express5800/GT-110e, GT-110e-S, R110e-1E Installation Guide (Windows) |

Contents
Contents
Documents Provided with This Product................................................................................................................. |
2 |
||
Contents ................................................................................................................................................................ |
|
|
3 |
Notations Used in This Document ......................................................................................................................... |
6 |
||
Notations used in the text.............................................................................................................................. |
6 |
||
Optical disk drives......................................................................................................................................... |
6 |
||
Hard Disk Drives ........................................................................................................................................... |
6 |
||
Removable media ......................................................................................................................................... |
6 |
||
Abbreviations of Operating Systems (Windows) ........................................................................................... |
7 |
||
Trademarks |
........................................................................................................................................................... |
|
8 |
Regulatory Notices ................................................................................................................................................ |
|
9 |
|
Warnings and Additions to This Document .......................................................................................................... |
11 |
||
Latest editions............................................................................................................................................. |
|
11 |
|
Chapter 1 Installing Windows .............................................................................................................................. |
12 |
||
1. Before Starting Setup.................................................................................................................................. |
13 |
||
1.1 |
Starting EXPRESSBUILDER ........................................................................................................... |
13 |
|
1.2 |
Supported Windows OS................................................................................................................... |
14 |
|
1.3 |
Service Pack Support ...................................................................................................................... |
15 |
|
1.4 |
Mass Storage Controllers Supported by EXPRESSBUILDER......................................................... |
16 |
|
1.5 |
When Using a Mass Storage Controller Not Supported by EXPRESSBUILDER............................. |
18 |
|
2. Setting Up the Operating System................................................................................................................ |
19 |
||
3. Setting Up Windows Server 2008 R2.......................................................................................................... |
20 |
||
3.1 |
Before Starting Setup....................................................................................................................... |
20 |
|
3.2 |
Setup with EXPRESSBUILDER....................................................................................................... |
23 |
|
|
3.2.1 |
Setup flow.......................................................................................................................... |
24 |
|
3.2.2 |
Requirements for Setup..................................................................................................... |
25 |
|
3.2.3 |
Setup procedure ................................................................................................................ |
26 |
3.3 |
Setup with OS Standard Installer ..................................................................................................... |
38 |
|
|
3.3.1 |
Setup flow.......................................................................................................................... |
39 |
|
3.3.2 |
Requirements for Setup..................................................................................................... |
40 |
|
3.3.3 |
Setup procedure ................................................................................................................ |
41 |
3.4 |
Installing Starter Pack ...................................................................................................................... |
55 |
|
|
3.4.1 |
When using EXPRESSBUILDER DVD.............................................................................. |
55 |
|
3.4.2 |
When using Internal Flash Memory ................................................................................... |
57 |
3.5 |
Setting Up Device Drivers................................................................................................................ |
63 |
|
|
3.5.1 |
Installing the LAN and BACS (teaming) drivers ................................................................. |
63 |
|
3.5.2 |
Setting up LAN drivers....................................................................................................... |
64 |
|
3.5.3 |
Setting up team/LiveLink ................................................................................................... |
66 |
|
3.5.4 |
Graphics accelerator driver................................................................................................ |
76 |
|
3.5.5 |
When using a SAS controller (N8103-104A/142)............................................................... |
77 |
|
3.5.6 |
When using a RAID Controller (N8103-160)...................................................................... |
77 |
|
3.5.7 |
When using a Fibre Channel controller (N8190-153/154).................................................. |
77 |
3.6 |
Installing the Bundled Software ....................................................................................................... |
78 |
|
3.7 |
License Authentication..................................................................................................................... |
79 |
|
3.8 |
Applying Service Pack ..................................................................................................................... |
81 |
|
3.9 |
Installation When Multiple Logical Drives Exist................................................................................ |
82 |
|
Express5800/GT-110e, GT-110e-S, R110e-1E Installation Guide (Windows) |
3 |

Contents
4. Setting Up Windows Server 2008 ............................................................................................................... |
84 |
||
4.1 |
Before Starting Setup....................................................................................................................... |
84 |
|
4.2 |
Setup with EXPRESSBUILDER....................................................................................................... |
88 |
|
|
4.2.1 |
Setup flow.......................................................................................................................... |
89 |
|
4.2.2 |
Requirements for Setup..................................................................................................... |
90 |
|
4.2.3 |
Setup procedure ................................................................................................................ |
91 |
4.3 |
Setup with OS Standard Installer ................................................................................................... |
103 |
|
|
4.3.1 |
Setup flow........................................................................................................................ |
104 |
|
4.3.2 |
Requirements for Setup................................................................................................... |
105 |
|
4.3.3 |
Setup procedure .............................................................................................................. |
106 |
4.4 |
Installing Starter Pack .................................................................................................................... |
121 |
|
|
4.4.1 |
When using EXPRESSBUILDER DVD............................................................................ |
121 |
|
4.4.2 |
When using Internal Flash Memory ................................................................................. |
123 |
4.5 |
Setting Up Device Drivers.............................................................................................................. |
129 |
|
|
4.5.1 |
Installing the LAN and BACS (teaming) drivers ............................................................... |
129 |
|
4.5.2 |
Setting up LAN drivers..................................................................................................... |
130 |
|
4.5.3 |
Setting up team/LiveLink ................................................................................................. |
132 |
|
4.5.4 |
Graphics accelerator driver.............................................................................................. |
143 |
|
4.5.5 |
When using a SAS controller (N8103-104A/142)............................................................. |
144 |
|
4.5.6 |
When using a RAID Controller (N8103-160).................................................................... |
144 |
|
4.5.7 |
When using a Fibre Channel controller (N8190-153/154)................................................ |
144 |
4.6 |
Specifying PAE Option................................................................................................................... |
145 |
|
4.7 |
Installing the Bundled Software ..................................................................................................... |
146 |
|
4.8 |
License Authentication................................................................................................................... |
147 |
|
4.9 |
Applying Service Pack ................................................................................................................... |
150 |
|
4.10 |
Installation When Multiple Logical Drives Exist.............................................................................. |
150 |
|
5. Setting Up Windows Server 2003 R2 x64 Edition ..................................................................................... |
152 |
||
5.1 |
Before Starting Setup..................................................................................................................... |
152 |
|
5.2 |
Setup with OS Standard Installer ................................................................................................... |
155 |
|
|
5.2.1 |
Setup flow........................................................................................................................ |
156 |
|
5.2.2 |
Requirements for Setup................................................................................................... |
157 |
|
5.2.3 |
Setup procedure .............................................................................................................. |
158 |
5.3 |
Installing Starter Pack .................................................................................................................... |
168 |
|
|
5.3.1 |
Procedures for applying Starter Pack and Windows x64 hotfix (KB) 921411 ................... |
169 |
|
5.3.2 |
Recovery process ............................................................................................................ |
180 |
5.4 |
Setting Up Device Drivers.............................................................................................................. |
181 |
|
|
5.4.1 |
Installing the LAN and BACS (teaming) drivers ............................................................... |
181 |
|
5.4.2 |
Setting up LAN drivers..................................................................................................... |
183 |
|
5.4.3 |
Setting up team/LiveLink ................................................................................................. |
184 |
|
5.4.4 |
When using a SAS controller (N8103-104A/142)............................................................. |
195 |
|
5.4.5 |
When using a RAID Controller (N8103-160).................................................................... |
195 |
|
5.4.6 |
Graphics accelerator driver.............................................................................................. |
195 |
5.5 |
Installing the Bundled Software ..................................................................................................... |
196 |
|
5.6 |
License Authentication................................................................................................................... |
197 |
|
5.7 |
Installation When Multiple Logical Drives Exist.............................................................................. |
198 |
|
6. Setting Up Windows Server 2003 ............................................................................................................. |
199 |
||
6.1 |
Before Starting Setup..................................................................................................................... |
199 |
|
6.2 |
Setup with OS Standard Installer ................................................................................................... |
202 |
|
|
6.2.1 |
Setup flow........................................................................................................................ |
203 |
|
6.2.2 |
Requirements for Setup................................................................................................... |
204 |
|
6.2.3 |
Setup procedure .............................................................................................................. |
205 |
6.3 |
Installing Starter Pack .................................................................................................................... |
215 |
|
|
6.3.1 |
Procedure to apply Windows Server 2003 hotfix: KB921411........................................... |
216 |
|
6.3.2 |
Recovery process ............................................................................................................ |
227 |
4 |
Express5800/GT-110e, GT-110e-S, R110e-1E Installation Guide (Windows) |
|
|
|
Contents |
|
|
|
|
6.4 |
Setting Up Device Drivers.............................................................................................................. |
228 |
|
|
6.4.1 |
Installing the LAN and BACS (teaming) drivers ............................................................... |
228 |
|
6.4.2 |
Setting up LAN drivers..................................................................................................... |
230 |
|
6.4.3 |
Setting up team/LiveLink ................................................................................................. |
231 |
|
6.4.4 |
Graphics accelerator driver.............................................................................................. |
243 |
|
6.4.5 |
When using a SAS controller (N8103-104A/142)............................................................. |
243 |
|
6.4.6 |
When using a RAID Controller (N8103-160).................................................................... |
243 |
6.5 |
Specifying PAE Option................................................................................................................... |
244 |
|
6.6 |
Installing the Bundled Software ..................................................................................................... |
245 |
|
6.7 |
License Authentication................................................................................................................... |
246 |
|
6.8 |
Reinstallation When Multiple Logical Drives Exist ......................................................................... |
247 |
|
7. Setup for Solving Problems....................................................................................................................... |
248 |
||
7.1 |
Specifying Memory Dump Settings (Debug Information) ............................................................... |
248 |
|
|
7.1.1 |
For Windows Server 2008 R2.......................................................................................... |
248 |
|
7.1.2 |
For Windows Server 2008 ............................................................................................... |
250 |
|
7.1.3 |
For Windows Server 2003 ............................................................................................... |
252 |
7.2 |
How to Create a User-mode Process Dump File ........................................................................... |
254 |
|
|
7.2.1 |
For Windows Server 2008 R2 and Windows Server 2008............................................... |
254 |
|
7.2.2 |
For Windows Server 2003 (setting up Dr. Watson).......................................................... |
255 |
7.3 |
Installing Network Monitor.............................................................................................................. |
256 |
|
|
7.3.1 |
For Windows Server 2008 R2 and Windows Server 2008............................................... |
256 |
|
7.3.2 |
For Windows Server 2003 ............................................................................................... |
257 |
8. Windows OS Parameter File..................................................................................................................... |
258 |
||
8.1 |
Creating Windows OS Parameter File ........................................................................................... |
258 |
|
|
8.1.1 |
How to create a parameter file......................................................................................... |
259 |
Chapter 2 Installing the Bundled Software......................................................................................................... |
269 |
||
1. Bundled Software for the Server ............................................................................................................... |
270 |
||
1.1 |
NEC ESMPRO Agent (for Windows) ............................................................................................. |
270 |
|
1.2 |
NEC ESMPRO Agent Extension.................................................................................................... |
271 |
|
1.3 |
BMC Configuration ........................................................................................................................ |
271 |
|
1.4 |
NEC ExpressUpdate Agent............................................................................................................ |
271 |
|
1.5 |
Universal RAID Utility .................................................................................................................... |
272 |
|
|
1.5.1 |
Setup of Universal RAID Utility ........................................................................................ |
272 |
|
1.5.2 |
Management by NEC ESMPRO Manager....................................................................... |
273 |
1.6 |
NEC Product Info Collection Utility ................................................................................................ |
274 |
|
|
1.6.1 |
Installation........................................................................................................................ |
274 |
|
1.6.2 |
Uninstallation ................................................................................................................... |
274 |
2. Bundled Software for PC for Management................................................................................................ |
275 |
||
2.1 |
NEC ESMPRO Manager................................................................................................................ |
275 |
|
Express5800/GT-110e, GT-110e-S, R110e-1E Installation Guide (Windows) |
5 |

Notations Used in This Document
Notations Used in This Document
Notations used in the text
In addition to safety-related symbols urging caution, 3 other types of notations are used in this document. These notations have the following meanings.
Important |
Indicates critical items that must be followed when handling the hardware or operating |
|
software. If the procedures described are not followed, hardware failure, data loss, and |
|
other serious malfunctions could occur. |
Note |
Indicates items that must be confirmed when handling the hardware or operating software. |
|
|
Tips |
Indicates information that is helpful to keep in mind when using this server. |
|
|
Optical disk drives
This server is equipped with one of the following drives, depending on the order at the time of purchase. These drives are referred to as optical disk drives in this document.
•DVD-ROM drive
•DVD Super MULTI drive
Hard Disk Drives
Unless otherwise stated, Hard Disk Drives (HDD) described in this document refer to the following.
•Hard disk drives (HDD)
•Solid state drive (SSD)
Removable media
Unless otherwise stated, removable media described in this document refer to the following.
•USB memory
•Flash FDD
6 |
Express5800/GT-110e, GT-110e-S, R110e-1E Installation Guide (Windows) |

Notations Used in This Document
Abbreviations of Operating Systems (Windows)
Windows Operating Systems are referred to as follows.
Refer to Chapter 1 (1.2 Supported Windows OS) for detailed information.
Notations in this document |
Official names of Windows |
||
|
|
||
Windows Server 2008 R2 |
Windows Server 2008 R2 Standard |
||
|
Windows Server 2008 R2 Enterprise |
||
|
Windows Server 2008 R2 Foundation |
||
Windows Server 2008*1 |
Windows Server 2008 Standard |
||
|
Windows Server 2008 Enterprise |
||
Windows Server 2003 R2 x64 Edition |
Windows Server 2003 R2 |
Standard x64 Edition |
|
|
Windows Server 2003 R2 |
Enterprise x64 Edition |
|
Windows Server 2003 R2*2 |
Windows Server 2003 |
R2 |
Standard Edition |
|
Windows Server 2003 |
R2 |
Enterprise Edition |
Windows Server 2003*2 |
Windows Server 2003 |
Standard Edition |
|
|
Windows Server 2003 |
Enterprise Edition |
|
Windows 7 |
Windows 7 Professional 64-bit (x64) Edition |
||
|
Windows 7 Professional 32-bit(x86) Edition |
||
Windows Vista |
Windows Vista Business 64-bit (x64) Edition |
||
|
Windows Vista Business 32-bit(x86) Edition |
||
Windows XP |
Windows XP Professional x64 Edition |
||
|
Windows XP Professional |
||
Windows PE*3 |
Windows Preinstallation Environment |
||
*1: Includes 64-bit and 32-bit Editions unless otherwise stated. The following appears on EXPRESSBUILDER screen.
•Windows Server 2008 64-bit Edition: Windows Server 2008 x64
•Windows Server 2008 32-bit Edition: Windows Server 2008 x86
*2: Unless otherwise stated, Windows Server 2003 R2 and Windows Server 2003 are collectively referred to as Windows Server 2003.
*3: Used as an installation platform only.
Express5800/GT-110e, GT-110e-S, R110e-1E Installation Guide (Windows) |
7 |

Trademarks
Trademarks
EXPRESSSCOPE is a registered trademark of NEC Corporation.
Microsoft, Windows, Windows Server, Windows Vista, and MS-DOS are registered trademarks or trademarks of Microsoft Corporation in the United States and other countries. Intel, Pentium, and Xeon are registered trademarks of Intel Corporation of the United States. AT is a registered trademark of International Business Machines Corporation of the United States and other countries. Adaptec, its logo, and SCSI Select are registered trademarks or trademarks of Adaptec, Inc. of the United States. LSI and the LSI logo design are trademarks or registered trademarks of LSI Corporation. Adobe, the Adobe logo, and Acrobat are trademarks of Adobe Systems Incorporated. DLT and DLTtape are trademarks of Quantum Corporation of the United States. PCI Express is a trademark of Peripheral Component Interconnect Special Interest Group. Linux is a trademark or registered trademark of Linus Torvalds in Japan and other countries. Red Hat® and Red Hat Enterprise Linux are trademarks or registered trademarks of Red Hat, Inc. in the United States and other countries.
All other product, brand, or trade names used in this publication are the trademarks or registered trademarks of their respective trademark owners.
8 |
Express5800/GT-110e, GT-110e-S, R110e-1E Installation Guide (Windows) |

Regulatory Notices
Regulatory Notices
FCC Statement
This equipment has been tested and found to comply with the limits for a Class A digital device, pursuant to Part 15 of the FCC Rules. These limits are designed to provide reasonable protection against harmful interference when the equipment is operated in a commercial environment. This equipment generates, uses, and can radiate radio frequency energy and, if not installed and used in accordance with the instruction manual, may cause harmful interference to radio communications. Operation of this equipment in a residential area is likely to cause harmful interference in which case the user will be required to correct the interference at his own expense.
Industry Canada Class A Emission Compliance Statement
This Class A digital apparatus complies with Canadian ICES-003.
Avis de conformité à la réglementation d'Industrie Canada
Cet appareil numérique de la classe A est conforme à la norme NMB-003 du Canada.
CE / Australia and New Zealand Statement
This is a Class A product. In domestic environment this product may cause radio interference in which case the user may be required to take adequate measures (EN55022).
BSMI Statement
Disposing of your used product In the European Union
EU-wide legislation as implemented in each Member State requires that used electrical and electronic products carrying the mark (left) must be disposed of separately from normal household waste. This includes Information and Communication Technology (ICT) equipment or electrical accessories, such as cables or DVDs.
When disposing of used products, you should comply with applicable legislation or agreements you may have. The mark on the electrical and electronic products only applies to the current European Union Member States.
Outside the European Union
If you wish to dispose of used electrical and electronic products outside the European Union, please contact your local authority and ask for the correct method of disposal.
Express5800/GT-110e, GT-110e-S, R110e-1E Installation Guide (Windows) |
9 |
Regulatory Notices
Turkish RoHS information relevant for Turkish market
EEE Yönetmeliğine Uygundur
CCC
|
|
|
|
|
|
||
|
|
|
|
|
|
|
|
|
|
|
|
|
|
||
|
|||||||
|
(Pb) |
(Hg) |
(Cd) |
(Cr( )) |
(PBB) |
(PBDE) |
|
|
× |
○ |
○ |
○ |
○ |
○ |
|
|
|
|
|
|
|
|
|
HDD DVD |
× |
○ |
○ |
○ |
○ |
○ |
|
|
○ |
○ |
○ |
○ |
○ |
○ |
|
|
|
|
|
|
|
|
|
|
× |
○ |
○ |
○ |
○ |
○ |
|
|
|
|
|
|
|
|
|
|
× |
○ |
○ |
○ |
○ |
○ |
|
|
× |
○ |
○ |
○ |
○ |
○ |
|
|
|||||||
|
|
|
|
|
|
||
○ SJ/T11363-2006 |
|||||||
|
|
|
|
|
|
|
|
× SJ/T11363-2006 |
|||||||
|
|
|
|
|
|
|
|
Vietnam RoHS information relevant for Vietnam market
Complying with "CIRCULAR, No.30/2011/TT-BCT (Hanoi, August 10 2011), Temporary regulations on content limit for certain hazardous substances in electrical products”
10 |
Express5800/GT-110e, GT-110e-S, R110e-1E Installation Guide (Windows) |
Warnings and Additions to This Document
Warnings and Additions to This Document
1.Unauthorized reproduction of the contents of this document, in part or in its entirety, is prohibited.
2.The contents of this document may change without prior notice.
3.Do not make copies or alter the document content without permission from NEC Corporation.
4.Every effort has been made to ensure the completeness of this document. However, if you have any concerns, or discover errors or omissions, please contact your retailer.
5.Regardless of these 4 items, NEC Corporation assumes no responsibility for effects resulting from operations.
6.The sample values used in this document are not the actual values.
Keep this document nearby so that you may refer to it as necessary.
Latest editions
This document was created based on the information available at the time of its creation. The screen images, messages and procedures may differ from the actual screens, messages and procedures. Substitute as appropriate when content has been modified.
The most recent version of User’s Guide, as well as other related documents, is also available for download from the following website.
http://www.nec.com/
Express5800/GT-110e, GT-110e-S, R110e-1E Installation Guide (Windows) |
11 |

NEC Express5800 Series |
1 |
|
|
Express5800/GT-110e, GT-110e-S, R110e-1E |
|
Installing Windows
This chapter describes how to install Windows. Read through this chapter to set up the system correctly.
1.Before Starting Setup
Describes the Service Packs and mass storage controllers that support EXPRESSBUILDER supplied with this product
2.Setting Up the Operating System
Describes the flow chart of setting up the operating system
3.Setting Up Windows Server 2008 R2
Describes how to set up Windows Server 2008 R2
4.Setting Up Windows Server 2008
Describes how to set up Windows Server 2008
5.Setting Up Windows Server 2003 R2 x64 Edition
Describes how to set up Windows Server 2003 R2 x64 Edition
6.Setting Up Windows Server 2003
Describes how to set up Windows Server 2003
7.Setting Up for Solving Problems
Describes the features that must be set up in advance so that the server can recover from any trouble immediately and precisely
8.Windows OS Parameter File
Describes how to set up the operating system by using the parameter file.
12 |
Express5800/GT-110e, GT-110e-S, R110e-1E Installation Guide (Windows) |

Chapter 1 Installing Windows |
1. Before Starting Setup |
|
|
1. Before Starting Setup
This section describes the points of using EXPRESSBUILDER (contained in this product) to set up Windows operating systems.
Important |
If you have purchased your server by BTO and ordered to install Windows, |
|
a COA (Certificate of Authenticity) label that describes your product key is |
|
stuck on your server. |
The product key is required when setting up or re-installing the OS. Do not intentionally peel off or damage the label. The product key cannot be reissued in any occasion. It is recommended to take a note of product key and store it carefully with other accessories.
1.1Starting EXPRESSBUILDER
Use the attached EXPRESSBUILDER to reconfigure the RAID System or re-install the OS.
Start EXPRESSBUILDER by either of the following two ways according to the media in which the EXPRESSBUILDER is stored. Refer to Chapter 2 (5. Details of EXPRESSBUILDER) in Maintenance Guide for more information.
With the pre-installation model, you do not need to start the EXPRESSBUILDER.
EXPRESSBUILDER DVD
Insert the DVD to the optical disk drive of the server, and then reboot by turning off and on the server or by pressing <Ctrl> + <Alt> + <Delete> keys.
Internal Flash Memory (optional)
Press <F3> key when the following message appears on POST screen. At this time, be sure to remove a bootable disc from the optical disk drive.
Press <F2> Setup, <F3> Internal Flash Memory, <F4> ROM Utility, <F12> Network
Express5800/GT-110e, GT-110e-S, R110e-1E Installation Guide (Windows) |
13 |

Chapter 1 Installing Windows |
1. Before Starting Setup |
|
|
1.2Supported Windows OS
EXPRESSBUILDER supports the following editions of Windows operating systems:
See the next section (1.3 Service Pack Support) for Service Pack.
|
Name of Windows OS |
|
Supported |
|
||
|
GT110e |
GT110e-S |
R110e-1E |
|||
|
|
|
||||
|
|
Windows Server 2008 R2 Standard |
|
|
|
|
Windows Server 2008 R2 |
|
Windows Server 2008 R2 Enterprise |
|
|
|
|
|
|
Windows Server 2008 R2 Foundation |
|
|
− |
|
Windows Server 2008 |
|
Windows Server 2008 Standard |
|
|
|
|
|
Windows Server 2008 Enterprise |
|
|
|
||
|
|
|||||
|
|
Windows Server 2003 R2 Standard |
|
|
|
|
|
|
x64 Edition |
||||
Windows Server 2003 R2 x64 Edition |
|
|
|
|||
Windows Server 2003 R2 Enterprise |
− |
− |
|
|||
|
|
|||||
|
|
x64 Edition |
||||
|
|
|
|
|
||
Windows Server 2003 R2 |
|
Windows Server 2003 R2 Standard |
|
|
|
|
|
Windows Server 2003 R2 Enterprise |
− |
− |
|
||
|
|
|||||
Windows Server 2003 |
|
Windows Server 2003 Standard |
|
|
− |
|
|
Windows Server 2003 Enterprise |
− |
− |
− |
||
|
|
|||||
Supported
− Not Supported
14 |
Express5800/GT-110e, GT-110e-S, R110e-1E Installation Guide (Windows) |

Chapter 1 Installing Windows |
1. Before Starting Setup |
|
|
1.3Service Pack Support
The following combination of operating system installation media and Service Packs are supported by
EXPRESSBUILDER.
Service Pack |
Windows Server 2008 R2 |
|
|
Service Pack 1 Included |
|
|
|
NO Service Pack + Service Pack 1 |
|
|
|
NO Service Pack |
|
|
|
|
|
Service Pack |
Windows Server 2008 |
|
|
Service Pack 2 Included |
|
|
|
NO Service Pack + Service Pack 2 |
|
|
|
NO Service Pack |
|
|
|
|
|
Service Pack |
Windows Server 2003 R2 x64 Edition |
|
|
Service Pack 2 Included |
|
|
|
NO Service Pack + Service Pack 2 |
|
|
|
NO Service Pack |
− |
|
|
|
|
Service Pack |
Windows Server 2003 R2 |
|
|
Service Pack 2 Included |
|
|
|
NO Service Pack + Service Pack 2 |
|
|
|
NO Service Pack |
− |
|
|
|
|
Service Pack |
Windows Server 2003 |
|
|
Service Pack 2 Included |
− |
|
|
Service Pack 1 Included + Service Pack 2 |
|
|
|
NO Service Pack + Service Pack 2 |
− |
|
|
Service Pack 1 Included |
− |
|
|
NO Service Pack |
− |
|
|
: Supported
−: Not supported
Note |
You can install the Service Pack on the server. When the Service Pack is not |
|
attached to your system, prepare it by yourself. |
|
|
Express5800/GT-110e, GT-110e-S, R110e-1E Installation Guide (Windows) |
15 |

Chapter 1 Installing Windows |
1. Before Starting Setup |
|
|
1.4Mass Storage Controllers Supported by EXPRESSBUILDER
The table below lists the controllers for this server, supported by the supplied EXPRESSBUILDER.
If an optional board not mentioned below is connected, set it up while referring to the instructions supplied with the board and Chapter 1 (1.4 When Using a Mass Storage Controller Not Supported by EXPRESSBUILDER).
Express5800/GT110e
OS |
Windows Server |
Windows Server |
Windows Server |
Windows Server |
|
2008 R2 |
2008 |
2003 R2 x64 Edition |
2003 |
||
|
|
|
|
|
|
RAID Controllers supporting OS installation by EXPRESSBUILDER |
|
|
|||
|
|
|
|
|
|
N8103-128 RAID Controller |
|
|
|
|
|
(128MB, RAID 0/1) |
|||||
|
|
|
|
||
|
|
|
|
|
|
N8103-149 RAID |
|
|
|
|
|
Controller(512MB, RAID 0/1) |
|||||
|
|
|
|
||
|
|
|
|
|
|
N8103-150 RAID Controller |
|
|
|
|
|
(512MB, RAID 0/1/5/6) |
|||||
|
|
|
|
||
|
|
|
|
|
|
N8103-151 RAID Controller |
|
|
|
|
|
|
|||||
(1GB, RAID 0/1/5/6) |
|
|
|
|
|
|
|
|
|
|
|
Onboard RAID Controller |
|
|
|
|
|
(LSI Embedded MegaRAID) |
|||||
|
|
|
|
||
|
|
|
|
|
|
Other options |
|
|
|
|
|
|
|
|
|
|
|
N8103-104A SAS Controller |
|
|
|
|
|
|
|
|
|
|
|
N8103-142 SAS Controller |
|
|
|
|
|
|
|
|
|
|
|
Express5800/GT110e-S |
|
|
|
|
|
|
|
|
|
|
|
OS |
Windows Server |
Windows Server |
Windows Server |
Windows Server |
|
2008 R2 |
2008 |
2003 R2 x64 Edition |
2003 |
||
|
|
|
|
|
|
RAID Controllers supporting OS installation by EXPRESSBUILDER |
|
|
|||
|
|
|
|
|
|
N8103-128 RAID Controller |
|
|
|
|
|
(128MB, RAID 0/1) |
|||||
|
|
|
|
||
|
|
|
|
|
|
N8103-149 RAID |
|
|
|
|
|
Controller(512MB, RAID 0/1) |
|||||
|
|
|
|
||
|
|
|
|
|
|
N8103-150 RAID Controller |
|
|
|
|
|
(512MB, RAID 0/1/5/6) |
|||||
|
|
|
|
||
|
|
|
|
|
|
N8103-151 RAID Controller |
|
|
|
|
|
|
|||||
(1GB, RAID 0/1/5/6) |
|
|
|
|
|
|
|
|
|
|
|
Onboard RAID Controller |
|
|
|
|
|
(LSI Embedded MegaRAID) |
|||||
|
|
|
|
||
|
|
|
|
|
|
16 |
Express5800/GT-110e, GT-110e-S, R110e-1E Installation Guide (Windows) |
Chapter 1 Installing Windows |
1. Before Starting Setup |
|
|
Express5800/R110e-1E
OS |
Windows Server |
Windows Server |
Windows Server |
Windows Server |
|
2008 R2 |
2008 |
2003 R2 x64 Edition |
2003 |
||
|
|||||
|
|
|
|
|
|
RAID Controllers supporting OS installation by EXPRESSBUILDER |
|
|
|||
|
|
|
|
|
|
N8103-128 RAID Controller |
|
|
|
|
|
(128MB, RAID 0/1) |
|||||
|
|
|
|
||
|
|
|
|
|
|
N8103-149 RAID Controller |
|
|
|
|
|
(512MB, RAID 0/1) |
|||||
|
|
|
|
||
|
|
|
|
|
|
N8103-150 RAID Controller |
|
|
|
|
|
(512MB, RAID 0/1/5/6) |
|||||
|
|
|
|
||
|
|
|
|
|
|
N8103-151 RAID Controller |
|
|
|
|
|
(1GB, RAID 0/1/5/6) |
|||||
|
|
|
|
||
|
|
|
|
|
|
Onboard RAID Controller |
|
|
|
|
|
(LSI Embedded MegaRAID) |
|||||
|
|
|
|
||
|
|
|
|
|
|
Other options |
|
|
|
|
|
|
|
|
|
|
|
N8103-104A SAS Controller |
|
|
|
|
|
|
|
|
|
|
|
N8103-142 SAS Controller |
|
|
|
|
|
|
|
|
|
|
|
N8103-160 RAID Controller |
|
|
|
|
|
(1GB, RAID 0/1/5/6) |
|||||
|
|
|
|
||
|
|
|
|
|
|
N8190-153 Fibre Channel |
|
|
* |
* |
|
Controller (1ch) (8Gbps/Optical) |
|||||
|
|
|
|
||
|
|
|
|
|
|
N8190-154 Fibre Channel |
|
|
* |
* |
|
Controller (2ch) (8Gbps/Optical) |
|||||
|
|
|
|
||
|
|
|
|
|
|
: Supported by EXPRESSBUILDER |
|
|
|
||
* : Supported by accessory of optional board |
|
|
|
||
Express5800/GT-110e, GT-110e-S, R110e-1E Installation Guide (Windows) |
17 |

Chapter 1 Installing Windows |
1. Before Starting Setup |
|
|
1.5When Using a Mass Storage Controller Not Supported by EXPRESSBUILDER
To install the Windows when using a mass storage controller not supported by EXPRESSBUILDER (such as the newest RAID controller), follow the steps below.
You do not need to perform the following instructions usually.
1. Have the instructions for the mass storage controller ready.
Note |
If the contents of this document differ from that of the mass storage controller, |
|
prioritize the contents of the controller ’s document. |
|
|
2.If you use a RAID controller, follow the controller instructions to configure the RAID system.
3.If you want to set up by using EXPRESSBUILDER, go to Step 4.
Refer to (Setup with OS standard installer) section of each OS and click [Skip] in RAID settings.
4.Boot from EXPRESSBUILDER.
5.Select Configure EXPRESSBUILDER settings from Top Menu, and then select Load a driver into EXPRESSBUILDER. Next, click [Next].
Insert the media in which the driver for the mass storage controller is copied, select the destination, and then click [Perform].
Tips |
By selecting this option, the driver supplied by the CD-ROM or removable media is |
|
loaded, and you can proceed with the EXPRESSBUILDER setup. |
|
|
6.Setup the server according to "Setup with EXPRESSBUILDER" for each OS.
−Click [Skip] in RAID settings.
−Confirm that Apply drivers for mass storage controller appears under Selected applications in Application settings.
18 |
Express5800/GT-110e, GT-110e-S, R110e-1E Installation Guide (Windows) |
Chapter 1 Installing Windows |
2. Setting Up the Operating System |
|
|
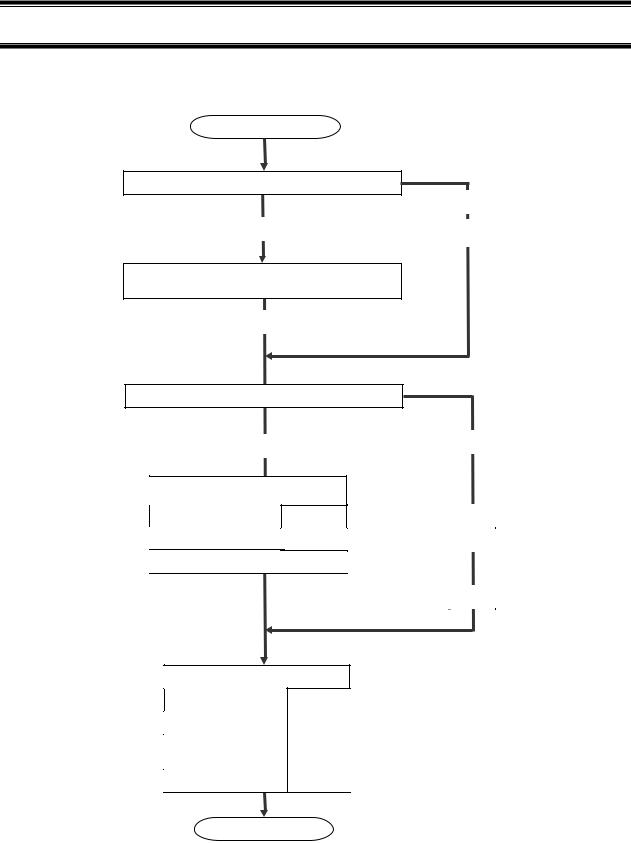
2. Setting Up the Operating System
See the figure below to find a section appropriate to your OS installation.
Start
Is the first setup after purchase?
Yes
Hard disk drive status at purchase
Not installed
No
Re-installation
Execute Setup with EXPRESSBUILDER?
Yes |
No |
|
Setup with EXPRESSBUILDER
Windows Server 2008 R2 |
Chapter 1 (3.3) |
|
Windows Server 2008 |
|
Chapter 1 (4.3) |
Windows Server 2003 |
R2 |
Chapter 1 (6.3) |
Setup with OS standard installer |
|
|
|
Windows Server 2008 R2 |
Chapter 1 (3.4) |
|
|
Windows Server 2008 |
Chapter 1 (4.4) |
|
|
Windows Server 2003 R2 |
Chapter 1 (5.2) |
x64 Edition |
|
|
|
Windows Server 2003 |
Chapter 1 (6.4) |
|
|
Setup for solving problems
Windows Server 2008 R2
Windows Server 2008
Windows Server 2003 R2
x64 Edition
Windows Server 2003
End
Express5800/GT-110e, GT-110e-S, R110e-1E Installation Guide (Windows) |
19 |

Chapter 1 Installing Windows |
3. Setting Up Windows Server 2008 R2 |
|
|
3. Setting Up Windows Server 2008 R2
Set up Windows Server 2008 R2.
3.1Before Starting Setup
Read through the cautions explained here before starting setup.
|
|
: Setting up of Pre-installed model |
|||||
|
|
: Confirm during Setup with EXPRESSBUILDER |
|||||
|
|
: Confirm during Setup with OS standard installer |
|||||
|
|
|
|
|
(1/4) |
||
|
Setup |
|
|
|
Items to confirm |
||
― |
|
|
Windows |
The following editions of the Windows Server 2008 R2 family may be installed. |
|||
|
|
|
• Windows Server 2008 R2 Standard |
||||
|
|
|
family |
|
|||
|
|
|
|
|
• Windows Server 2008 R2 Enterprise |
||
|
|
|
|
|
• Windows Server 2008 R2 Foundation (for GT110e and GT110e-S only) |
||
|
|
|
|
Inquiries about installing other editions may be made at your sales representative. For |
|||
|
|
|
|
information about Service Packs, refer to Chapter 1 (1.3 Service Pack Support). |
|||
|
|
|
Hardware |
The following hardware configurations require special procedures. |
|||
|
|
|
|
|
|
|
|
― |
|
|
configuration |
• Reinstalling to a mirrored volume |
|||
|
|
|
Disable the mirroring and reset to the basic disk. After installation, enable the mirroring |
||||
|
|
|
|
||||
|
|
|
|
again. |
|||
|
|
|
|
Use [Computer Management] – [Disk Management] to create, disable, or remove the |
|||
|
|
|
|
mirrored volume. |
|||
― |
|
|
|
• Peripheral devices such as RDX/MO |
|||
|
|
|
Remove an MO device before installing an OS. Some peripheral devices need to be halted |
||||
|
|
|
|
||||
|
|
|
|
before installation. Refer to the manual provided with the peripheral devices for how to set |
|||
|
|
|
|
a device appropriate to installation. |
|||
― |
|
|
|
• DAT, LTO, and similar media |
|||
|
|
|
Do not set media that is unnecessary to installation during setup. |
||||
|
|
|
|
||||
― |
|
|
|
• Reinstalling to hard disk drives that have been upgraded to dynamic disks |
|||
|
|
|
If the hard disk drive has been upgraded to a dynamic disk, the operating system cannot |
||||
|
|
|
|
||||
|
|
|
|
be reinstalled to it with the existing partitions. |
|||
|
|
|
|
Set up the operating system with the OS standard installer. |
|||
― |
|
|
|
• Connecting to multiple hard disk drives (logical drives) |
|||
|
|
|
For details on installing operating systems to a system in which multiple logical drives |
||||
|
|
|
|
||||
|
|
|
|
exist, refer to Chapter 1 (3.8 Applying Service Pack). |
|||
― |
|
|
|
• Setup when mass memory is installed |
|||
|
|
|
If mass memory is installed in your system, the large size of paging file is required at |
||||
|
|
|
|
||||
|
|
|
|
installation. Thus, the partition size for storing debug information (dump file) may not be |
|||
|
|
|
|
secured. |
|||
|
|
|
|
If you fail to secure the dump file size, use OS standard installer for setup, and allocate the |
|||
|
|
|
|
required file space to multiple disks by performing the following steps. |
|||
|
|
|
|
|
1. Set the system partition size to a size sufficient to install the OS and paging file. |
||
|
|
|
|
|
2. Specify another disk as destination to store the debug information (required dump file |
||
|
|
|
|
|
size) by referring to Chapter 1 (7. Setup for Solving Problems). |
||
|
|
|
|
If the hard disk drive does not have enough space to write the debug information, set the |
|||
|
|
|
|
partition size to a size sufficient to install the OS and paging file, and then add another |
|||
|
|
|
|
hard disk drive for the dump file. |
|||
|
|
|
|
Note |
|
|
|
|
|
|
|
|
If the partition size for installing Windows is smaller than the recommended |
|
|
|
|
|
|
|
|
size, expand the partition size or add another hard disk drive. |
|
|
|
|
|
|
|
|
|
20 |
press5800/GT-110e, GT-110e-S, R110e-1E Installation Guide (Windows) |
Chapter 1 Installing Windows |
|
3. Setting Up Windows Server 2008 R2 |
|||
|
|
|
|
|
|
|
|
|
|
(2/4) |
|
|
|
|
|
|
|
|
|
Setup |
Items to confirm |
|
|
|
― |
System |
The system partition size can be calculated by using the following formula. |
||
|
partition size |
Size required to install the OS + paging file size + dump file size + application size |
|||
|
|
||||
|
|
|
Full installations |
|
|
|
|
|
Size required to install the OS |
= 15,600 MB |
|
|
|
|
|
( Windows Server 2008 R2 + Service Pack 1) |
|
|
|
|
|
= 8,400 MB |
|
|
|
|
|
( Windows Server 2008 R2 with Service Pack 1) |
|
|
|
|
|
= 8,000 MB |
|
|
|
|
|
( Windows Server 2008 R2) |
|
|
|
|
Paging file size (recommended) |
= installed memory size × 1.5 |
|
|
|
|
Dump file size |
= installed memory size + 300 MB |
|
|
|
|
Application size |
= as required by the application |
|
|
|
|
Server Core installations |
|
|
|
|
|
Size required to install the OS |
= 11,100 MB |
|
|
|
|
|
( Windows Server 2008 R2 + Service Pack 1) |
|
|
|
|
|
= 3,700 MB |
|
|
|
|
|
( Windows Server 2008 R2 with Service Pack 1) |
|
|
|
|
|
= 3,500 MB |
|
|
|
|
|
( Windows Server 2008 R2) |
|
|
|
|
Paging file size (recommended) |
= installed memory size × 1.5 |
|
|
|
|
Dump file size |
= installed memory size + 300 MB |
|
|
|
|
Application size |
= as required by the application |
|
|
|
|
For example, if the installed memory size is 1 GB (1,024 MB) and Full installation is |
||
|
|
|
selected, the partition size is calculated as follows: |
||
|
|
|
8,000 MB + (1,024 MB × 1.5) + 1,024 MB + 300 MB + application size |
||
|
|
|
= 10,860 MB + application size |
|
|
|
|
|
The above mentioned partition size is the minimum partition size required for system |
||
|
|
|
installation. |
|
|
Ensure that the partition size is sufficient for system operations.
The following partition sizes are recommended.
|
Full installations |
: 32,768 MB (32 GB) or more |
|
Server Core installations |
: 10,240MB (10 GB) or more |
|
*1 GB = 1,024 MB |
|
Note |
• The above paging |
file sizes are recommended for collecting debug |
information (dump file). The initial size of the Windows partition paging file must be large enough to store dump files.
Make sure you set a sufficient paging file size. If the paging file is insufficient, there will be a virtual memory shortage that may result in an inability to collect correct debug information.
•Regardless of the sizes of internal memory and write debug information, the maximum size of the dump file is "size of internal memory + 300 MB".
•When installing other applications or other items, add the amount of space needed by the application to the partition.
press5800/GT-110e, GT-110e-S, R110e-1E Installation Guide (Windows) |
21 |

Chapter 1 Installing Windows |
|
3. Setting Up Windows Server 2008 R2 |
||||
|
|
|
|
|
|
|
|
|
|
|
(3/4) |
||
|
|
|
|
|
|
|
|
|
Setup |
|
Items to confirm |
|
|
|
― |
System |
If the partition size for installing Windows is smaller than the recommended size, expand the |
|||
|
partition size |
partition size or add another hard disk drive. |
||||
|
|
|||||
|
|
|
Tips |
When creating a new partition, Windows OS assigns an initial boot partition |
|
|
|
|
|
|
of 100 MB. |
||
|
|
|
|
For example, when making a partition of 40,960 MB (40 GB), usable space |
||
|
|
|
|
will be 40,960 MB – 100 MB = 40,860 MB. |
||
|
|
|
|
|
|
|
|
|
|
|
|
|
|
Free space |
|||
|
|
|
|
System Partition (40,860 MB) |
||||
|
|
|
|
Boot Partition (100 MB) |
||||
|
|
|
|
The boot partition is not recognized from the operating system. |
||||
|
|
|
|
|
|
|||
― |
Hyper-V 2.0 |
Refer to the following web site for information related to Hyper-V 2.0. |
||||||
|
support |
http://support.express.nec.co.jp/os/w2008r2/hyper-v-v2.html |
||||||
― |
Using |
If using BitLocker, note the following. |
||||||
BitLocker |
• Be sure to keep the recovery password secure. Do not keep it near a server running |
|||||||
|
||||||||
|
|
BitLocker. |
||||||
|
|
• To reinstall the operating system into a partition that is encrypted with BitLocker, delete |
||||||
|
|
the BitLocker-encrypted partition prior to reinstallation. |
||||||
|
|
• Microsoft releases software updates for BitLocker encryption. If using BitLocker, it is |
||||||
|
|
important that you read through the information provided by Microsoft. Also read through |
||||||
|
|
the checklist published by Microsoft. |
||||||
|
|
For details, visit http://support.microsoft.com/kb/975496/en-us. |
||||||
|
|
|
|
|
||||
|
|
Important |
If the recovery password is not entered, the OS cannot be started, and |
|
||||
|
|
|
|
the content of the partition encrypted by BitLocker cannot be |
|
|||
|
|
|
|
referenced any more. |
||||
The recovery password might be required at startup of the OS after the following:
−Replacement of motherboard
−Initialization of trusted platform module (TPM)
−Change of BIOS setting
―Installing • If the OS installation media contains Service Pack 1, you need not apply the service Service Pack pack again.
|
|
• You can install the Service Pack on the server. When the Service Pack is not attached |
|||
|
|
to your system, prepare it by yourself. |
|||
― |
License |
License authentication is required depending on the installation of Windows. |
|||
authentication |
For details, refer to 3.7 License Authentication. |
||||
|
|||||
|
|
Note |
|
||
|
|
• Activate within 30 days following installation. |
|
||
|
|
|
• A virtual product key is used when installing in a virtual environment. It is not |
|
|
|
|
|
used when directly installing an operating system to a physical server. |
|
|
22 |
press5800/GT-110e, GT-110e-S, R110e-1E Installation Guide (Windows) |

Chapter 1 Installing Windows |
3. Setting Up Windows Server 2008 R2 |
|
|
3.2Setup with EXPRESSBUILDER
This section describes how to install Windows with EXPRESSBUILDER.
This feature automatically recognizes the RAID controller connected to the server and configures the RAID system. Therefore the hardware installation of the server needs to be finished by following " User’s Guide ".
Important • Setup with EXPRESSBUILDER may delete all data of the hard disk drive depending on the settings. Pay attention to input parameters. You must be especially careful when configuring the following:
−RAID settings wizard
−Partition Settings in the Windows Setup wizard Backing up user data, as needed, is recommended.
•Before starting setup, be sure to disconnect hard disk drives from the RAID Controller that is not to be setup. Install those hard disk drives after setup has completed. Conducting setup with hard disk drives being connected with RAID Controller may cause existing data to be erased unintentionally. It is recommended to make backup copy of user data before starting setup.
Note |
• The Scalable Networking Pack (SNP) function is disabled on systems that have |
|
been installed by using EXPRESSBUILDER. |
|
The setting of SNP function may affect the system performance. |
|
Contact your sales representative for details. |
|
• When using an onboard RAID controller (LSI Embedded MegaRAID): |
|
Do not support the creation of RAID10 by using the onboard RAID controller. |
|
Refer to Chapter 2 (4. RAID System Configuration) in “Maintenance Guide” |
|
when creating RAID10. |
|
|
|
|
Tips |
• Setup with EXPRESSBUILDER allows you to use a pre-specified parameter file |
|
or save the parameters specified in setup as a parameter file on removable |
|
media or Internal Flash Memory (if purchased optionally). |
|
• For details on creating a parameter file, refer to 8 Windows OS Parameter File. |
|
|
press5800/GT-110e, GT-110e-S, R110e-1E Installation Guide (Windows) |
23 |

Chapter 1 Installing Windows |
3. Setting Up Windows Server 2008 R2 |
|
|
3.2.1Setup flow
Remove the CD/DVD-ROM or removable media
Insert the OS installation media
Automatic installation
Agree to the terms of the license
↓
Log on
Setup Selection Menu
Parameter Setup Menu
Setup Execution Screen
Configure RAID system
Create and format the Windows system partition
Copy Windows drivers
↓
Copy the selected application
 Process that requires input or selection
Process that proceeds automatically
End of installation
24 |
press5800/GT-110e, GT-110e-S, R110e-1E Installation Guide (Windows) |

Chapter 1 Installing Windows |
3. Setting Up Windows Server 2008 R2 |
|
|
3.2.2Requirements for Setup
Prepare the following media and instruction manuals before starting setup.
Either of the following OS installation media
•NEC operating system installation media (hereafter referred to as Backup DVD-ROM)
•Microsoft operating system installation media (hereafter referred to as Windows Server 2008 R2 DVD-ROM)
First Steps Guide
Either of the following EXPRESSBUILDER
•EXPRESSBUILDER DVD
•Internal Flash Memory (optional)
Prepare if needed:
•Removable media for Windows OS parameter file
•Service Pack
(If the OS installation media contains Service Pack 1, you need not apply the service pack again.)
Tips |
• EXPRESSBUILDER may be distributed in Internal Flash Memory. |
|
EXPRESSBUILDER can be run from Internal Flash Memory if it is installed in |
|
the server. |
|
• If you are using a server with Internal Flash Memory installed, you can install the |
|
OS without using EXPRESSBUILDER DVD. . |
press5800/GT-110e, GT-110e-S, R110e-1E Installation Guide (Windows) |
25 |

Chapter 1 Installing Windows |
3. Setting Up Windows Server 2008 R2 |
|
|
3.2.3Setup procedure
During Setup with EXPRESSBUILDER, parameters are specified through the wizard. You can also save the parameters as one file (a parameter file) to removable media.
Note |
• Read through the items in Chapter 1 (3.1 Before Starting Setup) prior to |
|
installing Windows. |
•If modifying or adding network adapters or other drivers, refer to Chapter 1 (3.5 Setting Up Device Drivers).
1.Turn peripheral device (such as a display) power on, and then turn the server power on.
2.Start EXPRESSBUILDER according to Chapter 1 (1.1 Starting EXPRESSBUILDER).
3.When the following message appears, select Os installation *** default ***. You will automatically advance to step 4, with no need for further input.
4.Select English on the language selection window, and then click [OK].
26 |
press5800/GT-110e, GT-110e-S, R110e-1E Installation Guide (Windows) |

Chapter 1 Installing Windows |
3. Setting Up Windows Server 2008 R2 |
|
|
5. When the Windows PE software license agreement window appears, click [Yes].
Note |
Unless you agree these terms, you cannot use EXPRESSBUILDER. |
|
|
6.Select Set up this computer from Top Menu of EXPRESSBUILDER, and then click [Next].
7.Set parameters on this menu according to your requirement.
When not using parameter file: Go to Step 8.
When using a parameter file: Go to Step 9.
Note |
When setting up again, parameter input via the wizard can be omitted by loading |
|
the saved parameter file. |
|
|
8.If you do not use a parameter file, select an OS from the pull-down menu in [Install Windows], and click [Next].
On this dialog, select "Windows Server 2008 R2" from the pull-down menu.
→Go to Step 10.
press5800/GT-110e, GT-110e-S, R110e-1E Installation Guide (Windows) |
27 |

Chapter 1 Installing Windows |
3. Setting Up Windows Server 2008 R2 |
|
|
9.If you use a parameter file, select Load a parameter file and click [Next]. Load a parameter file according to displayed instructions.
Confirm settings on Parameter Setup Menu as needed, then click [Next]. → Go to Step 13.
10.Set parameters required for setup.
Click [Settings] of the relevant category to change parameters.
28 |
press5800/GT-110e, GT-110e-S, R110e-1E Installation Guide (Windows) |

Chapter 1 Installing Windows |
3. Setting Up Windows Server 2008 R2 |
|
|
Click [Default] if you want to restore the default values. You can see the default values by clicking [Default values].
10-1 RAID settings
Use this menu to configure the RAID system with the RAID controller detected automatically.
Note |
When using an onboard RAID controller (LSI Embedded MegaRAID): |
|
This function does not support the creation of RAID10 by using the onboard RAID |
|
controller. Refer to Chapter 2 (4. RAID System Configuration) in “Maintenance |
|
Guide” when creating RAID10. |
|
|
Specify the RAID settings using the RAID settings wizard on Parameter Setup Menu.
When creating new logical drives
(1)Click [Settings] in RAID settings.
(2)Use the wizard to set up logical drives.
Important If you proceed with wizard, the existing RAID system is destructed and the contents of hard disk drive will be erased.
When skipping the creation of new logical drives
Click [Skip] in RAID settings.
When the RAID settings wizard is terminated, Parameter Setup Menu appears again.
press5800/GT-110e, GT-110e-S, R110e-1E Installation Guide (Windows) |
29 |

Chapter 1 Installing Windows |
3. Setting Up Windows Server 2008 R2 |
|
|
10-2 Windows settings
Set up Windows by using the Windows settings wizard on Parameter Setup Menu.
(1)Click [Settings] in Windows settings.
(2)Click [Next] in the Windows settings wizard.
(3)Specify the Windows basic settings.
Change settings for "Edition" and "Time Zone" as needed, and click [Next].
30 |
press5800/GT-110e, GT-110e-S, R110e-1E Installation Guide (Windows) |
Loading...