


- Windows® XP and Windows® 2000 are registered trademarks of Microsoft Corporation in the United States and/or other
countries.
- This product contains ACCESS Co., Ltd.’s NetFront3 Internet browser software.
- NetFront3 is the trademark or registered trademark of ACCESS Co., Ltd. in Japan and in other countries.
A portion of this software includes software modules developed by the I ndependent JPEG Group.
You may not alter or reproduce, or remove from this product, the Internet browser software contained herein.
Use of the GIF decoder module contained in this product is permitted only as a part of browser software, under a license
from Unisys Corporation. For other use, you have to obtain a separate license from Unisys Corporation.
Purchase and/or use of the browser software contained in this product does not authorize your use of any other product
or performance of any other method or activity involving use of the LZW patents or GIF technology, unless you are
separately licensed in writing by Unisys Corporation.
- Java and all Java-based marks are trademarks or registered trademarks of Sun Microsystems, Inc. in the U.S. and other
countries.
®
- The Bluetooth
license. Other trademarks and trade names are those of their respective owners.
®
Text Input is a registered trademark of Tegic Communications Inc.
- T9
T9 Text Input is licensed under one or more of the following: U.S. Pat. Nos. 5,818,437, 5,953,541, 5,187,480, 5,945,928,
6,011,554, and 6,307,548; Australian Pat. No. 727539; Canadian Pat. No. 1,331,057; United Kingdom Pat. No.
2238414B; Hong Kong Standard Pat. No. HK0940329; Republic of Singapore Pat. No. 51383; Euro.Pat. No. 0 842 463
(96927260.8) DE/DK, FI, FR, IT,NL,PT.ES,SE,GB; Republic of Korea Pat. Nos. KR201211B1 and KR226206B1; and
additional patents are pending worldwide.
- Licensed by QUALCOMM Incorporated under one or more of the following United States Patents and/or their
counterparts in other nations: 4,901,307, 5,490,165, 5,056,109, 5,504,773, 5,101,501, 5,506,865, 5,109,390, 5,511,073,
5,228,054, 5,535,239, 5,267,261, 5,544,196, 5,267,262, 5,568,483, 5,337,338, 5,600,754, 5,414,796, 5,657,420,
5,416,797, 5,659,569, 5,710,784, and 5,778,338.
word mark and logos are owned by the Bluetooth SIG, Inc. and any use of such marks by NEC is under
- WOW, Dialog Clarity, SRS and symbol are trademarks of SRS Labs, Inc.
- WOW and Dialog Clarity technologies are incorporated under license from SRS Labs, Inc.
- "The James Bond Theme" by Monty Norman© EMI Unart Catalog Inc.(BMI) All Right Reserved. International Copyright
Secured. Used by permission."
- The specifications and information in this manual are subject to change without notice.
- Some contents in this manual may differ from your handset depending upon the software of the phone or your service
provider.

Emergency Services and Safety Precautions
Emergency services
To make an emergency call in any country
1 Ensure that your e616 is on and in service.
2 Press Start key to return to the Home screen if needed.
3 Press 112 (or 999 within UK or 000 in Australia) followed by the Start key. (When the USIM card is not
inserted or when the dial lock function is on, just press the Softkeys (SOS).)
4 Follow instructions received and do not end call until told to do so.
Tell the operator which service you require: Police, Ambulance, Fire Brigade, Coastguard or Mountain
Rescue Service. Give your position and, if possible, remain stationary to maintain contact.
The 112 emergency number service is available on every digital network service while in the UK an
alternative is 999 and in Australia 000. Note that these can only be used with a valid USIM.
Due to the nature of the cellular system, the connection of emergency calls cannot be guaranteed.
General care
A handset contains delicate electronic circuitry, magnets, and battery systems. You should treat it with care
and give particular attention to the following points:
• Do not allow the handset, battery or accessories to come into contact with liquids or moisture at any time.
Do not immerse in any liquid.
• Do not place anything in the folded handset.
• Do not paint the handset.
• Do not drop, throw, or subject the handset to rough treatment.
• Do not place the handset alongside computer disks, credit cards, travel cards and other magnetic media.
The information contained on disks or cards may be affected by the handset.
• Do not leave the handset or the battery in places where the temperature could exceed 60 °C, e.g. on a
car dashboard or a window sill, behind glass in direct sunlight, etc.
• Do not remove the handset’s battery while the handset is switched on.
• Take care not to allow metal objects, such as coins or key rings to contact or short-circuit the battery
terminals.
PL-1 Emergency Services and Safety Precautions

• Do not dispose of battery packs in a fire. The handset’s Li-ION batteries may be safely disposed of at a
Li-ION recycling point. For more specific battery and power supply information, see pages 6 and 7.
• Do not put the handset’s battery in your mouth, as battery electrolytes may be toxic if swallowed.
• Do not attempt to dismantle the handset or any of its accessories.
• This equipment is fitted with an internal battery that can only be replaced by a qualified service engineer.
There is a risk of explosion if the battery is replaced with an incorrect battery type. Dispose of the used
battery in accordance with the manufacturer’s instructions.
• Do not put a battery into a microwave oven, dryer, or high-pressure container.
• Do not contact battery directly to an electric outlet or cigarette lighter charger. Use only authorised
charger units.
• Do not pierce battery with a sharp object such as a needle.
• When the battery is thrown away, be sure it is non-conducting by applying vinyl tape to the (+) and (-)
terminals.
• Do not disassemble or modify the battery.
• Do not solder a battery directly.
• Stop using the battery if abnormal heat, odor, discolouration, deformation, or abnormal condition is
detected during use, charge, or storage.
• Do not use with a damaged or deformed battery.
• In the unlikely event of a battery leak, take care to keep the battery discharge away from your eyes or
skin. If the leakage does come into contact with the eyes or skin, please flush thoroughly in clean water
and consult with a doctor.
• Remove the battery whose life cycle has expired from equipment immediately.
• The earpiece may become warm during normal use. Also, the handset itself may become warm while the
battery is being charged.
• When a handset is set to Vibration mode, the vibration can sometimes cause the e616 handset to move.
Be careful not to place the handset near heat sources (such as a heater) or too close to the edge of the
table.
• Use an anti-static cloth to clean the handset. Do not use an ordinary dry cloth or electrostatically charged
cloth. Do not use chemical or abrasive cleaners as these could damage the case.
• Remember to recycle: the cardboard packing supplied with this handset is ideal for recycling.
• Remember to make backup copies of all important data on your handset.
Emergency Services and Safety Precautions PL-2

• Third party equipment
The use of third party equipment, cables or accessories, not made or authorised by NEC, may invalidate
the warranty of your cellphone and also adversely affect the phone’s safety/operation.
Safety
The use of Mobile Phones is not allowed in some radiation sensitive areas, such as hospitals, research
centers and airplanes. The user is responsible to power-off the device. If there is any uncertainty, the battery
shall be removed.
Aircraft safety
• Switch off your phone and remove its battery when inside or near aircraft. The use of handsets in aircraft
is illegal. It may be dangerous to the operation of the aircraft and it may disrupt the cellular network.
Failure to observe this instruction may lead to suspension or denial of cellphone service to the offender,
or legal action, or both.
• Do not use the handset on the ground without the permission of the ground staff.
Hospital safety
• Switch off your phone and remove its battery in areas where the use of handsets is prohibited. Follow the
instructions given by the respective medical facility regarding the use of handsets on their premises.
General safety
• Observe "Turn off mobile" signs, such as those near petrol stations, chemicals or explosives and turn off
handset/device.
• If you have a heart condition, be careful with the settings of call vibration or tone volume.
• Do not allow children to play with the handset, charger or batteries.
• Do not use the handset where blasting is in progress.
• The operation of some medical electronic devices, such as hearing aids and pacemakers, may be
affected if a handset is used next to them. Observe any warning signs and the manufacturer’s
recommendations.
• Do not leave the battery pack empty or disconnected for a long time, otherwise some data may be
initialized.
• Your phone contains metal which may cause you an itch, a rash or eczema depending on your
constitution or physical condition.
PL-3 Emergency Services and Safety Precautions

• Take care not to put your phone in the back pocket of your trousers or skirt and then sit on it. Also, do not
put your phone at the bottom of bag where it may subject to excessive weight or pressure. Doing so may
damage the LCD and camera lens and cause them malfunction.
Road safety
• You MUST exercise proper control of your vehicle at all times. Give your full attention to driving.
• Observe all of the recommendations contained in your local traffic safety documentation.
• Pull off the road and park before making or answering a call, if driving conditions so require.
• You MUST NOT stop on the hard shoulder of a motorway to answer or make a call, except in an
emergency.
• Switch off your handset at a refuelling point, such as a petrol station, even if you are not refuelling your
own car.
• Do not store or carry flammable or explosive materials in the same compartment as a radio transmitter.
• Electronic vehicle systems, such as anti-lock brakes, speed control and fuel injection systems are not
normally affected by radio transmissions. The manufacturer of such equipment can advise if it is
adequately shielded from radio transmissions. If you suspect vehicle problems caused by radio
transmissions consult your dealer and do not switch on the handset until it has been checked by qualified
approved installers.
• Check if local laws and/or regulations restrict the use of handsets while driving.
Vehicles equipped with an air bag
An air bag inflates with great force. Do not place objects, including either installed or portable wireless
equipment, in the area over the air bag or in the air bag deployment area. If in-vehicle wireless equipment is
improperly installed and the air bag inflates, serious injury could result.
Third party equipment
The use of third party equipment, cables or accessories, not made or authorised by NEC, may invalidate the
warranty of your handset and also adversely affect the handset’s operation. For example, use o nly the NEC
mains cable supplied with the AC charger.
Service
The handset, batteries and charger contain no user-serviceable parts. We recommend that your handset be
serviced or repaired by an authorised service centre. Please contact 3 customer hotline 0870 7330 333 for
advice.
Emergency Services and Safety Precautions PL-4

Efficient use
The handset has an internal antenna. For optimum performance with minimum power consumption, please
do not cover the internal antenna area with your hand. Covering the internal antenna affects call quality, may
cause the handset to operate at higher power level than needed, and may shorten talk and standby times.
Radio frequency energy
Y our handset is a low-power radio transmitter and receiver. When it is turned on, it intermittently receives and
transmits radio frequency (RF) energy (radio waves). The system that handles the call controls the power
level at which the handset transmits.
Exposure to radio frequency energy
The handset is designed not to exceed the limits for exposure to RF energy set by national authorities and
international health agencies.* These limits are part of comprehensive guidelines and establish permitted
levels of radio wave exposure for the general population. The guidelines were developed by independent
scientific organizations such as ICNIRP (International Commission on Non-ionizing Radiation Protection)
through periodic and thorough evaluation of scientific studies. The limits include a substantial safety margin
designed to assure the safety of all persons, regardless of age and health, and to account for any variations
in measurements.
*Examples of radio frequency exposure guidelines and standards that the handset is designed to conform to:
• ICNIRP, "Guidelines for limiting exposure to time-varying electric, magnetic, and electromagnetic fields
(up to 300 GHz)-International Commission on Non-Ionizing Radiation Protection (ICNIRP). Health
Physics, vol.74. pp, 494-522, April 1998.
• 99/519/EC, EU Council Recommendation on the limitation of exposure to the general public to
electromagnetic fields 0 Hz-300 GHz. Official Journal of the European Communities, July 12, 1999.
• ANSI/IEEE C95.1-1992. "Safety levels with respect to human exposure to radio frequency
electromagnetic fields, 3kHz to 300 GHz". The Institute of Electrical and Electronics Engineers Inc., New
York, 1991.
• FCC Report and Order, ET Docket 93-62, FCC 96-326, Federal Communications Commission (FCC),
August 1996.
• Radiocommunications (Electromagnetic Radiation Human Exposure) Standard 1999, Australian
Communications Authority (ACA), May 1999.
Declaration of conformity
We declare under our sole responsibility that the product(s) detailed in this manual, and in combination wit h
our accessories, conform with the essential requirements of European Union Directive 1999/5/EC Radio and
Telecommunications Terminal Equipment Directive requirements 3.1(a), 3.1(b), 3.2.
PL-5 Emergency Services and Safety Precautions

Con la presente NEC dichiara, sotto la propria responsabilità, che il p rodotto descritto in questo manuale (e
in combinazione con i propri accessori), è conforme ai requisiti essenziali e alle disposizioni pertinenti
stabilite dalla direttiva radio 1999/5/CE e ai requisiti 3.1(a), 3.1(b), 3.2 stabiliti dalle direttive per i terminali di
telecomunicazioni.
Nous déclarons sous notre unique responsabilité que le(s) produit(s) présen tés dans ce manuel et leurs
accessoires sont conformes aux conditions de la Directive de l’Union Européenne 1999/5/EC sur les
équipements de terminaison radioélectriques et de télécommunications, 3.1(a), 3.1(b), 3.2.
Wir erklären in alleiniger Verantwortung, dass die in diesem Handbuch aufgeführten Produkte allein und in
Verbindung mit den von uns hergestellten Zubehörerzeugnissen den grundlegenden Vorschriften und
Bestimmungen der EG-Richtlinie 1999/5/EC, Funkund Telekommunikationsendgeräte, Abschnitte 3.1(a),
3.1(b) und 3.2 entsprechen.
Vi tar ansvar för att produkten/produkterna som beskrivs i manualen, också i kombination med våra tillbehör,
överenstämmer med de väsentliga krav som beskrivs i 3.1(a), 3.1(b), 3.2 i Rådets direktiv om radioutrustning
och teleterminalutrustning (1999/5/EG).
A copy of the “Declaration of Conformity” certificate can be found on www.neceurope.com.
Notices on Memory Card Usage
• Use only "Memory Stick Duo" (up to 128MB) in the e616.
• Always insert/remove the memory card while the handset power is off. If you remove the memory card
while an application is writing into it, it may be damaged.
• Make sure to insert the memory card in the right direction otherwise, the device may be damaged.
• To check whether a memory card is damaged, use the check disc function. For how to check the memory
card, refer to Check mem. card on page 95.
• If a damage cannot be fixed by the check disk function, format the memory card.
• The memory card cannot be used for recording copyright-protected data, such as music, because it is
not equipped with MagicGate (a copyright protection system).
• Even if this memory card is used with "Memory Stick PRO" compliant products, the data read/write speed
of this medium will not change.
• Always insert the memory card with the read-only lock unlocked.
• When you set the read-only lock to "LOCK," data cannot be recorded, edite d, or erased. Use this lock
function when using the card with other devices, such as a PC.
• Use a sharp object, such as a ballpoint pen, to move the read-only lock.
Emergency Services and Safety Precautions PL-6

• Data may be damaged if:
- You remove the memory card or turn off the unit while it is reading or writing data.
- You use the memory card in a location subject to the effects of static electricity or electric noise.
• We recommend that you make a backup copy of important data that you record on the memory card. To
make a backup, copy the data to a PC hard disk, etc.
• Do not write forcefully on the label.
• Carry and store the memory card in its case.
• To avoid damage or contamination, do not touch the connector of the memory card.
• Prevent dust, dirt, and/or foreign objects from getting into the adapter.
• Do not strike, bend, or drop the memory card.
• Do not disassemble or modify the memory card.
• Do not allow the memory card to get wet.
• Do not store the memory card in a location that is:
- Extremely hot, such as in a car parked in the sun.
- Under direct sunlight.
- Very humid or subject to corrosive substances.
• Data read/write speed may vary depending on the combination of the memory card and "Memory Stick
Duo" compliant product you use.
• Do not insert the memory card directly into standard "Memory Stick" compliant products.
• Insert the memory card fully in to the adapter until it clicks into place. Otherwise, it will not operate
correctly.
Copyright Notice
• The video/audio recordings you make/download are protected by copyright laws. They are for personal
use only and must not be otherwise used without the permission of the copyright owner.
Bluetooth®
• This product complies with Bluetooth® Specification Ver1.1. It can establish a dialup and headset
connection using Bluetooth
• In countries where the use of Bluetooth
Bluetooth
• Use of Bluetooth
®
function is set to OFF.
®
technology is prohibited on board aeroplanes.
®
technology.
®
wireless technology is not allowed, you must ensure that the
PL-7 Emergency Services and Safety Precautions

• The Bluetooth word mark and logos are owned by the Bluetooth SIG, Inc. and any use of such marks by
NEC is under license. Other trademarks and trade names are those of their respective owners.
• Bluetooth
®
can be used within a range of approximately 10m. Because of the nature of the radio wave ,
this range varies depending on location and the receiver.
• When using Bluetooth
larger.
• Note that when the settings of this product are reset, Bluetooth
• Note that the handset must be switched on to use Bluetooth
handset is not prohibited and will not cause interference or danger.
®
headset, the sound quality may drop as the distance from the handset becomes
®
registration information is also deleted.
®
. Before use always ensure that the use of a
Emergency Services and Safety Precautions PL-8

Contents
Emergency Services and Safety Precautions ........................................................................................1
Emergency services ..............................................................................................................................1
Contents .....................................................................................................................................................1
What’s e616? ..............................................................................................................................................1
Views, Keys, Display and Sub-Display of e616 ....................................................................................1
Setup ..........................................................................................................................................................5
USIM Card ............................................................................................................................................5
To Insert the USIM Card .................................................................................................................5
To Remove the USIM Card .............................................................................................................5
Battery ...................................................................................................................................................6
To Insert the Battery .......................................................................................................................6
To Remove the Battery ...................................................................................................................6
To Charge the Battery Using the Charger ......................................................................................7
Memory card .........................................................................................................................................9
What is "Memory Stick Duo™"? .....................................................................................................9
Date and Time .....................................................................................................................................10
Power On/Off ...........................................................................................................................................11
Power On/Off ...................................................................................................................................... 11
To Power On ................................................................................................................................. 11
To Power Off ................................................................................................................................. 11
Power Saver .......................................................................................................................................12
Setting Clock .......................................................................................................................................12
To Set Clock .................................................................................................................................12
Making and Receiving Calls ...................................................................................................................13
Making a Voice Call ............................................................................................................................14
To Make a Voice Call ....................................................................................................................14
-CL-1- Contents

Call Logs .......................................................................................................................................17
Receiving a Voice Call ........................................................................................................................18
To Receive a Call ..........................................................................................................................18
Voicemail ......................................................................................................................................20
During a Voice Call .............................................................................................................................20
To Make a Second Call .................................................................................................................20
To Receive a Second Call ............................................................................................................21
To Switch to a Grouptalk ...............................................................................................................21
Other Possible Operations During a Call ......................................................................................22
Making and Receiving a Video Call ....................................................................................................24
To Make a Video Call to a Video Capable Handset ......................................................................24
To Make a Video Call to a PC with Webcam ................................................................................25
To Receive a Video Call ...............................................................................................................25
Operations During a Video Call ....................................................................................................27
Showing and Hiding Your CLI .............................................................................................................28
To Hide Your Number When Making a Call ..................................................................................29
Text Entry .................................................................................................................................................30
Multitap Text (ABC) Input ....................................................................................................................31
T9® Text Input .....................................................................................................................................31
Numeric Input ......................................................................................................................................32
Symbol Input .......................................................................................................................................33
Text edit ...............................................................................................................................................34
To Enter a Space ..........................................................................................................................34
To Insert a New Line .....................................................................................................................34
To Change the Case .....................................................................................................................34
To Change to Delete/Backspace Mode ........................................................................................34
To Change to Insert/Overwrite Mode ............................................................................................34
To Delete Characters ....................................................................................................................34
Contents -CL-2-

To Copy and Paste the Text ..........................................................................................................35
To Cut and Paste the Text ............................................................................................................35
Display Information .............................................................................................................................37
Browser ....................................................................................................................................................38
Browser Menus ...................................................................................................................................38
To End a Browser session ............................................................................................................45
To Download a file and Save it in e616 File Manager ..................................................................45
To Register a Bookmark ...............................................................................................................45
Advanced Features .................................................................................................................................47
Video Call (available in 3G area only) .................................................................................................47
To Make a Video Call to a Video Capable Handset ......................................................................47
Photo/Video Camera ...........................................................................................................................48
To Take a Photo/Make a Video and Send it Attached to a Message ............................................48
Multiple selection ................................................................................................................................49
To Select Multiple Items ................................................................................................................49
Multi-call/Multi-task .............................................................................................................................49
To Start/Switch Task During Another Task ....................................................................................50
High-Speed Data Communications (transfer) .....................................................................................50
Other Features of e616 .......................................................................................................................51
How to Use Menu Function ....................................................................................................................54
Menu Functions Operations ................................................................................................................55
To Select Menus by Numbers .......................................................................................................55
To Adjust the Display Colour Contrast ..........................................................................................55
To Select the Home Screen Image ...............................................................................................56
To Turn On/Off the Any key answer Function ...............................................................................57
Quick Menu and Home Screen Shortcut ............................................................................................59
Taskbar ...............................................................................................................................................60
Menu Functions List ............................................................................................................................61
-CL-3- Contents

Message ...................................................................................................................................................64
Overview .............................................................................................................................................65
Message Menus ..................................................................................................................................66
Writing and Sending a New Message .................................................................................................70
To Write and Send a New Text Message ......................................................................................70
To Write and Send a New Video Message ...................................................................................71
To Write and Send a New Multimedia Message ...........................................................................73
To Write and Send a New Email ...................................................................................................74
To Edit a Slide Show .....................................................................................................................77
Receiving and Reading a Message ....................................................................................................78
To Receive a Video Message or Multimedia Message .................................................................78
To Receive a Video Message/Multimedia Message Manually ......................................................79
To Read a Message...................................................................................................................... 79
To Control the Multimedia Message Player ..................................................................................83
Replying and Forwarding ....................................................................................................................83
To Reply to a Received Message in Inbox ................................................................................... 83
To Forward a Received Message in Inbox ...................................................................................84
To Reply to a Received Message .................................................................................................85
Message Memory Maintenance ..........................................................................................................85
Creating Folders ...........................................................................................................................85
Remote mailbox ............................................................................................................................86
Copying or Moving Messages ......................................................................................................86
To Copy/Move Messages to the Memory Card ............................................................................86
To Create a Folder under My folders ............................................................................................86
File manager ............................................................................................................................................88
Handset memory .................................................................................................................................89
Memory card .......................................................................................................................................91
Operations ..........................................................................................................................................93
Contents -CL-4-

Memory card tool ................................................................................................................................95
Contacts ...................................................................................................................................................96
Contact Entries ...................................................................................................................................96
To Register a New Entry in the Contact ........................................................................................97
To Add a New Contact Group .......................................................................................................97
Java™ .....................................................................................................................................................100
Applications .......................................................................................................................................100
To Run Downloaded Application .................................................................................................100
Set permissions ..........................................................................................................................102
Settings .......................................................................................................................................102
Multimedia centre ....... ..................... ..................... ..................... ..................... .......................................103
Capture .............................................................................................................................................104
Camera Capture Screen .............................................................................................................104
Camera Options menus ..............................................................................................................107
Camera Settings .........................................................................................................................108
To Take a Photo ..........................................................................................................................109
To Make a Video ......................................................................................................................... 110
To Record Sound ........................................................................................................................ 111
Player ................................................................................................................................................ 112
To View an Image File ................................................................................................................ 113
To Play a Video File .................................................................................................................... 115
To Play an Audio File .................................................................................................................. 117
Connections ........................................................................................................................................... 119
Bluetooth® ........................................................................................................................................ 119
To activate Bluetooth .................................................................................................................. 119
To use a Bluetooth headset ........................................................................................................120
To establish dial-up connection for PC by Bluetooth ..................................................................121
To access the Bluetooth options screen .....................................................................................124
-CL-5- Contents

To establish or cancel Bluetooth connection for registered devices ...........................................125
USB ...................................................................................................................................................126
To Establish a Dialup Connection to a PC using an USB Cable .................................................126
Data exchange ...........................................................................................................................126
To activate Data Exchange .........................................................................................................127
To Transfer Data between the Handset and a PC ......................................................................127
Synchronisation ................................................................................................................................127
To perform local USB synchronisation ........................................................................................ 128
To perform OTA remote synchronisation ....................................................................................129
Synchronisation Options .............................................................................................................129
To Register a Server ...................................................................................................................130
Synchronisation Settings ............................................................................................................130
Settings ..................................................................................................................................................133
Handset settings ...............................................................................................................................134
Video calls .........................................................................................................................................137
Screen settings .................................................................................................................................138
Network .............................................................................................................................................139
Security .............................................................................................................................................140
Supplementary ..................................................................................................................................142
Date and time ....................................................................................................................................144
Language ..........................................................................................................................................145
Reset .................................................................................................................................................145
Toolbox ...................................................................................................................................................146
Calendar ...........................................................................................................................................147
To Display Your Calendar ...........................................................................................................147
To add a new calendar entry ......................................................................................................148
To edit a calendar entry ..............................................................................................................151
To synchronise or transfer calendar entries between e616 and a PC ........................................151
Contents -CL-6-

To delete a calendar entry or entries ..........................................................................................152
To Do .................................................................................................................................................153
To Add a New To Do Task ..........................................................................................................153
To Edit To Do Tasks ....................................................................................................................154
To Delete To Do Tasks ................................................................................................................155
To Display To Do List or Filter List ..............................................................................................155
Alarm clock .......................................................................................................................................156
To Set an Alarm ..........................................................................................................................156
To Edit an Alarm .........................................................................................................................157
To Delete Alarms ........................................................................................................................158
Calculator ..........................................................................................................................................158
Calculator ...................................................................................................................................158
To Use the Calculator .................................................................................................................159
Currency Calculation ..................................................................................................................159
To Convert one Currency to Another ..........................................................................................159
Notepad ............................................................................................................................................160
To Create a New Notepad Entry .................................................................................................160
To Edit a Notepad Entry ..............................................................................................................160
To Delete a Notepad Entry .........................................................................................................161
Call memo .........................................................................................................................................162
To Listen to a Call Memo ............................................................................................................162
To Delete a Call Memo ...............................................................................................................162
Shortcut Keys ........................................................................................................................................163
Index .......................................................................................................................................................170
-CL-7- Contents

Contents -CL-8-
What’s e616?
The e616 combines a wide range of features into a technologically advanced handse t, capable of operating
in UMTS (Universal Mobile Telecommunication System), also known as 3G, GSM (Global System for Mobile
Communications) or 2G, and GPRS (General Packet Radio Service) or 2.5G.
3G will allow much greater data speeds than 2G/2.5G networks and will enable you to make video calls, send
multimedia messages and view photos and videos and much more.
Views, Keys, Display and Sub-Display of e616
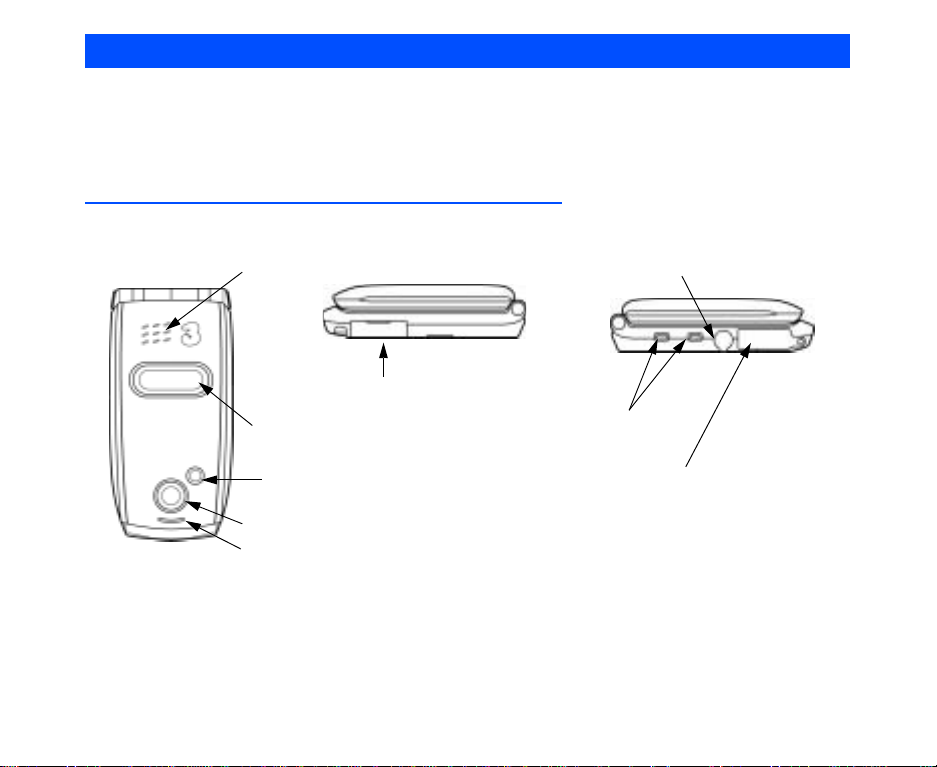
Views
Speaker
Memory card slot
Headset connector
Sub-display
(Small Screen)
Camera light
Camera (outward)
LED indicator
Side keys
I/O connector for USB cable or charger
-1- What’s e616?
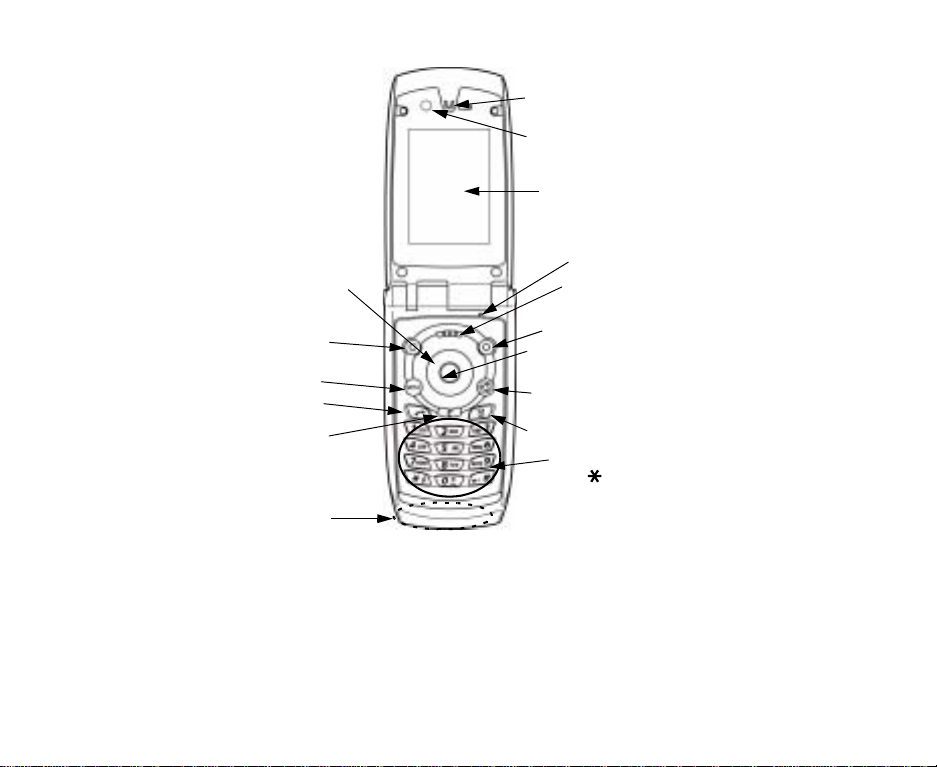
Keys
Earpiece
Camera (inward)
Display (Refer to the next page.)
8-Way navigation
(Up/Down/Left/Right) key
Softkey 1 (SK1)
MENU key
Start key
C (Clear) key
Internal antenna
What’s e616? -2-
Microphone
Options menu key
Softkey 2 (SK2)
Enter key
Triangle key
End (On-Off) key
Keypad characters
(0-9, and #)
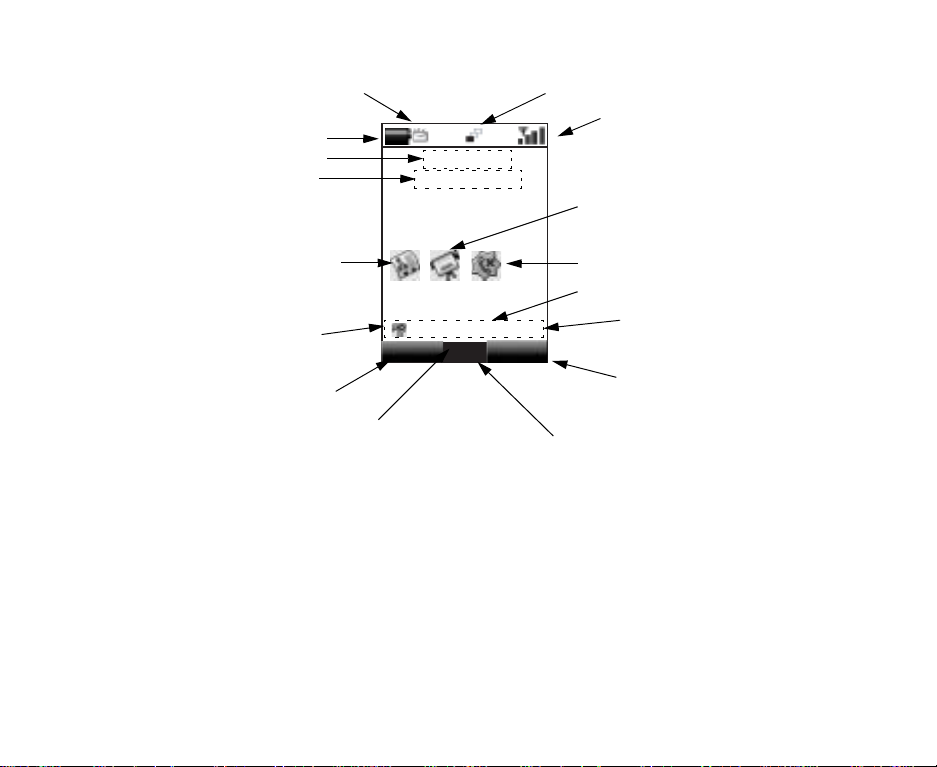
Display
Home screen (example)
New message
Battery level
Service provider name
Operator name
Multi-tasking indicator
Signal strength
Shortcut to Camera
Shortcut to Contact list
Missed voice call
Date
Help line***
Handset profile*
Camera
11/08/2003
12:34p
...
Msg
SK2
SK1
Home time
Options menu indicator**
* Handset profile icon indicates the current handset operation mode: standard profile, meeting profile,
outdoor profile, or car profile. (Refer to Handset profile on page 136.)
** The Options menu indicator is displayed whenever there is an Options menu list available for that
screen/application/function. Press the Options menu key to display the Options menu list. The
indicator disappears when the Options menu list is displayed.
*** On the Help line area, guidance information for the highlighted function/menu/item is displayed.
For example, the icon name for Main Menu, the number of characters remaining in a character input
field or hints for hidden functions are displayed.
-3- What’s e616?

Sub Display
Clock display
Battery level
New (unread)
message indicator
䎰䏒
Received Signal
Strength Indicator
#
Icons
Playback display
Player status
Play time
00:36
Incoming call display
09019680611
Unread message
Message memory full
In voice call
In video call
On hold
Voicemail
Videomail
Line 1 or 2
Battery
Radio field level
Received Signal
Strength Indicator
Memory card
Compass
Browsing SSL server
Packet communication
USB connected
Bluetooth connected
Area mode (Dual SIM/Manual)
Area mode (Single SIM)
Voicemail for line one and two
What’s e616? -4-

Setup
Before you use your handset you will need to carry out the following actions:
• Insert a valid USIM (Universal Subscriber Identity Module) card
• Charge the battery
• Insert the memory card (Memory Stick Duo™ in the side slot) (optional)
• Set the date and time
This section will guide you through this step by step.
USIM Card
When you become a subscriber to 3, you are issued a USIM card with a security code or PIN (Personal
Identification Number). The USIM card contains your personal subscriber data and must be inserted into your
handset.
If the USIM card is removed then the handset becomes unusable until a valid USIM is inserted. T he holder
for the USIM card is located underneath the battery.
Always disconnect the charger and other accessories from your handset before inserting and removing
your USIM card.
To Insert the USIM Card
1 Ensure that the power is off. If the power is on, press and hold the End (On-Off) key until power is off.
2 Remove the battery. (Refer to the illustration on the next page.)
3 Slide the USIM card into the USIM card holder.
4 Replace the battery.
To Remove the USIM Card
1 Ensure that the power is off. If the power is on, press and hold the End (On-Off) key until power is off.
2 Remove the battery. (Refer to the illustration on the next page.)
3 Slide the USIM card out of the USIM card holder.
-5- Setup
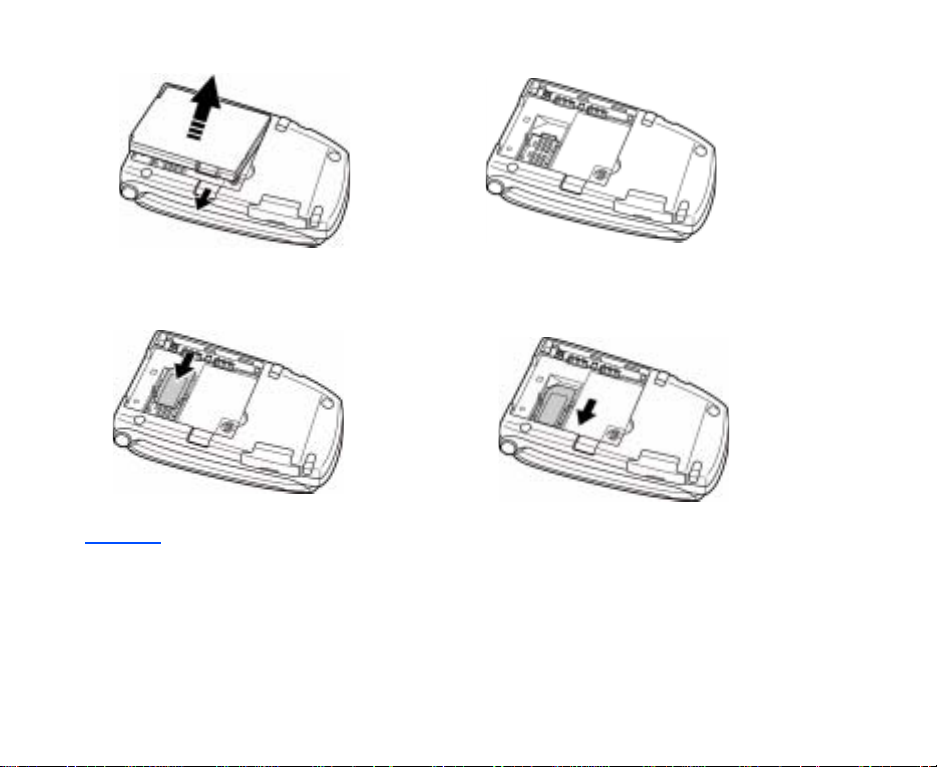
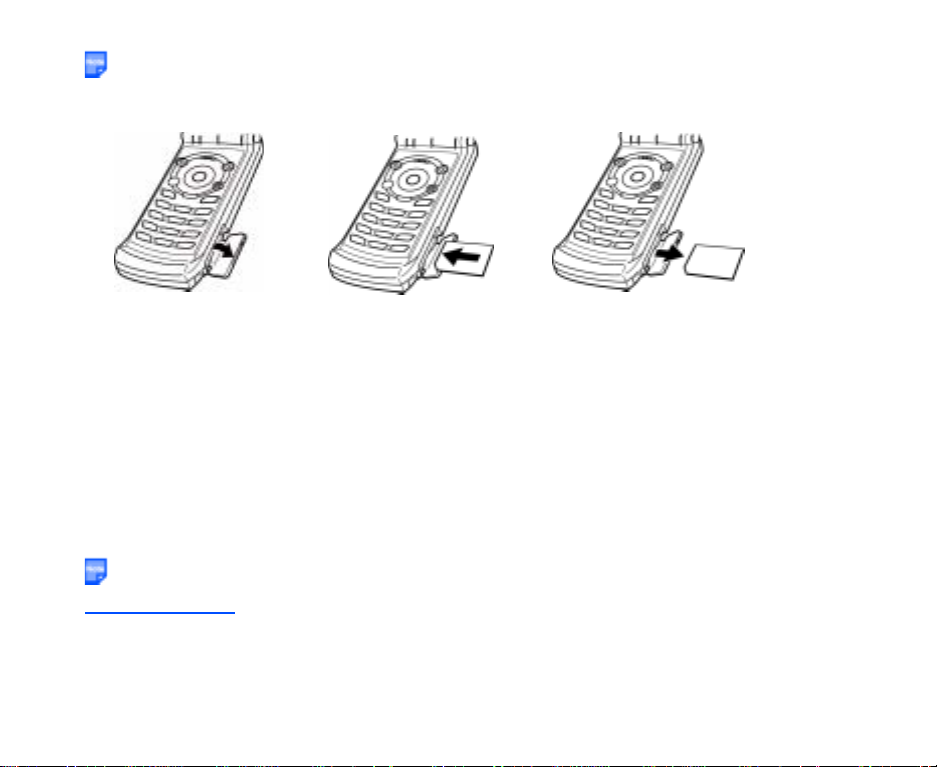
1 Remove the battery. 2 The USIM card holder
3 Insert the USIM card into the USIM card holder. 4 Slide and lock the USIM card holder.
.
Battery
To Insert the Battery
Place the bottom of the battery into position and then push down on the upper section of the battery until it
clicks into place.
To Remove the Battery
1 Ensure that your handset is switched off. If the handset is switched on, press and hold the End (On-
Off) key until power is off.
Setup -6-
2 Push up the release catch at the top of the battery and lift the battery away from the handset.
The battery is not fully charged when you buy your handset but there may be enough power in the battery to
turn the handset on. A battery that has not been used for a long period of t ime needs to be completely
discharged and then recharged two or three times before reaching full capacity. Charge the battery by
following the procedure indicated below.
The battery can also be charged whenever you wish without affecting the performance of the handset.
The e616 automatically switches off if the battery voltage is too low.
Batteries have a life cycle. If the battery does not last as long as it used to, the battery life may be coming
to an end. Replace the battery with a new one of the same type.
When not using the battery for a long period, remove it from the e616 and store in a place with low
humidity and low temperature.
Charging
Charge the battery by using the charger supplied with your handset. When the battery is fully charged, a full
battery power level icon will be displayed. Refer to Low Battery Alarm on the next page for details.
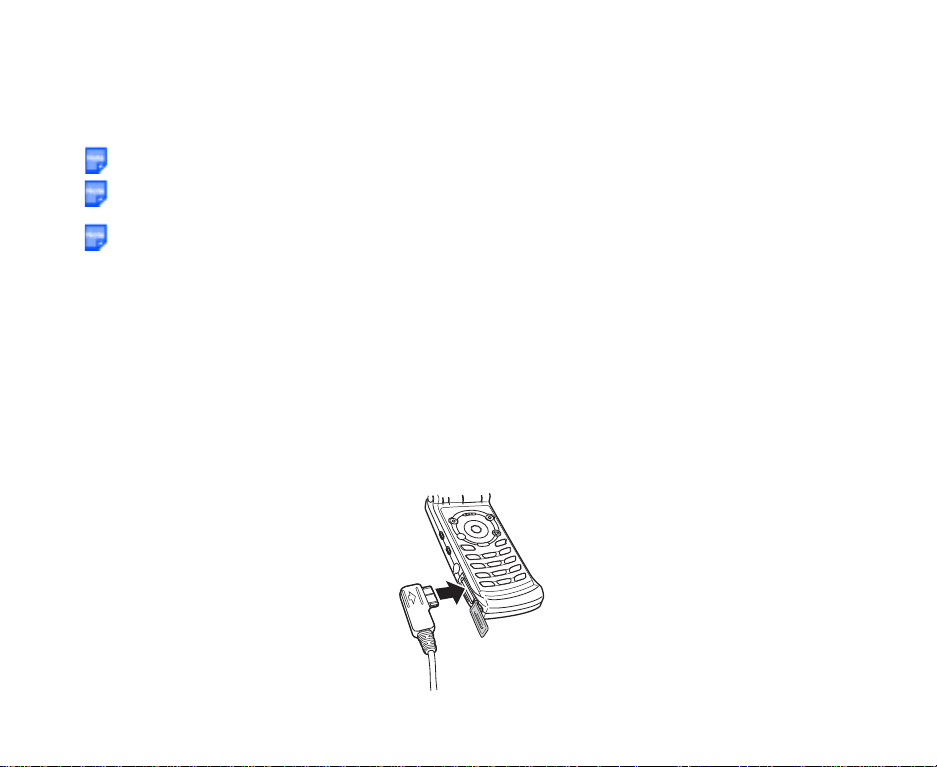
To Charge the Battery Using the Charger
1 Make sure that the battery is attached to your handset.
2 Connect the charger plug to the e616 I/O connector. See the diagram on the next page.
3 Plug the charger into a power socket. The red LED indicator on the outside of your e616 will light up
when charging is in progress and go off when charging is completed.
4 After charging the battery, tilt the charger plug upward and pull it away from the e616 I/O connector.
-7- Setup
Even if the handset remains connected to the charger, battery residual capacity may decrease when the
handset is used.
The battery must be charged in the room temperatures between 0°C and 45°C. Ensure that your handset
is switched off. If the handset temperature is high, wait until it returns to a normal temperature.
The recommended battery charge time is approximately two hours.
Stop charging the battery if charging is not completed within five hours.
When charging the battery, always fold and close the handset. If the handset is left open while charging,
it may take longer to complete the charge.
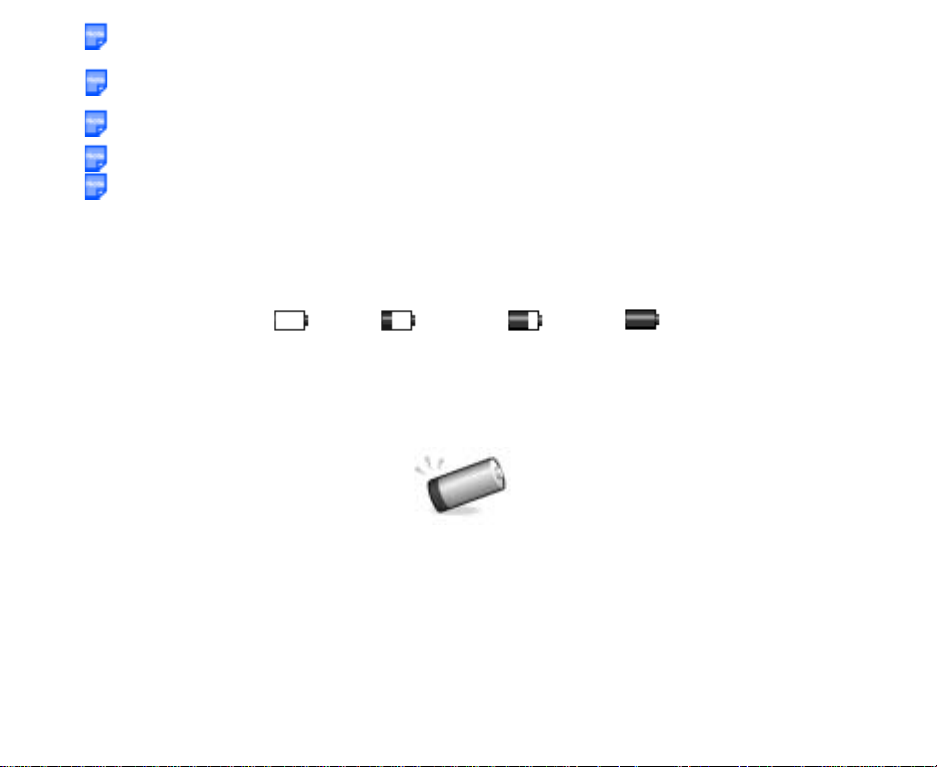
Low Battery Alarm
The battery power level (4 levels) is indicated by the following icons:
Empty Battery
When the battery runs out, the following image will blink on the display. A low-power warning alarm sound will
come on for approximately 10 seconds. Press the End key to turn off the alarm. After approximately one
minute, the power will be turned off.
During a call, the image and an intermittent alarm sound indicate low-power. After approximately 60 seconds
the call will be disconnected.
The volume level of the low-power warning alarm depends on the ringtune volume level on standby and the
ear piece volume during a call.
Setup -8-
Low Battery Medium Battery Full Battery

Memory card
The memory card slot equipped on the side of e616 can read/write a "Memory Stick Duo™" with a maximum
of 128MB capacity. "Memory Stick Duo" will be generally called "memory card" in this manual. You can use
this memory card to store data files, for example captured photo, video or audio, calendars/To Do entries (as
vCalendar files) and contact entries (as vCard files). When inserted into its adaptor, the memory card can be
used with other "Memory Stick" compliant devices such as a PC, to exchange data: save your data to or
import data from the device. Refer to File manager on page 88 for details on the data files.
Always insert/remove the memory card with the handset power off.
The following shows the memory card and its components.
Memory Stick Duo
INSERT
Label
Memory Stick Duo Adaptor
Insert Memory Stick Duo in this direction
Read-only lock
Connector (do not touch)
Adaptor
What is "Memory Stick Duo™"?
"Memory Stick Duo™" is a new, compact, portable, and versatile IC (integrated circuit) recording medium
with a data capacity that exceeds a floppy disk. "Memory Stick" is specially designed for exchanging and
sharing digital data among "Memory Stick" compliant products. Because it is removable, "Memory Stick Duo"
can also be used for external data storage.
"Memory Stick" is available in two sizes: standard size and compact "Memory Stick Duo™" size. Once
attached to a Memory Stick Duo adapter, "Memory Stick Duo" becomes the same physical size as standard
"Memory Stick" and thus can be used with products compliant with standard "Memory Stick." "Memory Stick"
is available in the various types and sizes to meet various requirements in functions. Out of these types,
"Memory Stick Duo" can only be used with e616.
-9- Setup
To insert the memory card
Always insert/remove the memory card with the handset power off.
• Insert the memory card into the slot until the memory card is fully inserted into the slot, as shown in the
figure below:
Open the memory card slot
Insert the memory card
Remove the memory card
To remove the memory card
1 Push in memory card with the tip of your finger into the slot.
The memory card is released from the slot.
2 Carefully pull the memory card out of the slot.
To format the memory card
1 Insert the memory card into the slot.
2 Press the MENU key and select File Manager, and Memory card tool.
3 Select Format mem. card.
4 Follow the instructions on the handset to format the memory card.
During formatting, all the data stored in the memory card is erased.
Date and Time
When using your e616 for the first time, please remember to set the date and time. This will ensure that all of
your e616 functions are accessible. For further instructions, refer to Setting Clock on page 12 and Date and
time on page 144.
Setup -10-

Power On/Off
Y ou can use your handset after set up of the e616 is completed. This section describes how to turn the power
on/off, how to enter the PIN code, and how to set the clock to use the e616.
Power On/Off
You can power on or off on the e616. Proceed as described below.
To Power On
1 Ensure that your USIM card is in your e616 and that the battery is charged.
2 Press and hold the End (On-Off) key until power is on.
The term “press and hold” is equivalent to a key press time of approximately 2 seconds.
To Power Off
In standby mode, press and hold the End (On-Off) key until power is off. There may be some delay while the
handset powers down. Do not repower the handset during this time.
-11- Power On/Off

Power Saver
The power saver function turns the screen off when the handset is left without any operation for a certain
period of time. By pressing any key, you can turn the screen on.
Setting Clock
When using your e616 for the first time you will be prompted to set the current date and time.
To Set Clock
1 Press the MENU key, select the Settings icon, select Date and time, Set date and time, and Home
time.
2 Enter the current date and time. Refer to Date and time on page 144 for details.
You may need to set Summer time function.
Power On/Off -12-

Making and Receiving Calls
To make and receive calls, e616 must first be turned on. When the power turns on and the PIN number is
entered, e616 automatically searches for the network registered in the USIM card. When the n etwork signal
is detected by e616, it is indicated by the network name and the radio signal strength icon on the display
screen.
When using the headset, you can start/end a voice call by the switch placed on the microphone.
When the headset is connected, you cannot end a voice call by closing the handset.
The following operations are described:
• Making a Voice Call
• Receiving a Voice Call
• During a Voice Call
• Making and Receiving a Video Call (available in 3G area only)
• Showing and Hiding Your CLI (Calling Line Identification)
-13- Making and Receiving Calls

Making a Voice Call
Voice calls can be made by using the Contact list, directly inputting numbers using the keypad, or by using
the Incoming calls/Outgoing calls list, Missed calls list, Speed dial or One touch dial function. You can also
select a number in a message and call that number. A maximum of 36 digits can be entered to make a call.
For international calls, up to 37 digits including the international code "+" (press and hold 0) can be entered to
dial. When the USIM card supports Alternate Line Service (ALS), the call will be made from the selected line
number.
When a call is made and e616 has an active outgoing call restriction setting, the call will be re jected. When
the receiver of a call has incoming call restriction setting active, the call will also be rejected. In both cases
the reason the call was rejected will be displayed as a message on the screen. (Refer to Call restrictions on
page 143 for details.)
Rejected calls will be diverted to the number registered in "Call forwarding > If busy". This is usually
defaulted to voicemail, depending on the network provider.
Basic Operations
The basic operations for making a voice call are shown below:
To Make a Voice Call
To Do This
1 Input the phone number Input the phone number using the keypad.
Note :To correct mistakes, press the C key briefly to delete the
last number, or press and hold the C key to repeat
deleting.
2 Dial the phone number Press the Start key.
3Talk
4 End the call Press the End key.
Note :When the headset is connected, closing the handset will
not end the call.
Making and Receiving Calls -14-

Useful Tips
Useful tips for making a call are shown below:
Operation Procedure
Making an emergency
call
Making an
international call
Making a call using
the Contact list
Making a call from
Incoming calls list
Making a call from
Outgoing calls list
Input the emergency number 999 (UK only), 000 (Australia only),
or 112.
Press the Start key to make an emergency call.
Tell the operator your location and which emergency service you
require: ambulance, police, rescue services, etc. If possible,
remain stationary and keep the line connected.
Press and hold 0 to display a "+" symbol.
Input the international country code, then the phone number,
starting with the area code.
Press the Start key to make an international call.
Press the MENU key and select Contact, or press the Up or
Down key.
Note :Pressing the Down key, you can scroll the contact list in
Note :Press the keypad character to display the contact entry
Search and select the addressee’s phone number.
Press the Start key to make a call using the Contact list.
Press the Left key, or the Options menu key and select Call
logs and Incoming calls.
Select the phone number on the list.
Press the Start key to make a call from the Incoming calls list.
Press the Start key, or the Options menu key and select Call
logs and Outgoing calls.
Select the phone number on the list.
Press the Start key to make a call from the Outgoing calls list.
the alphabetical order.
starting with the letter. For example, press the 2 key twice
to display the Contact entry list starting with B.
-15- Making and Receiving Calls

Operation Procedure
Making a call from
Missed calls list
Speed dial Enter a contact memory number from 2 to 99. Press Start key to
One touch dial Press and hold the keypad characters 2 to 9 to call the first
Pause Dial Input the phone number, then press and hold # to insert a pause
Entering the subaddress of a phone
number
Press the Right key, or the Options menu key and select Call
logs and Missed calls.
Select the phone number on the list.
Press the Start key to make a call from the Missed calls list.
call the phone number in the contact entry.
Note :Pressing 1 and then Start key will make a call to the
voicemail centre.
phone number registered for that memory number.
Note :Pressing 1, 2, 3 and then the Start key will make a call to
the voicemail centre.
(displayed as p). Input the numbers to call, inserting pauses
where necessary. Press the Start key to dial the input numbers.
When the other party answers the call, press the SK1 (Send) key
to dial the numbers before the next pause. Keep pressing the
SK1 key until all the required numbers are dialed.
After inputting the phone number, press the key and input the
sub-address number. You can specify one sub-address (office
extension number, etc.) for a phone number.
Making and Receiving Calls -16-

Call Logs
Call logs are lists of call records such as incoming/outgoing/missed calls. From the Home
screen, press the Options menu key and select Call logs to see Call logs. A maximum of 20
entries are saved each call log. You can make a call using these logs. The following settings and
operations are provided:
Item Description
Outgoing calls Displays the list of outgoing calls.
Note :You can see the Outgoing calls by pressing Start key
from the Home screen also.
Incoming calls Displays the list of incoming calls.
Note :You can see the Incoming calls by pressing Left key
from the Home screen also.
Missed calls Displays the list of missed calls.
Note :You can see the Missed calls by pressing Right key from
the Home screen also.
Clear all logs Deletes all the log data.
Automatic delete Turns the automatic deletion function on/off. This function
Duplicate records Selects whether to allow multiple records to/from the same
automatically deletes the call logs when the handset power is
turned off.
number to be made on the log or not.
Select Allow or Do not allow.
-17- Making and Receiving Calls

Receiving a Voice Call
When a voice call is made to your 3 number, the ringtune, the illumination and the vibrate function will be
activated (activation depends on the settings). When Calling Line Identification (CLI) function has been
activated by the caller, the caller’s phone number will be displayed. If the calling party opts to hide their
phone number, e616 will show a message indicating that the phone number has been withheld.
Basic Operations
The basic operations for receiving a voice call are shown below:
To Receive a Call
To Do This
1 Answer the call Press the Start key or SK1 (Answer) key.
Note :When Any key answer function is activated, you can
press any key except the SK2 (Ignore) key, End key,
Triangle key and the Options menu key to answer the
call. Refer to Call options on page 134 for details.
Note :When the headset is connected, pressing the headset
switch will also answer the call.
2Talk
3 End the call Press the End key, or fold to close the handset.
The call is disconnected, and the call time duration is
displayed.
Note :When the headset is connected, closing the handset will
not end the call.
Useful Tips
Useful tips for receiving a call are shown below:
Operation Procedure
Turning off the
ringtune
You can mute the ringtune by setting the active handset profile’s
Ringtune volume to Silent. Refer to Handset profile on page
136.
Making and Receiving Calls -18-

Operation Procedure
Rejecting a call While receiving a call, do one of the following:
• Press the End key,
• Press the SK2 (Ignore) key
• Press the Options menu key and select Ignore call, or
• Close the handset
Note :Rejected calls will be diverted to the number registered in
"Call Forwarding > If busy". This is usually defaulted to
voicemail, depending on the network operator.
When you miss a call If for some reason you miss a call, it will be indicated as a missed
Rejecting the second
call
Forwarding a voice
call (available in 3G
area only)
call by an icon on the Home screen. The missed call will be
saved to the Missed calls list.
Press the Right key or press the Options menu key and select
Call logs then Missed call to display the Missed calls list.
When you display Missed calls, the icon disappears.
Press the Options menu key and select Ignore call.
Note :Rejected calls will be diverted to the number registered in
"Call Forwarding > If busy". This is usually defaulted to
voicemail, depending on the network operator.
Press the Options menu key and select Divert call.
The registered call forwarding number is displayed.
Check the phone number and press the SK1 (OK) key.
The call will be diverted to the phone number registered in Call
forwarding setting. (Refer to Call forwarding on page 142 for
details.)
If you want to divert a call to another number, or there is no
phone number registered, input or search the phone number.
-19- Making and Receiving Calls

Voicemail
When you forward a call to voicemail centre, the caller may leave a message in the voicemail
centre for you. If a message is left, the voicemail icon will be displayed on your screen.
The following settings are available for Voicemail:
Item Description
Voicemail settings Clearance type: Sets how the voicemail icon is cleared from the
Home screen. Select Call voicemail to clear the icon when you
call the voicemail centre, or Network notify to clear the icon
when the network sends a notification to the handset that you
have retrieved the voicemail.
During a Voice Call
During a voice call, the following operations are possible: making and receiving a second call, putting the call
on hold, call waiting, Grouptalk, adjusting earpiece volume, adding the caller’s number to the contact list,
searching the contact list, recording a voice note and using the shortcut keys (when any key answer function
is turned off). Some of the operations are only available if you have subscribed to certain services. Ask 3
about details on service subscription.
Basic Operations
The possible operations during a voice call are shown below:
To Make a Second Call
To Do This
1 Input the second phone number
2 Dial the second phone number Press the Start key.
Input numbers are dialed and the first call will automatically be
put on hold.
3Talk To switch calls: Press the SK1 (Swap) key or press the
Options menu key and select Swap calls.
Making and Receiving Calls -20-

To Do This
4 End the calls To end the current call: Press the Options menu key and
select End call and End active call.
To end the call on hold: Press the Options menu key and
select End call and End held call.
To end both calls: Press the End key.
Note :When the headset is connected, closing the handset will
not end the call.
T o Receive a Second Call
To Do This
1 (Another call received during a call)
Answer the second call
2Talk To switch calls: Press the SK1 (Swap) key, or press the
3 End the call To end the current call: Press the Options menu key and
Press the SK1 (Answer) key. The first call will automatically be
put on hold.
Options menu key and select Swap calls.
select End call and End active call.
To end the held call: Press the Options menu key and select
End call and End held call.
To end both calls: Press the End key.
Note :When the headset is connected, closing the handset will
not end the call.
To Switch to a Grouptalk
To Do This
1 Switch to Grouptalk (When there are two calls on-line: the current call and a held
call)
Press the Options menu key, and select Join calls.
-21- Making and Receiving Calls

To Do This
2Talk Note :Press the Options menu key and select Grouptalk to
3 End the call Press the End key.
manage the list of other parties in the Grouptalk.
Pressing the SK1 (Split) key will split the selected caller
from the Grouptalk, and the SK2 (Drop) key will drop the
selected caller from the Grouptalk.
Note :When the headset is connected, closing the handset will
not end the call.
Other Possible Operations During a Call
To Do This
Use the Scratchpad If you input keypad characters during a call, the input
Adjust the earpiece volume Press the Side keys to adjust the volume level.
Search the contact list While talking, press the Up and Down key or SK2 (Contact)
Send DTMF You can send Dual Tone Multi Frequency (DTMF) signals
Put a call on hold While talking, press the SK1 (Hold) key, or press the Options
Swapping the connected and held call When you have a connected call and a held call, press the SK1
characters will remain displayed on the screen after the call is
finished. You can use this function as a screen scratchpad.
key to display the Contact list.
during a call. Press the Options menu key, select Settings,
Send DTMF tone and then just input the keypad character
needed.
menu key and select Hold call. The call will be put on hold. To
retrieve the call, press the SK1 (Retrieve) key or press the
Options menu key and select Retrieve call.
(Swap) key, or press the Options menu key and select Swap
calls. The connected call will be put on hold and vice versa.
Making and Receiving Calls -22-

To Do This
Record a Call memo While talking, press the Options menu key and select Call
Activate Settings Press the Options menu key and select Settings. The
Turn the Handsfree function on/off Press the Options menu key and select Handsfree. You can
Turn the Mute function on/off Press the Options menu key and select Mute. You can mute
memo to start recording the conversation.
To stop the recording, press the Enter key.
Both your voice and the other party’s voice will be recorded.
(20 seconds max.) Maximum of 5 call memos can be recorded
in the handset. A call memo is displayed with its date and time
of recording.
To listen to a call memo, press the MENU key and select
Toolbox and Call memo and select the call memo. You can
also delete a call memo by pressing the SK2 (Delete) key.
Refer to Call memo on page 162 for details.
Note :Always ask the other party’s permission to record.
Note :A call memo cannot be attached to messages or copied
to the memory card.
following settings are provided:
Auto answer: Turns on/off the automatic answering function.
Answer key: Selects Use any key or Send key only as the
call answering key.
Auto redial: Turns on/off the automatic redial function.
Send DTMF tones: Enables/disables the sending of DTMF
tones.
Divert to: Sets the phone number to forward the call to.
turn the handsfree function on/off.
function on/off.
-23- Making and Receiving Calls

To Do This
Receive a third call When a third call is received while already there are two calls
on line, the current call and the call held, you can receive the
third call only if you end one of the current/held calls.
Press the Options menu key and select the appropriate option
to end the current/held call.
Making and Receiving a Video Call
(available in 3G area only)
Basic Operations
The operations for making and receiving a video call are shown below:
To Make a Video Call to a Video Capable Handset
To Do This
1 Call a phone number Input the phone number using the keypad, or select the phone
2 Start the video function Press the SK1 (Vid. call) key.
number from the Incoming calls/Outgoing calls/Missed calls
list. Refer to page 26 for how to make a video call to an entry in
your contact list.
Note :You can also make a video call to a phone number (or
characters) highlighted in email and webpage. Pressing
the Enter key with the phone number (or characters)
highlighted will bring you to the call screen.
Note :To correct mistakes, press the C key briefly to delete the
last number, or press and hold the C key to clear the
field.
Note :The video call may take some time to connect. Please
be patient. The connection time will also depend on how
quickly the other party answers the call.
Making and Receiving Calls -24-

To Do This
3 Talk and see Adjust the camera position if necessary.
4 End the call Press the End key.
To Make a Video Call to a PC with Webcam
Video calling to PC may not be available in all countries. Please check with your network provider.
To Do This
1 Select the email address to connect Select the email address from the contact list, the Incoming calls/
Missed calls list, etc.
2 Start the video function Press the SK1 (Vid. call) key.
Note :The video call may take some time to connect. Please be
patient. The connection time will also depend on how
quickly the other party answers the call.
3 Talk and see Adjust the camera position if necessary.
4 End the call Press the End key.
To Receive a Video Call
To Do This
1 Receive a video call You will receive an incoming video call notification.
2 Answer the call Press the Start key or SK 1 (Answer) key to answer and send
the captured image from the active camera to the other party.
Note :To answer the video call without sending your image,
press the SK2 (No video) key. The alternative photo will
be sent to the other party.
3 Talk and see Adjust the camera position if necessary.
4 End the call Press the End key.
-25- Making and Receiving Calls

Useful Tips
Useful tips for making a video call are shown below:
Operation Procedure
Making a video call using the contact
list
Making a video call from the Missed
calls number list
Making a video call from Incoming
calls number list
Rejecting the incoming video call 1 Press the End key, or press the Options menu key and
1Press the MENU key and select Contacts, or press the
Up or Down key.
2 Search and select the addressee’s phone number/email
address.
3Press the SK1 (Vid. call) key to dial the phone number/
email address.
If for some reason you miss a call, it will be indicated as a
missed call by an icon on the Home screen. When you
display Missed calls, or turn the power off, the icon
disappears.
1 Press the Right key to display Missed calls.
2 Search and select the addressee’s phone number/email
address.
3Press the SK1 (Vid. call) key to dial the phone number/
email address.
1 Press the Left key to display Incoming calls.
2 Search and select the addressee’s phone number/email
address.
3 Press the SK1 (Vid. call) key to dial the phone number.
select Ignore.
Making and Receiving Calls -26-

Operations During a Video Call
The following operations are possible during a video call:
Operation Procedure
Zoom in/out Press the Right key to zoom in, or Left key to zoom out.
Turning the microphone on/off
(sending/not sending your voice to
the other party)
Changing the camera direction
(Available only while sending the
camera image)
Turning your camera on/off (sending/
not sending your image to the other
party)
Changing the screen display mode Press the Options menu key and select Screen mode.
Changing the image quality Press the Options menu key and select Picture quality.
Changing the camera mode Press the Options menu key and select Camera mode.
To turn the microphone on/off, do one of the following:
• Press the SK1(Mute/Unmute) key. The SK1 (Mute)
will turn the microphone off, and will not send your
voice to the other party, and SK1 (Unmute) will turn
the microphone on to send your voice to the other
party.
• Press the Options menu key and select Other
settings and Mute settings. Select Mute or Unmute.
Press the SK2 (In/Out) to switch to the other camera.
Press the Options menu key to find the alternative, either
Use live video or Use photo instead, is displayed. Select it
to switch the image to send.
Select My side is smaller (your image will be displayed on
the smaller window), My side is larger (your image will be
displayed on the larger window), Other side only (only the
other party’s image will be displayed), or My side only (only
your image will be displayed).
Select Standard, Better picture (image quality has the
priority), or Faster movement (capture movement has the
priority).
Select Portrait mode, Landscape mode, and Night-time
mode.
-27- Making and Receiving Calls

Operation Procedure
Setting the handsfree mode Press the Options menu key and select Handsfree. Select
Adjusting the colour contrast Press the Options menu key and select Contrast settings.
Setting the lighting mode Press the Options menu key and select Lighting settings.
Setting the call time duration
information
Adjusting the speaker volume Press the Up and Down keys or the side keys.
Handsfree on, or Handsfree off.
When the handsfree function is turned on, the microphone
sensitivity increases, and the other party’s voice is heard
from the speaker.
Select Much brighter, Brighter, Standard, Darker, or
Much darker.
Select Sunny, Cloudy, Automatic, or Indoors.
Press the Options menu key and select Other settings and
Show call length. Select Show call length or Do not show.
Showing and Hiding Your CLI
You can show/hide your 3 number when you make or receive a call. As a default setting, your 3 number is
shown to the caller or the receiver.
To hide your 3 number when making a call, subscribe to the Calling Line Identification Restriction (CLIR)
service. There are two CLIR service subscription settings: permanent and temporary. When permanent CLIR
subscription is set, your 3 number will always be hidden when making a call. When temporary CLIR service is
subscribed to, you can turn on/off this function from Settings, or just input #31#/ 31# before a phone
number to hide/show your 3 number for that particular call.
When forwarding a call, the Connected Line Identity Restriction (COLR) service will hide the forward
destination phone number from the caller.
When making a call, the receiver’s identity (phone number) can be displayed on your handset’s display if you
subscribed to the Connected Line Identity Presentation (COLP) service, and your 3 number will be notified to
the receiver if you have subscribed to the Calling Line Identity Presentation (CLIP). The current subscriptio n
status of these settings can be found and displayed from Settings. (Refer to Settings on page 133 for
details.)
Making and Receiving Calls -28-

Basic Operations
The basic operations for hiding your number are shown below:
To Hide Your Number When Making a Call
(available only when temporary CLIR service is subscribed)
To Do This
1Start Settings Press the MENU key and select Select Settings.
2Display Send my caller ID Select Supplementary, and Send my caller ID.
3 Turn off the own number presentation Select Withhold.
Your telephone number will be hidden when making a call.
-29- Making and Receiving Calls

Text Entry
You can enter characters, numbers and symbols into your handset, for example, when you enter a phone
number to call, add information to the Contact list, write text messages or enter an internet address.
The maximum number of characters allowed in an item or a field is defined as the number of single-byte
characters that can be input. When entering double byte characters such as accents (ë, î, ô, etc.) or triple
byte characters such as the Euro symbol (€), the maximum number of characters will vary accordingly.
When entering text on e616, the word on the line boundary is moved to the next line (wordwrap function).
There are four types of text entry:
• Multitap Text (ABC) Input
• T9® Text Input
• Numeric Input
• Symbol Input
The multitap, T9® and numeric input modes can be switched by pressing the SK1 (Abc/T9/123) key. The
symbol input mode is activated by pressing the # key.
This section describes the procedures for text entry and text editing.
T9® Text Input is covered by the United Kingdom Pat. No. 2238414B, Euro. Pat. No. 0 842 463
(96927260.8) and other patents pending.
Text Entry -30-

Multitap Text (ABC) Input
You press each key as many times as needed to display the character you want to enter.
You can also press 1 several times to select and insert common symbols.
In the following example, to enter dog in a text message.
To Do this
1 Start the message function Press the SK2 (Msg), or press the MENU key and select
2 Set Multitap Text (ABC) Input Mode Select the text box, press Enter Key, press the SK1 (Mode)
3 Enter d Press the (3DEF) key once, then d appears.
4 Enter o Press the (6MNO) key three times, then o appears.
5 Enter g Press the (4GHI) key once, then g appears. Press the Right
Messages. Press the SK1 (New) key, select Text Message.
(Refer to Message on page 64 for details.)
key until ABC is displayed on screen.
Note :Press the key to switch lower case, upper case (shift)
and Caps lock.
key to move to the next character position.
T9® Text Input
You can use T9® Text Input when entering text in text messages, notepad, Todo, Calendar, Contact list etc.
In the T9® Text Input mode, you press each key only once, even if the character you want is not the first
character on the key.
When you press the keys, different words are suggested. If the word you want is not suggested, you can edit
the word and register it to the dictionary for access the next time.
You can select and insert common symbols or emoticons by pressing 1 key and the SK1 (Next) or SK2
(Prev.) key.
In the following example, to enter fog in a text message.
To Do this
1 Start the message function Press the SK2 (Msg), or press the MENU key and select
Messages. Press the SK1 (New) key, select Text Message.
(Refer to Message on page 64 for details.)
-31- Text Entry

To Do this
2 Set T9® Text Input Mode Select the text box, press Enter key. Press the SK1 (Mode)
3 Enter fog Press the (3DEF) (6MNO) (4GHI) keys.
4 Convert and select the word you want Press the SK1 (Next), SK2 (Prev.) key or # key to display the
5 If the word you want is not
suggested, edit the word and
register it by using the Multitap
Input Mode
key until T9 is displayed on screen.
Note :Press the key to switch lower case, upper case (shift)
and Caps lock.
word you want, then press the Right key to select or the 0 key
to select and insert a space.
ex. If dog appears as the 1st suggestion, you press the SK1
(Next) key or # key to continue. If the 2nd suggestion is the
word you want (fog), then you enter the Right key or 0 key to
select the word.
Enter fog by using the Multitap Input Mode. The word is
registered in the dictionary. If you enter the (3DEF) (6MNO)
(4GHI) keys the next time, you can select the word fog.
Numeric Input
If you want to input a series of numbers, you can change to numeric input mode.
In the following example, to enter 364 in a text message.
To Do this
1 Start the message function Press the SK2 (Msg), or press the MENU key and select
2 Change to Numeric Input Mode Select the text box, press Enter key. Press the SK1 (Mode)
3 Enter 3 Press the (3DEF) key; then 3 appears.
4 Enter 6 Press the (6MNO) key; then 6 appears.
5 Enter 4 Press the (4GHI) key; then 4 appears.
Messages. Press the SK1 (New) key. (Refer to Message on
page 64 for details.)
key until 123 is displayed on screen.
Text Entry -32-

Symbol Input
By pressing the # key in the Multitap Text Input mode, the T9® Text Input mode, or the Numeric Input mode,
the temporary symbol menu is displayed.
Highlight the line in which the symbol you want is located. You can move the highlighted line by using the Up,
Down, Left and Right keys. Find the keypad character displayed above the symbol and press the key.
The temporary symbol menu disappears after inserting a symbol.
The temporary symbol menu can be cancelled by pressing C key.
To input a character from the Greek alphabet or alphabet with accents, select from the symbol menu.
To Do this
1 Start the message function Press the SK2 (Msg), or press the MENU key and select
2 Set Multitap Text (ABC) Input Mode
or T9® Text Input Mode or Numeric
input mode
3 Change to Symbol Input Mode Press the # key. The temporary symbol menu is displayed.
4 Select symbol Highlight the line which includes the symbol you want by using
Messages. Press SK1 (New) or the Options menu and select
New message. Select Text Message and press the Enter key
to open the text box. (Refer to Message on page 64 for
details.)
Press the Options menu key and select ABC, T9, or 123.
the Up, Down, Left, or Right key. Press the relevant key given
above the symbol. The display returns to the previous text input
mode and the symbol is entered.
-33- Text Entry

Text edit
When you edit text entered in the Contact list or messages, you can use the copy, cut, paste and clear
functions in the text input mode as shown below:
To Enter a Space
To enter a space in the text in the Multitap Text Input mode or the T9® Text Input mode, press the 0 key.
To Insert a New Line
To insert a new line in the text, move the cursor to the inserting point of the new line, press and hold the # key
or press the Options menu key and select New line.
To Change the Case
To change the alphabet case, press the key in the Multitap Text Input mode or the T9® Text Input mode.
If the text input mode is the lower case mode in the beginning, press the key once to switch to shift mode
(the next input character will be in uppercase), press the key again to caps lock mode, then press it again
to return to the lower case mode.
To Change to Delete/Backspace Mode
To change to delete/backspace mode, press the Options menu key in the text input mode, select Editing
options, then select Delete or Backspace radio button for Clear mode.
In the Delete mode, you can delete ch aracters after the cursor by pressin g the C key. Pressing and holding
the C key deletes all characters after the cursor.
In the Backspace mode, you can delete characters before the cursor by pressing the C key. Pressing and
holding the C key deletes all characters before the cursor.
To Change to Insert/Overwrite Mode
To change to insert/overwrite mode, press the Options menu key in the text input mode, select Editing
options, then select Insert or Overwrite radio button for Write mode.
In the Insert mode, the cursor is expressed as a vertical line between texts, and you can insert characters at
the cursor position.
In the Overwrite mode, the cursor is expressed as a square over a text/space you can overwrite characters
starting at the cursor position.
To Delete Characters
In the Backspace mode, press the C key to delete the character to the left of the cursor. Pressing and holding
the C key will repeat this operation.
Text Entry -34-

In the Delete mode, press the C key to delete the character highlighted by the cursor. Pressing and holding
the C key will repeat this operation.
To Copy and Paste the Text
To copy and paste text, proceed as described below:
To Do this
1 Activate the copy function Press the Options menu key in the text input mode, then
2 Specify the copy starting point Move the cursor to the starting point of the block to copy by
3 Specify the copy ending point Move the cursor to the ending point of the block to copy by
4 Specify the paste point Move the cursor to the paste point by using the Up, Down,
5 Paste the block Press the Options menu key in the text input mode, then
select Copy.
using the Up, Down, Left, or Right key and press the Enter
key.
Note :You can cancel the specified copy starting point by
pressing the C key.
using the Up, Down, Left, or Right key and press the Enter
key.
Note :Maximum capacity of clip board is 1024 byte.
Left, or Right key.
select Paste.
Repeat the steps one to four if necessary.
Note :If the copied text exceeds the maximum number of
characters allowed in the field, the message asking
whether you want to discard the remaining characters or
cancel the paste operation.
To Cut and Paste the Text
To cut and paste text, proceed as described below:
To Do this
1 Specify the cut function Press the Options menu key in the text input mode, then
select Cut.
-35- Text Entry

To Do this
2 Specify the cut starting point Move the cursor to the starting point of the block to cut by using
3 Specify the cut ending point Move the cursor to the ending point of the block to cut by using
4 Specify the paste point Move the cursor to the paste point by using the Up, Down,
5 Paste the block Press the Options menu key in the text input mode, then
the Up, Down, Left, or Right key and press the Enter key.
Note :You can cancel the specified cut starting point by
pressing the C key.
the Up, Down, Left, or Right key and press the Enter key. The
specified text is cut.
Note :Maximum capacity of clip board is 1024 byte.
Left, or Right key.
select Paste.
Repeat the steps one to four if necessary.
Note :If the copied text exceeds the maximum number of
characters allowed in the field, the message asking
whether you want to discard the remaining characters or
cancel the paste operation.
Text Entry -36-

Display Information
When you enter text in the Contact list or a message, the text entry display shows you various information as
shown below:
Remaining number of characters
Indicates Shift ( ) or
caps lock ( ).
Input mode icons
T9®
T9:
ABC: Multitap text (ABC)
123: Numeric
Current mode
Insert/Overwrite
Delete/Backspace
-37- Text Entry

Browser
(Press the “ ” key)
The browser application enables you to 3 Services - Football, Music, Games, Location service and etc.
Browser Menus
Pressing the Options menu key will display a menu list of functions provided for the browser application.
The following describes the function menus:
Level 1 Level 2 Level 3 Description
Add to Contacts Registers the highlighted phone number/email
Add bookmark Current page Registers the page on display to the Bookmarks.
Selected link Registers the highlighted link to the Bookmarks.
address to the Contact list. A new contact entry
creation screen is displayed with the phone number/
email address inserted.
Note :Maximum of 50 bookmarks can be registered.
Note :Maximum of 50 bookmarks can be registered.
Browser -38-

Level 1 Level 2 Level 3 Description
Bookmarks Displays the list of Bookmarks. On the list, the most
Save page Saves the page on display as an off-line file. A
recently accessed bookmark will be displayed first.
Press the Options menu key again, and the following
submenus are provided:
Edit title: Edits the bookmark’s title (24 single-byte
characters max.).
Send URL: Starts the message writer to edit a new
message with the URL in the message text.
Note :Before the message writer starts, the message
type you want to apply must be selected. For
more information about message types, see
Messaging Services Provided by e616 on
page 65.
Copy URL: Copies the URL of the bookmark
Delete: Delete selection deletes the selected
bookmark, and Delete all deletes all the bookmarks.
Link this: Adds a shortcut to the selected bookmark in
the Quick Menu and Home screen.
maximum of 20 pages can be saved. To avoid
accidental deletion, 10 saved pages can be protected.
Maximum data size for a saved page is 100KB.
-39- Browser

Level 1 Level 2 Level 3 Description
Saved pages Displays the list of pages saved offline.
Highlight the file and press the Enter key to open.
Alternatively, press the Options menu key, and the
following Options menus are provided:
Edit title: Edits the saved page’s title (24 single-byte
characters max.).
Send URL: Starts the message writer with the URL of
the saved page in the message text.
Note :Before the message writer starts, the message
type you want to apply must be selected. For
more information about message types, see
Messaging Services Provided by e616 on
page 65.
Protect: Protects the selected saved page.
Unprotect: Cancels the protection of the selected
saved page.
Delete: Delete selection deletes the selected page,
and Delete all deletes all the pages.
Move to highlight a file and press the Enter key to
display the contents.
When a saved page is displayed, press the Options
menu key, and the following Options menus are
provided:
• Add to contacts: Registers the highlighted
phone number/email address/URL to the
Contact list. A new contact entry creation
screen is displayed with the phone number/
email address/URL inserted.
• Save image: registers an image on the file to
the Image List.
• Edit title: Edits the title.
Browser -40-

Level 1 Level 2 Level 3 Description
Saved pages (Continued) • Send as message: Starts the message writer
Copy as text Copies the text on the displayed page.
Save image Saves an image to the Image List.
with the current page URL/image URL in the
message text, or the image file attached.
• Page information: Displays the page
information.
Check page title displays the title.
Check URL displays the URL.
Check certificate displays the certificates
saved with the file.
• Copy as text: Copies the text on the saved
page.
• Protection: Sets protection on the selected file
or clear the set protection.
• Delete: Deletes the selected saved page.
-41- Browser

Level 1 Level 2 Level 3 Description
Send as
message
Refresh Refreshes the page displayed.
Enter URL Starts an input screen. You can directly input a URL
Current page URL Starts the message writer to edit a new message with
Image URL Starts the message writer to edit a new message with
Image file Starts the message writer to edit a new message with
the URL of the displayed page in the message text.
Note :Before the message writer starts, the message
type you want to apply must be selected. For
more information about message types, see
Messaging Services Provided by e616 on
page 65.
the URL of the displayed image in the message text.
Note :Before the message writer starts, the message
type you want to apply must be selected. For
more information about message types, see
Messaging Services Provided by e616 on
page 65.
the displayed image attached.
Note :Before the message writer starts, the message
type you want to apply must be selected. For
more information about message types, see
Messaging Services Provided by e616 on
page 65.
and display it.
Browser -42-

Level 1 Level 2 Level 3 Description
History Displays the URL history input from Enter URL menu
Encoding Latin-1 Changes the character encode to Latin-1. Latin-1 is
US ASCII Changes the character encode to US ASCII.
UTF-8 Changes the character encode to UTF-8.
UCS2 Changes the character encode to UCS2.
UCS4 Changes the character encode to UCS4.
UTF-16 Changes the character encode to UTF-16.
Page
information
Check page title Displays the title of the displayed page.
Check URL Displays the URL of the displayed page.
Check certificate Displays the certificate on the displayed page. When
function.
Highlight a URL history and press the Options menu
key and the following submenus are provided:
Send URL: Starts the message writer to edit a new
message with the URL of the selected history in the
message text.
Note :Before the message writer starts, the message
type you want to apply must be selected. For
more information about message types, see
Messaging Services Provided by e616 on
page 65.
Delete: Delete selection deletes the selected URL
history, and Delete all deletes all the URL history.
set by default.
the contents of the displayed page has been
downloaded without a certificate, this menu will be
greyed out.
-43- Browser

Level 1 Level 2 Level 3 Description
Settings Display Settings Scroll settings Selects the number of lines per scroll from Scroll one
Display settings Sets the following items by checking the
Font size
settings
Other settings Cookie settings Selects the method of Cookie reception from Accept
Timeout Sets the communication timeout time from 30
line, Scroll three lines, Scroll five lines, and Scroll
one page.
corresponding checkboxes:
Images: Turns on (Yes)/off (No) the image display.
Animations: Enables/disables the animation display.
Selects the font size.
all, Block all and Prompt each time.
seconds, 60 seconds and No timeout limit.
Saved Pages Selects whether to automatically save a page with/
Certificates Displays the list of certificates.
Reset Clear settings Returns the modified settings to the default settings.
Browser reset Returns all the information (Saved, History,
Browser -44-
without image files, or to ask each time.
When a certificate is displayed, press the SK1
(Validity) key or press the Options menu key and
select Change validity to enable/disable the selected
certificate.
Bookmarks and settings) about the browser
application to the default settings. This requires the
Code Number to avoid accidental operation.
Note :Refer to page 141 for details on the Code
Number.

Basic Operations
The following describes basic operation for the browser application.
To End a Browser session
To Do this
1 End a browser session Press the End key.
To Download a file and Save it in e616 File Manager
To Do this
1 Start the browser Browse and search for a file.
2 Download the file Select the link and press the Enter key.
Note :If the selected file is a multimedia file supported by e616,
Multimedia centre will be activated and the file is
downloaded and then played.
3 Save the file in e616 File manager Enjoy the saved file.
To Register a Bookmark
To Do this
1 Display the page to register Display the page to register by entering the URL.
2 Register the page as a bookmark Press the Options menu key and select Add Bookmark.
Note :Pressing and holding the Enter key while an URL is
highlighted will also register the URL in the Bookmarks.
-45- Browser

Useful Tips
Operation Procedure
Links and Anchors Pressing the Enter key on a link/anchor will:
• Make a voice/video call to the phone number
• Start message writer to edit a new message to the
address
• Jump to the URL
• Register data in the contact list
• Download the multimedia file
• Download the Java™ Application
Scrolling You can press the Up and Down keys or the Side keys to
Displaying the previous/next page Press the Left key to display the previous page. Press the
Jumping to 3’s site Pressing the triangle key will always bring you back to 3’s site.
scroll the page up and down.
Right key to return to the original page.
Browser -46-

Advanced Features
The e616 brings you a whole new world of mobile multimedia communications!
In this section, we introduce the following advanced features of e616:
• Video Call (make a live person to person video call to enhance your communication experience)
• Photo/Video Camera (take pictures or record short videos and send them from your e616)
• Multiple selection (Select multiple items in list screens)
• Multi-call/Multi-task (watch the latest sports results and call your friends to tell them about it at the same
time)
• Messaging (send simple text, multimedia, video messages or Email)
• Other Features of e616 (play Java™ application, listen to music, transfer data from a PC, synchronise
data with your PC or store and manage your video/image/audio data on the memory card.)
Video Call (available in 3G area only)
If you want to really show what you mean, make a video call. With a video call you can not only talk but also
see the other person. Ask someone for advice with a shopping decision, show someone where you are on
holidays or simply show your friends how you are doing.
The video call function consumes the battery faster than other functions. When the battery power is low,
recharge the battery.
To Make a Video Call to a Video Capable Handset (Refer to page 24 for details.)
To Do this
1 Enter the phone number and start a
video call
2 Talk and see When the called party responds, hold the camera towards you
3 End the video call Press the End key.
Input the phone number using the keypad, or select the phone
number/email address from the contact list, and Outgoing/
Incoming/Missed call logs.
and talk.
Note :Handsfree is set to on by default for video calls. You
can also talk using the e616 headset.
-47- Advanced Features

Useful Tips
• The received image and the sent image can both be displayed on the screen. You can hide/show the
sent image (your image) from the Options menu.
• If you want to capture sound away from the handset, attach the headset and use the headset’s
microphone close to the sound source.
Photo/Video Camera
Ever wished you had brought your camera with you? With the e616 that won’t happen to you again.
When you want to show your friends what you’re up to or want to ask a friend which new shirt to buy, simply
take a picture and send it from the e616. To make the visual experience even more appealing, record a short
video with e616 and send it by Video message.
To Take a Photo/Make a Video and Send it Attached to a Message
Refer to page 109, 110, and 70, for details on taking photos, making videos and sending messages.
To Do this
1 Start the image/video function Press the SK1 (Camera) key, or press the MENU key and
2 Take a photo/make a video clip The screen will change to viewfinder. Press the Enter key to
3 Attach the snapshot/video clip
to a message and send
select Multimedia centre and select Take photo/Make video.
start.
Start up the message function and select the message type.
(Refer to Writing and Sending a New Message on page 70
for details.)
Useful Tips
• Make the most of your photos and video clips: send them as attachments of a message, use an image as
a Home screen wallpaper, use a photo of your friend’s face as their contact picture, etc.
Advanced Features -48-

Multiple selection
To Select Multiple Items
In certain item lists, for example in Contacts, you can highlight multiple items by using the and # keys. In
the relevant screen, start the selection by pressing .
• To select/deselect another item, press .
• To highlight a group of items, start the selection by pressing , then scroll down and press #. All items
between the .and # will be highlighted.
• To end the multiple selection, press the C key.
This function is only available in certain applications. This function will not be available for contacts when
accessed through the Up or Down keys. The application must in this case be accessed by pressing the
MENU key and then 5.
Multi-call/Multi-task
Did you ever wish you could send a message while talking on the handset? e616’s multi-call function lets you
do this.
If you want to check your calendar while talking, the multi-task function allows you to display the calendar
saved in e616.
For example, you can use one of the following functions while talking on the handset:
• Message (Text message/Video message/Multimedia message/Email)
• Java™ Application
• Contact
• Settings
• Toolbox
The more tasks you are carrying out simultaneously, the more ’pages’ you will see on the multi-task icon;
it could show 2 or 3 pages depending on the amount of simultaneous multi-tasking being performed by
the e616.
-49- Advanced Features

To Start/Switch Task During Another Task
To Do this
1 Go back to the Home screen Press the MENU key for a few seconds to display the multi-task
2 Start another task Enter the phone number to make a call.
3 Switch to another task Press and hold the MENU key.
4 End tasks End a task: Select the icon on the multi-task bar to end and
bar and select the Home screen icon. Alternatively, press the
Start key (except when a video call or voice call is being
made).
Press the MENU key and select Message to start the message
function.
Press the SK2 (Contact) key or Up key to start the contact list
function.
Press the key to access the exciting world of 3 services.
Press the MENU key to display Main Menu.
The taskbar is displayed.
Select the required task by pressing Left and Right keys and
the Enter key to switch to the selected task.
press SK1 (End task).
End all tasks: Press SK2 (End all).
When only idle screen icon is displayed, which means no tasks
are active, press End key to end the multi-task function.
High-Speed Data Communications (transfer)
The e616 supports high-speed data communication rates for your PC via USB connection and Bluetooth
technology. Connect the supplied USB cable between your e616 and a PC, and install the 616 USB driver
and/or 616 Bluetoo th Modem Setting File from the "Utilities/Tools" section of the e616 CD-ROM. Then to
discover how these technologies can be used with your e616, please refer to Connections section on page
119.
Advanced Features -50-

Other Features of e616
e616 provides many multimedia functions: messaging, Java™ applications, and multimedia player. You can
easily personalise e616 functions by using menu functions. (Refer to How to Use Menu Functions on page
54 for details.)
Messaging
e616 supports four types of messaging services: Text message, Video message, Multimedia message, and
Email.
The following describes these services:
• Text message service is suitable for exchanging text messages. Refer to Message on page 64 for
details.
Use text messaging to send a message to a colleague saying you will be 10 minutes late for a meeting,
or to tell a friend the movie schedule for Friday night.
• Video message is a form of Multimedia messaging and allows you to send a message with attachments:
take a photo, or make a video and attach it to a message. Video messaging is available in the 3G and
2.5G area. Refer to Message on page 64 for details.
Use video messaging to make a video of your product and send it to a client with a message, or to send
a short movie of your birthday party to a friend.
• Multimedia message service sends a slide show of images, video, audio and text. A slide show will play
a combination of multimedia files. Multimedia messaging is available in the 3G and 2.5G area. Refer to
Message on page 64 for details.
Use multimedia messaging to send a slide show of a new house listing containing several photos to a
client with a message or to snap a photo of a celebrity and send it to a friend.
• Email allows you to send messages to email addresses with ringtunes (MID), images (GIF, JPEG, BMP),
audio (AAC, WMA), video (MPEG4) and other types of files attached. You can also cc or bcc other
people on your email message. Email is available in 3G and 2.5G area. Refer to Email on page 85 for
details.
Use email to receive document files attached to an email, and forward them to your PC email address, or
to send the latest sports result to a group of friends who share the same interest.
Java™ Application
You can download Java™ applications (games, utility software, etc.) to your e616. The downloaded Java™
application will be listed in Java™ (press the MENU key → select Java™). e616 can save the Java™
application up to 10, if you download 11th, it will delete a file before you saved. Refer to Java™ on page 100
for details.
-51- Advanced Features

Image Viewer
When images are downloaded to the e616, are received attached to a message, or there are photos taken by
using e616’s camera, you can display them using the Image viewer. Such images can be used as a Home
screen and contact list data. Refer to To View an Image File on page 113 for details.
Video/Audio Player
You can play video and audio data saved in e616’s play list using the Video/Audio Player. Refer to
Multimedia centre on page 103 for details. The following shows the display images of the video/audio
player:
Mute
Play video
Rabbit
00:10 03:50
Camera
Camera
Mute
Play music
BLUE
00:10 03:50
Video Player Audio Player
Synchronisation
By connecting e616 and a PC with the supplied USB cable, you can synchronise data files with your PC
using Intellisync. You will be able to synchronise Contacts, Calendar and To Do information using the
software on the supplied CD-ROM.
Using the synchronisation function, you can use data files on e616 more easily and effectively: you can edit
the contact list and calendar on your PC, then synchronise the data with e616 to carry them around on your
handset. Please see Synchronisation on page 127 for further instructions.
Using the File Transfer software supplied on the CD-ROM, you can copy files and information from your e616
to the PC. Contact list data, calendars, ringtunes, video clips, images, audio files and voice data can all be
copied. Using this software, you can also backup all the files from your phone. Please see Synchronisation
on page 127 for further instructions.
Advanced Features -52-

Memory Card
Inserting the Memory Stick Duo™ into e616 lets you store and manage your data more easily and with much
more space (up to 128MB). You can not only transfer the videos you recorded or photos you took using
e616’s camera, but also manage the downloaded video/image/audio files, recorded sound (using Sound
Recorder), calendar entries, To Do entries and other files in your handset. Refer to File manager on page 88
for details.
GPS
Using e616’s GPS feature, your questions such as "How do I get to the nearest tube station from here?" or
"Is there a good French restaurant in this district?" will be answ ered accurately. Many more location related
services will be provided (for details on the kind of services available, please ask 3).
-53- Advanced Features

How to Use Menu Function
You can use various e616 functions by using menu functions. By selecting icons, menu s, submenus and
Options menus or building your own shortcuts, you can access the numerous functions and their settings.
• ICON LIST (From the Home screen, press the Enter key.)
An icon is a graphic image with a name that represents and links to a category of functions or a particular
function. To select an icon, highlight (a highlighted icon/category has an orange border around it) to the
necessary icon and press the Enter key. An example of an icon list is Main Menu, which is displayed
after pressing the MENU key.
• MENU LIST (Press the MENU key.)
A menu is a named link to a function. To select a menu, highlight (a highlighted menu will appear in
highlight) to the necessary menu and press the Enter key, or just press the number key shown on the
same line of the menu as a shortcut. If there are more than 9 menus under the category, you can scroll
with the Up and Down keys. Pressing the Up key on the first menu displays the page with the last menu
item.
• Options menu LIST (Press the Options menu key when available.)
An option menu is a named link to function settings and operations. The handling of an Options menu is
similar to that of a menu. There are different types of item/option operations: adjusting levels, selecting
an option setting, and turning a function on/off. When there is an Options menu list for an application/
function, the Options menu indicator will be displayed between the Softkey indicators. This indicator
disappears when you display the Options menu. Refer to Display on page 3 for details.
How to Use Menu Function -54-

Menu Functions Operations
The following describes the operations performed by using the menu functions.
Operation Outlines
The following shows an outline of performing operations by using the menu functions:
• Display Main Menu.
• Select an icon from the Main Menu.
• Select a menu from the list menu.
• Select an item/option.
When using certain application/function, the Options menu indicator may be displayed. This means that
there is an Options menu list for that application/function. Pressing the Options menu key will display
the Options menu list. An Options menu list provides more operations and detailed settings for that
particular function. Refer to Display on page 3 for details.
To Select Menus by Numbers
When a menu is numbered on the left column, you can select the menu by just pressing the number. This
number will be displayed on the header part of the screen, as menu path indicator. For example, pressing the
MENU key, 8 7 1 will display Set date and time screen which gives you options of Home time and Dual time,
and M871 will be displayed on the screen header part.
Operations in Detail
The following shows how to adjust the display colour contrast, select the Home screen image, and turn on/off
the any key answer function.
To Adjust the Display Colour Contrast
To Do This
1Display Main Menu Press the MENU key.
Main Menu is displayed.
2 Highlight Settings icon Press the Up, Down, Left and Right keys to highlight the
Settings icon. Whenever an icon is highlighted it will appear
shaded and the icon name will appear at the bottom of the
display.
-55- How to Use Menu Function

To Do This
3 Select Settings icon Press the Enter key.
Settings is displayed.
4 Select Screen settings • Press the Up and Down keys to highlight Screen
5 Select Contrast • Press the Up and Down keys to highlight Contrast and
6 Select a screen Select Main screen or Small screen box and press the Enter
7 Adjust the contrast level Adjust the contrast level by using the Up and Down keys, and
settings and press the Enter key, or
• press 3.
press the Enter key, or
• Press 3.
key.
press the SK1 (OK) key or Enter key.
The contrast level is changed, and Contrast is displayed.
To Select the Home Screen Image
To Do This
1Display Main Menu Press the MENU key.
Main Menu is displayed.
2 Highlight Settings icon Press the Up, Down, Left and Right keys to highlight the
3 Select Settings icon Press the Enter key.
4 Select Screen settings • Press the Up and Down keys to highlight Screen
Settings icon.
Settings is displayed.
settings and press the Enter key, or
• Press 3.
Screen settings is displayed.
How to Use Menu Function -56-

To Do This
5 Select Set as Wallpaper • Press the Up and Down keys to highlight Set as
6 Display the list Press the Enter key to display the list of available images.
7 Select the image Open a folder in the list by pressing the Enter key and,
Wallpaper and press the Enter key, or
• Press 2.
Wallpaper is displayed.
• Press the Up and Down keys to highlight the image and
press the Enter key, or
• Press the number shown on the same line of the image.
The Home screen image is changed.
To Turn On/Off the Any key answer Function
To Do This
1Display Main Menu Press the MENU key.
Main Menu is displayed.
2 Highlight Settings icon Press the Up, Down, Left and Right keys to highlight the
3 Select Settings icon Press the Enter key.
4 Select Handset settings • Press the Up and Down keys to highlight Handset
5 Select Call options and Any key
answer
Settings icon.
Settings is displayed.
settings and press the Enter key, or
• Press 1.
Handset settings is displayed.
• Press the Up and Down keys to highlight Call options
and press the Enter key, and then press the Enter key
with Any key answer highlighted, or
• Press 3 and 3.
-57- How to Use Menu Function

To Do This
6 Turn on/off the function To turn on:
• Press the Up and Down keys to highlight On and press
the Enter key, or
• Press 1.
To turn off:
• Press the Up and Down keys to highlight Off and press
the Enter key, or
• Press 2.
How to Use Menu Function -58-

Quick Menu and Home Screen Shortcut
You can make shortcuts to an application or a function that you frequently use in Quick menu or on the
Home screen. Whenever a shortcut to an application/function can be created, Link this will be provided on
the SK1. From the SK1, you can select where to add the shortcut, in the Quick menu list or on the Home
screen.
• Quick menu
The quick menu is your customised list of shortcuts to applications/functions. Pressing the MENU key
twice on the Home screen, or pressing the SK2 (Quick) key on Main Menu will display Quick menu.
Highlight the required shortcut by pressing the Up and Down keys and then press Enter key to activate
the application/function.
• Home screen
You can also create shortcut icons to applications/funct ions on the Home screen. Pressing the Enter
key, then pressing the Up, Down, Left or Right keys on the Home screen will highlight the shortcuts.
Press the Enter key to select the highlighted shortcut to activate the application/function.
Operations on the Home screen
Apart from creating shortcuts, you can activate various functions and settings, and customise your Home
screen. You can press the C key several times to return to the Home screen, and press the Enter key on the
Home screen to highlight the Home screen items. The following operations are available on the Home
screen:
Operation Procedure
Activating a Home screen shortcut Press the navigation keys to select the shortcut, and press the
Changing the active handset profile Press the Options menu key and select Handset profile.
Accessing the Quick menu Press the Options menu key and select Quick menu.
Displaying call logs Press the Options menu key and select Call logs.
Setting the side key lock function Press the Options menu key and select Handset locks.
Setting the dial lock function Press the Options menu key and select Handset locks and
Deleting a Home screen shortcut Select the Home screen shortcut, press the SK2 (Delete).
Enter key.
Select a profile option.
Select Side key lock, and On or Off.
Dial lock. Refer to Dial lock on page 140.
-59- How to Use Menu Function

Operation Procedure
Moving a Home screen shortcut Select the Home screen shortcut, press the SK1 (Move).
Pasting the copied phone number onto the
Home screen (dialer will be activated)
Saving the input/copied phone number in
Contact list
Sending a text message to the input/
copied phone number
Setting the Home screen type Press the Options menu key and select Home screen type.
Highlight the new place and press the SK1 (Place).
After you copy a phone number, return to the Home screen and
press the Options menu key and select Paste.
The copied phone number will be pasted on the dialler.
After you input/copy a phone number on the Home screen,
press the SK2 (Add).
After you input/copy a phone number, press the Options menu
key and select Send message.
Select Standard or Show calendar (the monthly view
calendar).
Taskbar
Pressing and holding the MENU key displays the "taskbar". When there are multiple tasks active at the same
time, they will be displayed on the taskbar as icons. Highlight using the Left and Right keys and press the
Enter key to switch to that task.
On the taskbar, you can end the selected task by pressing the End key or the SK1 (End task) key, and
pressing the SK2 (End all) key ends all tasks. The taskbar display can be cancelled by pressing the C key.
When you end tasks by pressing the End, SK1 (End task) or SK2 (End all) key, the tasks are
interrupted. Therefore, any unsaved changes are discarded.
How to Use Menu Function -60-

Menu Functions List
The following table lists the menu functions under the Main Menu.
Level 1 Level 2 Level 3
Phone/USIM card
Messages Inbox
Outbox
Drafts
Sent
My folders User defined folders
Remote mailbox Remote inbox and user defined
Memory card Inbox
File manager Handset memory
Memory card
Memory card tool
Java™
Contacts
Multimedia centre Take photo
Make video
Record sound
View images
Play video
Play music
Play sound
folders
Sent
User defined folders
-61- How to Use Menu Function

Level 1 Level 2 Level 3
External Connection
Bluetooth
®
USB
Synchronisation
Settings Handset settings Handset profile
Call time info.
Call options
Making calls
Video calls Camera settings
Video call options
Video call service
Screen settings Greeting
Wallpaper
Contrast
Small screen
Network Network select
Pref. networks
Network mode
APN
Auto reconnect
Security Locks
Set codes
Supplementary Send my caller ID
Call waiting
Call forwarding
Call restrictions
How to Use Menu Function -62-
Level 1 Level 2 Level 3
Settings (Continued) Supplementary
Toolbox Calendar
(Continued)
Date and time Set date and time
Language Display Language
Reset Clear everything
To Do
Alarm clock
Notepad
Calculator
GPS and compass
Call memo
Caller ID info.
Format
View clocks
Word wrap
Clear settings
-63- How to Use Menu Function

Message
(Press the “SK2 (Msg)” on the Home screen, or press the “MENU” key → Select “Messages”)
You can send and receive messages that can contain photos, ringtunes, video files, etc.
The following items are described in this section:
• Overview
• Message Menus
• Writing and Sending a Message
• Receiving and Reading a Message
• Replying and Forwarding
• Message Memory Maintenance
Message -64-

Overview
Messaging Services Provided by e616
Your e616 supports the following messaging services:
• Text messaging allows you to send text messages. (160 characters max.)
To send a Text message, the user of the destination phone number must be a Text messaging or service
subscriber.
• Video messaging allows you to send messages with files attached. These files include video clips, audio
files, image files, vCards and vCalendar files. A maximum of 60 attachments are allowed per message,
with the total message size not exceeding 100 KB, including the message text. When you receive a video
message you will be notified by a message from the message centre. When you receive a video message
you will be notified by a message from the message centre. Your handset is set to automatically receive
the contents of a video message.
• Multimedia messaging allows you to send messages with multimedia files included to be played like
slide show by the recipient. Multimedia files include video clips, audio files, image files and text with the
total message size not exceeding 100KB. When you receive a multimedia message, you will be notified
by a message from the message centre. Yours handset is set to automatically receive the contents of a
multimedia message. Multimedia messaging is available in the 3G and 2.5G area.
• Email allows you to send messages to email addresses with attachments. A maximum of 60
attachments are allowed per message, with the total data size not exceeding 100 KB, including the
message text. Attachable files include ringtunes, images, audio, video and other types of files. You can
attach files such as Word, Excel, Power Point but you cannot read/edit these on your handset, you can
only forward these to another email address. You can set a total of 70 addressees for To, Cc (Carbon
Copy), and Bcc (Blind Carbon Copy) fields of an email. There are two types of Email server: POP3 and
IMAP4. With a POP3 server, your email is received and stored in the handset, while with IMAP4 the
received email is stored on the email server. The list of email in the Remote mailbox is synchronised
with the email stored on the IMAP4 server.
Email service is only available in the 3G area.
Maximum Number of Characters
The maximum number of characters are defined as the number of single-byte characters (alphanumeric
characters, etc.) allowed in a field/item. If a double or triple byte character such as a special symbol is used,
the number of characters allowed will vary accordingly. (Refer to Text entry on page 30 for details.)
Supported Attachment Types
The following shows the supported attachment types that can be played/used by e616 (these files can be
attached to messages and transferred between your handset and PC).
• Video: 3GPP, MPEG4, WMV, H.263 baseline
• Audio: MIDI, MPEG4-AAC, MP3, WMA, AMR
-65- Message

• Image: JPEG, GIF, PNG, BMP, WBMP, TIFF (TIFF files are not viewable on the handset but can be
forwarded on to a PC)
• Text: Text, vCard, vCalendar
Message Menus
The following describes the functions provided on the Messages menu list:
Item Description
Inbox Displays the received messages as a list.
Outbox Displays the messages waiting to be sent.
Drafts Displays incomplete messages.
Sent Displays sent messages as a list.
My folders Displays a list of folders to store the messages. Maximum of 10
Remote mailbox Accesses the specified IMAP4 email server.
Memory Card Accesses the messages stored in the memory card.
The following describes the Options menus provided under Messages menu list:
Item Description
New message Creates a text/multimedia/video message or email. Select the
Check messages Checks for new emails from a mail server.
Link this Adds a shortcut of the current screen to the Home screen area or
Delete all folders Deletes all the messages and user defined folders in the handset
Settings Changes the message settings.
folders can be created under this menu.
Maximum of 50 folders including Inbox can exist in Remote
mailbox.
Maximum of 1000 messages can be stored in Remote mailbox.
Note :If the memory card is not inserted in the handset, this
menu will be unavailable.
message type on the next screen.
Quick menu list.
memory.
Message -66-

The following describes the settings provided under Settings:
Item Description
General:
Scrolling Selects the number of lines scrolled when you press the Up or
Display Selects the title display in message list.
Heading text Turns the automatic header insertion function on/off, and edits
Signature setting Turns the automatic signature insertion function on/off, and edits
Quote indicator Edits the quoted reply mark (20 characters max.). You can
Text message:
Send options Changes the settings for sending text messages.
Down key. Select from Scroll one line, Scroll three lines,
Scroll five lines or Scroll one page.
Show sender: Displays the sender’s address/phone number or
the Contact entry name if the sender is registered in your Contact
list.
Show the subject: Displays the subject of the message.
the header sentence.
Text insertion settings: When Auto insert text is set, inserts
the header sentence automatically. Setting Insert manually
turns this function off.
Heading text: Edits the header sentence (128 characters max.)
Input text for your heading and press the Enter key.
the signature.
Text insertion settings: When Auto insert text is set, inserts
the signature automatically. Setting Insert manually turns this
function off.
Signature text: Edits the signature (60 characters max.) Input
text for your signature and press the Enter key.
change the default quote reply mark to another symbol.
Delivery report: Selects whether to request a status report of the
sent Text messages. Select Request report and No report
request.
-67- Message

Item Description
Validity period Selects the period of time the text message is stored on the
Text message centre Edits the text message centre address. This address is saved in
Video message:
Receive options Changes the settings for receiving video or multimedia
Send reports Selects whether to create a delivery report and send it back on
Validity period Selects the period of time the video/multimedia message is
Message -68-
server while trying to deliver the text message. Select 12 Hours,
One day, One week, One month or Maximum time.
Note :One month is 30 days.
the USIM card.
messages.
Download timing: Selects whether to receive the video/
multimedia messages manually or automatically.
When Manual is selected, the contents of the video/multimedia
messages will stay in the message centre until you request a
download, or the expiry date has arrived.
When Automatic is selected, e616 will automatically download
the contents of the video/multimedia messages.
Maximum download size: Sets a maximum size of a video/
multimedia message that the handset will receive.
Anonymous messages: Selects whether to receive a video/
multimedia message without a sender’s ID (e.g. sender’s name
or telephone number) or not. Select Refuse or Accept.
Multimedia msg playback: Selects how to play the received
multimedia message once you select a multimedia message and
press the Enter key.
Automatic: The multimedia message will be played immediately.
Manual: The message information will be displayed. Press the
Enter key to start playing.
request or not. Select Send report or No reports sent.
stored on the server while trying to deliver the message. Select
12 Hours, One day, One week, One month or Maximum time.
Note :One month is 30 days.

Item Description
Video msg centre Edits the message centre address. This address is saved in the
Video msg proxy Edits the proxy server address.
Email settings for: Email server one or Email server two
Note :3 only allows access via IMAP4.
Server settings Server name: Displays and edits your email server name.
Server type POP3 or IMAP4: POP3 server or IMAP4 server
Name + password User name: Displays and edits the User name to access the
Email address Displays and edits your email address used in the From field
Receive options Maximu m receive size: Sets a maximum size of an email that
Send options Message send timing: Selects whether to send an email
USIM card. When the address field is left blank and the SK1
(OK) key is pressed, the address returns to the previous setting.
Server priority: Sets Server priority.
Use APOP: Selects whether to use APOP server or not. Select
Yes or No.
Leave on server: Selects whether to leave the downloaded
message on a POP3 email server or not. Select Leave
messages or Delete messages.
email server.
Password: Displays and edits the password to access the email
server.
when sending an email, and also used as your own address in
the Outbox or Sent (90 characters max.).
Note :If the email address field is left blank and the SK1 (OK)
key is pressed, the email address returns to the previous
setting.
the handset will receive.
immediately, or send later. Setting Send immediately will send
an email immediately, and Send later will store an email
message in Outbox for you to send later.
-69- Message

Item Description
Server addresses SMTP server: Displays and edits the SMTP server address.
SMTP port: Display and edits the SMTP port.
Incoming server: Displays and edits the incoming server
address.
Incoming port: Displays and edits the incoming port.
Authentication Sets whether to execute the authentication operation.
Writing and Sending a New Message
The following describes basic operations and useful tips when writing and sending a new message.
Basic Operations
The basic operations for writing and sending a message are shown below:
To Write and Send a New Text Message
To Do this
1 Start the message function Press the SK2 (Msg), or press the MENU key and select
2 Display Text screen
for Text message
3 Input the message text Select Message text, input the message and press the Enter
4 Set the addressee Select the address box, input the addressee’s phone number
5 Send the message Press the SK1 (Send) key.
Messages.
Select press the SK1 (New) key, or press the Options menu
key and select New message.
On New message displayed, select text message.
New message screen is displayed.
key (160 characters max.).
and press the Enter key (Maximum of 20 numbers not
including the international code +).
Note :To set the addressee from the Contact list, press the
SK2 (Find) key.
The message is sent and saved in the Sent folder.
Message -70-

To Write and Send a New Video Message
To Do this
1 Start the message function Press the SK2 (Msg), or press the MENU key and select
2 Display the message writer for
video message
3 Attach files Select the Attachment box and press the Enter key, or press
4 Input the message text Select the text box and press the Enter key, input the message
5 Input the subject Select the subject box and input the title (256 characters max.).
Messages.
Press the SK1 (New) key or the Options menu key, and on
New message displayed, select Video message.
New message screen is displayed.
Note :You can activate the message writer for a new video
message by making a video, then pressing the Options
menu key and selecting Send as message. Refer to
Multimedia centre on page 103 for details.
the Options menu key and select Attach file. Select the
attachment type from Music file, Image file, Video file, Sound
file, Text file and Other file type. Press SK2 (Add) to add
more files or SK1 (OK) when done.
and press the Enter key.
-71- Message

To Do this
6 Set the addressee Select the address box and press the Enter key, input the
7 Send the message Press the SK1 (Send) key. The message is sent and saved in
address and press the Enter key (90 characters max. for an
addressee).
Add more addresses if necessary, by repeating the same
operation for the vacant entry in the address box.
Change the address in To address to Cc (Carbon Copy) or
Bcc (Blind Carbon Copy) by pressing the Options menu key
and selecting CC address or BCC address.
Press the SK1 (OK) key to end the address list edition.
Note :A maximum of 70 addresses in total can be set in TO,
CC, and BCC.
Note :To set the addressee from the Contact list, press the
SK2 (Find) key.
Note :If the email address does not contain an @ symbol, the
email may not be delivered to the destination.
Sent folder.
Message -72-

To Write and Send a New Multimedia Message
Use this function to create a slide show containing several multimedia files and message text.
To Do this
1 Start the message function Press the SK2 (Msg), or press the MENU key and select
2Start Composer Press the SK1 (New) key or the Options menu key and select
3 Compose a slide show Press the Options menu key to use the various functions of
4 Input the subject Select the subject box and input the title (256 characters max.).
5 Set the addressee Select the address box, input the address and press the Enter
Messages.
New message to display the New message screen.
Select Multimedia Msg and press the Enter key.
Enter the message text and press the Enter key. If you do not
want to add text, just press the Enter key again.
Composer is displayed.
composer. (Refer to To Edit a Slide Show on page 77 for
details.)
When you finish editing, press the SK1 (OK) key.
New message is displayed.
Note :To edit the slide show again, select the slide show title
on New message to display Composer.
key (90 characters max. for an addressee).
Add more addresses if necessary, by repeating the same
operation for the vacant entry in the address box.
Press the SK1 (OK) key to end the address list edition.
Note :A maximum of 70 addresses in total can be set in TO,
CC, and BCC.
Note :To set the addressee from the Contact list, press the
SK2 (Find) key.
Note :If the email address does not contain an @ symbol, the
email may not be delivered to the destination.
-73- Message

To Do this
6 Send the message Press the SK1 (Send) key.
The message is sent and saved in the Sent folder.
To Write and Send a New Email
To Do this
1 Start the message function Press the SK2 (Msg), or press the MENU key and select
2 Display the message writer for Email Press the SK1 (New) key or the Options menu key and select
3 Add attachment Select the attachment box and select the file type. Select a file
4 Input the message text Select the message text box, input the message and press the
5 Input the subject Select the subject box and input the title (256 characters max.).
6 Set the addressee Select the address box, input the address and press the Enter
Messages.
New message, and on Message type displayed, select Email.
New message is displayed.
from the list displayed.
Enter key.
key (90 characters max. for an addressee).
Add more addresses if necessary, by repeating the same
operation for the vacant entry in the address box.
Change the address from To address to Cc (Carbon Copy) or
Bcc (Blind Carbon Copy) by pressing the Options menu key
and selecting CC address or BCC address.
Press the SK1 (OK) key to end the address list edition.
Note :A maximum of 70 addresses in total can be set in TO,
CC, and BCC.
Note :To set the addressee from the Contact list, press the
SK2 (Find) key.
Note :If the email address does not contain an @ symbol, the
email may not be delivered to the destination.
Message -74-

To Do this
7 Send the email Press the SK1 (Send) key. Your message will be sent
according to how you have already set the following settings:
• Send immediately for Message send timing
e616 automatically becomes online and the email is sent
and saved in Sent folder.
• Send later for Message send timing
The email will be stored in Outbox until the next time
you send the messages manually. Refer to Sending
messages manually on page 75 for details.
Useful Tips
The useful tips for writing and sending a message are shown below.
The availability of each function is shown by the following abbreviations:
T: Text message
V: Video message
M: Multimedia message
E: Email, EP is POP3 only and EI is IMAP4 only
Operation Procedure Available for
Setting the addressee
from the contact entries
Sending messages
manually
Previewing a message
before sending
Changing the message
type
Press the SK2 (Find) key and select the addressee’s
phone number/email address.
The selected phone number/email address is input in To.
Display Outbox, press the Options menu key and select
Send all.
Press the Options menu key and select Preview
message.
Note :For multimedia message, pressing the SK2
(Preview) key on Composer also displays the
preview.
Select the message type field, press the Enter key and
select the message type.
TVME
TVME
TVME
E
-75- Message

Operation Procedure Available for
Clearing the subject/
address/text/attachment
Saving an unfinished and
unsent message
Attaching a heading/
signature
Canceling the message
edition
Setting the priority Press the Options menu key and select Send option.
Setting the delivery date
and time
Sending a message to
more than one addressee
Attaching a video, an
image, an audio file, or a
ringtune
Deleting an attached file Select the attachment file name to delete.
Press the Options menu key and select Clear fields.
Select the field to clear from Clear all fields, Clear
subject (not available for text message), Clear address,
Clear text or Clear attachment (not available for
multimedia or text message).
Press the SK2 (Save) key. The message is saved in
Drafts.
Press the Options menu key and select Insert fixed text.
Select Insert heading or Insert signature.
Press the Options menu key and select Cancel editing.
Select Message Priority and set Low, Standard, or
High.
Set the delivery time in the Select Delivery Time field.
While editing the address list in To address, press the
Options menu key and select Add address.
For Video message and email, press the Options menu
key and select Add attachment. Select Attach video,
Attach image, Attach audio, or Attach ringtune.
Pressing SK2 (Handset/Card) switches the memory
location to search for files. For multimedia message,
perform these operations from Composer screen.
Press the Options menu key and select Delete.
(T) V (M) E
TVME
TV E
TVME
V ME
V M
V ME
V ME
V EP
Message -76-

To Edit a Slide Show
Y ou can edit the slide show for Multimedia messaging using the Options menus on Composer. The following
shows the operations available:
Operation Procedure
Changing the layout of the text Press the Options menu key and select Text layout. Select
Adding a slide Select a slide, press the Options menu key and select Add
Inserting a slide in between slides Select a slide, press the Options menu key and select
Removing a slide Press the Options menu key and select Delete slide.
Inserting an image/audio/video/sound
file
Inserting/editing text Press the Options menu key and select Insert item and then
Deleting a text/image/audio/video file Press the Options menu key and select Remove item.Select
Setting the slide timing Press the Options menu key and select Slide timing. The
Ending the Composer Press the SK1 (OK) key.
Previewing the slide show Press the SK2 (Preview) key.
the layout from On top line, On top 3 lines, On top 5 lines,
On bottom line, On bottom 3 lines, or On bottom 5 lines and
press the Enter key. The default setting is On bottom line.
slide (after). A new slide is added after the selected slide.
slide (before). A new slide is inserted before the selected
slide.
Press the Options menu key and select Insert item. Select
the file type from Image, Music, Sound, or Video.
Insert text (displayed when there is no text inserted) or Edit
text (displayed when text is inserted already). Input/edit text on
the Text entry screen.
the file type from Text, Image, Audio, or Video.
slides are displayed within the set time (1 to 60 seconds).
Add
-77- Message

Receiving and Reading a Message
The following describes basic operations and useful tips when receiving and reading a message.
Operation of Other Applications
If applications other than the messaging application are running when a message is received, e616 will
receive the message as a background operation, in which case the message ringtune will not sound but
an icon is displayed on the upper area of the screen, indicating that you have an unr ead message. Also ,
while another application is running, the contents of the Video message/Multimedia message will not be
downloaded automatically, even if the Download timing is set as Automatic.
Receiving Video messages and Multimedia messages in 2.5G Area
The Video messaging and Multimedia messaging services are supported in 2.5G and 3G area. When
your handset is in an area outside the 2.5G and 3G area, you can still receive notification messages.
However, you can only receive the contents of the Video message/Multimedia message within the 2.5G
and 3G area.
Basic Operations
The basic operations for receiving and reading a message are shown below:
To Receive a Video Message or Multimedia Message
To Do this
1 Check the notification message When you receive a Video message/Multimedia message, the
2 Download the contents of the
Video message/Multimedia message
message centre sends you a notification message.When the
notification message is received, it will be displayed as a popup message.
When Download timing is set to Automatic (default):
The contents of the Video message/Multimedia message are
downloaded automatically from the message centre.
When Download timing is set to Manual:
Press the SK1 (Receive) key to download the contents of the
Video message/Multimedia message, or press the SK2
(Cancel) key to receive the contents later. (Refer to To
Receive a Video message/Multimedia message Manually
for details.) If cancelled, the notification message will be saved
in the Inbox.
Message -78-

T o Receive a Video Message/Multimedia Message Manually
To Do this
1 Start the message function Press the SK2 (Msg) key, or press the MENU key and select
2 Select the mailbox Select Inbox and select the mailbox with the notification
3 Select the notification message Highlight to the notification message and press the Enter key.
4 Receive the contents of the
Video message/Multimedia message
Messages.
message.
Press the SK1 (Receive) key.
The contents will be downloaded from the message centre.
T o Read a Message
To Do this
1 Start the message function Press the SK2 (Msg) key, or press the MENU key and select
2 Select the mailbox to read from Select Inbox and select the mailbox with the unread message.
3 Select the message Select the message to read.
Messages.
The message contents are displayed.
Note :For a multimedia message, press the Enter key to start
the slide show.
Useful Tips
The useful tips for receiving and reading a message are shown below:
For Reading a Message
Operation Procedure Available for
Checking newly received
messages
Refreshing the current
message list display
Press the SK2 (Check) key.
Press the Options menu key and select Update.
EP
EI
-79- Message

Operation Procedure Available for
Filtering the received
messages by a condition
Sorting the messages Press the Options menu key and select Sort
Changing the font size Press the Options menu key and select Font size.
Switching the message list
display type
Copying or moving a message
between USIM card memory
and the phone memory
Displaying the address list Select the message, press the Options menu key
Displaying the attachment file
list
Press the Options menu key and select Filter view.
The filters provided are as follows: Read or unread,
Read messages, Unread messages, High priority,
Message type, Sent or failed, Sent Later, Send
failed, Video message class, Personal,
Advertisements, and Information.
To cancel the filtering, press the Options menu key
and select Show all.
messages. The orders available are as follows:
By date ↑: Ascending order of date
By date ↓: Descending order of date
By subject ↑: Ascending order of subject
By subject ↓: Descending order of subject
Select Large, Medium and Small.
Note :For a multimedia message, the font size can be
changed on the Text viewer.
Press the Options menu key and select Subject/
address.
Select the message, press the Options menu key
and select Copy or move. Select the copy/move
destination, and then press the SK1 (Copy) key or
SK2 (Move) key.
and select View address list.
Select the message, press the Options menu key
and select View file list.
TVME
TVME
TVME
TVME
T
TVME
TVME
Message -80-

Operation Procedure Available for
Copying or moving a message Select the message, press the Options menu key
Deleting a message Select the message and press the SK2 (Delete) key,
Deleting all messages Select the message, press the Options menu key
Displaying detailed
information on a message
Displaying various reports Press the Options menu key and select View report.
Calling back to the sender of a
Text message
Making a call to a phone
number in the message text
Displaying a URL in the
message text
and select Copy or move. Select the copy/move
destination, and then press the SK1 (Copy) key or
SK2 (Move) key.
or select the message, press the Options menu key
and select Delete and Delete selection.
and select Delete and Delete all.
Select the message, press the Options menu key
and select Message details. Detailed information
such as the message type and the received date and
time is displayed.
Display the Text message, press the Options menu
key and select Call sender.
Select the message, press the Enter key to display
the message. The phone number will be highlighted.
(If there is more than one phone number, highlight
using the Up and Down keys.) Press the Enter key.
The phone number will be displayed. Make a voice or
video call.
Note :For a multimedia message, a phone number
will be highlighted on the Text viewer.
Select the message, press the Enter key to display
the message text. The URL will be highlighted. Press
the Options menu key and select Open in browser.
The browser will be displayed with the selected URL.
Note :You can also jump to the URL by pressing the
Enter key with the URL address highlighted.
Note :For a multimedia message, a URL will be
highlighted on the Text viewer.
TVME
TVME
TVME
TVME
TVM
T
TVME
TVME
-81- Message

Operation Procedure Available for
Adding the sender/receiver’s
email address to the contact
list
Adding a phone number
/email address in the
message text to
the contact list
Adding an URL in the
message text to the
Bookmarks
Select the message. Press the Options menu key
and select Add to contact. Use Add to Contacts to
save the phone number/email address. (Refer to
Contact on page 96 for details.)
Note :For a multimedia message, press the SK2
(Stop) key to stop the slideshow and return to
the address input screen, and then press the
Options menu key.
Select the message and press the Enter key to
display the message text. The phone number/email
address will be highlighted. (If there is more than one
phone number/email address, highlight using the Up
and Down keys.)
Press the Options menu key and select Use the
selection and Add to Contacts. Register the phone
number/email address on Add to Contacts. (Refer to
Contact on page 96 for details.)
Note :For a multimedia message, a phone number/
email address will be highlighted on the Text
viewer.
Select the message and press the Enter key to
display the message text. The URL will be highlighted.
(If there is more than one URL, highlight using the Up
and Down keys.)
Press the Options menu key and select Use the
selection and Add to bookmark.
Register the URL on Bookmark.
Note :For a multimedia message, an URL will be
highlighted on the Text viewer.
TVME
TVME
TVME
Message -82-

Operation Procedure Available for
Saving an attached file Select the message and press the Enter key to
Opening an attached file Select the file and press the Enter key.
display the message text.
Select the attachment to save.
Press the SK2 (Attach) key. Alternatively, press the
Options menu key and select View file list to display
the list of attached files and select a file to be
attached, and then press the SK1 (Save) key or press
the Options menu key and select Save.
V ME
V ME
To Control the Multimedia Message Player
The following operations are available for multimedia message player:
Operation Procedure
Starting the slide show Press the SK1 (Play) key.
Pausing the slide show While playing, press the SK1 (Pause) key.
Stopping the slide show Press the SK2 (Stop) key.
Displaying the text message Press the Enter key.
Replying and Forwarding
The following describes basic operations and useful tips when replying and forwarding.
Basic Operations
The basic operations for replying and forwarding are shown below:
To Reply to a Received Message in Inbox
To Do this
1 Start the message function Press the SK2 (Msg) key, or press the MENU key and select
2 Display the received message
to reply
Message.
Select Inbox.
-83- Message
 Loading...