


 Loading...
PLEASE READ
This manual is provided as a free service by Projector.com.
We are in no way responsible for the contents of the manual. We do not guarantee its accuracy and we do not make any claim of copyright. The copyright remains the property of their respective owners.
ABOUT PROJECTOR.COM
Projector.com (http://www.projector.com) is your review and buying guide resource for DLP and LCD video projectors.
Visit the site to read the latest projector news and reviews, read and comment on projector specifications, download user manuals and much more.

LT156 |
|
LT156 |
|
|
Projector |
|
|
|
LT156 |
||
When Viewing a DVI Digital Signal: |
|
Beim Betrachten eines DVI-Digitalsignals: |
Lors de la projection d’un signal numérique DVI : |
||
To project a DVI digital signal, be sure to con- |
Zum Projizieren eines DVI-Digitalsignals |
Lorsque vous désirez projeter un signal DVI |
|||
nect the PC and the projector using the sup- |
müssen Sie den PC und den Projektor vor |
numérique, veuillez connecter le PC au |
|||
plied DVI-D signal cable before turning on |
dem Einschalten des PCs mit dem |
projecteur à l’aide du câble DVI-D fourni avant |
|||
your PC or projector. Turn on the projector |
mitgelieferten DVI-D-Signalkabel verbinden. |
d’allumer votre PC ou votre projecteur. |
|||
first and select RGB1 –D (digital) from the |
Schalten Sie zuerst den Projektor ein und |
Allumez le projecteur en premier et |
|||
source menu before turning on your PC. |
|
wählen Sie RGB1-D (digital) vom |
sélectionnez RGB1-D( numérique) du menu |
||
Failure to do so may not activate the digital |
Quellenmenü, bevor Sie Ihren PC |
de source avant d’allumer votre PC. |
|||
output of the graphics card resulting in no |
einschalten. Andernfalls wird der Digital- |
Si vous ne le faites pas, il se peut que le sig- |
|||
picture being displayed. Should this happen, |
Ausgang der Grafikkarte nicht aktiviert und |
nal numérique de sortie de la carte graphique |
|||
restart your PC. |
|
dadurch kein Bild angezeigt. Starten Sie Ihren |
ne soit pas activé, ce qui aurait pour |
||
|
|
PC in einem derartigen Fall neu. |
conséquence un non affichage de l’image. |
||
Do not disconnect the supplied DVI-D signal |
|
|
|
Dans ce cas, veuillez redémarrer votre PC. |
|
cable while the projector is running. If the sig- |
Trennen Sie das mitgelieferte DVI-D- |
|
|||
nal cable has been disconnected and then |
Signalkabel nicht ab, während der Projektor |
Veuillez ne pas déconnecter le câble DVI-D |
|||
re-connected, an image may not be correctly |
in Betrieb ist. Nach dem Abtrennen und |
fourni lorsque le projecteur est en marche. |
|||
displayed. Should this happen, restart your |
Wiederanschließen des DVI-D-Signalkabels |
Si le câble DVI-D est déconnecté puis |
|||
PC. |
|
wird das Bild möglicherweise nicht richtig |
reconnecté ensuite, l’image peut être mal |
||
|
|
angezeigt. Starten Sie Ihren PC in einem |
affichée. Dans ce cas, veuillez redémarrer |
||
|
|
derartigen Fall neu. |
|
votre PC. |
|
LT156 |
|
LT156 |
|
|
LT156 |
Quando visionate un segnale digitale DVI: |
Cuando visualice una señal digital DVD: |
Visning av DVI Digital Signal: |
|||
Per proiettare un segnale digitale DVI, |
Para proyectar una señal digital DVI, |
När du projekterar DVI digital signal, |
|||
assicuratevi di collegare il PC e il proiettore |
asegúrese de conectar el PC al proyector |
kontrollera att datorn och projektorn är |
|||
utilizzando il cavo per segnale fornito DVI-D |
utilizando el cable de señal DVI-D antes de |
anslutna med den medföljande DVI-D |
|||
prima di accendere il vostro PC. Accendete |
encender su PC. Encienda el proyector |
signalkabeln innan du sätter på datorn |
|||
|
nloaded |
|
Innan du sätter på datorn ska du slå på |
||
il proiettore e selezionate come prima cosa |
primero y seleccione RGB1-D(digital) del |
||||
RGB1 –D (digitale) dal menu della fonte |
menú |
fuente antes |
encender su PC. |
projektorn och välja RGB1-D (digital) från |
|
prima di avviare il vostro PC. Un errore nel |
Fallos al realizar este procedimientofrompuede huvudmenyn. Om anslutningen inte är riktig |
||||
compiere ciò potrebbe non permettere |
hacer que no se active la salida digital de la |
aktiveras inte digitalutgången på grafikkortet |
|||
l'attivazione del segnale digitale della scheda |
tarjeta |
gráficos ocasionando que no se |
och ingen bild visas på bildskärmen. Starta |
||
grafica facendo in modo che nessuna |
visualice ninguna imagen. Si esto sucede, |
om datorn om detta inträffar. |
|||
immagine appaia sul display. In questo caso, |
reinicie su PC. |
|
|
||
rinizzializzate il vostro PC. |
|
|
|
|
Frånkoppla aldrig den medföljande DVI-D |
|
|
No desconecte el cable de señal DVI-D |
kabeln medans projektorn är på. Det kan |
||
Non scollegate il cavo per segnale fornito DVI- |
suministrado mientras que el proyector esté |
hända att störningar uppstår i bilderna om |
|||
D mentre il proiettore è in funzione. Se il cavo |
funcionando. Si el cable de señal DVI-D ha |
sladden kopplas från och sedan kopplas till |
|||
per segnale DVI-D è stato scollegato |
|
sido desconectado y luego conectado |
igen. Starta om datorn om detta inträffar. |
||
ricollegato ulteriormente, un immagine |
nuevamente, puede que no se visualice una |
|
|||
potrebbe non apparire sul display in maniera |
imagen correctamente. Si esto sucede, |
|
|||
corretta. In questo caso, rinizzializzate il |
reinicie su PC. |
|
|
||
vostro PC. |
|
|
|
|
|
.c DVI Pin Assignments
DVI connector
1 
 2
2 
 3
3 
 4
4 
 5
5 
 6
6 
 7
7 
 8 9
8 9 
 10
10
 11
11
 12
12
 13
13
 14
14
 15
15
 16 17
16 17
 18
18
 19
19
 20
20
 21
21
 22
22
 23
23
 24
24
Pin No. |
Signal (Digital) |
1T.M.D.S Data 2 -
2T.M.D.S Data 2 +
3T.M.D.S Data 2 Shield
4No connection
5No connection
6DDC Clock
7DDC Data
8Analog Vertical Sync
9T.M.D.S Data 1 -
10T.M.D.S Data 1 +
11T.M.D.S Data 1 Shield
12No connection
13No connection
14+5V Power
15Ground
16Hot Plug Detect
17T.M.D.S Data 0 -
18T.M.D.S Data 0 +
19T.M.D.S Data 0 Shield
20No connection
21No connection
22T.M.D.S Clock Shield
23T.M.D.S Clock +
24T.M.D.S Clock -
25Analog Red
26Analog Green
27Analog Blue
28Analog Horizontal Sync
29Analog Ground
Printed in Japan.
7N8P0411
|
|
|
|
|
|
|
. |
|
|
|
|
|
|
Projector |
|
MultiSync LT156/LT155/LT154 |
|
||||||
LCD Projector |
|
|
|||||
User’s Manual |
|
|
|||||
Downloaded |
|
from |
|
|
|||
|
|
|
|
||||
|
|
S |
O |
|
|
|
|
|
|
AT |
|
|
|
|
|
|
|
N /N |
|
|
|
|
|
|
|
YB |
|
|
|
|
|
OP |
|
|
|
|
|
|
|
EW |
S |
|
A |
|
|
|
|
R |
AT |
UJ |
|
|
|
|
|
UT CA |
UA |
|
|
|
|
||
S |
EC CP |
TS OT |
|
|
|
|
|
SS C |
|
|
|
|
|
|
|
|
RA |
|
|
|
|
|
|
|
|
|
S |
|
|
|
|
|
|
|
UO |
|
|
|
|
|
|
|
ECR |
|
RETNE |
|
|
|
|
|
|
AC |
S |
|
|
|
|
|
|
N |
|
|
|
|
|
|
|
C |
E |
|
|
|
|
|
|
E |
EL |
|
|
|
|
|
|
L |
TC |
|
|
|
|
|
|
|
EM |
|
|
|
|
|
|
|
UN |
|
|
com
English 
E – 1

IMPORTANT INFORMATION |
|
|
|
|
|
|
||||||||||||||||||
Precautions |
|
|
|
|
|
|
|
|
|
|
|
|
|
|
|
|
|
|
RADIACION LASER |
|
|
REMOTE |
||
|
|
|
|
|
|
|
|
|
|
|
|
|
|
|
|
|
|
|
|
|||||
Please read this manual carefully before using your NEC MultiSync |
|
|
|
C A U T I O N |
|
|
|
|
|
|||||||||||||||
|
|
|
|
|
|
NO MIRE AL RAYO |
|
|
CONTROL |
|||||||||||||||
LT156/LT155/LT154 Projector and keep the manual handy for future |
|
|
|
|
|
|
LASER RADIATION- |
|
|
PRODUCTO LASER CLASSE2 |
|
MODEL: |
||||||||||||
|
|
|
|
|
|
|
|
LASER-STRAHLUNG |
|
RD-367E |
||||||||||||||
reference. |
|
|
|
|
|
|
|
|
DO NOT STATE INTO BEAM |
|
|
|
||||||||||||
|
|
|
|
|
|
|
|
WAVE LENGTH: 650nm |
|
|
NICHT IN DEN STRAHL |
|
7N900012 |
|||||||||||
Your serial number is located under the name plate label on the bot- |
|
|
|
|
|
|
|
|
BLICKEN ! LASER KLASSE2 |
|
|
|
||||||||||||
|
|
|
|
|
|
MAX. OUTPUT: 1mW |
|
|
|
|
|
|||||||||||||
|
|
|
|
|
|
|
|
|
. |
|
|
|
|
|||||||||||
tom of your MultiSync LT156/LT155/LT154. Record it here: |
|
|
|
|
|
|
|
|
CLASS 2 LASER PRODUCT |
|
|
RAYONNEMENT LASER NE PAS |
|
|
|
|||||||||
|
|
|
|
|
|
|
|
|
|
|
|
|
|
|
|
|
|
|
REGARDER DANS LE FAISCEAU |
|
|
|
||
has been provided.The information should be read care- |
|
|
|
|
|
|
|
|
|
|
|
|
|
|
|
|
APPAREIL A LASER DE CLASSE2 |
|||||||
|
|
|
|
|
|
|
|
|
|
|
|
|
|
|
|
|||||||||
|
ever,Projectorthere is no guarantee that interference will not occur in a |
|||||||||||||||||||||||
|
|
|
|
|
|
|
|
|
|
|
|
|
|
|
|
|
|
|
EN60825-1 : 1994 + A11 : 1996 |
MADE IN CHINA |
||||
CAUTION |
|
|
This label is located on the back of the remote control. |
|
|
|
||||||||||||||||||
To turn off main power, be sure to remove the plug from |
|
|
|
|
|
|
|
|
|
|
|
|
|
|
|
|
|
|
|
com |
||||
power outlet. |
|
|
|
|
|
|
|
|
|
|
|
|
|
|
|
|
|
|
|
|
|
|
|
|
The power outlet socket should be installed as near to |
|
|
|
|
|
|
|
|
|
|
|
|
|
|
|
|
|
|
|
|
|
|
|
|
the equipment as possible, and should be easily acces- |
|
|
|
|
|
|
|
|
|
|
|
|
|
|
|
|
|
|
|
|
|
|
|
|
sible. |
|
|
|
|
|
|
|
|
|
|
|
|
|
|
|
|
|
|
|
|
|
|
|
|
CAUTION |
|
|
RF Interference |
|
|
|
|
|
|
|||||||||||||||
TO PREVENT SHOCK, DO NOT OPEN THE CABINET. |
|
|
WARNING |
|
|
|
|
|
|
|||||||||||||||
NO USER-SERVICEABLE PARTS INSIDE. |
|
|
|
The Federal Communications Commission does not allow any |
||||||||||||||||||||
REFER SERVICING TO QUALIFIED NEC SERVICE |
|
|
modifications changes the unit EXCEPT those specified by |
|||||||||||||||||||||
PERSONNEL. |
|
|
|
NEC Technologies in this manual. Failure to comply with this gov- |
||||||||||||||||||||
|
|
|
|
ernment regulation could void your right to operate this equip- |
||||||||||||||||||||
|
|
|
||||||||||||||||||||||
This symbol warns the user that uninsulated voltage |
|
|
ment. |
|
|
|
|
|
|
|||||||||||||||
|
|
This equipment has been tested and found to comply with the |
||||||||||||||||||||||
within the unit may be sufficient to cause electrical shock. |
|
|
limits for a Class B digital device, pursuant to Part 15 of the FCC |
|||||||||||||||||||||
Therefore, it is dangerous to make any kind of contact |
|
|
Rules.These limits are designed |
provide reasonable protection |
||||||||||||||||||||
with any part inside of the unit. |
|
|
|
against harmful interference in a residential installation.This equip- |
||||||||||||||||||||
|
|
|
|
ment generates, uses, and can radiate radio frequency energy |
||||||||||||||||||||
|
from |
|||||||||||||||||||||||
|
|
and, if not installed and used in accordance with the instructions, |
||||||||||||||||||||||
This symbol alerts the user that important information |
|
|||||||||||||||||||||||
concerning the operation and maintenance of this unit |
|
may cause harmful interference |
radio communications. How- |
|||||||||||||||||||||
fully to avoid problems. |
|
|
|
particular installation. If this equipment does cause harmful inter- |
||||||||||||||||||||
|
|
|
|
ference to radio or television reception, which can be determined |
||||||||||||||||||||
|
|
|
|
by turning the equipment off and on, the user is encouraged to try |
||||||||||||||||||||
WARNING |
|
|
|
to correct the interference by one or more of the following mea- |
||||||||||||||||||||
|
|
|
sures: |
|
|
|
|
|
|
|||||||||||||||
TO PREVENT FIRE OR SHOCK, DO NOT EXPOSE THIS UNIT TO |
|
|
|
|
|
|
|
|||||||||||||||||
|
• Reorient or relocate the receiving antenna. |
|
|
|
|
|||||||||||||||||||
RAIN OR MOISTURE. |
|
|
|
|
|
|
|
|||||||||||||||||
|
|
|
• Increase the separation between the equipment and receiver. |
|||||||||||||||||||||
DO NOT USE THIS UNIT’S GROUNDED PLUG WITH AN EXTEN- |
|
|||||||||||||||||||||||
|
• Connect the equipment into an outlet on a circuit different from that to |
|||||||||||||||||||||||
Downloaded |
|
|
|
|||||||||||||||||||||
SION CORD OR IN AN OUTLET UNLESS ALL THREE PRONGS CAN |
|
|
which the receiver is connected. |
|
|
|
|
|
|
|||||||||||||||
BE FULLY INSERTED. |
|
|
|
|
|
|
|
|
|
|
||||||||||||||
|
|
|
• Consult the dealer or an experienced radio / TV technician for help. |
|||||||||||||||||||||
DO NOT OPEN THE CABINET. THERE ARE HIGH-VOLTAGE COM- |
|
|||||||||||||||||||||||
|
|
|
|
|
|
|
|
|
|
|
|
|
|
|
|
|
|
|
|
|
|
|||
|
|
|
|
|
|
|
|
|
|
|
|
|
|
|
|
|
|
|
|
|
|
|||
PONENTS INSIDE. ALL SERVICING MUST BE DONE BY QUALI- |
In UK, a BS approved power cable with moulded plug has a Black (five |
|||||||||||||||||||||||
FIED NEC SERVICE PERSONNEL. |
|
|
||||||||||||||||||||||
|
|
Amps) fuse installed for use with this equipment. If a power cable is not |
||||||||||||||||||||||
|
|
|
||||||||||||||||||||||
DOC Compliance Notice |
|
|
supplied with this equipment please contact your supplier. |
|||||||||||||||||||||
|
|
|
|
|
|
|
|
|
|
|
|
|
|
|
|
|
|
|
|
|
|
|
|
|
This Class B digital apparatus meets all requirements of the Canadian |
|
|
|
|
|
|
|
|
|
|
|
|
|
|
|
|
|
|
|
|
|
|
||
Interference-Causing Equipment Regulations. |
|
|
|
|
|
|
|
|
|
|
|
|
|
|
|
|
|
|
|
|
|
|
|
|
3. GSGV Acoustic Noise Information Ordinance: |
|
|
|
|
|
|
|
|
|
|
|
|
|
|
|
|
|
|
|
|
|
|
||
The sound pressure level is less than 70 dB (A) according to ISO 3744 |
|
|
|
|
|
|
|
|
|
|
|
|
|
|
|
|
|
|
|
|
|
|
||
or ISO 7779. |
|
|
|
|
|
|
|
|
|
|
|
|
|
|
|
|
|
|
|
|
|
|
|
|
|
|
|
• IBM is a registered trademark of International Business Machines |
|||||||||||||||||||||
|
|
|
|
Corporation. |
|
|
|
|
|
|
||||||||||||||
|
|
|
• Macintosh and PowerBook are registered trademarks of Apple Com- |
|||||||||||||||||||||
|
|
|
|
puter, Inc. |
|
|
|
|
|
|
||||||||||||||
|
|
|
• Other product and company names mentioned in this user's manual |
|||||||||||||||||||||
|
|
|
|
may be the trademarks of their respective holders. |
|
|
|
|||||||||||||||||
E – 2

Important Safeguards
These safety instructions are to ensure the long life of your projector and to prevent fire and shock. Please read them carefully and heed all warnings.
Installation
1.For best results, use your projector in a darkened room.
2.Place the projector on a flat, level surface in a dry area away from dust and moisture.
3.Do not place your projector in direct sunlight, near heaters or heat radiating appliances.
4.Exposure to direct sunlight, smoke or steam can harm internal components.
5.Handle your projector carefully. Dropping or jarring can damage internal components.
6.Do not place heavy objects on top of the projector.
7.If you wish to have the projector installed on the ceiling:
a.Do not attempt to install the projector yourself.
b.The projector must be installed by qualified technicians in order to ensure proper operation and reduce the risk of bodily injury.
c.In addition, the ceiling must be strong enough to support the projector and the installation must be in accordance with any local building codes.
d.Please consult your dealer for more information.
Power Supply
1. The projector is designed to operate on a power supply of 100-120
or 200-240 V 50/60 Hz AC. Ensure that your power supply fits this from
requirement before attempting to use your projector.
2. Handle the power cable carefully and avoid excessive bending. A damaged cord can cause electric shock or fire.
3. If the projector is not to be used for an extended period of time, disconnect the plug from the power outlet.
Cleaning
1. Unplug the projector before cleaning.
2. Clean the cabinet periodically with a damp cloth. If heavily soiled,
use a mild detergent. Never use strong detergents or solvents such
3. Use blower or lens paper to clean the lens, and be careful not to scratch or mar the lens.
Downloadedas alcohol or thinner.
CAUTION
not unplug the power cable from the wall outlet under any one of the following circumstances. Doing so can cause damage to the projector:
• While the Hour Glass icon appears.
• While the message "Please wait moment." appears. This message will be displayed after the projector is turned off.
• Immediately after the power cable is plugged into the wall outlet (the POWER indicator has not changed to steady orange glow).
• Immediately after the cooling fan stops working (The cooling fan continues to work for ONE minute after the projector is turned off with the POWER button).
• While the POWER and the STATUS indicators are alternately flashing.
CAUTION
not put the projector on its side when the lamp is turned on. Doing so may cause damage to the projector.
Lamp Replacement
• |
To replace the lamp, follow all instructions provided on page E-48. |
|
||
• |
Be sure to replace the lamp when the message "The Lamp has |
|
||
|
reached the end of its usable life. Please replace the lamp." |
|
||
|
appears. If you continue to use the lamp after the lamp has reached |
|
||
|
the end of its usable life, the lamp bulb may shatter, and pieces of |
|
||
|
glass may be scattered in the lamp case Do not touch them as the |
|
||
|
pieces of glass may cause injury. If this happens, contact your NEC |
|
||
|
dealer for lamp replacement. |
|
|
|
• |
Allow a minimum of ONE minute elapse after turning off the pro- |
|
||
|
|
|
com |
|
|
jector. Then disconnect the power cable.and allow 60 minutes to |
|
||
|
cool the projector before replacing the lamp. |
|
|
|
Fire and Shock Precautions |
|
|||
1. |
Ensure that there is sufficient ventilation and that vents are unob- |
|
||
|
structed |
prevent the build-up of heat inside your projector. Allow |
|
|
|
at least 3 inches (10 cm) of space between your projector and a |
|
||
|
wall. |
|
|
|
|
Projector |
|
|
|
2. Prevent foreign objects such as paper clips and bits of paper from |
|
|||
|
falling into your projector. Do not attempt to retrieve any objects that |
|
||
|
might fall into your projector. Do not insert any metal objects such as |
|
||
|
a wire |
screwdriver into your projector. If something should fall into |
|
|
|
your projector, disconnect it immediately and have the object re- |
|
||
|
moved by a qualified NEC service personnel. |
|
|
|
3. |
Do not place any liquids on top of your projector. |
|
||
• |
Do not look into the lens while the projector is on. Serious damage |
|
||
|
to your eyes could result. |
|
|
|
• |
Keep any items such as magnifying glass out of the light path of the |
|
||
|
projector. The light being projected from the lens is extensive, there- |
|
||
|
fore any kind of abnormal objects that can redirect light coming out |
|
||
|
of the lens, can cause unpredictable outcome such as fire or injury |
|
||
|
to the eyes. |
|
|
|
• |
Do not cover the lens with the supplied lens cap or equivalent while |
|
||
|
the projector is on. Doing so can lead to melting of the cap and |
|
||
|
possibly burning your hands due to the heat emitted from the light |
|
||
|
|
|||
|
output. |
|
|
|
• |
Do not look into the laser pointer while it is on and do not point the |
|
||
|
laser beam at another person. Serious injury could result. |
|
||
E – 3

TABLE OF CONTENTS
1. INTRODUCTION |
|
|
Setup ................................................................................... |
|
|
E-37 |
Introduction to the MultiSync LT156/LT155/LT154 Projector |
|
E-5 |
Orientation ..................................................................... |
|
|
E-37 |
|
Background |
|
|
E-37 |
||
Getting Started |
|
E-5 |
|
|
||
|
Mouse Settings |
|
|
E-37 |
||
What's in the Box |
|
E-6 |
|
|
||
|
Button/Sensitivity |
|
|
E-37 |
||
Getting to Know Your MultiSync LT156/LT155/LT154 Projector |
|
E-7 |
. |
|
||
|
PC Card Viewer Options |
|
E-37 |
|||
Front / Side Features |
|
E-7 |
|
|||
|
|
|
||||
|
Capture Options |
|
|
E-37 |
||
Attaching the lens cap |
|
E-7 |
|
|
||
|
Signal Select |
|
|
E-37 |
||
Rear / Side Features |
|
E-8 |
|
|
||
|
StartingProjectorUp the PC Card Viewer Software on your PC |
E-38 |
||||
3. OPERATION |
|
|
||||
Top Features .......................................................................... |
|
E-9 |
Auto Adjust (RGB only) ................................................. |
|
com |
|
Terminal Panel Features ...................................................... |
|
E-10 |
......................................................................Auto Start |
|
E-38 |
|
Remote Control Features .................................................... |
|
E-11 |
......................................................Power Management |
|
E-38 |
|
Remote Control Battery Installation .............................. |
|
E-13 |
.................................................Power Off Confirmation |
|
|
E-38 |
Operating Range ........................................................... |
|
E-13 |
..............................................................Keystone Save |
|
|
E-38 |
Remote Control Precautions |
|
E-13 |
.................................................Clear Lamp Hour Meter |
|
|
E-38 |
|
Communication Speed |
|
|
E-38 |
||
Using Remote Mouse Receiver |
|
E-14 |
|
|
||
|
Default Source Select |
|
|
E-38 |
||
Switching Operation mode between mouse and projector |
E-15 |
|
|
|||
|
|
|
|
|||
2. INSTALLATION |
|
|
Tools ........................................................................................... |
|
|
E-39 |
|
|
Capture |
|
|
E-39 |
|
Setting Up Your Projector |
|
E-16 |
|
|
||
|
PC Card Files |
|
|
E-39 |
||
Selecting a Location |
|
E-16 |
|
|
||
|
Changing Background Logo |
|
|
E-40 |
||
Screen and Projection Distance |
|
E-16 |
|
|
||
|
Chalk Board |
|
|
E-40 |
||
Distance Chart |
|
E-17 |
|
|
||
|
|
|
|
|
||
Reflecting the Image .................................................................. |
|
E-17 |
Help |
|
|
E-40 |
Wiring Diagram |
|
E-18 |
|
|
||
|
Contents |
|
|
E-40 |
||
Connecting Your PC |
|
E-19 |
|
|
||
|
Information |
|
|
E-40 |
||
Connecting Your Macintosh Computer |
|
E-20 |
|
|
||
|
|
|
|
|
||
Connecting Your DVD Player ............................................... |
|
E-21 |
Using the PC Card Viewer Function |
|
|
E-41 |
Connecting Your VCR or Laser Disc Player |
|
E-22 |
|
|
||
|
Features |
|
|
E-41 |
||
Picture |
fromE-33 |
|
|
|||
|
|
|
|
|||
About Startup screen (Menu Language Select screen) ............. |
|
E-23 |
Inserting and Ejecting a CompactFlash™ Card .................. |
E-41 |
||
|
|
|
Installing the PC Card Viewer Software ............................... |
|
E-42 |
|
Connecting the Power Cable and Turn on the Projector ............ |
|
E-24 |
(PC Card Viewer Utility 1.0) ....... |
E-42 |
||
Basic Operation ......................................................................... |
|
E-27 |
Operating the PC Card Viewer Function from the Projector |
|
||
Using the Menus ........................................................................ |
|
E-29 |
(playback) .................................. |
|
|
E-43 |
Customizing Basic/Custom Menu ........................................ |
|
E-29 |
Capturing Images Displayed on the Projector ..................... |
E-45 |
||
Using a USB Mouse ................................................................... |
|
E-30 |
Viewing Digital Images ........................................................ |
|
|
E-45 |
Menu Tree .................................................................................. |
|
E-31 |
Uninstalling the PC Card Viewer Software .......................... |
|
E-46 |
|
Menu Elements .......................................................................... |
|
E-32 |
Terminology ......................................................................... |
|
|
E-47 |
Menu Descriptions & Functions ................................................. |
|
E-33 |
|
|
|
|
Downloaded |
|
|
|
|
|
|
Source Select ............................................................................. |
|
E-33 |
4. MAINTENANCE |
|
|
|
RGB (DVI on LT156 only)/Video/S-Video/PC Card Viewer |
|
Replacing the Lamp ................................................................... |
|
|
E-48 |
|
Brightness/Contrast/Color/Hue/Sharpness |
|
|
Cleaning or Replacing the Filters ............................................... |
|
|
E-49 |
Volume ....................................................................................... |
|
E-33 |
5. TROUBLESHOOTING |
|
|
|
............................................................................Image Options |
|
E-34 |
Power / Status Light Messages .................................................. |
|
|
E-50 |
..............................................................................Keystone |
|
E-34 |
Common Problems & Solutions ................................................. |
|
|
E-50 |
...............................................................Color Temperature |
|
E-34 |
|
|
|
|
Lamp Mode .......................................................................... |
|
E-34 |
6. SPECIFICATIONS |
|
|
|
Gamma Correction .............................................................. |
|
E-34 |
|
|
|
|
Aspect Ratio ........................................................................ |
|
E-34 |
Optical/Electrical/Mechanical ..................................................... |
|
|
E-52 |
Noise Reduction .................................................................. |
|
E-35 |
Cabinet Dimensions ................................................................... |
|
|
E-53 |
Color Matrix ......................................................................... |
|
E-35 |
D-Sub Pin Assignments ............................................................. |
|
|
E-54 |
White Balance ..................................................................... |
|
E-35 |
Timing Chart .............................................................................. |
|
|
E-55 |
Position/Clock ...................................................................... |
|
E-35 |
PC Control Codes ...................................................................... |
|
|
E-56 |
Resolution ............................................................................ |
|
E-35 |
Cable Connection ....................................................................... |
|
|
E-56 |
Video Filter .......................................................................... |
|
E-35 |
|
|
|
|
Factory Default .................................................................... |
|
E-36 |
|
|
|
|
Projector Options ....................................................................... |
|
E-36 |
|
|
|
|
Menu .................................................................................... |
|
E-36 |
|
|
|
|
Menu Mode ................................................................... |
|
E-36 |
|
|
|
|
Advanced Menu, Basic/Custom Menu ...................... |
|
E-36 |
|
|
|
|
Language ...................................................................... |
|
E-36 |
|
|
|
|
Projector Pointer ............................................................ |
|
E-36 |
|
|
|
|
Source Display .............................................................. |
|
E-36 |
|
|
|
|
Direct Button (Volume Bar and Keystone Bar) .............. |
|
E-36 |
|
|
|
|
Menu Display Time ........................................................ |
|
E-36 |
|
|
|
|
CompactFlash is trademark of San Disk Corporation.
E – 4

1. INTRODUCTION |
|
|
|
|
|
|
Introduction to the MultiSync LT156/LT155/LT154 Projector |
|
|
|
com |
|
|
*1 Do not attempt to mount the projector on a ceiling yourself. |
|
|
||||
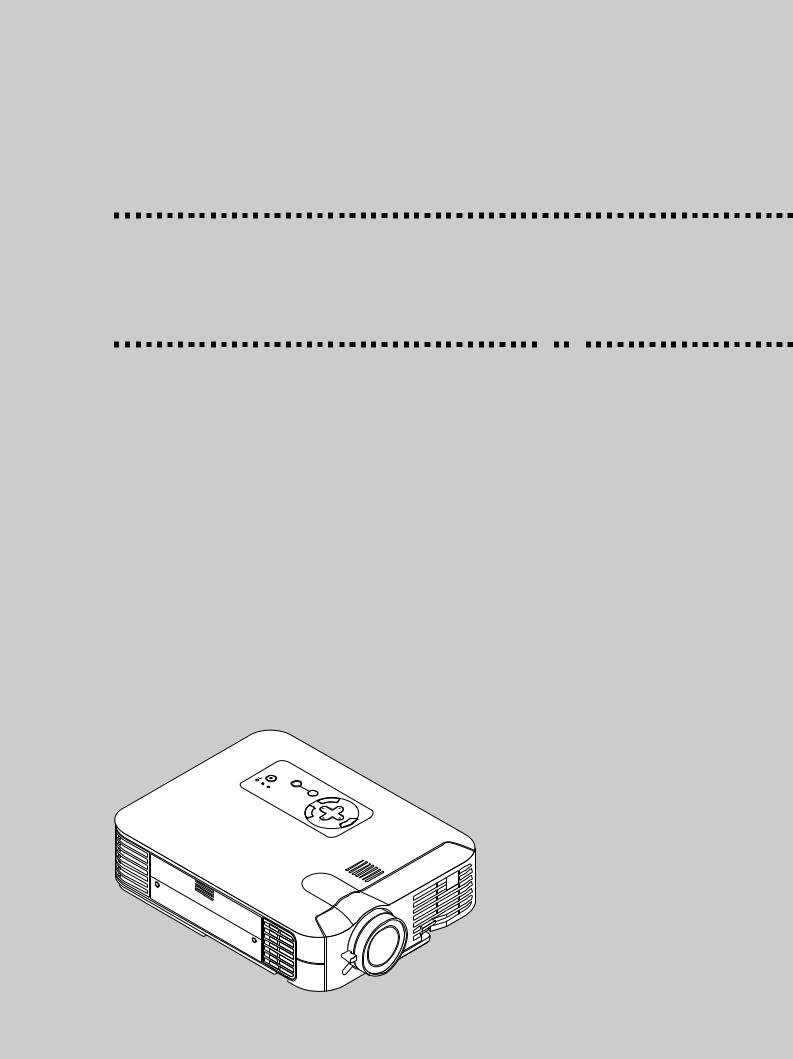
This section introduces you to your new MultiSync LT156 (XGA) / LT155 |
The projector must be installed by qualified technicians in order to |
|
|
|||
(XGA) / LT154 (XGA) Projector and describes the features and con- |
ensure proper operation and reduce the risk of bodily injury. In addi- |
|
|
|||
trols. |
tion, the ceiling must be strong enough to support the projector and |
|
|
|||
|
the installation must be in accordance with any local building codes. |
|
|
|||
Congratulations on Your Purchase of The |
Please consult your dealer for more information. |
|
|
|||
MultiSync LT156/LT155/LT154 Projector |
*2 A UXGA (1600 1200) and an SXGA (1280 1024) image are dis- |
|
|
|||
• The "Capture" enables you to capture the current projected image. |
Projector |
|
|
|
|
|
The MultiSync LT156/LT155/LT154 is one of the very best projectors |
played with NEC technology’s Advanced AccuBlend. This applies |
|
|
|||
available today. The MultiSync LT156/LT155/LT154 enables you to |
only analog RGB signal. |
|
. |
|
|
|
project precise images up to 300 inches across (measured diagonally) |
|
|
|
|
|
|
from your PC or Macintosh computer (desktop or notebook), VCR, DVD |
*3 LT156 only. |
|
|
|
|
|
player, document camera, a laser disc player or PC Card Viewer. |
|
|
|
|
|
|
You can use the projector on a tabletop or cart, you can use the projec- |
*4 The PC Control Utility 1.0 is required. This program is included on |
|
|
|||
tor to project images from behind the screen, and the projector can be |
the supplied CD-ROM. |
|
|
|
|
|
permanently mounted on a ceiling*1. The remote control can be used |
|
|
|
|
|
|
wirelessly. |
*5 The USB terminal meets the USB1.1 specification and accepts a |
|
|
|||
Features you’ll enjoy: |
USB mouse only. |
|
|
|
|
|
• Simple set up and operation. |
|
|
|
|
|
|
• A high-performance 130 watt NSH lamp. |
Getting Started |
|
|
|
|
|
• The supplied wireless remote control operates the projector from |
The fastest way get started is |
take your time and do everything |
|
|
||
the front side or rear. |
|
|
||||
right the first time. Take a few minutes now to review the user’s manual. |
|
|
||||
• The image can be projected between 25 and 300 inches (measured |
|
|
||||
This may save you time later on. At the beginning of each section of |
|
|
||||
diagonally). |
|
|
||||
the manual you’ll find an overview. If the section doesn’t apply, you can |
|
|
||||
• Keystone correction allows you to correct trapezoidal distortion so |
|
|
||||
skip it. |
|
|
|
|
|
|
that the image is square. |
|
|
|
|
|
|
|
|
|
|
|
|
|
• You can choose between video modes depending on your source: |
|
|
|
|
|
|
"normal" for a typical picture, "natural" for true color reproduction. |
|
|
|
|
|
|
NTSC, PAL, PAL-N*3, PAL-M*3, PAL60, SECAM and NTSC4.43fromstan- |
|
|
|
|
|
|
• The built-in PC Card Viewer allows you to start your presentation |
|
|
|
|
|
|
even when a PC is not available at the site. |
|
|
|
|
|
|
• An image can be projected from in front or behind a screen, and the |
|
|
|
|
|
|
projector can even be installed on the ceiling. |
|
|
|
|
|
|
• NEC Technologies’ exclusive Advanced AccuBlend intelligent pixel |
|
|
|
|
|
|
blending technology - an extremely accurate image compression |
|
|
|
|
|
|
technology - offers a crisp image with UXGA (1600 1200) resolu- |
|
|
|
|
|
|
tion*2. |
|
|
|
|
|
|
• Supports most IBM VGA, SVGA, XGA, SXGA/UXGA(with Advanced |
|
|
|
|
|
|
AccuBlend)*2, Macintosh, component signal (YCbCr /YPbPr) or any |
|
|
|
|
|
|
Downloaded |
|
|
|
|
|
|
other RGB signals within horizontal frequency range of 15 to 100 kHz and vertical frequency range of 50 to 120 Hz. This includes
dard video signals.
NOTE: Composite video standards are as follows:
NTSC: U.S. TV standard for video in U.S. and Canada.
PAL: TV standard used in Western Europe.
PAL-N: TV standard used in Argentine, Paraguay and Uruguay.
PAL-M: TV standard used in Brazil.
PAL60: TV standard used for NTSC playback on PAL TVs.
SECAM: TV standard used in France and Eastern Europe.
NTSC4.43: TV standard used in Middle East countries.
• The supplied remote control can be used without a cable, and you can even use the remote control and mouse adapter to operate your
PC or Macintosh mouse wirelessly from across the room with the built-in remote mouse receiver.
• You can control the projector with PC using the PC Control port*4.
• USB terminal allows USB mouse operation *5.
• The contemporary cabinet design is light, compact, easy to carry, and complements any office, boardroom or auditorium.
• Eight pointers are available for your presentation.
E – 5

What's in the Box?
Make sure your box contains everything listed. If any pieces are missing, contact your dealer.
Please save the original box and packing materials if you ever need to ship your MultiSync LT156/LT155/LT154 Projector.
/ |
|
|
|
|
|
|
|
|
|
|
|
|
|
|
|
|
|
|
com |
|
|
|
|
|
Lens cap |
|
|
|
|
|
Batteries (AA 2) |
||||||||
AC |
RETNE |
|
|
|
|
|
|
|
|
.Remote mouse |
|||||||||
CN |
|
|
|
|
|
|
|
|
|
|
|
|
|
|
|
|
|
|
receiver |
E |
|
|
|
|
|
|
|
|
|
|
|
|
|
|
|
|
|
|
|
L |
|
|
|
|
|
|
|
|
|
|
|
|
|
|
|
|
|
|
|
|
U |
|
|
|
|
|
|
|
|
|
|
|
|
|
|
|
|
|
|
|
|
|
|
|
|
|
|
|
|
|
|
|
|
|
|
|
|
String and rivet |
|
|
|
|
|
|
|
|
|
|
|
|
|
|
|
|
|
O |
|
|
|
|
|
|
|
|
|
|
|
|
|
|
|
|
|
|
|
FF |
|
|
|
|
|
|
|
|
|
|
|
|
|
|
|
|
|
|
VIDEO |
|
|
|
|
|
|
|
|
|
|
|
|
|
|
|
|
|
|
RGB1 |
|
S- |
|
ON |
|
|
|
|
|
|
|
|
|
|
|
|
|
|
M |
|
VID |
|
|
||
|
|
|
|
|
|
|
|
|
|
|
|
|
EN |
RGB |
EO |
AUTO |
|
|
|
|
|
|
|
|
|
|
|
|
|
|
|
|
|
U |
2 |
ADJ. |
|
||
|
|
|
|
|
|
|
|
|
|
|
|
- |
|
|
J |
|
|
|
|
|
|
|
|
|
|
|
|
|
|
|
|
|
|
|
LASER |
|
|
|
|
|
|
|
|
|
|
|
K |
|
HELP |
R- |
|
|
+ |
|
|
|
|
|
|
|
|
|
|
|
|
|
EYSTO |
|
|
OI |
|
|
|
|
|
|
|
|
|
|
|
|
|
|
|
|
|
NE |
MAGNIFY |
CLICK/CANCELNTER |
|
|
|
|
|
|
|||
|
|
|
|
|
|
FREEZE |
|
|
|
PC |
CARD |
|
|
|
|
|
|
||
|
|
|
|
|
P |
|
|
|
|
S |
|
|
|
|
|
|
|
||
|
|
|
|
|
IC-M |
|
VOL. |
|
|
|
LIDE |
|
|
|
|
|
|
|
|
NEC MultiSync LT156/LT155/LT154 projector |
UTE |
FOLDER |
|
|
|
|
|
|
|
|
|
|
|||||||
|
|
SLIDE |
|
|
|
|
|
|
|
|
|
|
|||||||
|
LIST |
|
|
|
|
|
|
|
|
|
|
|
|
||||||
|
|
|
|
|
|
|
|
|
|
|
|
|
|
||||||
LT156 only |
|
|
|
|
|
|
|
|
|
Remote control |
Remote control case |
||||||||
|
|
|
|
|
|
Projector |
|
||||||||||||
|
|
|
|
|
|
|
|
||||||||||||
DVI-A – VGA |
|
|
|
|
|
|
|
|
|
|
|
|
|
|
|
|
|
|
|
adapter |
|
|
|
|
|
|
|
|
|
|
|
|
|
|
|
|
|
|
|
DVI- |
– DVI- |
signal cable |
|
Power cable |
|
|
|
|
|
|
|
|
|||||||
|
|
|
|
|
|
|
|
RGB signal cable |
|
||||||||||
|
|
|
|
from |
|
|
|
|
|
|
|
|
|
(15-Pin Mini D-Sub To 15-Pin Mini D-Sub connector) |
|||||
|
|
|
|
|
|
|
|
|
|
|
|
|
|
|
|||||
|
|
|
|
|
|
|
|
|
|
|
|
|
|
|
|
|
|
|
Mouse adapter |
|
|
|
|
|
|
|
|
|
|
|
|
|
|
|
|
|
|
|
(For Macintosh) |
Mouse adapter |
|
|
Mouse adapter |
|
|
|
|
|
|
|
|
|
|
|
|
|
|
|
|
(USB) |
|
|
(For IBM PS/2) |
|
|
|
|
|
|
|
|
|
|
|
|
|
|
|
|
|
|
|
Quick |
|
|
|
|
|
|
|
|
|
|
|
|
|
|
|
|
|
|
|
Connect |
|
|
|
|
|
|
|
|
|
|
|
|
|
|
|
|
|
|
Guide |
|
|
|
|
|
|
|
|
|
|
|
|
|
|
|
|
|
CD-ROM |
|
|
User's |
|
|
|
|
|
|
|
|
|
|
|
|
|
|
|
|
|
Manual |
|
|
|
|
|
|
|
|
|
|
|
|
|
|
|
|
||
|
|
|
|
|
|
|
|
|
|
|
|
|
|
|
|
|
|
||
Downloaded |
|
|
|
|
|
|
|
|
|
|
|
|
|
|
|
|
|
||
Soft
E – 6
STATUS |
|
|
|
|
|
|
|
com |
Getting to Know Your MultiSync LT156/LT155/LT154 Projector |
|
|
||||||
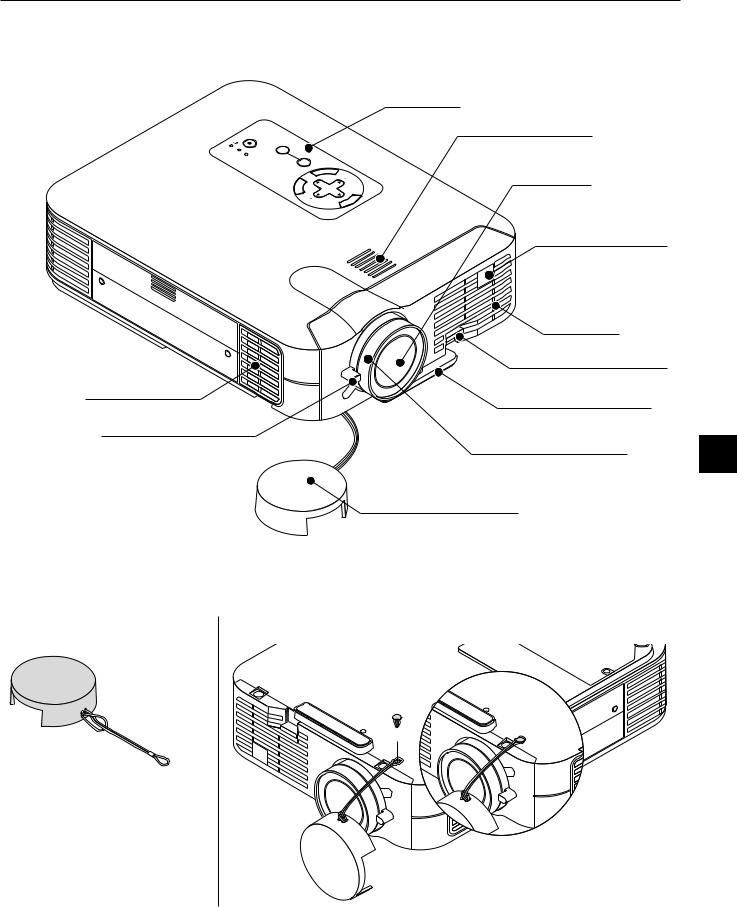
Front/Side Features |
|
|
|
|
|
|
. |
|
|
|
|
|
|
Controls |
|
|
|
|
|
|
|
|
|
|
|
|
|
|
|
ON |
|
|
Built-In Monaural Speaker (0 5W) |
||
|
|
STAND/ |
|
|
|
|
|
|
|
|
BY |
|
|
|
|
|
|
POWER |
|
|
ADJUSTAUTO |
|
|
|
|
|
|
PC |
|
|
|
|
|
|
|
ACCESS |
|
|
|
|
|
|
|
|
CARD |
|
|
|
SOURCE |
|
|
|
|
|
|
|
|
RETNE |
|
Lens |
||
|
|
|
|
|
|
|
||
A |
C |
N |
|
C |
|
E |
|
L |
|
SELECT
NEM
U
Remote Sensor
Air Filter |
from |
|
|
|
|
Zoom lever |
|
|
Downloaded |
|
Lens cap |
|
|
Attaching the lens cap to the lens hood with the supplied string and rivet
1. Thread the string through the hole on the |
2. Use the rivet to attach the string to the bottom of the lens hood. |
lens cap and then tie knot in the string. |
|
Ventilation (inlet)
One-touch Tilt Button
Adjustable Tilt Foot
Focus ring
E – 7
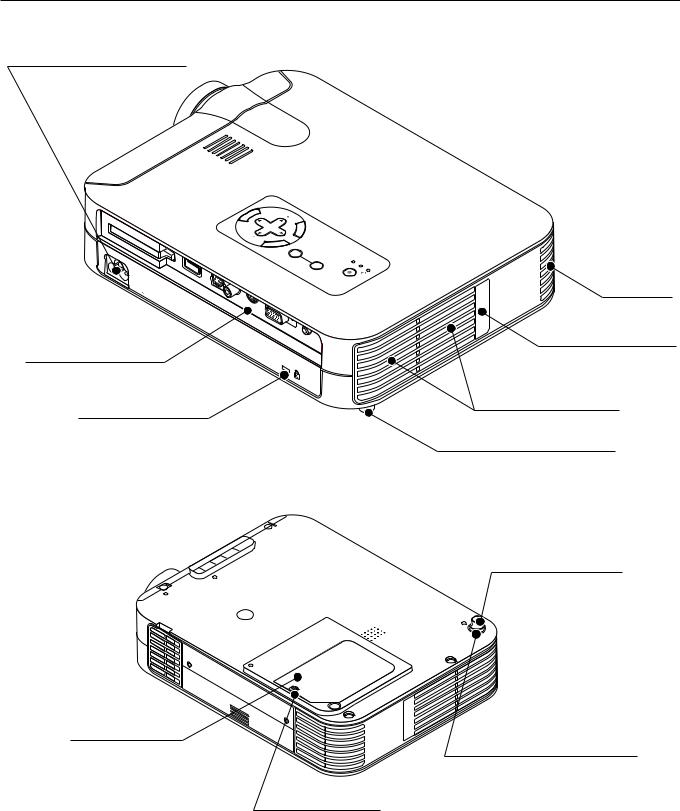
Rear/Side Features
AC Input
Connect the supplied power cable’s threepin plug here.
|
U |
|
N |
E |
|
M |
|
 CARD
CARD
USB
AC |
IN |
|
S-
VIDEO
Terminal Panel
Slot for Kensington Micro saver Security System
Bottom
DownloadedLamp cover
SELECT |
|
N |
|
|
L |
|
|
|
|
E |
|
|
|
C |
|
|
C |
A |
|
ENTER |
|
SOURCE |
|
|
|
AUTO |
PC CARD |
|
|
ACCESS |
|
|
|
ADJUST |
STATUS |
|
|
|
POWER |
|
|
/ |
BY |
|
|
STAND |
|
|
|
ON |
|
AUDIO 
 from
from
Projector |
.com |
|
Ventilation (inlet)
Remote Sensor
Ventilation (outlet)
Rear Foot
Rear Foot
Rotate to fine-adjust horizontally position
|
Spacer (black rubber) |
|
To fine-adjust the height of the |
|
rear foot, remove the spacer |
Lamp cover screw |
and rotate the rear foot to the |
desired height. |
E – 8
Top Features |
|
|
|
|
|
|
|
|
|
|
|
|
|
|
com |
|
|
|
|
|
|
|
|
|
4 |
|
|
|
|
|
|
. |
|
|
|
|
|
U |
|
|
|
|
|
|
|
|
|
|
||
|
|
|
|
N |
|
|
|
|
|
|
|
|
|
|
||
|
|
|
E |
|
|
|
|
|
|
|
|
|
|
|||
|
|
|
M |
|
|
|
|
|
|
|
|
|
|
|
||
|
|
|
|
SELECT |
|
L |
|
|
|
|
|
|
||||
|
|
|
|
|
|
E |
|
|
|
|
|
|
|
|
||
|
|
|
|
|
|
C |
|
|
|
|
|
|
|
|
||
|
|
|
|
|
|
N |
|
|
|
|
|
|
|
|
||
|
|
|
|
|
|
|
C |
A |
|
|
|
8 |
9 |
|
|
|
|
|
|
|
|
|
|
|
|
|
|
|
|
|
|
||
CA |
|
|
|
|
|
|
|
|
|
|
|
|
|
|
|
|
R |
1 |
|
|
|
|
|
|
|
|
|
|
|
|
|
|
|
|
D |
|
|
|
|
|
|
|
|
|
PC CARD |
|
|
|
||
|
|
|
|
|
|
|
|
AUTO |
|
|
|
|
||||
|
|
|
|
|
|
|
|
|
|
|
|
|
||||
|
|
|
|
|
|
|
|
|
|
|
ACCESS |
|
|
|
||
|
|
|
|
2 |
|
|
|
|
ADJUST |
|
|
STATUS |
|
|
|
|
|
|
|
|
|
|
|
|
|
|
|
|
POWER |
|
|
|
|
|
|
|
|
3 |
|
|
|
|
|
|
|
|
|
|
||
|
U |
|
|
|
|
|
|
|
|
|
|
|
|
|
||
|
S |
|
|
|
|
|
|
|
|
|
|
|
|
|
||
|
B |
|
|
|
5 |
|
|
|
BY |
|
|
|
|
|||
|
|
|
|
|
|
|
|
|
/ |
|
|
|
|
|||
|
P |
|
|
|
|
|
|
ON |
|
|
|
|
|
|
||
|
|
|
|
|
|
|
|
STAND |
|
|
|
|
|
|||
|
|
T |
|
|
|
|
|
6 |
|
|
|
|
10 |
|
|
|
|
|
E |
|
|
|
|
|
|
|
|
7 |
|
|
|
||
|
|
O |
S |
|
|
|
|
|
|
|
|
|
|
|
||
|
|
|
|
|
|
|
|
|
|
|
|
|
|
|||
|
|
|
|
|
|
|
|
|
|
|
|
|
|
|
||
1. Menu Button |
|
|
|
|
|
|
|
|
|
|
Projector |
|
|
|||
|
|
|
|
|
|
|
|
|
|
|
|
|
|
|
||
Displays the menu. |
|
|
|
|
|
|
|
|
6. Auto Adjust Button (RGB only) |
|
|
|||||
|
|
|
|
|
|
|
|
|
|
Use this button to adjust Position-H/V and Pixel Clock/Phase for an |
||||||
2. Select ▲▼ / Volume (+) (-) Buttons |
|
|
|
|
|
optimal picture. Some signals may not be displayed correctly or take |
||||||||||
▲▼: Use these buttons to select the menu of the item you wish to |
|
time to switch between sources. |
|
|
||||||||||||
|
adjust. |
|
|
|
|
|
|
|
|
|
|
|
|
|
|
|
|
When no menus appear, these buttons work as a volume con- |
|
7. Power Button (ON / STAND BY) |
|
|
|||||||||||
|
trol. |
|
|
|
|
|
|
|
|
Use this button to turn the power on and off when the power is sup- |
||||||
: |
Use these buttons to change the level of |
selected menu item. |
|
plied and the projector is in standby mode. |
|
|||||||||||
|
A press of the button executes the selection. |
|
|
|
NOTE: To turn off the projector, press and hold this button for a minimum of |
|||||||||||
|
When the menus or the Viewer tool bar is not displayed, these |
|
two seconds. |
|
|
|
|
|||||||||
|
buttons can be used to select |
|
|
|
|
from |
|
|
|
|
|
|
|
|||
|
|
slide, or to move the cursor in |
|
|
|
|
|
|
|
|
||||||
|
Folder List or Slide List. |
|
|
|
|
|
|
|
8. PC Card Access Indicator |
|
|
|||||
|
When the pointer is displayed, these ▲▼ buttons move |
|
Lights while accessing a CompactFlash memory card. |
|||||||||||||
|
the pointer. |
|
|
|
|
|
|
|
|
|
|
|
|
|
|
|
3. Enter Button |
|
|
|
|
|
|
|
|
9. Status Indicator |
|
|
|
||||
|
|
|
|
|
|
|
|
When this is lit red (orange in Eco mode) continually, it's warning you |
||||||||
Executes your menu selection and activates items selected from the |
|
that the projection lamp has exceeded 1000 hours (2000 hours in Eco |
||||||||||||||
menu. |
|
|
|
|
|
|
|
|
|
mode) of service. After this light appears, it is advisable to replace the |
||||||
4. Cancel Button |
|
|
|
|
|
|
|
|
projection lamp as soon as possible. (See page E-48). In addition the |
|||||||
|
|
|
|
|
|
|
|
message "The lamp has reached the end of its usable life. Please re- |
||||||||
Press this button to exit "Menus". Press this button to return the adjust- |
|
place the lamp." appears continually until the lamp is replaced. |
||||||||||||||
ments to the last condition while you are in the adjustment or setting |
|
If this light blinks red rapidly, it indicates that the lamp cover is not |
||||||||||||||
menu. |
|
|
|
|
|
|
|
|
|
attached properly or the projector is overheated. |
||||||
5. Source Button |
|
|
|
|
|
|
|
|
See the Power / Status Light Messages on page E-50 for more details. |
|||||||
|
|
|
|
|
|
|
|
|
|
|
|
|
|
|
||
Use this button to select |
video source such as |
PC, VCR, DVD |
|
10. Power Indicator ( |
) |
|
|
|||||||||
player or PC Card Viewer (CompactFlash card). |
|
|
|
|
|
When this indicator is green, the projector is on; when the indicator is |
||||||||||
Each time this button is pressed, the input source will change as fol- |
|
|||||||||||||||
|
orange, it is in standby mode. |
|
|
|||||||||||||
lows: |
|
|
|
|
|
|
|
|
|
|
|
|||||
|
|
|
|
|
|
|
|
|
|
|
|
|
|
|
|
|
→ RGB [“DVI (DIGITAL) → |
DVI (ANALOG)” on LT156] → |
Video |
|
|
|
|
|
|
|
|
|
|||||
|
|
PC Card Viewer ← |
S-Video ← |
|
|
|
|
|
|
|
|
|
||||
If no input signal is present, the input will be skipped. |
|
|
|
|
|
|
|
|
|
|
|
|||||
Downloaded |
|
|
|
|
|
|
|
|
|
|
|
|||||
E – 9

Terminal Panel Features
8
|
|
|
|
|
U |
|
|
|
|
|
|
|
|
|
N |
|
|
|
|
|
|
|
|
E |
|
|
|
|
|
|
|
7 |
|
M |
|
|
|
|
|
|
|
|
|
SELECT |
|
|
N |
||
|
|
|
|
|
|
|
|
L |
|
|
|
|
|
|
|
|
|
|
E |
|
|
6 |
|
|
|
|
|
|
C |
|
|
|
|
|
|
|
C |
A |
|
|
|
|
5 |
|
N |
R |
|
SOURCE |
|
|
|
CARD |
|
|
E |
TE |
|
|
|
|
|
4 |
|
|
|
|
|
|
|
|
|
|
|
3 |
|
LT156 |
|||
|
|
|
|
|
|
||||
|
|
|
|
|
|
|
|
|
|
|
|
USB |
|
|
|
2 |
|
|
|
|
|
|
|
|
|
|
|
|
|
|
AC |
IN |
CONTROL |
|
|
|
|
|
|
|
|
|
|
|
|
|
|
||
|
|
|
|
|
|
|
|
|
|
|
9 |
|
|
S- |
|
|
|
|
|
|
|
|
|
VIDEO |
|
|
|
|
|
|
|
|
|
|
|
|
|
|
|
|
|
|
|
|
|
|
|
|
AUDIO |
1. Audio Input Mini Jack (3.5 mm ) |
|
|
|
|
|
|
|
||
This is where you connect audio output from your computer, VCR, |
|
|
|
|
|
|
|||
DVD player or laser disc player. |
|
|
|
|
|
|
|
||
A commercially available audio cable is required. |
|
|
|
|
|
|
|
||
2. RGB Input/ Component Input Connector (Mini D-Sub 15 pin) |
|
|
|
10 |
|
|
|||
Connect your PC or other RGB equipment. Use the supplied RGB |
Slot for Kensington |
|
|
||||||
cable to connect to a PC. Or connect a Macintosh computer here using |
|
|
|
||||||
MicroSaver Security System |
|
|
|||||||
the supplied RGB cable. This also serves as a component input con- |
|
|
|||||||
|
|
|
|
|
|
||||
nector that allows you to connect a component video output of compo- |
|
|
|
|
|
|
|||
Downloaded |
|
|
|
|
|
|
|
||
nent equipment such as |
DVD player. |
|
|
|
|
|
|
|
|
For LT156: DVI Connector (DVI 29-pin) |
|
|
|
|
|
|
|
||
This connector can accept digital or analog signal input fromfroma com- |
|
|
|
|
|
||||
puter with |
DVI connector. |
|
|
|
|
|
|
|
|
If you connect mini -sub 15 pin connector of computer, attach the |
|
|
|
|
|
|
|||
supplied DVI-A–VGA adapter to this connector. |
|
|
|
|
|
|
|
||
3. S-Video Input (Mini DIN 4 Pin) |
|
|
|
|
|
|
|
||
Here is where you connect the S-Video input from an external source |
|
|
|
|
|
|
|||
like VCR. |
|
|
|
|
|
|
|
|
|
NOTE: S-Video provides more vivid color and higher resolution than the tradi- |
|
|
|
|
|
|
|||
tional composite video format. |
|
|
|
|
|
|
|
||
4. Video Input (RCA) |
|
|
|
|
|
|
|
|
|
Connect |
VCR, DVD player, laser disc player, or document camera |
|
|
|
|
|
|
||
here to project video. |
|
|
|
|
|
|
|
|
|
5. PC Control Port (Mini DIN 8 Pin) |
|
|
|
|
|
|
|
||
Use this port to connect your PC to control your projector via a serial |
|
|
|
|
|
|
|||
cable. This enables you to use your PC and serial communication pro- |
|
|
|
|
|
|
|||
tocol to control the projector. The NEC optional serial cable is required |
|
|
|
|
|
|
|||
to use this port. Also PC Control Utility 1.0 included in the supplied CD- |
|
|
|
|
|
|
|||
ROM must be installed on your PC. |
|
|
|
|
|
|
|
||
If you are writing your |
program, typical PC control codes are on |
|
|
|
|
|
|
||
page E-56. |
|
|
|
|
|
|
|
|
|
A cap is put on the port at the factory. Remove the cap when using the port.
.com
CARD
ACCESS
STATUS
POWER
1
E – 10

Remote Control Features
NOTE: If you are using a Macintosh computer, you can click either the rightclick or left-click button to activate the mouse.
NOTE: If any one of the buttons is pressed and held for 60 seconds or more, the button operations will cease to operate. This is not a malfunction, rather it is a feature used to prolong battery power. To cancel this feature, press any one of the buttons other than the Mouse button.
1. Infrared Transmitter
Direct the remote control toward the remote sensor on the projector cabinet.
2. Laser Pointer
Beams a laser light when "Laser" button is pressed.
1
2
3 |
|
|
from |
|
|
|
|
OFF |
|
ON |
|
5 |
|
|
4 |
VIDEO |
S-VIDEO AUTO ADJ. |
|
|
6 |
|
|
10 |
RGB 1 |
RGB 2 |
PJ |
|
Downloaded |
11* |
||
8 |
|
|
|
7 |
|
LASER |
9 |
MENU |
|
|
|
13* |
|
|
12 |
14 |
|
|
|
R-CLICK /CANCEL |
|
||
HELP |
POINTER |
PC CARD |
|
KEYSTONE MAGNIFY |
SLIDE |
|
|
FREEZE |
VOL. |
FOLDER |
|
PIC-MUTE |
|
SLIDE |
|
|
|
LIST |
|
4. Power On Button
If the main power is applied, you can use this button to turn your pro-
jector on. |
. |
|
|
5. Power Off Button |
|
Projector |
|
If the main power is applied, you can use this button to turn your pro- |
|
jector off. |
|
com |
|
NOTE: To turn off the projector, press and hold the POWER OFF button for a |
|
minimum of two seconds. |
|
6. Video Button
Press this button select an NTSC, PAL, SECAM or NTSC4.43 compatible video source from a VCR, DVD player, laser disc player or document camera.
7. |
S-Video Button |
|
Press this button |
select an S-Video source from a VCR. |
|
8. |
RGB 1 Button |
|
Press this button |
select a video source from computer or compo- |
|
nent equipment connected your RGB port (DVI digital on LT156).
9. RGB 2 Button
Not available on LT155/LT154.
For LT156:
Press this button select DVI analog signal from a computer.
10. Auto Adjust Button (RGB only)
Press this button to automatically adjust the vertical/horizontal position, clock frequency/phase and resolution if the projected picture is not centered, if there are vertical stripes on the picture or if the picture is flickering.
11. PJ Button
Press this button to switch the Mouse, Cancel/Right Click, and Enter/
Left Click buttons between the Projector mode (lit red) and the Computer mode. Press this button or any one of the Menu, Help, Pointer,
PC Card, Folder List or Slide List buttons to switch to the Projector mode and the PJ button lights red. To switch back to the Computer mode, press the PJ button again.
12. Laser Button
Press and hold this button to activate the laser pointer. When lit, you can use the laser to draw your audience's attention to a red dot that you can place on any object.
13. Menu Button
Displays the menu for various settings and adjustments.
14. Mouse (▲▼ ) / (+) (–) Button
When you are in the Computer mode, these buttons work as a computer mouse.
When you are in the Projector mode, which is indicated by lighting the PJ button:
▲▼: Use these buttons to select the menu of the item you wish to adjust.
: Use these buttons to change the level of a selected menu item. A press of the button executes the selection.
When the pointer is displayed, these ▲▼ buttons move the pointer.
E – 11

15. Enter / Left Click Button
When you are in the Computer mode, this button works as the mouse left button.
When you are in the Projector mode, which is indicated by lighting the PJ button:
Use this button to enter your menu selection. It works the same way as the "Enter" button on the cabinet.
15
|
OFF |
|
|
|
|
ON |
|
VIDEO |
S-VIDEO AUTO ADJ. |
|
|||||
RGB 1 |
RGB 2 |
|
PJ |
from |
|||
MENU |
|
|
|
|
LASER |
||
Downloaded |
16 |
||||||
17* |
|
R-CLICK /CANCEL |
|||||
18* |
HELP |
POINTER |
PC CARD |
24* |
|||
KEYSTONE MAGNIFY |
SLIDE |
|
|||||
19 |
|
|
|
|
|
|
25 |
20 |
|
|
|
|
|
|
|
21 |
FREEZE |
VOL. |
FOLDER |
26* |
|||
22 |
PIC-MUTE |
|
|
SLIDE |
27* |
||
|
|
|
|
|
LIST |
|
|
23 |
|
|
|
|
|
|
|
|
|
|
M |
|
PC |
EL |
|
|
|
|
A |
|
|
||
FRE |
|
|
GNIFY |
|
C |
|
|
|
|
|
|
AR |
|
||
PIC- |
EZE |
VOL. |
|
SLIDE |
|
|
|
UTE |
|
|
|
|
|
|
|
M |
|
|
|
|
|
|
|
|
|
|
FOL |
|
|
|
|
|
|
SLIDE |
ER |
|
|
|
|
|
LIST |
|
|
|
|
|
|
|
|
|
|
|
|
|
|
28 |
|
|
|
|
|
|
|
16. Cancel/ Right Click Button
When you are in the Computer mode, this button works as the mouse right button.
When you are in the Projector mode, which is indicated by lighting the PJ button:
Press this button to exit "Menus". It works the same way as the “Cancel” button on the cabinet.
WhenProjectorthe pointer is displayed, the image is magnified about the center of the pointer. When the pointer is not displayed, the image is magni-
17. Pointer Button
Press this button display one of the eight pointers; press again to
hide the pointer. You can move your pointer icon to the area you want |
|
on the screen using the Mouse button. |
.com |
|
|
18. Help Button
Provides information about operation and adjustment procedures or the set information for the current menu or adjustment during menu operation.
19. Keystone (+) (–) Button
Press the (+) |
(–) button correct the keystone (trapezoidal) distor- |
tion, and make the image square. |
|
20. Magnify (+) (–) Button |
|
Use this button |
adjust the image size up to 400%. |
fied about the center of the screen.
When the image is magnified, the pointer is changed to the magnifying icon.
21. Freeze Button
This button will freeze a picture. Press again to resume motion.
22. Picture Mute Button
This button turns off the image and sound for a short period of time.
Press again to restore the image and sound.
NOTE: When the menu is displayed, a press of this button mutes an image and sound without turning off the menu.
23. Volume (+) (–) Button
Press (+) to increase the volume and (–) to decrease it.
24. PC Card Button
Press this button to select the PC Card Viewer source.
25. Slide (+) (–) Button
Press (+) to select the next folder or slide and (–) to select the previous folder or slide.
26. Folder List Button
Press this button to select PC Card Viewer source to display a list of folders included in a CompactFlash memory card.
27. Slide List Button
Press this button to select PC Card Viewer source to display a list of slides included in a CompactFlash memory card.
28. Remote Jack
Not available on this model.
*NOTE: The default is the Computer mode, which allows you to use the Mouse, R-Click/Cancel, and L-Click/Enter buttons as your computer mouse. When the MENU, HELP, POINTER, PC CARD, FOLDER LIST, or SLIDE LIST button is pressed, the PJ button lights red to indicate that you are in the Projector mode. If no buttons are pressed within 10 seconds, the light goes out and the Projector mode is canceled.
E – 12

Remote Control Battery Installation |
Operating Range |
1. Press firmly and slide the battery cover off.
2.Remove both old batteries and install new ones (AA). Ensure that you have the batteries' polarity (+/–) aligned correctly.
|
from |
3. Slip the cover back over the batteries until it snaps into place. |
|
Downloaded |
|
Do not mix different types of batteries or new and old batteries.
7m
7m
30˚
Remote Control Precautions
• Handle the remote control carefully.
• If the remote control gets wet, wipe it dry immediately.
• Avoid excessive heat and humidity.
• If you will not be using the remote control for a long time, remove the batteries.
• Do not place the batteries upside down.
• Do not look into the laser pointer while it is on.
• Do not point the laser beam at a person.
Projector30˚
E – 13

Using Remote Mouse Receiver
The remote mouse receiver enables you to operate your computer's mouse functions from the remote control (Computer mode). It is a great convenience for clicking through your computer-generated presentations. To return to the Projector mode, press the PJ button (lit red).
Connecting the remote mouse receiver to your computer
To use the remote mouse function, connect the remote mouse receiver to your computer with one of the remote mouse cables (USB, PS/2 or Mac ADB). Choose the appropriate mouse cable for your computer.
NOTE: Depending on the type of connection or OS installed on your computer, you may have restart your computer |
change your computer settings. |
||||
Remote mouse receiver |
|
|
|
|
.com |
|
|
|
|
|
|
|
To USB |
|
|
Computer |
|
|
|
|
|
To USB port of PC or |
|
|
|
USB Cable |
|
Macintosh |
|
|
|
|
|
|
|
To PS/2 or Mac |
|
|
|
To Mouse port of PC |
|
|
|
|
|
||
|
|
PS/2 Cable |
|
|
|
|
|
|
|
To ADB port of Macintosh |
|
|
|
|
Projector |
|
|
|
|
Mac (ADB) Cable |
|
|
|
Notes on Connecting with USB Cable
* When you use an IBM PC, the Remote mouse receiver does not support the other operating systems than Windows 98/2000.
* Do not pull out the cable from the USB port of your PC or the remote mouse receiver and then immediately insert it back into the USB port. Allow a minimum of 5 seconds to elapse between insertion and extraction of the cable.
Doing so repeatedly can result in your PC failing to detect the remote mouse receiver.
* The supplied USB cable is designed especially for the Remote mouse receiver. If you use the USB cable with other equipment, we do not assure |
|
the correct functioning of the equipment. |
from |
When operating computer via the remote mouse receiver |
|
7m |
|
30˚ |
|
30˚ |
|
Remote sensor on the |
|
remote mouse |
|
receiver |
|
Downloaded |
|
E – 14

Switching operation mode between mouse and projector
The three shaded buttons shown on the drawing work as a computer mouse in the Computer mode.
In the Computer mode the PJ button is not lit.
• When the MENU button is pressed, the PJ button lights red to indicate that you are in the Projector mode, which allows the projector menu operation using the three buttons.
• |
When the POINTER button is pressed, the PJ button lights red to indicate that you are in the Projector mode and that the MOUSE ▲▼ button |
||
|
works as a moving button for the POINTER or magnified image. |
|
|
• |
If no buttons are pressed within 10 seconds, the PJ button's light goes out to indicate that you are in the Computer mode Tocomenable the projector |
||
|
|
rPojector |
. |
menu operation again, press the PJ button to light red. To move the pointer or a magnified image again, turn off the pointer and then turn on the pointer (press the POINTER button two times).
• When the PJ button is lit, if you want to use the mouse function immediately, press the PJ button |
return the Computer mode (not lit). |
|||||||
OFF |
|
ON |
|
OFF |
|
ON |
|
|
VIDEO |
S-VIDEO |
AUTO ADJ. |
|
VIDEO |
S-VIDEO |
AUTO ADJ. |
|
|
RGB 1 |
RGB 2 |
PJ |
|
RGB 1 |
RGB 2 |
J |
|
|
|
|
|
Not lit |
|
|
|
Lit red |
|
MENU |
|
LASER |
|
MENU |
|
LASER |
|
|
|
|
|
Works as a mouse for your computer. |
|
|
|
Works as the Select button |
|
|
|
|
|
|
|
on the projector. |
||
|
|
|
Works as a right-click button |
|
|
|
Works as the Cancel |
|
|
|
|
for your computer. |
|
|
|
||
|
|
|
|
|
|
button on the projector. |
||
|
|
|
Works as left-clickfrombutton |
|
|
|
||
R-CLICK /CANCEL |
R-CLICK /CANCEL |
|
||||||
HELP |
POINTER |
PC CARD |
HELP |
POINTER |
PC CARD |
|
||
KEYSTONE MAGNIFY |
SLIDE |
KEYSTONE MAGNIFY |
SLIDE |
Works as the Enter |
||||
for your computer. |
button on the projector. |
|||||||
|
|
|
|
|
|
|||
FREEZE |
VOL. |
FOLDER |
|
FREEZE |
VOL. |
FOLDER |
|
|
PIC-MUTE |
|
SLIDE |
|
PIC-MUTE |
|
SLIDE |
|
|
|
|
LIST |
|
|
|
LIST |
|
|
Downloaded |
|
|
|
|
||||
L-CLICK/ENTER |
L-CLICK/ENTER |
|
E – 15

This section describes how to set up your MultiSync LT156/LT155/LT154 projector and how to connect video and audio sources.
1. Determine the image size. |
|
. |
|
|
|
|
|
2. Set up a screen or select a non-glossy white wall onto which you can project your image. |
|
|
|
Ensure that the power cable and any other cables connecting to video sources are disconnected before moving the projector. |
|||
144 |
Projector457. |
|
com |
When moving the projector or when it is not in use, cover the lens with the lens cap. |
|
||
Selecting a Location |
|
|
|
The further your projector is from the screen or wall, the larger the image. The minimum size the image can be is approximately 25" (0.6 m) measured diagonally when the projector is roughly 3.7 feet (1.1 m) from the wall or screen. The largest the image can be is 300" (7.6 m) when the projector is about 40.1 feet (12.2 m) from the wall or screen.
of the projector and screen. Refer the table determine the position of installation.
Throw distance |
|
|
|
|
|
|
|
|
|
|
|
|
|
|
|
|
|
|
|
|
|
|
|
|
|
|
|
|
|
|
|
|
|
|
Screen |
size |
|
|
|
|
|
|
|
|
|
|
|
|
|
|
|
|
|
||||||||||||||||
|
|
|
|
|
|
|
|
|
|
|
|
|
|
|
|
|
|
|
|
|
|
|
|
|
|
|
|
|
|
|
|
|
|
|
|
|
|
|
|
|
|
|
|
|
|
548. |
|
|
|
(Unit: |
|
|
|
|
|
|
|
|
|
|
|
|
|
|
|
||||
|
|
|
|
|
|
|
|
|
|
|
|
|
|
|
|
|
|
|
|
|
|
|
|
|
|
|
|
|
|
|
|
|
|
|
|
|
|
|
|
|
|
|
|
|
|
|
6 |
(W) |
X |
|
|
|
|
|
|
|
|
|
|
|
|
|
|
|
|||||
|
|
|
|
|
|
|
|
|
|
|
|
|
|
|
|
|
|
|
|
|
|
|
|
|
|
|
|
|
|
|
|
|
|
|
|
|
|
|
|
|
|
|
|
|
|
|
|
|
|
|
|
cm/ |
|
|
|
|
|
|
|
|
|
|
|
|
|
|
|||
|
|
|
|
|
|
|
|
|
|
|
|
|
|
|
|
|
|
|
|
|
|
|
|
|
|
|
|
|
|
|
|
|
|
|
|
|
|
|
|
|
|
|
|
|
|
|
|
|
|
|
|
411. |
|
|
|
|
|
|
|
|
|
|
|
|
|
|
|||
|
|
|
|
|
|
|
|
|
|
|
|
|
|
|
|
|
|
|
|
|
|
|
|
|
|
|
|
|
|
|
|
|
|
|
|
|
|
|
|
|
|
|
|
|
|
|
|
|
|
|
|
|
5 |
(H)/ |
inch) |
|
|
|
|
|
|
|
|
|
|
|
|
|
|
|
|
|
|
|
|
|
|
|
|
|
|
|
|
|
|
|
|
|
|
|
|
|
|
|
|
|
|
|
|
|
|
|
|
|
|
|
|
|
|
|
|
|
|
|
|
|
|
|
|
|
|
|
|
|
|
|
|
|
|
|
|
|
|
|
|
|
|||
|
|
|
|
|
|
|
|
|
|
|
|
|
|
|
|
|
|
|
|
|
|
|
|
|
|
|
|
|
|
|
|
|
|
|
|
|
|
|
|
487. |
|
|
|
|
|
|
|
|
|
|
|
|
216 |
(W) |
X |
|
|
Screen |
|
|
|
|
|
|
|
|
|
||
|
|
|
|
|
|
|
|
|
|
|
|
|
|
|
|
|
|
|
|
|
|
|
|
|
|
|
|
|
|
|
|
|
|
|
|
|
|
|
|
|
|
|
|
|
|
|
|
|
|
|
|
|
|
162 |
|
|
|
|
|
|
|
|
|
|
|||||
|
|
|
|
|
|
|
|
|
|
|
|
|
|
|
|
|
|
|
|
|
|
|
|
|
|
|
|
|
|
|
|
|
|
|
|
|
|
|
|
|
|
|
|
|
|
|
|
|
|
|
|
|
|
|
|
|
|
|
|
|
|
|
|
|
|||||
|
|
|
|
|
|
|
|
|
|
|
|
|
|
|
|
|
|
|
|
|
|
|
|
|
|
|
|
|
|
|
|
|
|
|
|
|
|
|
|
|
7 |
(W) |
X |
|
|
|
|
|
|
|
|
|
|
|
(H) |
|
|
|
|
|
|
|
|
|
|||||
|
|
|
|
|
|
|
|
|
|
|
|
|
|
|
|
|
|
|
|
|
|
|
|
|
|
|
|
|
|
|
|
|
|
|
|
|
|
|
|
|
|
|
|
|
|
|
|
|
|
|
|
|
|
|
|
|
|
|
|
|
|
|
|
||||||
|
|
|
|
|
|
|
|
|
|
|
|
|
|
|
|
|
|
|
|
|
|
|
|
|
|
|
|
|
|
|
|
|
|
|
|
|
|
|
|
|
|
|
|
|
|
|
|
|
|
|
|
|
|
|
|
|
|
|
|
|
|
|
|
|
|||||
|
|
|
|
|
|
|
|
|
|
|
|
|
|
|
|
|
|
|
|
|
|
|
|
|
|
|
|
|
|
|
|
|
|
|
|
|
|
|
|
|
|
|
|
|
|
365. |
|
|
|
|
|
|
|
|
|
|
|
|
|
WIDE: |
|
|
|
|
|
|
|
||
|
|
|
|
|
|
|
|
|
|
|
|
|
|
|
|
|
|
|
|
|
|
|
|
|
|
|
|
|
|
|
|
|
|
|
|
|
|
|
|
|
|
|
|
|
|
|
8 |
(H) |
|
|
|
|
|
|
|
|
|
|
|
|
|
|
|
|
|
||||
|
|
|
|
|
|
|
|
|
|
|
|
|
|
|
|
|
|
|
|
|
|
|
|
|
|
|
|
|
|
|
|
|
|
|
|
|
|
|
|
|
|
|
|
|
|
|
|
|
|
/ |
|
|
|
|
|
|
|
|
|
|
|
|
|
|
|
|
|||
|
|
|
|
|
|
|
|
|
|
|
|
|
|
|
|
|
|
|
|
|
|
|
|
|
|
|
|
|
|
|
|
|
|
|
|
|
|
|
|
|
|
|
|
|
|
|
|
|
|
|
192 |
|
|
|
|
|
|
|
270" |
609. |
|
300" |
|
|
|
|
|
|
|
|
|
|
|
|
|
|
|
|
|
|
|
|
|
|
|
|
|
|
|
|
|
|
|
|
|
|
|
|
|
|
|
|
|
|
|
|
|
|
|
|
|
|
|
|
|
|
|
|
|
|
(W)X |
|
|
|
|
|
6 |
|
|
|
|
|
|
|
|||||
|
|
|
|
|
|
|
|
|
|
|
|
|
|
|
|
|
|
|
|
|
|
|
|
|
|
|
|
|
|
|
406. |
|
|
|
|
|
|
|
|
|
|
|
|
|
|
|
|
|
|
|
|
|
|
|
|
(W)X |
|
|
|
|
|
|
|||||||
|
|
|
|
|
|
|
|
|
|
|
|
|
|
|
|
|
|
|
|
|
|
|
|
|
|
|
|
|
|
|
|
|
|
4 |
(W) |
X |
|
|
|
|
|
|
|
|
|
|
|
|
|
|
|
|
(H) |
|
|
|
|
|
|
|
2 |
(H)/ |
|
|
|
|
|||
|
|
|
|
|
|
|
|
|
|
|
|
|
|
|
|
|
|
|
|
|
|
|
|
|
|
|
|
|
|
|
|
|
|
|
304. |
|
|
|
|
|
|
|
|
|
|
|
|
|
|
|
|
|
|
|
|
|
|
|
|
|
|||||||||
|
|
|
|
|
|
|
|
|
|
|
|
|
|
|
|
|
|
|
|
|
|
|
|
|
|
|
|
|
|
|
|
|
|
|
|
|
|
|
|
|
|
|
|
|
|
|
|
|
|
|
|
|
|
|
|
|
|
|
|
|
|||||||||
|
|
|
|
|
|
|
|
|
|
|
|
|
|
|
|
|
|
|
|
|
|
|
|
|
|
|
|
|
|
|
|
|
|
|
|
|
|
|
|
|
|
|
|
|
|
|
|
|
|
|
|
|
|
|
|
|
|
|
|
|
|
|
240 |
|
|
|
|
||
|
|
|
|
|
|
|
|
|
|
|
|
|
|
|
|
|
|
|
|
|
|
|
|
|
|
|
|
|
|
|
|
|
|
|
|
|
|
|
|
8 |
(H)/ |
|
|
|
|
|
|
|
|
|
|
|
|
|
|
|
|
|
|
|
|
(W) |
X |
180 |
|
||||
|
|
|
|
|
|
|
|
|
|
|
|
|
|
|
|
|
|
|
|
|
|
|
|
|
|
|
|
|
|
|
|
|
|
|
|
|
|
|
|
|
|
|
|
|
|
|
|
|
|
|
|
|
|
|
|
|
|
|
|
|
|
|
|||||||
|
|
|
|
|
|
|
|
|
|
|
|
|
|
|
|
|
|
|
|
|
|
|
|
|
|
|
|
|
|
|
|
|
|
|
|
|
|
|
|
|
|
|
|
|
160 |
(W) |
X |
|
|
|
|
|
|
|
|
|
240" |
|
|
|
|
|
|
|
|
(H) |
|||
|
|
|
|
|
|
|
|
|
|
|
|
|
|
|
|
|
|
|
|
|
|
|
|
|
|
|
|
|
|
|
|
|
|
|
|
|
|
|
|
|
|
|
|
|
|
|
120 |
|
|
|
|
|
|
|
|
|
|
|
|
|
|
|
|
||||||
|
|
|
|
|
|
|
|
|
|
|
|
|
|
|
|
|
|
|
|
|
|
|
|
|
|
|
|
|
|
|
|
|
|
|
|
|
|
|
|
|
|
|
|
|
|
|
|
|
|
|
|
|
|
|
|
|
|
|
|
|
|
|
|
||||||
|
|
|
|
|
|
|
|
|
|
|
|
|
|
|
|
|
|
|
|
|
|
|
|
|
|
|
|
|
|
|
|
|
|
|
|
|
|
|
|
|
|
|
|
|
|
|
|
(H) |
|
|
|
|
|
|
|
|
|
|
|
|
|
|
|
||||||
|
|
|
|
|
|
|
|
|
|
|
|
|
|
|
|
|
|
|
|
304. |
|
|
|
|
|
|
|
|
|
|
|
|
|
|
|
|
|
|
|
|
|
|
|
|
|
|
|
|
|
|
|
|
|
|
|
|
|
|
|
|
|
|
|||||||
|
|
|
|
|
|
|
|
|
|
|
|
|
|
|
|
|
|
|
|
|
|
|
|
|
|
|
|
|
|
|
|
|
|
|
|
|
|
|
|
|
|
|
|
|
|
|
|
|
|
|
|
|
|
|
|
|
|
|
|
|
|
|
|||||||
|
|
|
|
|
|
|
|
|
|
|
|
|
|
|
|
|
|
|
|
|
|
|
|
|
|
|
|
|
|
|
|
|
|
|
|
|
|
|
|
|
|
|
|
|
|
|
|
|
|
|
|
|
|
|
|
|
|
|
|
|
|
|
|
|
|||||
|
|
|
|
|
|
|
|
|
|
|
|
|
|
|
|
|
|
|
|
|
|
8 |
(W) |
|
|
|
|
|
|
|
|
|
|
|
|
|
|
|
|
|
|
|
|
|
|
|
|
|
|
|
|
|
|
|
|
|
|
|
|
|
|
|
|
|
|
|
|||
|
|
|
|
|
|
|
|
|
|
|
|
|
|
|
|
|
|
|
|
|
|
|
|
|
|
X |
|
|
|
|
|
|
|
|
|
|
|
|
|
|
|
|
|
|
|
|
|
|
|
|
|
|
|
|
|
|
|
|
|
|
|
|
|
|
|
|
|
|
|
|
|
|
|
|
|
|
|
|
|
|
|
|
|
|
|
|
|
|
|
|
|
|
|
|
|
|
228. |
|
|
|
|
|
|
|
|
|
|
|
|
|
|
|
|
|
|
|
|
|
|
|
200" |
|
|
|
|
|
|
|
|
|
|
|
|
|
|||||
|
|
|
|
|
|
|
|
|
|
|
|
243. |
|
|
|
|
|
|
|
|
|
|
|
|
|
|
|
6 |
(H)/ |
|
|
|
|
|
|
|
|
|
|
|
|
|
|
|
|
|
|
|
|
|
|
|
|
|
|
|
|
|
|
|
|
||||||||
|
|
|
|
|
|
|
|
|
|
|
|
|
|
|
|
|
|
|
|
|
|
|
|
|
|
|
|
|
|
|
120 |
|
|
|
|
|
|
|
|
|
|
|
|
|
|
|
|
|
|
|
|
|
|
|
|
|
|
|
|
|
|
||||||||
|
|
|
|
|
|
|
|
|
|
|
|
|
|
|
|
|
|
|
|
|
|
|
|
|
|
|
|
|
|
|
(W)X |
|
|
|
|
|
|
|
|
|
|
|
from |
|
|
|
|
|
|
|
|
|
|
|
|||||||||||||||
|
|
|
|
|
|
|
|
|
|
|
|
|
|
|
8 |
(W) |
X |
|
|
|
|
|
|
|
|
|
|
|
|
|
|
|
|
90 |
|
|
|
|
|
|
|
|
|
|
|
|
|
|
|
|
|
|
|
||||||||||||||||
|
|
|
|
|
|
|
|
|
|
|
|
|
|
|
|
|
|
|
|
|
|
|
|
|
|
|
|
|
|
|
|
|
|
|
|
|
|
|
|
|
|
|
|
|
|
|
|
|
|
|
|||||||||||||||||||
|
|
|
|
|
|
|
|
203. |
|
|
|
|
|
|
|
|
|
|
182. |
|
|
|
|
|
|
|
|
|
|
|
|
|
|
|
|
|
(H) |
|
|
|
|
|
|
|
|
|
|
|
|
|
|
|
|
|
|||||||||||||||
|
|
|
|
|
|
|
|
|
|
|
|
|
|
|
|
|
|
|
|
9 |
(H) |
|
|
|
|
|
|
|
|
|
|
|
|
|
|
|
|
|
|
|
|
|
|
|
|
|
|
|
|
|
|
|
|
|
|||||||||||||||
|
|
|
|
|
|
|
|
|
|
2 |
(W) |
|
|
|
|
|
|
|
|
|
|
|
|
|
|
|
|
|
|
|
|
|
|
|
|
|
|
|
|
|
|
|
|
|
|
|
|
|
|
|
|
|
|
|
|
|
|||||||||||||
|
|
|
|
|
|
|
|
|
|
|
|
|
|
|
|
|
|
|
|
|
|
|
|
/ |
|
|
|
|
|
|
|
|
|
|
|
|
|
|
|
|
|
|
|
|
|
|
|
|
|
|
|
|
|
|
|
|
|
|
|||||||||||
|
|
|
|
|
|
|
|
|
|
|
|
X |
152. |
|
|
|
|
|
|
|
96 |
(W) |
X |
|
|
|
|
|
|
|
|
|
|
|
|
|
|
|
|
|
|
|
|
|
|
|
|
|
|
|
|
|
|
|
|
|
|
|
|||||||||||
|
|
|
|
|
|
|
|
|
|
|
|
|
|
|
|
|
|
|
|
|
|
|
|
|
72 |
|
|
|
|
|
|
|
|
|
|
|
|
|
|
|
|
|
|
|
|
|
|
|
|
|
|
|
|
|
|
|
|
|
|
||||||||||
|
|
|
|
|
|
|
|
|
|
|
|
|
|
|
|
|
|
|
|
|
|
|
|
|
|
|
|
|
|
|
|
|
|
|
|
|
|
|
|
|
|
|
|
|
|
|
|
|
|
|
|
|
|
|
|
|
|
|
|
|
|
|
|||||||
|
|
|
|
|
|
162. |
|
|
|
|
|
|
|
|
|
|
|
4 |
(H)/ |
|
|
|
|
|
|
|
|
|
|
|
(H) |
|
|
|
|
|
|
|
|
|
|
|
150" |
|
|
|
|
|
|
|
|
|
|
|
|
|
|
|
|
||||||||||
|
|
|
|
|
|
|
|
|
|
|
|
|
|
|
|
|
|
|
|
|
|
|
|
|
|
|
|
|
|
|
|
|
|
|
|
|
|
|
|
|
|
|
|
|
|
|
|
|
|
|
|
|
|
|
|
|
|||||||||||||
|
|
|
|
|
|
|
|
6 |
(W) |
X |
|
|
|
|
|
|
|
|
|
80 |
(W) |
X |
|
|
|
|
|
|
|
|
|
|
|
|
|
|
|
|
|
|
|
|
|
|
|
|
|
|
|
|
|
|
|
|
|
|
|
||||||||||||
|
|
|
|
|
|
|
|
|
121. |
|
|
|
|
|
|
|
|
|
|
|
|
|
|
|
|
|
|
|
|
|
|
|
|
|
|
|
|
|
|
|
|
|
|
|
|
|
|
|
|
||||||||||||||||||||
|
|
|
|
|
|
|
|
|
|
|
|
|
|
|
|
|
60 |
(H) |
|
|
|
|
|
|
|
|
|
|
|
|
|
|
|
|
|
|
|
|
|
|
|
|
|
|
|
|
|
|
|
|
|
|
|
||||||||||||||||
|
|
|
|
121. |
|
|
|
|
|
|
|
|
|
|
|
|
|
|
|
|
|
|
|
|
|
|
|
|
|
|
|
|
|
|
|
|
|
|
|
|
|
|
|
|
|
|
|
|
|
|
|
|
|
|
|||||||||||||||
|
|
|
|
|
|
|
|
|
|
|
|
|
|
|
|
|
|
|
|
|
|
|
|
|
|
|
|
|
|
|
|
|
|
|
|
|
|
|
|
|
|
|
|
|
|
|
|
|
|
|
|
|
|
|
|
|
|
||||||||||||
|
|
|
|
|
|
|
|
|
|
|
|
|
9 |
(H)/ |
|
|
|
|
|
|
|
|
|
|
|
|
|
|
|
|
|
|
|
|
120" |
|
|
|
|
|
|
|
|
|
|
|
|
|
|
|
|
|
|
|
|
|
|
||||||||||||
|
|
|
|
|
|
9 |
(W) |
|
|
|
|
|
|
|
|
|
|
|
|
|
|
|
|
|
|
|
|
|
|
|
|
|
|
|
|
|
|
|
|
|
|
|
|
|
|
|
|
|
|
|
|
|
|
|
|
|
|
|
|
|
|
||||||||
|
|
|
|
|
|
|
|
X |
91. |
|
|
|
|
|
|
|
|
64 |
(W)X |
48 |
|
|
|
|
|
|
|
|
|
|
|
|
|
|
|
|
|
|
|
|
|
|
|
|
|
|
|
|
|
|
|
|
|
|
|
|
|||||||||||||
|
|
|
|
|
|
|
|
|
|
|
|
|
|
|
|
|
|
|
|
|
|
|
|
|
|
|
|
|
|
|
|
|
|
|
|
|
|
|
|
|
|
|
|
|
|
|
|
|
|
|
|
|
|
||||||||||||||||
|
|
|
|
|
|
|
|
|
|
|
|
|
|
|
|
|
|
|
|
|
|
|
|
|
|
|
|
|
|
|
|
|
|
|
|
|
|
|
|
|
|
|
|
|
|
|
|
|
|
|
|
|
|
|
|
|
|||||||||||||
|
|
81. |
|
|
|
|
|
|
|
|
|
4 |
(H)/ |
|
|
|
|
|
|
|
|
|
(H) |
|
|
|
|
|
|
|
|
100" |
|
|
|
|
|
|
|
|
|
|
|
|
|
|
|
|
|
|
|
|
|
|
|
|
|||||||||||||
|
|
|
3 |
(W) |
|
|
|
|
|
|
|
|
|
|
|
|
|
|
|
|
|
|
|
|
|
|
|
|
|
|
|
|
|
|
|
|
|
|
|
|
|
|
|
|
|
|
|
|
|
|
|
|
|
|
|
|
|
|
|||||||||||
61. |
|
|
|
X |
61. |
|
|
|
|
|
|
|
|
|
48 |
(W)X |
36 |
|
|
|
|
|
|
|
|
|
|
|
|
|
|
|
|
|
|
|
|
|
|
|
|
|
|
|
|
|
|
|
|
|
|
|
|
|
|
||||||||||||||
|
|
|
|
|
|
|
|
|
|
|
|
|
|
|
|
|
|
|
|
|
|
|
|
|
|
|
|
|
|
|
|
|
|
|
|
|
|
|
|
|
|
|
|
|
|
|
|
|
|
|
|
|
|
||||||||||||||||
|
|
|
|
|
|
|
|
|
|
|
|
|
|
|
|
|
|
|
|
|
|
|
|
|
|
|
|
|
|
|
|
|
|
|
|
|
|
|
|
|
|
|
|
|
|
|
|
|
|
|
|
|
|
|
|
|
|
|
|
|
|||||||||
|
|
|
|
|
|
|
0 |
(H)/ |
|
|
|
|
|
|
|
|
|
|
|
(H) |
|
|
|
|
|
|
|
|
|
|
|
|
|
|
|
|
|
|
|
|
|
|
|
|
|
|
|
|
|
|
|
|
|
|
|
|
|
|
|
|
|
||||||||
0 |
(W) |
|
|
|
|
|
|
|
|
|
|
|
|
|
|
|
|
|
|
|
|
|
|
|
|
|
|
|
|
|
80" |
|
|
|
|
|
|
|
|
|
|
|
|
|
|
|
|
|
|
|
|
|
|
|
|
|
|
|
|
|
|||||||||
|
X |
|
|
|
|
|
|
|
|
32 |
(W) |
|
|
|
|
|
|
|
|
|
|
|
|
|
|
|
|
|
|
|
|
|
|
|
|
|
|
|
|
|
|
|
|
|
|
|
|
|
|
|
|
|
|
|
|
|
|
|
|
|
|||||||||
TELE: |
|
45. |
|
|
|
|
|
|
|
|
|
|
X |
|
|
|
|
|
|
|
|
|
|
|
|
|
|
|
|
|
|
|
|
|
|
|
|
|
|
|
|
|
|
|
|
|
|
|
|
|
|
|
|
|
|
|
|
|
|
|
|||||||||
|
|
7 |
(H)/ |
|
|
|
|
|
|
|
|
|
24 |
|
|
|
|
|
|
|
|
|
|
|
|
|
|
|
|
|
|
|
|
|
|
|
|
|
|
|
|
|
|
|
|
|
|
|
|
|
|
|
|
|
|
|
|
|
|
|
|
||||||||
50. |
|
25" |
|
|
|
|
|
|
|
|
|
|
|
|
|
(H) |
|
|
|
|
|
|
|
|
|
|
60" |
|
|
|
|
|
|
|
|
|
|
|
|
|
|
|
|
|
|
|
|
|
|
|
|
|
|
|
|
|
|
|
|
|
|||||||||
8 |
|
|
|
|
|
24 |
|
|
|
|
|
|
|
|
|
|
|
|
|
|
|
|
|
|
|
|
|
|
|
|
|
|
|
|
|
|
|
|
|
|
|
|
|
|
|
|
|
|
|
|
|
|
|
|
|
|
|
|
|
|
|
||||||||
|
(W) |
X |
38. |
|
|
|
(W) |
X |
|
|
|
|
|
|
|
|
|
|
|
|
|
|
|
|
|
|
|
|
|
|
|
|
|
|
|
|
|
|
|
|
|
|
|
|
|
|
|
|
|
|
|
|
|
|
|
|
|
|
|||||||||||
|
|
|
|
|
|
18 |
|
|
|
|
|
|
|
|
|
|
|
|
|
|
|
|
|
|
|
|
|
|
|
|
|
|
|
|
|
|
|
|
|
|
|
|
|
|
|
|
|
|
|
|
|
|
|
|
|
|
|||||||||||||
|
|
|
|
|
|
|
|
|
|
|
|
|
|
|
|
|
|
|
|
|
|
|
|
|
|
|
|
|
|
|
|
|
|
|
|
|
|
|
|
|
|
|
|
|
|
|
|
|
|
|
|
|
|
|
|
|
|
|
|||||||||||
|
|
|
|
|
|
|
|
|
|
|
|
|
|
|
|
|
|
|
|
|
|
|
|
|
|
|
|
|
|
|
|
|
|
|
|
|
|
|
|
|
|
|
|
|
|
|
|
|
|
|
|
|
|
|
|
|
|
|
|
|
|||||||||
|
|
|
|
|
|
|
|
|
|
|
|
|
|
|
|
|
|
|
|
|
|
|
|
|
|
|
|
|
|
|
|
|
|
|
|
|
|
|
|
|
|
|
|
|
|
|
|
|
|
|
|
|
|
|
|
|
|
|
|
|
|
|
|
|
|||||
|
|
|
|
1 |
(H)/ |
|
|
|
|
|
|
(H) |
|
|
|
|
|
|
|
|
40" |
|
|
|
|
|
|
|
|
|
|
|
|
|
|
|
|
|
|
|
|
|
|
|
|
|
|
|
|
|
|
|
|
|
|
|
|
|
|
||||||||||
|
|
|
|
|
|
|
|
20 |
(W) |
|
|
|
|
|
|
|
|
|
|
|
|
|
|
27" |
|
|
|
|
|
|
|
|
|
|
|
|
|
|
|
|
|
|
|
|
|
|
|
|
|
|
|
|
|
|
|
|
|
|
|
|
|
|
|||||||
|
|
|
|
|
|
|
|
X |
|
|
|
|
|
|
|
|
|
|
|
|
|
|
|
|
|
|
|
|
|
|
|
|
|
|
|
|
|
|
|
|
|
|
|
|
|
|
|
|
|
|
|
|
|
|
|
|
|
|
|
|
|
||||||||
|
|
|
|
|
|
|
|
|
|
15 |
(H) |
|
|
|
|
|
|
|
|
|
|
|
|
|
|
|
|
|
|
|
|
|
|
|
|
|
|
|
|
|
|
|
|
|
|
|
|
|
|
|
|
|
|
|
|
|
|
|
|||||||||||
|
|
|
|
|
|
|
|
|
|
|
|
|
|
|
|
|
|
|
|
|
|
|
|
|
|
|
|
|
|
|
|
|
|
|
|
|
|
|
|
|
|
|
|
|
|
|
|
|
|
|
|
|
|
|
|
|
|
|
|
|
|
||||||||
|
|
|
|
|
|
|
|
|
|
|
|
|
|
|
|
|
|
|
|
|
|
|
|
|
|
|
|
|
|
|
|
|
|
|
|
|
|
|
|
|
|
|
|
|
|
|
|
|
|
|
|
|
|
|
|
|
|
|
|
|
|
|
|
||||||
|
|
|
|
|
|
|
|
|
|
|
|
|
|
|
|
|
|
|
|
|
|
|
|
|
|
|
|
|
|
|
|
|
|
|
|
|
|
|
|
|
|
|
|
|
|
|
|
|
|
|
|
|
|
|
|
|
|
|
|
|
|
|
|
|
|
||||
|
|
|
|
|
|
|
|
|
|
|
|
|
|
|
|
|
|
|
|
|
|
|
|
|
|
|
|
|
|
|
.6 |
|
|
|
|
|
|
|
|
|
|
|
|
|
|
|
|
|
|
|
|
|
|
|
|
|
|
|
|
|
|
|
|
|
|
|
|
||
|
|
|
|
|
|
|
|
|
|
|
|
|
|
|
|
|
|
|
|
|
|
|
|
|
|
|
|
|
.1/3 |
|
|
|
|
|
.6 |
|
|
|
|
|
|
|
|
|
|
|
|
|
|
|
|
|
|
|
|
|
|
|
|
|
|
|
|
|
|
||||
|
|
|
|
|
|
|
|
|
|
|
|
|
|
|
|
|
|
|
|
|
|
|
|
|
|
|
|
1 |
|
|
|
|
|
|
|
|
|
|
.5 |
|
|
|
|
|
|
|
|
|
|
|
|
|
|
|
.4 |
|
|
|
|
|
|
||||||||
|
|
|
|
|
|
|
|
|
|
|
|
|
|
|
|
|
|
|
|
|
|
|
|
|
|
|
|
|
|
|
|
|
|
|
.7/5 |
|
|
|
|
|
|
|
|
|
|
|
|
|
|
|
|
|
|
|
|
|
.0 |
|
|
|
|
||||||||
|
|
|
|
|
|
|
|
|
|
|
|
|
|
|
|
|
|
|
|
|
|
|
|
|
|
|
|
|
|
|
|
|
|
|
|
|
|
.6/8 |
|
|
|
|
.5 |
|
|
|
|
|
|
|
|
|
|
|
|
|
|
|
|
|
|||||||||
|
|
|
|
|
|
|
|
|
|
|
|
|
|
|
|
|
|
|
|
|
|
|
|
|
|
|
|
|
|
|
|
|
|
1 |
|
|
|
|
|
|
|
|
|
|
|
.1 |
|
|
|
|
|
.5 |
. |
|
|
|
|
|
|
|
|
||||||||
|
|
|
|
|
|
|
|
|
|
|
|
|
|
|
|
|
|
|
|
|
|
|
|
|
|
|
|
|
|
|
|
|
|
|
|
|
|
|
|
|
2 |
|
|
|
|
|
|
|
|
|
|
|
|
|
|
|
|
. |
|
|
|
|
|
||||||
|
|
|
|
|
|
|
|
|
|
|
|
|
|
|
|
|
|
|
|
|
|
|
|
|
|
|
|
|
|
|
|
|
|
|
|
|
|
|
|
|
|
|
|
|
|
|
.5/11 |
|
|
|
|
|
|
|
|
|
|
5/34 |
|
|
|
|
|
|
|
||||
|
|
|
|
|
|
|
|
|
|
|
|
|
|
|
|
|
|
|
|
|
|
|
|
|
|
|
|
|
|
|
|
|
|
|
|
|
|
|
|
|
|
|
|
|
|
|
3 |
|
|
|
|
. |
|
|
.1 |
|
|
.3 |
.7/28 |
10 |
|
12 |
|
|
|
|
|
||
|
|
|
|
|
|
|
|
|
|
|
|
|
|
|
|
|
|
|
|
|
|
|
|
|
|
|
|
|
|
|
|
|
|
|
|
|
|
|
|
|
|
|
|
|
|
|
|
|
|
|
|
|
3/14 |
|
|
|
.5/21 |
|
|
|
|
|
|
|
|||||
|
|
|
|
|
|
|
|
|
|
|
|
|
|
|
|
|
|
|
|
|
|
|
|
|
|
|
|
|
|
|
|
|
|
|
|
|
|
|
|
|
|
|
|
|
|
|
|
|
|
|
|
4 |
.2/17 |
|
8 |
|
|
|
|
|
|
|
|
|
|||||
|
|
|
|
|
|
|
|
|
|
|
|
|
|
|
|
|
|
|
|
|
|
|
|
|
|
|
|
|
|
|
|
|
|
|
|
|
|
|
|
|
|
|
|
|
|
|
|
|
|
|
|
|
|
|
6 |
|
|
|
|
|
|
|
|
|
|
||||
|
|
|
|
|
|
|
|
|
|
|
|
|
|
|
|
|
|
|
|
|
|
|
|
|
Lens |
|
|
|
|
|
|
|
|
|
|
|
|
|
|
|
|
|
|
|
|
|
|
|
|
5 |
|
|
|
|
|
|
|
|
|
|
|
|
|
|
|
||||
|
|
|
|
|
|
|
|
|
|
|
|
|
|
|
|
|
|
|
|
|
|
|
|
|
center |
|
|
|
|
|
|
|
|
|
|
|
|
|
|
|
|
|
|
|
|
|
|
|
|
|
/feet) |
|
|
|
|
|
|
|
|
||||||||||
|
|
|
|
|
|
|
|
|
|
|
|
|
|
|
|
|
|
|
|
|
|
|
|
|
|
|
|
|
|
|
|
|
|
|
|
|
|
|
|
|
|
|
|
|
|
|
|
|
|
|
|
|
|
|
|
|
|
|
|
|
|
|
|||||||
|
|
|
|
|
|
|
|
|
|
|
|
|
|
|
|
|
|
|
|
|
|
|
|
|
|
|
|
|
|
|
|
|
|
|
|
|
|
|
|
|
|
|
|
|
|
|
|
|
|
|
|
|
|
|
:m |
|
|
|
|
|
|
|
|
|
|||||
Downloaded |
|
|
|
|
|
|
|
|
|
|
|
|
|
|
|
|
|
|
|
|
|
||||||||||||||||||||||||||||||||||||||||||||||||
|
|
|
|
|
|
|
|
|
|
|
|
(Unit |
|
|
|
|
|
|
|
|
|
||||||||||||||||||||||||||||||||||||||||||||||||
|
|
|
|
|
|
|
|
|
|
|
Distance |
|
|
|
|
|
|
|
|
|
|||||||||||||||||||||||||||||||||||||||||||||||||
|
|
|
|
|
|
|
E – 16 |
|
|
|
|
|
|
|
|
|
|
||||||||||||||||||||||||||||||||||||||||||||||||||||
|
|
|
|
|
|
|
|
|
|
|
|
|
|
|
|
|
|
|
|
|
|
|
|
|
|
|
|
|
|
|
|
|
|
|
|
|
|
|
|
|
|
|
|
|
|
|
|
|
|
|
|
|
|
|
|
|
|
|
|
|
|
|
|
|
|||||
Loading...