


 Loading...
MotorolaTM
iDEN® Digital Portable
i1000 - Multi-Service Wearable
Getting Started
June 17, 1998
68P81088C88-O
0 |
i1000 |
GETTING STARTED |
|
|

CONTENTS
YOUR i1000 PORTABLE . . . . . . . . . . . . . . . . . . . . . . . . . . . . 1
About Your Portable’s Features . . . . . . . . . . . . . . . . . . . . . . . . . . . 1 Features of Your i1000 . . . . . . . . . . . . . . . . . . . . . . . . . . . . . . . . . 2 Battery . . . . . . . . . . . . . . . . . . . . . . . . . . . . . . . . . . . . . . . . . . . . . . 4 Charging the Battery . . . . . . . . . . . . . . . . . . . . . . . . . . . . . . . . 4 Attaching the Battery . . . . . . . . . . . . . . . . . . . . . . . . . . . . . . . 4 Detaching the Battery . . . . . . . . . . . . . . . . . . . . . . . . . . . . . . . 4 Battery and Charging Status . . . . . . . . . . . . . . . . . . . . . . . . . . 4 Display Icons . . . . . . . . . . . . . . . . . . . . . . . . . . . . . . . . . . . . . . . . . 5 Turning On Your Portable . . . . . . . . . . . . . . . . . . . . . . . . . . . . . . . 6 Turning Off Your Portable . . . . . . . . . . . . . . . . . . . . . . . . . . . . . . . 6 Speakerphone . . . . . . . . . . . . . . . . . . . . . . . . . . . . . . . . . . . . . . . . . 7
VibraCall™ . . . . . . . . . . . . . . . . . . . . . . . . . . . . . . . . . . . . . . . . . . 7 Selecting All Incoming Calls and Messages . . . . . . . . . . . . . . 8 Selecting Individual Services . . . . . . . . . . . . . . . . . . . . . . . . . 8
Turning Off Group and Private Modes . . . . . . . . . . . . . . . . . . . . 10 Setting the Time and Date Format . . . . . . . . . . . . . . . . . . . . . . . . 12 Storing Numbers in the Phone and Private Lists . . . . . . . . . . . . . 14 Entering Phone Numbers Using the Keypad . . . . . . . . . . . . 14 Entering a Name Using the Keypad . . . . . . . . . . . . . . . . . . . 14 Entering Names and Numbers . . . . . . . . . . . . . . . . . . . . . . . 15 Editing and Erasing Phone List Contents . . . . . . . . . . . . . . . 17 Editing and Erasing Private ID List Contents . . . . . . . . . . . . 17 Changing the Display Language . . . . . . . . . . . . . . . . . . . . . . . . . 18 Modes and Menus . . . . . . . . . . . . . . . . . . . . . . . . . . . . . . . . . . . . 19 Modes . . . . . . . . . . . . . . . . . . . . . . . . . . . . . . . . . . . . . . . . . . 19 Menus . . . . . . . . . . . . . . . . . . . . . . . . . . . . . . . . . . . . . . . . . . 19
PHONE MODE . . . . . . . . . . . . . . . . . . . . . . . . . . . . . . . . . . . . 23
At First Glance . . . . . . . . . . . . . . . . . . . . . . . . . . . . . . . . . . . . . . . 23
Making a Phone Call . . . . . . . . . . . . . . . . . . . . . . . . . . . . . . . . . . 24
Emergency Dial . . . . . . . . . . . . . . . . . . . . . . . . . . . . . . . . . . . 25
Automatic Redial . . . . . . . . . . . . . . . . . . . . . . . . . . . . . . . . . 25
Last Number Redial . . . . . . . . . . . . . . . . . . . . . . . . . . . . . . . 25
Receiving a Phone Call . . . . . . . . . . . . . . . . . . . . . . . . . . . . . . . . 26
Programming Your Own Phone Number . . . . . . . . . . . . . . . . . . . 27
Selectable Ring Styles . . . . . . . . . . . . . . . . . . . . . . . . . . . . . . . . . 27
Call Forwarding . . . . . . . . . . . . . . . . . . . . . . . . . . . . . . . . . . . . . . 28
Selecting a Call Forward Number . . . . . . . . . . . . . . . . . . . . . 28
Unconditional Call Forwarding . . . . . . . . . . . . . . . . . . . . . . 29
Conditional Call Forwarding . . . . . . . . . . . . . . . . . . . . . . . . 29
i1000 |
GETTING STARTED i |

Call Waiting . . . . . . . . . . . . . . . . . . . . . . . . . . . . . . . . . . . . . . . . . 31 Call Hold . . . . . . . . . . . . . . . . . . . . . . . . . . . . . . . . . . . . . . . . . . . 31 3-Way Calling . . . . . . . . . . . . . . . . . . . . . . . . . . . . . . . . . . . . . . . 32 Alternate Phone Line . . . . . . . . . . . . . . . . . . . . . . . . . . . . . . . . . . 32 Setting the Active Line . . . . . . . . . . . . . . . . . . . . . . . . . . . . . 33 Receiving a Call . . . . . . . . . . . . . . . . . . . . . . . . . . . . . . . . . . 33 Receiving Calls on Your Second Line . . . . . . . . . . . . . . . . . 33
PRIVATE MODE . . . . . . . . . . . . . . . . . . . . . . . . . . . . . . . . . . 35
At First Glance . . . . . . . . . . . . . . . . . . . . . . . . . . . . . . . . . . . . . . . 35
Group/Private Speaker . . . . . . . . . . . . . . . . . . . . . . . . . . . . . . . . . 36
Making a Private Call . . . . . . . . . . . . . . . . . . . . . . . . . . . . . . . . . . 36
Receiving a Private Call . . . . . . . . . . . . . . . . . . . . . . . . . . . . . . . . 37
Programming Your Private ID . . . . . . . . . . . . . . . . . . . . . . . . . . . 37
Recalling Your Private ID . . . . . . . . . . . . . . . . . . . . . . . . . . . . . . 37
Call Alert™ . . . . . . . . . . . . . . . . . . . . . . . . . . . . . . . . . . . . . . . . . 38
Sending a Call Alert . . . . . . . . . . . . . . . . . . . . . . . . . . . . . . . 38
Receiving a Call Alert . . . . . . . . . . . . . . . . . . . . . . . . . . . . . . 38
Call Alert Stacking . . . . . . . . . . . . . . . . . . . . . . . . . . . . . . . . . . . . 38
Receiving a Call Alert with Stacking . . . . . . . . . . . . . . . . . . 39
Responding to a Call Alert in the Stack . . . . . . . . . . . . . . . . 39
GROUP MODE . . . . . . . . . . . . . . . . . . . . . . . . . . . . . . . . . . . . 41
At First Glance . . . . . . . . . . . . . . . . . . . . . . . . . . . . . . . . . . . . . . . 41
Group/Private Speaker . . . . . . . . . . . . . . . . . . . . . . . . . . . . . . . . . 42
Making a Group Call . . . . . . . . . . . . . . . . . . . . . . . . . . . . . . . . . . 42
Changing Talkgroups . . . . . . . . . . . . . . . . . . . . . . . . . . . . . . . . . . 42
Receiving a Group Call . . . . . . . . . . . . . . . . . . . . . . . . . . . . . . . . 43
Area Selection . . . . . . . . . . . . . . . . . . . . . . . . . . . . . . . . . . . . . . . 43
Talkgroup Naming . . . . . . . . . . . . . . . . . . . . . . . . . . . . . . . . . . . . 43
Call Alerts . . . . . . . . . . . . . . . . . . . . . . . . . . . . . . . . . . . . . . . . . . 43
VOICE MAIL . . . . . . . . . . . . . . . . . . . . . . . . . . . . . . . . . . . . . 45
Retrieving Voice Mail . . . . . . . . . . . . . . . . . . . . . . . . . . . . . . . . . 45
Viewing Voice Mail Status . . . . . . . . . . . . . . . . . . . . . . . . . . . . . 45
MESSAGE MAIL™ . . . . . . . . . . . . . . . . . . . . . . . . . . . . . . . . 47
Receiving New Message Mail . . . . . . . . . . . . . . . . . . . . . . . . . . . 47
Retrieving Stored/Unread Mail . . . . . . . . . . . . . . . . . . . . . . . . . . 47
Saving and Erasing Mail . . . . . . . . . . . . . . . . . . . . . . . . . . . . . . . 48
Auto Call Back . . . . . . . . . . . . . . . . . . . . . . . . . . . . . . . . . . . . . . . 48
Message Mail Memory Full . . . . . . . . . . . . . . . . . . . . . . . . . . . . . 48
ii |
i1000 |
GETTING STARTED |

PROGRAMMING MENU OPTIONS . . . . . . . . . . . . . . . . . 49
ERROR MESSAGES . . . . . . . . . . . . . . . . . . . . . . . . . . . . . . . 55
ACCESSORIES . . . . . . . . . . . . . . . . . . . . . . . . . . . . . . . . . . . 57
Safety Instructions. . . . . . . . . . . . . . . . . . . . . . . . . . . . . . . . . . . . . 57
Batteries . . . . . . . . . . . . . . . . . . . . . . . . . . . . . . . . . . . . . . . . . . . . 59
Battery Operating Instructions . . . . . . . . . . . . . . . . . . . . . . . 59
Charging Lithium Ion Batteries . . . . . . . . . . . . . . . . . . . . . . 59
Travel Charger . . . . . . . . . . . . . . . . . . . . . . . . . . . . . . . . . . . . . . . 60
Installing the Travel Charger . . . . . . . . . . . . . . . . . . . . . . . . 60
Travel Charger Operating Specifications . . . . . . . . . . . . . . . 60
Vehicular Battery Charger . . . . . . . . . . . . . . . . . . . . . . . . . . . . . . 61
Installing the Vehicular Battery Charger . . . . . . . . . . . . . . . 61
Removing the Vehicular Battery Charger . . . . . . . . . . . . . . . 62
Vehicular Battery Charger Operating Specifications . . . . . . 62
Desktop Charger . . . . . . . . . . . . . . . . . . . . . . . . . . . . . . . . . . . . . . 63
Charging a Battery . . . . . . . . . . . . . . . . . . . . . . . . . . . . . . . . 63
Desktop Battery Charger Troubleshooting . . . . . . . . . . . . . . 64
Audio Adapter . . . . . . . . . . . . . . . . . . . . . . . . . . . . . . . . . . . . . . . 65
Installation Instructions . . . . . . . . . . . . . . . . . . . . . . . . . . . . . 65
Attaching/Detaching the Earpiece Microphone . . . . . . . . . . 65
Removing the Audio Adapter . . . . . . . . . . . . . . . . . . . . . . . . 65
SAFETY AND GENERAL INFORMATION . . . . . . . . . . . 67
Radio Operation . . . . . . . . . . . . . . . . . . . . . . . . . . . . . . . . . . . . . . 67
Cleaning Instructions . . . . . . . . . . . . . . . . . . . . . . . . . . . . . . . . . . 72
For Further Information . . . . . . . . . . . . . . . . . . . . . . . . . . . . . . . . 72
Owner’s Information . . . . . . . . . . . . . . . . . . . . . . . . . . . . . . . . . . 73
Private Number Directory . . . . . . . . . . . . . . . . . . . . . . . . . . . . . . 74
Talkgroup Directory . . . . . . . . . . . . . . . . . . . . . . . . . . . . . . . . . . . 74
i1000 |
GETTING STARTED iii |

Patent Information
This product is protected under one or more of the following patents:
4817157, 4896361, 4857928, 5041793, 5060294, 5066923, 5134718, 5140156, 5239963, 5257411, 5287387, 5265219, 5289504, 5316168, 5317247, 5338396, 5389927, 5406588, 5424921, 5457376, 5460906, 5551063, 5557079, 5596487, 5615412, 5638403, 5559468, 5469465, 5170413, 5140615, 5519730, 5241544, 5584059, 5574992, 5396656, 5487091, 5533004, 5299199, 5343499, 5369501, 5509031, 5515379, 5528723, 5598417, 5066923, 5241650, 5278833, 5359696, 5548631, 5410632, 5440582, 5457735, 5457818, 5471670, 5477550, 5481537, 5566181, 5229767, 5208804, 5295140, 5381449, 5440590, 5467398, 5490230, 5620242, 5623523, 5655913
Trademarks
 , Motorola, VibraCall, Call Alert, and Message Mail are trademarks or registered trademarks of Motorola, Inc.
iDEN is a registered trademark of Motorola, Inc. ®Reg. U.S. Pat . & Tm. Off.
All other trademarks mentioned in this manual are trademarks of their respective companies.
Important!
Be sure to read “Safety and General Information” on page 67 before using your i1000 Portable.
© Copyright 1998, Motorola, Inc. All rights reserved.
iv |
i1000 |
GETTING STARTED |

YOUR i1000 PORTABLE
ongratulations on purchasing your Motorola iDEN i1000 Cmulti-service digital portable. Superior features and state-of-
the-art technology help to keep you in constant touch with all of your business and personal contacts.
The sleek, compact design of the i1000 portable:
•Makes it easy to wear or to carry in your pocket or purse.
•Provides a speakerphone feature for placing hands-free incoming and outgoing phone calls.
•Includes a protective cover that, when open, provides a comfortable earpiece.
The i1000 portable offers the following functions:
▲ PHONE
▲ PRIVATE
▲ GROUP
▲ VOICE MAIL
▲ MESSAGE MAIL
ABOUT YOUR PORTABLE’S FEATURES
You can use various features of your portable with the cover open or closed. Look for special operating instructions in this manual.
This manual describes the features that most people use every day. However, your service provider or organization might have customized the portable for your individual needs. For more information, check with your service provider or organization.
Additional information for your iDEN Digital Portable can be found on the Motorola iDEN web site at:
http://www.mot.com/LMPS/iDEN
Portable i1000 Your
i1000 |
GETTING STARTED 1 |
Your i1000 Portable
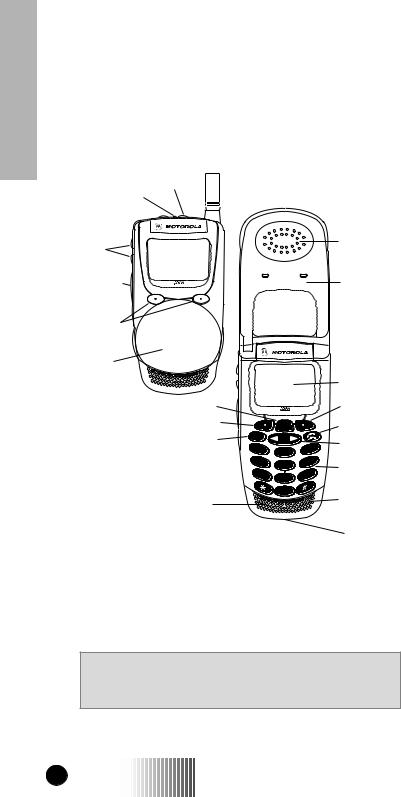
FEATURES OF YOUR i1000
1.Antenna 

2.On/Off Key
3. LED
4. Speaker Key 
5. Volume |
|
|
|
|
|
|
12. |
Earpiece |
Control |
|
|
|
|
|
|
|
|
Buttons |
|
|
|
|
|
|
|
|
6. Push-To-Talk |
|
|
|
|
|
|
8. |
Flip Cover |
(PTT) Button |
|
|
|
|
|
|
||
|
|
|
|
|
|
|
(Open) |
|
|
|
|
|
|
|
|
|
|
7. Option Keys |
|
|
|
|
|
|
|
|
8. Flip Cover |
|
|
|
|
|
|
|
|
(Closed) |
|
|
|
|
|
|
|
|
|
|
|
|
|
|
|
13. |
Alphanumeric |
|
|
|
|
|
|
|
|
Display |
9. Menu Key |
|
|
|
|
|
|
7. |
Option Key |
7. Option Key |
|
|
MENU |
|
|
|
14. |
SEND/END Key |
|
|
|
|
|
|
|||
10. Mode Key |
Mode |
|
|
|
|
15. |
Scroll Key |
|
|
|
|
|
|
|
|||
|
1 |
|
|
3 |
def |
|||
|
|
2 abc |
|
|
||||
|
|
|
|
|
|
|||
|
|
|
|
|
|
|
|
|
|
4 |
ghi |
5 jkl |
6 |
mno |
16. |
Alphanumeric |
|
|
|
|
||||||
|
7 pqrs |
|
|
|
||||
|
8 tuv |
wxyz |
|
Keypad |
||||
|
|
|
9 |
|
|
|
|
|
|
|
|
0 |
|
|
|
|
|
11. Speaker |
|
|
|
|
|
|
17. |
Microphone |
|
|
|
|
|
|
|
|
|
18. Accessory Connector
N O T E
Remove the three plastic film lens protectors from the display and cover before initial use.
2 |
i1000 |
GETTING STARTED |
|

|
|
|
|
Your |
|
1. |
Antenna |
Extend for optimal signal. |
|
i1000 |
|
|
|
|
|
||
2. |
On/Off Key |
Press to turn your portable on or off. |
|||
|
|
||||
|
|
|
|
|
|
3. |
LED |
Check the i1000’s status. See page 6 for |
|
Portable |
|
|
|
earpiece or the speaker during Group and |
|
||
|
|
more information. |
|
|
|
4. |
Speaker Key |
Press to set incoming calls through either the |
|
|
|
|
|
Private calls. |
|
|
|
|
|
|
|
|
|
5. |
Volume Control |
Press to adjust volume levels.When using the |
|
|
|
|
Buttons |
List menu option, press to scroll forward and |
|
|
|
|
|
backward. |
|
|
|
|
|
|
|
|
|
6. |
Push-To-Talk (PTT) |
Transmit a Group or Private Call, or a Call |
|
|
|
|
Button |
Alert. Press and hold the PTT button to talk; |
|
|
|
|
|
release it to listen. |
|
|
|
|
|
|
|
|
|
7. |
Option Keys |
Press to select a menu option on the display |
|
|
|
|
|
that appears directly above the left or right |
|
|
|
|
|
option key. |
|
|
|
|
|
|
|
|
|
8. |
Cover |
Protect the keypad. |
|
|
|
|
|
|
|
|
|
9. |
Menu Key |
Press to scroll through menu options. |
|
|
|
|
|
|
|
|
|
10. |
Mode Key |
Press to change between Phone, Group, and |
|
|
|
|
|
Private modes. |
|
|
|
|
|
|
|
||
11. Speaker |
Listen to Group and Private (high-audio) |
|
|
||
|
|
conversations. Listen to Phone calls in |
|
|
|
|
|
Speakerphone mode. |
|
|
|
|
|
|
|
|
|
12. |
Earpiece |
Hold to your ear to listen during Phone calls |
|
|
|
|
|
and Group/Private (low-audio) conversations. |
|
|
|
|
|
Listen to calls when the speakerphone is |
|
|
|
|
|
turned off. |
|
|
|
|
|
|
|
|
|
13. |
Alphanumeric |
View up to four lines (up to 12 characters per |
|
|
|
|
Display |
line) on the display. |
|
|
|
|
|
|
|
|
|
14. |
Send/End Key |
Press to answer an incoming Phone call. |
|
|
|
|
|
After entering a phone number, press to |
|
|
|
|
|
begin an outgoing Phone call or to redial the |
|
|
|
|
|
entered phone number. |
|
|
|
|
|
Press to end Phone calls. |
|
|
|
|
|
|
|
|
|
15. |
Scroll Key |
Press the left side to scroll backward or the |
|
|
|
|
|
right side to scroll forward through menu |
|
|
|
|
|
options and lists. |
|
|
|
|
|
|
|
|
|
16. |
Alphanumeric |
Enter telephone numbers, Private call IDs, |
|
|
|
|
Keypad |
and alphanumeric characters. |
|
|
|
|
|
|
|
|
|
17. |
Microphone |
Use to speak during outgoing calls. |
|
|
|
|
|
|
|
|
|
18. |
Accessory |
Use to connect accessories. |
|
|
|
|
Connector |
|
|
|
|
|
|
|
|
|
|
i1000 |
GETTING STARTED 3 |
Your i1000 Portable
BATTERY
Charging the Battery
To get the maximum use from the battery, charge it for at least three hours before you use it for the first time.
Attach the charger connector to the i1000 then connect the adapter to an electrical outlet. For more information about chargers, see “Accessories” on page 57.
Attaching the Battery
To attach the battery to your i1000, align the battery as shown and press down on the battery until you hear a click.
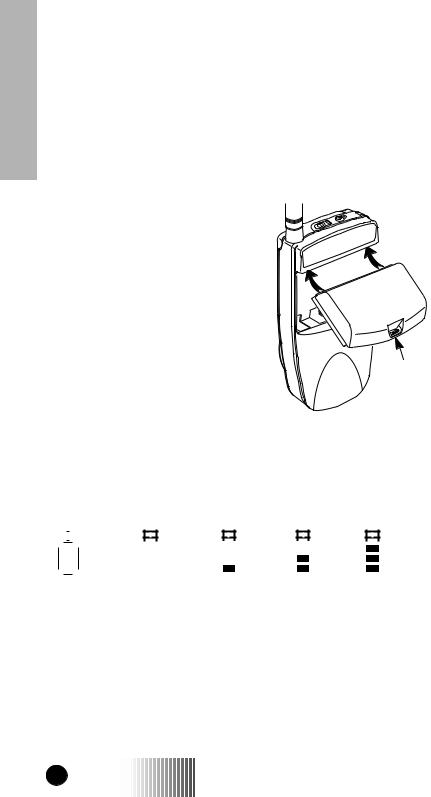
Detaching the Battery
To detach the battery, press the latch |
|
|
to release the battery and slide the |
Latch |
|
battery downward. |
||
|
Battery and Charging Status
A low battery is indicated by a short, chirp-like sound through the speaker. The battery strength icons display battery level information, as shown below. The battery indicators show the battery level during both operation and charging.
|
|
|
|
|
|
|
|
|
|
|
|
|
|
|
|
|
|
|
|
|
|
|
|
|
|
|
|
|
|
|
|
|
|
|
|
|
|
|
|
|
|
|
|
|
|
|
|
|
|
|
|
|
|
|
|
|
|
|
|
|
|
|
|
|
|
|
|
|
|
|
|
|
|
|
|
|
|
|
|
|
|
|
|
Low |
0-30% |
31-60% |
61-90% |
90-100% |
|||||||||||||||||||||||
Battery - Icon flashes
4 |
i1000 |
GETTING STARTED |
|

DISPLAY ICONS
After you turn on the portable and use various features, icons appear on the screen to inform you of existing conditions.
Some of the following icons may appear along the top of the display.
Signal Strength Indicator
Shows the signal strength. Six bars indicate the strongest signal. Calls and messages may not be sent or received in weak signal areas.
Battery Strength Indicator
Shows the remaining charge in your battery. Three bars show full charge. The indicator flashes when you have less than five minutes of talk time remaining.
Voice Mail
Indicates that unplayed messages are waiting in your voice mail box
New Message Mail
Indicates that you have new text messages in your mail box.
Unread Message Mail
Indicates that you have unread Message Mail.
Vibrate All
Indicates that the Vibrate All option is turned on.
You will not hear a ring tone.
Call Forward/Active Line Indication
Indicates that incoming phone calls are being forwarded and displays the associated phone line (1, 2, or both).
Group/Private Speaker
Indicates that the Group/Private speaker is off. You will hear group and private calls through the ear piece.
Roam
Displays when you enter the service area of another iDEN service provider. The portable learns and remembers the new radio frequencies and channels in use.
Portable i1000 Your
i1000 |
GETTING STARTED 5 |
Your i1000 Portable
TURNING ON YOUR PORTABLE
Press the On/Off button  until a set of icons appears on your display. (For a description of the icons, see page 5.) Then the message “Please Wait” displays while the portable connects to your carrier’s network.
Please Wait
The LED indicator located on top of the portable shows the service state of your i1000. See Table 1.
Table 1: LED Indicator
LED Indicator |
Status of Your i1000 |
|
|
|
|
Flashing Red |
Registering—your portable is signing on |
|
|
to your carrier’s network. |
|
|
|
|
Solid Red |
No service—your portable cannot sign on. |
|
|
It will continue trying to connect every two |
|
|
minutes as long as your portable is turned |
|
|
on. |
|
|
|
|
Flashing Green |
In service—your portable is ready to use. |
|
|
You can now place and receive Phone, |
|
|
Group, and Private calls. |
|
|
|
|
Solid Green |
In use—-your portable is currently being |
|
|
used. Check to make sure that you ended |
|
|
the last call by pressing |
. |
|
|
|
TURNING OFF YOUR PORTABLE
Press and hold the On/Off button  until you see the message “Powering Off”.
6 |
i1000 |
GETTING STARTED |
|

SPEAKERPHONE
The i1000 provides a speakerphone feature similar to a speakerphone you may use on your office or home phone. Because the i1000 is wireless, you will have the convenience of a hands free speakerphone anytime, anyplace to bring people together. Use the speakerphone to hold impromptu meetings, or to listen to your voicemail messages.
With the speakerphone feature, when one party is speaking, the other party will not be heard. The other party must wait until the first party stops speaking.
With the built-in speaker, you can use your portable hands free. The cover can be open or closed during a speakerphone call. However:
•If the cover is open during a speakerphone call and you close the cover, you will end the call.
•If the cover is closed during a speakerphone call and you open the cover, the call switches to the earpiece. You can
switch back to speakerphone operation by pressing  under “Spkr”.
During speakerphone use, the “Spkr” option flashes to remind you that the speakerphone is on.
Typically, the i1000 should be placed 15-30 inches away from you during a speakerphone call. In a noisy environment, you may want to move the i1000 closer to you for optimum audio quality to the other party.
VIBRACALL™
VibraCall is an alert that notifies you of incoming phone calls and messages.
The alert choices are:
•Vibrate Only—produces only a vibration.
•Vibrate/Ring—produces a vibration followed by a ring tone.
•Vibrate Off—turns off the vibration and produces only a ring tone.
You can set VibraCall to notify you of all incoming calls and messages, or you can select individual services for vibration alert.
In “Mail” and “Group/Prvt” modes, the choices are Vibe On or Vibe Off.
N O T E
If VibraCall is set for incoming calls and messages, the power-up sequence includes a brief vibrate cycle. You also hear a call-waiting tone.
Portable i1000 Your
i1000 |
GETTING STARTED 7 |

Your i1000 Portable
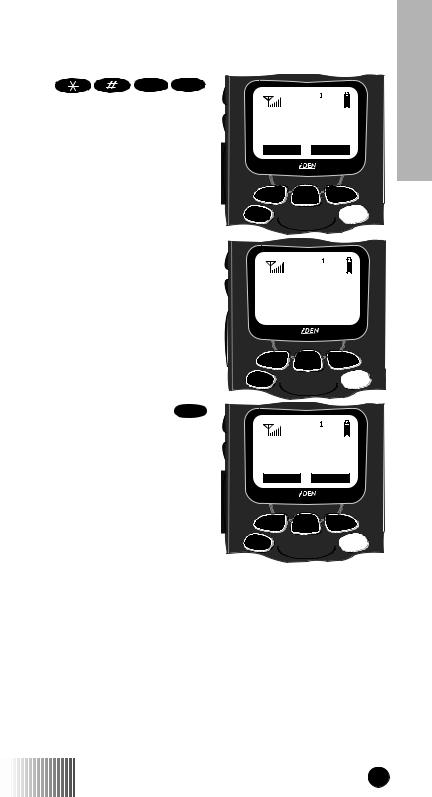
Selecting All Incoming Calls and Messages
1.Press
 9WXYZ .
2.Press  under “All”.
9=Vibrate
Alert:Off
Exit |
All |


 MENU
MENU 


Mode 


After you set the vibration alert for all  incoming calls and messages, the display returns to the previous mode.
Look for  (the Vibrate All icon) at the top of your display.
Selecting Individual Services
To set the vibration alert for specific phone or mail services:
1.Press 
 9WXYZ .
2.Press MENU until you see the “Selct” menu option on the last line of the display.
3.Press  under “Selct”.
Pressing “Selct” allows you to set individual vibration alerts for incoming calls and messages.
Phone Ready
Line1 Vibe 10:54p 12/09 Name 
 Mail
Mail


 MENU
MENU 


Mode 


9=Vibrate
Alert:Off
Exit |
On |


 MENU
MENU 


Mode 


9=Vibrate
Alert:Off
Selct 


 MENU
MENU 


Mode 


8 |
i1000 |
GETTING STARTED |
|

The first selection is Vibe. To view the Vibe/Ring vibration alert
choices, press MENU on the keypad.
The vibration selection that you make affects only the current mode. In this example, vibration is set only for Phone mode. You must set each mode or service individually or select “All” to set all services.
Phone
Vibrate:
Vibrate Off
Exit |
Vibe |


 MENU
MENU 


Mode 


4.To set a vibration alert for another mode, such as “Mail” or “Group/
Prvt”, press  on the keypad until you see the desired mode or service.
5.Press  under “Exit” to return to the Vibrate Alert menu.
6.Press  under “Exit” again to return to your previous base mode.
Group/Prvt
Vibe:Off
Exit |
On |


 MENU
MENU 


Mode 


I F Y O U H A V E A S E C O N D L I N E
And you want to change the vibration selections for the second line, exit this programming feature, select the other line, and repeat the procedure for selecting all services or selecting individual services to vibrate.
Portable i1000 Your
i1000 |
GETTING STARTED 9 |

Your i1000 Portable
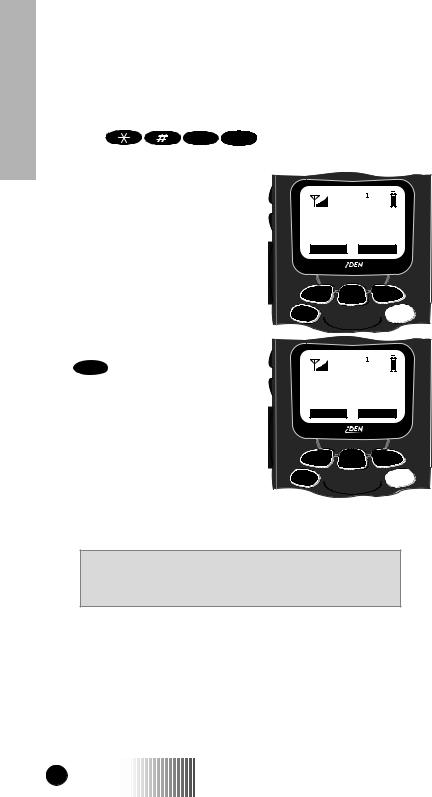
TURNING OFF GROUP AND PRIVATE MODES
Your portable has a special feature, Phone Only mode, that allows you to turn off the Private and Group services. You can make and receive phone calls and receive Message Mail.
Placing the portable in Phone Only mode increases the standby battery life. Make sure that the LED is blinking green, which indicates that you are in a coverage area.
To turn on the Phone Only mode:
1. Press |
8 TUV 0 |
. |
|
|
80=Phone |
|
|
Only:Off |
2. Press |
under “On”. |
Exit |
On |


 MENU
MENU 


Mode 


80=Phone
Only:On
3. |
Press |
under “Exit”. |
Exit |
Off |


 MENU
MENU 


Mode 


The “Phone ONLY” message displays. Group and Private Mode services are now suspended.
Phone ONLY
Line 1
2:12p 07/21
Name |


 MENU
MENU 


Mode 


10 |
i1000 |
GETTING STARTED |
|
|

To return to normal Phone mode:
1. Press |
8 TUV 0 |
. |
2. Press  under “Off”.
3.Press  under “Exit”. The display returns to Phone Ready.
Group and Private mode services are now available.
80=Phone
Only:On
Exit |
Off |


 MENU
MENU 


Mode 


80=Phone
Only:Off
Exit |
On |


 MENU
MENU 


Mode 


Portable i1000 Your
i1000 |
GETTING STARTED 11 |

Your i1000 Portable
SETTING THE TIME AND DATE FORMAT
If your carrier provides this option, you can set your portable to display the current time and date. Unless the portable is turned off, it continues to display the current time during a loss of service.
You have a choice of a 12or a 24-hour clock format. See Table 2.
N O T E
As you travel between different time zones, your portable automatically displays local time.
Table 2: Time Display Options
12-Hour Display |
24-Hour Display |
|
|
12:00a |
00:00 |
|
|
6:25a |
06:25 |
|
|
10:25a |
10:25 |
|
|
12:00p |
12:00 |
|
|
6:25p |
18:25 |
|
|
10:25p |
22:25 |
|
|
You have a choice of either a MM/DD (month/day) or a DD/MM (day/month) date format. See Table 3.
Table 3: Date Display Options
|
|
International |
|
US Format |
Format |
Date |
(MM/DD) |
(DD/MM) |
|
|
|
January 2nd |
01/02 |
02/01 |
|
|
|
January 31st |
01/31 |
31/01 |
|
|
|
October 9th |
10/09 |
09/10 |
|
|
|
December 31st |
12/31 |
31/12 |
|
|
|
If you activate the time and date, they are displayed in all ready states (Phone, Group, Private). The time of day is also shown during an active Phone call. The time and date are not displayed in Group mode when you select an Area option.
12 |
i1000 |
GETTING STARTED |
|
|

To set the time and date format:
1. Press |
7 PQRS 1 |
. |
2.Press  under “Ok”. The Time/Date screen displays.
The default (preset) time and date format that is displayed depends on your service provider. You can accept the default format or select an alternate format.
3.Press  until you see the Time Format screen.
4.Do one of the following:
•To accept the 12-hour format, go to the next step.
•To set the 24-hour format,
press  under “24hr”. (See Table 2 on page 12.) Then go to the next step.
5.Press  until you see the Date Format screen.
6.Do one of the following:
•To accept the MM/DD
format, press  under “Exit”.
• Or to set the DD/MM format,
press  under “DD/MM”. (See Table 3 on page 12.)
71=Time/ Date
Exit |
Ok |


 MENU
MENU 


Mode 


Time/Date |
▲ |
Display:On |
Exit |
Off |


 MENU
MENU 


Mode 


Time Format: |
▲ |
|
12 Hour |
||
|
Exit |
24hr |


 MENU
MENU 


Mode 


Date Format: |
▲ |
|
MM/DD |
||
|
Exit |
DD/MM |


 MENU
MENU 


Mode 


i1000 |
GETTING STARTED 13 |
Portable i1000 Your

Your i1000 Portable
7.Select “Exit”. The Ready screen for each mode (Phone, Group, and Private) now displays the time and date formats that you selected.
STORING NUMBERS IN THE PHONE AND PRIVATE LISTS
You can set a Phone and a Private ID number with the associated name, which eliminates the need to program the same name twice.
You can add up to 100 numbers to your phone list, store them with names, and assign them to speed-dial numbers.
The display holds 12 phone-number characters. If the phone number exceeds 12 characters, you can select “More” to see the remaining characters. To return to the start of the number, select “Numbr”.
Entering Phone Numbers Using the Keypad
To enter a number, press the corresponding number key.
Entering a Name Using the Keypad
The number of times that you press a key to enter a letter depends on the position of the letter on the key. Table 4 describes how to
enter each letter on the 7 PQRS key.
Table 4: Entering a Name on the Keypad
Letter Position
PTo enter the first letter on the keypad, press the key once.
Q |
To enter the second letter on the keypad, press the |
|
key twice. |
|
|
R |
To enter the third letter on the keypad, press the |
|
key three times. |
|
|
S |
To enter the fourth letter on the keypad, press the |
|
key four times. |
|
|
7 |
To enter the number, press the key five times. |
14 |
i1000 |
GETTING STARTED |
|
|
Entering Names and Numbers
1. Press |
2 ABC |
6 MNO . |
The “26=Phone/Prvt List” |
|
|
message appears on your display. |
||
2. Press  under “Ok”.
.
The next screen displays the remaining number of phone numbers and private IDs that you can store.
3.Enter the name and press  under “Store”.
See Table 5 on page 16 for an example of entering a name.
26=Phone/ Prvt List
Exit |
Ok |


 MENU
MENU 


Mode 


Available
98 Phone #
3 Prvt IDs


 MENU
MENU 


Mode 


Enter Name
_ _
Exit |
Store |


 MENU
MENU 


Mode 


Portable i1000 Your
i1000 |
GETTING STARTED 15 |
Your i1000 Portable
Table 5: Entering a Name
N A M E M E T H O D E X A M P L E
To enter the name “Tim”: |
|
|
|
1. |
Enter “T” by pressing |
8 TUV once. |
|
2. |
Move to the next letter by pressing |
. |
|
3. |
Enter “i” by pressing |
4 GHI . |
|
4. |
Move to the next letter by pressing |
. |
|
5. |
Enter “m” by pressing |
6 MNO . |
|
6.Enter the phone number that you want to associate with this name
and press  under “Store”.
To skip the Phone Number entry, press
 under “Skip”. You will go directly to the “Enter Prvt ID Number” screen.
Enter Phone
_Number
_
Skip |
Store |


 MENU
MENU 


Mode 


The next screen displays the name that you entered and a flashing speed-dial number.
7. Do one of the following:
• To accept the speed-dial
number shown, press  under “Store”.
•To change the speed-dial number, enter the desired number. The number stops
TIM
Spd#=3
Cancl |
Store |


 MENU
MENU 


Mode 


flashing. To enter another number, press  and enter the desired number.
If you do not want to enter a speed-dial number, press  under
under
“Cancl”. You will return to the “Enter Phone Number” screen.
16 |
i1000 |
GETTING STARTED |
|
|

8.At the next screen, enter the Private ID number associated with the name that you entered.
To skip the Private ID number entry, press  under “Skip”.
For more information about using the speed-dial feature, see “Speed Dial Method” on page 24.
Enter Prvt
_ID Number
Skip |
Store |


 MENU
MENU 


Mode 


Editing and Erasing Phone List Contents
Editing Phone List Entries |
|
|
|
|||
1. |
Press |
, |
, |
2 ABC |
, |
0 . |
2. |
Press |
under “Edit” |
|
|
||
Erasing Phone List Entries |
|
|
|
|||
1. |
Press |
, |
, |
2 ABC |
, |
0 . |
2.Press  once.
once.
3.Press  under “Erase”
Editing and Erasing Private ID List Contents
Editing Private ID List Entries |
|
|
|
||||
1. |
Press |
, |
, |
2 ABC |
, |
1 |
. |
2. |
Press |
under “Edit” |
|
|
|
||
Erasing Private ID List Entries |
|
|
|
||||
1. |
Press |
, |
, |
2 ABC |
, |
1 |
. |
1.Press  once.
once.
2.Press  under “Erase”
Portable i1000 Your
i1000 |
GETTING STARTED 17 |
Your i1000 Portable
CHANGING THE DISPLAY LANGUAGE
You can customize your portable to display one of four languages: English, French, Spanish, or Portuguese.
To change the displayed language:
1. Press |
7 PQRS 0 |
screen.
2.Press  under “Ok”.
3.Press  to scroll through the language options.
to view the language option
70=Language English
Pressing  under “Exit” at any time retains the current language selection.
Exit |
Ok |


 MENU
MENU 


Mode 


4.When the desired language appears on your display, press
 under “Ok”. The text immediately changes to the language that you selected.
5.Press  under “Exit”, “Quitt”, “Salir”, or “Saír” (whichever one displays) to exit this mode.
70=Langue Francais
Quitt |
Ok |


 MENU
MENU 


Mode 


The language that you select will be the displayed language.
N O T E
If you select an incorrect language, repeat the procedure for Changing the Display Language.
18 |
i1000 |
GETTING STARTED |
|
|

MODES AND MENUS
Modes and menus are the navigational tools of your portable.
Modes
Modes are portable operation states for placing and receiving calls. Your portable has three modes:
•Phone—for cellular phone calls and special phone features
•Private—for one-to-one radio calls
•Group—for calls with all individuals in a designated talkgroup.
To access modes:
Cover Closed |
|
Cover Open |
|
|
|
• To switch between Phone, |
• To switch between Phone, |
|
Group, and Private modes, |
Group, and Private modes, |
|
press |
under “Mode”. |
press Mode . |
|
|
|
For more information, see “Phone Mode” on page 23, “Private Mode” on page 35, and “Group Mode” on page 41.
Menus
Menus are choices within each mode that enable you to use various features.
To access menus:
Press MENU to scroll through the menus associated with each mode.
With the cover open, when your portable is ready to use, your display looks like the following screens for the Phone, Group, and Private modes. If the word “Ready” does not appear after the mode name in the display, your portable is not ready.
Portable i1000 Your
i1000 |
GETTING STARTED 19 |
Loading...