


 Loading...
Motorola
iDEN
Digital Multi-service Data-capable Phone
i305 Phone User’s Guide
@NNTN4781A@
NNTN4781A
IMPORTANT NOTICE: PLEASE READ PRIOR TO USING YOUR PHONE
The SIM card provided in this kit is intended for use with the phone provided in this package.
Loss of certain features will result when using a SIM card from one of the following models: i30sx, i35s, i50sx, i55sr, i58sx, i60c, i80s, i85s, i88s, i90c, i95cl series, and the i2000 series.
For more information on SIM card compatibility, go to www.motorola.com/iden/support.
Contents |
|
Getting Started........................................... |
1 |
Locating Your SIM Card .................................. |
2 |
Activating Service ............................................ |
5 |
Powering On and Off ....................................... |
5 |
Enabling Over-the-Air Security ........................ |
5 |
Finding Your Phone Number ........................... |
6 |
Completing Setup ............................................ |
7 |
Phone Basics................................................... |
7 |
SIM Card Security.......................................... |
10 |
Locking the Keypad ....................................... |
13 |
Accessories ................................................... |
14 |
For More Information ..................................... |
14 |
Making Calls............................................. |
15 |
Phone Calls ................................................... |
15 |
Private Calls................................................... |
15 |
Receiving Calls .............................................. |
15 |
Call Icons ....................................................... |
16 |
Ways to Enter Calls ....................................... |
16 |
Using Speakerphone ..................................... |
18 |
Using Mute..................................................... |
19 |
Making Emergency Phone Calls.................... |
19 |
Call Alerts ................................................ |
21 |
Sending Call Alerts ........................................ |
21 |
Receiving Call Alerts...................................... |
21 |
Using the Call Alert Queue ............................ |
21 |
Recent Calls............................................. |
23 |
Storing Recent Calls to Contacts ................... |
23 |
Deleting Recent Calls .................................... |
24 |
Contacts................................................... |
25 |
Viewing Contacts ........................................... |
26 |
Creating Entries ............................................. |
27 |
Storing Numbers Faster................................. |
28 |
Editing Entries................................................ |
29 |
Deleting Entries.............................................. |
29 |
Checking Capacity ......................................... |
29 |
Creating Pauses and Waits ........................... |
30 |
International Numbers.................................... |
30 |
Accessing Contacts with GSM Phones.......... |
31 |
Call Forwarding ....................................... |
33 |
Forwarding All Calls ....................................... |
33 |
Turning Off Call Forwarding........................... |
34 |
i
Forwarding Missed Calls ............................... |
34 |
Viewing Call Forwarding Settings .................. |
35 |
Ring Tones ............................................... |
37 |
Setting Your Phone to Vibrate ....................... |
37 |
Turning Ring Tones Off ................................. |
37 |
Ring and Vibrate ............................................ |
38 |
Assigning Ring Tones to Contacts................. |
39 |
Viewing Ring Tone Assignments ................... |
39 |
Downloading More Ring Tones ..................... |
39 |
Managing Memory ......................................... |
39 |
Deleting Custom Ring Tones......................... |
40 |
Messages ................................................. |
41 |
Message Notifications.................................... |
41 |
Voice Mail ...................................................... |
41 |
Text and Numeric Messages ......................... |
42 |
Net Alerts ....................................................... |
43 |
Mobile Originated Text Messaging ........ |
45 |
Setting Up ...................................................... |
45 |
Receiving Messages...................................... |
45 |
Reading Messages From |
|
the Message Center ...................................... |
46 |
Creating and Sending Messages................... |
46 |
Managing Memory ......................................... |
49 |
GPS Enabled............................................ |
51 |
IMPORTANT: Things to Keep in Mind ........... |
51 |
Making an Emergency Call ............................ |
52 |
Viewing Your Approximate Location .............. |
53 |
Enhancing GPS Performance........................ |
54 |
Updating Satellite Almanac Data ................... |
55 |
Setting Privacy Options.................................. |
56 |
Using GPS with Map Software....................... |
57 |
Voice Records ......................................... |
61 |
Creating Voice Records ................................. |
61 |
Playing Voice Records................................... |
61 |
Labelling Voice Records ................................ |
62 |
Deleting Voice Records ................................. |
62 |
Locking Voice Records .................................. |
62 |
Managing Memory ......................................... |
62 |
Advanced Calling Features.................... |
65 |
Call Waiting.................................................... |
65 |
Call Hold ........................................................ |
66 |
3-Way Calling................................................. |
66 |
ii
Creating Pauses and Waits While Dialing |
..... 67 |
Making International Calls ............................. |
67 |
Setting One Touch PTT ................................. |
67 |
Group Calls.................................................... |
68 |
Call Timers..................................................... |
69 |
Using Your Phone as a Modem ..................... |
69 |
Making TTY Calls .......................................... |
70 |
Memo ........................................................ |
73 |
Entering Text............................................ |
75 |
Using Alpha Mode ......................................... |
75 |
Using Word Mode .......................................... |
75 |
Special Function Keys ................................... |
76 |
Using Numeric Mode ..................................... |
77 |
Using Symbols Mode..................................... |
77 |
Customizing Your Phone........................ |
79 |
Setting the Volume ........................................ |
79 |
Setting Your Phone to Not Ring..................... |
79 |
Seeing the Display Better .............................. |
80 |
Using a Headset ............................................ |
80 |
Using Settings................................................ |
80 |
Understanding Status Messages........... |
85 |
Safety and General Information............. |
87 |
RF Operational Characteristics...................... |
87 |
Portable Radio Product Operation and EME |
|
Exposure........................................................ |
87 |
Electro Magnetic Interference/Compatibility |
..90 |
Medical Devices............................................. |
90 |
Operational Warnings .................................... |
91 |
Operational Cautions ..................................... |
92 |
Accessory Safety Information ........................ |
93 |
MOTOROLA LIMITED WARRANTY........ |
95 |
Limited Warranty |
|
Motorola Communication Products |
|
(International) .......................................... |
99 |
Patent and Trademark Information...... |
103 |
Index....................................................... |
105 |
Driving Safety Tips................................ |
111 |
iii
iv

DECLARATION OF CONFORMITY
Per FCC CFR 47 Part 2 Section 2.1077(a)
Responsible Party Name: Motorola, Inc.
Address: 8000 West Sunrise Boulevard
Plantation, FL 33322 USA
Phone Number: 1 (800) 453-0920
Hereby declares that the product:
Product Name: i305
Model Number: H62XAH6RR1AN
Conforms to the following regulations:
FCC Part 15, subpart B, section 15.107(a), 15.107(d) and section 15.109(a)
Class B Digital Device
Note: This equipment has been tested and found to comply with the limits for a Class B digital device, pursuant to part 15 of the FCC Rules. These limits are designed to provide reasonable protection against harmful interference in a residential installation. This equipment generates, uses and can radiate radio frequency energy and, if not installed and used in accordance with the instructions, may cause harmful interference to radio communications. However, there is no guarantee that interference will not occur in a particular installation.
If this equipment does cause harmful interference to radio or television reception, which can be determined by turning the equipment off and on, the user is encouraged to try to correct the interference by one or more of the following measures:
•Reorient or relocate the receiving antenna.
•Increase the separation between the equipment and receiver.
•Connect the equipment into an outlet on a circuit different from that to which the receiver is connected.
•Consult the dealer or an experienced radio/TV technician for help.
v
vi
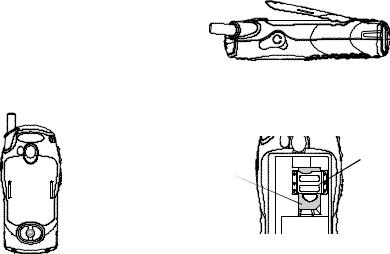
Getting Started
volume controls
Push-To-Talk (PTT) button
speaker (in back) 
speaker key 
accessory connector interface
antenna
audio jack
 microphone
p Power button.
Navigation key — press the arrows to scroll through menus and lists.
mMenu key — accesses context-sensitive menus.
AOption key — selects the option appearing above it on the display.
Note: Throughout this User Guide, the
option keys will be represented by
A.
s Send key — places phone calls.
eEnd key — ends phone calls; returns to idle screen; in browser mode, returns to Net main menu.
1
Getting Started
To start using your i305 phone:
•Make sure your SIM card is in place.
•Charge the battery.
•Activate your service.
•Enable over-the-air security if you are prompted to.
Removing the Battery Door
1Make sure the phone is powered off.
2Slide the release button forward until it releases the battery door.
3Remove the battery door from the back of your phone.
Locating Your SIM Card
Your SIM (Subscriber Identity Module) card is a small piece of white plastic located in the SIM card holder in the back of your phone, underneath the battery.
SIM card  holder
SIM card
If there is no SIM card in your phone or the box, contact your service provider.
2

Battery
Inserting the Battery
1Remove the battery door.
2Insert the top of the battery into the battery area. Press the bottom of the battery to secure it.
3Replace the battery door and press it gently until you hear a click.
Locating Your SIM Card
2 Open the connector cover.
connector cover
3Plug the other end of the charger into the accessory connector.
Charging the Battery
Your phone comes with a standard travel charger.
1 Plug the charger into an electrical outlet.
Charger Attached appears on the display.
3

Getting Started
Tip: To remove the charger from the accessory connector: Press the buttons on the sides of the plug. Pull the plug straight out.
4When charging the battery for the first time, charge for 30 minutes longer than the time shown in “Charging Times”.
Charging Times
See your battery and charger to determine the appropriate charging time.
Battery |
Charger |
|
|
|
|
|
Rapid |
Mid-Rate |
|
|
|
Slim |
2 hours |
3 hours |
|
|
|
High |
2 hours |
4 hours |
Performance |
|
|
|
|
|
Extra |
2.5 hours |
5.5 hours |
Capacity |
|
|
|
|
|
Maximum |
3.5 hours |
7.5 hours |
Capacity |
|
|
|
|
|
For best results, charge the batteries within the temperature range of 50°F to 104°F (10°C to 40°C).
Prolonged charging is not recommended.
Removing the Battery
1With the phone powered off, remove the battery door.
2Remove the battery by pushing the battery toward the antenna and lifting it out.
Battery Use and Maintenance
•The Motorola iDEN Approved Lithium Ion chargers provide optimum performance. Other chargers may not fully charge the iDEN Lithium Ion battery or may yield a reduced number of lifetime charge cycles.
•Extreme temperatures degrade battery performance. Do not store the battery where temperatures exceed 140°F (60°C) or fall below 4°F (-20°C).
•Lithium Ion batteries have a self discharge rate and without use, lose about 1% of their charge per day.
4

•The battery capacity is degraded if the battery is stored for long periods while fully charged. If long term storage is required, store at half capacity.
Activating Service
The first time you power on your phone, you must be in your local calling area. This activates your service.
Powering On and Off
To power your phone on:
Press p.
To power your phone off:
Press and hold p.
When You Power On for the First Time
The first time you power your phone on, screen may appear asking you to update your browser information. This means you must enable security.
If the Enter SIM PIN Code screen appears, enter your SIM PIN. See “Entering the PIN” on page 10. Press A under Ok.
When you receive your phone, the SIM PIN is 0000. Change your PIN to prevent fraudulent use of the SIM card (see “Changing the PIN” on page 11).
Activating Service
As your phone connects to the network, you will see a connecting message. When the idle screen appears, the phone is ready to use.
s 1 d
Contcs S Mesg
Enabling Over-the-Air Security
If you are set up to receive over-the-air programming from your service provider, you must enable security the first time you power on your phone or within 20 days of first activation of your phone:
1When you power on your phone for the first time, after the idle screen appears, you will be prompted to select Ok to update your browser information.
Note: If you press A under Later, you will be prompted to enable security each time you power on your phone until you press A under Ok.
2 Press A under Ok.
5
Getting Started
3You are prompted to enable security. Press A under Yes. A series of screens appears. If you subscribe to your service provider’s plan, your home page appears.
4Press e to return to the idle screen.
Within 24 hours of enabling security, you will receive a Net alert containing your Private ID and Talkgroup lists for Private calls.
To accept programming:
1When you receive a Net alert saying New
Browser Message - Receive Programming Info, press A under Goto.
2You are prompted to accept changes to your lists. Press A under Ok.
3If you are prompted again to accept changes to your lists, press A under Ok.
4A confirmation screen displays. Press A under
Ok.
5Press e to return to the idle screen.
Finding Your Phone Number
My Info lets you view your phone number, Private ID, and other phone information:
1Press m to access the main menu.
2Scroll to My Info.
3Press A under Select.
4Scroll to see your information:
•Name — Enter your name. See “Entering Text” on page 75.
•Line 1 and Line 2 — your phone numbers for phone lines 1 and 2. These are filled in when you receive your first Private call after enabling over-the-air security on your phone.
•Private — Your Private ID is the number that others use to contact you using Private calls. It is filled in when you receive your first Private call.
•Group ID — the number of the Talkgroup you have joined.
•Carrier IP — the IP address assigned to your service provider. It is filled in when you register for packet data services.
•IP1 Address and IP2 Address — the IP addresses you use to access the Internet with your phone.
•Ckt — Your circuit data number is the number you use if you want to use your phone to transfer circuit data. See “Using Your Phone as a Modem” on page 69. You receive this number from your service provider.
•Service Status — This information may be used by your service provider if there is a problem with your phone’s services.
6

Completing Setup
Voice Mail and Other Messages
To receive voice mail, you must set up an account with your service provider. See “Messages” on page 43 for information on using voice mail.
If your service provider offers mobile originated text messaging, see “Mobile Originated Text Messaging” on page 47 for information on setting up and using it.
Joining a Talkgroup
Your sales representative or your service provider establishes Talkgroups for you and assigns each Talkgroup a Talkgroup number. You can choose a name for each of your Talkgroups when you create entries for them in Contacts.
To receive group calls made to a Talkgroup, you must join the Talkgroup. You can belong to only one Talkgroup at a time. When you join a new Talkgroup, you no longer belong to your previous Talkgroup.
To join a Talkgroup:
1Press #. Then enter the Talkgroup number using the keypad. -or-
Choose the Talkgroup name from Contacts or the recent calls list.
Completing Setup
2 Press A under Join.
Customizing Features
You can control many features of your phone, including the volume of incoming sound, rings, and other tones. See “Customizing Your Phone” on page 79.
Phone Basics
Any time your phone is powered on, the display provides you with information and options.
status icons
s 1 d
 text area
menu icon
 display options
Contcs S Mesg
Mesg
The screen shown above is the idle screen. The text that appears on your idle screen depends on your service provider. The idle screen appears when your phone is on, but not engaged in any activity.
7
Getting Started
Text Area
This area displays menus, messages, names, phone numbers, and other information.
Display Options
Two display options appear at the bottom of most screens. You select a display option by pressing the option key below it.
Menus and Lists
Your phone’s features are arranged in menus, submenus, and lists.
To access the items in a menu or list, scroll using the navigation key at the top of your keypad. This key lets you scroll up, down, left, or right. Holding down the appropriate part of the navigation key speeds up scrolling.
In this guide, this symbol > tells you to select a menu or list item. For example, Settings > Security means:
1Scroll to Settings on the main menu.
2Press A under Select to see the Settings screen.
3Scroll to Security.
4Press A under Select to see the Security screen.
Menu Key
Many features provide context-sensitive menus that let you access related features and actions. The S icon appears any time a context-sensitive menu is available. Press m to access the menu.
Main Menu
All your phone’s features can be accessed through the main menu. When you are using a feature, the icon for that feature appears in the upper left corner of the display.
a Browser |
Browse the Web. |
b Settings |
Customize your phone. |
Display/Info |
See page 79. |
Phone Calls |
|
2-Way Radio |
|
Volume |
|
Security |
|
Advanced |
|
c VoiceRecord |
Record and play audio |
|
messages. See page 61. |
d Contacts |
View, store, edit contacts. |
new contact form |
See page 25. |
list of contacts |
|
Contacts menu |
|
8
e Messages |
Access messages. See |
Voice Mail |
page 41. |
Text Msgs |
|
Net Alert |
|
f Call Forward |
Set call forwarding options. |
|
See page 33. |
g Memo |
Store a number to access |
|
later. See page 73. |
h Call Timers |
Phone usage information. |
|
See page 69. |
i Recent Calls |
Lists recent calls. See |
list of calls |
page 23. |
recent calls menu |
|
Call Setup menu |
|
j My Info |
View personal phone |
|
information, including |
|
phone number and Private |
|
ID. See page 6. |
k Call Alert |
Lists call alerts. See |
list of call alerts |
page 21. |
Call Alerts menu |
|
|
Phone Basics |
l GPS |
Find your approximate |
|
geographical location. See |
|
page 51. |
m Ring Tones |
Assign ring tones and turn |
VibeAll |
ringer off. See page 37. |
list of ring tones |
|
Ring Tones menu |
|
Status Icons
Status icons appear in the two rows at the top of the display. Some appear at all times. Others appear only when your phone is engaged in certain activities or when you have activated certain features.
abcd efgd
opqr s
Battery Strength — More bars on the battery indicate a greater charge.
Signal Strength — More bars next to the antenna indicate a stronger signal.
APhone In Use — Your phone is active on a phone call.
BPrivate In Use — Your phone is active on a Private call.
9
Getting Started
CTalkgroup In Use — Your phone is active on a group call.
12 |
Active Phone Line — 1 |
|
indicates phone line 1 is ready |
|
to make calls; 2 indicates phone |
|
line 2 is ready to make calls. |
GHI Call Forward — Your phone is JKL set to forward calls. See “Call
Forwarding” on page 33.
uvM Ringer Off — Your phone is set not to ring. See “Turning Ring Tones Off” on page 37.
wyxMessages — You have one or more messages. See “Messages” on page 41.
DInternet — You are ready to browse the internet.
YZ |
Packet Data — You are ready |
|
to transfer packet data or are |
|
transferring packet data. See |
|
“Using Your Phone as a |
|
Modem” on page 69. |
PRoaming — You are using your phone outside your carrier's network.
SIM Card Security
Your SIM card protects your personal information. The SIM card stores all your Contacts information. Since this information is stored on your SIM card, not in your phone, you can remove the information by removing your SIM card.
Note: Except for making emergency calls, your phone will not function without the SIM card.
To prevent unauthorized use of your phone, your SIM card is protected by a PIN that you enter each time the phone is powered on. You can change the PIN or turn off the requirement that it be entered.
Entering the PIN
You may be required to enter a SIM PIN when you first use your phone.
When you receive your phone, the SIM PIN is 0000. Change your PIN to prevent fraudulent use of the SIM card.
10
Important: If you enter your PIN incorrectly 3 times, your SIM card is blocked. To unblock your SIM card, you must contact your service provider. See “Unblocking the PIN”.
1When the Enter SIM PIN Code screen appears, enter your SIM PIN. An asterisk appears for each character entered.
2Press A under Ok.
Changing the PIN
1From the main menu, select Settings > Security > Change Password > SIM PIN.
2At the Enter Old SIM PIN Code screen, enter the current SIM PIN.
3Press A under Ok.
4At the Enter New SIM PIN Code screen, enter the new 4- to 8-digit SIM PIN.
5Press A under Ok.
6At the Re-enter New SIM PIN Code screen, re-enter the new SIM PIN to confirm.
7Press A under Ok.
SIM Card Security
Turning the PIN Requirement On and
Off
When the SIM PIN requirement is on, you are prompted to enter your PIN each time you turn on your phone.
Note: If a SIM PIN is required, your phone will not function until the SIM PIN is entered, except for making emergency calls.
When the PIN requirement is off, your phone can be used without entering a PIN.
Important: When the SIM PIN requirement is off, the personal data on your SIM card is not protected. Anyone can use your phone and access your personal data.
1From the main menu, select Settings > Security > SIM PIN.
2Select On or Off.
3Enter the current SIM PIN.
4Press A under Ok.
Unblocking the PIN
If you enter your PIN incorrectly 3 times, your SIM card is blocked. To unblock your SIM card, you must contact your service provider to get a PIN Unblock Code (PUK).
11
Getting Started
Important: If you unsuccessfully enter the PUK code 10 times, your SIM card is permanently blocked and must be replaced. If this happens, all data is lost. You will get a message to contact your service provider. Except for making emergency calls, your phone will not function with a blocked SIM card.
To unblock the PIN:
1Press * # m 1.
2At your service provider representative’s request, provide the information needed to give you a PUK code.
3Select Unblock PIN.
4Enter the PUK code.
5Enter a new 4- to 8-digit SIM PIN.
6Re-enter your SIM PIN.
If you entered the codes properly, SIM Unlocked appears on the display.
Inserting and Removing Your SIM Card
Important: Do not touch the gold-colored areas of your SIM card.
Switching SIM Cards
Moving your SIM card from one phone to another moves all your Contacts information, but erases other information. If you remove your SIM card and use it with another phone, or use another SIM card with your phone, the following information is erased:
•The recent calls list
•Call forwarding settings
•Net alerts
•Mobile originated text messages, drafts, and quick notes
•Information stored in Memo
•3 most recent GPS Enabled locations
•Voice records
•Voice names
12
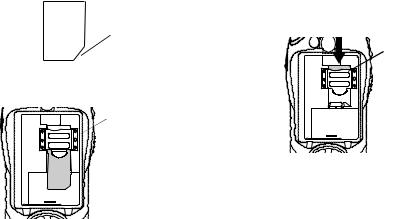
Inserting Your SIM Card
With your phone powered off, remove the battery door and battery. See “Removing the Battery” on page 4.
1Hold your SIM card as shown. Do not touch the gold-colored area.
cut corner
2Carefully slide your SIM card into your phone, until it lies flat in the SIM card holder.
SIM card
 holder
Locking the Keypad
Removing Your SIM Card
Important: To avoid loss or damage, do not remove your SIM card from your phone unless absolutely necessary.
1With your phone powered off, remove the battery door and battery.
2While holding the tab down, slide your SIM card out of the SIM card holder.
SIM card
 holder
 tab
tab
Note: Protect your SIM card as you would any delicate object. Store it carefully.
Locking the Keypad
Locking the phone’s keypad prevents its buttons from being pressed. When the keypad is locked, you can only:
13
Getting Started
•Power the phone on and off
•Unlock the keypad
•Respond to incoming calls, messages, and alerts
Important: Emergency calls cannot be placed while the keypad is locked.
To lock the keypad:
1From the idle screen, press m.
2Press *.
If you press a key while the keypad is locked, instructions for unlocking the keypad display briefly.
To unlock the keypad:
1From the idle screen, press m.
2Press *.
While the keypad is locked, you can respond to incoming calls, messages, and alerts just as you do when the keypad is not locked. When finished, press e to return to the idle screen. The keypad remains locked.
Accessories
Your phone comes with a battery and a charger.
To order additional accessories, log on to our Web site at www.motorola.com/store/iden or contact your Motorola Authorized Retailer.
For More Information
If you have questions about your i305 phone, contact your sales representative or your service provider.
14
Making Calls
Your i305 phone makes two types of calls: digital cellular phone calls and Private calls. With Private calls, you use your phone as a long-range, digital walkie-talkie.
Phone Calls
1Enter the number you want to call.
2Press s to place the call.
3Press e to end the call.
Private Calls
1Enter the Private ID you want to call.
2Press and hold the PTT button on the side of your phone. Begin talking after your phone emits a chirping sound.
3Release the PTT button to listen.
Tip: To let someone know you want to talk to him or her on a Private call, send a call alert. See “Call Alerts” on page 21.
Receiving Calls
Phone Calls
When you receive a phone call, your phone rings, vibrates, or lights up its backlight.
Answering
Press s. -or-
Press A under Yes. -or-
Press any number key.
Sending to Voice Mail
Press e. -or-
Press A under No.
Ending
Press e.
Private Calls
When you receive a Private call, your phone emits a chirping sound.
Answering
1Wait for the caller to finish speaking.
2Press and hold the PTT button on the side of your phone. Begin talking after your phone emits a chirping sound.
15
Making Calls
3 Release the PTT button to listen.
Call Icons
When you make a call, call icons appear in the text area of the phone’s display.
X Placing a phone call.
W Receiving a phone call.
YPhone call is active.
ZPhone call is on hold.
U Phone call ended.
When you miss a call, this icon appears in the text area:
V You missed a phone call.
Ways to Enter Calls
To enter the number you want to call, you can:
•Use the numbers on the keypad
•Select the number from the recent calls list
•Select the number from Contacts
•Redial the last phone number called
•Use Speed Dial or Turbo Dial®
•Use One Touch PTT to make a Private call
•Use a TTY device — see “Making TTY Calls” on page 70
From the Keypad
To enter the number you want to call, press the numbers on the keypad.
If you make a mistake:
•To clear a digit, press A under Delete.
•To clear all digits, press and hold A under
Delete.
•To insert or delete a digit anywhere in the string of digits you have entered, scroll left or right.
•To cancel, press e.
From the Recent Calls List
The recent calls list stores the last 20 calls you made or received.
To select a number from the recent calls list as the number you want to call:
1From the idle screen, scroll down. -or-
From the main menu, select Recent Calls.
2Scroll to the name or number you want to call.
16
From Contacts
If you have numbers stored in Contacts, you can use these numbers to make calls. For information on entering numbers into Contacts, see “Creating Entries” on page 27.
Calling from the Contacts List
1From the main menu, select Contacts.
2Scroll to the name or number you want to call.
Tip: To find Contacts entries faster, use the keypad to enter the first letter of the name.
3Place the call now. -or-
Scroll left or right to display the Contacts type for the number you want to call.
If you are making a Private call, your phone places the call to the Private ID stored in the Contacts entry, even if the Private icon is not displayed.
If you are making a phone call:
•Your phone places the call to the phone number assigned to the Contacts type displayed.
•If the Contacts type displayed is not a phone number, your phone places the call to the phone number stored in the Contacts entry.
Ways to Enter Calls
•If the Contacts type displayed is not a phone number and you have more than one phone number stored in the Contacts entry, your phone prompts you to select the phone number you want to place the call to.
Calling from a Contacts Entry
1From the main menu, select Contacts.
2Scroll to the name or number you want to call.
3Press A under View. -or-
If View is not one of your options: Press m. Select
View.
4Place the call now. -or-
Scroll to view more numbers. When you place the call, it is made to the number displayed.
Redialing the Last Number
Press and hold s to place a call to the last phone number you called.
Using a Voice Name
Note: This is an optional feature. Contact your service provider about its availability for purchase.
17
Making Calls
If you have created a voice name in Contacts for the number you want to call, say the voice name into your phone to enter the number. See page 26 for information on voice names.
1Press and hold t until a prompt appears telling you to say the voice name.
2Speaking into the microphone, say the voice name assigned to the number you want to call.
Your phone plays the name back to you.
If you are making a Private call, press the PTT button to place the call.
If you are making a phone call, the call is placed automatically.
Tip: To stop a phone call from being completed, press e.
Using Speed Dial and Turbo Dial®
Each phone number stored in Contacts is assigned a Speed Dial number which you can use to enter that number.
Speed Dial
1From the idle screen, use the keypad to enter the Speed Dial number assigned to the phone number you want to call.
2Press #.
3 Press s.
Turbo Dial
From the idle screen, press and hold the Speed Dial number (1 through 9) assigned to the phone number you want to call.
Using One Touch PTT
One Touch PTT sets your phone to call the most recent Private ID on the recent calls list, or to a Private ID you choose, every time you press the PTT button. See “Setting One Touch PTT” on page 67.
Using Speakerphone
Note: This is an optional feature. Contact your service provider about its availability for purchase.
Turning on speakerphone makes incoming sound come out of the phone’s speaker instead of the earpiece. Speakerphone is available whenever you are on an active phone call.
To turn speakerphone on or off:
Press A under Speaker. -or-
Press t.
18
Using Mute
Muting calls lets you listen to incoming sound without transmitting sound. Mute is available whenever you are on an active call.
To turn mute on:
Press A under Mute.
While mute is on, Unmute appears as a display option.
To turn mute off:
Press A under Unmute.
Making Emergency Phone
Calls
Your phone supports emergency calling. Emergency phone calls can be made even when your SIM card is blocked or not in your phone.
Dial 911 to be connected to an emergency response center. If you are on an active call, you must end it before calling 911.
When you make an emergency call, your phone’s GPS Enabled feature can help emergency service personnel find you, if you are in a location where your phone's GPS antenna has established a clear view of the open sky and your local emergency
Using Mute
response center has the equipment to process location information. See “GPS Enabled” on page 51, and particularly “IMPORTANT: Things to Keep in Mind” on page 51 and “Making an Emergency Call” on page 52, for more information on the limitations of this feature. Because of the limitations of this feature, always provide your best knowledge of your location to the emergency response center when you make an emergency call.
Important: Emergency calls cannot be placed while the keypad is locked.
Important: If you have not registered on the network, emergency calls cannot be placed while your SIM card is in your phone.
19
20
Loading...