


HT1250
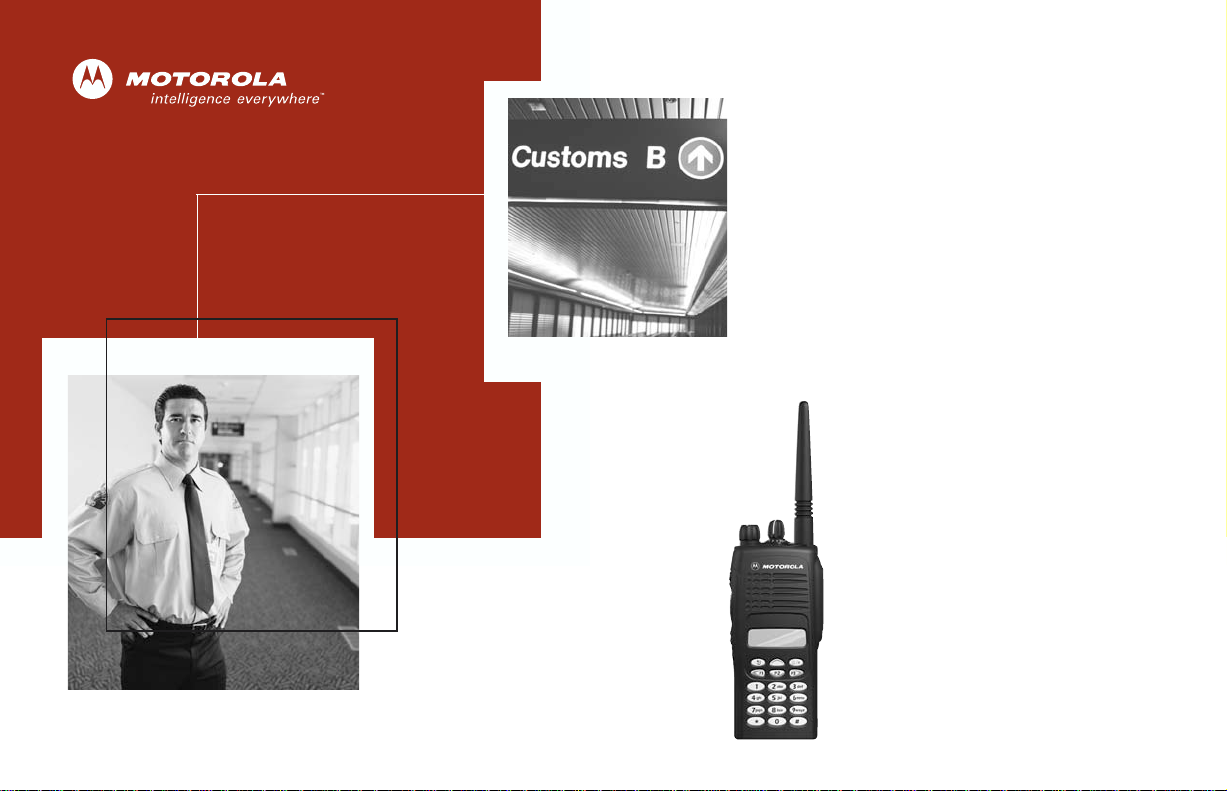
HT1250
Professional Series
Two-Way Radio User Guide
Série Professionnelle
Manuel de l’utilisateur pour radios
bidirectionnelles
™


CONTENTS
Computer Software Copyrights. . . . . . . . . . 3
Product Safety and RF Exposure
Compliance. . . . . . . . . . . . . . . . . . . . . . . . . 5
Battery Information . . . . . . . . . . . . . . . . . . . 5
Charging Batteries . . . . . . . . . . . . . . . . . 5
Radio Overview . . . . . . . . . . . . . . . . . . . . . 7
Parts of the Radio . . . . . . . . . . . . . . . . . . . . 7
HT1250 Full-Keypad Model . . . . . . . . . . 7
HT1250 Limited-Keypad Model . . . . . . . 8
On/Off/Volume Knob . . . . . . . . . . . . . . . 9
Channel Selector Knob . . . . . . . . . . . . . 9
LED Indicator . . . . . . . . . . . . . . . . . . . . . 9
Programmable Buttons . . . . . . . . . . . . . 9
Push-to-Talk (PTT) Button. . . . . . . . . . 11
Microphone . . . . . . . . . . . . . . . . . . . . . 11
Menu Keys. . . . . . . . . . . . . . . . . . . . . . 11
Keypad Keys (for full-keypad radios). .12
LCD Screen . . . . . . . . . . . . . . . . . . . . . 14
Audio Indicators for Programmable
Buttons . . . . . . . . . . . . . . . . . . . . . . . . . . . 16
Getting Started . . . . . . . . . . . . . . . . . . . . 17
Battery Information . . . . . . . . . . . . . . . . . . 17
Charging the Battery . . . . . . . . . . . . . . 17
Battery Charge Status . . . . . . . . . . . . . 18
Attaching the Battery. . . . . . . . . . . . . . 19
Removing the Battery . . . . . . . . . . . . . 19
Accessory Information . . . . . . . . . . . . . . . 20
Attaching the Antenna. . . . . . . . . . . . . 20
Removing the Antenna . . . . . . . . . . . . 20
Attaching the Belt Clip. . . . . . . . . . . . . 21
Removing the Belt Clip . . . . . . . . . . . . 21
Attaching the Side Connector Cover. . 22
Turning The Radio On or Off . . . . . . . . . . 22
Adjusting the Volume . . . . . . . . . . . . . . . . 23
Selecting a Zone. . . . . . . . . . . . . . . . . . . . 23
Selecting a Radio Channel. . . . . . . . . . . . 23
Sending a Call . . . . . . . . . . . . . . . . . . . . . 24
Receiving a Call . . . . . . . . . . . . . . . . . . . . 24
Radio Calls . . . . . . . . . . . . . . . . . . . . . . . 25
Making a Selective Call . . . . . . . . . . . . . . 25
Receiving a Selective Call F. . . . . . . . . . . 25
Sending a Call Alert™ Page. . . . . . . . . . . 26
Receiving a Call Alert Page . . . . . . . . . . . 26
Radio Check. . . . . . . . . . . . . . . . . . . . . . . 27
Sending an Emergency Alert E . . . . . . . 27
Editing a Radio Call List K . . . . . . . . . . . 28
Repeater or Talkaround J Mode . . . . . 29
Setting Tight or Normal Squelch. . . . . . . . 29
Setting the Power Level
Name and Call Tone Tagging. . . . . . . . . . 31
B
. . . . . . . . . . . . 30
CONTENTS
1
English

CONTENTS
Scan. . . . . . . . . . . . . . . . . . . . . . . . . . . . . 33
Starting or Stopping Scan G. . . . . . . . . 33
Talkback . . . . . . . . . . . . . . . . . . . . . . . . . . 33
Deleting a Nuisance Channel . . . . . . . . . . 34
Restoring a Channel Back to the
Scan List . . . . . . . . . . . . . . . . . . . . . . . 34
Editing a Scan List . . . . . . . . . . . . . . . . . . 34
To Add or Delete Channels in a
Scan List . . . . . . . . . . . . . . . . . . . . . . . 35
Prioritizing a Channel in a Scan List . . 35
Setting Priority Channels. . . . . . . . . . . 36
Phone. . . . . . . . . . . . . . . . . . . . . . . . . . . . 37
Making a Phone Call D . . . . . . . . . . . . . . 37
Modifying The Phone List K . . . . . . . . . . 38
To Add an Entry
(for full-keypad radios only) . . . . . . . . . 38
To Delete an Entry. . . . . . . . . . . . . . . . 39
To Edit an Entry
(for full-keypad radios only) . . . . . . . . . 40
Audio/Tone Settings. . . . . . . . . . . . . . . . 41
Utilities. . . . . . . . . . . . . . . . . . . . . . . . . . . 43
Setting the Time . . . . . . . . . . . . . . . . . . . . 45
Warranty . . . . . . . . . . . . . . . . . . . . . . . . . 47
Limited Warranty . . . . . . . . . . . . . . . . . . . 47
Accessories . . . . . . . . . . . . . . . . . . . . . . 51
Carry Cases. . . . . . . . . . . . . . . . . . . . . . . 51
Chargers . . . . . . . . . . . . . . . . . . . . . . . . . 51
Headsets . . . . . . . . . . . . . . . . . . . . . . . . . 52
Remote Speaker Microphones. . . . . . . . . 52
Adapters. . . . . . . . . . . . . . . . . . . . . . . . . . 52
Batteries. . . . . . . . . . . . . . . . . . . . . . . . . . 52
Antennas . . . . . . . . . . . . . . . . . . . . . . . . . 52
English
2

COMPUTER SOFTWARE
COPYRIGHTS
The Motorola products described in this
manual may include copyrighted Motorola
computer programs stored in semiconductor
memories or other media. Laws in the United
States and other countries preserve for
Motorola certain exclusive rights for
copyrighted computer programs, including, but
not limited to, the exclusive right to copy or
reproduce in any form the copyrighted
computer program. Accordingly, any
copyrighted Motorola computer programs
contained in the Motorola products described
in this manual may not be copied, reproduce d,
modified, reverse-engineered, or distributed in
any manner without the ex press written
permission of Motorola. Furthermore, the
purchase of Motorola products shall not be
deemed to grant either directly or by
implication, estoppel, or otherwise , an y license
under the copyrights, patents or patent
applications of Motorola, except for the normal
non-exclusive license to use that arises by
operation of law in the sale of a product.
CONTENTS
3
English

CONTENTS
Notes:
English
4

SAFETY
!
BATTERY INFORMATION
Charging Batteries
PRODUCT SAFETY AND RF EXPOSURE COMPLIANCE
Before using this radio, read the
operating instructions for safe
usage contained in the Product
C a u t i o n
This radio is restricted to occupational use
only to satisfy FCC RF energy exposure
requirements. Before using this product, rea d
the RF energy awareness information and
operating instructions in the Product Safety
and RF Exposure booklet enclosed with your
radio (Motorola Publication part number
68P81095C98) to ensure compliance with RF
energy exposure limits.
For a list of Motorola-approved antennas,
batteries, and other accessories, visit the
following web site which lists approved
accessories: http://www.motorola.com/cgiss/
index.shtml.
Safety and RF Exposure booklet
enclosed with your radio.
ATTENTION!
This product is powered by a nickel-cadmium
(NICd), nickel-metal-hydride (NiMH), or lithiumion rechargeable battery. Charge the battery
before use to ensure opt imum capacity and
performance. The battery was designed
specifically to be used with a Motorola charger.
Charging in non-Motorola equipment m ay lead
to battery damage and void the battery
warranty.
Note: When charging a battery attached to a
radio, turn the radio off to ensure a full
charge.
The battery should be at about 77°F (25°C)
(room temperature), whenever possible.
Charging a cold battery (bel ow 50° F [10°C] )
may result in leakage of electrolyte and
ultimately in failure of the battery. Charging a
hot battery (above 95°F [35°C]) results in
reduced discharge capacity, affecting the
performance of the radio. Motorola rapid-rate
battery chargers contain a temperaturesensing circuit to ensure that batteries are
charged within the temperature limits stated
above.
SAFETY
5
English

SAFETY
Notes:
English
6
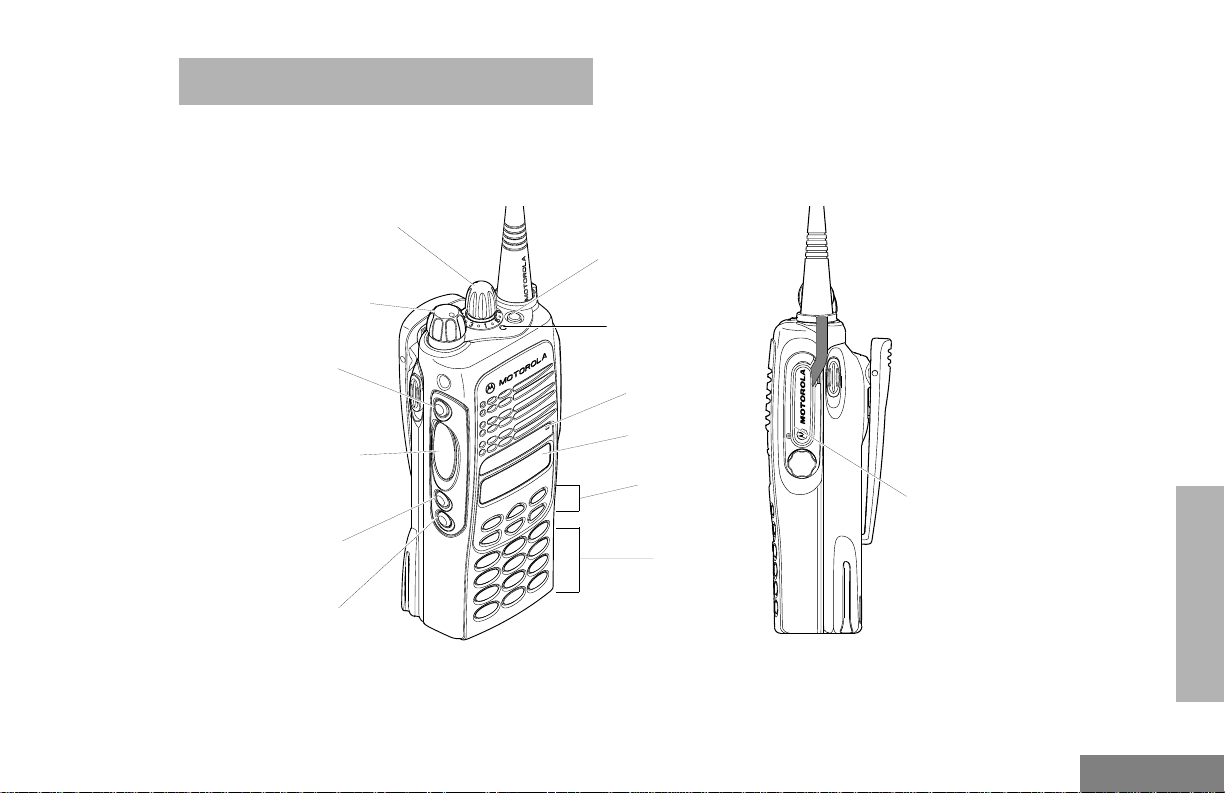
RADIO OVERVIEW
PARTS OF THE RADIO
HT1250 Full-Keypad Model
Channel Selector Knob
On/Off/Volume Knob
Side Button 1 (A)
(programmable)
Push-to-Talk (PTT)
Button
Side Button 2 (B)
(programmable)
ide Button 3 (C)
(programmable)
Top Button (D)
(programmable)
LED Indicator
Microphone
LCD Screen
Menu Keys
(P1, P2, P3)
(programmable)
Keypad
Side
Connector
Cover
RADIO OVERVIEW
7
English
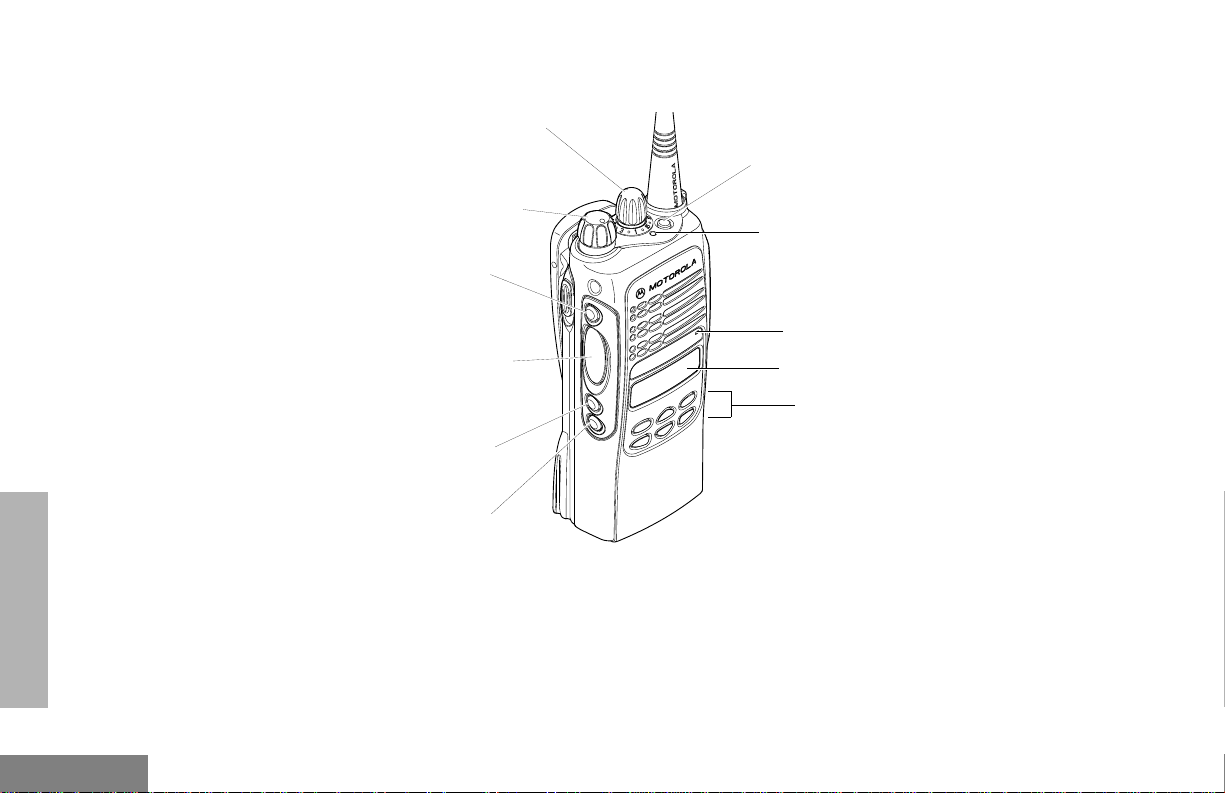
HT1250 Limited-Keypad Model
RADIO OVERVIEW
Channel Selector Knob
On/Off/Volume Knob
Side Button 1 (A)
(programmable)
Push-to-Talk (PTT)
Button
Side Button 2 (B)
(programmable)
Side Button 3 (C)
(programmable)
Top Button (D)
(programmable)
LED Indicator
Microphone
LCD Screen
Menu Keys
(P1, P2, P3)
(programmable)
English
8

On/Off/Volume Knob
Turns the radio on or off, and adjusts the
radio’s volume.
Channel Selector Knob
Switches the radio to different channels.
LED Indicator
Indicates status of battery, power-up, scan,
and receipt of a selective call.
Programmable Buttons
Several of your radio’s buttons can be
programmed by your dealer as shortcut
buttons for many of the radio’s features.
Check with your dealer for a complete list of
functions your radio supports.
Programmable buttons include:
• the three Side Buttons (A, B, C) and the Top
Button (D)
• the three lower Menu Keys (P1, P2, P3)
(when the radio is not in Menu Mode)
Each button can access up to two features,
depending on the type of button press:
• short press—quickly pressing and releasing the programmable buttons, or
• long press—pressing and holding the programmable buttons for a period of time (at
least 1 1/2 seconds), or
• hold down—pressing and holding down
the programmable buttons while checking
status or making adjustments.
The table on pages 10 and 9 summarizes the
programmable features available and shows
the page number where the feature is
explained.
In the “Button” column, have your dealer write
down the programmable buttons next to the
features that have been programmed to them.
Use the abbreviations (e.g., A for Side
Button 1, D for Top Button, etc.) shown in the
radio illustration at the front of this manual.
Also, where a choice exists, have your dealer
indicate whether the button press is short
press (SP) or long press (LP).
RADIO OVERVIEW
9
English
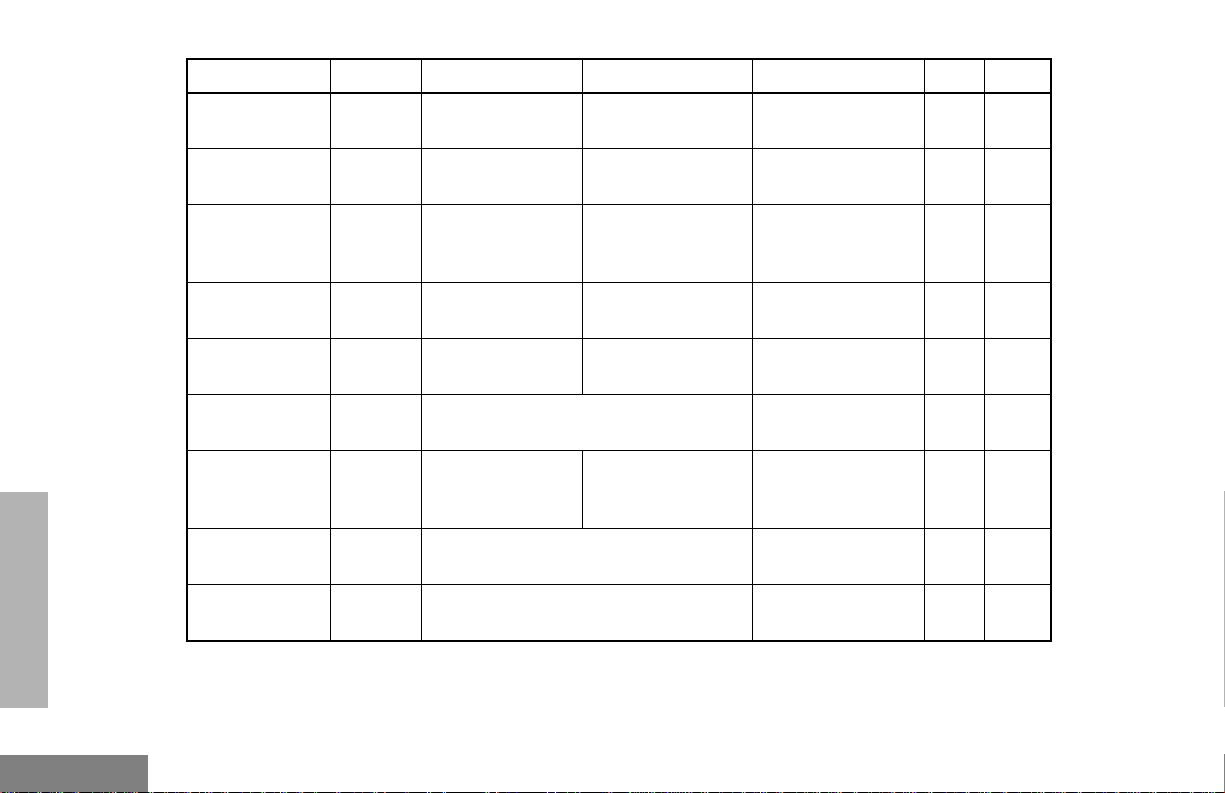
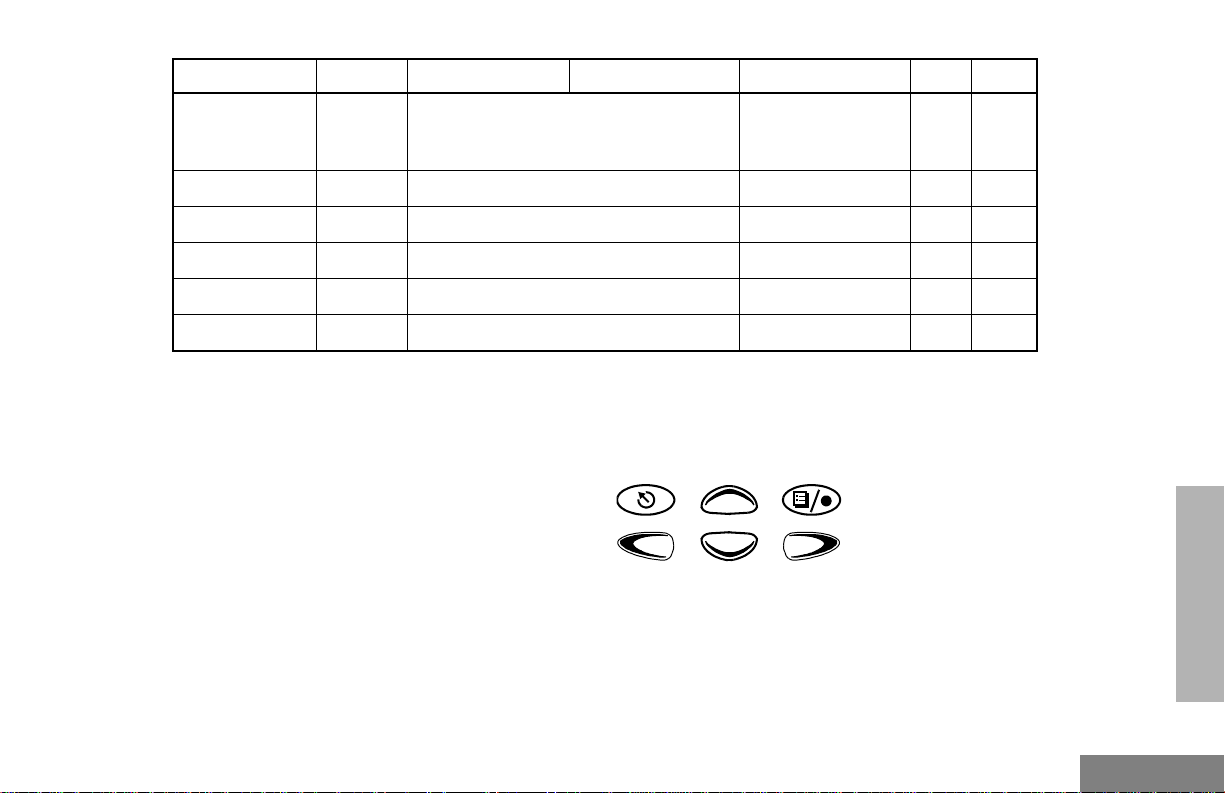
Function Indicator Short Press Long Press Hold Down Page Button
Emergency
(Top button only)
E
Initiate Emergency Alert.
Cancel Emergency
status.
—27
RADIO OVERVIEW
Monitor
Volu me Set
Battery Gauge
Scan/Nuisance
Channel Delete
Power Level
Keypad Lock
Repeater/
Talkaround
Squelch
†
This function is activated by EITHER a short OR a long press, but not both.
—
P
G
B
L
J
—
Turn monitor
C
function off.
——
——
T oggle scan on and
off.
Toggle transmit power level between
High and Low.
—
Toggle between using a repeater or
transmitting directly to another radio.
Toggle squelch level between Tight and
Normal.
†
Continually monitor
selected channel.
Sound a tone for
adjusting your
radio’s volume level.
Check the battery’s
charge status.
Delete a nuisance
channel while scanning.
†
Toggle keypad
between Locked
and Unlocked.
†
——
23
18
—34
—30
——
—29
— 29
English
10
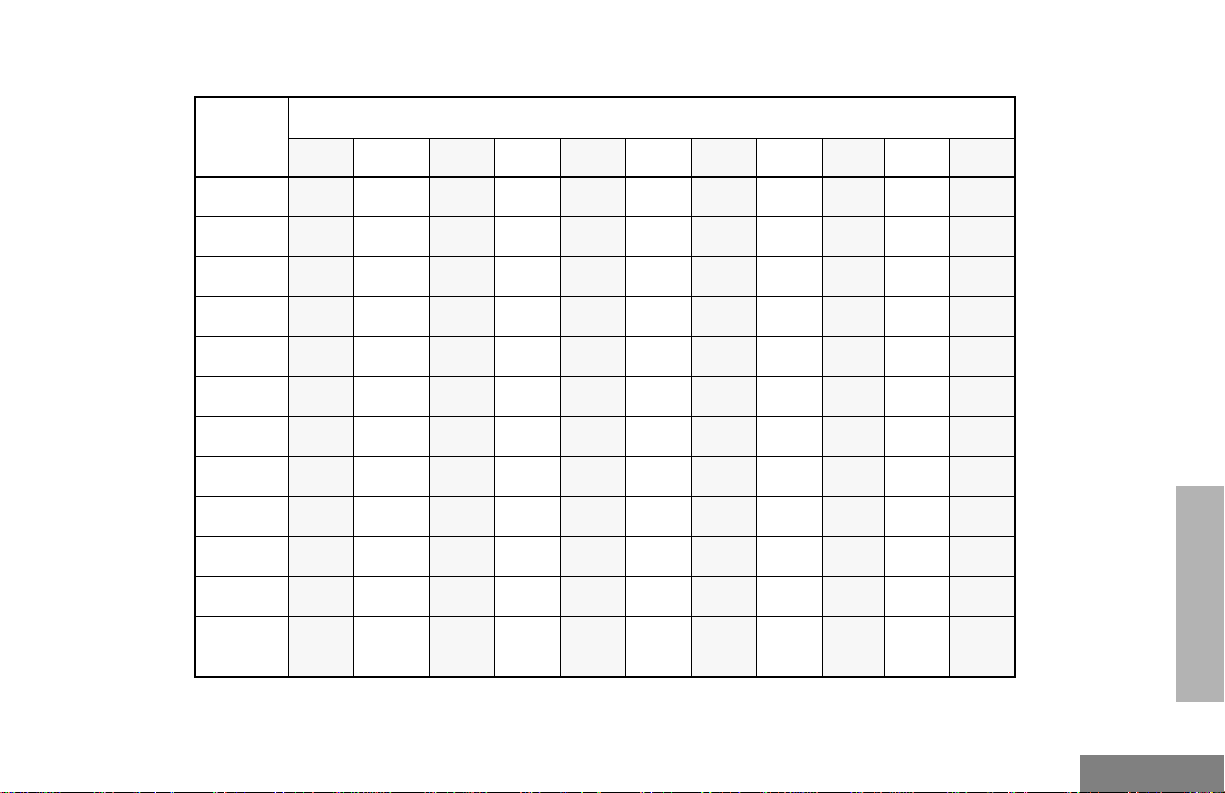
Function Indicator Short Press Long Press Hold Down Page Button
Option Board
(if one is
installed)
Phone
Speed Dial
Radio Call
Light
Zone
†
This function is activated by EITHER a short OR a long press, but not both.
N
D
—
—
—
—
Toggle between activating and
deactivating the option board.
Access Phone Mode.
Access your phone list.
Make a radio call.
Turn on your radio backlight.
Access your zone list.
†
†
†
†
†
†
——
—37
—37
—25
——
— 23
Push-to-Talk (PTT) Button
Press and hold down this button to talk;
release it to listen.
Microphone
When sending a message, hold the
microphone 1 to 2 inches (2.5 to 5 cm) away
from your mouth, and speak clearly into the
microphone.
Menu Keys
Exit
Left
Down
Up
P2
Menu/
Select
RADIO OVERVIEW
P3P1
Right
11
English

Menu/Select Key )
Keypad Keys (for full-keypad radios)
Used to enter Menu Mode. When in Menu
Mode, this key is also used to make menu
selections.
Exit Key (
Used to move to the prev ious Menu lev el (short
press) or to exit Menu Mode (long press).
Up Key + and Down Key ?
Used for scrolling when in Menu Mode.
The
? key can also be prog rammed.
Right Key
Moves the cursor right or inserts a space when
editing. This key can also be programmed.
Left Key <
Used as a backspace key when editing. This
key can also be programmed.
>
123
456
789
*0#
These keys are used for:
• dialing a phone number
• making a radio call
• entering information when programming
radio lists
Each key can generate sev eral different
characters. For e xample , to enter the character
“C,” press the 2 ke y three times. (Ref er to the
following tab le.)
RADIO OVERVIEW
English
12
Entering Characters Using the Keypad
Number of Times Key is Pressed
Key
0
1
2
3
4
5
6
7
8
9
*
#
1234567891011
0()<>
1&%# *
ABC2abc2
DEF3def3
GH I4ghi4
JKL5jkl5
MNO6mno6
PQRS7pqrs7
TUV8tuv8
WXYZ9wxyz9
*/+-=
Blank
#
Space
-.!?’”,;:
RADIO OVERVIEW
13
English
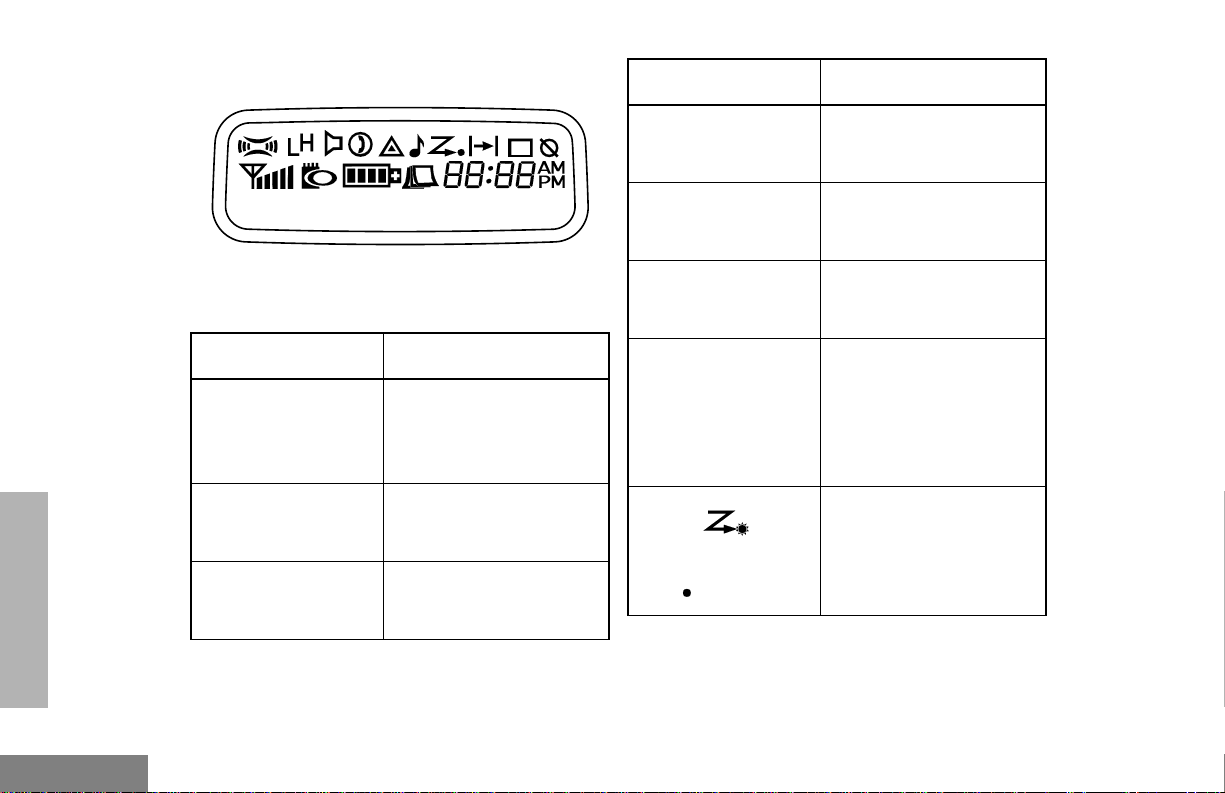
LCD Screen
Symbol Indication
RADIO OVERVIEW
Call Received
The top two screen rows display menu and
radio status information:
Symbol Indication
A
Companding
B
Power Level
C
Monitor
The Companding feature
is activated. When in
narrow band, this feature
improves audio quality.
Low Power “ R ” or High
Power “ S ” is activated.
The selected channel is
being monitored.
D
Phone
E
Emergency
F
Call Received
G
Scan
Priority 1 Scan
( flashing)
Phone Mode is selected.
An Emergency Alert is
being sent.
A Selective Call or Call
Alert has been received.
The Scan feature has
been activated. Also,
during Scan, indicates
that there is some activity
on a non-priority
channel.
During Scan, indicates
that there is some activity
on a Priority 1 channel.
English
14
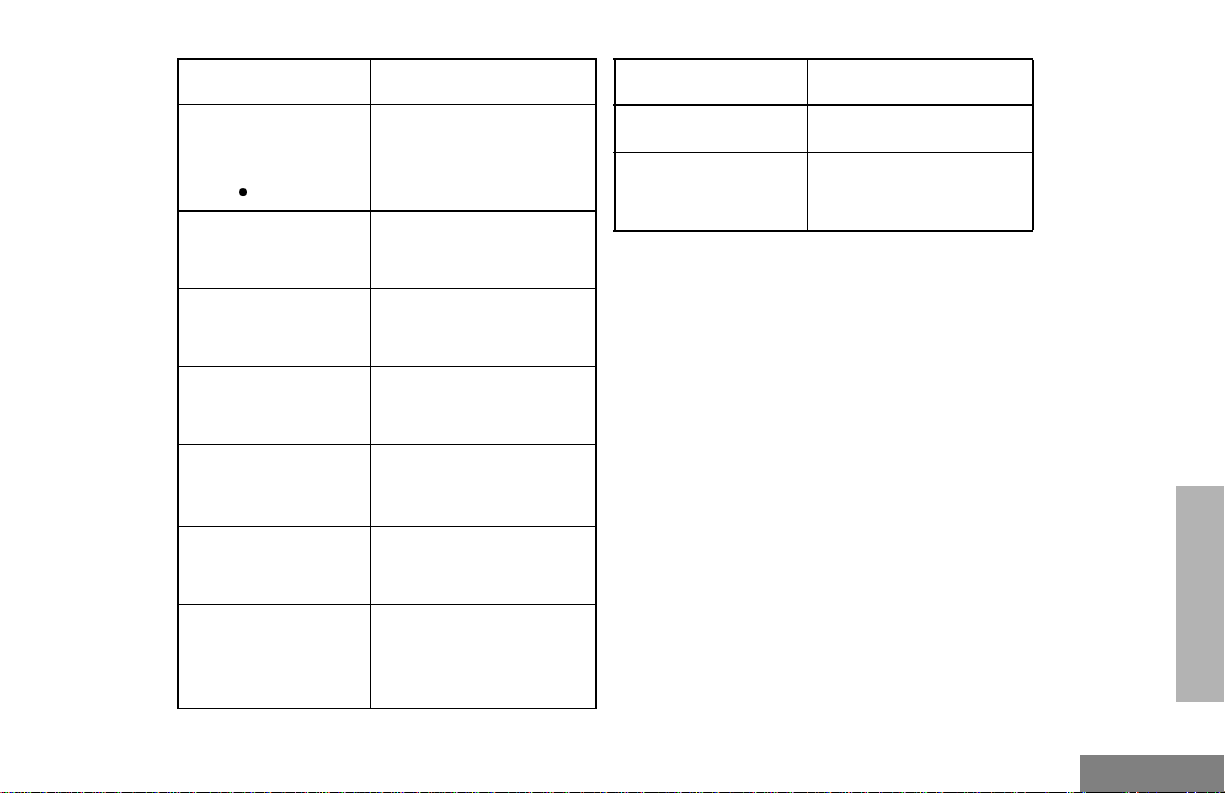
Symbol Indication
Symbol Indication
H
Priority 2 Scan
( steady)
J
Talkaround
K
Programming Mode
L
Keypad Lock
M
Signal Strength
N
Option Board
P
Battery Level
During Scan, indicates
that there is some activity
on a Priority 2 channel.
You are not transmitting
through a repeater.
A Program List is being
edited.
Keypad is locked.
The more bars, the
stronger the signal being
received.
Option board is
activated.
The number of bars (0–
4) shown indicates the
charge remaining in your
battery.
Q
U
Clock
Not Currently Assigned
Shows the time (12- or
24-hour).
RADIO OVERVIEW
15
English
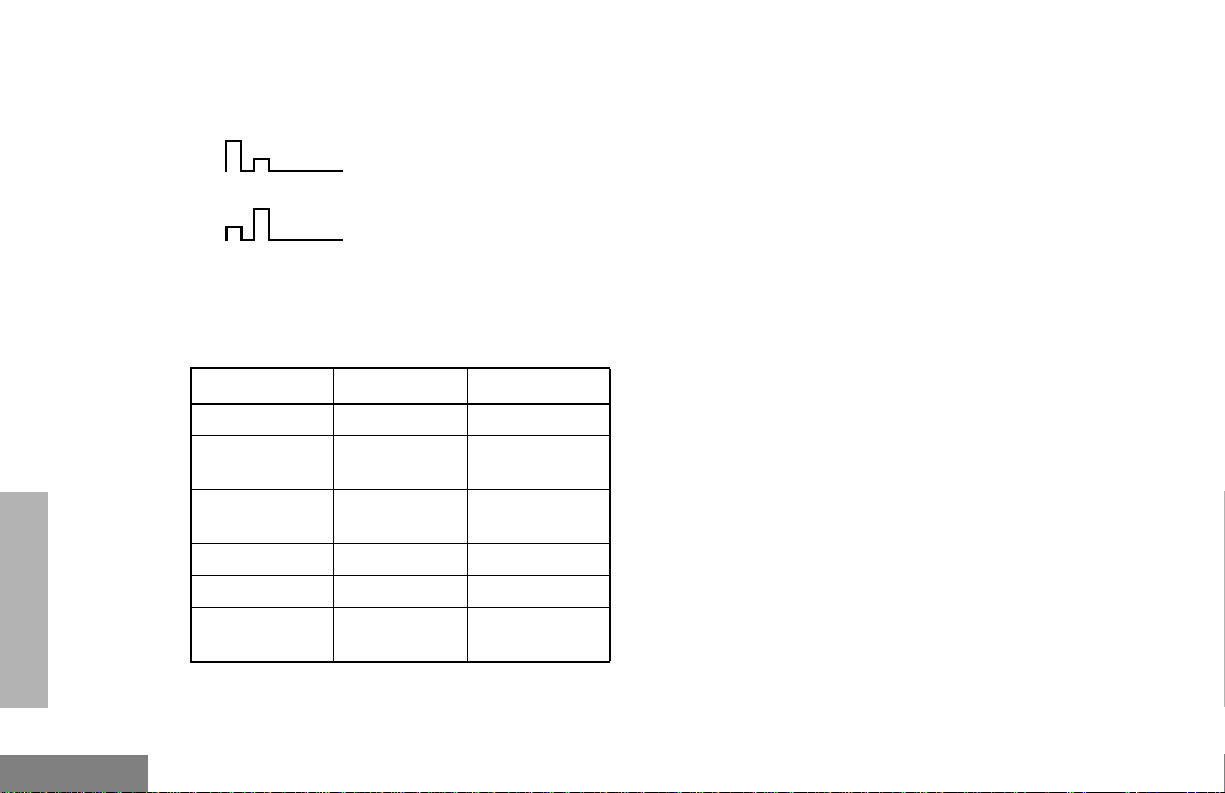
AUDIO INDICATORS FOR PROGRAMMABLE BUTTONS
High-Low Tone
Low-High Tone
In addition to having visual indicators, some
programmable buttons use tones to indicate
one of two modes:
Button High-Low Tone Low-High T one
Scan Start scan Stop scan
Power Level
Squelch (no
visual indicator)
Option Board Activated Deactivated
Keypad Lock Locked Unlocked
Repeater/
Talkaround
Low power
selected
Tight squelch Normal squelch
Does not use
repeater
High power
selected
Uses repeater
RADIO OVERVIEW
English
16
 Loading...