


 Loading...
User Guide
i576 by Motorola®
www.nextel.com
© 2008 Sprint. Sprint and the NEXTEL name and logo are trademarks of Sprint. Other marks are the property of their respective owners.
9/1/08
Motorola, Inc. |
Manual number: NNTN7500A |
Consumer Advocacy Office |
|
1307 East Algonquin Road |
|
Schaumburg, IL 60196 |
|
www.hellomoto.com
Note: Do not ship your phone to the above address. If you need to return your phone for repairs, replacement or warranty service, please contact the Motorola Customer Support Center at:
1-800-453-0920 (United States)
1-877-483-2840 (TTY/TDD United States for hearing impaired)
Product Support:
www.motorola.com/support
Certain mobile phone features are dependent on the capabilities and settings of your service provider’s network. Additionally, certain features may not be activated by your service provider, and/or the provider's network settings may limit the feature’s functionality. Always contact your service provider about feature availability and functionality. All features, functionality, and other product specifications, as well as the information contained in this user's guide are based upon the latest available information and are believed to be accurate at the time of printing. Motorola reserves the right to change or modify any information or specifications without notice or obligation.
FCCNoticetoUsers
The following statement applies to all products that have received FCC approval. Applicable products bear the FCC logo, and/or an FCC ID in the format FCC-ID: IHDP56HS1 on the product label.
Motorola has not approved any changes or modifications to this device by the user. Any changes or modifications could void the user’s authority to operate the equipment. See 47 CFR Sec. 15.21.
This device complies with part 15 of the FCC Rules. Operation is subject to the following two conditions: (1) This device may not cause harmful interference, and (2) this device must accept any interference received, including interference that may cause undesired operation. See 47 CFR Sec. 15.19(3).
This equipment has been tested and found to comply with the limits for a Class B digital device, pursuant to part 15 of the FCC Rules. These limits are designed to provide reasonable protection against harmful interference in a residential installation. This equipment generates, uses and can radiate radio frequency energy and, if not installed and used in accordance with the instructions, may cause harmful interference to radio communications. However, there is no guarantee that interference will not occur in a particular installation. If this equipment does cause harmful interference to radio or television reception, which can be determined by turning the equipment off and on, the user is encouraged to try
to correct the interference by one or more of the following measures:
Reorient or relocate the receiving antenna.
Increase the separation between the equipment and the receiver.
Connect the equipment to an outlet on a circuit different from that to which the receiver is connected.
Consult the dealer or an experienced radio/TV technician for help.

Table of Contents
Introduction . . . . . . . . . . . . . . . . . . . . . . . . . . . . . . . i
Your Phone’s Menu. . . . . . . . . . . . . . . . . . . . . . . . ii
Use and Care . . . . . . . . . . . . . . . . . . . . . . . . . . . . . vi
Section 1: Getting Started. . . . . . . . . . . . . . . . . . 1
1A. Setting Up Service . . . . . . . . . . . . . . . . . . . . 2
Setting Up Your Phone . . . . . . . . . . . . . . . . . . . . . . |
2 |
Activating Your Phone . . . . . . . . . . . . . . . . . . . . . . . |
3 |
Setting Up Your Voicemail . . . . . . . . . . . . . . . . . . . |
3 |
Enabling Security . . . . . . . . . . . . . . . . . . . . . . . . . . . |
4 |
Account Passwords . . . . . . . . . . . . . . . . . . . . . . . . . |
4 |
Getting Help . . . . . . . . . . . . . . . . . . . . . . . . . . . . . . . |
5 |
1B. Phone Basics . . . . . . . . . . . . . . . . . . . . . . . . 6
Your Phone . . . . . . . . . . . . . . . . . . . . . . . . . . . . . . . . 6
Getting Started With Your Phone . . . . . . . . . . . . . . 8
Features of Your Phone . . . . . . . . . . . . . . . . . . . . . 15
Navigating Through Phone Menus
and Options . . . . . . . . . . . . . . . . . . . . . . . . . . . . . . . 18
Displaying Your Phone Number and
Direct Connect Number . . . . . . . . . . . . . . . . . . . . 19
Entering Text . . . . . . . . . . . . . . . . . . . . . . . . . . . . . . |
21 |
Accessories . . . . . . . . . . . . . . . . . . . . . . . . . . . . . . |
25 |
Section 2: Using Your Phone. . . . . . . . . . . . . . . 27
2A. Making and Answering Calls . . . . . . . . . . 28
Types of Calls . . . . . . . . . . . . . . . . . . . . . . . . . . . . . 28
Making and Answering Phone Calls . . . . . . . . . 29
Making and Answering Direct Connect Calls . 36
Making and Answering Group Connect Calls . 39
Nextel Direct Send . . . . . . . . . . . . . . . . . . . . . . . . . 44
Making and Answering Talkgroup Calls . . . . . . 51
Call Alerts . . . . . . . . . . . . . . . . . . . . . . . . . . . . . . . . 53
Making and Answering Direct Talk Calls . . . . . . 55
2B. Settings . . . . . . . . . . . . . . . . . . . . . . . . . . . . 60
Using the Settings Menu . . . . . . . . . . . . . . . . . . . 60
Sound Settings . . . . . . . . . . . . . . . . . . . . . . . . . . . . 65
Display Settings . . . . . . . . . . . . . . . . . . . . . . . . . . . 70
Messaging Settings . . . . . . . . . . . . . . . . . . . . . . . . 71
Temporarily Turning Off Transmissions
(Airplane Mode) . . . . . . . . . . . . . . . . . . . . . . . . . . . 73
Setting One Touch Direct Connect . . . . . . . . . . . 74
Headset Options . . . . . . . . . . . . . . . . . . . . . . . . . . 75
Profiles . . . . . . . . . . . . . . . . . . . . . . . . . . . . . . . . . . . 76
Phone Setup Options . . . . . . . . . . . . . . . . . . . . . . 80
2C. Security . . . . . . . . . . . . . . . . . . . . . . . . . . . . 84
SIM Card Security . . . . . . . . . . . . . . . . . . . . . . . . . 84
Your Phone’s Lock Feature . . . . . . . . . . . . . . . . . 86
Your Phone’s Keypad Lock . . . . . . . . . . . . . . . . . 86
Resetting Your Phone . . . . . . . . . . . . . . . . . . . . . . 87
GPS Privacy Options . . . . . . . . . . . . . . . . . . . . . . . 88
Java Applications & GPS Security . . . . . . . . . . . 89
2D. Recent Calls . . . . . . . . . . . . . . . . . . . . . . . . 92
About Recent Calls . . . . . . . . . . . . . . . . . . . . . . . . 92
Viewing Recent Calls . . . . . . . . . . . . . . . . . . . . . . 95
Recent Calls Options . . . . . . . . . . . . . . . . . . . . . . 95
Saving Items From Recent Calls . . . . . . . . . . . . . 96
Deleting Items From Recent Calls . . . . . . . . . . . 96
Prepending a Phone Number From
Recent Calls . . . . . . . . . . . . . . . . . . . . . . . . . . . . . . 97
2E. Contacts . . . . . . . . . . . . . . . . . . . . . . . . . . . . 98
About Contacts . . . . . . . . . . . . . . . . . . . . . . . . . . . 98 Creating Contacts Entries . . . . . . . . . . . . . . . . . . . 99 Viewing Contacts . . . . . . . . . . . . . . . . . . . . . . . . . 102 Adding a Number or Address to an Entry . . . 103 Editing Entries . . . . . . . . . . . . . . . . . . . . . . . . . . . . 103
Deleting Entries . . . . . . . . . . . . . . . . . . . . . . . . . . 103 Assigning Speed Dial Numbers . . . . . . . . . . . . 104 Selecting a Ringer Type for an Entry . . . . . . . . 105 Checking Capacity . . . . . . . . . . . . . . . . . . . . . . . 105 Dialing Nextel Customer Service . . . . . . . . . . . 105
2F. Tools . . . . . . . . . . . . . . . . . . . . . . . . . . . . . 106
Datebook . . . . . . . . . . . . . . . . . . . . . . . . . . . . . . . |
106 |
Java Applications . . . . . . . . . . . . . . . . . . . . . . . . |
113 |
Digital Rights Management (DRM) . . . . . . . . . |
117 |
GPS Enabled . . . . . . . . . . . . . . . . . . . . . . . . . . . . |
118 |
Memo Feature . . . . . . . . . . . . . . . . . . . . . . . . . . . |
125 |
Voice Records . . . . . . . . . . . . . . . . . . . . . . . . . . |
126 |
Media Center . . . . . . . . . . . . . . . . . . . . . . . . . . . . |
128 |
Call Timers . . . . . . . . . . . . . . . . . . . . . . . . . . . . . . |
134 |
2G. Bluetooth . . . . . . . . . . . . . . . . . . . . . . . . . . 135
Turning Bluetooth On and Off . . . . . . . . . . . . . . 135
Using the Bluetooth Menu . . . . . . . . . . . . . . . . . 136
Pairing Bluetooth Devices . . . . . . . . . . . . . . . . . 137
Transferring Items Via Bluetooth . . . . . . . . . . . . 143
Section 3: Service Features . . . . . . . . . . . . . . 147
3A. Service Features: The Basics . . . . . . . . 148
Message Center . . . . . . . . . . . . . . . . . . . . . . . . . 148 Receiving Messages . . . . . . . . . . . . . . . . . . . . . 149 Voicemail . . . . . . . . . . . . . . . . . . . . . . . . . . . . . . . . 151 Multimedia Messages . . . . . . . . . . . . . . . . . . . . 152 Text Messaging (SMS) . . . . . . . . . . . . . . . . . . . . . 171 Caller ID Blocking . . . . . . . . . . . . . . . . . . . . . . . . 172 Call Waiting . . . . . . . . . . . . . . . . . . . . . . . . . . . . . . 172
Putting a Call on Hold and Making a
Second Call . . . . . . . . . . . . . . . . . . . . . . . . . . . . . . 173 Making a Three-Way Call . . . . . . . . . . . . . . . . . . 174 Call Forwarding . . . . . . . . . . . . . . . . . . . . . . . . . . . 174 Making International Calls . . . . . . . . . . . . . . . . . 177 Special Dialing Codes . . . . . . . . . . . . . . . . . . . . . 177 Nextel Phone Services . . . . . . . . . . . . . . . . . . . . 178
3B. Data Services . . . . . . . . . . . . . . . . . . . . . . 180
Wireless Data Services . . . . . . . . . . . . . . . . . . . 180
Downloading Content . . . . . . . . . . . . . . . . . . . . 183
Using Your Phone as a Modem . . . . . . . . . . . 183
Section 4: Safety and Warranty
Information . . . . . . . . . . . . . . . . . . . . . . . . . . . . 187
4A. Important Safety Information . . . . . . . . 188
General Precautions . . . . . . . . . . . . . . . . . . . . . . 188
Maintaining Safe Use of and Access to
Your Phone . . . . . . . . . . . . . . . . . . . . . . . . . . . . . . 189
Using Your Phone With a Hearing
Aid Device . . . . . . . . . . . . . . . . . . . . . . . . . . . . . . . 191 Caring for the Environment by Recycling . . . . 193 Caring for the Battery . . . . . . . . . . . . . . . . . . . . . 193 Export Law Assurances . . . . . . . . . . . . . . . . . . . 195 Radio Frequency (RF) Energy . . . . . . . . . . . . . . 196 Owner’s Record . . . . . . . . . . . . . . . . . . . . . . . . . . 198 Patent and Trademark Information . . . . . . . . . . 199 Software Copyright Notice . . . . . . . . . . . . . . . . . 199 Privacy and Data Security . . . . . . . . . . . . . . . . . 200 Smart Practices While Driving . . . . . . . . . . . . . . 200
4B. Manufacturer’s Warranty . . . . . . . . . . . . 202
Motorola Limited Warranty
for the United States and Canada . . . . . . . . . . 202 Service and Repairs . . . . . . . . . . . . . . . . . . . . . . 207
Index . . . . . . . . . . . . . . . . . . . . . . . . . . . . . . . . . . 208

Introduction
This UserGuide introduces you to your wireless service and all the features of your new phone. It’s divided into four sections:
Section1: GettingStarted
Section2: UsingYourPhone
Section3: ServiceFeatures
Section4: SafetyandWarrantyInformation
Throughout this guide, you’ll find tips that highlight special shortcuts and timely reminders to help you make the most of your new phone and service. The Table of Contents and Index will also help you quickly locate specific information.
You’ll get the most out of your phone if you read each section. However, if you’d like to get right to a specific feature, simply locate that section in the Table of Contents and go directly to that page. Follow the instructions in that section, and you’ll be ready to use your phone in no time.
User |
Because of updates in phone software, this |
|
Guide |
printed guide may not be the most current |
|
Note |
version for your phone. Visit www.nextel.com |
|
and sign in to access the most recent version |
||
|
||
|
of the user guide. |
|
|
|
|
|
|
|
WARNING |
Please refer to the Important Safety |
|
|
Information section on page 188 to learn |
|
|
about information that will help you safely use |
|
|
your phone. Failure to read and follow the |
|
|
Important Safety Information in this phone |
|
|
guide may result in serious bodily injury, |
|
|
death, or property damage. |
|
|
|
i

Your Phone’s Menu
The following table outlines your phone’s menu structure. For more information about using your phone’s menus, see “Navigating Through Phone Menus and Options” on page 18.
Net
Java Apps
Settings
1: Display/Info
1: Wallpaper
1: Buy Wallpapers |
2: Auto Cycle |
3: Wallpaper |
|
|
|
2: Text Size |
|
1: Zoom |
2: Standard |
3: Compressed |
|
|
|
3: Theme |
|
1: Onyx |
2: Blue Ice |
3: Crimson |
|
4:Home Icons
5:Backlight
6:Clock
7:Menu View
1: Icon View |
2: List View |
8:Large Dialing
9:Language
2:Phone Calls
1:Set Line
2:Any Key Ans
3:Auto Redial
4:Call Waiting
5:Auto Ans
6:Flip Activation
7:Minute Beep
8:Call Duration
9:TTY
10:Hearing Aid
ii

11:Notifications
12:DTMF Dialing
13:Prepend
3:DC/GC Options
1:Tkgrp Silent
2:Tkgrp Area
3:One Touch DC
4:Alert Type
5:On/Off Settings
6:Store Rcvd Info
7:PTT Backlight
4:Personalize
1:Menu Options
1: Reorder Menu |
2: Add/Remove Apps |
2:Up Key
3:Down Key
4:Left Key
5:Right Key
6:Center Key
7:Left Sftkey
8:Right Sftkey
9:Power Up
5:Volume
6:Security
1:Phone Lock
2:Keypad Lock
3:SIM PIN
4:GPS PIN
5:Change Passwds
7:Advanced
1:Alert Timeout
2:Headset/Spkr
3:Connectivity
4:Reset Defaults
5:Return to Home
6:Transmitters
iii

7: Baud Rate
Ring Tones
1:Buy Ring Tones
2:Vibrate All
3:< list of ringtones >
4:Vibrate
5:Silent
Contacts
Messagesa
1:[Create Mesg]
2:Voice Mail
3:Inbox
4:Drafts
5:Sent Items
6:Net Alert
7:SMS
Call Forward
Downloads
Bluetooth
1:Hands Free
2:Link to Devices
3:Device History
4:Setup
5:Find Me
My Info
Direct Talk
1:Go To Direct Talk
2:Setup
1:Direct Launch
2:State Tone
3:Help
Direct Connect
VoiceRecord
iv
GPS
1:Position
2:Privacy
3:Interface
Datebook
Memo
Call Timers
1:Last Call
2:Phone Reset
3:Phone Lifetime
4:DC/GC Reset
5:DC/GC Lifetime
6:Kbytes Reset
Recent Calls
Shortcuts
Profiles
1: [New Profile]
2:Standard
3:Car
4:Meeting
5:Office
6:Outdoors
7:Headset
8:PRVT Only
9:CONTCS Only
10:Surveillance
Call Alert
Media Center
a.The Messaging menus may look slightly different, depending on the messaging setup of your phone.
Please keep in mind that the menu options and order shown here may change as updates become available and as you set your own preferences through the
Settings>Personalize>Menu Options feature.
v

Use and Care
To care for your Motorola phone, keep it away from:
liquidsofanykind
Don’t expose your phone to water, rain, extreme humidity, sweat, or other moisture.
extremeheatorcold
Avoid temperatures below -10°C/14°F or above 45°C/113°F.
microwaves
Don’t try to dry your phone in a microwave oven.
dustanddirt
Don’t expose your phone to dust, dirt, sand, food, or other inappropriate materials.
cleaningsolutions
To clean your phone, use only a dry soft cloth. Don’t use alcohol or other cleaning solutions.
theground
Don’t drop your phone.
vi

Section 1
Getting Started

Section 1A
Setting Up Service
SettingUpYourPhone(page2)
ActivatingYourPhone(page3)
SettingUpYourVoicemail(page3)
EnablingSecurity(page4)
AccountPasswords(page4)
GettingHelp(page5)
Settingupserviceonyournewphoneisquickandeasy. This section walks you through the necessary steps to unlock your phone, set up your voicemail, establish passwords, and contact Nextel for assistance with your wireless service.
SettingUpYourPhone
1.Make Sure your SIM card is in Place.
2.Install the battery.
See “Installing the Battery” on page 11.
3.Press P to turn the phone on.
If your phone is activated, it will turn on, search for service, and enter standby mode.
If your phone is not yet activated, see “Activating Your Phone” on page 3 for more information.
Note You may see a prompt to update your browser information. Press the left softkey (the top left key below the display screen) to select Ok and complete the task.
4.Make your first call.
Use your keypad to enter a phone number.
Press N.
2Section 1A. Setting Up Service

Note Your phone’s battery should have enough charge for your phone to turn on and find a signal, set up your voicemail, and make a call. You should fully charge your battery as soon as possible. See “Charging the Battery” on page 12 for details.
ActivatingYourPhone
If you purchased your phone at a Nextel Store, it is probably activated and ready to use.
If your phone is not activated, please call Nextel Customer Service at 1-800-639-6111 from any other phone.
Tip You must be in an area covered by the Nextel National Network when you first power up your phone.
When you power up your phone the first time, it performs a series of security checks. For example, it verifies the phone is Nextel-approved and the correct SIM card is installed. If you don’t pass the security checks, your phone displays messages and screen prompts showing what to do next. If you still
encounter security messages, call Nextel Customer Service at 1-800-639-6111 from any other phone.
SettingUpYourVoicemail
All unanswered calls to your phone are automatically transferred to your voicemail, even if your phone is in use or turned off. Therefore, it is recommended that you set up your voicemail and personal greeting as soon as your phone is activated.
1.Using your i576 phone, call your wireless phone number.
2.Follow the system prompts to:
Create your passcode.
Record your name announcement.
Record your greeting.
For more information about using your voicemail, see “Voicemail” on page 151.
 Setting Up Service
Section 1A. Setting Up Service |
3 |

EnablingSecurity |
|
AccountPasswords |
You must enable security the first time you power on your phone or within ten days of first activation of your phone.
1.Press and hold P for two seconds to power on your phone.
2.Press Ok (right softkey).
3.You are prompted to enable security. Press Yes (right softkey). A series of screens followed by the default homepage displays.
4.Press P to return to standby mode.
With Nextel service, you enjoy unlimited access to your personal account information and voicemail account. To ensure that no one else has access to your information, you need to create passwords to protect your privacy.
AccountUsernameandPassword
If you are the account owner, you will create an account username and password when you sign on to www.nextel.com. (Click Needtoregisterforaccess? to get started.) If you are not the account owner (if someone else receives the bill for your service), you can get a sub-account password at www.nextel.com.
Note When you go to www.nextel.com, you will be redirected to www.sprint.com by default. Follow the sign in instructions above to access your Nextel account.
4Section 1A. Setting Up Service

VoicemailPassword
You’ll create your voicemail password (or passcode) when you set up your voicemail. See “Setting Up Your Voicemail” on page 3 for more information on your voicemail password.
GettingHelp
ManagingYourAccount
Online:www.nextel.com
Access your account information.
Check your minutes used (depending on your service plan).
View and pay your bill.
Enroll for online billing and automatic payment.
Purchase accessories.
Shop for the latest phones.
View available service plans and options.
FromYouri576Phone
Press *4N to check minute usage and account balance.
Press *3Nto make a payment.
FromAnyOtherPhone
Nextel Customer Service: 1-800-639-6111.
Business Customer Service: 1-800-390-9545
OperatorServices
Operator Services provides assistance when you place collect calls or when you place calls billed to a local telephone calling card or third party.
Press 0N.
For more information or to see the latest in products and services, visit us online at www.nextel.com.
 Setting Up Service
Section 1A. Setting Up Service |
5 |
Section 1B
Phone Basics
YourPhone(page6)
GettingStartedWithYourPhone(page8)
FeaturesofYourPhone(page15)
NavigatingThroughPhoneMenusandOptions(page18)
DisplayingYourPhoneNumberandDirectConnect Number(page19)
EnteringText(page21)
Accessories(page25)
Yourphoneispackedwithfeaturesthatsimplifyyourlifeand expandyourabilitytostayconnectedtothepeopleand informationthatareimportanttoyou.This section will guide you through the basic functions and calling features of your phone.
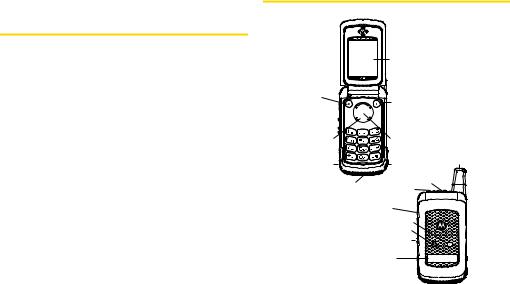
YourPhone
|
12. Display Screen |
1. Left |
|
Softkey |
11. Right Softkey |
2.Menu Key 


 10. Web Key
3.Talk Key 


 9. End/Power Key
4. Navigation |
8. OK key |
|
Key |
|
|
5. Headset |
7. Charger |
13. Antenna |
Jack |
Connector |
|
|
|
|
6. Speaker/Microphone |
14. Smart Button |
|
15. Speaker Button |
|
|
|
|
|
|
16. Volume |
|
|
Button |
|
|
17. Messaging LED |
|
|
18. Bluetooth LED |
|
|
19. Direct Connect |
|
|
Button |
|
|
20. External |
|
|
Display Screen |
|
6Section 1B. Phone Basics

KeyFunctions
1.LeftSoftkey (-) lets you select softkey actions or menu items corresponding to the bottom left line on the display screen.
2.MenuKey (M) lets you access the phone’s menu from standby mode and allows you to access context-sensitive menus from other screens.
3.TalkKey(N) allows you to place or receive calls, answer Call Waiting, or use Three-Way Calling.
4.NavigationKey scrolls through the phone’s menu options and acts as a shortcut key from standby mode.
Press Up to access Ringtones.
Press Down to access Recent Calls.
Press Right to launch Java Applications.
Press Left to access Net.
5.HeadsetJackallows you to plug in either a stereo headset or an optional headset for convenient, hands-free conversations. Your Direct Connect headset can only use this connector.
WARNING Inserting an accessory into the incorrect jack may damage the phone.
6.Speaker/Microphone lets you hear the caller and automated phone prompts when using speakerphone mode and allows other callers to hear you clearly when you are speaking to them.
7.ChargerConnector allows you to connect your battery charger or other accessories to your phone.
8.OKKey (r) selects the highlighted choice when navigating through a menu.
9.End/PowerKey(P) allows you to end calls, return to standby mode, or turn the phone on or off.
10.WebKey (L) launches the Web browser.
11.RightSoftkey (-)lets you select softkey actions corresponding to the bottom right line on the display screen.
12.DisplayScreendisplays all the information needed to operate your phone, such as the call status, the Contacts list, the date and time, and the signal and battery strength.
Phone Basics |
Section 1B. Phone Basics |
7 |

13.Antennadelivers the best receiption when fully extended.
14.SmartButton(() anticipates the next action you are likely to perform. For example, when you highlight a menu item, you can press the SmartButton to select it. You can also use the SmartButton to make and end calls, navigate menus or exit applications when your phone is closed.
15.SpeakerButton()) lets you place or receive calls in speaker mode. In standby mode, pressing the speaker button turns Direct Connect speaker mode on and off.
16.VolumeButton allows you to adjust the ringer volume in standby mode (with the phone open) or adjust the voice volume during a call. The volume key can also be used to scroll up or down to navigate through the different menu options.
17.MessagingLED blinks when new messages are received.
18.BluetoothLED glows solid while the device is pairing to a Bluetooth accessory and blinks while connected. The LED turns off when no Bluetooth accessories are connected to the device.
19.DirectConnectButton allows you to use Nextel Direct Connect on your Nextel phone. (See “Making and Answering Direct Connect Calls” on page 36.)
20.ExternalDisplayScreenprovides information about your phone’s status and options.
Note The use of wireless phones while driving may cause distraction. Discontinue a call if you can’t concentrate on driving. Additionally, the use of wireless devices and their accessories may be prohibited or restricted in certain area is. Always obey the laws and regulations on the use of these products.
GettingStartedWithYourPhone
To start using your i576 phone:
Make sure your SIM card is in place.
Charge the battery.
Turn on your phone.
After you’ve completed these items, you are ready to begin using your new phone.
8Section 1B. Phone Basics
YourSIMCard
LocatingtheSIMCard
Your SIM (Subscriber Identity Module) card is a small card inserted into the SIM card holder within your phone behind the battery area.
If no SIM card came with your phone, contact Nextel Customer Service at 1-800-639-6111.
Most users will never need to remove or insert the SIM card. However, if you wish to, follow the instructions in “Removing and Inserting the SIM Card” on page 9.
Important The SIM card is designed for optimal Contacts storage and feature use. For Nextel SIM card compatibility information, visit www.nextel.com/sim.
In some cases, Contacts and Groups may not be accessible if you move your SIM card to another phone. Contacts and Groups created with your i576 phone may not be readable by an older iDEN SIM-based phone.
RemovingandInsertingtheSIMCard |
Basics |
||
Important |
To avoid losing information stored in your SIM |
||
|
card, do not remove it from your phone |
|
|
|
unless absolutely necessary. |
Phone |
|
ToremoveyourSIMcard: |
|||
|
|||
1. With your phone powered off, remove the battery |
|
||
door and battery. See “Removing the Battery” on |
|
||
page 12. |
|
|
|
2. Lift the rubber flap directly above the SIM card |
|
||
holder, and then with your fingernail, carefully slide |
|
||
the SIM card out from under the edge. |
|
||
Section 1B. Phone Basics |
9 |
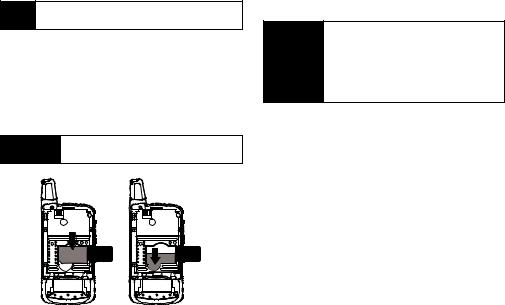
Note Protect your SIM card as you would any delicate object. Store it carefully.
ToinsertyourSIMcard:
1.With your phone powered off, remove the battery door and battery. See “Removing the Battery” on page 12.
2.Lift the rubber flap directly above the SIM card holder, and then carefully slide the SIM card into your phone, until it lies flat in the SIM card holder.
Important Do not touch the gold-colored areas of your SIM card.
UsingYourPhone’sBatteryandCharger
WARNING Use only Nextel-approved or Motorolaapproved batteries and chargers with your phone. The failure to use a Nextel-approved or Motorola-approved battery and charger may increase the risk that your phone will overheat, catch fire, or explode, resulting in serious bodily injury, death, or property damage.
Nextel-approved and Motorola -approved batteries and accessories can be found at Sprint Stores or through Motorola. You may order online at www.nextel.comor by calling1-866-866-7509.
BatteryCapacity
Your phone is equipped with a Lithium Ion (Li-Ion) battery. It allows you to recharge your battery before it is fully drained.
When the battery reaches 5% of its capacity, your phone makes a sound and displays a message. When there are approximately two minutes of talk time left, the phone sounds an audible alert and then turns off.
10 Section 1B. Phone Basics
Note Long backlight settings, searching for service, vibrate mode, browser use, and other variables may reduce the battery’s talk and standby times.
Tip Watch your phone’s battery level indicator and charge the battery before it runs out of power.
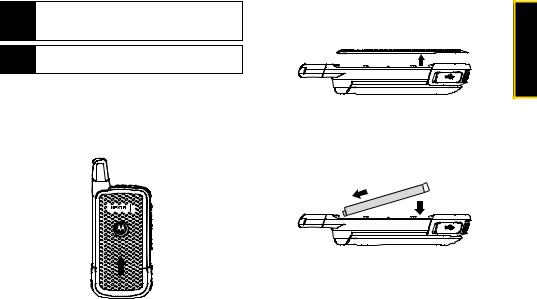
InstallingtheBattery
1.With your thumbs, press down on the battery cover on the back of your phone and slide it up toward the antenna to release it.
2. Remove the battery cover from the back of the |
phone |
Phone Basics |
3.Insert the battery into the opening, making sure the connectors align. Gently press down to secure the battery.
Section 1B. Phone Basics |
11 |
4.Replace the battery cover and press down until you hear a click.
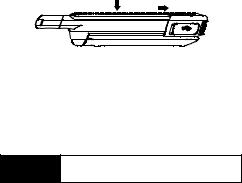
RemovingtheBattery
1.Make sure the power is off so that you don’t lose any stored numbers or messages.
2.Remove the battery cover and remove the battery from the phone.
WARNING Do not handle a damaged or leaking Li-Ion battery as you can be burned.
ChargingtheBattery
Charge your battery as soon as possible so you can begin using your phone.
Keeping track of your battery’s charge is important. If your battery level becomes too low, your phone automatically turns off, and you will lose any information you were just working on. For a quick check of your battery level, glance at the battery charge indicator located on your display screen.
Always use a Nextel-approved or Motorola-approved desktop charger, travel charger, or vehicle power adapter to charge your battery.
12 Section 1B. Phone Basics
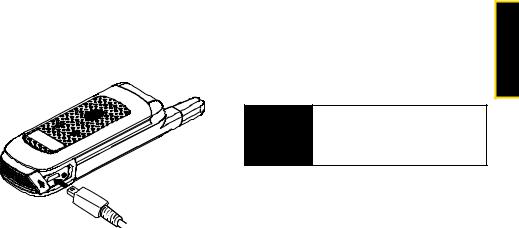
UsingthePhoneCharger
Plug the flat end of the charger into the phone’s charger connector and the other end into an electrical outlet.
With the approved Li-Ion battery, you can recharge the battery before it becomes completely run down.
BatteryUseandBatterySafety
MotorolarecommendsyoualwaysuseMotorola-branded batteriesandchargers.The warranty does not cover damage caused by non-Motorola batteries and/or chargers.
WARNING Use of an unqualified battery or charger may present a risk of fire, explosion, leakage, or other hazard. Improper battery use, or use of a damaged battery, may result in a fire, explosion, or other hazard.
Battery usage by children should be supervised.
Phone Basics |
●Your display screen lets you know the battery is charging.
●Both the battery icon and a text message show the charging status.
Section 1B. Phone Basics |
13 |

Important Motorola mobile devices are designed to work best with qualified batteries. If you see a message on your display such as Invalid Battery or Unable to Charge, take the following steps:
•Remove the battery and inspect it to confirm that it bears a Motorola “Original Equipment” hologram;
•If there is no hologram, the battery is not a qualified battery;
•If there is a hologram, replace the battery and retry charging it;
•If the message remains, contact a Motorola Authorized Service Center.
New batteries or batteries stored for a long time may take more time to charge.
Chargingprecautions: When charging your battery, keep it near room temperature. Never expose batteries to temperatures below 0°C (32°F) or above 45°C (113°F) when charging. Always take your mobile device with you when you leave your vehicle.
When storing your battery, keep it in a cool, dry place.
It is normal for battery life to decrease over time, and for the battery to exhibit shorter runtime between charges or require more frequent or longer charging times.
Avoiddamagetobatteryandmobiledevice.Do not disassemble, open, crush, bend, deform, puncture, shred, or submerge the battery or mobile device. Avoid dropping the battery or mobile device, especially on a hard surface. If your battery or mobile device has been subjected to such damage, take
it to a Motorola Authorized Service Center before using. Donotattempt to dry it with an appliance or heat source, such as a hair dryer or microwave oven.
Usecarewhenhandlingachargedbattery — particularly when placing it inside a pocket, purse, or other container with metal objects. Contact with metal objects (e.g., jewelry, keys, beaded chains) could complete an electrical circuit (short circuit), causing the battery to become very hot, which could cause damage or injury.
14 Section 1B. Phone Basics

Promptly dispose of used batteries in accordance with local regulations. Contact your local recycling center for proper battery disposal.
WARNING Never dispose of batteries in a fire because they may explode.
TurningYourPhoneOnandOff
TurningYourPhoneOn
Press and hold P for approximately two seconds.
As your phone connects to the network, you see a connecting message. Your phone may require you to enter identifying information to use it or to access specific features.
TurningYourPhoneOff
Press and hold P for two seconds until you see the powering down animation on the display screen.
Your screen remains blank while your phone is off (unless the battery is charging).
FeaturesofYourPhone
The i576 is easy to use, and reliable, and it offers many features and service options. This list previews some of those features and provides page numbers where you can find out more:
NextelDirectConnect provides instant, coast-to-coast 2-way “walkie-talkie-style” communication at the click of a button (page 36).
NextelDirectTalk allows for two-way radio communication “off the network” between two or more phones equipped with this capability (page 55).
TextMessaging(also known as Multimedia Messaging), provides quick and convenient messaging capabilities (page 152).
Built-in Speakerphone allows you to enjoy easy hands-free communication.
Games,ringers,screensavers,and other applications can be downloaded to make your phone as unique as you are (page 183). Additional charges may apply.
Phone Basics |
Section 1B. Phone Basics |
15 |
Your Contacts list allows you to store up to 600 entries, with several numbers or addresses per entry (page 98).
The built-in Datebook offers several personal information management features to help you manage your busy lifestyle (page 106).
The GPSEnabled feature works in connection with available location-based services (page 118).
WordEnglishTextInput lets you quickly type messages with one keypress per letter (page 21).
Bluetooth® capability that allows you to wirelessly connect to other Bluetooth enabled devices (page 135).
Speeddial lets you dial phone numbers quickly (page 35).
ViewingtheStatus Information
Your phone’s display screen provides information about your phone’s status and options. This list identifies the symbols you’ll see on your phone’s display screen:
abcBatteryStrength — A fuller battery indicates a defgreater charge.
gd
opq |
SignalStrength — More bars next to the |
rs |
antenna indicate a stronger signal. |
6NoService — Your phone is without service. You cannot make or receive any type of call.
APhoneInUse — Your phone is active on a phone call.
BDirectConnectInUse — Your phone is active on a Direct Connect call.
SGroupInUse — Your phone is active on a Group Connect call.
nDirectTalk — Your phone is off network and set to Direct Talk mode.
CTalkgroupInUse — Your phone is active on a Talkgroup call.
16 Section 1B. Phone Basics

BBluetoothInUse — Your phone is using Bluetooth. If this icon is blinking, then your phone is in discoverable mode. If this icon is static, your phone is active in a Bluetooth connection.
12ActivePhoneLine — 1 indicates phone line 1 is ready to make calls; 2 indicates phone line 2 is ready to make calls.
GLICallForward — Your phone is set to forward
calls. See “Call Forwarding” on page 174.
JHK
QRRingerOff — Your phone is set to not ring.
MSee “Vibrate All” on page 67.
uSpeakerOff — Direct Connect sound is set to come through the earpiece rather than through the speaker.
wxMessages — You have one or more messages. See “Message Center” on
Typage 148.
z
QRS TextInput — You are using one of the phone’s text entry methods. See “Selecting a Text
TUV Input Mode” on page 21.
WX
DEInternet — You are ready to browse the Internet or are browsing the Internet using a secure connection. See “Data Services” on page 180.
9Transmitters — Your phone is set not to receive calls and other transmissions. See “Temporarily Turning Off Transmissions (Airplane Mode)” on page 73.
YZ |
PacketData — You are ready to transfer |
|
packet data or are transferring packet data. |
|
See “Using Your Phone as a Modem” on |
|
page 183. |
NO |
TTY — You are ready to use your phone to |
|
make calls using a teletypewriter device. |
|
See “Telecommunications Relay Service” on |
|
page 177. |
Phone Basics |
Section 1B. Phone Basics |
17 |

7HearingAid — Your phone is set for use with a hearing aid and is active on a phone call. See “Using Your Phone With a Hearing Aid Device” on page 191.
cVoiceRecord — You have one or more voice records stored. See “Voice Records” on page 126.
NavigatingThroughPhoneMenus andOptions
The navigation key on your phone lets you scroll through menus quickly and easily.
To navigate through a list-type menu, simply press your navigation key up or down. The scroll bar at the right of the menu keeps track of your position in the menu at all times.
For a diagram of your phone’s menu, please see “Your Phone’s Menu” on page ii.
Many features provide context-sensitive menus that let you access related features and actions. This icon S
appears any time a context-sensitive menu is available. Press M to access the menu
Tip When scrolling through the main menu, it may be necessary to select More to view additional main menu options. Depending on which menu view you’re using, either highlight More and press r or press More (right softkey).
SelectingMenuItems
As you navigate through the menu, menu options are highlighted. Select an item by highlighting it and pressing r.
Forexample,toviewyourtextmessages:
1.Press M to access the main menu.
2.Select Messages by highlighting Messages and pressing r.
3.Select Inbox by highlighting it and pressing r.
(If you have any text messages, they are displayed.)
Note For the purposes of this guide, the above steps condense into “Press M > Messages > Inbox.”
18 Section 1B. Phone Basics
Loading...