


 Loading...
i410
User’s Guide

DECLARATION OF CONFORMITY
Per FCC CFR 47 Part 2 Section 2.1077(a)
Responsible Party Name: Motorola, Inc.
Address: 8000 West Sunrise Boulevard Plantation, FL 33322 USA
Phone Number: 1 (800) 453-0920 Hereby declares that the product: Product Name: i410
Model Number: H76XAH6JR7BN FCC-ID: IHDP56KR2
Conforms to the following regulations:
FCC Part 15, subpart B, section 15.107(a), 15.107(d) and section 15.109(a)
FCC Notice to Users
The following statement applies to all products that have received FCC approval. Applicable products bear the FCC logo, and/or an FCC ID in the format FCC-ID: IHDP56KR2 on the product label.
Motorola has not approved any changes or modifications to this device by the user. Any changes or modifications could void the user’s authority to operate the equipment. See 47 CFR Sec. 15.21.
Class B Digital Device
As a personal computer peripheral, this device complies with part 15 of the FCC Rules. Operation is subject to the following two conditions: (1) This device may not cause harmful interference, and (2) this device must accept any interference received, including interference that may cause undesired operation. See 47 CFR Sec. 15.19(3).
Note: This equipment has been tested and found to comply with the limits for a Class B digital device, pursuant to part 15 of the FCC Rules. These limits are designed to provide reasonable protection against harmful interference in a residential installation. This equipment generates, uses and can radiate radio frequency energy and, if not installed and used in accordance with the instructions, may cause harmful interference to radio communications. However, there is no guarantee that interference will not occur in a particular installation.
If this equipment does cause harmful interference to radio or television reception, which can be determined by turning the equipment off and on, the user is encouraged to try to correct the interference by one or more of the following measures:
•Reorient or relocate the receiving antenna.
•Increase the separation between the equipment and receiver.
•Connect the equipment into an outlet on a circuit different from that to which the receiver is connected.
•Consult the dealer or an experienced radio/TV technician for help.
Industry Canada Notice to Users
Operation is subject to the following two conditions: (1) This device may not cause interference and (2) This device must accept any interference, including interference that may cause undesired operation of the device. See RSS-GEN 7.1.5.
Motorola, Inc.
Consumer Advocacy Office 600 North US Highway 45 Libertyville, IL 60048
www.hellomoto.com
Note: Do not ship your phone to the above address. If you need to return your phone for repairs, replacement, or warranty service, please contact the Motorola Customer Support Center at:
1-800-453-0920 (United States)
1-877-483-2840 (TTY/TDD United States for hearing impaired)
Certain mobile phone features are dependent on the capabilities and settings of your service provider’s network. Additionally, certain features may not be activated by your service provider, and/or the provider's network settings may limit the feature’s functionality. Always contact your service provider about feature availability and functionality. All features, functionality, and other product specifications, as well as the information contained in this user's guide are based upon the latest available information and are believed to be accurate at the time of printing. Motorola reserves the right to change or modify any information or specifications without notice or obligation.
MOTOROLA and the Stylized M Logo are registered in the US Patent & Trademark Office. All other product or service names are the property of their respective owners. Java and all other Java-based marks are trademarks or registered trademarks of Sun Microsystems, Inc. in the U.S. and other countries.
© Motorola, Inc., 2009.
Manual Number: NNTN7813A
HELLOMOTO
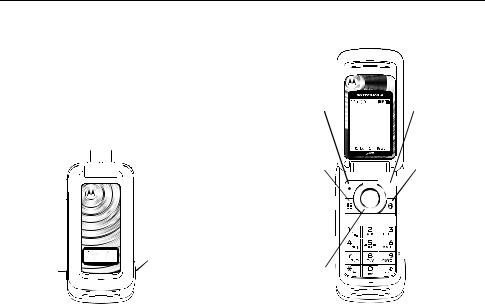
Introducing your new Motorola i410 phone. Here’s a quick anatomy lesson.
Speaker |
|
On/Off Key |
Smart Key |
Volume Keys
PTT Button
Audio Jack |
|
Micro USB |
|
||
|
Connector |
|
|
|
Connects charger |
|
|
and accessories. |
Left Soft Key |
10:05pm 10/23 |
Right Soft Key |
|
Ready |
|
Perform function |
|
Perform function |
in lower left |
|
in lower right |
display. |
|
display. |
|
Menu Key
From home screen, open main menu
Talk Key
Make & answer calls.
4-Way Navigation
Key
Web Key


 OK Key

 End/Power Key
End calls, exit
menu system,
turns phone on/off.
1

check it out
Ready |
Ready |
10:05pm 10/23 |
10:05pm 10/23 |
2 Customizable rkey
that can be used to open the
Settings screen
1 Press and hold the
Power Key @for a few seconds, or until the screen lights up, to turn on your phone.
3Press the Navigation Key up, down, left or right
to highlight a menu feature.
4Press the rkey to select.
2

contents
check it out . . . . . . . . . . . . 2 menu map . . . . . . . . . . . . . 5 use and care . . . . . . . . . . . 7 essentials . . . . . . . . . . . . . 8 about this guide . . . . . . 8 SIM card . . . . . . . . . . . . 9 battery . . . . . . . . . . . . . . 9 turn it on & off . . . . . . 12 enable security . . . . . 12 make a phone call . . . 13 answer a phone call . 13 make a private call . . 13 answer a private call 14
store a phone
number or private ID. 14 call a stored phone number or private ID. 15 your phone number and Private ID . . . . . . 16 text messages . . . . . . 16
3 contents
main attractions . . . . . . 21 media center . . . . . . . 21 PTX features . . . . . . . 22 one touch PTT. . . . . . 28 PT manager . . . . . . . . 29 MMS . . . . . . . . . . . . . . 29 Bluetooth® . . . . . . . . 44
basics . . . . . . . . . . . . . . . 48 display . . . . . . . . . . . . 48 text entry . . . . . . . . . . 49 volume . . . . . . . . . . . . 51 navigation key. . . . . . 52 handsfree speaker . . 52 transmitters . . . . . . . . 52 features for the
hearing impaired. . . . 53 calls. . . . . . . . . . . . . . . . . 55 recent calls . . . . . . . . 55 redial. . . . . . . . . . . . . . 56 voice names . . . . . . . 56 caller ID . . . . . . . . . . . 57
call forward . . . . . . . . 57 emergency calls . . . . 58 international calls . . . 58 speed dial . . . . . . . . . . 59 turbo dial . . . . . . . . . . . 59 voice mail . . . . . . . . . . 60
customize. . . . . . . . . . . . . 61 ring tones . . . . . . . . . . 61 wallpaper . . . . . . . . . . 62 backlight . . . . . . . . . . . 63 datebook . . . . . . . . . . . 63 hide or show
location information . 64 other features . . . . . . . . . 65 advanced calling . . . . 65 contacts . . . . . . . . . . . 66 datebook . . . . . . . . . . . 66 GPS . . . . . . . . . . . . . . . 67 handsfree . . . . . . . . . . 68 personalize . . . . . . . . . 69 pc applications. . . . . . 69
TTY . . . . . . . . . . . . . . . . 69 security . . . . . . . . . . . . 70
Legal and Safety. . . . . . . 71
Safety and General Information . . . . . . . . . 71 Operational Precautions . . . . . . . . 72 RF Energy Interference/ Compatibility. . . . . . . . 72 Bluetooth . . . . . . . . . . 73 Caring for the Environment by Recycling . . . . . . . . . . 74 Driving Precautions . 74 Operational
Warnings. . . . . . . . . . . 74 Service and Repairs . 76 Export Law
Assurances . . . . . . . . 77 Battery Use
and Safety. . . . . . . . . . 77 Battery Charging . . . . 79 Specific Absorption Rate . . . . . . . . . . . . . . . 79
AGPS and |
|
Smart Practices |
|
Emergency Calls. . . . |
80 |
While Driving . . . . . . . |
87 |
Motorola Limited |
|
index. . . . . . . . . . . . . . . . . |
89 |
Warranty for the |
|
|
|
United States |
|
|
|
and Canada . . . . . . . . |
81 |
|
|
Hearing Aid |
|
|
|
Compatibility With |
|
|
|
Mobile Phones . . . . . |
84 |
|
|
Information From |
|
|
|
the World Health |
|
|
|
Organization . . . . . . . |
85 |
|
|
Product Registration |
85 |
|
|
Wireless: The New |
|
|
|
Recyclable . . . . . . . . . |
86 |
|
|
California |
|
|
|
Perchlorate Label. . . |
86 |
|
|
Patent and |
|
|
|
Trademark |
|
|
|
Information . . . . . . . . |
86 |
|
|
Software Copyright |
|
|
|
Notice. . . . . . . . . . . . . |
86 |
|
|
Privacy and Data |
|
|
|
Security . . . . . . . . . . . |
87 |
|
|
|
|
contents |
4 |
main menu
p Call Alert
LJava Apps.
•Java System
u Settings
•(see next page) t Ring Tones
•Vibrate All: On/Off
•Ringer
•Vibrate
•Silent
cGPS
•Position
•Privacy
•Interface
PCall Forward
D Datebook
l Memo
1 Net
JMy Info
•My Name
•Line 1
•Private ID
•Group ID
•Carrier IP
•IP1 Address
•IP2 Address
•Circuit Data
menu map
0VoiceRecord
•[New VoiceRec]
BRecent Calls
j Media Center
KShortcuts
•[New Entry]
•1)Shortcuts
•2)Cntcs[New Contact]
•3)Recent Calls
•4)Contacts
•5)Datebook
•6)Messages
•7)VoiceRecord
•8)Net
•9)Call Forward
AContacts
•[New Contact]
o Profiles
MCall Timers
•Last Call
•Phone Reset
•Phone Lifetime
•Prvt/Grp Reset
•Prvt/Grp Life
•Circuit Reset
•Circuit Lifetime
•Kbytes Reset
NPT Manager
•Quick PTT
•Send Message
•Send Picture
•Send Event
•Send My Info
•Send Contact
•Configure
EMessages
•[Create Message]
•[Create Txt Msg]
•[Create MMS Msg]
•Voice Mail
•Inbox
•Drafts
•Outbox
•Net Alert
C Bluetooth
•Hands Free
•Link to Devices
•Device History
•Setup
•Find Me
This is the standard Main Menu layout. Your phone’s menu may be a little different.
menu map |
5 |
settings menu
Display/Info
•Wallpaper
•Text Size
•Theme
•Home Icons
•Backlight
•Clock
•Menu View
•Large Dialing
•Language
Phone Calls
•Set Line
•Any Key Ans
•Auto Redial
•Call Waiting
•Auto Ans
•Flip Activation
•Minute Beep
•Call Duration
•TTY
•Hearing Aid
•Notifications
•DTMF Dialing
•Prepend
2-Way Radio |
Security |
|||
• |
Tkgrp Silent |
• |
Phone Lock |
|
• |
Tkgrp Area |
• |
Keypad Lock |
|
• |
One Touch PTT |
• |
SIM PIN |
|
• |
Alert Type |
• |
GPS PIN |
|
• |
PTT Quick Notes |
• |
Change Passwds |
|
• |
On/Off PTT |
Advanced |
||
• |
Store Rcvd Info |
|||
• |
Alert Timeout |
|||
Personalize |
• |
Headset/Spkr |
||
• |
Menu Options |
• |
Connectivity |
|
• |
Up Key |
• |
Reset Defaults |
|
• |
Down Key |
• |
Return to Home |
|
• |
Left Key |
• |
Transmitters |
|
• |
Right Key |
• |
Baud Rate |
|
•Center Key
•Left Sftkey
•Right Sftkey
•Power Up
Volume
•Line 1
•Messages
•Earpiece
•Speaker
•Keypad
•Java Earpiece
•Java Spkr
•Data
6 menu map
use and care
To care for your Motorola phone, please keep it away from:
liquids of any kind
Don’t expose your phone to water, rain, extreme humidity, sweat, or other moisture. If it does get wet, don’t try to accelerate drying with the use of an oven or dryer, as this may damage the phone.
extreme heat or cold
Avoid temperatures below 0°C/32°F or above 45°C/113°F.
dust and dirt
Don’t expose your phone to dust, dirt, sand, food, or other inappropriate materials.
cleaning solutions
To clean your phone, use only a dry soft cloth. Don’t use alcohol or other cleaning solutions.
microwaves |
the ground |
Don’t try to dry your phone in a |
Don’t drop your phone. |
microwave oven. |
|
7

essentials
Caution: Before using the phone for the first time, read the Important Safety and Legal information included in the gray edged pages at the back of this guide.
about this guide
This guide shows how to locate a menu feature as follows:
Find it: /> Settings
This means that, from the home screen:
1Press the menu button /to open the
Main Menu.
2Press the navigation key to scroll to
Settings.
3 Press the rto select it.
symbols
This means a feature is network/ subscription dependent and may not be available in all areas. Contact your service provider for more information.
This means a feature requires an optional accessory.
8 essentials
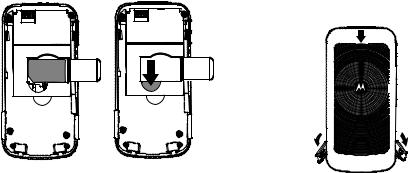
SIM card
insert the SIM card
Turn off your phone and remove your battery before you install or remove a SIM card.
Carefully slide the SIM card into your phone, until it lies flat in the SIM card slot.
Warning: To avoid loss or damage, do not remove your SIM card from your phone unless absolutely necessary.
battery
battery installation
1Open the micro-USB and headphone jack connector covers. Slide the battery door down until it is released.
essentials 9
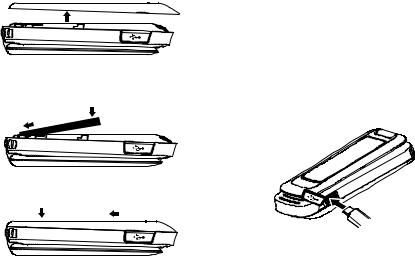
2Remove battery door.
3Insert battery as shown below. Push the battery down until it snaps in place.
battery charging
New batteries are not fully charged.
Note: See “Battery Use and Safety” on page 77.
charge using the charger
1Pull out the connector cover, and insert the charger into the accessory connector on your phone as shown.
4 Replace the battery door.
2 Plug the other end of the charger into the appropriate electrical outlet.
When you charge the battery, the battery level indicator at the upper right of the screen shows charging progress. At least one
10 essentials

segment of the indicator must be visible to ensure full phone functionality while charging.
charge from your computer
You can partially charge your phone’s battery by connecting a Motorola-approved
USB cable from your phone’s micro-USB port to a high power USB connector on a computer (not a low-power one, such as the USB connector on your keyboard or bus-powered USB hub). Typically, USB high-power connectors are located directly on your computer.
Note: The phone will be charged at a slower rate than it is charged with the rapid charger.
Your computer must be turned on, and you must have correct software drivers installed on your computer. If the Phone is off when the USB cable is connected between the computer and the phone, the phone will
power up in charging mode. This mode allows the phone to charge fastest and quickest.
Note: If the battery is very low, the phone will not turn On, but it will continue to charge at a low rate. The phone will power up in charging mode when the battery has been charged to approximately 5% of its capacity. For faster charging under a very low battery condition, it is recommended to use the rapid charger supplied with the handset.
If the phone is turned on while charging from a computer, it will not fully charge the battery. In this case, the battery charge will be maintained approximately between 80% and 95% of the battery's capacity. Cables and software drivers are available in Motorola OriginalTM data kits, sold separately.
Tip: Motorola batteries have circuitry that protects the battery from damage from overcharging. Of course, unplugging the
essentials 11

charger from the wall will prevent the battery from overcharging.
battery indicators
d |
The battery is at approximately 100% |
|
to 90% capacity when the indicator is |
|
blue and displaying three bars. |
e |
The battery is at approximately 65% |
|
capacity when the indicator is green |
|
and displaying two bars. |
f |
The battery is at approximately 10% |
|
capacity when the indicator is yellow |
|
and displaying one bar. |
g |
The battery is at approximately 5% |
|
capacity when the indicator is red |
|
and has a flashing red bar. |
h |
The battery is charging. |
turn it on & off
To turn on your phone, press and hold @for a few seconds or until the display turns on.
To turn off your phone, press and hold @for two seconds.
Note: If you press @for more than four seconds, the handset will power “On” on “Transmitter Off” mode. See “transmitters” on page 52.
enable security
You must enable security the first time you power on you phone or within 10 days of first activation.
1 Press - under Ok.
12 essentials
2You are prompted to enable security. Press - under Yes. A series of screens followed by the default home page displays.
3Press @to return to the home screen.
make a phone call
Enter a phone number and press `to make a call or use a voice name. See “voice names” on page 56.
Note: For best call quality avoid covering the antenna with your hand.
To hang up press @.
answer a phone call
When your phone rings and/or vibrates, you have the following options to answer:
1If you want to answer the call on the handsfree speaker phone, press the speaker key s with the flip closed. To hang up press the smart key (.
2If you want to answer the call using the handset, just open the flip and press `. To hang up press @or close the flip.
Note: You must have the Flip Activation feature On. See “advanced calling” on page 65.
make a private call
With Private calls service, you use your phone as a long-range, digital 2-way radio using one- to-one Private calls.
Your Private ID is the number at which you receive one-to-one Private calls.
Note: PTT means Push to Talk / Walkie-Talkie.
essentials 13
To make a private call
1Enter the Private ID you want to call.
2Press and hold the PTT button. Begin talking after your phone emits a chirping sound.
3Release the PTT button to listen. To end the call press @.
Note: A Private call ends automatically if there is no activity on the call for a few seconds.
Tip: To let someone know you want to talk to them on a Private call, press - under Alert.
answer a private call
1When your phone emits a chirping sound or vibrates to indicate you are receiving a Private call, wait for the caller to finish speaking.
2Press and hold the PTT button and begin talking after your phone emits a chirping sound.
3Release the PTT button to listen. To end the call press - under Exit.
store a phone number or private ID
You can store a phone number or Private ID in
Contacts:
1Press /> Contacts > [New Contact].
2Enter a name for the new entry. Each entry’s name can contain up to 20 characters.
3Select Ringer if you wish to assign a specific ring tone to that phone number.
14 essentials
4Select a type for the entry (Mobile, Private,
Work1, Work2, Home, Email, Fax, Pager, IP or Other). To store a Private ID, choose Private.
5Enter the number for the entry and press - under Done to save the entry.
Tip: Before saving the entry, you can save more information. You can store E-mail addresses, or IP addresses. You can assign each number a speed dial number and voice name.
After you have saved the number, the new Contacts entry is displayed.
call a stored phone number or private ID
Shortcut: From the home screen press - under Contcs
or
Find it: /> Contacts
1Scroll to the Contacts entry.
Tip: By pressing the first letter of the name of the Contacts you want, you will be taken to all the contact names starting with the letter you pressed.
2If the Contacts entry contains more than one number, scroll left or right until the type of the number you want to call is displayed (Mobile, Private, Work1, Work2, Home, etc.).
3If you choose a phone number, press ` to call the entry.
or
If you choose a Private ID press and hold the PTT button to call the number.
Tip: If the Contacts entry you scrolled to contains a Private ID, you can make an instant Private call to that Private ID by pressing and
essentials 15

holding the PTT button, even if the Private ID is not the type of number displayed.
your phone number and Private ID
Find it: /> My Info
Tip: Want to see your phone number or Private ID while you’re on a call? Press />
My Info.
text messages
If your service provider offers text messaging, your phone sends text messages using Mobile Originated Short Messaging Services (MOSMS) and receives text messages from other phones that are using MOSMS.
Note: The messaging menus may look slightly different, depending on the messaging setup of your phone.
set it up
Before you begin using text messaging, you may need to set up your signature, service center number, and expiration information.
Shortcut: From the home screen press - under Msgs > /> Text Msg Setup.
or
Find it: /> Messages > /> Text Msg Setup
The following options become available:
option
Signature: Enter your signature (up to 11 characters long).
Delivery Rpt: Set this option to On if you want your phone to show you when the message has been delivered.
16 essentials
option
Srvc Cntr No: Enter the phone number of your service center. If you do not know this number, contact your service provider.
Expire After: This is the amount of time messages you send are saved at the service center if they cannot be delivered. After this period, they are discarded.
Scroll to select the number of days you want your messages to be saved.
Cleanup: Controls how long messages remain in the Inbox and Outbox before they are deleted. See “cleanup” on page 42.
Quick Notes: Quick notes are short, pre-written text messages that you can create, edit, and send in your text messages. You can store up to 20 quick notes. A quick note may be up to 30 characters long.
You can create a [New Note] or press -under Edit to change the pre-written quick notes.
Press - under Done to save the information you entered.
receive a text message
1To view the message press - under Read.
2To dismiss the message notification press - under Exit.
Note: If your phone is powered off when you receive a text message, your phone notifies you the next time you power it on. If you are out of your coverage area, your phone alerts you when you return to your coverage area.
Tip: While reading a text and numeric message that contains a phone number, you can press `to call that number.
read from the message center
1From the home screen press - under
Msgs > Inbox > Text Inbox.
essentials 17
2Select the message you want to read or press the number of the message you want to read. If the message fills more than one screen, scroll to read it.
Tip: Scrolling through one message lets you view the next message.
3To reply to the message, press - under Reply or to see all other choices, including forwarding and deleting the message, calling the sender, or storing the sender’s number in Contacts, press /.
create and send text messages
1From the home screen press - under
Msgs > [Create Message] > [Create Txt Msg]. or
Select Inbox > Text Inbox, or Outbox > Text Outbox, or Drafts > Text Draft.
2To address the message use the keypad to enter the phone number of the person
you want to send the message to and press r.
or
Press - under Browse, and select Recent Calls, Contacts or Memo to find the number you want.
3Select Msg and enter the text of the message or to use a quick note press - under Browse and scroll to the quick note you want.
4Press /> Set Send Method and select Text, Fax, x400, Paging, Email, ERMES, or Voice.
5If you want to send the message, press - under Send or to delete the message without sending it, press - under Cancel.
Note: If you want to request confirmation of delivery press /> Delivery Report > On.
18 essentials
use drafts
When you save a message as a draft, it is saved in the drafts folder.
Shortcut: From the home screen press - under Msgs > Drafts > Text Draft.
1Select the draft you want to edit. You also have the choice to create new text messages from this menu.
2To edit the fields you want to change, follow step 2 through step 5 in “create and send text messages” above.
resend text messages
Shortcut: From the home screen press - under Msgs > Outbox > Text Outbox.
1Scroll to the message you want to resend or press the number of the message you want to resend.
2Press - under Resend.
delete sent text messages
Shortcut: From the home screen press - under Msgs > Outbox > Text Outbox.
1Scroll to the message you want to delete.
2Press - under Delete.
3Press - under Yes to confirm.
delete all unlocked sent messages
Shortcut: From the home screen press - under Msgs > Outbox > Text Outbox.
1Press /> Delete All.
2Press - under Yes to confirm.
go to a website
If a message contains one or more website URLs, you can go to that website. See “go to a website” on page 38.
essentials 19
manage memory
Your text inbox, outbox, and drafts folder have a set amount of memory available for storing messages.
The text inbox holds 20 messages. If the text inbox is full, you cannot receive messages until you delete some.
The outbox and drafts folder share memory space. Together they can hold 30 messages. If the outbox and drafts folder memory is full, you cannot send messages or save drafts until you delete some.
To view the amount of memory available in your text inbox:
Shortcut: From the home screen press - under Msgs > /> Text Msg Setup > Mem Mtr-Inbox.
To view the amount of memory available in your outbox and drafts folder:
Shortcut: From the home screen press - under Msgs > /> Text Msg Setup > Mem Mtr-Other.
20 essentials

main attractions
media center
The media center lets you access pictures and audio recordings stored in your phone’s memory.
The following audio recordings can be accessed through the media center:
•Voice records
•Musical ring tones in the list of ring tones
•Audio recordings saved from MMS messages received
•Audio recordings downloaded to your phone
Items in the media center can be sent in MMS messages. See “MMS” on page 29.
Pictures in the media center can be sent in Private calls using Send via PTT.
Audio files supported by the Media Center include:
Format |
Sampling Rates/Bit Rates |
|
|
|
|
.au |
8 |
KHz/8 kbps |
|
|
|
.midi |
8 |
KHz, Type 0 |
|
|
|
.mp3 |
8 KHz/8 kbps |
|
|
|
|
.wav |
8 |
KHz/64 kbps |
|
|
|
Note: Stereo audio files are not supported by the Media Center.
main attractions |
21 |

Image files supported by the Media Center include:
Format |
Max. Image Size (in pixels) |
.png |
640 x 480 |
|
|
.gif |
640 x 480 |
|
|
.jpg |
640 x 480 |
|
|
.wbmp |
127 x 127 |
|
|
PTX features
With Push To View features, your phone 
 can send and receive the following
  items through Private calls with other phones that have this capability:
•Short text messages
•Pictures
•Datebook events
•My Info
• Contact information
You can choose to send My Info and contact information to any Private ID.
You can choose to send pictures, messages, events to the Private ID you are engaged in a a Private call with, Private IDs on the Recent Calls list, and Private IDs stored in Contacts.
When you make or receive a Private call, your phone automatically determines whether the phone you are engaged in a Private call with is able to receive each of these items. Your phone saves this information for as long as the Private ID is on your Recent Calls list or is saved in your Contacts. Your phone updates the saved information each time you make or receive a call to or from that Private ID.
You can turn your phone’s ability to send and receive messages, pictures, events on and off.
22 main attractions

send messages
The Push to Send Messages feature lets you send short text messages through Private calls.
When you send a message, it appears on the display of the phone you are engaged in the Private call with. The message won’t be stored in the recent calls list.
begin a message and choose a recipient
You can begin a message during a Private call, from the Contacts list, the Recent Calls list, or from the PT Manager.
begin a message during a Private call:
While in a Private call, press />
Use PTT Feature > Send Message.
begin a message from the Contact or the Recent Calls list
1From the Contacts or the Recent Calls list, select the entry containing the Private ID you want to send the message to.
2Press /> Use PTT Feature > Send Message.
begin a message from the PT Manager
The PT Manager lets you select the Private ID you want to send the message to from Contacts or the Recent Calls list.
Find it: /> PT Manager > Send Message
Then select A Contact or A Recent Call to see a list of entries from the Contacts or the Recent Calls list that can receive messages.
create messages
After you have begun a message and chosen a recipient, a screen appears that lets you create the text of the message you want to
main attractions |
23 |

send. Your message may be up to 400 characters long.
You can choose from a list of ready-made words or short phrases called Quick Notes. You can use a Quick Note as it is or edit it before you send it. Editing a Quick Note changes the Quick Note for this message only and will not change the Quick Note on the list.
send a completed message
After you have completed your message, press the PTT button to send it.
receive messages
When you receive a message, a message notification appears on the display. To view the message press r.
To dismiss the message press - under
Dismiss.
reply to a message
1View the message.
2Press - under Reply.
3Create the message and press the PTT button to send it.
send pictures
You can send pictures stored in Media Center through Private calls. The picture you send appears on the Private call recipient’s display.
If the recipient accepts the picture, their phone saves the picture.
The first time you send a stored picture after turning the phone on, Picture Fees May Apply. Continue? appears and you are prompted to respond.
Note: You cannot make or receive Private calls while transmitting or receiving a picture.
24 main attractions
send a picture during a call
1While in a Private call, press - under
Picture or press /> Use PTT Feature > Send Picture.
A list of pictures that can be included in a Private call appears.
2Select the picture you want to send.
3Press the PTT button to send the picture.
4Wait while the picture is transmitted. The Private call is temporarily interrupted while a picture is transmitted.
5When prompted, press the PTT button to resume the Private call.
start a call by sending a picture
from Media Center
Find it: /> Media Center
1 Select the picture you want to send.
2Press /> Send Via... > Send via PTT.
A list of contacts that have Private IDs and are able to receive pictures appears.
3Select the name of the person you want to send the picture to.
4Press the PTT button to send the picture.
5When prompted, press the PTT button to resume the Private call.
from the PT Manager:
Find it: /> PT Manager > Send Picture
1Select A Contact, or A Recent Call to see a list of entries that can receive pictures.
2Select the entry containing the Private ID you want to send the message to.
3Select the picture you want to send.
4Press the PTT button to send the picture.
main attractions |
25 |
5Once picture has been sent, when prompted press the PTT button to resume the call.
receive a picture
When someone sends you a picture, your phone emits a tone or vibrates and a message appears asking if you want to accept the picture.
Pictures you receive are saved to your phone’s memory. They are accessible through Media Center.
When you see a message asking if you want to accept the picture, press Yes to accept or No to decline.
Tip: If you want to stop the transmission before it is finished, press @.
Note: The first time you accept a stored picture after turning the phone on, Picture Fees May Apply. Continue? appears and you are
prompted to respond. Press - under Yes to accept the picture.
clear a picture from the display
If you want to clear a picture from your phone’s display while still on a call, press
/> Clear Screen.
The picture will not appear on the display again the next time you receive a call from person who sent it. This does not delete the picture from Media Center.
send My Info
1While in a Private Call press /> Send via PTT, and push the PTT button to send.
or
2From the home screen press />
My Info > /> Send via PTT and push the PTT button to send.
26 main attractions
Loading...