


CFJN2975B - 01/2007
MOTOROLA and the Stylized M Logo are registered in the US Patent & Trademark Office. All other product or service names are the property of their respective owners. The Bluetooth wordmark and logos are owned by the Bluetooth SIG, Inc. and any use of such marks by Motorola, Inc. is under license. Other trademarks and trade names are those of their respective owners. Printed in the EU.
© 2007 Motorola, Inc. All rights reserved.

®


 H350
H350
CFJN2975B - 01/2007
ark ive nc. rks
H350
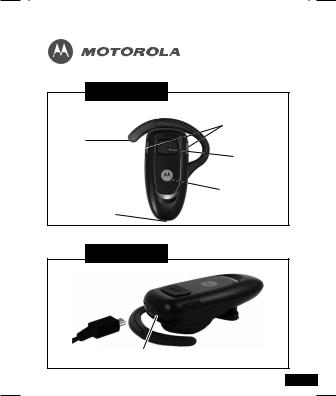
Figure 1 |
2 |
1 |
3 |
4 |
5 |
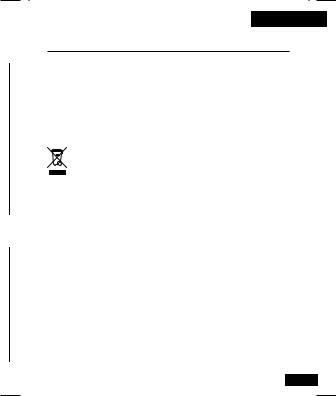
Figure 2
Charging
Port
1

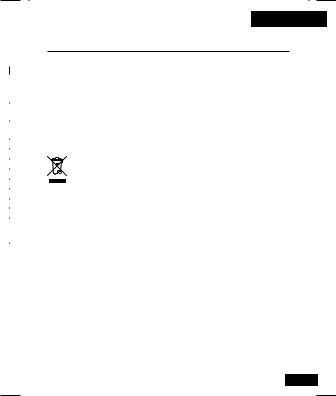
Figure 3 |
Figure 4
2 |
English
General and safety information
European Union Directives Conformance Statement
Hereby, Motorola Inc., declares that this H350 is in compliance with the essential requirements and other relevant provisions of Directive 1999/5/EC.
You can view your product's Declaration of Conformity (DoC) to Directive 1999/5/EC (the R&TTE Directive) at www.motorola.com/rtte.
Caring for the Environment by Recycling
When you see this symbol on a Motorola product, do not dispose the product with household waste.
Recycling Mobile Phones and Accessories
Do not dispose of mobile phones or electrical accessories, such as chargers or headsets, with your household waste. In some countries or regions, collection systems are set up to handle electrical and electronic waste items. Contact your regional authorities for more details. If collection systems aren’t available, return unwanted mobile phones or electrical accessories to any Motorola Approved Service Centre in your region.
FCC Notice to Users
Users are not permitted to make changes or modify the device in any way. Changes or modifications not expressly approved by the party responsible for compliance could void the user’s authority to operate the equipment. See-47-CFR-Sec.-15.21.
This device complies with part 15 of the FCC Rules. Operation is subject to the following two conditions: (1) This device may not cause harmful interference, and (2) this device must accept any interference received, including interference that may cause undesired operation. See-47-CFR-Sec.-15.19(3).
3

English
Initial set up
Welcome to the world of Motorola digital wireless communications! We are pleased that you have chosen the Motorola H350 Bluetooth® Handsfree Headset.
Before you begin
Take a moment to familiarize yourself with your H350 headset.
See figure 1 on page 1.
1 Earhook
2 Volume buttons
3 Call button
4 Blue indicator light
5 Microphone
Charging your headset
See figure 2 on page 1
First time use: Charge your headset for 2 hours.
Recharging: When you hear 5 rapid high tones through the headset speaker repeated at 60-second intervals, the headset battery needs to be recharged.
Note: the headset is not functional while charging.
The rechargeable battery that powers this product must be disposed of properly and may need to be recycled. Contact your local recycling center for proper disposal methods. Never dispose of batteries in fire because they may explode.
Wearing the headset
You can wear your H350 headset on your left of right ear. The headset comes ready for the right ear.
Placing the headset on your ear: refer to figure 3 on page 2 Placing the headset on the left ear: refer to figure 4 on page 2
•Open the earhook 90°
•Detach the earhook from the hinge pin.
4

English
Changing volume button orientation
If you change your headset to wear it on the other ear, you can also change the orientation of the volume buttons.
1 Turn the headset power off
2Press the Call button and the volume button you want to assign as the “volume” up button until the indicator light flashes twice.
The headset power turns on.
Pairing your headset and phone
Your phone’s Bluetooth feature is off by default. Make sure the Bluetooth feature is permanently turned on in your phone. Please check your phone’s user’s guide.
Before you can use your headset, you must pair (link) it with your phone.
1.With the headset power off, press and hold the Call button for 5 seconds until the indicator light turns on and remain steadily lit.
If the indicator light is flashing or does not remain steadily lit, turn off the headset and repeat this step.
2.Perform a device discovery (or scan) from the phone. For details about device discovery, consult your phone’s user’s guide. The phone lists Bluetooth devices it finds.
3.Select Motorola H350 in the list of discovered devices and confirm by following the on-screen prompts.
4.When prompted by the phone, enter the passkey 0000 and confirm.
When your headset successfully pairs with your phone, the indicator light changes from steadily to flashing blue.
After you have successfully paired your phone and headset, you do not need to repeat these steps each time you use the headset.
5

English
Test and use
Your phone and headset are now paired and ready to make and receive calls. To confirm they are successfully paired and operating properly, make a call from you phone. You will hear ringing from the headset.
Paired link to additional devices
Your headset can store pairing information for up to 8 different devices in chronological order. When an attempt to pair to more than 8 devices is made, the oldest paired device is removed from the list.
The headset will automatically initiate a connection with the last device it was connected to either by powering up the headset or by pressing the Call button. If you want to connect the headset to another device in the paired device list, you must initiate the connection from that device. Whichever of the 8 devices initiates a connection to the headset afterwards, that device then becomes the “last connected” device.
6

English
Using your headset
Turning your headset on & off
To turn your headset on, press and hold the Call button until the indicator light flashes rapidly. Then, release the button.
To turn you headset off, press and hold the Call button until the indicator light flashes rapidly and then turns off.
Making & receiving calls
Function |
Action |
|
Receive a call |
Tap the Call button |
|
|
|
|
End a call |
Tap the Call button |
|
Reject a call |
Press and hold the Call button until you hear a |
|
|
|
beep |
|
|
|
|
Redial last call |
Press and hold the Call button until you hear a |
|
|
beep |
|
|
|
|
Make a voice dial call |
Tap the Call button and speak the name after |
|
|
the tone |
|
|
|
|
Transfer a call from the phone to the |
Tap the call button |
headset |
|
|
|
|
|
Answer a second incoming call |
Press and hold the Call button until you hear a |
|
Put active call on hold |
beep (The 1st call is placed on hold). |
|
Toggle between two active calls |
Press and hold the Call button until you hear a |
|
|
|
beep |
|
|
|
|
Join a 3 way call (note: feature is |
Press and hold both volume buttons |
phone/network dependent) |
|
|
|
|
|
Disable or enable the indicator light |
Press and hold both volume button for 3 to 4 |
|
|
|
seconds |
|
|
|
|
Mute or un-mute a call |
Tap both Volume buttons |
Your headset supports both hands-free and headset profiles. Accessing call functions depend upon which profile your phone supports. See your phone’s user’s guide for more information.
7

English
Indicator lights
The indicator light provides information about your headset status.
With the charger plugged in:
Headset indicator |
Headset status |
On (steady) |
Charge in progress |
|
|
Off |
Charging complete |
With no charger plugged in:
Headset indicator |
Headset status |
Off |
Power off |
|
|
On (steady) |
Pairing mode |
10 rapid flashes |
Pairing successful |
Quick flash |
Standby (not on a call) |
Slow pulse |
Connected (on a call) |
Note: after 5 minutes of inactivity, the light stop flashing to conserve power, but the headset is in standby mode. Any button press on the headset will re-awaken the headset and the flashing resumes.
8
English
Audio tones
The audio tones provide information about your headset status.
Audio tone |
Headset status |
Single high tone when pressing |
Volume at minimum or maximum |
volume button |
|
5 rapid high tones repeated |
Low battery |
every 60 seconds |
|
No audio indications: deteriorating quality |
Out of range |
Ring tone |
Incoming call |
Single high tone |
Pairing confirmation |
Single low tone |
Voice activation |
Dual high/low tone |
Voice tag not recognized |
Single high tone |
End call |
Low to high tone |
Phone network not available |
2 ascending tones |
Mute enabled |
2 descending tones |
Mute disabled |
Troubleshooting
My phone does not find my headset: make sure the blue light on your headset is steadily lit when you phone is searching for devices
My headset worked before but now it is not working: Make sure the Bluetooth feature is turned on in your phone. If the Bluetooth feature has been turned off or was turned on temporarily, you may need to restart the Bluetooth feature and pair your phone and headset again.
If you have any additional questions, please call your hotline number (0870-9010-555) or visit us at www.hellomoto.com.
9

Français
Informations générales
Déclaration de conformité aux directives de l’Union Européenne
Par la présente Motorola Inc., déclare que l’appareil H350 est conforme aux exigences essentielles et aux autres dispositions pertinentes de la directive 1999/5/EC.
Vous pouvez consulter la Déclaration de conformité de votre produit à la Directive 1999/5/EC (la Directive R&TTE) à l'adresse www.motorola.com/rtte.
Protection de l'environnement par le recyclage
Lorsqu'un produit Motorola arbore ce symbole, ne le jetez pas dans votre poubelle.
Recyclage des téléphones portables et accessoires
Ne jetez aucun téléphone portable ou accessoire électrique, comme un chargeur ou un kit piéton, dans votre poubelle. Des systèmes de collecte permettant de traiter les déchets électriques et électroniques sont progressivement mis en place. Renseignez-vous localement pour plus d'informations. En l'absence de système de collecte, renvoyez les téléphones portables et accessoires électriques à l'un des Centres de Service agréé par Motorola le plus proche.
Avis aux utilisateurs
L’utilisateur n’a le droit d’apporter ni changement ni modification à l’appareil, de quelque façon que ce soit. Le droit de l’utilisateur de faire usage de l’appareil peut être annulé par des changements ou modifications non expressément approuvés par l’entité en charge de la conformité de l’appareil aux normes. Voir 47 CFR Sec.15.21.
Cet appareil est conforme à la clause 15 des règlements de la FCC. Son fonctionnement est sujet aux deux conditions suivantes : (1) cet appareil ne doit pas causer d’interférence nuisible, et (2) cet appareil doit accepter toute interférence, y compris l’interférence pouvant causer un fonctionnement inapproprié. Voir 47 CFR Sec.15.19 (3).
10

Français
Mise en route initiale
Bienvenue dans le monde de la communication sans fil numérique de Motorola ! Merci d'avoir choisi l'oreillette Bluetooth® Motorola H350.
Avant-propos
Prenez le temps de vous familiariser avec votre oreillette H350.
Voir schéma 1, page 1.
1.Attache d'oreille
2.Boutons de contrôle du volume
3.Bouton d'appel
4.Voyant lumineux bleu
5.Microphone
Mise en charge de l'oreillette
Voir schéma 2, page 1.
Utilisation initiale : chargez l’oreillette pendant environ 2 heures. Recharges ultérieures : il convient de recharger la batterie de l'oreillette lorsque vous entendez 5 bips rapides dans l'écouteur toutes les 60 secondes.
Note : l'oreillette ne fonctionne pas en cours de chargement.
La batterie, une fois usagée, peut être recyclée. Mettez-la au rebut en respectant les spécifications de protection de l’environnement en vigueur. À cet égard, contactez le centre de recyclage le plus proche pour vous informer des dispositions à prendre. Ne jamais exposer de batteries au feu afin d'éviter tout risque d'explosion.
Port de l'oreillette
Vous pouvez porter l'oreillette H350 sur l'une ou l'autre des oreilles. Par défaut, l'oreillette est configurée pour être portée à l'oreille droite.
Pour porter l'oreillette à l'oreille droite : voir schéma 3, page 2. Pour porter l'oreillette à l’oreille gauche : voir schéma 4, page 2.
•Ouvrez l'attache d'oreille à 90°.
•Retirez l'attache d'oreille de la charnière.
11

Français
Modification de l'orientation des boutons de contrôle du volume
Si vous montez votre oreillette de façon à la porter sur l'autre oreille, vous pouvez également modifier l'orientation des boutons de contrôle du volume.
1 Éteignez l'oreillette.
2Appuyez sur le bouton d'appel et sur le bouton de contrôle du volume que vous souhaitez définir comme bouton d'augmentation du volume. Attendez que le voyant lumineux clignote deux fois. L'oreillette s'allume.
Couplage de l'oreillette et du téléphone
Par défaut, la fonction Bluetooth de votre téléphone est désactivée. Assurez-vous que la fonction Bluetooth de votre téléphone est activée en permanence. Consultez le manuel d'utilisation de votre téléphone.
Avant de pouvoir utiliser votre oreillette, vous devez la coupler à votre téléphone.
1.Mettez l'oreillette hors tension, appuyez sur le bouton d'appel et maintenez-le enfoncé pendant 5 secondes jusqu'à ce que le voyant lumineux reste allumé en permanence.
Si le voyant clignote et ne reste pas allumé de façon permanente, éteignez l'oreillette et recommencez l'opération.
2.À partir de votre téléphone, faites une recherche de votre oreillette Bluetooth (pour plus d’informations sur la recherche de périphériques, consultez le manuel d'utilisation de votre téléphone). Le téléphone indique les périphériques Bluetooth trouvés.
3.Sélectionnez Motorola H350 dans la liste des périphériques découverts et confirmez en suivant les instructions à l'écran du téléphone.
4.Entrez le code d'accès "0000" lorsqu'il est demandé par le téléphone puis confirmez.
Le couplage de l’oreillette au téléphone est confirmé lorsque le voyant lumineux passe d’une lumière continue à des clignotements rapides bleus.
Une fois le couplage de l'oreillette et du téléphone terminé, il n'est pas nécessaire de répéter ces opérations à chaque utilisation de l'oreillette.
12

Français
Test et utilisation
Le couplage de l'oreillette et du téléphone est terminé ; vous pouvez émettre et recevoir des appels. Afin de vérifier le bon fonctionnement de l'oreillette et du téléphone, émettez un appel depuis votre téléphone. Vous devez entendre une sonnerie dans votre oreillette.
Lien de couplage avec d'autres périphériques
Votre oreillette peut garder en mémoire les informations de couplage de 8 périphériques Bluetooth différents selon un ordre chronologique. Lorsque vous couplez un neuvième périphérique, le périphérique le plus ancien est retiré de la liste.
L'oreillette se connecte au dernier périphérique auquel elle a été précédemment connectée en mettant en marche l'oreillette ou en appuyant sur le bouton d’appel. Si vous voulez la connecter à un autre périphérique inscrit dans la liste des périphériques couplés, vous devez établir une connexion à partir de cet autre périphérique. Celui des 8 périphériques couplés qui établit une connexion avec l'oreillette est alors considéré comme le dernier périphérique connecté.
13

Français
Utilisation de l'oreillette
Mise sous tension/hors tension de l'oreillette
Pour allumer l'oreillette, appuyez sur le bouton d'appel et maintenez-le enfoncé jusqu'à ce que le voyant lumineux clignote rapidement. Relâchez ensuite le bouton.
Pour éteindre l'oreillette, appuyez sur le bouton d'appel et maintenezle enfoncé jusqu'à ce que le voyant lumineux clignote rapidement et s'éteigne.
Émission et réception d’appels
Fonction |
Action |
|
Recevoir un appel |
Appuyer sur le bouton d'appel |
|
|
|
|
Mettre fin à un appel |
Appuyer sur le bouton d'appel |
|
Rejeter un appel |
Appuyer sur le bouton d'appel et le maintenir |
|
|
|
enfoncé jusqu'à l’émission d’un bip |
|
|
|
|
Rappeler le dernier numéro composé |
Appuyer sur le bouton d'appel et le maintenir |
|
|
enfoncé jusqu'à l’émission d’un bip |
|
Émettre un appel par activation vocale |
Appuyer sur le bouton d'appel et indiquer le |
|
|
nom du correspondant après le signal sonore |
|
Transférer un appel du téléphone |
Appuyer sur le bouton d'appel |
vers l'oreillette |
|
|
|
|
|
Répondre à un deuxième appel entrant |
Appuyer sur le bouton d'appel et le maintenir |
|
Mettre en attente l'appel en cours |
enfoncé jusqu'à entendre l’émission d’un bip |
|
|
|
(le-1er appel est mis en attente) |
|
|
|
|
Commuter entre 2 appels en cours |
Appuyer sur le bouton d'appel et le maintenir |
|
|
enfoncé jusqu'à l’émission d’un bip |
|
|
|
|
Participer à une conférence à 3 |
Appuyer sur les deux boutons de contrôle du |
(note : cette fonction dépend du |
volume et les maintenir enfoncés |
|
téléphone/réseau) |
simultanément |
|
|
|
|
Activer ou désactiver |
Appuyer sur les deux boutons de contrôle du |
|
le voyant lumineux |
volume et les maintenir enfoncés |
|
|
|
simultanément pendant 3 ou 4 secondes |
|
|
|
|
Activer/désactiver le mode |
Appuyer sur les deux boutons de contrôle du |
« coupure micro » |
volume |
|
14

Français
Votre oreillette supporte les profils oreillette et mains-libres. L'accès aux fonctions d'appel dépend du profil utilisé par le téléphone. Pour plus d'informations, consultez le manuel d'utilisation de votre téléphone.
Voyants lumineux
Le voyant lumineux fournit des informations sur l'état de l'oreillette.
Oreillette connectée au chargeur :
Voyant de l'oreillette |
État de l'oreillette |
Allumé (voyant permanent) |
Charge en cours |
Éteint |
Charge terminée |
Oreillette seule :
Voyant de l'oreillette |
État de l'oreillette |
Éteint |
Oreillette éteinte |
|
|
Allumé (voyant permanent) |
Couplage en cours |
10 clignotements rapides |
Couplage terminé |
Clignotement rapide |
En veille |
Clignotement lent |
Connecté (en cours d'appel) |
Remarque : après 5 minutes d'inactivité, le voyant cesse de clignoter afin d'économiser de l'énergie ; l'oreillette est en mode veille. Il suffit d'appuyer sur n'importe quel bouton de l'oreillette pour qu'elle redevienne opérationnelle et que le clignotement du voyant lumineux reprenne.
15

Français
Signaux sonores
Les signaux sonores fournissent des informations sur l'état de l'oreillette.
Signal sonore |
État de l'oreillette |
1 seul signal aigu lorsque l'utilisateur |
Volume maximum ou minimum atteint |
appuie sur le bouton de contrôle |
|
du volume |
|
5 signaux aigus rapides toutes |
Batterie faible |
les 60 secondes |
|
Aucun signal sonore ; détérioration |
Perte de connexion (hors de portée) |
du signal audio |
|
|
|
Sonnerie standard |
Appel entrant |
1 seul signal aigu |
Couplage confirmé |
1 seul signal grave |
Lancement de l'activation vocale |
Double signal aigu/grave |
Étiquette vocale non reconnue |
1 seul signal aigu |
Appel terminé |
Signal grave passant à l’aigu |
Réseau téléphonique non disponible |
2 signaux ascendants |
Mode « coupure micro » activé |
2 signaux descendants |
Mode « coupure micro » désactivé |
Dépannage
Mon téléphone ne reconnaît pas l'oreillette : assurez-vous que le voyant bleu de l'oreillette est allumé de façon permanente lorsque le téléphone recherche les périphériques.
L'oreillette fonctionnait auparavant et ne fonctionne plus : vérifiez que la fonction Bluetooth de votre téléphone est activée. Si la fonction Bluetooth a été activée ou désactivée provisoirement, il se peut que vous ayez besoin de redémarrer cette fonction et d'effectuer à nouveau le couplage de l'oreillette et du téléphone.
Pour plus d’informations, appelez l’assistance Motorola au numéro suivant : 0825 303 302 (0.15€/minute) ou consultez notre site à l’adresse suivante : www.motorola.com.
16
Deutsch
Sicherheitshinweise
EU-Richtlinien Konformitätserklärung
Hiermit erklärt Motorola Inc., dass sich das Gerät H350 in Übereinstimmung mit den grundlegenden Anforderungen und den übrigen einschlägigen Bestimmungen der Richtlinie 1999/5/EC befindet.
Die Übereinstimmungserklärungen können unter www.motorola.com/rtte eingesehen werden.
Schutz der Umwelt durch Recycling
Produkte von Motorola, die dieses Zeichen tragen, dürfen nicht als Hausmüll entsorgt werden.
Recycling von Mobiltelefonen und Zubehör
Mobiltelefone oder elektronisches Zubehör, wie Ladegeräte oder Headsets, dürfen nicht als Hausmüll entsorgt werden. In manchen Ländern wurden spezielle Sammelsysteme für Elektroschrott eingerichtet. Nähere Informationen erteilen örtliche Behörden. Falls keine Sammelsysteme verfügbar sind, wenden Sie sich bzgl. der Entsorgung Ihres Motorola Mobiltelefons oder des elektonischen Zubehörs an ein von Motorola autorisiertes Servicecenter.
FCC Nutzerhinweis
Benutzer dürfen keine Veränderungen am Gerät vornehmen. Veränderungen, die nicht ausdrücklich vom Hersteller genehmigt worden sind, können die Entziehung der Nutzungserlaubnis des Gerätes zur Folge haben. Siehe auch 47 CFR Sec. 15.21.
Dieses Gerät erfüllt die Bestimmungen von Teil 15 der FCC Regulation und RSS-210/RSS-139 der Industry Canada. Die Nutzung des Geräts unterliegt den folgenden Bedingungen: (1) Das Gerät darf keine gefährliche Überlagerung verursachen und (2) das Gerät muss jede Überlagerung akzeptieren, auch solche die einen ungewollten Betrieb verursachen. Siehe
auch 47 CFR Sec. 15.19(3).
17

Deutsch
Ersteinrichtung
Willkommen in der Welt der digitalen Mobilkommunikation von Motorola! Wir freuen uns, dass Sie sich für das Motorola H350 Bluetooth® Headset entschieden haben.
Zu Beginn
Nehmen Sie sich einen Moment Zeit, um sich mit Ihrem H350 Bluetooth® Headset vertraut zu machen.
Siehe Abbildung 1 auf Seite 1.
1 |
Ohrbügel |
2 |
Lautstärketasten |
3 |
Anruftaste |
4 |
Blaue Leuchtanzeige |
5 |
Mikrofon |
So laden Sie das Headset auf
Siehe Abbildung 2 auf Seite 2
Erstgebrauch: Laden Sie das Headset für ca. zwei Stunden auf. Wiederaufladen: Wenn Sie über das Headset fünf schnelle hohe Töne hören, die sich in 60-Sekunden-Intervallen wiederholen, muss der Akku des Headsets wieder aufgeladen werden.
Hinweis: Das Headset ist während des Ladevorgangs nicht betriebsfähig.
Der zum Betrieb dieses Produkts verwendete Akku muss ordnungsgemäß entsorgt und möglicherweise dem Recycling zugeführt werden. Hinweise zur ordnungsgemäßen Entsorgung erhalten Sie bei Ihrer lokalen Recycling-Stelle. Verbrennen Sie Akkus niemals, da diese explodieren können.
So tragen Sie das Headset
Sie können das H350 Bluetooth® Headset am linken oder am rechten Ohr tragen. Im Auslieferzustand ist das Headset für das rechte Ohr eingestellt.
18
Deutsch
Aufsetzen des Headsets: Siehe Abbildung 3 auf Seite 2.
Einstellen des Headsets für das Tragen am linken Ohr: Siehe Abbildung
4 auf Seite 2.
•Öffnen Sie den Ohrbügel um 90°
•Nehmen Sie den Ohrbügel vom Gelenkstift ab.
So ändern Sie die Orientierung der Lautstärketasten
Wenn Sie das Headset am linken Ohr tragen, können Sie auch die Orientierung der Lautstärketasten ändern.
1 Schalten Sie das Headset aus.
2Drücken Sie die Anruftaste und die Lautstärketaste, die zum Erhöhen der Lautstärke verwendet werden soll, bis die Anzeigeleuchte zwei Mal blinkt.
Das Headset ist nun eingeschaltet.
So melden Sie das Headset beim Mobiltelefon an
Die Bluetooth-Funktion des Mobiltelefons ist standardmäßig deaktiviert. Stellen Sie sicher, dass sie aktiviert ist. Informationen hierzu finden Sie in der Bedienungsanleitung des Mobiltelefons.
Sie müssen das Headset vor Benutzung mit dem Mobiltelefon koppeln
1.Drücken Sie bei ausgeschaltetem Headset die Anruftaste, und halten Sie diese für 5 Sekunden gedrückt, bis sich die Leuchtanzeige einschaltet und dauerhaft leuchtet.
Sollte die Leuchtanzeige blinken oder nicht dauerhaft leuchten, so schalten Sie das Headset aus, und wiederholen Sie diesen Schritt.
2.Lassen Sie das Mobiltelefon nach Bluetooth-Geräten suchen. Informationen zum Durchführen einer Gerätesuche finden Sie in der Bedienungsanleitung des Mobiltelefons. Das Mobiltelefon zeigt die gefundenen Bluetooth-Geräte in einer Liste an.
3.Wählen Sie aus der Liste der gefundenen Bluetooth-Geräte den Eintrag Motorola H350 aus, und folgen Sie zur Bestätigung den Eingabeaufforderungen in der Anzeige.
4.Wenn das Telefon zur Eingabe eines Passkeys auffordert, geben Sie 0000
ein, und bestätigen Sie die Eingabe. |
19 |
|

Deutsch
Wenn das Headset erfolgreich gepaart wurde ändert sich die Farbe der Anzeige von Lila leuchtend in ein blinkendes Blau.
War die Kopplung zwischen Headset und Mobiltelefon erfolgreich, müssen Sie diese Schritte nicht bei jeder weiteren Verwendung des Headsets erneut durchführen.
Test und Einsatz
Das Mobiltelefon und das Headset sind nun miteinander verbunden und bereit zum Tätigen und Empfangen von Anrufen. Um zu kontrollieren, dass Mobiltelefon und Headset korrekt zusammen funktionieren, machen Sie bitte einen Testanruf. Sie sollten nun das Klingeln im Headset hören.
Koppeln mit weiteren Geräten
Ihr Headset kann mit bis zu 8 Geräte verbunden werden, die chronologisch abgelegt werden. Wenn Sie das Headset mit mehr als acht Geräten koppeln möchten, wird die älteste Information gelöscht.
Wenn Sie das Headset einschalten oder die Anruftaste drücken, baut es automatisch eine Verbindung mit dem zuletzt verbundenen Gerät auf. Wenn Sie das Headset mit einem anderen Gerät aus der Liste der gekoppelten Geräte verbinden möchten, müssen Sie die Verbindung von dem betreffenden Gerät aus initiieren. Wenn eines der acht in der Liste gespeicherten Geräte auf diese Weise mit dem Headset verbunden wird, erkennt das Headset es bei der nächsten Verbindung wieder automatisch.
20

Deutsch
Verwendung des Headsets
So schalten Sie das Headset ein und aus
Zum Einschalten des Headsets halten Sie die Anruftaste gedrückt, bis die Leuchtanzeige schnell blinkt. Lassen Sie die Anruftaste dann los.
Zum Ausschalten des Headsets halten Sie die Anruftaste gedrückt, bis die Leuchtanzeige schnell blinkt und dann erlischt.
Anrufen und Anrufe entgegennehmen
Funktion |
Aktion |
|
Anruf entgegennehmen |
Drücken Sie kurz die Anruftaste. |
|
|
|
|
Anruf beenden |
Drücken Sie kurz die Anruftaste. |
|
Anruf abweisen |
Drücken Sie die Anruftaste, und halten Sie |
|
|
|
diese gedrückt, bis Sie einen Piepton hören. |
|
|
|
|
Wahlwiederholung |
Drücken Sie die Anruftaste, und halten Sie |
|
|
diese gedrückt, bis Sie einen Piepton hören. |
|
|
|
|
Sprachwahlanruf tätigen |
Drücken Sie kurz die Anruftaste, und nennen |
|
|
Sie nach dem Ton den Namen. |
Gespräch vom Telefon an das Headset übergeben
Drücken Sie kurz die Anruftaste.
Zweiten eingehenden Anruf annehmen |
Drücken Sie die Anruftaste, und halten Sie |
|
Aktives Gespräch halten |
diese gedrückt, bis Sie einen Piepton hören |
|
|
|
(das erste Gespräch wird gehalten). |
|
|
|
|
Zwischen zwei Gesprächen hinund |
Drücken Sie die Anruftaste, und halten Sie |
herschalten (Makeln) |
diese gedrückt, bis Sie einen Piepton hören. |
|
Konferenzgespräch
(Hinweis: Die Verfügbarkeit von Konferenzgesprächen ist mobiltelefon-/netzwerkabhängig)
Drücken Sie beide Lautstärketasten, und halten Sie diese gedrückt.
Deaktivieren/Aktivieren |
Drücken Sie beide Lautstärketasten, und halten |
der Leuchtanzeige |
Sie diese für drei bis vier Sekunden gedrückt. |
|
|
Stummschalten/Stummschalten aufheben |
Drücken Sie kurz beide Lautstärketasten. |
21

Deutsch
Das Headset unterstützt sowohl Freisprechals auch Headset-Profile. Der Zugriff auf die Telefonfunktionen hängt davon ab, welches Profil vom Mobiltelefon unterstützt wird. Entsprechende Informationen finden Sie in der Bedienungsanleitung des Mobiltelefons.
Leuchtanzeige
Die Leuchtanzeige liefert Informationen über den Status des Headsets.
Mit angeschlossenem Ladegerät:
Leuchtanzeige des Headsets |
Headset-Status |
Ein (kontinuierliches Leuchten) |
Ladevorgang läuft |
|
|
Aus |
Ladevorgang abgeschlossen |
Ohne angeschlossenes Ladegerät:
Leuchtanzeige des Headsets |
Headset-Status |
Aus |
Ausgeschaltet |
Ein (kontinuierliches Leuchten) |
Anmeldemodus |
10 schnelle Blinksignale |
Anmeldung erfolgreich |
Schnelles Blinken |
Standby (kein aktives Gespräch) |
Langsames Blinken |
Verbunden (aktives Gespräch) |
Hinweis: Wenn für fünf Minuten keine Aktivität erfolgt, hört die Leuchtanzeige auf zu blinken, um Energie zu sparen. Das Headset befindet sich dennoch im Standby-Modus Ein Tastendruck am Headset führt dazu, dass die Leuchtanzeige wieder zu blinken beginnt.
22

Deutsch
Signaltöne
Akustische Signaltöne liefern Informationen über den Status des Headsets.
Signalton |
Headset-Status |
Einzelner hoher Ton beim Drücken |
Maximale bzw. minimale Lautstärke erreicht |
einer Lautstärketaste |
|
Fünf schnell aufeinanderfolgende hohe |
Akku schwach |
Töne, die alle 60 Sekunden wiederholt |
|
werden |
|
Keine Signaltöne, nachlassende |
Außer Reichweite |
Audioqualität |
|
|
|
Klingelton |
Eingehender Anruf |
Einzelner hoher Ton |
Bestätigung der Anmeldung |
Einzelner tiefer Ton |
Einleiten der Sprachwahl |
Doppelton hoch/tief |
Sprachkommando nicht erkannt |
Einzelner hoher Ton |
Gespräch beendet |
Ansteigender Ton |
Kein Netz |
Zwei ansteigende Töne |
Stummschaltung aktiviert |
Zwei abfallende Töne |
Stummschaltung deaktiviert |
Fehlerbehebung
Das Mobiltelefon kann das Headset nicht finden: Kontrollieren Sie, ob die Leuchtanzeige des Headsets konstant blinkt, während das Mobiltelefon nach Bluetooth-Geräten sucht.
Das Headset hat bereits funktioniert, funktioniert jetzt aber nicht mehr:
Stellen Sie sicher, dass die Bluetooth-Funktion des Mobiltelefons aktiviert ist. Wurde die Bluetooth-Funktion deaktiviert oder nur vorübergehend aktiviert, müssen Sie diese möglicherweise neu starten und das Headset erneut beim Mobiltelefon anmelden.
Weitere Informationen finden Sie auf unserer Website: www.motorola.com oder wenden Sie sich an den Motorola Kundendienst: 0180-35050.
23

Italiano
Sicurezza ed informazioni generali
Dichiarazione di conformità alle direttive dell’Unione Europea
Con la presente Motorola Inc., dichiara che questo H350 è conforme ai requisiti essenziali ed alle altre disposizioni pertinenti stabilite dalla direttiva 1999/5/EC.
È possibile prendere visione della dichiarazione di conformità alla direttiva 1999/5/EC (Direttiva R&TTE) per questo prodotto all’indirizzo www.motorola. com/rtte.
Salvaguardia dell’ambiente con il riciclaggio
Se un prodotto Motorola riporta questo simbolo, deve essere smaltito separatamente dai rifiuti domestici.
Riciclaggio dei telefoni e degli accessori
Non smaltire i telefoni o gli accessori elettrici, come i caricabatteria o gli auricolari, con i rifiuti domestici. Alcuni paesi o regioni prevedono sistemi di raccolta differenziata per lo smaltimento di materiali elettrici ed elettronici. Per ulteriori informazioni, contattare le autorità locali. Se non fossero disponibili sistemi di raccolta differenziata, restituire i telefoni o gli accessori elettrici al centro di assistenza autorizzato Motorola più vicino.
Norme FCC per gli utenti
Agli utenti non è consentito apportare alcun tipo di cambiamento o modifica al dispositivo. Cambiamenti o modifiche non espressamente approvati dalla controparte responsabile per la compatibilità potrebbero invalidare il diritto dell’utente di utilizzare l’apparecchiatura. Fare riferimento alla normativa 47 CFR Sec. 15.21.
Questo dispositivo è conforme alle specifiche descritte nella parte 15 delle norme FCC e allo standard RSS-210 / RSS – 139 di Industry Canada. Il funzionamento è soggetto alle due condizioni riportate di seguito: (1) Il dispositivo non può causare interferenze dannose e (2) deve accettare eventuali interferenze anche se possono causare un funzionamento indesiderato. Vedere la normativa 47 CFR Sec. 15.19(3).
24

Italiano
Setup iniziale
Benvenuti nel mondo delle comunicazioni digitali senza fili Motorola! Siamo lieti che abbiate scelto l'auricolare Bluetooth® H350 di Motorola.
Prima di iniziare
Prendetevi qualche minuto per familiarizzare con il vostro auricolare H350.
Riferimento figura 1 a pagina 1.
1.Sagoma per l'orecchio
2.Tasti volume
3.Tasto chiamata
4.Indicatore luminoso blu
5.Microfono
Ricarica dell'auricolare
Riferimento figura 2 a pagina 1.
Primo utilizzo: ricaricare per 2 ore prima dell'uso.
Ricarica: quando si avvertono 5 toni rapidi attraverso l'altoparlante dell'auricolare a intervalli di 60 secondi, l'auricolare necessita di ricarica
Nota: l'auricolare non funziona durante la ricarica.
La batteria ricaricabile che alimenta questo prodotto deve essere dismessa correttamente e può essere riciclata. Contattate il vostro centro di riciclaggio per la dismissione più adeguata. Non gettate le batterie sul fuoco poiché possono esplodere.
Indossare l'auricolare
L’auricolare H350 più essere indossato sull'orecchio sinistro o destro. All’inizio, l'auricolare è predisposto per l'orecchio destro.
Posizionare l'auricolare all'orecchio: riferimento figura 3 a pagina 2. Posizionare l'auricolare all'orecchio sinistro: riferimento figura 4 a pagina 2.
•Aprire di 90° la sagoma per l'orecchio.
•Staccare la sagoma dal perno di cerniera
25

Italiano
Cambiare l'orientamento dei tasti volume
Se si sposta l'auricolare per indossarlo sull'altro orecchio, è possibile cambiare anche l'orientamento dei tasti per il volume.
1.Spegnere l'auricolare
2.Premere il tasto Chiamata e il tasto del volume che si vuole designare come tasto di "aumento del volume" sino a quando l'indicatore luminoso non lampeggia due volte.
L'auricolare si accende.
Collegare l'auricolare al telefono
Come impostazione predefinita, la funzione Bluetooth del telefono è spenta. Accertatevi che la funzione Bluetooth del telefono sia attivata in modo permanente. Consultate la guida utente del telefono.
Dovete collegare l'auricolare al telefono prima dell'uso.
1.Con l'auricolare spento, premete e tenete premuto il tasto Chiamata per 5 secondi sino a quando l'indicatore luminoso non si accende e non rimane acceso stabilmente.
Se l'indicatore luminoso lampeggia o non rimane acceso stabilmente, spegnete l'auricolare e ripetete quest'operazione.
2.Eseguite la ricerca dell'apparecchio dal terminale. Per maggiori dettagli sulla ricerca dell'apparecchio consultate la guida utente del telefono. Il telefono elenca gli apparecchi Bluetooth che trova.
3.Selezionate l'auricolare Motorola H350 dall'elenco degli apparecchi disponibili e confermate tramite il display.
4.Quando richiesto dal telefono inserite il codice 0000 e confermate.
26

Italiano
Il collegamento è confermato dal lampeggiamento rapido dell’indicatore luminoso di colore blu.
Dopo aver collegato una prima volta il telefono con l'auricolare, non dovrete ripetere queste operazioni ogni volta che userete l'auricolare.
Prova e utilizzo
Il telefono e l'auricolare sono ora collegati e possono ricevere ed effettuare chiamate. Per provare il loro collegamento e corretto funzionamento, effettuate una chiamata dal vostro telefono. Sentirete suonare attraverso il vostro auricolare.
Collegamento di ulteriori apparecchi
Il vostro auricolare può memorizzare fino a 8 differenti collegamenti disponendoli in ordine cronologico. Quando si cerca di collegare più di 8 apparecchi, il collegamento più vecchio viene sostituito nell'elenco della memoria.
L'auricolare inizia la connessione automatica con l'ultimo apparecchio al quale era collegato precedentemente accendendo l'auricolare stesso oppure premendo il tasto Chiamata. Se volete collegare un nuovo apparecchio presente nella memoria dovete iniziare il collegamento da quell'apparecchio. Qualunque apparecchio degli 8 memorizzati inizia il collegamento con l'auricolare diviene automaticamente l'ultimo apparecchio collegato.
27

Italiano
Utilizzo dell'auricolare
Accensione e spegnimento
Per accendere l'auricolare premete a lungo il tasto Chiamata fino a quando l'indicatore luminoso non lampeggia in rapida successione. Rilasciate quindi il tasto.
Per spegnere l'auricolare premete a lungo il tasto Chiamata fino a quando l'indicatore luminoso non lampeggia in rapida successione e non si spegne.
Effettuare e ricevere chiamate
Funzione |
Azione |
|
Ricevere una chiamata |
Premere il tasto Chiamata |
|
Terminare una chiamata |
Premere il tasto Chiamata |
|
Rifiutare una chiamata |
Premere a lungo il tasto Chiamata fino a |
|
|
|
quando non si sente un beep |
|
|
|
|
Richiamare l'ultimo numero |
Premere a lungo il tasto Chiamata fino a |
|
|
quando non si sente un beep |
|
|
|
|
Effettuare una chiamata vocale |
Premere il tasto Chiamata e pronunciare il |
|
|
nome dopo il segnale acustico |
|
|
|
|
Trasferire una chiamata dal telefono |
Premere il tasto Chiamata |
all'auricolare |
|
|
|
|
|
Rispondere a una seconda chiamata |
Premere a lungo il tasto Chiamata fino a |
|
in arrivo |
quando non si sente un beep (la 1a chiamata |
|
Mettere in attesa la chiamata in corso |
viene messa in attesa). |
|
|
|
|
Alternare due chiamate attive |
Premere a lungo il tasto Chiamata fino a |
|
|
|
quando non si sente un beep |
|
|
|
|
Partecipare a una chiamata in |
Premere a lungo i tasti Volume |
conferenza a 3 (nota: questa funzione |
|
|
dipende dal telefono/dalla rete) |
|
|
|
|
|
Attivare o disattivare l'indicatore |
Premere a lungo i tasti Volume per 3 o 4 |
|
luminoso |
secondi |
|
Attivare o disattivare la funzione mute |
Premere entrambi i tasti Volume |
|
per una chiamata |
|
|
28
 Loading...