


Notes on This Manual
Keep these instructions with your computer at all times. The proper set up, use and care can help extend the life of your computer. In the event that you transfer ownership of this computer, please provide these instructions to the new owner.
This manual is divided into sections to help you find the information you require. Along with the Table of Contents, an Index has been provided to help you locate information.
In addition, many application programs include extensive help functions. As a general rule, you can access help functions by pressing F1 on the keyboard. These help functions are available to you when you use the Microsoft Windows® operating system or the various application programs.
This interactive manual is designed to provide additional information about your Notebook as well as useful links accessible via the World Wide Web.
Windows Vista® offers you additional aids to learn about the new version of Windows and your Notebook. You can find this information in the Welcome Center after booting up your Notebook. We have listed further useful sources of information starting on page 62.
Document Your Notebook
It is important to document the details of your Notebook purchase in the event you need
warranty service. The serial number can be found on the back of the Notebook:
Serial Number ......................................
Date of Purchase ......................................
Place of Purchase ......................................
Audience
These instructions are intended for both the novice and advanced user. Regardless of the possible professional utilization, this Notebook is designed for day-to-day household use. The functions and applications for use with this Notebook have been designed with the entire family in mind.

Quality
We have selected the components in this computer for their high level of functionality, ease of use, safety and reliability.
Through balanced hardware and software design we are able to provide you with an innovative personal computer useful for applications relating to both work and leisure.
We are pleased to welcome you as our newest customer.
Copying this manual
This document contains legally protected information. All rights reserved. Copying in mechanical, electronic and any other form without the written approval of the manufacturer is prohibited.
Copyright© 2007 MEDION®.
All rights reserved. Microsoft®, MS-DOS®, and Windows are registered trademarks of Microsoft Corporation in the U.S. and other countries.
Pentium® is a registered trademark of Intel Corporation.
The names of actual companies and products mentioned herein may be the trademarks of their respective owners.
Information in this document is subject to change without notice.
ii

Table of Contents: |
|
Safety and Maintenance ......................................................................................... |
1 |
Safety Instructions ............................................................................................. |
3 |
Data Security ................................................................................................. |
4 |
Set-Up Location............................................................................................. |
4 |
Ambient Temperature .................................................................................... |
4 |
Working in Comfort........................................................................................ |
5 |
Connecting .................................................................................................... |
6 |
Power supply ........................................................................................... |
6 |
Cabling..................................................................................................... |
7 |
Information about the regulatory compliance according to R&TTE................ |
8 |
Modem........................................................................................................... |
8 |
Touch Pad ..................................................................................................... |
8 |
Battery Operation .......................................................................................... |
9 |
Views & Handling.................................................................................................. |
11 |
Included with Your Notebook ........................................................................... |
13 |
Views ............................................................................................................... |
14 |
Open Notebook ........................................................................................... |
14 |
Front View ................................................................................................... |
15 |
Left Side ...................................................................................................... |
15 |
Right Side .................................................................................................... |
15 |
Rear Side..................................................................................................... |
16 |
Device Indicators ......................................................................................... |
17 |
......................................................................................................... |
17 |
Getting Started................................................................................................. |
18 |
How to start: ................................................................................................ |
18 |
Step 1..................................................................................................... |
18 |
Step 2..................................................................................................... |
20 |
Step 3..................................................................................................... |
20 |
Short description of the Windows® Desktop........................................... |
21 |
Main Components................................................................................................. |
23 |
Power Supply................................................................................................... |
25 |
On/Off Button............................................................................................... |
25 |
Power Adapter............................................................................................. |
26 |
Battery Operation ........................................................................................ |
27 |
Inserting the Battery............................................................................... |
27 |
Removing the Battery............................................................................. |
27 |
Charging the Battery .............................................................................. |
28 |
Discharging the battery .......................................................................... |
28 |
Battery Performance .............................................................................. |
29 |
Power Management..................................................................................... |
30 |
Sleep Mode ( Ö )...................................................................... |
30 |
Hibernate Mode ( Ö )..................................................................... |
30 |
Using the Power Saving Quick Button ................................................... |
31 |
iii

Display............................................................................................................. |
32 |
Opening and Closing the Display ................................................................ |
32 |
Screen Resolution ....................................................................................... |
32 |
Connecting an External Monitor .................................................................. |
33 |
Duplicating the Desktop ......................................................................... |
34 |
Extending the Desktop ........................................................................... |
34 |
Sound Output For HDMI Video .............................................................. |
35 |
Data Entry........................................................................................................ |
36 |
The Keyboard .............................................................................................. |
36 |
Notebook-Specific Key Combinations.................................................... |
36 |
Touch Pad ................................................................................................... |
37 |
The Hard drive ................................................................................................. |
38 |
Important Directories ................................................................................... |
39 |
The Optical Drive ............................................................................................. |
40 |
Loading a Disc............................................................................................. |
40 |
Emergency Ejection of a Blocked Disc................................................... |
42 |
Playing Back and Retrieving Data from Discs ............................................. |
42 |
Regional Playback Information for DVD ...................................................... |
43 |
Subjects Concerning the CD/DVD-Rewriter ................................................ |
43 |
Recordable/Rewriteable Discs ............................................................... |
43 |
The Sound Card .............................................................................................. |
44 |
External Audio Ports.................................................................................... |
45 |
Modem (optional)............................................................................................. |
47 |
Modem Port ................................................................................................. |
47 |
The Network .................................................................................................... |
48 |
What is a network? ...................................................................................... |
48 |
Ethernet-Network ................................................................................... |
48 |
Wireless LAN ......................................................................................... |
49 |
Troubleshooting within the Network ....................................................... |
50 |
The Multimedia Card Reader........................................................................... |
51 |
Inserting Memory Cards .............................................................................. |
51 |
Removing Memory Cards ............................................................................ |
51 |
Express Card ................................................................................................... |
52 |
Installing Express Card................................................................................ |
52 |
Removing Express Card.............................................................................. |
52 |
Webcam (optional)........................................................................................... |
53 |
Example of the use of Windows Messenger................................................ |
53 |
The TV Tuner Card & the Remote Control (optional)....................................... |
55 |
The Remote Control .................................................................................... |
55 |
Inserting batteries .................................................................................. |
55 |
Installing the remote control receiver ..................................................... |
55 |
Button layout .......................................................................................... |
56 |
Changing the transmission/reception channels...................................... |
57 |
Operation..................................................................................................... |
58 |
Inserting the TV card.............................................................................. |
58 |
Removing the TV card ........................................................................... |
58 |
Connecting the aerial ............................................................................. |
58 |
Watch TV ............................................................................................... |
59 |
iv

Universal Serial Bus (USB) Port ...................................................................... |
60 |
Securing the Notebook .................................................................................... |
61 |
Startup Password ........................................................................................ |
61 |
Using a safety lock ...................................................................................... |
61 |
Software........................................................................................................... |
62 |
Getting to Know Windows Vista® ................................................................. |
62 |
Windows Vista® – Quickstartguide......................................................... |
62 |
Windows Vista® – Help and Support...................................................... |
62 |
Windows Vista® – Welcome Center ....................................................... |
63 |
Windows Vista® – User Account Control................................................ |
64 |
Software Installation .................................................................................... |
65 |
Uninstall Software .................................................................................. |
66 |
Windows Activation...................................................................................... |
67 |
Product activation on your Notebook ..................................................... |
67 |
The BIOS Set-up-Program .......................................................................... |
68 |
Running the BIOS Set-up....................................................................... |
68 |
First Aid ................................................................................................................. |
69 |
FAQ – Frequently Asked Questions ................................................................ |
71 |
Data and System Security ............................................................................... |
72 |
Data Security ............................................................................................... |
72 |
Maintenance Programs................................................................................ |
72 |
Password Reset Disk................................................................................... |
72 |
Windows® Update........................................................................................ |
73 |
Windows Update Information for Data Security ..................................... |
74 |
System Restore ............................................................................................... |
75 |
Correction .................................................................................................... |
75 |
System Restore powered by Symantec....................................................... |
76 |
Limits of the Recovery............................................................................ |
76 |
Performing the State of Delivery ............................................................ |
76 |
Troubleshooting ............................................................................................... |
77 |
Localize the Cause ...................................................................................... |
77 |
Check Cables and Connections............................................................. |
77 |
Errors And Possible Causes .................................................................. |
78 |
Additional Support ....................................................................................... |
78 |
Driver Support ............................................................................................. |
79 |
Maintenance .................................................................................................... |
80 |
Care of the TFT Display............................................................................... |
80 |
Transporting the Notebook .......................................................................... |
81 |
Recycling and Disposal ............................................................................... |
82 |
Batteries and Proper Treatment............................................................. |
82 |
Upgrades and Repairs................................................................................. |
84 |
Notes for Service Engineers .................................................................. |
84 |
v

Appendix ............................................................................................................... |
|
85 |
Standards ........................................................................................................ |
87 |
|
Electromagnetic Compatibility ..................................................................... |
87 |
|
ISO 13406-2 Class II ................................................................................... |
87 |
|
FCC Compliance Statement ........................................................................ |
89 |
|
Restricted Warranty ......................................................................................... |
90 |
|
I. General Conditions of Warranty ............................................................... |
90 |
|
1. |
General .............................................................................................. |
90 |
2. |
Scope................................................................................................. |
92 |
3. |
Exclusion from warranty..................................................................... |
93 |
4. |
Service Hotline................................................................................... |
93 |
II. Special warranty conditions for MEDION PC, notebook, |
|
|
pocket PC (PDA) and navigation devices (PNA) ......................................... |
94 |
|
III. Special warranty conditions for repair on site or replacement on site..... |
95 |
|
Index................................................................................................................ |
|
96 |
vi

Chapter 1
Safety and Maintenance
Subject |
Page |
Safety Instructions .............................................................. |
3 |
Data Security ....................................................................... |
4 |
Set-up Location ................................................................... |
4 |
Ambient Temperature ........................................................ |
4 |
Working in Comfort ............................................................. |
5 |
Connecting .......................................................................... |
6 |
Information about the regulatory compliance |
|
according to R&TTE ............................................................ |
8 |
Modem (optional)................................................................. |
8 |
Touch Pad ........................................................................... |
8 |
Battery Operation ................................................................ |
9 |
Safety
Handling
Components
Aid
Appendix

2 |
Safety and Maintenance |
|

Safety Instructions
Please follow the instructions in this section for the safe operation of your notebook:
•Do not allow small children to play unattended with electrical equipment. Children are incapable of judging potential risks properly.
•Keep the packing materials, such as foil away from children. The danger of suffocation could arise in the case of misuse.
•Do not open the case of the notebook, the battery or the power adaptor. When the case is open there is a danger of severe electric shock.
•CD-ROM-/CDRW-/DVD-drives are Laser Class 1 devices. These lasers must remain in their sealed casing. DO NOT remove the drive covers, as exposure to the lasers may be harmful.
•Do not insert objects through the slots and openings of the notebook. This may lead to electric shock, electrical short-circuit or fire that will damage your notebook.
•Slots and openings in the notebook serve to ventilate it. Do not cover up these openings, because the notebook could overheat.
•The notebook is not intended to be operated in a heavy industry company. Operation under extreme environmental conditions can result in damage to your notebook.
•Do not operate the notebook during a thunderstorm, in order to avoid damage through lightning strike.
•Never place objects on top of the notebook that would exert any pressure on the display. There is a danger that even slight pressure may break the TFT display.
•There is a risk of injury if the TFT display breaks. Use protective gloves to pack up the broken pieces and contact customer service to arrange for proper disposal. It is important to thoroughly wash your hands after handling a broken TFT display. There is a chance that chemicals may have been released.
•Do not forcibly open the notebook.
•In order to avoid damage to the display, do not touch it with your fingers or sharp objects.
•Never lift the notebook by the TFT Display; doing so could break the hinges.
Switch off your Notebook immediately or do not switch it on at all and contact customer service …
•… if the power cord or the connectors attached to it are burnt or damaged. Replace the defective power cord with an original power cord. Under no circumstances may a defective power cord be repaired.
•... if the housing of the Notebook is damaged or fluids have leaked into it. Have the Notebook checked by customer service first, because the Notebook may not be safely operated otherwise and there may be a life-threatening risk of electrocution!
Safety
Handling
Components
Aid
Appendix
Safety Instructions |
3 |

Data Security
Attention!
Every time you update your data make back-up copies on an external storage medium. The supplier does not assume liability for data loss or damage to data storage units, and no claims can be accepted for damages resulting from the loss of data or consequential losses.
Set-Up Location
•Keep your notebook and all connected peripherals away from moisture, dust, heat and direct sunlight. Failure to do so can lead to Notebook malfunction or damage.
•It is highly recommended you do not use the notebook outdoors.
•Operate the notebook and all peripherals on a stable, balanced and vibration-free surface.
•Do not leave the base of your notebook on your lap or any part of your body for a long period of time. The notebook can become very warm while it is turned on or charging and can cause discomfort or injury from heat exposure.
•In the first hours of operation, new devices may emit a typical, unavoidable but completely harmless smell, which will decline increasingly in the course of time. We recommend you to ventilate the room regularly, in order to counteract the formation of the smell. During the development of this product, we have made sure that the applicable limits are clearly fallen below.
Ambient Temperature
•The notebook is most reliably operated at an ambient temperature between +41° (5° C) and +104° F (40° C) and at a relative humidity between 20% and 70% (without condensation).
•When powered off, the notebook can be stored at temperatures between 32° and 140° F (0° and 60° C).
•Unplug the cable during thunderstorms and make especially sure to remove the antenna cables, if present. We recommend the use of a surge protector for additional safety, in order to protect your notebook from being damaged by power peaks or lightning strikes through the power network.
•Wait until the notebook has reached ambient (room) temperature before turning it on or connecting it to the power adapter. Drastic variations in temperature and humidity can create condensation within the Notebook and may cause it to short-circuit.
•For transporting the notebook keep the original packing.
4 |
Safety and Maintenance |
|
Working in Comfort
Safety
|
|
Handling |
|
Sitting in one position for long periods can be uncomfortable. To minimize the potential for |
|
||
physical discomfort or injury, it’s important that you maintain proper posture. |
|
||
• Back – While sitting at your work surface, make sure your back is supported by the |
|
||
|
chair’s backrest in erect position or angled slightly backwards. |
Components |
|
• |
Arms – Your arms should be relaxed and loose, elbows close to your sides, with |
||
|
|||
|
forearms and hands approximately parallel to the floor. |
|
|
• Wrists – Your wrists should be as straight as possible while using the keyboard, |
|
||
|
mouse or trackball. They should not be bent sideways, or more than 10 degrees up |
|
|
|
or down. |
|
|
• Legs – Your thighs should be horizontal or angled slightly downward. Your lower |
|
||
|
legs should be near a right angle to your thighs. Your feet should rest flat on the |
|
|
|
floor. If necessary, use a footrest, but double check that you have your seat height |
|
|
|
adjusted correctly before getting a footrest. |
|
|
• Head – Your head should be upright or tilted slightly forward. Avoid working with |
|
||
|
your head or trunk twisted. |
Aid |
|
• |
Overall – Change your position frequently and take regular breaks to avoid fatigue. |
||
|
|||
Appendix
Safety Instructions |
5 |

Connecting
Pay attention to the following information, in order to connect your notebook correctly:
Power supply
•Do not open the power adapter housing. When the housing is open there is a danger of severe electric shock. It contains no user-serviceable parts.
•The electric outlet must be in the vicinity of the notebook and within reach of the power adapter cables.
•To disconnect your notebook from the power source, or set the notebook to battery operation, remove the power cord from the notebook’s power socket.
•Only use the notebook with a power adaptor operating at AC 110-240V~/50-60 Hz. For details on power consumption, please refer to the rating plate on the rear of your notebook. If you are unsure of the type of power supply available at the point of use, ask your local power company.
•Use only the supplied power cord and power adapter.
•If using an extension cord, make certain that it meets your local safety requirements. If in doubt, consult an electrician.
•To provide additional protection against electric shock, power surges, lightning strikes, or other electrical damage to your notebook, we recommend the use of a surge protector.
•Firstly remove the plug, and then the connector of the notebook, from the power source, if you want to detach the network adapter from the mains power supply. A reverse sequence could damage the network adapter or the notebook. Always hold the connector firmly when removing it. Never pull on the power cord.
6 |
Safety and Maintenance |
|

Cabling
•Arrange cables so no one can walk on or trip over them.
•Do not place objects on any of the cables.
•To avoid damage to your Notebook, connect your peripherals (e.g., keyboard, mouse and monitor) whilst your notebook is powered off. Some devices can be connected whilst your notebook is in use. These devices usually have a USB connector. Please follow the appropriate instructions for each device.
•Keep the notebook at least one meter (approximately three feet) away from high frequency and magnetic interference sources (e.g., televisions, loudspeaker cabinets, mobile telephones, etc.) in order to avoid malfunctions and/or loss of data.
•Please note that only shielded cables shorter than
3 metres (9.84 ft) should be used for the LPT, COM, USB, IEEE 1394, audio, video and network interfaces with this notebook. Please use only doubly screened cables in the case of printer cables.
•Do not replace the cables supplied. Only use the cable supplied with the notebook, since that cable will have been tested extensively in our laboratory.
•Also only use the connection cables supplied with the devices to connect your peripherals.
•Make sure that all connecting cables are connected with the respective peripheral devices, in order to avoid perturbing radiation. Remove any cables not needed.
•The connection of devices is limited to equipment that complies with EN60950 “Safety of information technology equipment” or EN60065 “Audio, video and similar electronic apparatus. Safety requirements”.
Safety Instructions |
7 |
Safety
Handling
Components
Aid
Appendix

Information about the regulatory compliance according to R&TTE
The following remote equipment has been supplied with this notebook:
•Wireless LAN
•Remote Control (optional)
•Remote Control Receiver (optional)
In France this device may only be operated indoors due to the power of the built-in wireless LAN solution (>100mW).
In all other EU-countries there are no restrictions at this moment. When deploying this device in another country you are required to inform yourself about the applicable legal regulations of the corresponding country.
The company declares herewith that these devices are in agreement with the fundamental requirements and the other relevant terms of the 1999/5/EG Guideline. Complete declarations of conformity are available under www.medion.com/conformity.
The optional modem meets the requirements of TBR21 (01/1998) and EG201120/V1.1.1/01/98 regarding connection with an analogue telephone network.
Modem
•If your system has a modem, please make sure you connect it to an analogue telephone line only. Connecting to a digital PBX, a digital line designed for broadband services or ISDN, a shared service line or a payphone will damage the modem or the devices to which it is connected.
Touch Pad
•Light pressure with the tip of your finger is all that is required to operate the touch pad. Because the touch pad is electrostatic sensitive, objects cannot be used in place of your fingers. Using a pen or other object can damage the touch pad or cause the notebook to malfunction.
8 |
Safety and Maintenance |
|

Battery Operation
To extend the life and power of your battery and guarantee secure operation, the instructions below should be followed:
•Never expose the battery to direct sunlight or heat for long periods.
•Do not dispose of the battery by fire.
•Disregarding these instructions will lead to damage and under some circumstances may even cause the battery to explode.
•Do not open the battery housing; it contains no user-serviceable parts.
•Keep the battery away from electrically conductive materials, chemical substances and cleaning agents.
•Only use the originally supplied power adapter to charge the battery.
•Ensure (through the display or the signalling sound of the notebook) that the battery is completely discharged before recharging it.
•Replace the battery only with the same type or an equivalent type recommended by the manufacturer.
•Charge the battery only until the battery charging light goes out. Also, refer to the instructions under “Charging the Battery” on page 28 for instructions on checking the battery level.
•Only change the battery when the unit is switched off.
•Batteries are classified as special waste and should always be disposed of properly. Contact Customer Service for more details.
Safety Instructions |
9 |
Safety
Handling
Components
Aid
Appendix

10 |
Safety and Maintenance |
|

|
Chapter 2 |
|
Views & Handling |
Subject |
Page |
Included with your notebook |
............................................... 13 |
Open notebook ..................................................................... |
14 |
Front view ............................................................................ |
15 |
Left side ................................................................................ |
15 |
Right side.............................................................................. |
15 |
Rear side .............................................................................. |
16 |
Power and status indicators.................................................. |
17 |
Getting started ...................................................................... |
18 |
Safety
Handling
Components
Aid
Appendix

12 |
Views & Handling |
|

Included with Your Notebook
Please check that the contents are complete and notify us within 14 days of purchase if any of the following components are missing:
•Notebook
•Battery
•Power adapter with connection cable (Model: FSP1ADC21)
•Application-/Support-Disc
•OEM version of operating system
•Documentation
Included with Your Notebook |
13 |
Safety
Handling
Components
Aid
Appendix
Views
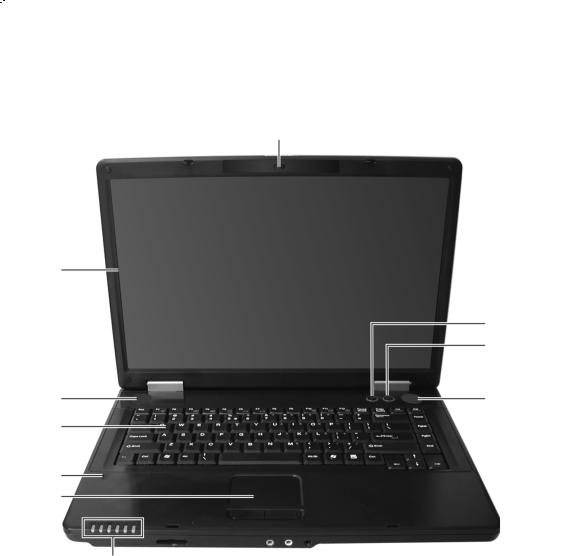
Open Notebook |
1 |
2
9
8
3 |
3 |
4
5
6
|
7 |
(similar picture) |
1 |
- Webcam (optional) ................................................................... |
(Ö p. 53) |
2 |
- TFT display............................................................................... |
(Ö p. 32) |
3 |
- Stereo speaker |
|
4 |
- Keyboard ................................................................................. |
(Ö p. 36) |
5 |
- Internal Microphone |
|
6 |
- Touchpad ................................................................................. |
(Ö p. 37) |
7 |
- Device indicators ..................................................................... |
(Ö p. 17) |
8 |
- Power ON/OFF ........................................................................ |
(Ö p. 25) |
9 |
- Power Saving Quick Button |
|
14 |
|
Views & Handling |
|
|
Front View |
10 |
|
|
11 |
12 13 14 |
(similar picture) |
10 |
- Display Catch ........................................................................... |
|
(Ö p. 32) |
11 |
- Multimedia card reader ........................................................... |
|
(Ö p. 51) |
12 |
- Microphone ............................................................................. |
|
(Ö p. 45) |
13 |
- Audio Out / Headphones ........................................................... |
|
(Öp. 45) |
14 |
- Digital Audio Out (S/PDIF)....................................................... |
|
(Ö p. 45) |
Safety
Handling
Left Side
|
15 |
16 17 |
18 |
(similar picture) |
15 |
- External monitor port DVI ........................................................ |
|
(Ö p. 33) |
|
16 |
- Modem port (RJ-11) (optional) ................................................. |
|
(Ö p. 47) |
|
17 |
- LAN port (RJ-45) .................................................................... |
|
(Ö p. 48) |
|
18 |
- Express Card .......................................................................... |
|
(Ö p. 52) |
|
Right Side
Components
Aid
|
|
19 |
20 |
(similar picture) |
19 |
- |
Optical Drive .......................................................................... |
(Ö p. 40) |
|
20 |
- |
USB port .................................................................................. |
(Ö p. 60) |
|
Appendix
Views |
15 |
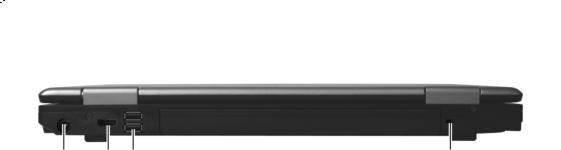
Rear Side
|
21 |
22 |
20 |
23 |
|
|
|
|
(similar picture) |
20 |
- USB port |
.................................................................................. |
(Ö p. 55) |
|
21 |
- Power socket ......................................................................... |
(Ö p. 26) |
||
22 |
- HDMI connector (optional) ....................................................... |
(Ö p. 33) |
||
23 |
- Kensington® lock ..................................................................... |
(Ö p. 61) |
||
16 |
Views & Handling |
|

Device Indicators
LED's indicate the power and operating system states of the Notebook. The meaning of each LED is:
Power Indicator
Below you will see the different meanings of the LED in various situation:
Blinking |
The notebook is in Sleep mode. |
On |
The notebook is turned on. |
|
|
Battery Charge Indicator
Below you will see the different meanings of the LED in various situation:
Blue/green |
The battery is fully charged. |
Amber |
The battery is being charged. |
Blinking |
Almost completely discharged. |
|
|
Access indicator
This LED lights or flashes when the notebook is accessing the hard disk or the optical drive.
Num Lock
This LED lights when NUM-Lock has been activated (Fn+NumLk).
Safety
Handling
Components
Capital Lock
This LED lights when CAPS-Lock has been activated. This sets the keyboard to capital letters.
Wireless LAN
Display for wireless data exchange. If the display lights steadily the wireless LAN function is enabled (optional feature)
Views
Aid
Appendix
17
Getting Started
Before you get started using your notebook, first take a few moments to read the important section on Safety.
This notebook comes with software fully pre-installed. You do not have to install any of the discs supplied.
How to start:
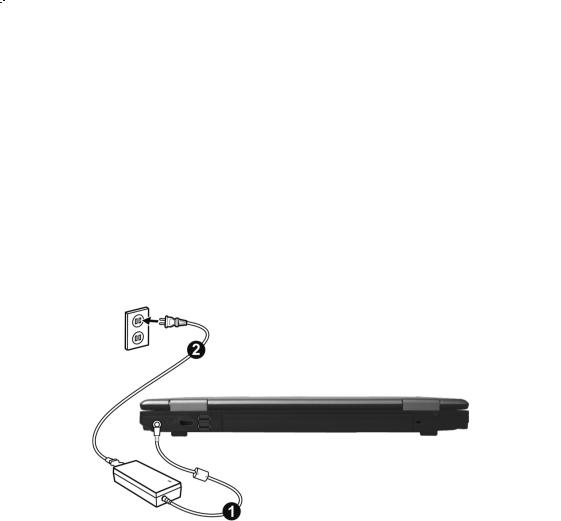
Step 1
•Insert the battery before bringing the notebook into operation by sliding the battery pack into the compartment.
•Connect the supplied power adapter to the notebook at the notebook power socket (21).
•Open the display by pushing the lock (10) to the right with your thumb and then opening the display to the required position with your thumb and index fingers.
18 |
Views & Handling |
|

Safety
Handling
• |
Switch the notebook on by operating the On/Off Switch (8). The notebook starts and |
Components |
|
||
|
now goes through a number of phases. |
|
Aid
Note
Make sure there is no bootable disc (e.g., the Recovery disc) in the optical drive. Such discs will prevent the operating system from loading off the hard drive.
The operating system is loaded from the hard disk. During the initial set-up, the loading process takes slightly longer than normal to register the operating system and the individual components completely. Your operating system is finished loading when a welcome screen is shown on your display.
Appendix
Getting Started |
19 |

Step 2
Follow the instructions on the screen. Dialogue boxes will explain any steps that need to be taken.
The greeting procedure will guide you through a series of dialogue boxes. The information in each dialogue box will explain the steps that need to be taken.
Should you have any questions just click on  .
.
•License Agreement
The greeting procedure also displays the license agreement. Please read this carefully. It contains important legal information on the use of your software. In order to see the full text, use the mouse and the scroll bar on the right side of the screen to move downwards until you have reached the end of the document. You accept the agreement by clicking on the “I accept the agreement” option field. Only by doing so will you be entitled to use the product under lawful terms and conditions.
Step 3
After the login procedure the Windows® desktop appears on your screen. You will find a brief overview on the following pages.
After the login procedure the Windows® desktop appears on your screen. This can be adjusted so that the screen of your computer looks different.
However, basic operation is guaranteed.
20 |
Views & Handling |
|
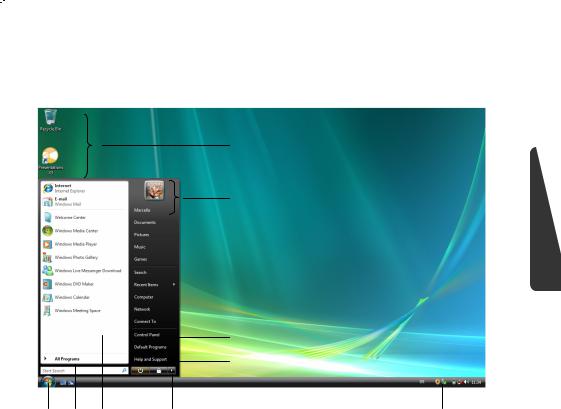
Short description of the Windows® Desktop
After the login procedure the Windows® Vista® desktop appears on your screen. (Your desktop might not look exactly like the one shown here.)
s
t
u v
n o p |
q |
r |
1. Start Button
Clicking the Start button brings up a menu where you can access help, software programs, files, and settings.
2. All Programs
All of the software programs installed on your notebook are ordinarily listed here. Click All Programs to reveal an extensive menu.
3. Program Bar
The most commonly used software programs are listed here.
4. Turn Off Computer
Click on this interface with the left mouse button and select the Shut Down option, in order to switch the Notebook off.
5. Task Bar
Here you receive information and status reports about Windows® Vista® and which programs are running.
Safety
Handling
Components
Aid
Appendix
Getting Started |
21 |

6. Desktop Icons
Desktop icons link to their respective programs. To start a program, double-click its desktop icon.
7. Logged in User
This tells you which user is logged in to your notebook.
8. Control Panel
You can use the icons in Control Panel to change the appearance and functionality of Windows® Vista®. These icons represent options for configuring your notebook.
9. Windows® Vista® Help
Here you can find information on using your notebook, networking, backup, and many other tasks.
22 |
Views & Handling |
|

|
Chapter 3 |
|
Main Components |
Subject |
Page |
Power Supply ...................................................................... |
25 |
Display ................................................................................. |
32 |
Data entry ............................................................................ |
36 |
Hard Drive ............................................................................ |
38 |
Optical Drive ......................................................................... |
40 |
Sound Card .......................................................................... |
44 |
Modem (optional).................................................................. |
47 |
Network ................................................................................ |
48 |
The Multimedia Card Reader................................................ |
51 |
Express Card ....................................................................... |
52 |
Webcam (optional) ............................................................... |
53 |
TV card with remote control (optional) .................................. |
55 |
Universal Serial Bus (USB) Port ........................................... |
60 |
Securing the Notebook ........................................................ |
61 |
Software ............................................................................... |
62 |
Safety
Handling
Components
Aid
Appendix

24 |
Main Components |
|
 Loading...