


M A G E L L A N
NAV 6500/NAV 6510 User Manual
© 1998 by Magellan Corporation. All rights reserved.
No part of this User Guide may be reproduced or transmitted in any form or by any means, electronic or mechanical, including photocopying and recording, for any purpose other than the purchaser's personal use without the written permission of Magellan Corporation.
Magellan™, GPS NAV 6500/ NAV 6510™ are the trademarks of Magellan Corporation.
Part No. 630323
Magellan NAV 6500/ NAV 6510 User Manual
WARNINGS
USE GOOD JUDGEMENT
This product is an excellent navigation aid, but does not replace the need for careful orienteering and good judgement. Never rely solely on one device for navigating.
USE CARE
The Global Positioning System (GPS) is operated by the U.S. Government, which is solely responsible for its accuracy and maintenance.
The accuracy of position fixes can be affected by the periodic adjustments to GPS satellites made by the U.S. Government and is subject to change in accordance with the Department of Defense civil GPS user policy and the Federal Radionavigation Plan.
USE CAUTION
Accuracy can be affected by poor satellite geometry. When accuracy warnings appear on the screen, use the data with extreme caution.
USE PROPER ACCESSORIES
Use only Magellan cables and antennas; the use of non-Magellan cables and antennas may severely degrade performance or damage the receiver, and will void the warranty.
LICENSE AGREEMENT
Magellan grants you, the purchaser, the right to use the software supplied in and with MAGELLAN GPS products (the “SOFTWARE”) in the normal operation of the equipment. You may make copies only for your own personal use and for use within your organization.
The SOFTWARE is the property of MAGELLAN and/or its suppliers and is protected by United States copyright laws and international treaty provisions; therefore, you must treat this SOFTWARE like any other copyright material.
You may not use, copy, modify, reverse engineer or transfer this SOFTWARE except as expressly provided in this license. All rights not expressly granted are reserved by MAGELLAN and/or its suppliers.
* * *
Contents
Introduction |
|
Packing List ....................................................................... |
1 |
Conventions Used in this Manual ...................................... |
2 |
Commonly Used Terms ..................................................... |
2 |
Getting Started |
|
Magellan NAV 6500/NAV 6510 Description .................... |
3 |
Power ON/OFF ................................................................ |
5 |
Adjusting Contrast ............................................................ |
5 |
Adjusting Backlighting ...................................................... |
6 |
First Time Use - Initializing the Receiver ........................... |
6 |
Navigating with Your Receiver ........................................... |
8 |
Reference |
|
General Usage .................................................................... |
9 |
Turning the Receiver ON/OFF ......................................... |
9 |
Cancelling an Operation .................................................... |
9 |
Inputting Data .................................................................. |
9 |
Adjusting Contrast ............................................................ |
9 |
Adjusting Backlighting .................................................... |
10 |
NAV Screens ................................................................... |
10 |
Satellite Status Screen ................................................... |
10 |
Map Screen .................................................................. |
12 |
Setting the Map Scale................................................... |
13 |
Using the Cursor Key on the Map Screen .................... |
13 |
Map Orientation .......................................................... |
14 |
Track Plot Mode .......................................................... |
15 |
Viewing Nav-Aid Attributes ......................................... |
15 |
Finding Distance & Bearing from a Point on the Map . 17 |
|
Viewing Tide Information ............................................ |
18 |
Viewing Port Information ............................................ |
18 |
NAV 1 Screen .............................................................. |
19 |
NAV 2 Screen .............................................................. |
19 |
Customizing the Nav 2 Screen ..................................... |
20 |
Waypoints ..................................................................... |
20 |
Creating a Waypoint .................................................... |
21 |
Saving the Cursor Position as a Waypoint .................... |
21 |
Saving the Current Position Fix as a Waypoint ............. |
21 |
Modifying Waypoint Data Fields ................................. |
22 |
Creating a Waypoint Using the MARK key .................. |
22 |
Accessing the Waypoint List ......................................... |
23 |
Finding a Waypoint in the Waypoint List ..................... |
23 |
Viewing a Waypoint from the Waypoint List ............... |
24 |
Editing a Waypoint from the Waypoint List ................. |
24 |
Deleting a Waypoint from the Waypoint List ............... |
25 |
Deleting All Waypoints in the Waypoint List ............... |
25 |
Creating a Waypoint from the Waypoint List ............... |
25 |
Viewing Nearest Waypoint ........................................... |
26 |
Deleting a Waypoint from the Map Screen .................. |
26 |
Moving a Waypoint ..................................................... |
26 |
Routes ........................................................................... |
27 |
Creating a GOTO Route from Waypoint List .............. |
27 |
Creating a GOTO Route from Nearest List ................. |
28 |
Creating a GOTO Route by Waypoint Name .............. |
28 |
Creating a GOTO Route to the Cursor Position .......... |
29 |
Creating a MOB Route ................................................ |
29 |
Deleting a GOTO Route ............................................. |
29 |
Multi-leg Routes .......................................................... |
30 |
Creating a Multi-Leg Route Using the Map ................. |
30 |
Creating a Multi-Leg Route (Text Mode) ..................... |
30 |
Activating a Route ........................................................ |
31 |
Deactivating a Route .................................................... |
32 |
Reversing a Route from the Map Screen ....................... |
32 |
Reversing a Route from the List ................................... |
33 |
Editing a Route ............................................................ |
33 |
Inserting a Waypoint in a Route ................................... |
33 |
Removing a Waypoint from a Route ............................ |
34 |
Appending a Waypoint to the End of a Route .............. |
34 |
Moving a Waypoint in a Route .................................... |
35 |
Replacing a Waypoint in a Route Using Text Edit ........ |
35 |
Activating a Leg of a Route .......................................... |
36 |
Deleting a Route on the Map ....................................... |
37 |
Deleting a Route in the List ......................................... |
37 |
Copying a Route .......................................................... |
37 |
Auxiliary Functions........................................................ |
38 |
The Aux Screen ............................................................ |
38 |
General Setup Function ............................................... |
38 |
Adjusting Contrast ....................................................... |
39 |
Setting Time Reference ................................................ |
39 |
Initializing Date/Time ................................................. |
39 |
Setting Time Format .................................................... |
40 |
Setting Date Format ..................................................... |
40 |
Turning the Beeper On or Off ..................................... |
40 |
Language Setting .......................................................... |
40 |
Navigation Setup ......................................................... |
41 |
Selecting Coordinate System ........................................ |
41 |
Selecting Map Datum .................................................. |
42 |
Selecting North Reference ............................................ |
42 |
Selecting Map Orientation ........................................... |
42 |
Setting Projected Course .............................................. |
43 |
NAV 2 Screen Setup .................................................... |
43 |
CDI/Units/Alarms Function ........................................ |
43 |
Selecting CDI Scale ..................................................... |
44 |
Setting Distance Units ................................................. |
44 |
Setting Speed Units ...................................................... |
44 |
Setting Depth Units ..................................................... |
44 |
Activating Alarms ......................................................... |
45 |
Setting Arrival Radius .................................................. |
45 |
Setting Anchor Alarm .................................................. |
45 |
Setting XTE Alarm ...................................................... |
46 |
Turning Test Alarm On or Off ..................................... |
46 |
Data Port Setup Functions ........................................... |
46 |
Setting NMEA Output ................................................ |
46 |
Changing NMEA Output Baud Rate ........................... |
47 |
Turning NMEA Input On or Off ................................ |
47 |
Changing NMEA Input Baud Rate .............................. |
47 |
Setting Differential Input Baud Rate ............................ |
47 |
Map Configuration Functions ...................................... |
48 |
Turning Land Settings On and Off .............................. |
48 |
Turning Marine Settings On and Off ........................... |
48 |
Bathymetric Lines ........................................................ |
49 |
Depth Areas Limit ....................................................... |
49 |
Bathymetrics and Soundings Range ............................. |
50 |
Turning Nav-Aid Settings On and Off ......................... |
50 |
Lights ........................................................................... |
51 |
Turning Other Settings On and Off ............................. |
51 |
Turning Chart Settings On and Off ............................. |
51 |
Plotter Mode ................................................................ |
52 |
Track History Functions............................................... |
52 |
Turning Track History On or Off ................................. |
53 |
Choosing Plotting Interval ........................................... |
53 |
Resolution by Dist ....................................................... |
53 |
Resolution by Time ...................................................... |
53 |
Percentage of Track Memory Used ............................... |
53 |
Clearing Track Memory ............................................... |
54 |
Trip Planning Function ................................................ |
54 |
Calculator .................................................................... |
54 |
Calculating Sunrise/Sunset and Lunar Information ...... |
55 |
Calculating Actual Current .......................................... |
55 |
Simulation Mode Function .......................................... |
56 |
Memory Reset .............................................................. |
56 |
Color Setup.................................................................. |
56 |
User C-Card ................................................................ |
57 |
Map Shift ..................................................................... |
58 |
Troubleshooting |
|
Troubleshooting ........................................................... |
60 |
Warnings/Alarms ......................................................... |
62 |
Tutorial |
|
Tutorial ........................................................................ |
63 |
NAV 6500/NAV 6510 Appendix |
|
Installation Instructions ................................................... |
69 |
Gimbal Mount Installation Instructions ....................... |
70 |
Flush Mount Installation Instructions .......................... |
72 |
Proper Antenna Installation - Signal Reception ............ |
74 |
Electrical Connections ................................................. |
74 |
Wiring Instructions ...................................................... |
75 |
Navaid Icons .................................................................... |
76 |
Data Cartridges ............................................................... |
81 |
List of Available Datums .................................................. |
82 |
NMEA Messages ............................................................. |
83 |
Abbreviations ................................................................... |
90 |
Specifications ................................................................... |
92 |
Coordinate Systems ......................................................... |
93 |
What Is GPS? .................................................................. |
95 |
Explanation of Data Terms .............................................. |
97 |
Glossary ........................................................................... |
99 |
Index |
102 |

Introduction
1
Congratulations on your purchase of the Magellan NAV 6500/ NAV 6510 receiver. The receiver integrates the remarkable accuracy of a GPS receiver with a broad range of electronic chart and navigation aids into a single easy-to-use navigation information center.
Equipped with C-MAP CF-95 cartography, the receiver can store up to 500 waypoints, and 25 routes with up to 50 legs. The large LCD display features a help bar on every screen and can be used either with cartography or as a track plotter to monitor progress.
The manual is to be used with either the NAV 6500 or the NAV 6510. These receivers differ in that the NAV 6510 is the color version of the NAV 6500.
This manual is divided into six chapters; Introduction, Getting Started, Reference, Troubleshooting, Tutorial and Appendix. It is very important that you go through the Getting Started chapter first as it prepares your receiver for use and provides basic instruction. The third chapter is a Reference Section for the features found in your receiver including step- by-step instructions on their use. Because of the advanced navigational features of the receiver some of the terminology
used may be new to you. The Troubleshooting section gives you a problem and answer series to guide you with problems you may have. The fourth chapter is a Tutorial that walks you through the basic usage of the receiver. The final chapter, Appendix, contains some further explanations and information that will help you use your receiver and defines many of the terms that may be unfamiliar.
Packing List
The following items should be in your package:
NAV 6500/NAV 6510 receiver
Remote antenna with 40 ft coax cable
Power/data cable
Gimbal mount kit
Plastic cover
Flush mount kit
Warranty card
If any of these items is missing, please contact your local Magellan dealer or distributor.
Magellan NAV 6500/NAV 6510 |
1 |
Conventions Used in this Manual
The reference section of this manual is designed to assist you in the use of your receiver. Each topic in the reference section includes a brief description of the activity chosen, a pictorial view of the keys to press, and a detailed description with sample screens of how to perform the activity. As you become more familiar with your receiver, you will be able to use the pictorial view of the keys as a "quick reference" to perform the desired activity.
Also in the reference section are alerts to inform you of some cautions or notes that will assist you in using your receiver.
The stop sign indicates information that is very important and should be read before continuing.
The light bulb denotes information that can help you use or understand your receiver. While this information is not required to perform the activity, it may provide you with a better understanding of the activity or shortcuts you can use.
Commonly Used Terms
A few of the terms used in this manual may be unfamiliar to you and are described in the Glossary found in the Appendix. To help you get started, some of the more common terms are described here with a simple explanation as to their meaning.
Position Fix: The receiver attains information from GPS satellites to compute a value (coordinates) that describes your unique position on the earth. This is called taking a position fix and the coordinates computed are referred to as the position fix.
Waypoint: (Abbreviated as WPT.) A position fix can be saved in memory with a name and type that you either assign or let the receiver assign for you. These saved position fixes are called waypoints.
MARK: You can mark the cursor position or your present position at any time by pressing the MARK key to create a waypoint.
GOTO: You can actually "Go To" a saved waypoint or any cursor position simply by pressing the GOTO key and choosing a destination waypoint. The receiver will navigate you from your present position to the waypoint chosen with bearing and distance information.
Route: A route is slightly different from a GOTO. A route contains a starting and ending waypoint and may include intermediate waypoints along the way. Routes can be from one waypoint to another (a single-leg route) or from a waypoint to a series of waypoints, (a multi-leg route) up to 50 legs.
Leg: Legs are the divisions of a route between waypoints. A route that goes from WPT A to WPT B, from WPT B to WPT C, and from WPT C to WPT D has three legs.
2 |
Magellan NAV 6500/NAV 6510 |
Getting Started
This section shows you how to begin using your receiver for the first time. After a brief description of the receiver, it discusses:
•Turning power on and off
•Adjusting contrast and backlighting
•First time use, initializing the receiver
•Navigating
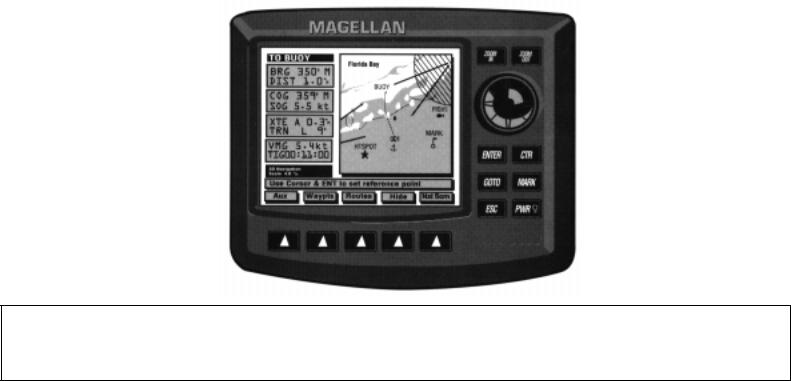
Magellan NAV 6500/NAV 6510 Description
The Magellan GPS NAV 6500/NAV 6510 has a high contrast, high resolution backlit LCD, and backlit keypad and is designed to be either flush-mounted or gimbal mounted. Mount the unit as you plan on using it, install the antenna, and make all the electrical and data connections before you attempt to operate it. See the Installation section in the Appendix for details on mounting and connecting the receiver.
Keys
ZOOM IN - Changes the displayed map scale to view a smaller area in greater detail.
2
ZOOM OUT - Changes the displayed map scale to view a larger area in less detail.
CURSOR KEY - Controls cursor movement, and is used to select menu items as well as scroll through the alphanumeric series for data entry. The UP/DOWN and RIGHT/LEFT indicators on the CURSOR KEY move the cursor or highlight in the cardinal directions, up, down, right and left. The dots on the cursor key move the cursor diagonally on the map display.
ENTER - Used to confirm data entry and confirm selections on the screen.
CTR - Centers the boat or cursor on the screen and allows toggling between the boat and the cursor position.
GOTO -Creates a one-leg route directly to the selected waypoint or to the cursor position.
MARK - Records the present boat position or cursor position (if the map is displayed), as a stored waypoint.
ESC - Cancels and backs out of an operation or backs up one step in a sequence.
Magellan NAV 6500/NAV 6510 |
3 |

Magellan NAV 6500/NAV 6510 GPS Receiver
Display
Softkeys
Cartridge Slot
(not shown)
ZOOM IN
ZOOM OUT
Cursor Key
ENTER Key
 CTR (Center) Key
GOTO Key
MARK Key
PWR (Power) and
Light Key
ESC (Escape) Key
4 |
Magellan NAV 6500/NAV 6510 |
PWR - Turns the receiver on and off and adjusts the LCD and keys backlight intensity.
SOFTKEYS - Softkey functions are accessed using the keys along the bottom of the display. Softkey functions appear at the bottom of each screen.
Information |
Map |
Window |
|
|
Help |
|
Bar |
Softkey |
|
Functions |
|
When the text of the softkey function is dark, the feature is accessible; when the text is grayed out, the function is available from this screen but is not currently accessible.
Using the Help Bar. The map screen and many of the function screens contain a help bar, located just above the softkeys, which tells you which action or actions you may perform on the current screen.
Power ON/OFF
To turn power on :
Press and release the PWR key.
The start-up screen and navigation warning screen are displayed.
From the warning screen, press any key to exit and continue.
To turn power off :
Press and hold down the PWR key.
A countdown window is displayed on the screen. The window will countdown from 3 to zero.
Continue to hold the PWR key until the countdown is complete. The unit turns off.
Adjusting Contrast
Press the AUX softkey to access the AUXILIARY MENU screen.
While “General Setup” is highlighted in the Auxiliary window, press ENTER to access the window at right, containing the CONTRAST option.
Use the CURSOR KEY to highlight CONTRAST and press ENTER. A bar graph appears.
Magellan NAV 6500/NAV 6510 |
5 |

Use the RIGHT/LEFT arrows on the CURSOR KEY to adjust the contrast to a comfortable level, then press ENTER to confirm.
Follow the instructions at the bottom of the screen, pressing ESC twice to back out of the AUXILIARY screen.
Adjusting Backlighting
Adjust backlighting to three different levels of intensity by pressing and releasing the PWR key repeatedly. The intensity increases and decreases incrementally when the PWR key is pressed.
First Time Use - Initializing the Receiver
The constellation of 24 GPS satellites circling the globe is in constant motion and before your receiver can tell you where you are, it needs to know where the satellites are relative to itself. Your receiver’s internal almanac tells it which satellites are in view at a given geographic position.
Therefore, you need to enter your approximate location, time and date, which will serve as a point of reference for your receiver in selecting the best satellites to use. Without knowing its approximate location, the receiver may take 10 minutes or more to find the specific coordinates of your position.
Telling your receiver the initial position, time and date is called initializing your receiver; initializing enables it to begin track-
ing satellites, and therefore, calculating your position, much faster.
You need not reinitialize your receiver each time you use it, but only if the unit has moved over 300 miles without computing a postion or if the total memory has been cleared by the user. If you do not reinitialize, the receiver may take 10 minutes or more to compute a new position fix.
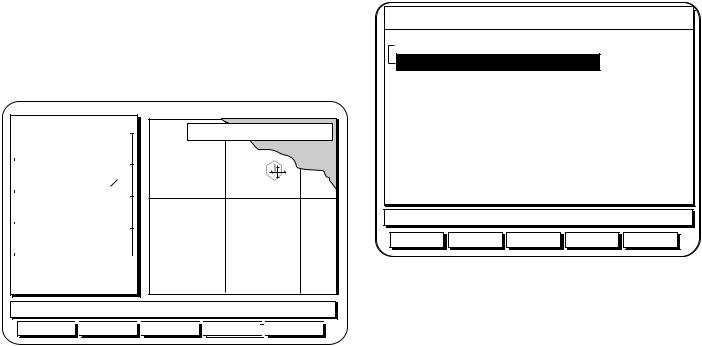
Entering an Approximate Initial Position. To give your receiver an approximation of its current position, you will need to enter the latitude and longitude of your general location. The receiver allows you to enter the location quickly and easily using the MAP screen.
While viewing the Satellite Status screen, press the INIT POS softkey. The Map screen will appear.
Use the CURSOR KEY to move the cursor to your present geographic area on this map. Use the ZOOM IN /ZOOM OUT keys to help you determine whether the cursor is active in the right part of the globe. (Some basic knowledge of continental land masses is helpful.)
If the cursor is not in your region of the world, press ZOOM OUT repeatedly, then use the CURSOR KEY to move the cursor to your present geographic area and use the ZOOM IN key repeatedly to zero in on your present location.
When you have placed the cursor near your current loca-
6 |
Magellan NAV 6500/NAV 6510 |

tion, press ENTER, as you are instructed to do by the help bar.
Now the help bar displays the word “Initializing...” and the receiver returns to the Satellite Status screen.
The receiver records the coordinates of the cursor position where ENTER was pressed as the starting point from which it searches for available satellites. When it begins receiving signals from satellites, this approximate coordinate position will be updated to reflect your actual position.
Pressing the ESC key before initializing returns to the Satellite Status screen without changing the initial position.
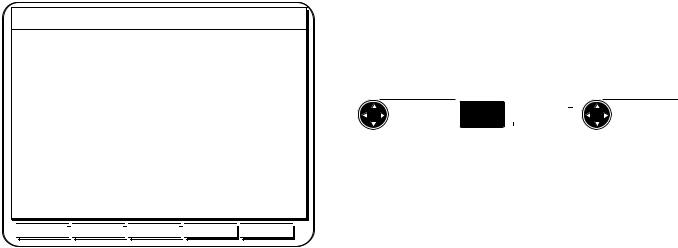
Setting the Date and Time. To set the UTC date and time, press the AUX soft key.
UTC, or Universal Time Coordinates, is simply the current local time at the Prime Meridian running through Greenwich, England. You must calculate the local offset and enter the correct time expressed in UTC for initializing your receiver. (Be reminded that as you calculate your UTC you need to correct for changes in your time zone due to daylight savings time.)
While “General Setup” is highlighted in the Auxiliary window, press ENTER to access the window at right, containing the options, UTC DATE and UTC TIME.
Use the CURSOR KEY to highlight UTC DATE and press ENTER.
Use the CURSOR KEY to change the date to the current UTC date, then press ENTER to confirm.
Use the CURSOR KEY to highlight UTC TIME and press ENTER.
Use the CURSOR KEY to change the time to the current UTC time, then press ENTER to confirm.
Press ESC twice to return to the previously viewed NAV screen.
In a few seconds, after being initialized, the receiver will acquire its first position fix, displaying the actual latitude and longitude coordinates of your current position.
It is necessary to have a current position fix in order for the receiver to compute navigation information. If you do not have a position fix, the navigation information will be displayed with dashes until a position fix is acquired.
Magellan NAV 6500/NAV 6510 |
7 |

The format of the coordinates displayed can be changed. Latitude and longitude (LAT/LON) are expressed in ddd mm.ss, ddd mm.mm or ddd mm.mmm. The first option uses seconds (there are 60 seconds to one minute of latitude or longitude), while the second and third options use decimal format. Other formats include: UTM, OSGB and TDs.
See Navigation Setup for instructions on changing the coordinate system.
Navigating with Your Receiver
Navigation requires setting waypoints and routes. You can either create waypoints first, using the Waypoints softkey function, and then create routes using those waypoints, or go directly to the Routes function and connect the waypoints into a route as you create them.
Once the route is created, it must be activated. As you get ready to navigate, make sure the boat icon representing your present position is active (press CTR and the boat appears at the center of your screen, press it again and the cursor is centered). Also, make sure that the unit is computing fixes, then it is ready to update navigation information.
As you navigate, you can look at the map screen to see graphically how you are progressing and where you are with respect to your planned route. You can view important navigation data in the information window to the left of the map. You
can also use the Nav 1 screen to get complete information on your navigation such as position coordinates, DTG, BRG, SOG, COG, VMG, TRN, TTG and ETA to the next destination waypoint. If you wish to use other parameters for navigation, you may customize the Nav 2 screen.
If you are not planning to monitor the receiver continuously, you may choose to turn on certain alarms to warn you when you are drifting off course or approaching your destination waypoint.
The unit can also be connected to an autopilot. The steering of the boat is then done automatically by the autopilot using NMEA messages output by the unit.
8 |
Magellan NAV 6500/NAV 6510 |
Reference
General Usage
Turning the Receiver ON/OFF
To turn power on :
PWR 
3
Cancelling an Operation
ESC
Use the ESC key to cancel and back out of an operation. (except in setup)
Press and release the PWR key.
The copyright and warning screens are displayed.
From the warning screen, press any key to exit and continue.
To turn power off :
PWR |
Hold down until |
|
countdown is finished. |
||
|
A countdown window is displayed on the screen. The window will countdown from 3 to zero: POWERING DOWN IN 3 Seconds.
Continue to hold the PWR key until the countdown is complete. The unit turns off.
Inputting Data
Use the CURSOR KEY to select menu items as well as scrolling through alphanumeric series for data entry.
Use the UP/DOWN indicators on the CURSOR KEY to scroll up and down through the alphanumeric list, stopping on the selection. Then use the RIGHT/LEFT indicators on the CURSOR KEY to move the highlight to the right or left to continue or correct data entry.
Use ENTER to confirm data entry.
Adjusting Contrast
|
Highlight |
Highlight |
|
Adjust |
|
ENTER |
|
AUX |
General Setup |
Contrast |
|||||
Contrast |
|||||||
|
Press ENTER |
Press ENTER |
|
||||
|
|
|
|
||||
|
|
|
|
||||
Magellan NAV 6500/NAV 6510 |
9 |

Press the AUX softkey to access the AUXILIARY MENU screen.
While “General Setup” highlighted in the Auxiliary window, press ENTER to access the window at right, containing the CONTRAST option.
Use the CURSOR KEY to highlight CONTRAST and press ENTER.
A bar graph appears.
Use the RIGHT/LEFT arrows on the CURSOR KEY to adjust the contrast to a comfortable level, then press ENTER to confirm.
Follow the instructions at the bottom of the screen, pressing ESC twice to back out of the AUXILIARY screen and return to the last viewed root screen.
Adjusting Backlighting
Adjust backlighting to four different levels of intensity by pressing and releasing the PWR key repeatedly. The intensity increases and decreases incrementally when the PWR key is pressed.
NAV Screens
The receiver has four different NAV screens that provide you with information that you can use for navigating: SAT STATUS, MAP, NAV 1 and NAV 2.
From any NAV screen, press the Nxt Scrn soft key repeatedly to cycle through the four NAV screens. The SAT STATUS screen, MAP screen, NAV 1, and NAV 2 screens are constantly updating and contain the information necessary to guide you to your destination. You can customize the NAV 2 screen to display the navigation information you find most useful (see customizing).
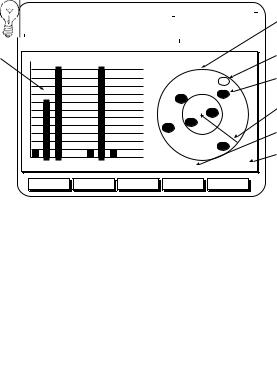
Satellite Status Screen
The first screen after the navigation warning screen is the Satellite Status screen. This screen displays information relating to the satellites being tracked, searched for, or used in the position fix.
A bar graph shows the signal quality of the satellites being tracked. The satellite identification numbers are shown along the bottom of the graph, and the signal strength is shown along the left edge. The longer the bar, the stronger the signal of the corresponding satellite.
The satellites’ positions in the sky are plotted at right in 2 concentric circles representing 0° elevation at the horizon, and 45°. The center point of the circle, 90°, is directly overhead. The satellites being tracked are shaded.
10 |
Magellan NAV 6500/NAV 6510 |
Satellite Quality
Bar Graph
|
|
Jan/19/96 |
True North |
GPS Fix |
|
||
|
09:19:05AM |
|
|
|
|
|
|
|
|
|
|
Satellite Position (not tracking)
9 |
|
|
|
|
|
8 |
|
|
|
20 |
Satellite Position |
|
|
|
|
(tracking) |
|
7 |
|
|
|
|
|
6 |
|
|
14 |
01 |
|
|
|
|
Direction of |
||
5 |
|
|
|
25 |
|
|
|
|
|
COG |
|
4 |
|
|
15 |
|
|
|
|
29 |
|
|
|
3 |
|
|
|
Geometric Quality |
|
2 |
|
|
|
|
|
|
|
|
|
|
|
1 |
|
|
|
22 |
|
|
|
|
|
Estimated Position |
|
|
|
|
|
|
|
|
01 14 15 20 21 22 25 29 -- -- |
HDOP: |
1.1 |
EPE: 63.1Ft |
Error |
|
|
Aux |
Waypts |
Routes |
MapShft |
NxtScrn |
The current time, date, GPS status, geometric quality (HDOP) and estimated position error (EPE) are also displayed. When the unit is first turned on, or when the position fix is more than 20 seconds old, the GPS status field will indicate “Acquiring,” the HDOP and EPE numbers are replaced by underscores and the available softkeys are Aux, Waypts, Routes, Init Pos, and Nxt Scrn.
Init Pos can be used to initialize the unit (see Entering an Approximate Initial Position).
If the receiver is computing fixes and moving faster than 0.2 mph, a line from the center to the outer circle points in the
direction of COG. The direction of the line is updated whenever COG changes.
When the unit is computing fixes the GPS status field will indicate “GPS Fix” and the active softkeys at the bottom of the Satellite Status screen are Aux, Waypts, Routes, Map Shft and Nxt Scrn.
If the boat’s position plotted on the map screen is consistently offset from the coordinates plotted on the paper chart, a bias may exist in the paper chart due to the datum used. You can use Map Shift to apply an offset to the boat’s position to correct for the bias. See the section entitled Map Shift.
Magellan NAV 6500/NAV 6510 |
11 |
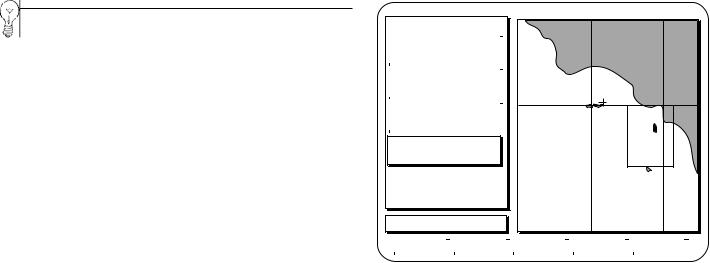
Map Screen
From the SAT STATUS screen, press Nxt Scrn to access the Map Screen.
When the Map Screen is viewed for the first time after the unit is turned on, the map always shows the cursor location before the unit was turned off.
If the receiver is not yet initialized, the cursor position defaults to 00°00.00 N and 00°00.00 E, off the African coast in the Gulf of Guinea. See Initializing.
On the left side of the screen, an information window displays the name of the destination waypoint of the active route (if any), the distance and bearing from the present position to the destination waypoint, the cartographic scale, and GPS status, as well as COG, SOG, XTE and steering data if you are moving.
Ten seconds after accessing the Map screen, the help bar disappears and the date and time are shown.
To Cursor
BRG |
035` |
M |
|
DTG |
6.7 |
n |
|
m |
|||
|
|
|
|
|
|
|
|
COG |
359` |
M |
|
SOG |
7.0 |
k |
|
t |
|||
|
|
||
|
|
|
|
|
|
|
|
XTE --.- |
n |
||
m |
|||
TRN |
---` |
|
|
|
|
|
|
34`06'34"N 119`26'01"W
GPS Fix
Scale: 954nm
03:07:21 PM
Los Angel
|
Aux |
|
|
Waypts |
|
|
Routes |
|
|
Hide |
|
|
NxtScrn |
|
|
|
|
|
|
|
|
|
|
|
|||||
|
|
|
|
|
|
|
|
|
|
|
|
|
|
|
Press the Hide softkey to temporarily remove the information window, extending the map to the full screen width. Press the Show softkey to redisplay the information window.
12 |
Magellan NAV 6500/NAV 6510 |
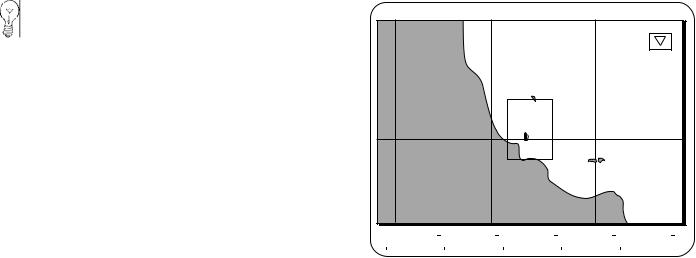
While the information window is hidden, press ESC to remove and deactivate the softkey labels, enlarging the map to the dimensions of the entire display. Press ESC again or any softkey to bring the softkey labels back into view.
N 34 00 00.00 |
Los Angel |
|
N 32 00 00.00
Aux |
|
Waypts |
|
Routes |
|
Show |
|
NxtScrn |
|
|
|
|
|
|
|||||
|
|
|
|
|
|
|
|
|
|
When the unit computes a fix, the present position will be represented by a boat icon. If the position is more than 20 seconds old it is represented by the ( ) icon.
If the last computed fix is differentially corrected, the letter D appears next to the GPS status.
Setting the Map Scale
ZOOM |
ZOOM |
IN |
OUT |
The map screen first appears in the highest possible scale setting. Use the ZOOM IN and ZOOM OUT keys to zero in on a small area of the map or pan over a larger area.
The receiver retains the scale level last used when you go to view other screens or when the receiver is turned off. If the cartridge is changed, the screen will once again zoom to the highest scale.
Map scale can also be changed from the Waypoint and Route functions.
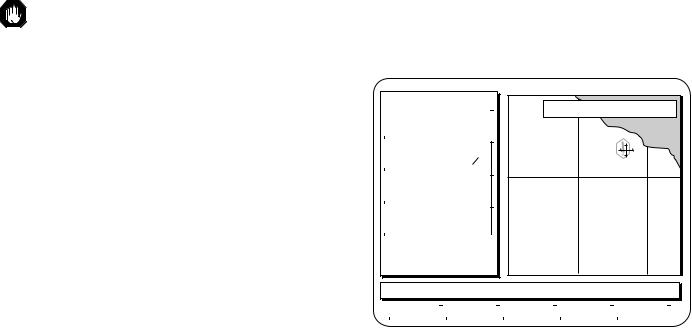
Using the Cursor Key on the Map Screen
Press the CURSOR KEY to activate and move the cursor on the Map screen.
The cursor is represented by a + .
The information window displays the bearing and distance from the present position (boat) to the cursor location (+), the coordinates of the cursor, COG and SOG.
VMG and TTG are replaced by the cursor coordinates and XTE and TRN are replaced by underscores.
Magellan NAV 6500/NAV 6510 |
13 |
While the cursor is active, press CTR to center the map around the present position boat icon. Press CTR again to recenter the display on the cursor.
If the boat and the cursor are shown on the screen, pressing CENTER first centers the map around the present position and removes the cursor icon, though it remains active. Pressing CENTER again centers the map around the cursor and the present position boat icon is continuously updated.
If the map is centered on the boat, pressing the CURSOR KEY will activate the cursor. If the cursor was already active somewhere else on the map and is not shown on the screen, that cursor position is lost.
As you scroll across the map, the map will follow the cursor movement when the cursor comes near the edge. The map redraws with the cursor near the edge.
Map Orientation
The map orientation can be set to North Up or Track Up. When North Up is selected, the boat icon rotates according to the COG direction with respect to north. The map on the previous page is shown in North Up mode.
When Track Up is selected, the map turns to keep the boat icon pointing upwards. The top of the screen is then always the COG direction. The map rotates every time the COG changes more than the specified number of degrees set under Aux functions (see Selecting Map Orientation, Auxiliary Functions).
Los Angeles |
|
Aux |
|
|
Waypts |
|
|
Routes |
|
|
Show |
|
|
NxtScrn |
|
|
|
|
|
|
|
|
|
|
|
|||||
|
|
|
|
|
|
|
|
|
|
|
|
|
|
|
14 |
Magellan NAV 6500/NAV 6510 |
Track Plot Mode |
Viewing Nav-Aid Attributes |
Track Plot Mode allows you to go where no man has gone before - or at least where your chart does not provide detailed navigation information - by displaying a LAT/LON grid without background cartography.
Though you can use this feature to plot and retrace your course conveniently using coordinates alone, EXTREME CAUTION IS REQUIRED when using the Track Plot Mode. The Track Plot Mode should never be used as a sole means of navigation. Paper charts are required.
If a cartridge is not installed, zooming into a scale not supported by the built-in map activates the Track Plot mode. If a cartridge is installed, zooming into a scale not supported by either the cartridge or the internal map also activates the Track Plot mode.
In this mode, the LAT/LON grid and label are turned on automatically, even if they are off in the Map Configuration and a warning appears for two seconds to let you know you have zoomed to a scale not supported by cartography.
Track Plot Mode then plots the route you are traveling on a grid showing coordinates, without background cartography.
Map objects appear as icons on the map. The Nav-Aids (buoys, lights, signals, etc.) and other objects are part of the cartography such as rocks, wrecks, etc. See Appendix for a list of map objects.
Object attributes appear instantly on the map screen in a QUICK INFO window when the cursor covers an icon, giving a description of the object or objects. The abbreviated description is similar in format and content to what you would see in a standard paper chart.
To Cursor
BRG |
035` |
M |
|
DTG |
7061. |
n |
|
m |
|||
|
|
|
|
|
|
|
|
COG |
164` |
M |
|
SOG |
0.9 |
k |
|
h |
|||
|
|
||
|
|
|
|
|
|
|
|
XTE |
--.- |
|
|
TRN |
---` |
|
|
|
|
|
33`20'66 |
"N |
|
|
117`31'94 |
"W |
|
|
GPS Fix |
|
|
|
Scale: |
6 |
n |
|
m |
|||
Underwater rock
Use Cursor & ENT to set reference pnt
Aux |
|
Waypts |
|
Routes |
|
Hide |
|
NxtScrn |
|
|
|
|
|
|
|||||
|
|
|
|
|
|
|
|
|
|
Magellan NAV 6500/NAV 6510 |
15 |
Press ENTER and the softkeys Expand, All Info, LocPort and Set Ref become active. To view additional information on the Objects shown in the QUICK INFO window, press ENTER and a full-screen window opens, showing a list of the objects under the cursor.
To Cursor
BRG |
035` |
M |
DTG |
7061. |
n |
m |
||
|
|
|
|
|
|
COG |
164` |
M |
SOG |
0.9 |
k |
h |
||
|
|
|
|
|
|
XTE |
--.- |
|
TRN |
---` |
|
|
|
|
33`20'66 |
"N |
|
|
117`31'94 |
"W |
|
|
GPS Fix |
|
|
|
Scale: |
6 |
n |
|
m |
|||
Underwater rock
Use Cursor & ENT to set reference pnt
Expand 

 All Info

 LocPort


 Set Ref

Object:
Underwater rock
Navigational aid, generic
Use Cursor to scroll: ENT to select
When the ENTER key is pressed, the objects now appear in the form of a menu. Use the CURSOR KEY to highlight an object on the menu and press ENTER. For example, to view the attributes for "Navigational aid, generic" use the CURSOR KEY to highlight it and press ENTER.
Complete attributes on the selected object appear.
16 |
Magellan NAV 6500/NAV 6510 |
Navigational aid, generic:
Generic navigational aid information
DANA POINT BREAKWATER LIGHT ‘5’ FL G 4S R=9M HOR
N US LL# 2395


 Restart

 PageDn

Sometimes a single object, such as a floating Navigation mark, may contain several navigational aids such as a buoy, a radar transponder beacon and a fog signal. In this case, when you press ENTER, the navigational aids appear on the menu and you may select them by highlighting them individually and pressing ENTER to view their attributes.
If there is a single object under the cursor on the map and it consists of one nav-aid, pressing Expand will immediately display the attributes of the object.
When you have finished viewing attributes, press ESC to re-
turn to the object menu, and ESC again to return to the map screen.
Finding Distance and Bearing from a Point on the Map
You can find the distance and bearing from one point to another on the Map screen using a built-in “measuring stick.”
Move cursor |
ENTER |
Set Ref |
|
|
Move cursor |
|
|||||
to Ref. Point |
|
|
|
|
to 2nd Point |
|
|
|
Use the CURSOR KEY to place the cursor on the starting reference point from which you are measuring. Press ENTER, Set Ref to activate the reference point. A temporary reference point icon is created on the screen at the cursor position.
The information window heading displays “Ref Cursor.”
Use the CURSOR KEY to move the arrow to a second point. The bearing, distance and other navigation data displayed in the information window change by increments as you move the cursor, drawing a dotted line between the two points.
Press SET REF again, and the the reference point changes to the new cursor location, which becomes the starting point of the measurement.
Pressing SET REF when the cursor is not active sets the last computed position fix or the boat’s position as the reference point. Use the CURSOR KEY to move to a second point. Press ESC to exit the reference point feature.
Magellan NAV 6500/NAV 6510 |
17 |
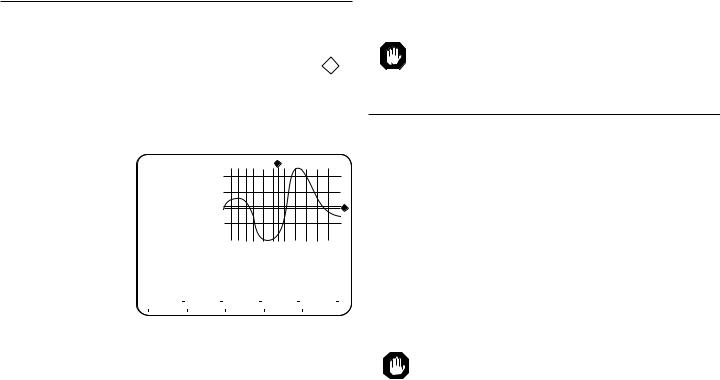
Viewing Tide Information
You may want information about the changing tides at a certain Tide Reference Station. From the Map screen, while a C-MAP cartridge is installed, use the ZOOM IN and the CURSOR KEY to find a Tide Reference Station icon ( T ). Place the CURSOR KEY over the icon and press ENTER. The Tide screen (shown below) will appear.
The top left of the screen shows the current time and height |
||||||||||||||||||
according to the |
|
|
|
|
|
|
|
|
|
|
|
|
|
|
|
|
|
|
tide graph. The |
|
|
|
|
|
|
|
|
|
|
|
|
|
|
|
|
|
|
Time: 12:00 |
|
|
|
|
|
|
|
|
|
|
|
|
|
|
||||
tide graph shows |
Height: 0.27 Ft |
0.51 |
|
|
|
|
|
|
|
|
|
|
|
|
|
|||
Aug/14/98 +1 |
|
|
|
|
|
|
|
|
|
|
|
|
|
|
||||
the tidal height |
0.43 |
|
|
|
|
|
|
|
|
|
|
|
|
|
||||
|
|
|
|
|
|
|
|
|
|
|
|
|
|
|
|
|
||
31590.83 |
|
|
|
|
|
|
|
|
|
|
|
|
|
|
|
|
||
56167.92 |
|
|
|
|
|
|
|
|
|
|
|
|
|
|
|
|
||
range over a 24 |
|
|
0.35 |
|
|
|
|
|
|
|
|
|
|
|
|
|
||
|
|
|
|
0.26 |
|
|
|
|
|
|
|
|
|
|
|
|
|
|
hour period. The |
|
|
|
|
|
|
|
|
|
|
|
|
|
|
|
|
|
|
|
|
|
|
0.18 |
|
|
|
|
|
|
|
|
|
|
|
|
|
|
CURSOR KEY |
|
|
|
|
|
|
|
|
|
|
|
|
|
|
|
|
|
|
|
|
|
|
0 2 |
4 6 8 10 12 |
14 16 |
18 |
20 |
22 |
24 |
|
|||||||
|
Port Info |
|
|
|
|
|
|
|
|
|
|
|
|
|
|
|||
allows you to move |
|
Carlo Forte |
|
|
|
|
|
|
|
|
|
|
|
|
|
|
||
|
High Water (max) 0.51 Ft (17:00L) |
|
|
|
|
|
|
|
|
|||||||||
the dotted lines on |
|
Low Water (min) 0.18 Ft (09:00L) |
|
|
|
|
|
|
|
|
||||||||
|
Sunrise 05:54L |
Sunset |
18:59L |
|
|
|
|
|
|
|
|
|||||||
|
|
|
|
|
|
|
|
|
|
|
|
|
|
|
|
|
|
|
the graph to |
|
|
|
|
|
|
|
|
|
|
|
|
|
|
|
|||
|
|
|
|
|
|
|
|
|
|
|
|
|
|
|
|
|
|
|
|
SetDate |
|
Today |
|
NextDay |
|
PrevDay |
|
|
|
|
|
|
|
||||
change the height |
|
|
|
|
|
|
|
|
|
|
|
|
|
|
|
|
|
|
accordingly. Under |
|
|
|
|
|
|
|
|
|
|
|
|
|
|
|
|
|
|
PORT INFO is the Tide Reference Station name, height of the water (max and min) and the sunrise and sunset for the date and time you have chosen. The softkeys at the bottom of the screen allow you to set the date. Press the desired key
and the tide graph will show the tides for the appointed day.
The C-MAP cartridge needs to be inserted into the receiver in order to obtain the above information.
Viewing Port Information
The receiver can show you information regarding port services such as restaurants, fuel stations, police, etc. From the Map screen, press ENTER. Press the LOCPORT softkey at the bottom of the Map screen to locate a port. A screen will appear listing the local services available.
Use the CURSOR KEY to highlight the service you want information about and press ENTER to find the name, distance and bearing of the port for the service. The ports are listed in order of nearest proximity to your present position. Again, use the CURSOR KEY to highlight your choice and press ENTER. A screen appears to give you specifics on the service you have chosen. Press ESC to view the Map screen with your port location selection shown.


 The C-MAP cartridge containing port informa-

 tion is needed for this function.
18 |
Magellan NAV 6500/NAV 6510 |
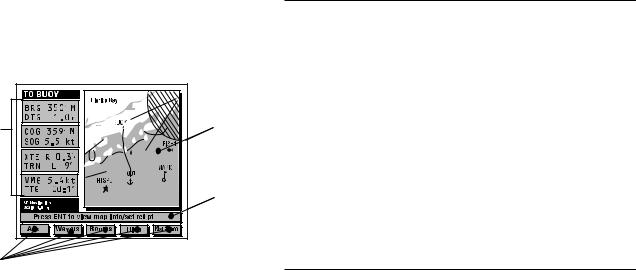
NAV 1 Screen
From the Map Screen, press Nxt Scrn to access the NAV 1 screen
|
TO HOTSPOT |
|
34`06'35"N |
|
Jan/19/96 |
|||
|
GPS Fix D |
|
117`49'34"W |
|
09:19:05AM |
|||
|
|
|
|
WGS84 |
|
|||
|
|
|
|
|
|
|||
|
|
|
|
|
|
|
|
|
|
DTG |
6.7 Nm |
|
BRG |
22` M |
|||
|
SOG |
7.0 Kts |
|
COG |
359` M |
|||
|
VMG |
6.5 Kts |
|
TRN R 23` |
||||
|
|
|
|
|
|
|
|
|
L4.0n |
n |
m |
R4.0 m |
TTG:00:58:13 ETA:10:17:18
Aux |
Waypts |
Routes |
MapScrn |
NxtScrn |
At the top of the NAV 1 screen is the destination waypoint (if any), and current GPS status, the current position coordinates and datum, the time and date. The position coordinates are based on the setup datum, which you may select under Navigation Setup.
The letter “D“ for differential appears next to the GPS status if the last computed fix is differentially corrected (see DGPS in Appendix).
The two large center windows display Distance to Go (DTG), Bearing (BRG), Speed over Ground (SOG), Course over Ground (COG), Velocity made good (VMG), and how many degrees and direction to turn (TRN).
The bottom of the screen displays Time to Go (TTG), Estimated Time of Arrival (ETA ), and Course Deviation Indicator (CDI). The boat icon on the CDI points in the direction of COG with respect to Bearing (BRG).
The active softkeys are Aux,Waypts, Routes, MapScrn and Nxt Scrn.
Press MapScrn to return to the Map screen or Nxt Scrn to switch to the Nav 2 screen.
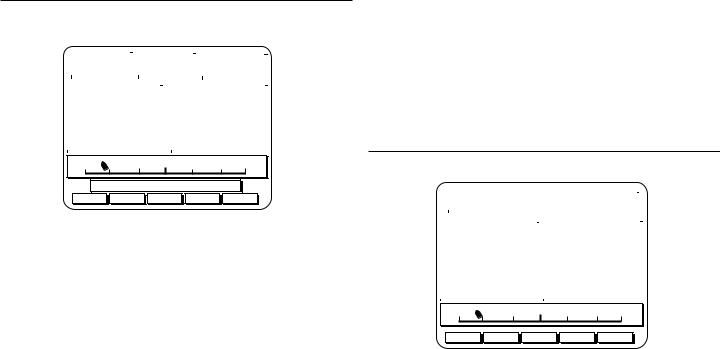
NAV 2 Screen
From the NAV 1 screen, press Nxt Scrn to access the NAV 2 screen.
|
TO HOTSPOT |
|
GPS Fix D |
|
|||
|
|
|
|
|
|
|
|
|
|
|
|
|
|
|
|
SOG |
7.0 Kts |
|
COG |
359` M |
|||
DTG |
6.7 |
Nm |
|
CTS |
45` M |
||
XTE L3.0 |
Nm |
|
STR R 46` |
||||
|
|
|
|
|
|
|
|
L4.0n |
n |
m |
R4.0 m |
Aux |
Waypts |
Routes |
MapScrn |
NxtScrn |
At the top of the screen the name of the destination waypoint (if any) and the current GPS status are displayed. If the last computed fix is differentially corrected, the letter D appears.
Magellan NAV 6500/NAV 6510 |
19 |

The two large center windows display Speed over Ground (SOG), Course over Ground (COG), Distance to Go (DTG), Course to Steer (CTS), Cross Track Error (XTE) and Steering (STR). These fields can be changed to include other information under Navigation Setup.
The bottom of the NAV 2 screen displays a Course Deviation Indicator (CDI). The boat icon on the CDI points in the direction of COG with respect to Bearing (BRG).
The active softkeys are Aux,Waypts, Routes, MapScrn and Nxt Scrn.
Press MapScrn to return to the Map screen or Nxt Scrn to return to the Satellite Status screen.
Customizing the Nav 2 Screen
In addition to the navigation parameters shown, you may select BRG, Drift, SOA, Set, TRN, and VMG.
|
|
Highlight |
|
Highlight |
Select Field |
AUX |
Navigation Setup |
Nav2 Screen Setup |
to Change |
||
|
|||||
|
Press ENTER |
Press ENTER |
|
||
|
ENTER |
Select New |
ENTER |
|
|
|
Data Type |
|
|||
|
|
|
|
||
Press the Aux softkey, highlight Navigation Setup and press ENTER. Highlight Nav 2 Screen Setup and press ENTER.
Use the CURSOR KEY to highlight the field you wish to change and press ENTER to access the complete list of parameters.
Highlight the parameter in the list that you wish to use, then press ENTER. Do this for each field that you wish to change, confirming with ENTER each time, then press ESC three times to return to the Nav 2 screen.
The receiver will not accept an entry of the same parameter more than once.
Waypoints
The Waypoints function allows you to store in memory up to 500 positions, which can be used to build routes by which you navigate.
Waypoints can be created, viewed, edited, deleted, moved, and listed by proximity to the cursor or present position.
Waypoint names can be generated by the receiver or created by the user. In addition, you may choose from 16 different waypoint types, whose icons appear on the map, making them more easily identifiable.
From any NAV screen, press the Waypts softkey to access the Waypoints function.
The Map screen appears.
20 |
Magellan NAV 6500/NAV 6510 |

If you have stored waypoints in memory, the number of waypoints plotted on the map display depends on the map zoom scale and the proximity of the waypoints to each other.
The cursor shown on the map is an arrow and can be moved using the CURSOR KEY.
Softkeys available on the Waypoints screen are List, Nearest, Create, Delete and Move.
Press the ESC key to exit from the Waypoints screen and return to the root screen.
Creating a Waypoint
The receiver allows you to create waypoints in several ways: graphically, by moving the cursor to the desired location on the map, by saving your current position as a waypoint, by entering coordinates manually, or by pressing the MARK key from any screen to save either your current position or the cursor position. You also have the choice of allowing the unit to automatically name the waypoint, or naming it yourself.
Saving the Cursor Position as a Waypoint
|
|
|
|
|
|
|
|
Modify or |
|
|
|
|
|
Set Cursor |
|
|
|
|
|
||
Waypts |
|
|
|
Create |
|
Accept |
|
Done |
||
|
|
|
Position |
|
|
|
Default Data |
|
|
|
|
|
|
|
|
|
|
|
|
|
|
|
|
|
|
|
|
|
|
|
|
|
From any NAV screen, press the Waypts softkey, use the CURSOR KEY to move the cursor arrow to the point on the map at which you wish to create a waypoint, and press the CREATE softkey.
The Create Waypoint window appears. You can change the waypoint name, waypoint icon, coordinates, description, or you can accept the default values. When the information for the waypoint is correct, press Done.
Saving the Current Position Fix as a Waypoint
|
|
|
|
|
|
Modify or |
|
|
Waypts |
|
Create |
|
GPS |
|
Accept |
|
Done |
|
|
|
|
|
|
Default Data |
|
|
|
|
|
|
|
|
|
||
|
|
|
|
|
|
|
|
|
While the unit is computing fixes, from any root screen, press the Waypts, Create softkeys.
The Create Waypoint window appears. Press the GPS softkey. The current computed position is entered into the coordinates field. You may modify any of the four fields in the Create Waypoint window. Press Done to accept the waypoint.
You can also access the create window from the Waypoint List screen.
Magellan NAV 6500/NAV 6510 |
21 |
Modifying Waypoint Data Fields |
Notes on the Data Fields |
Each of the four fields in the Create Waypoint window can be modified. Each field is assigned a default value determined by the way in which the window was accessed. You can modify a field or accept the default values.
To modify one of the fields, use the CURSOR KEY to highlight the field you wish to modify and press ENTER.
The highlight on the first character in the field becomes active. Press up or down on the CURSOR KEY to scroll through the alphanumeric character list, press left or right to move the cursor to the next character.
Create Waypoint:
Name: WPT001 Type: 
34`06.00N
117`49.00W
Description: 02/15/96 08:00
If you want to clear the entire name or description line press the Clear softkey.
If you want to restore the name or description field to what it was at before you made these changes press the Restore softkey. This will not restore the field to its default value, but to whatever value it was when you pressed ENTER to begin this edit.
When you have completed editing the field, press ENTER. You may now use the CURSOR KEY to move to another field.
Name: A receiver-generated name is automatically generated in the format WPTXXX where XXX is a sequential number (001, 002 etc.). This name may be changed to any eight character name.
Type: A • type (icon) is generated as a default for the waypoint. You may change it to anyone of 16 different icons (Dot, Fish, Buoy, Light, Anchor, Flagstaff, Red Daymark, Grn Daymark, Wreck, House, Star, Boat, Fuel, Danger, Diver Down, or Food).
Coordinates: The coordinates may be modified in the manner described above or with the field highlighted you can press the Cursor or GPS softkey to automatically assign the cursor position or current GPS position fix to the coordinate field. The header of the Create Waypoint window tells you which coordinates are displayed, CURSOR or GPS.
Description: You may enter any description you desire up to 16 characters in this field. The default description is the time and date of the waypoint creation.
Creating a Waypoint Using the MARK key
Modify or
MARK Accept Done
Default Data
22 |
Magellan NAV 6500/NAV 6510 |
 Loading...