


GPS 300
User Manual
WARNINGS
A measure of knowledge by the user is required for proper and safe use of the Magellan GPS 300™. READ THE USER GUIDE & WARRANTY COMPLETELY.
Use Good Judgment
This product is an excellent navigation aid, but it does not replace the need for careful orientation and good judgment. Never rely solely on one device for navigating.
Use Care to Avoid Inaccuracies
The Global Positioning System (GPS) is operated by the U.S. Government, which is solely responsible for the accuracy and the maintenance of GPS. Certain conditions can make the system less accurate.
No part of this User Guide may be reproduced or transmitted in any form or by any means, electronic or mechanical, including photocopying and recording, for any purpose other than the purchaser’s personal use, without the written permission of Magellan Corporation.
© Copyright 1999 by Magellan Corporation. All rights reserved.
Magellan™ and GPS 300™ are the trademarks of Magellan Corporation.
PN: 630283 B

TABLE OF CONTENTS
Introduction .................................................... |
1 |
Welcome to the Magellan GPS 300 ..................................... |
1 |
GPS 300 Description ........................................................... |
1 |
Magellan GPS 300 ............................................................... |
2 |
Getting Started ................................................ |
3 |
Installing the Batteries ......................................................... |
3 |
Getting Signals from Satellites ............................................. |
3 |
Initializing the Receiver - EZStart ........................................ |
4 |
Computing a Position .......................................................... |
5 |
Basic Operation ............................................... |
7 |
Saving a Position Fix ............................................................ |
7 |
Creating a Landmark ........................................................... |
8 |
Viewing the POSITION Screen ........................................... |
9 |
Viewing the NAVIGATION Screens .................................. |
10 |
Creating a GOTO Route ................................................... |
13 |
Summary ........................................................................... |
14 |
Working with Landmarks .............................. |
15 |
Viewing a Landmark .......................................................... |
15 |
Editing the Landmark Name ............................................. |
16 |
Deleting a Landmark ......................................................... |
16 |
i

Working with Routes..................................... |
17 |
Creating a Route ................................................................ |
17 |
Viewing a Route ................................................................ |
19 |
Activating/Deactivating a Route ........................................ |
20 |
Deleting a Route ................................................................ |
21 |
Appending a Leg to a Route ............................................... |
21 |
Activating a Leg in a Route ................................................ |
22 |
Editing a Leg in a Route .................................................... |
23 |
Deleting a Leg From a Route ............................................. |
24 |
Additional Features ....................................... |
25 |
Viewing the Time and Date ............................................... |
25 |
Viewing Elevation .............................................................. |
25 |
Viewing Battery Life .......................................................... |
25 |
Changing Coordinate Systems ........................................... |
26 |
Changing Map Datums ..................................................... |
27 |
Changing Distance Units ................................................... |
27 |
Changing Time Display and Time ..................................... |
28 |
Changing North Reference ................................................ |
28 |
Initializing the Receiver (EZSTART) ................................. |
29 |
Activating the Demo Mode ................................................ |
30 |
Setting Display Contrast .................................................... |
30 |
Troubleshooting ............................................ |
31 |
Commonly Asked Questions ............................................. |
32 |
Icons .................................................................................. |
34 |
Accessories ..................................................... |
36 |
Glossary ......................................................... |
38 |
Index ............................................................. |
41 |
ii

Introduction
Welcome to the Magellan GPS 300
Congratulations on your purchase of the Magellan GPS 300 satellite navigator. The GPS 300 is an easy-to-use GPS receiver designed to get you out in the “Great Outdoors” rather than spending hours reading a User’s Manual. There are, however, a few items that you need to be familiar with so it is suggested that you follow along at least through the chapter on Basic Operation.
Before you begin, make sure that your package includes the items listed on the GPS 300 box. If any items are missing or damaged, contact your Magellan dealer or retailer.
GPS 300 Description
The GPS 300 is a self-contained hand-held GPS receiver designed for general purpose position locating and navigation. It has a built-in antenna located at the top of the receiver, a backlit display, and keypad. Using two AA batteries, inserted from the battery door found at the back of the receiver, the GPS 300 will operate continuously for up to 24 hours.
1

Magellan GPS 300
The ENTER key confirms data entries or menu selections.
The NAV key accesses the Position and Navigation screens.
The MARK key is used to create landmarks and store the current position.
The LIGHT key turns the light on and off.
 GPS Antenna
The GOTO key is used to create a direct route to any landmark stored in memory.
The MENU key is used to access the route, landmark and setup functions.
The PWR key turns the receiver on and off.
The ARROW pad is used to enter landmark names, and scroll through the series of screens and menu selections.
2

Getting Started
Installing the Batteries
The GPS 300 uses two AA alkaline batteries that are installed at the back of the receiver. To remove the battery cover, turn the ring of the battery door screw counterclockwise until the battery cover can be removed.
Insert the new batteries as shown, being sure to respect the polarities, and replace the
battery cover. |
- |
+ |
|
- |
|||
Replace the screw and turn the |
+ |
||
|
|
||
ring clockwise until the battery |
|
|
|
door is held in place securely. |
|
|
|
You should avoid overtightening |
|
|
|
the battery door screw. |
|
|
Getting Signals from Satellites
Since the GPS 300 receives information from satellites orbiting the earth, the antenna needs to have a relatively unobstructed view of the sky. Large obstructions such as buildings, cliffs, and overhangs may interfere with signal reception causing your GPS 300 to take additional time to compute your location.
3
The GPS 300 is designed to fit comfortably in your hand. Hold the receiver with the antenna towards the sky.
Initializing the Receiver - EZStart
Before using your GPS 300 for the first time, the receiver needs to know its approximate location. Using Magellan’s EZStart procedure, the GPS 300 will prompt you for the information it requires when you turn it on for the first time.
You do not need to initialize your receiver each time you use it. Follow these steps to initialize the GPS 300 if this is the first time you are using it.
1 Press PWR to turn the GPS 300 on.
2SELECT REGION. Use the ARROW pad to change the flashing text to select the appropriate region for your present location. Press ENTER .
3 SELECT COUNTRY or STATE. Use the ARROW pad to change the flashing text to select the country or state for your present location.
Press ENTER .
4
4 ENTER ELEVATION. Use the ARROW pad to enter the approximate elevation for your position. If unknown, leave the elevation at 0. Press ENTER .
5 ENTER TIME. Use the ARROW pad to enter your present time. Press ENTER .
6 ENTER DATE. Use the ARROW pad to enter the date. Press ENTER .
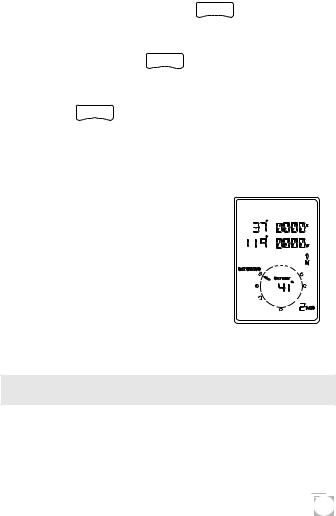
The GPS 300 then displays the POSITION screen and automatically begins searching for satellites that it knows are in this area for the date and time you entered.
The display shown here may differ from yours depending upon the information you selected in steps 2 and 3. As the GPS 300 scans the sky, the arrow in the circle will swing around pointing to a satellite and displays, in the center of the circle, that satellite’s elevation above the horizon.
Computing a Position
The GPS 300 will begin to acquire information from the satellites and use this information to compute your current position (called a position fix). Whether you have just
5
completed the initialization process or have just turned your GPS 300 on, the GPS 300 will display the following screens in the order shown.
As the GPS 300 searches for satellites, some of the small circles around the large circle will become black indicating that the GPS 300 is tracking that satellite and receiving information. The number at the bottom right of the screen displays how many satellites are being tracked.
After the GPS receiver has received positioning data from at least three satellites (approximately 2-3 minutes), it
will begin computing a position fix based upon the information it is receiving. As soon as a position fix is computed, the receiver switches to the navigation screen displaying the moving compass. The word “TRACKING” is
displayed in the lower right corner indicating that the receiver is computing position fixes.
Note: If the receiver has not acquired a position fix in approximately 10 minutes, refer to the troubleshooting section of this manual.
More information on these screens and the information they display can be found in the next chapter.
6
Basic Operation
Saving a Position Fix
Position fixes can be saved in memory for use later when you want to return to that position. Saved position fixes are referred to as landmarks or LMK.
To save (mark) your current position press MARK .
Receiver-Generated Name: The GPS 300 prompts you to enter a name or accept the receiver-generated name for this landmark. To accept the receiver-generated name (LM01 - LM99), press ENTER .
User-Created Name: To create a name (up to four characters), use the UP/DOWN arrows to change the character and the LEFT/RIGHT arrows to move the cursor to the left or right respectively. After you have input the desired landmark name press ENTER .
Press ENTER to accept the current latitude and press ENTER again to accept the current longitude.
Shortcut: Press MARK at anytime while viewing this screen to quickly save the position.
7

Creating a Landmark
To create a landmark at a location which is not your current position, use the same procedure as saving a position with the additional step of inputting different latitude/longitude coordinates.
To create a landmark press MARK .
The GPS 300 prompts you to enter a name or accept the receivergenerated name for this landmark. When the desired name is displayed at the top of the screen press
ENTER .
Use the ARROW pad to change the latitude and press ENTER to accept.
Use the ARROW pad to change the longitude and press ENTER to accept.
The newly created landmark is stored in memory and you are returned to the screen that was displayed when you pressed the MARK key.
Shortcut: Press MARK at anytime while viewing this screen to quickly save the position.
8
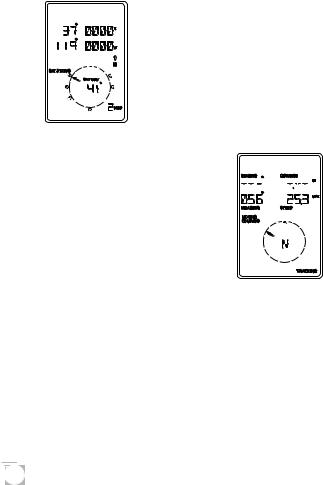
Viewing the POSITION Screen
The POSITION screen displays the coordinates for your last computed position and information about any satellites that are visible. It can be accessed by pressing the NAV key.
Latitude and
Longitude
Satellite Elevation
Degrees above the horizon of the satellite indicated by the satellite pointer.
Satellite Icons
 Visible but not tracked.
 Satellite is being tracked.
North Indicator
Satellite
Pointer
Number of satellites being used.
Tracking Indicator
Appears when the receiver has acquired enough information from the satellites to compute a position fix.
You may sometimes notice that the number of satellites being tracked differs from the number of satellites being displayed graphically. This is due to more than one satellite being tracked in the same general area.
9
Viewing the Navigation Screens
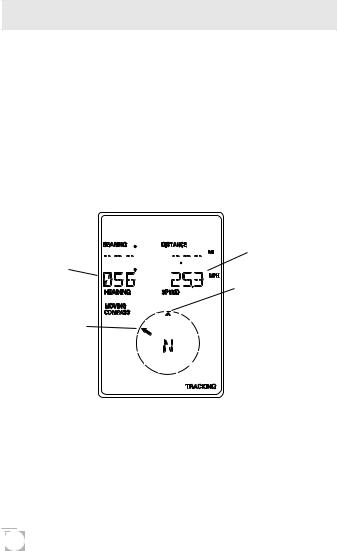
Without an Active Route. Without an active route the navigation screen displays your heading and the speed at which you are traveling. The lower portion of the screen displays a moving compass. The triangle at the top of the compass points in the direction you are traveling and the arrow points to north.
Navigation Screen without an Active Route (Moving Compass)
Current
Heading
North
Indicator
Current
Speed
Direction of
Travel
Tracking Indicator
 Appears when enough satellites have provided information to compute position fixes.
The navigation screens display your speed of travel. For the speed to be displayed, you must be moving at a speed greater than 2 miles per hour.
10
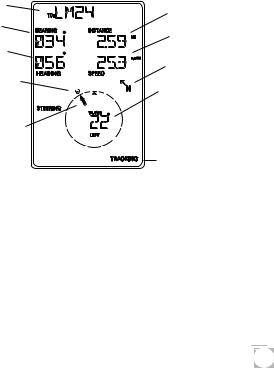
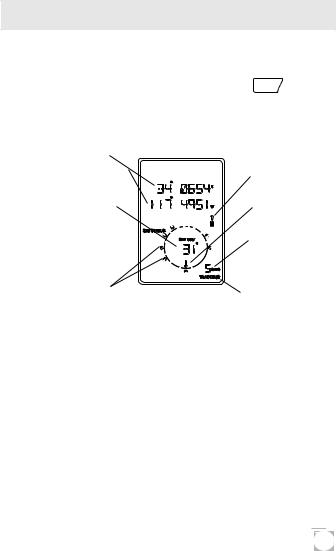
With an Active Route. When you have an active route the navigation screen still displays your heading and speed but also includes the bearing and distance to your destination. The moving compass is then replaced with steering information. You can use the graphical representation or the steering indicator to assist in directing you towards your final destination.
Navigation Screen with an Active Route
|
(Steering) |
Destination |
|
Landmark |
Distance to |
Bearing to |
Destination |
Destination |
Current |
Current |
Speed |
|
|
Heading |
North |
|
Indicator |
Destination
Icon
Destination
Pointer
Steering Indicator
Indicates the number of degrees to turn, right or left, to destination landmark.
Tracking Indicator
Appears when enough satellites have provided information to compute position fixes.
In the screen above you are traveling with a heading of 56° while your destination bearing is 34°. This would indicate that you need to turn left 22° to be on a straight line to your destination. The circle and arrow display the same information but in a visual manner. The triangle points in the direction you are traveling and the arrow points towards your destination.
11
 Loading...