


 Loading...
User Manual  CYCLO™ 315/505 Series

Welcome
Thank you for purchasing this Magellan Cyclo . Please read this manual carefully before using your Magellan for the first time. Keep this manual in a safe place and use as your first point of reference.
Important information for using the manual
It is important to understand the terms and typographical conventions used in this manual.
Bold — Components or items displayed on screen, including buttons, headings, field names and options.
Italics — Indicates the name of a screen.
Disclaimer
Not all models are available in all regions.
Depending on the specific model purchased, the color and look of your device and accessories may not exactly match the graphics shown in this document.
Magellan operates a policy of ongoing development. Magellan reserves the right to make changes and improvements to any of the products described in this document without prior notice. Magellan does not warrant that
this document is error-free. The screenshots and other presentations shown in this manual may differ from the actual screens and presentations generated by the actual product. All such differences are minor and the actual product will deliver the described functionality as presented in this User Manual in all material respects.
Copyright
© 2014 MiTAC International Corporation. Magellan is a registered trademark of MiTAC International Corporation. All rights reserved.
All other trademarks and registrations are the property of their respective owners.
ANT+™ |
is a trademark of Dynastream Innovations Inc. or its |
subsidiaries. |
|
112-0075-001A Revision: R00
Contents |
|
Welcome |
|
Important information for using the manual |
.......................................... 2 |
Disclaimer........................................................................................................... |
2 |
Copyright............................................................................................................ |
2 |
Contents |
|
Knowing your device |
|
Main unit............................................................................................................. |
4 |
Accessories......................................................................................................... |
4 |
Getting started |
|
Charging the battery...................................................................................... |
5 |
Performing the initial start-up...................................................................... |
5 |
Connecting your device to the computer................................................ |
6 |
Installing the device |
|
Provided Mounts.............................................................................................. |
6 |
Installing the Forward mount...................................................................... |
6 |
Installing the Pad-Style mount..................................................................... |
7 |
Installing the sensors on your bike............................................................. |
8 |
Putting on the heart rate monitor.............................................................. |
9 |
Battery Replacement Information:.............................................................. |
9 |
Operating basics |
|
Using the POWER button............................................................................ |
10 |
Using the touch screen................................................................................ |
10 |
Main menu....................................................................................................... |
11 |
Keyboard screen............................................................................................. |
12 |
Viewing Dashboard screens |
|
Starting navigation |
|
Without the wizard....................................................................................... |
14 |
Using the Navigate wizard......................................................................... |
14 |
Navigating to Home..................................................................................... |
15 |
2

Finding the location by Address............................................................... |
15 |
Searching for a POI........................................................................................ |
15 |
Searching for a location from the map screen..................................... |
15 |
Searching for a location using GPS coordinates.................................. |
16 |
Navigating to a saved Favorite.................................................................. |
16 |
Tracks................................................................................................................. |
16 |
GPX Data Information:................................................................................. |
17 |
Other navigating options............................................................................ |
17 |
Surprise Me™ |
|
Loop................................................................................................................... |
19 |
A to B (Address, POI, Favorite, or Point on map)................................. |
19 |
Workout mode |
|
Workout by Distance.................................................................................... |
20 |
Workout by Time............................................................................................ |
20 |
Workout by Calories...................................................................................... |
20 |
Workout by HR Zone.................................................................................... |
21 |
Workout by Power Zone............................................................................. |
21 |
Indoor training mode................................................................................... |
21 |
Viewing the History |
|
Viewing recorded data................................................................................ |
22 |
Managing data on the device |
|
Using MagellanCyclo ................................................................................... |
22 |
Sharing your route with friends in the trip............................................ |
23 |
Using WiFi (wireless local area network)............................................... |
23 |
Pairing with your smartphone |
|
Receiving incoming calls.............................................................................. |
25 |
Receiving text messages.............................................................................. |
25 |
Playing music................................................................................................... |
26 |
Audible Alerts.................................................................................................. |
26 |
Customizing your device |
|
Profiles .............................................................................................................. |
27 |
Routing ............................................................................................................ |
27 |
Dashboard ....................................................................................................... |
28 |
Sensors ............................................................................................................ |
29 |
Shimano Di2 ..................................................................................................... |
29 |
Phone ................................................................................................................... |
29 |
WiFi sync ............................................................................................................. |
30 |
Where Am I ........................................................................................................ |
30 |
Screen ............................................................................................................... |
30 |
Transfer ........................................................................................................... |
30 |
Maps ...................................................................................................................... |
31 |
Alerts ..................................................................................................................... |
31 |
Manage ................................................................................................................ |
31 |
Define Zones................................................................................................... |
31 |
Compass ................................................................................................. |
32 |
Language ............................................................................................................ |
32 |
Keyboard ............................................................................................................. |
32 |
Date & Time .................................................................................................. |
33 |
Units ................................................................................................................. |
33 |
Product Info ................................................................................................... |
33 |
For more information |
|
Online support................................................................................................ |
33 |
Caring for your Cyclo ................................................................................... |
33 |
Troubleshooting............................................................................................. |
34 |
What is GPS?.................................................................................................... |
34 |
IPX7..................................................................................................................... |
35 |
Safety precautions.......................................................................................... |
35 |
Regulatory information................................................................................ |
36 |
Bluetooth.......................................................................................................... |
36 |
WEEE.................................................................................................................. |
37 |
End User License Agreement..................................................................... |
37 |
3

Knowing your device
Main unit
1.Charge Indicator
Indicates the level of internal battery charge:
Green - battery full; Orange - battery charging.
2.POWER button
Turns your device on/off.
3.Touch screen
•Displays the output of your device.
•Tap the screen with your finger to select menu commands or enter information.
4.Mini-USB connector
Connects to the charger or USB cable. 5. Bike mount socket
For the device mount.
Accessories
Your device comes with the following accessories. To use your device on a bike, ensure you use the specific bike mount kit that came with your device. Magellan may provide optional accessories for specific models. Please visit the Cyclo website
(www.magellancyclo.com) for information.
Power |
USB cable |
Heart rate belt* |
|
(ANT+™ sensor) |
|
|
|
5 |
|
kit |
Speed and cadence sensor kit* |
|
|
(ANT+™ sensor) |
Note: |
specific model purchased, the color and look of your |
|
device and |
not exactly match the graphics shown in this |
|
document. |
|
|
* May be sold separately and used for selected models only.
Information:
This device is ANT+ certified. Visit www.thisisant.com/directory for a list of compatible products and apps.
4
Getting started
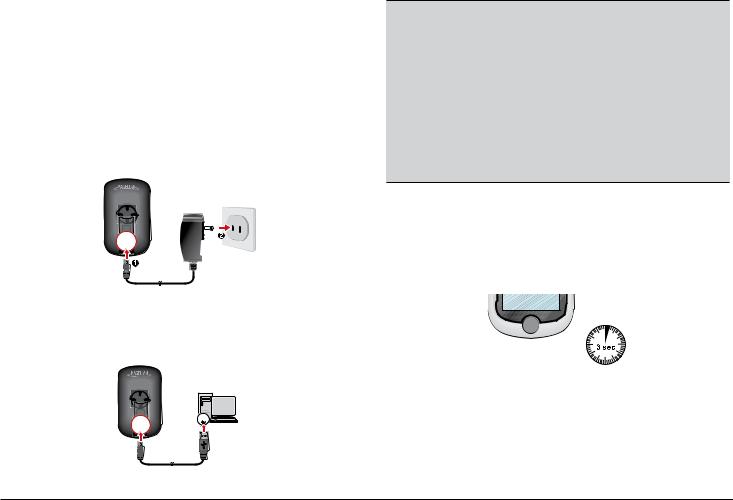
Charging the battery
Your device has an internal battery that may not be fully charged when you purchase it. You should charge the battery for at least 8 hours before you start using it for the very first time.
To charge the battery:
•Using a power socket
Plug the home charger cable into the USB connector on the back of your device and the charger into the AC outlet.
•Via the computer
Connect your device to the computer by using the provided USB cable. For more information, see "Connecting your device to the computer" in this section.
CAUTION:
For optimal performance of the lithium battery, note the following:
•Do not charge the battery where the temperature is high (e.g. in direct sunlight).
The battery will stop charging when the ambient temperature is less than -10ºC (14ºF) or more than 60ºC (140ºF).
•Recharge the battery when it is nearly discharged. When recharging, make sure that the battery is fully charged. Doing so can extend the battery life.
•If you will not use the product for a long period of time (over one month) or find the discharge/recharge time has been shortened, be sure to fully discharge the battery first before recharging it. You are also advised to fully discharge and recharge the battery once every 1~2 months.
•Failure to follow the battery usage instructions could cause damage to your device, battery and even bodily injury or property damage and will void the warranty.
Performing the initial start-up
1.Mount the device and accessories on to your bike. For more information, see the “Installing the device” section.
2.Press and hold the POWER button for 3 seconds to turn your device on.
3.Follow the prompts to personalize your device, including:
•Select your preferred language.
•Set the date and time.
•Set the units format.
•Create your user profile.
Note: You can change these settings later by tapping Main menu > Settings.
5

4.Once your device is turned on, it will search for satellite signals automatically. This may take several seconds depending on the location.
When GPS is fixed, the GPS signal icon (  ) on the screen indicates the GPS status.
5. Depending on your device model, it will also automatically scan for heart rate monitor and cadence/speed sensor and prompt to pair them with Cyclo.
See the following section for sensor installation and pairing.
You can also scan the accessories manually by tapping Main menu > Settings > Sensors.
Installing the device
Follow the instructions in this section to mount the device and the cadence/speed sensor kit (for selected models only) on your bike. In addition, you will need to put on the heart rate monitor during your workouts.
Provided Mounts
Two styles of mounts may be provided for the device. These are the forward mount and the pad-style mount. If both are included with your kit, you may use either, or mount them on two different bikes.
Connecting your device to the computer |
Installing the Forward mount |
1.Turn on the computer.
2.Turn on your device. Connect the mini-USB end of the USB cable to the back of your device and the other end to a USB port on your computer.
3.Select the desired connection type from the pop-up message window:
•Connect to PC: Your device will be recogized as two external massstorage drives: Mgn_system and Mgn_data. You can use Windows File Explorer to copy/move the files from the computer to your device. A USB Connection screen appears to prevent you from using your device.
DO NOT delete any files that are pre-installed on the device.
Deleting the files can cause the device to crash. Magellan is not responsible for product quality caused by file deletion.
•Charge only: You will be able to continue using your device with the battery in charging mode via the computer.
For additional information, see page 22 Managing data on the device.
The forward mount is sized for a 31mm bar. For a smaller bar, a shim is required. Shims are not provided with the device.
On the side of the handlebar where you’ll install the forward mount:
1. |
Remove the handgrip and brake handle |
2. |
Remove other items on the bar (such as shift lever) as needed. |
3.Slide the forward mount into position and make sure it fits the way you want it.
6
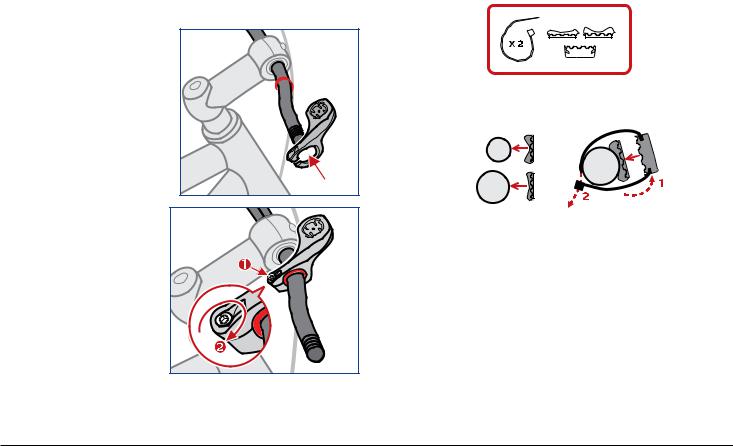
4.Using shims if needed, secure the forward mount to the handlebar.
5.Re-install removed items and adjust as needed.
6.See page 8 Mounting the Device to attach and remove the device from the mount.
Installing the Pad-Style mount
The bike mount kit includes two types of rubber pads, allowing you to attach the bike mount to your bike securely.
1.Select the rubber pad that best fits the handle bars on your bike and then attach it using the two plastic straps.
2.Align the latch on the back of the device with the slot on the bike mount, and then rotate the device clockwise to lock the device to the bike mount.
You can choose to mount the device on the handlebar (a) or on the stem (b). See the following figure for the examples of mounting the device.
7

Mounting the Device
3.To remove the device from the bike mount, rotate it counterclockwise.
Installing the sensors on your bike
The cadence/speed sensor kit is used for selected models only.
1.Follow the instruction below to install the cadence/speed sensor kit on your bike.
c  a
a
d 
 For both sensors (crank and wheel):
Set clearance between
magnet and sensor
3-5 mm (1/8 - 3/16 inch)
b

2.Ensure that the magnets are aligned with the sensing area on the sensors.
3.When done, you can pair the sensor with
your device by tapping Main menu > Settings > Sensors > Cadence/Speed.
Note: the sensors “sleep” when not in use to conserve battery power. They “wake up” when they receive their usual input - the Speed/Cadence sensor must “see” a magnet passing it a few times to wake up.
The sensor can only be paired within a few minutes of “waking up”, or it goes back to sleep.
8
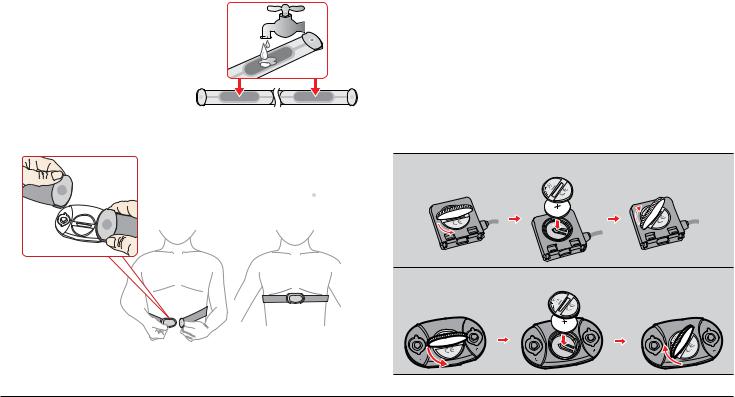
Putting on the heart rate monitor
The heart rate monitor is used for selected models only.
Note: Please note the heart rate monitor is not a medical device and its readings are not a substitute for obtaining measurements that require medical precision. It is strongly recommended to consult a doctor if you have a pacemaker or other implanted devices before using the heart rate monitor.
1.Before using the heart rate monitor, wet the contacts on the back of the chest strap.
Note: You can also use an electrolyte gel (usually available in local sports stores) to ensure good contact.
2. Adjust the elastic strap so it’s snug while you are putting it on. Ensure that you can take a good deep breath after putting on the strap.
3.Follow the instructions below to wrap the strap around your back, and then secure it on the other side with the buckle.
4.When done, you can pair the monitor with your device by tapping
Main menu > Settings > Sensors > Heart rate.
Note: the sensors “sleep” when not in use to conserve battery power. They “wake up” when they receive their usual input - the Heart Rate Monitor’s pads must firmly touch your skin to wake up.
The sensor can only be paired within a few minutes of “waking up”, or it goes back to sleep.
Battery Replacement Information:
The cadence sensor and heart rate monitor each contain a replaceable CR2032 battery. Follow the instructions below to replace the battery:
1.Locate the battery cover on the back of the unit, and then twist the cover counterclockwise (e.g. by using a coin) to remove the cover and battery.
2.Insert the new battery into the battery chamber .
3.Making sure the rubber ring is in place, replace the cover.
4.Twist the cover clockwise (e.g. by using a coin) to close the cover.
Speed/Cadence Sensor Battery
Heart Rate Monitor Battery
Note: Putting on the heart rate monitor is like wearing an elastic belt around your lower chest.
9

Operating basics
Using the POWER button
•Turning on the device
Press and hold the POWER button for 3 seconds to turn on your device.
•Turning off the device
Press and hold the POWER button for 3 seconds to pop up the Power
Off/
Cancel screen. Choose Power Off to turn off the device or Cancel to continue operating the device.
Note: Press and hold the POWER button for 5 seconds to force power off if the device doesn’t respond.
Your device will automatically turn off after 10 minutes (by default) of inactivity. The Power Off/Cancel screen will pop up and the device will
be turned off if you do not make a selection.
Note: You can change the auto power off setting by tapping Main menu > Settings > Screen > Auto Power Off Timer.
Using the touch screen
To operate your device, touch the screen with your finger. You can perform the following actions:
•Tap
Quick touch the screen once to open menus or select onscreen button/ option.
•Drag
While navigating on the map, tap and hold on the screen without releasing your finger to move the map to the desired position.
•Slide
Drag your finger vertically or horizontally across the screen.
•Drag to the left/right to switch to another menu screen.
•Drag to the top/bottom to scroll up/down a list.
Note: Not all slide gestures are applicable to all screens.
Unlocking the screen
Your device will automatically lock the screen after 5 minutes (by default) of inactivity. When the screen is locked, press the POWER button briefly to unlock the screen.
Note: You can change the screen lock setting by tapping Main menu > Settings > Screen > Screen Lock Timer.
•Navigating through the screens
While the device is turned on and you are navigating through the menu screens, press the POWER button briefly to return to the previous screen.
10
Main menu
The Main menu is your starting place for various tasks, providing quick access to applications and settings. Tap a button to start a task or open another menu.
Icon Description
The Dashboard displays the view of functions, including the map/ navigation screen and the workout screen (when a workout has been selected).
Start to plan your route by selecting the locations, such as home, address, tracks, POI, coordinate, favorite, etc.
Your trip/training can be saved in the history records. When your ride is finished, you can check the history data such as date/time, distance, speed, altitude, etc.
Based on distance or time, the device will plan 3 routes for you to choose from.
You can set workouts by entering your goals, such as by distance, by time, or by calories.
There are various customization options available to enhance your cycling experience. You can customise the system settings, user profiles and more.
Depending on your model, when a phone is connected, you may control the music playback of your smartphone from your Cyclo device.
Icon Description
Depending on your model, when a phone is connected, you will be notified of missed calls and new text messages of your smartphone from your Cyclo device.
The System icons
Various System icons on the title bar at the top of the screen provide the status information of your device. Depending on your settings, the icons may be different to provide various information of your device. Please note that these icons will not be always displayed during your trip/training.
|
|
|
|
|
|
|
|
|
|
|
|
|
|
|
|
|
|
|
|
|
|
|
|
1 |
2 |
3 |
4 |
5 |
6 |
7 |
8 |
9 |
10 |
||||||||||
|
|
|
|
|
|
|
|
|
|
|
|
|
|
|
|
||||||
NO. |
Icon |
|
Description |
|
|
|
|
|
|
|
|
|
|
|
|
||||||
|
|
|
|
|
|
|
|
|
|
||||||||||||
1 |
Time display |
|
Displays the current time. |
|
|
|
|
|
|
||||||||||||
|
|
|
The device will automatically set the correct time based |
||||||||||||||||||
|
|
|
on the current GPS fixes. |
|
|
|
|
|
|
||||||||||||
2 |
User profile |
|
|
|
|
/ |
|
|
|
/ |
|
|
|
: Bike (city bike/mountain bike/race |
|||||||
|
|
|
|
|
|
|
|
|
|
|
|
||||||||||
|
|
|
bike) navigation mode enabled. |
|
|
||||||||||||||||
|
|
|
|
|
|
: Running navigation mode enabled. |
|||||||||||||||
|
|
|
|
|
|
: Indoor training mode* enabled (navigating |
|||||||||||||||
|
|
|
function of the device will be disabled). |
||||||||||||||||||
3 |
Heart rate* |
|
Availability of these features (3~6) vary according to |
||||||||||||||||||
|
|
|
model. |
|
|
|
|
|
|
|
|
|
|
|
|
|
|
||||
|
|
|
If a feature is available, its icon will display when its |
||||||||||||||||||
4 |
Cadence/ |
|
|||||||||||||||||||
|
sensor is enabled in Settings > Sensors. |
||||||||||||||||||||
|
Speed* |
|
|||||||||||||||||||
|
|
|
: The icon is not displayed unless it is enabled in the |
||||||||||||||||||
|
|
|
|
||||||||||||||||||
5 |
Power |
|
|
||||||||||||||||||
|
Sensors setting. |
|
|
|
|
|
|
|
|
|
|
||||||||||
|
sensor*/ ** |
|
|
|
|
|
|
|
|
|
|
|
|||||||||
|
|
|
/ |
|
/ |
|
|
/ |
|
: The icon is greyed out when enabled, |
|||||||||||
6 |
Di2 sensor |
|
|
|
|
|
|
||||||||||||||
|
but not paired with the device. |
|
|
||||||||||||||||||
|
*/ ** |
|
|
|
|||||||||||||||||
|
|
|
|
/ |
|
/ |
|
|
/ |
|
|
: The icon is white when the |
|||||||||
|
|
|
connection is made, or blinking when the pairing is in |
||||||||||||||||||
|
|
|
progress. |
|
|
|
|
|
|
|
|
|
|
|
|
|
|
||||
11
NO. |
Icon |
Description |
|
|
|
7 |
Bluetooth |
When the Bluetooth function is enabled: |
|
status* |
: No phone is connected. The icon flashes when a |
|
|
|
|
|
connection is being made. |
|
|
: A phone is connected. |
|
|
: A call is in progress. |
|
|
: There are missed calls or new text messages on the |
|
|
connected phone. |
8 |
Recording |
: The device is recording your trip/training. |
|
status |
|
|
|
|
|
|
: Recording has been paused. |
9 |
GPS signal |
The GPS signal icon indicates the GPS status. |
|
|
A bar shows the strength of the GPS signal being |
|
|
received; the more bars the stronger the signal. |
|
|
Replaced with Trainer icon when Indoor profile with |
|
|
trainer is active.** |
|
|
|
10 |
Battery status |
The Battery icon indicates the remaining battery power. |
|
|
|
*For selected models only.
**(selected models only),
The icons for each sensor or function are only displayed when the sensor or function is enabled in the currently selected profile.
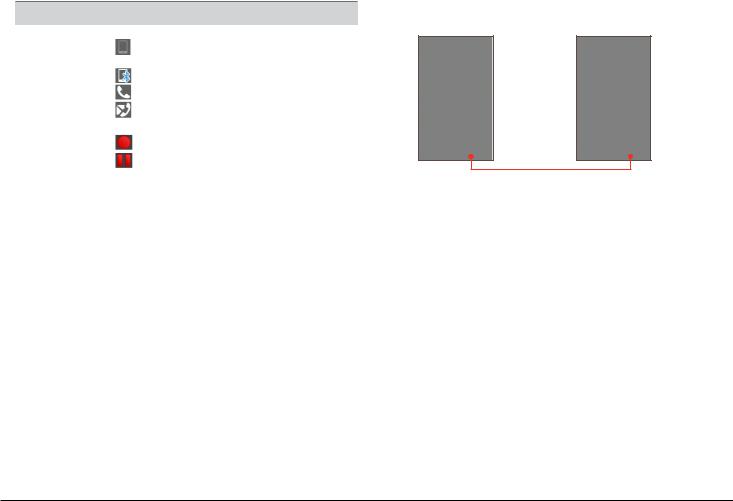
Keyboard screen
The Keyboard screen will display when you are required to enter text, such as when searching for a street name. Search results will be listed
in matching order, with the closest matches appearing on the screen. The Keyboard screen can display with various layouts depending on the
information you need to enter.
Example: entering the street name while searching for an address
ABC keyboard |
Numeric keypad |
Tap to switch between the ABC keyboard and Numeric keypad.
Entering characters/numbers
• Tap the keys to enter letters or numbers.
The keyboard features the “Predictive text” technology that allows addresses to be searched easily and quickly. As you enter a letter of an address, your device will compare all possible combinations against the maps.
•Tap  to delete the character.
•When done, tap  .
.
Changing the keyboard layout
The device also supports Russian, Bulgarian, and Greek keyboards. You can enable/disable those keyboards from Main menu > Settings > Keyboard. The enabled keyboards are available in addition to the English and numeric keyboards.
The keyboard selection keys will then include ABC, 123, and the additional keyboard(s) enabled.
12
Loading...