


eXplorist 500
Magellan eXplorist 500
Reference
Manual
Topics:
• eXplorist 500 GPS Receiver
• Using the eXplorist 500
• Starting Up
• Navigation Screens
• File Structure
• Points of Interest
• Routes
• Track Logs
• Advanced Features
• Magellan Geocache Manager
• Using MapSend
• Preferences
• Specifications
• Accessories
• Contacting Magellan Support

*** Warnings ***
IN THE INTEREST OF SAFETY, DO NOT USE THIS NAVIGATION DEVICE WHILE DRIVING
A VEHICLE.
Please do not try to change any settings on the Magellan®eXplorist™ while driving. Come to a
complete stop or have a passenger make any changes. Taking your eyes off the road is dangerous
and can result in an accident in which you or others could be injured.
USE GOOD JUDGMENT
This product is an excellent navigation aid, but it does not replace the need for careful orienteering
and good judgment. Never rely solely on one device for navigating.
USE CARE
The Global Positioning System (GPS) is operated by the U.S. Government, which is solely
responsible for the accuracy and maintenance of the GPS network. The accuracy of position fixes
can be affected by the periodic adjustments to GPS satellites made by the U.S. government and is
subject to change in accordance with the Department of Defense civil GPS user policy and the
Federal Radionavigation Plan. Accuracy can also be affected by poor satellite geometry and
uctions, such as buildings and large trees.
obstr
USE PROPER ACCESSORIES
Use only Magellan cables and antennas; the use of non-Magellan cables and antennas may sever
degrade performance or damage the receiver, and will void the warranty.
ely
LICENSE AGREEMENT
Thales Navigation grants you, the purchaser
Thales Navigation GPS products (the “SOFTWARE”) in the normal operation of the equipment in
accordance with the terms of the End User License Agreement that is included with the product.
ty of Thales Navigation and/or its suppliers and is pr
The SOFTW
States copyright laws and inter
like any other copyright material.
You may not use, copy, modify, reverse engineer or transfer this SOFTWARE except as expressly
provided in the license. All rights not expressly granted are reserved by Thales Navigation and/or its
suppliers.
ARE is the pr
oper
national treaty provisions; therefore, you must treat the SOFTWARE
, the right to use the software supplied in and with
otected by United
* * *
No part of this guide may be reproduced or transmitted in any form or by any means, electronic or
mechanical, including photocopying and recording, for any purpose other than the purchaser’s
personal use without the prior written permission of Thales Navigation.
* * *
Operation is subject to the following two conditions: (1) this device may not cause interference, and
(2) this device must accept any inter
operation of the device.
ence, including inter
fer
ence that may cause undesir
fer
ed
© 2005 Thales S.A. All rights reserved.
The Magellan Logo, Magellan, eXplorist and TrueFix are trademarks of Thales.
631208-01 B

Table of Contents
eXplorist 500 GPS Receiver . . . . . . . . . . . . . . . . . . . . . . . . . . . . . . . . . 1
Features of the Magellan eXplorist GPS Receiver. . . . . . . . . . . . . . . . . . 1
Button Descriptions . . . . . . . . . . . . . . . . . . . . . . . . . . . . . . . . . . . . . . 2
Installing and Charging the Battery . . . . . . . . . . . . . . . . . . . . . . . . . . . 4
Installing an Optional SD Card. . . . . . . . . . . . . . . . . . . . . . . . . . . . . . . 5
Connecting to a Personal Computer . . . . . . . . . . . . . . . . . . . . . . . . . . . 5
Using the eXplorist 500 . . . . . . . . . . . . . . . . . . . . . . . . . . . . . . . . . . . . 6
Going to a Destination . . . . . . . . . . . . . . . . . . . . . . . . . . . . . . . . . . . . 6
Saving Your Position . . . . . . . . . . . . . . . . . . . . . . . . . . . . . . . . . . . . . . 7
Tracing Your Steps . . . . . . . . . . . . . . . . . . . . . . . . . . . . . . . . . . . . . . . 8
Additional Features. . . . . . . . . . . . . . . . . . . . . . . . . . . . . . . . . . . . . . . 9
Summary. . . . . . . . . . . . . . . . . . . . . . . . . . . . . . . . . . . . . . . . . . . . . . 9
i
Starting Up. . . . . . . . . . . . . . . . . . . . . . . . . . . . . . . . . . . . . . . . . . . . . 10
Turning the eXplorist On . . . . . . . . . . . . . . . . . . . . . . . . . . . . . . . . . . 10
Turning the eXplorist Off . . . . . . . . . . . . . . . . . . . . . . . . . . . . . . . . . . 10
Changing the Display Backlight Intensity . . . . . . . . . . . . . . . . . . . . . . 10
Using the eXplorist for the First Time . . . . . . . . . . . . . . . . . . . . . . . . . 11
Conclusion. . . . . . . . . . . . . . . . . . . . . . . . . . . . . . . . . . . . . . . . . . . . 14
Navigation Screens . . . . . . . . . . . . . . . . . . . . . . . . . . . . . . . . . . . . . . 15
Accessing the Navigation Screens . . . . . . . . . . . . . . . . . . . . . . . . . . . 15
Map Screen . . . . . . . . . . . . . . . . . . . . . . . . . . . . . . . . . . . . . . . . . . . 15
Map Screen Overview
Changing Map Scale . . . . . . . . . . . . . . . . . . . . . . . . . . . . . . . . . . 16
Map Screen Modes . . . . . . . . . . . . . . . . . . . . . . . . . . . . . . . . . . . 16
Showing or Hiding Map Information . . . . . . . . . . . . . . . . . . . . . . . 17
Customizing the Map Information . . . . . . . . . . . . . . . . . . . . . . . . . 18
Displaying Street Information . . . . . . . . . . . . . . . . . . . . . . . . . . . . 19
Changing the Map Orientation . . . . . . . . . . . . . . . . . . . . . . . . . . . 19
. . . . . . . . . . . . . . . . . . . . . . . . . . . . . . . . . . 16
Changing the Primary Usage
Changing the Map Detail . . . . . . . . . . . . . . . . . . . . . . . . . . . . . . . 21
Changing the T
Customizing the Display. . . . . . . . . . . . . . . . . . . . . . . . . . . . . . . . 22
rack Recording Interval. . . . . . . . . . . . . . . . . . . . . . 21
. . . . . . . . . . . . . . . . . . . . . . . . . . . . . 20

Table of Contents
Compass Screen. . . . . . . . . . . . . . . . . . . . . . . . . . . . . . . . . . . . . . . . 23
Compass Screen Overview . . . . . . . . . . . . . . . . . . . . . . . . . . . . . . 23
Customizing the Information Fields . . . . . . . . . . . . . . . . . . . . . . . . 24
Position Screen . . . . . . . . . . . . . . . . . . . . . . . . . . . . . . . . . . . . . . . . 25
Position Screen Overview . . . . . . . . . . . . . . . . . . . . . . . . . . . . . . . 25
Resetting the Trip Odometer . . . . . . . . . . . . . . . . . . . . . . . . . . . . . 26
Satellite Status Screen . . . . . . . . . . . . . . . . . . . . . . . . . . . . . . . . . . . 27
Basic File Stucture . . . . . . . . . . . . . . . . . . . . . . . . . . . . . . . . . . . . . . . 28
File Structure Overview . . . . . . . . . . . . . . . . . . . . . . . . . . . . . . . . . . . 28
Using the Filing System with POIs . . . . . . . . . . . . . . . . . . . . . . . . . . . 29
Using the Filing System with Routes . . . . . . . . . . . . . . . . . . . . . . . . . 29
Using the Filing System with Track Logs. . . . . . . . . . . . . . . . . . . . . . . 30
ii
Points of Interest . . . . . . . . . . . . . . . . . . . . . . . . . . . . . . . . . . . . . . . . 31
Marking Your Position. . . . . . . . . . . . . . . . . . . . . . . . . . . . . . . . . . . . 31
Quick-Marking Your Position. . . . . . . . . . . . . . . . . . . . . . . . . . . . . 31
Marking Your Position (Personalized). . . . . . . . . . . . . . . . . . . . . . . 32
Making POIs for Locations Other Than Your Present Position . . . . . . . . 33
Marking a Position by Entering Coordinates . . . . . . . . . . . . . . . . . . 33
Marking a Position using the Map Cursor. . . . . . . . . . . . . . . . . . . . 34
Marking a Position from a Map Object. . . . . . . . . . . . . . . . . . . . . . 34
The POI Database. . . . . . . . . . . . . . . . . . . . . . . . . . . . . . . . . . . . . . . 35
Searching for a User-Entered POI . . . . . . . . . . . . . . . . . . . . . . . . . 35
Searching for a Preloaded POI using Nearest . . . . . . . . . . . . . . . . . 36
Searching for a Preloaded POI using Alphabetical . . . . . . . . . . . . . 37
Editing a User-Created POI . . . . . . . . . . . . . . . . . . . . . . . . . . . . . . . . 38
Deleting a User-Created POI . . . . . . . . . . . . . . . . . . . . . . . . . . . . . . . 39
Viewing a User-Created POI on the Map Screen . . . . . . . . . . . . . . . . . 40
Copying a Preloaded POI. . . . . . . . . . . . . . . . . . . . . . . . . . . . . . . . . . 41
Viewing a Preloaded POI on the Map Screen. . . . . . . . . . . . . . . . . . . . 42
Showing or Hiding User-Entered POIs on the Map Screen . . . . . . . . . . 43

Table of Contents
Routes . . . . . . . . . . . . . . . . . . . . . . . . . . . . . . . . . . . . . . . . . . . . . . . . 44
GOTO Routes . . . . . . . . . . . . . . . . . . . . . . . . . . . . . . . . . . . . . . . . . . 44
Creating a GOTO Route . . . . . . . . . . . . . . . . . . . . . . . . . . . . . . . . 45
Creating a GOTO Route from the Map Cursor . . . . . . . . . . . . . . . . . 46
Creating a GOTO Route to a Map Object . . . . . . . . . . . . . . . . . . . . 47
Multi-Leg Routes . . . . . . . . . . . . . . . . . . . . . . . . . . . . . . . . . . . . . . . 48
Creating a Multi-leg Route . . . . . . . . . . . . . . . . . . . . . . . . . . . . . . 49
Activating/Deactivating a Route. . . . . . . . . . . . . . . . . . . . . . . . . . . 50
Changing the Destination Leg of an Active Route . . . . . . . . . . . . . . 51
Editing a Saved Route . . . . . . . . . . . . . . . . . . . . . . . . . . . . . . . . . 52
Reversing a Route . . . . . . . . . . . . . . . . . . . . . . . . . . . . . . . . . . . . 53
Deleting a Route . . . . . . . . . . . . . . . . . . . . . . . . . . . . . . . . . . . . . 54
Moving a Route . . . . . . . . . . . . . . . . . . . . . . . . . . . . . . . . . . . . . . 55
Copying a Route . . . . . . . . . . . . . . . . . . . . . . . . . . . . . . . . . . . . . 56
iii
Viewing a Route on the Map. . . . . . . . . . . . . . . . . . . . . . . . . . . . . 57
Track Logs . . . . . . . . . . . . . . . . . . . . . . . . . . . . . . . . . . . . . . . . . . . . . 58
Track Logs . . . . . . . . . . . . . . . . . . . . . . . . . . . . . . . . . . . . . . . . . . . . 58
Stopping and Resuming Active Track Logging . . . . . . . . . . . . . . . . 59
Starting a New Active Track Log . . . . . . . . . . . . . . . . . . . . . . . . . . 60
Saving an Active Track Log. . . . . . . . . . . . . . . . . . . . . . . . . . . . . . 61
Creating a BackTrack Route . . . . . . . . . . . . . . . . . . . . . . . . . . . . . 62
Clearing the Active Track . . . . . . . . . . . . . . . . . . . . . . . . . . . . . . . 63
Converting the Track Log to a Route . . . . . . . . . . . . . . . . . . . . . . . 64
Viewing the Track Log on the Map. . . . . . . . . . . . . . . . . . . . . . . . . 65
Working with Saved Track Logs . . . . . . . . . . . . . . . . . . . . . . . . . . . . . 66
Following Saved Track Logs . . . . . . . . . . . . . . . . . . . . . . . . . . . . . 66
Reversing a Saved Track Log . . . . . . . . . . . . . . . . . . . . . . . . . . . . 66
Deleting a Saved T
Moving a Saved Track Log . . . . . . . . . . . . . . . . . . . . . . . . . . . . . . 68
Copying a Saved Track Log . . . . . . . . . . . . . . . . . . . . . . . . . . . . . . 69
rack Log . . . . . . . . . . . . . . . . . . . . . . . . . . . . . 67
Advanced Features . . . . . . . . . . . . . . . . . . . . . . . . . . . . . . . . . . . . . . . 70
Using Area Calculation . . . . . . . . . . . . . . . . . . . . . . . . . . . . . . . . . . . 70
Calculating an Area . . . . . . . . . . . . . . . . . . . . . . . . . . . . . . . . . . . 70
Deleting All POIs from the Area Calculation List. . . . . . . . . . . . . . . 71
Editing the POI List in Area Calculation . . . . . . . . . . . . . . . . . . . . 71

Table of Contents
Computing Best Fish/Hunt Times . . . . . . . . . . . . . . . . . . . . . . . . . . . . 72
Accessing Fishing and Hunting Times . . . . . . . . . . . . . . . . . . . . . . 72
Changing the Position . . . . . . . . . . . . . . . . . . . . . . . . . . . . . . . . . 72
Changing the Date. . . . . . . . . . . . . . . . . . . . . . . . . . . . . . . . . . . . 72
Displaying Sun and Moon Information . . . . . . . . . . . . . . . . . . . . . . . . 73
Accessing the Sun/Moon Function . . . . . . . . . . . . . . . . . . . . . . . . 73
Changing the Position . . . . . . . . . . . . . . . . . . . . . . . . . . . . . . . . . 73
Changing the Date. . . . . . . . . . . . . . . . . . . . . . . . . . . . . . . . . . . . 73
Viewing the Vertical Profile . . . . . . . . . . . . . . . . . . . . . . . . . . . . . . . . 74
Using the Simulator . . . . . . . . . . . . . . . . . . . . . . . . . . . . . . . . . . . . . 75
Simiulating a Saved Route . . . . . . . . . . . . . . . . . . . . . . . . . . . . . . 75
Communicating with a Personal Computer . . . . . . . . . . . . . . . . . . . . . 76
Connecting to a Personal Computer. . . . . . . . . . . . . . . . . . . . . . . . 76
Changing Modes . . . . . . . . . . . . . . . . . . . . . . . . . . . . . . . . . . . . . 76
Working with Files on the Personal Computer. . . . . . . . . . . . . . . . . 77
iv
Magellan Geocache Manager . . . . . . . . . . . . . . . . . . . . . . . . . . . . . . . 78
What is Geocaching?. . . . . . . . . . . . . . . . . . . . . . . . . . . . . . . . . . . . . 78
What is the Magellan Geocache Manager? . . . . . . . . . . . . . . . . . . . . . 78
How Do I Install the Magellan Geocache Manager? . . . . . . . . . . . . . . . 78
Using the Magellan Geocache Manager . . . . . . . . . . . . . . . . . . . . . . . 79
Magellan Geocache Manager Tools . . . . . . . . . . . . . . . . . . . . . . . . . . . 80
Working with Geocache Files . . . . . . . . . . . . . . . . . . . . . . . . . . . . . . . 81
Adding Downloaded Files to the List . . . . . . . . . . . . . . . . . . . . . . . 81
Uploading to the Magellan eXplorist . . . . . . . . . . . . . . . . . . . . . . . 82
Using the eXplorist with MapSend. . . . . . . . . . . . . . . . . . . . . . . . . . . . 83
What is MapSend? . . . . . . . . . . . . . . . . . . . . . . . . . . . . . . . . . . . . . . 83
Overview of Uploading Detailed Maps from MapSend to eXplorist . . . . . 83
Transferring POIs, Routes, and Track Between MapSend and eXplorist . 86
Transferring POIs, Routes, and Track to MapSend . . . . . . . . . . . . . 86
Transferring Waypoints, Routes, and Track from MapSend . . . . . . . . 87

Table of Contents
Preferences . . . . . . . . . . . . . . . . . . . . . . . . . . . . . . . . . . . . . . . . . . . . 88
Restarting the GPS. . . . . . . . . . . . . . . . . . . . . . . . . . . . . . . . . . . . . . 89
Using Active Setup. . . . . . . . . . . . . . . . . . . . . . . . . . . . . . . . . . . . . . 91
Changing the Default Files . . . . . . . . . . . . . . . . . . . . . . . . . . . . . . 91
Selecting the Background or Detail Map . . . . . . . . . . . . . . . . . . . . 92
Setting the Map Units. . . . . . . . . . . . . . . . . . . . . . . . . . . . . . . . . . . . 93
Selecting Navigational Units of Measure . . . . . . . . . . . . . . . . . . . . 93
Selecting the North Reference . . . . . . . . . . . . . . . . . . . . . . . . . . . 94
Selecting the Coordinate System. . . . . . . . . . . . . . . . . . . . . . . . . . 95
Selecting the Map Datum. . . . . . . . . . . . . . . . . . . . . . . . . . . . . . . 96
Using the Power Management Tool. . . . . . . . . . . . . . . . . . . . . . . . . . . 97
Setting the Power-Off Timer . . . . . . . . . . . . . . . . . . . . . . . . . . . . . 97
Setting the Light Timer . . . . . . . . . . . . . . . . . . . . . . . . . . . . . . . . 98
Personalizing the eXplorist . . . . . . . . . . . . . . . . . . . . . . . . . . . . . . . . 99
v
Selecting Languages . . . . . . . . . . . . . . . . . . . . . . . . . . . . . . . . . . . . 100
Clearing Memory . . . . . . . . . . . . . . . . . . . . . . . . . . . . . . . . . . . . . . 101
Clearing Active Track History . . . . . . . . . . . . . . . . . . . . . . . . . . . 101
Clearing User-Entered POIs and Routes . . . . . . . . . . . . . . . . . . . . 102
Clearing Routes . . . . . . . . . . . . . . . . . . . . . . . . . . . . . . . . . . . . . 102
Clearing Active Track, User-Entered POIs, and Routes . . . . . . . . . 102
Reseting the eXplorist to Factory Defaults . . . . . . . . . . . . . . . . . . 103
Setting Alarms & Beepers . . . . . . . . . . . . . . . . . . . . . . . . . . . . . . . . 104
Setting the Beeper. . . . . . . . . . . . . . . . . . . . . . . . . . . . . . . . . . . 105
Setting Alarms . . . . . . . . . . . . . . . . . . . . . . . . . . . . . . . . . . . . . 105
Setting the Clock . . . . . . . . . . . . . . . . . . . . . . . . . . . . . . . . . . . . . . 106
Setting the Time & Format . . . . . . . . . . . . . . . . . . . . . . . . . . . . . 106
Setting Daylight Savings Time. . . . . . . . . . . . . . . . . . . . . . . . . . . 107
Specifications . . . . . . . . . . . . . . . . . . . . . . . . . . . . . . . . . . . . . . . . . 108
Accessories . . . . . . . . . . . . . . . . . . . . . . . . . . . . . . . . . . . . . . . . . . . 110
Contacting Magellan Support . . . . . . . . . . . . . . . . . . . . . . . . . . . . . . 111
eXplorist 500 GPS Receiver
Features of the Magellan eXplorist GPS receiver:
1
• Built-in background map (8 MB)
• High-definition color display
• Preloaded points of interest
• Rugged design, rubber-protected
• 8 MB of usable memory
• Superior tracking with 14 parallel channels
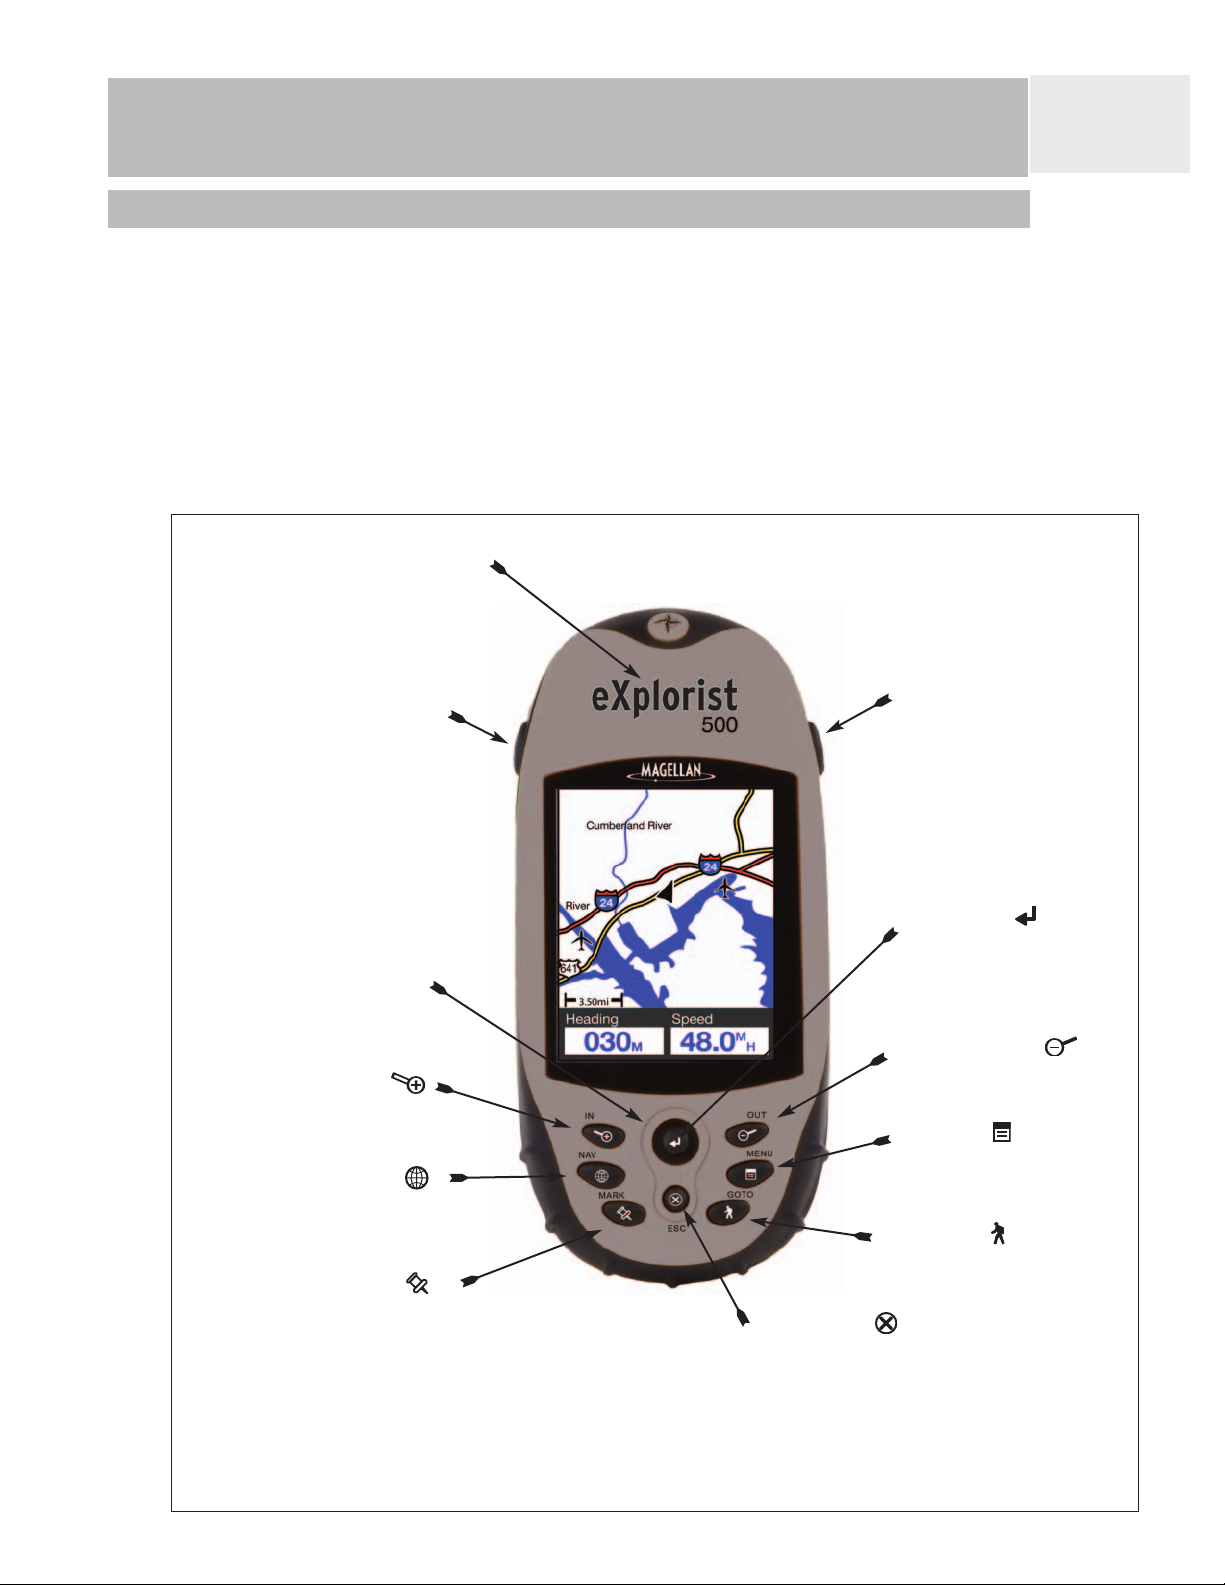
Antenna
Display Backlight
Button
• Rechargeable Li-Ion battery
™
• TrueFix
• 3 meter accuracy (WAAS/EGNOS)
• Multiple track logs
• Unlimited storage of data using SD
cards
• Pocket-sized and waterproof to IPX-7
GPS technology
On/Off Button
Arrow Joystick
ZOOM IN
NAV
MARK
eXplorist 500 GPS Receiver (front)
ENTER
ZOOM OUT
MENU
GOTO
ESCAPE

eXplorist 500 GPS Receiver
Button Descriptions:
On/Off Turns the eXplorist on or off.
Backlight Turns the display backlight on. Sequences from off to low to high
intensity.
ENTER Used to access highlighted menu items or accept highlighted
buttons.
ESCAPE Cancels data inputs.
Closes the accessed function and goes back to the last viewed
screen.
Steps backward through the navigation screens.
ZOOM IN Used on the Map screen to zoom in on the map displayed. The
map display can be zoomed in to 100 ft. (35.0 m).
2
Also used to quickly step through the list of POIs when doing an
alphabetical search.
ZOOM OUT Used on the Map screen to zoom out on the map displayed. The
map display can be zoomed out to 1700 mi (2700 km).
Also used to quickly step through the list of POIs when doing an
alphabetical search.
MENU Brings up a menu with available options. Options can be selected
by using the arrow joystick to highlight the option and pressing
ENTER to access it.
NAV Steps through the navigation screens. (Map screen > Compass
screen > Position screen > Satellite Status screen)
MARK Used to save your present position as a point of interest. Points of
interest that you save are stored in the
of the database.
My Points of Interest portion
GOTO Creates a one-leg route from your present position to a destination
selected from the Points of Interest database or by using the cursor
on the background map.
Arrow joystick Pans the cursor on the Map screen.
Moves the highlight bar to select menu options and data-entry
fields.
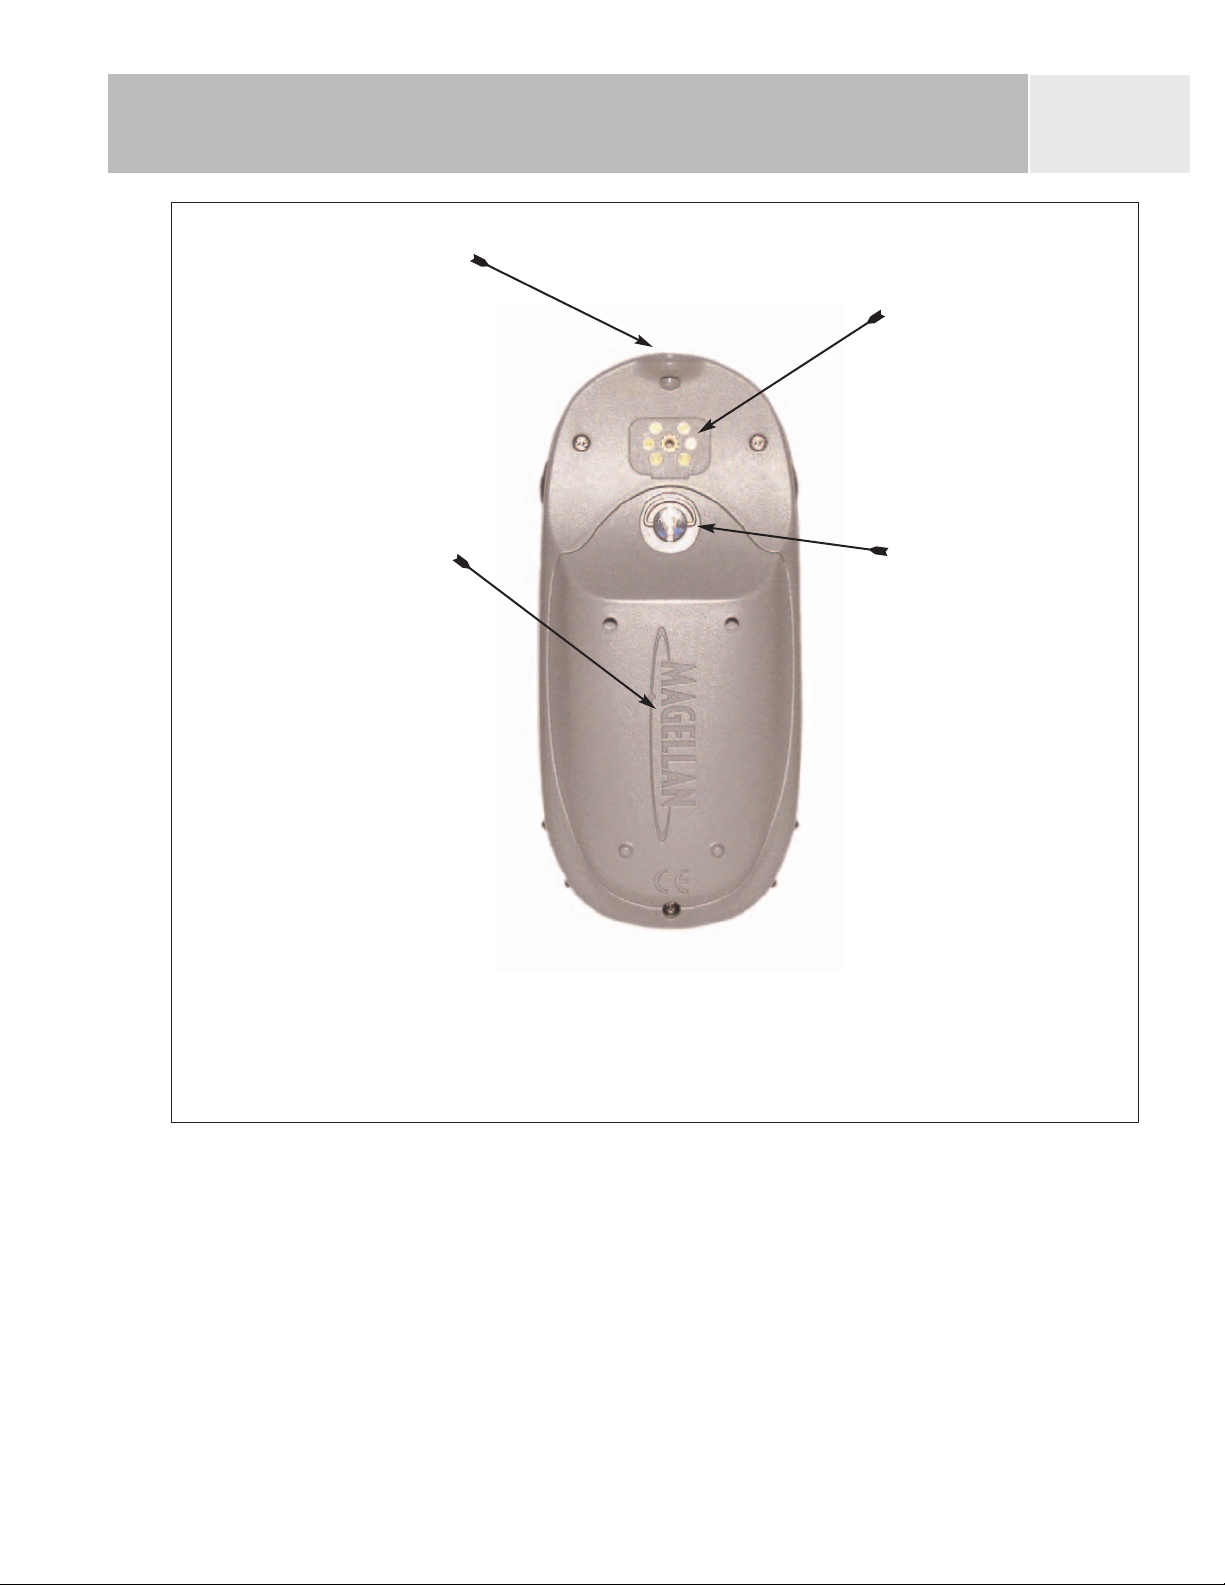
eXplorist 500 GPS Receiver
Wrist Lanyard
Strap Mounting
Hole
3
Connector for
external power
and connection
to a personal
computer.
Battery Door
Battery Door
Fastener
(Unscrew to
open battery
door to install
batteries.)
eXplorist 500 GPS Receiver (back)

eXplorist 500 GPS Receiver
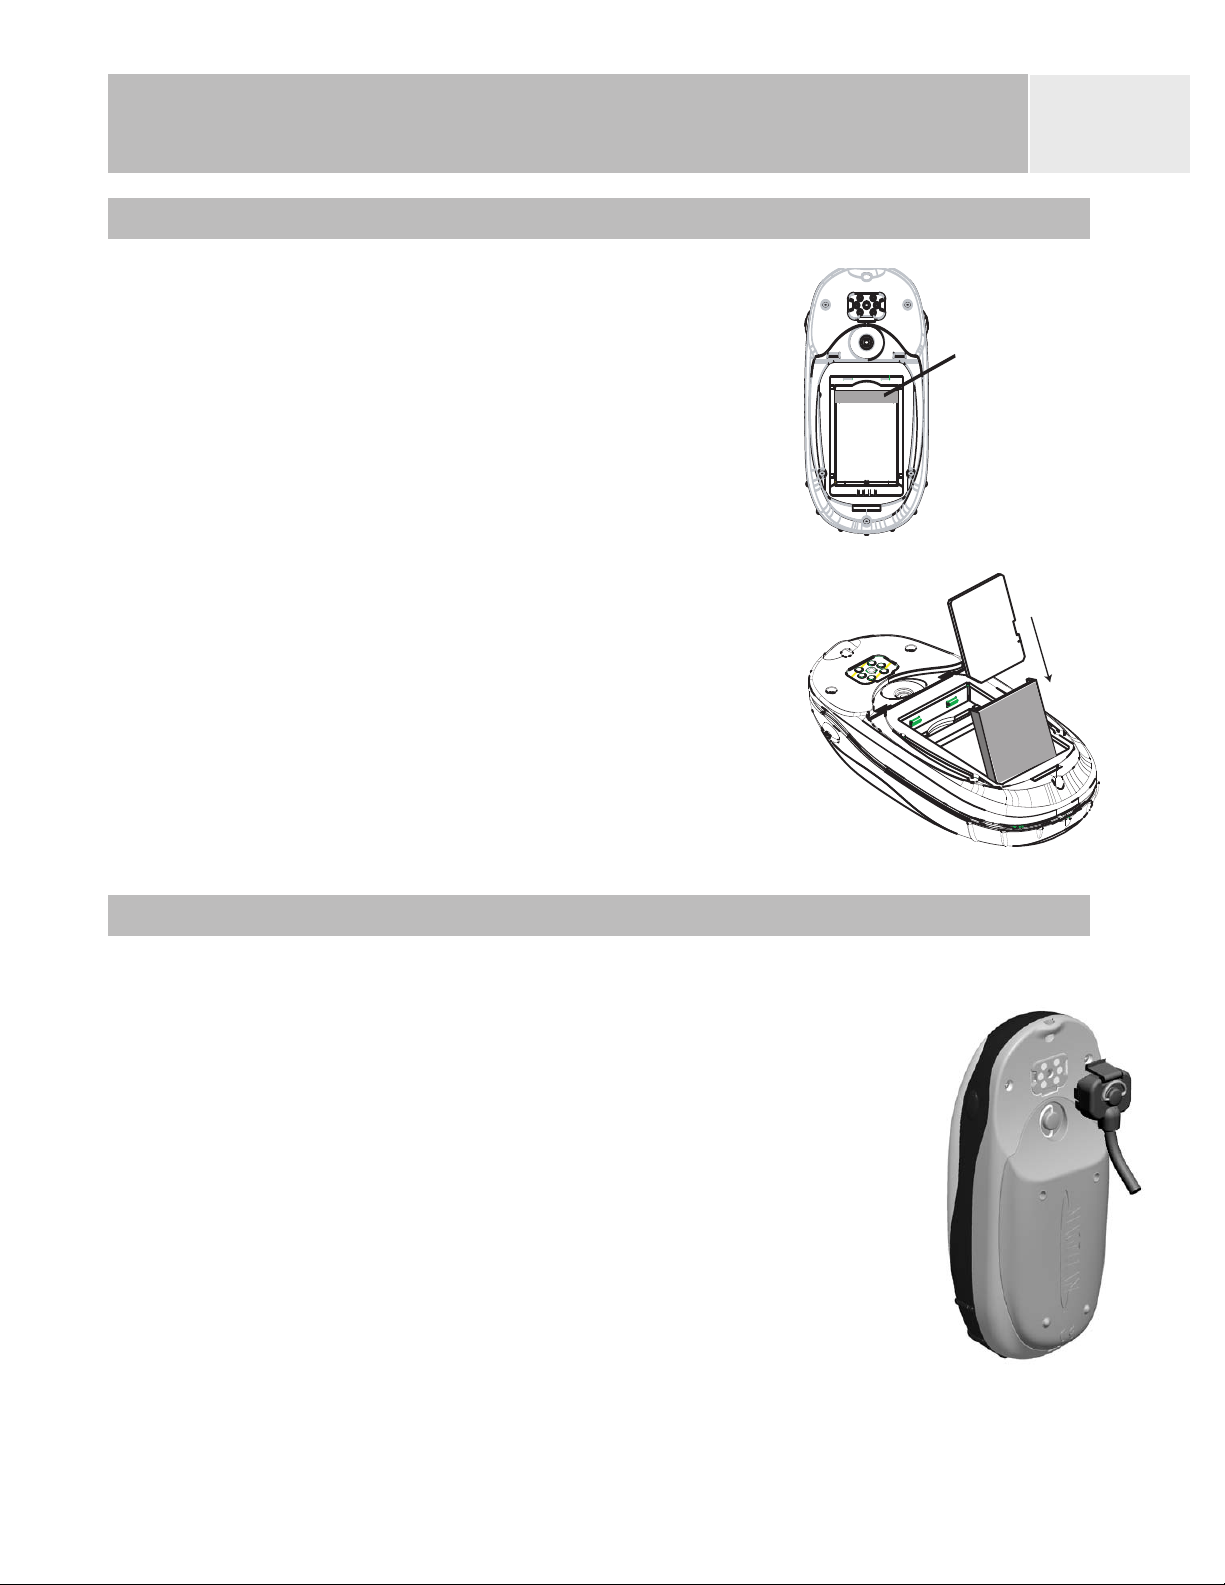
Installing and Charging the Battery
Installing the Battery: Remove the battery door by
unscrewing the battery door fastener and lifting the
battery door out. Insert the battery as shown and
replace the battery door.
Charging the Battery: Important: Charge the battery
completely before first using your eXplorist.
Connect the PC cable to the back of the eXplorist.
Connect the AC adapter jack to the PC cable and
then to an AC wall outlet. The battery will begin
charging, even with the eXplorist turned off. Full battery charging may take 4 hours.
Tips on conserving battery life:
• Turn the eXplorist off when not in use. Whether you are moving or standing still, the
eXplorist is constantly calculating position fixes and using power at the same rate. If
you are going to be at the same position for any length of time, turn the eXplorist off.
4
Use the Power Timer to automatically turn the eXplorist off. The Power Timer option
•
allows you to set a time that the eXplorist will automatically turn off when none of
the buttons have been pressed and you are not moving for a selected time. You can
select from 5, 10, 30 or 60 minutes.
Use the display backlight sparingly. The most severe drain on the batteries is the
•
use of the display backlight. You will notice a drastic drop in battery life with the
backlight display on high. You should use the Light Timer to set a time interval that
the display backlight will automatically turn to the lowest setting when none of the
buttons have been pressed and the computed location hasn’t changed.
Setting the Power Timer
From any Nav screen press MENU. Highlight Preferences and press ENTER. Highlight
Pwr Management and press ENTER twice. Use the arrow joystick to select 5 Minutes, 10
Minutes, 30 Minutes, 60 Minutes or Off. Press ENTER. Press NAV to return to the last
viewed navigation screen.
Setting the Light Timer
From any Nav screen press MENU. Highlight Preferences and press ENTER. Highlight
Pwr Management and press ENTER. Use the down arrow to highlight the Light Timer field.
Press
Minutes
navigation screen.
ENTER. Use the arrow joystick to select 30 Seconds, 1 Minute, 2 Minutes, 4
, 10 Minutes or Timer Off. Press ENTER. Press NAV to return to the last viewed
eXplorist 500 GPS Receiver
Installing an Optional SD Card
Open the battery door and remove the LI-ION battery,
exposing the SD Card Cradle.
Lightly press on the SD Card Cradle Release and the
cradle will spring open.
With the cradle open, slide the SD card in the cradle
(shown in gray). Do NOT lay the SD card flat in the
battery compartment as damage will occur when
closing the SD Card Cradle. Gently push the SD card
cradle back down until it locks into place.
SD Card Cradle
elease
R
5
Put the LI-ION batter
compartment and secure the battery door.
y back in the battery
Connecting to a Personal Computer
Turn your eXplorist off and connect the round connector of the
eXplorist data cable to the back of your eXplorist and tighten the
locking screw. There are alignment tabs on the connector to make
sure that the connector is installed properly. It is recommended
that you connect the eXplorist to external power using the external
AC power adapter.
The other end of the eXplorist data cable has a standard USB
connector that you connect to your personal computer USB ports
(normally found on the back of your personal computer). Turn your
personal computer on and then turn on your eXplorist. You may
see a message on your computer indicating that it has found a new
USB hardware device. On your eXplorist, a screen is displayed
indicating that it is in USB File transfer mode.
Right click the “My Computer” icon on the desktop of your
computer and select the “Explore” option. If you have an SD card
installed in your eXplorist you will see a new device named “Removable Disk”. From here
you are able to copy files to and from the installed SD card to your computer.
Connecting the Cable

Using the eXplorist 500
The eXplorist 500 uses information from the GPS satellites orbiting the earth to provide you
with detailed information about your exact location. This is the foundation that your
eXplorist will use to provide you with the necessary information to arrive at your destination.
Going to a Destination
The most common use of your eXplorist will be to provide you with the navigation tools
you’ll need to arrive at your chosen destination. The simplest route, and the one used most
often, is a GOTO route. This is a route that is computed as a straight line from where you
are to where you want to go.
Step One: Compute Your Position
The basic operation of your eXplorist is to use the GPS satellites to compute your present position. This is done internally in the software of your eXplorist. The only thing
that you need to do is to give your eXplorist a clear view of the sky so that it can receive
the signals from the satellites.
Do:
• Point the antenna up toward the sky.
6
• Maintain a clear view of the sky.
Don’t:
• Cover the antenna with your hand or other objects.
• Point the antenna down.
• Stand under trees or other heavy foliage.
• Stand where the satellite signals are being blocked by large obstructions (such as
buildings, in a narrow canyon, etc.)
If you find that the eXplorist is not computing a position, just move to a place that has
a better view of the sky.
Anytime that you want to view the status of the satellites and
their signal strength, switch to the Satellite Status screen. Here,
you will graphically see the satellites and their relative signal
strength. You need at least three satellites with good signal
strength (indicated by green bars) to compute your position. A
computed position with only three satellites is termed a 2D position fix. When you are getting a 2D position fix, your elevation is
not being computed. To add elevation to your position fix, you
need at least four satellites with good signal strength. Positions
that use four or more satellites are called 3D position fixes.

Using the eXplorist 500
Step Two: Where Do You Want To Go?
Now that the eXplorist knows where you are, you need to tell it where you want to go.
There are many different ways you can do this, but the simplest and most commonly
used is a “GOTO” route. This is a one-leg route with a beginning (where you are now)
and a destination (where you want to go). The destination is selected by using the
Points of Interest database. This database has two main options: positions you have
saved (
eXplorist (
My Points of Interest) or points of interest that have been preloaded into your
Background Map).
7
Creating a GOTO route is as simple as pressing the
tination from the points of interest database.
Step Three: Calculating Movement
As you move, your eXplorist is constantly calculating new positions, comparing the new
position to the previous position and calculating such things as heading and speed.
This is all done in the eXplorist’s software communicating with the satellites and is
instantaneously shown on your display.
Step Four: Providing Directions
Your eXplorist constantly computes a direct line from your present position to your destination. From there, it will provide you instructions to guide you along that straight path.
Unless you are on a large body of water, it will be unlikely that you will be able to follow
these instructions exactly. To compensate for that, your eXplorist automatically updates
the route, providing you with up-to-date information about getting to your destination.
GOTO routes are the simplest and most commonly used feature of your eXplorist 200. With
just the
interest stored in your database.
GOTO button the eXplorist will provide you with the tools needed to get to any point of
GOTO button and selecting the des-
Saving Your Position
Another commonly used feature of the eXplorist is saving your position to the points of interest
database. This feature is accessed by pressing the
you can also add attributes such as the icon or a name for the point of interest. This will help
you to find this spot in the future when accessing it from the points of interest database.
Suppose that you have set up camp for the night. Tomorrow, you plan on doing some
nature exploring and you want to be able to come back to the campsite when you are
done. Press the
After your hiking is done, simply use the
My Points of Interest. It’s that simple to find your way back.
of
While out fishing on the lake, you come across the perfect spot for catching your limit.
Next year, you want to be able to come back to this same spot. Turn on your eXplorist;
and after it has computed your position, press the
you can enter the name “Catfish1” and save your point of interest. Next year, you can
be back at the same hot spot with just a press of the GOTO button.
MARK button and set the name of the point of interest to “Camp”.
MARK button. When saving your position,
GOTO button and select “Camp” from the list
MARK button to save it. This time

Using the eXplorist 500
A simpler example, and one you can do at just about any time, is finding your car in that
ocean of other cars in the shopping mall parking lot. Just park your car, step outside and
let your eXplorist compute your position. (Make sure that you have a clear view of the
sky.) Using the
done shopping, just go outside the mall and create a GOTO with the destination “Car”.
No matter where you parked, your eXplorist will guide you back, simply and easily.
Tracing Your Steps
Hikers, mountain bikers and outdoor enthusiasts often need the option of leaving a trail of
breadcrumbs that they can follow back to where they started. The eXplorist has a feature
called
It was mentioned earlier that your eXplorist is constantly computing your present position and
that you can save your position by using the
automatically saved your computed positions as you moved along the trail. Pretty soon there
would be a set of saved positions, like breadcrumbs, that represents the trail you have taken.
This is exactly what the eXplorist does. It saves the computed positions as hidden points of
interest and strings them together to represent your travels. This is called your
hidden points of interest are your
BackTrack that enables you to do just that.
MARK button, save this position with the name “Car”. When you are
MARK button. Now, imagine that your eXplorist
Track, and the
Track Log.
8
Your eXplorist enables you to use this Track, reverse it and navigate you along the same path
that you followed to get you back to your destination.
You might drive to the ranger station and follow the trail that leads you to the waterfalls
you have been wanting to see. With your eXplorist turned on and able to compute position fixes, you continue along the trail. The trail winds along and has many smaller
trails attached to it. As the day progresses you arrive at the falls. When it’s time to
head back to your car, you access your Track Logs list and select the
Now, press MENU, highlight BackTrack and press ENTER. Your eXplorist will now
seamlessly guide you along the path, tracing your footsteps, back to where you started.
Another nice feature of Track Logs, which you may find useful, is that you are able to
save the Track Logs and recall them at any time. In the above example, at the waterfall,
you could save that track and use it anytime you wanted to go back.
Active Track log.
Using the eXplorist 500
Additional Features
Your Magellan eXplorist contains all of the features that you would
expect from a high-quality Magellan-brand handheld navigation
device, as well as many more to make your outdoor experience more
enjoyable. You have the ability to customize the navigation screens,
enabling you to view the information that is important to you. The
eXplorist makes full use of the Map screens, enabling you to graphically see your position, the route you are navigating, the path you
have trekked (Track), and points of interest icons. There is a builtin odometer so that you can log the length of your journey. User
preferences enable you to set up and maintain your eXplorist so that
it fits your needs and requirements. The eXplorist gives you all of
this and more in an easy-to-use, portable navigation tool that
includes built-in help files that you can access in the great outdoors.
9
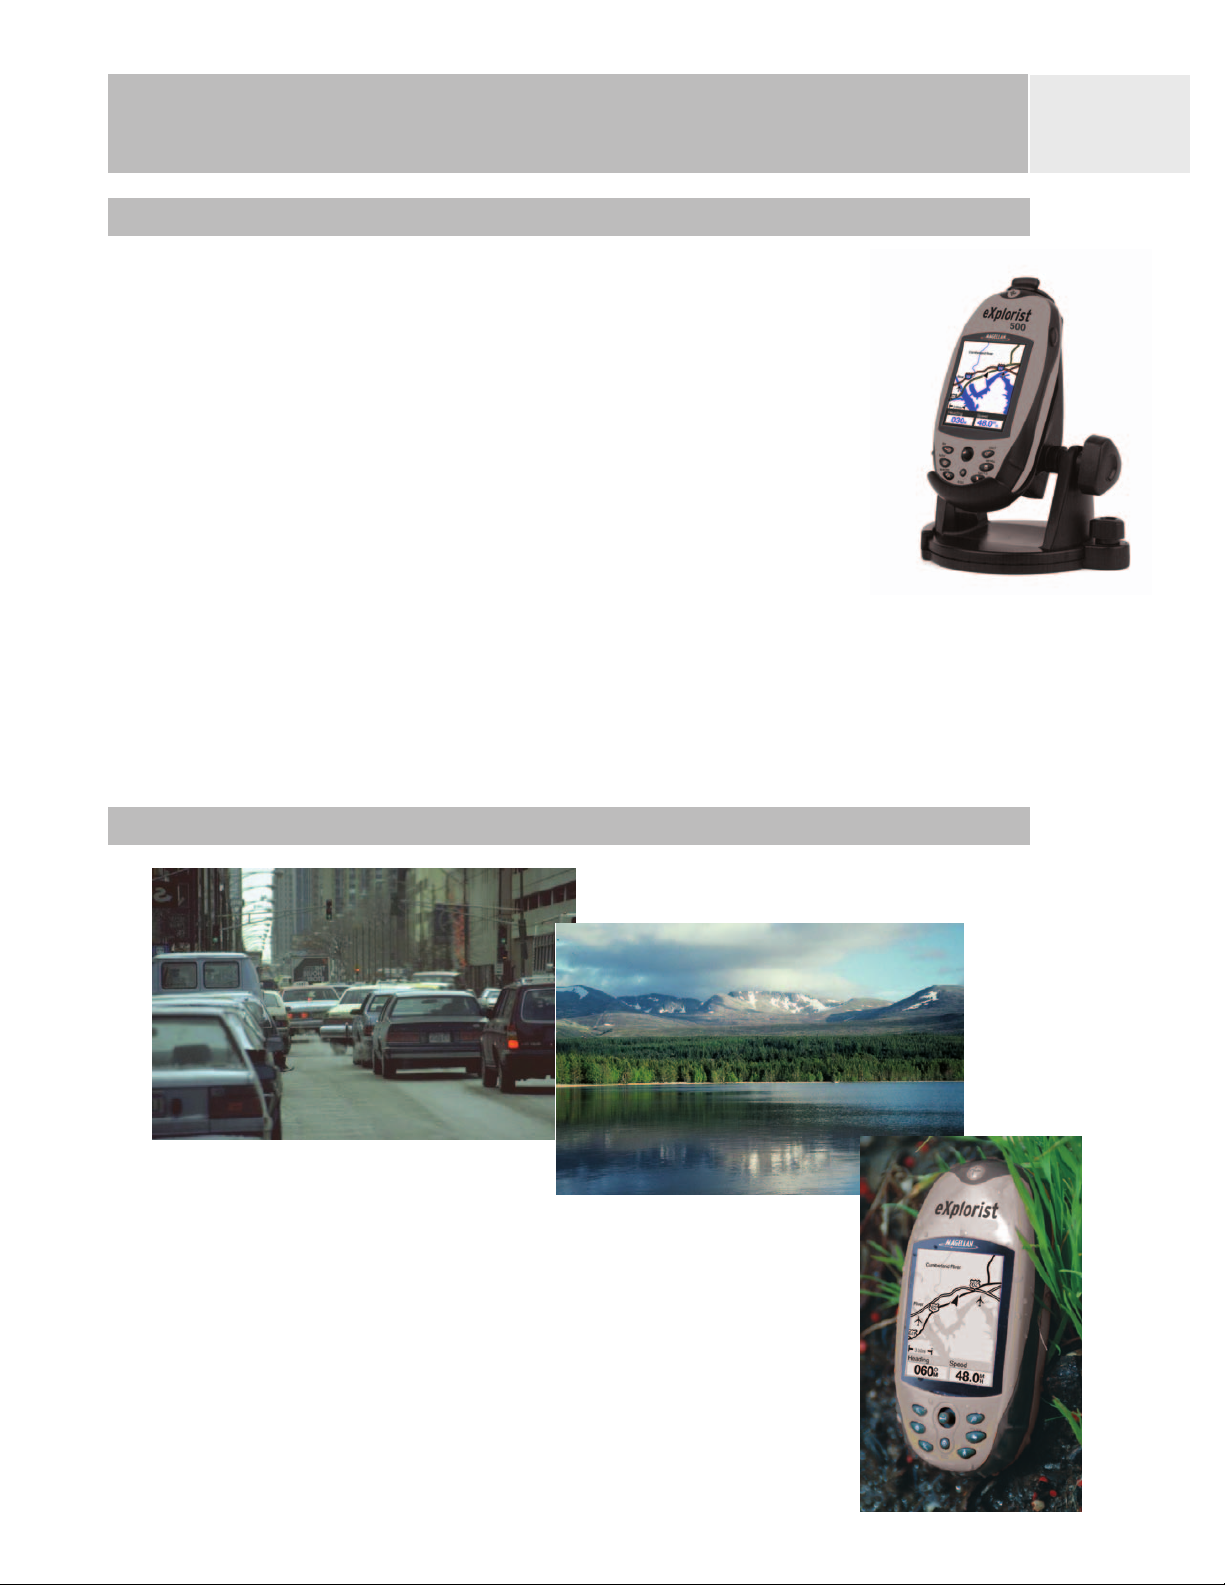
Magellan eXplorist 500
with optional
swivel mounting bracket
Summary
Go from this...
to this...
with this.
Starting Up
Turning the eXplorist On
To turn the eXplorist on, press the POWER button on the top right
side. To prevent the eXplorist from being turned on accidentally,
draining the batteries, you need to press
screen is displayed. You have approximately 30 seconds between
pressing the
otherwise the eXplorist will automatically turn itself off.
POWER button and pressing the ENTER button,
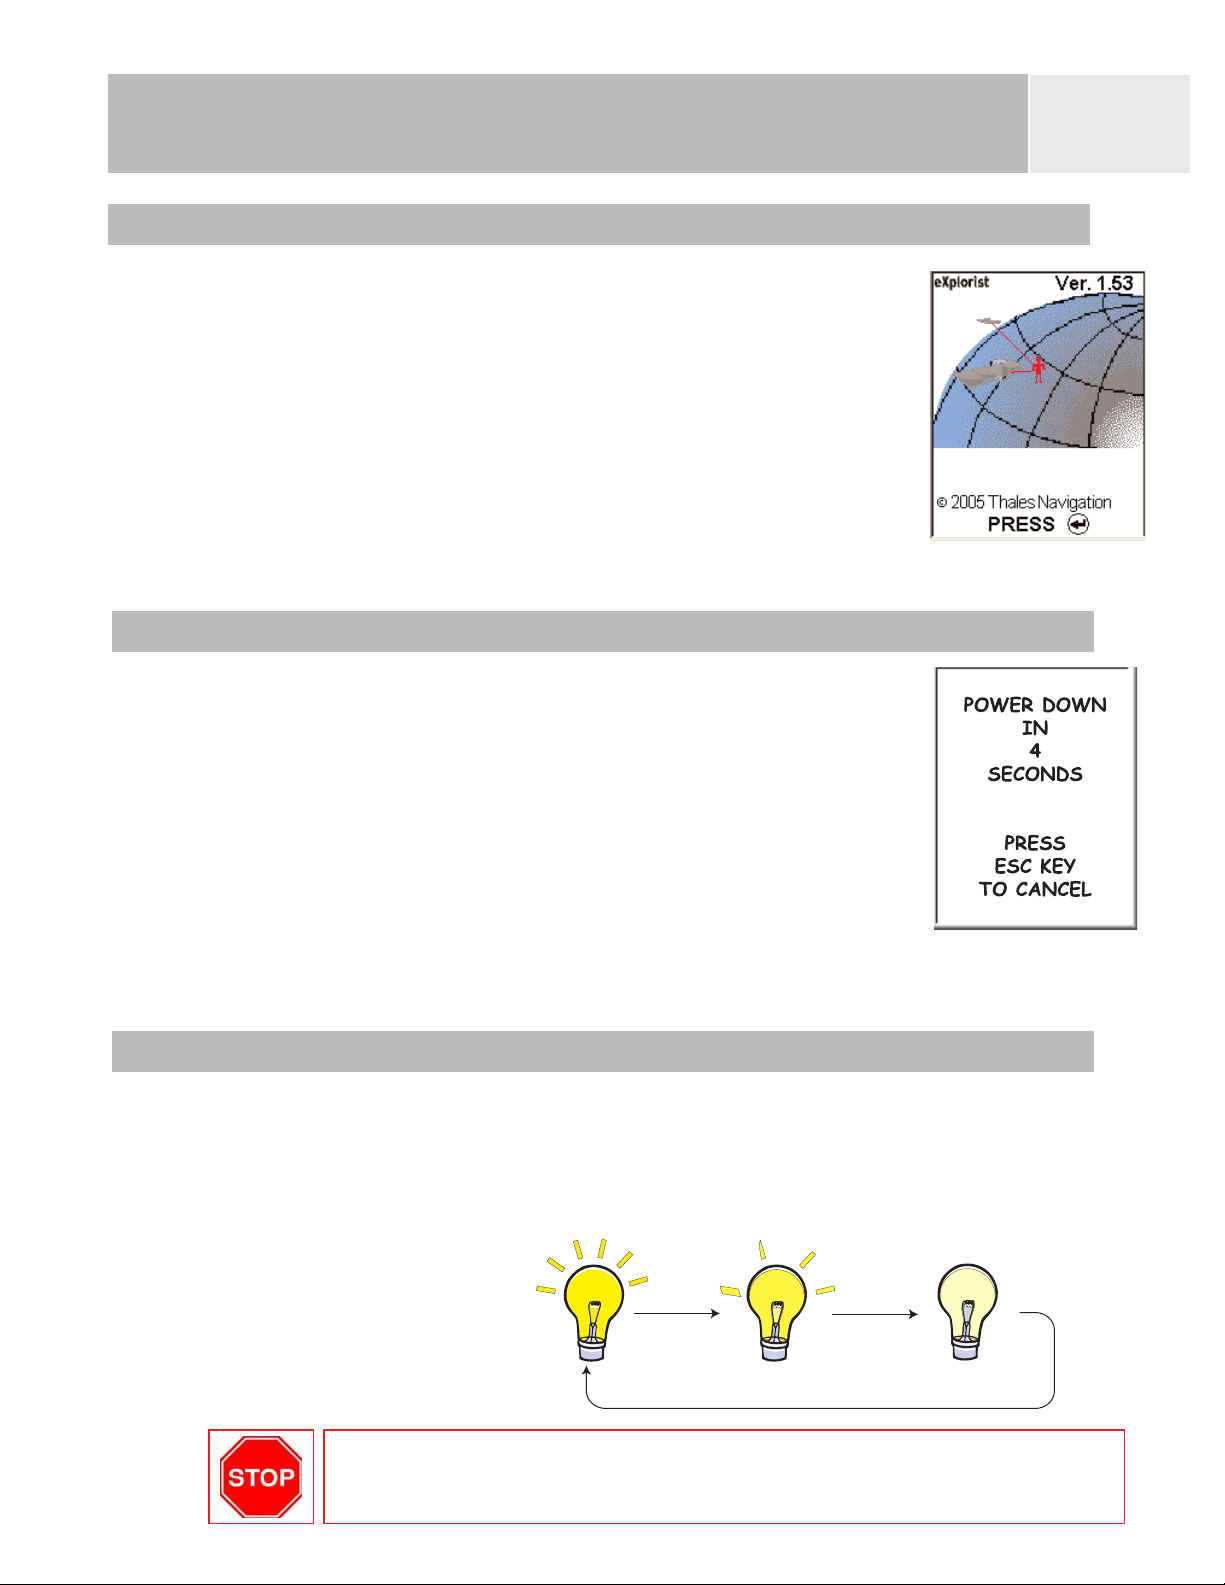
Turning the eXplorist Off
To turn the eXplorist off, press the POWER button on the top right
side.
ENTER when the Startup
10
There is a 5-second countdown after you press the
you change your mind and decide to leave the eXplorist on, just press
the
ESC button. If you press the POWER button during this
countdown period, the eXplorist will immediately turn off.
POWER button. If
Changing the Display Backlight Intensity
The display backlight has three levels of intensity: high, medium, and low. When the
eXplorist is first turned on, the display backlight is set to high. Press the
the top left side of the eXplorist to turn the backlight on medium. Pressing the
button a second time sets the backlight to low. To turn the backlight back to high, press the
LIGHT button again.
Backlight
intensity changes
each time you
press the
button.
LIGHT
LIGHT button on
LIGHT
REMEMBER: Using the display backlight on high causes severe
drain on the batteries.
Starting Up
Using the eXplorist for the First Time
Turn the eXplorist on. Press the Power button. When the Startup screen is displayed, press
ENTER.
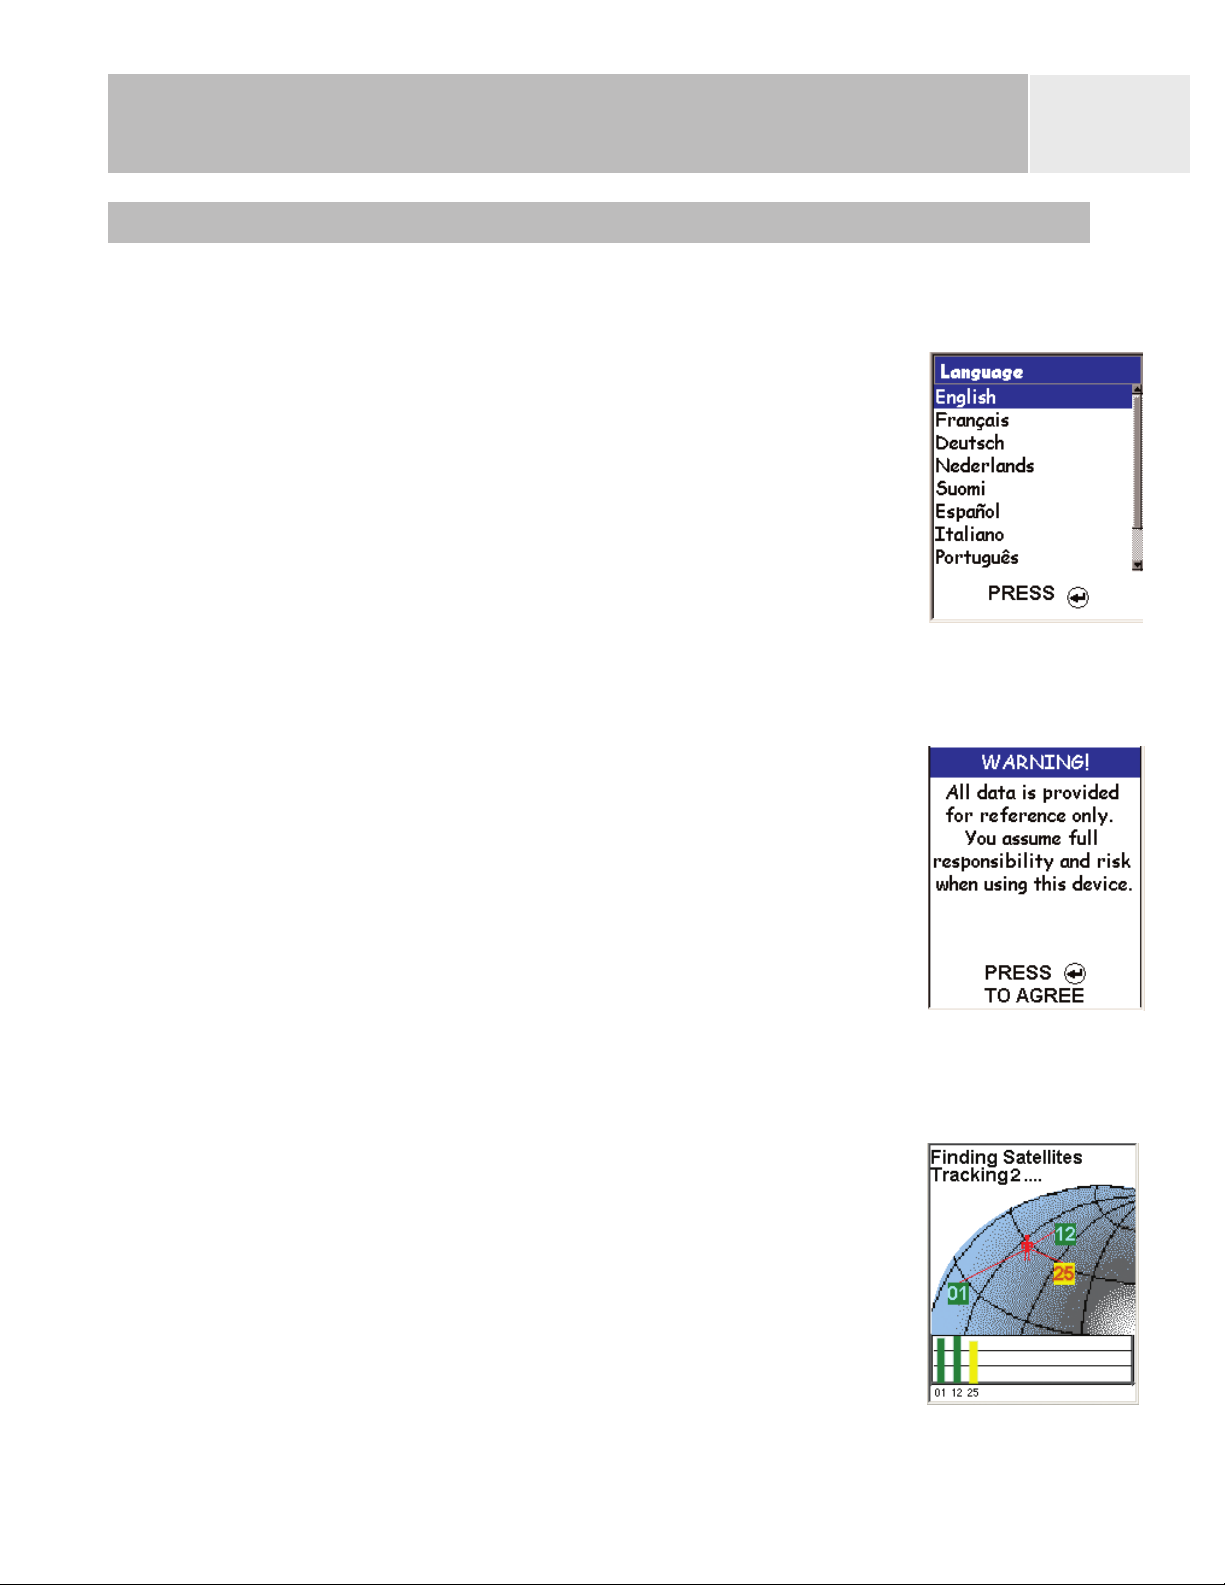
Select Language. When you turn on the eXplorist for the first time,
you are given the option of selecting one of the ten languages that
can be used.
You can change the language selection at any time by accessing
Menu > Preferences > Languages.
Tip: If you accidentally change the language but you can’t read
the text and need to change it back, press the
Satellite Status screen is displayed. Press MENU. Use the
the
Arrow joystick to highlight the fourth line and press ENTER. Use
the Arrow joystick to highlight the fifth line and press ENTER.
Language Select screen will be displayed.
The
NAV button until
Use arrow joystick to move
the highlight up and down.
ENTER to accept
Press
11
Read Warning. When you agree to the warning statement, press
ENTER to continue.
Press ENTER to continue
Compute Initial Position. For this operation, it is best if you are outside and have a clear,
unobstructed view of the sky. Without a clear view, this will take much longer and could
result in the eXplorist being unable to compute the initial position
automatically.
The eXplorist begins to compute your initial position. This may take a
few minutes while it is doing a
Normally, when you first turn the eXplorist on it will compute your
position in a matter of seconds when able to do a warm start. (An
explanation of
section.)
cold start vs. warm start is provided following this
cold start.
Satellite Status screen is displayed, showing you the progress
The
of the collection of satellite data.
Satellite Status screen shows
how many satellites ar
tracked, as well as the
relative strength of the signal.
e being
Starting Up
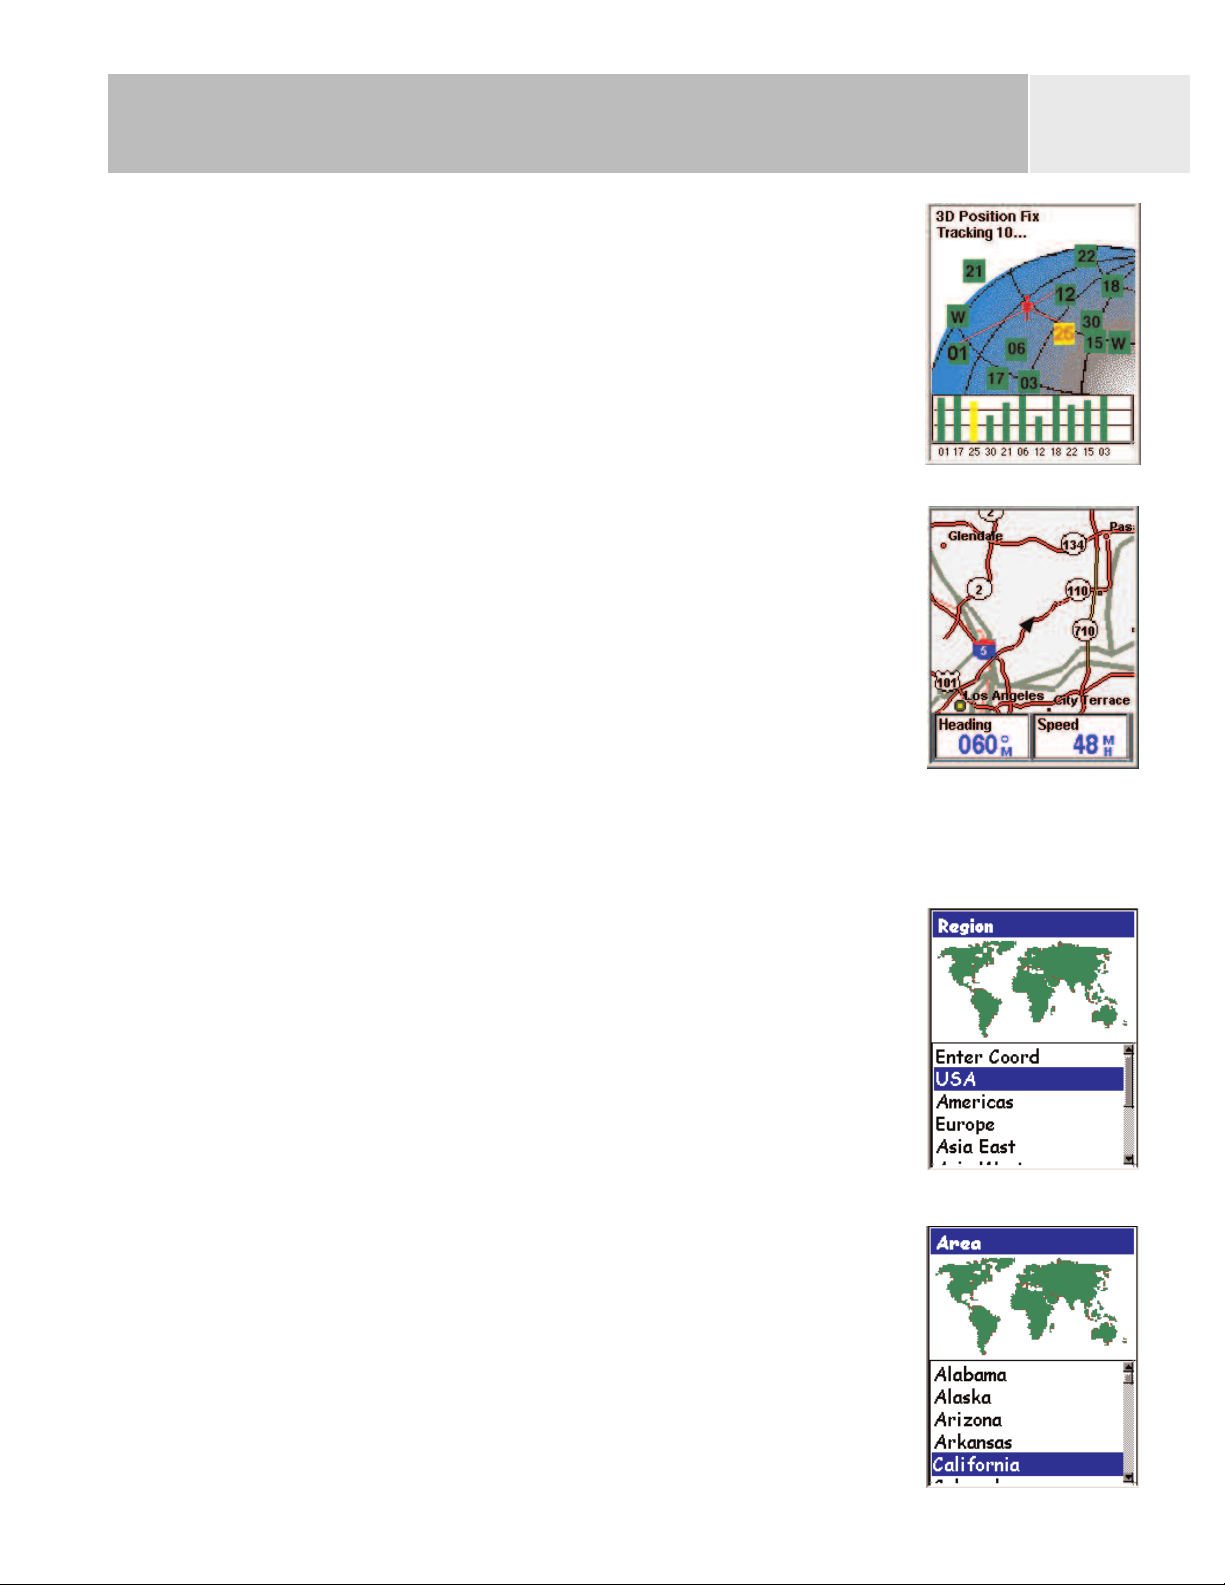
The Satellite Status screen will continuously update, and you will be
able to graphically see how well your eXplorist is performing.
When the eXplorist has enough information to compute a position fix,
Satellite Status screen is replaced with the Map screen. The
the
arrow cursor in the center of the Map screen represents your
position. As you move, the arrow will point in the direction you are
traveling.
Tip: Use the ZOOM IN and ZOOM OUT buttons to change the
map scale so that you can see your present position better.
12
If the eXplorist is unable to compute your initial fix in a few minutes: If the eXplorist
determines that it is unable to track the satellites within a few minutes, it will present
you with the following screens in an effort to better determine its
approximate location.
Select Region. Use the arrow joystick to highlight the region that
you are located in. With the region highlighted, press the
button.
Select Area. This displays a list of areas for the region you
selected. Use the Arrow joystick to highlight the area that
applies to you, and press the
ENTER button.
ENTER
Starting Up
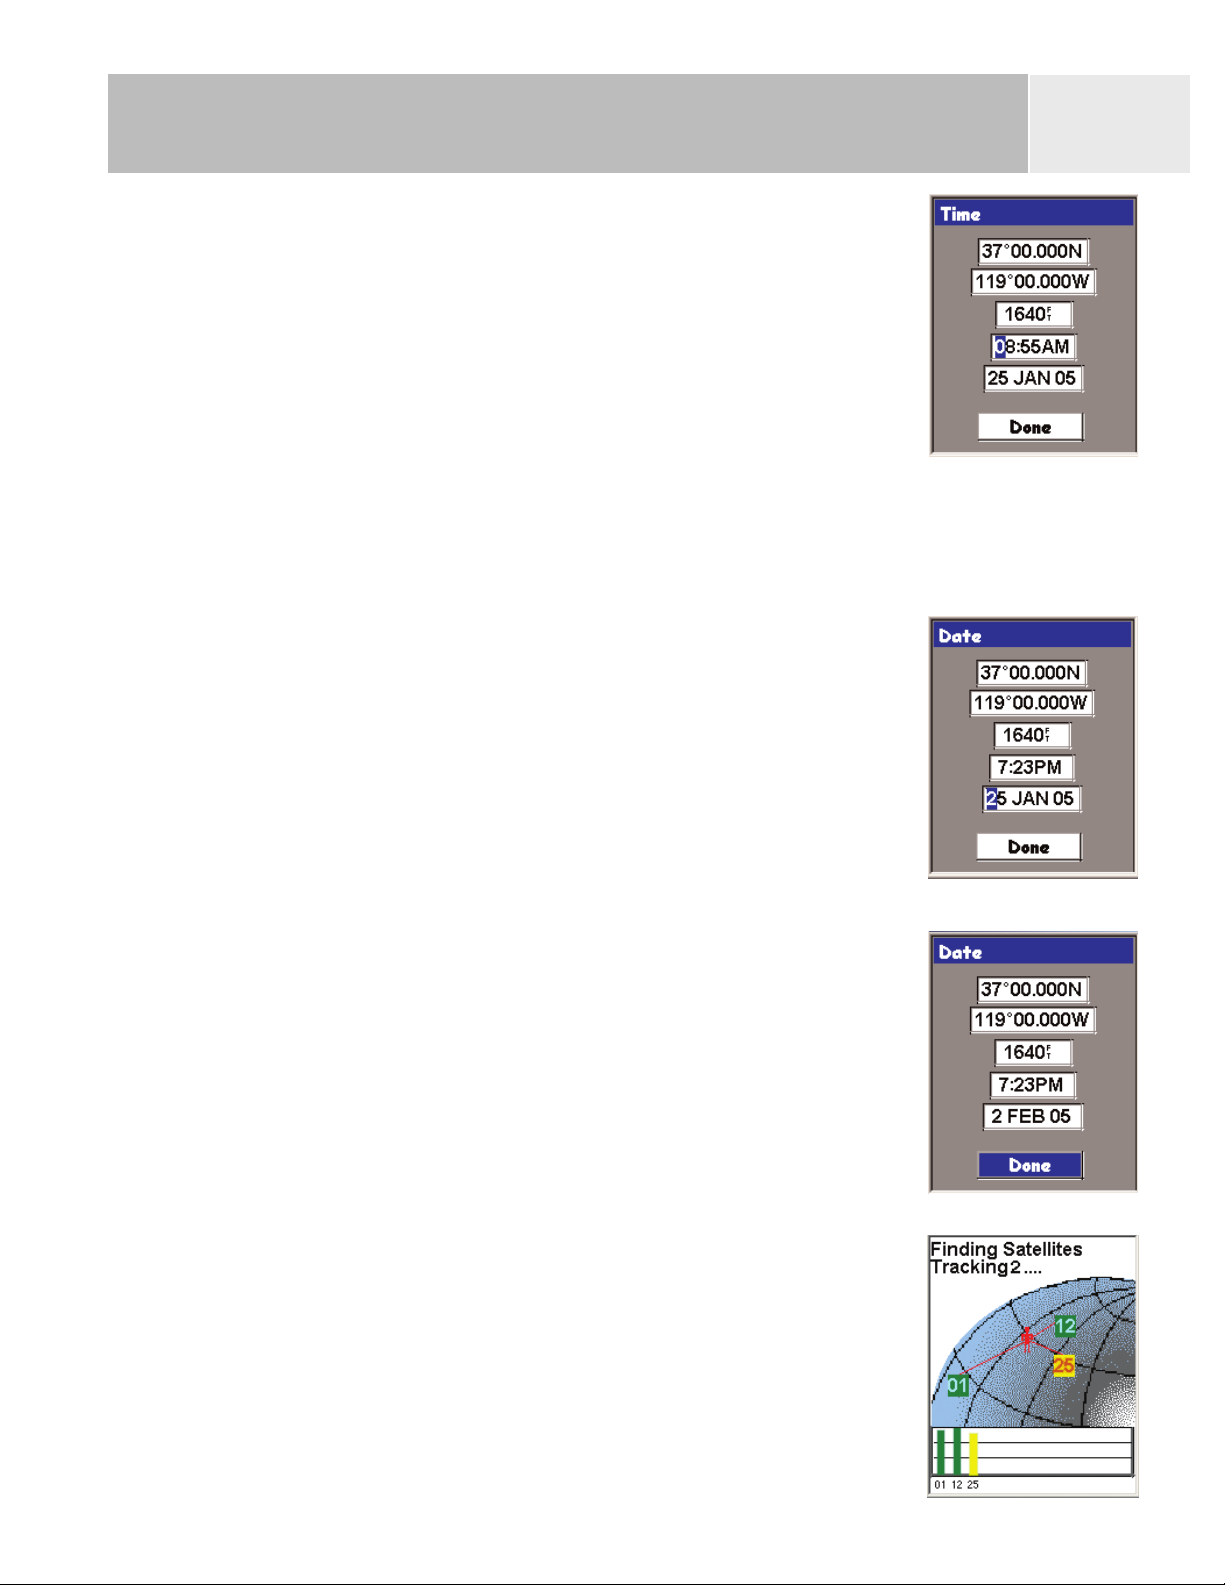
Enter Current Time. Use the arrow joystick to enter the current
time.
rrow Joystick Up: Increases the highlighted number
A
Arrow Joystick Down: Decreases the highlighted number
Arrow Joystick Right: Moves the highlight one character to the right
Arrow Joystick Left: Moves the highlight one character to the left
Toggle between AM and PM by moving the arrow joystick up or down when
AM or PM is highlighted.
13
When you have entered the correct time, press ENTER.
Enter the Date. Use the Arrow joystick to set the date displayed
to the current date.
Arrow Joystick Up: Increases the highlighted number
Arrow Joystick Down: Decreases the highlighted number
Arrow Joystick Right: Moves the highlight one character to the right
Arrow Joystick Left: Moves the highlight one character to the left
When the month is highlighted, use the arrow joystick up or down to scroll
through the list of months.
When you have entered the correct date, press ENTER.
Accept Information. The Done button is highlighted at the
bottom of the display. Review the information you entered; if
correct, press ENTER.
Tip: If the time or the date is incorrect, you can fix it now.
Use the
Arrow joystick to highlight the time or the date field
that you want to change. With the field highlighted, press
ENTER. You can now change the information using the same
technique used before.
The latitude and longitude
that represents the center
of the region and area you
selected is displayed.
Satellite Status screen is displayed again and the eXplorist
The
will try to compute your position using the information you just
provided.
Tip: If you notice that the satellite signal-strength bars are
still not changing, try moving to a new location where you
have a clearer view of the sky.
As before, when the eXplorist computes the initial position, the
Map screen will be displayed, with your computed position
indicated by the arrow cursor in the middle of the display.

Starting Up
Cold vs. Warm Start. When the eXplorist is turned on, one of the first things it does is
to find out which satellites are overhead, along with their relative position. It does this
by using a built-in satellite almanac. This almanac, when given the current date, time
and approximate position, can provide the eXplorist with information on which satellites
are overhead and their approximate relationship to the eXplorist. Now with information
on satellite availability, the eXplorist can begin setting its internal satellite channels to
receive satellite transmissions.
Cold Start. Cold start is defined as when the eXplorist does not have an
approximate position to use when referring to its almanac. This can occur when:
• The eXplorist is turned on for the first time after purchase. The memory is
14
cleared prior to shipping so that any position that may have been in the
eXplorist is set to a null value.
• If you have cleared the eXplorist's memory, (found in
the memory will be cleared and the last computed position will be set to a
null value.
• If you have traveled with your eXplorist with it turned off, the last position
saved may be so far away that when the eXplorist begins looking for
satellites, the ones it is expecting to find are not there. (As a rule of
thumb, any time you move for more than 500 mi [804.7 km] with the
eXplorist turned off, there is a good chance that it will start up using a
cold start.
A cold start should take no more than 2-3 minutes to compute the initial position
fix.
Warm Start. Warm starts are when the last position calculated before the
eXplorist was turned off is still in memory and you are in the same approximate
position. Most of the time that the eXplorist is turned on, it will be in its warmstart mode. With a clear view of the sky, the eXplorist should compute its
position in a matter of seconds.
Preferences) all of
Conclusion
This concludes the initial startup procedure for the Magellan eXplorist 500. Once the Map
screen is displayed, you have successfully initialized the eXplorist and are ready to go.
Now would be a good time to familiarize yourself with the dif
(using the
defaults.
NAV button) and to set any preferences that may be different from the factory
ferent navigation screens
N
AV
E
SC
NAV
ESC
NAV
ESC
N
AV
E
SC
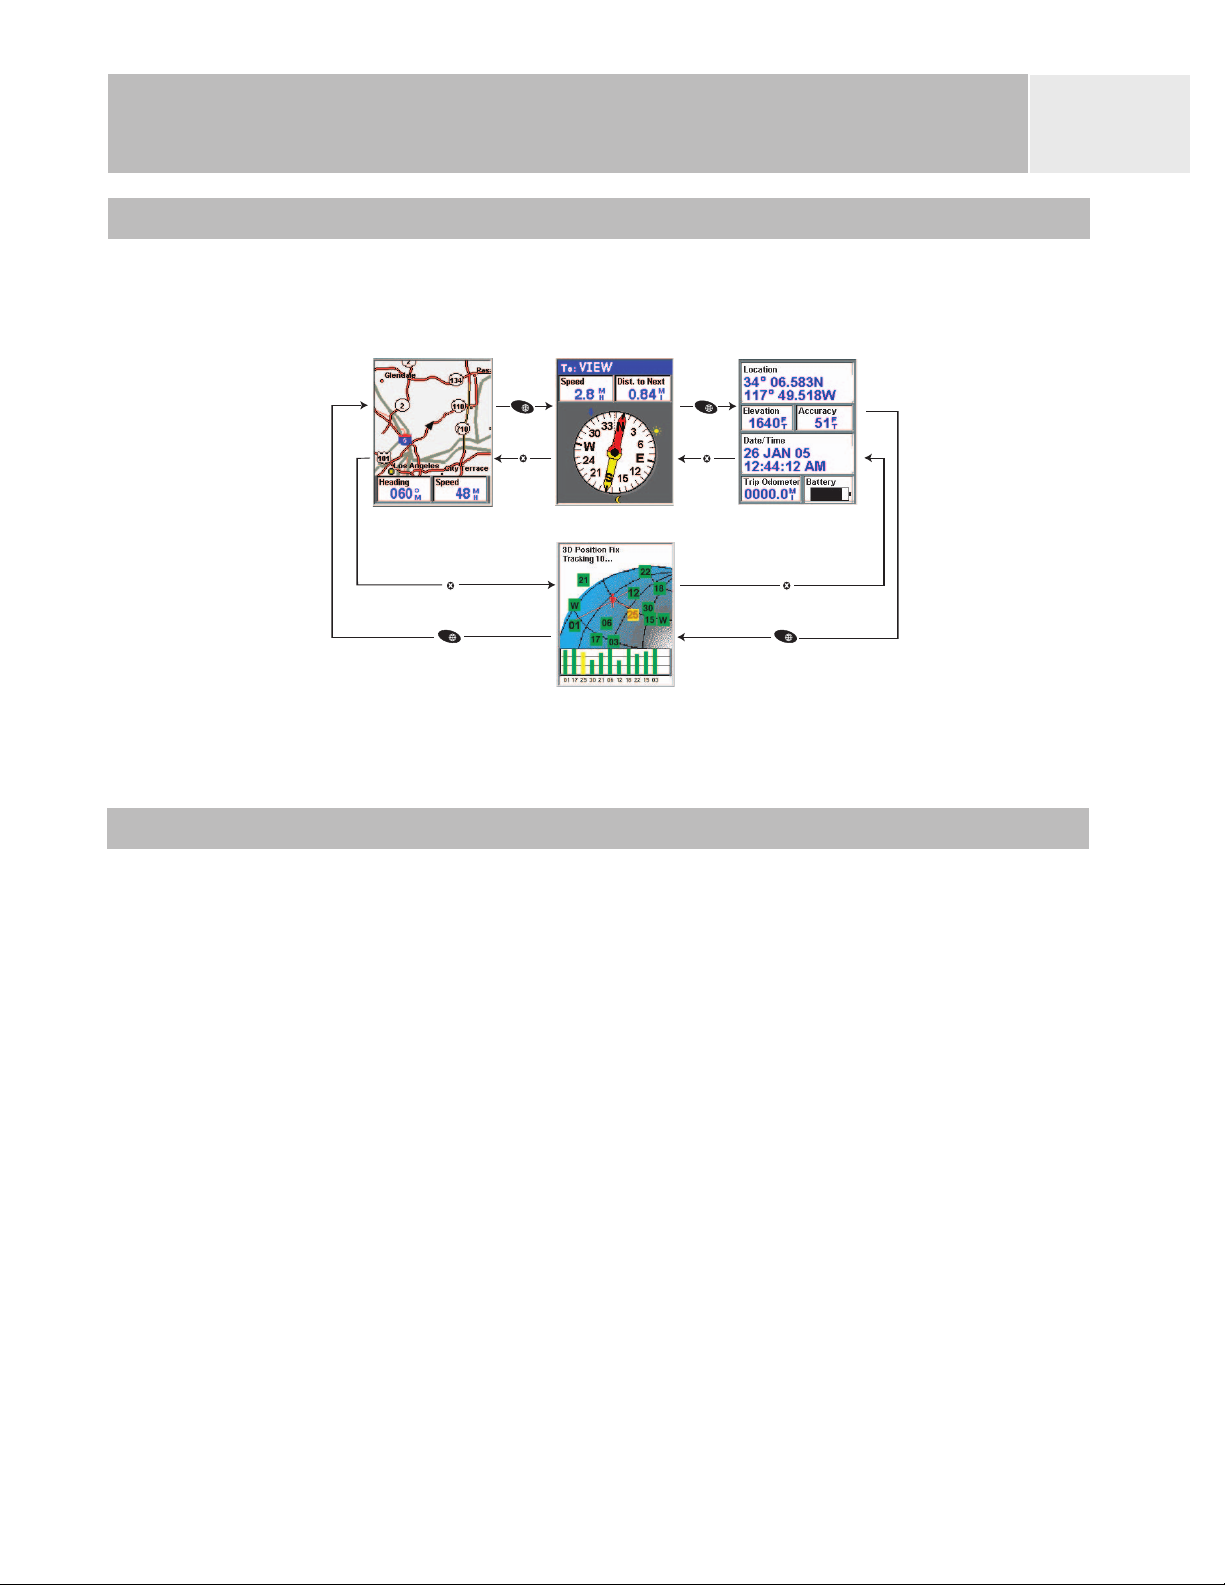
Navigation Screens
Accessing the Navigation Screens
The eXplorist has three navigation screens, as well as a Satellite Status screen that can be
accessed by pressing the
different format, giving you the choice of choosing the screen that best suits your needs.
NAV button. Each screen provides the same information in a
15
Tip: The ESC button will also set through the navigation screens, just like the NAV
button but in the reverse order.
Map Screen
The first, and most commonly used, screen is the Map screen. The Map screen displays
your position, as well as POIs and any background map data for the area displayed.
Highlights of the
• Use the zoom in/out buttons to change the scale.
• The arrow cursor in the middle of the display indicates your position and, if moving,
points in the direction you are heading.
• Press
MARK to save your position.
• Use the
cursor, with any available information about the position of the cursor at the bottom of
the display. You can also save the position of the crosshair cursor as a POI by pressing
MARK button.
the
• Press ESC when you ar
position with the arrow cursor.
• Press
boxes at the bottom of the screen on or off.
MENU and select Hide Map Info or Show Map Info to turn the information
Map screen:
Arrow joystick to move the cursor. The arrow cursor changes to a crosshair
e done panning with the crosshair cursor to display your present
• Press
MENU and select Customize page to change the information displayed at the
bottom of the screen.
• Press
MENU and select Map Setup to change the screen orientation, level of map
detail, track mode and the primary usage (land or marine).
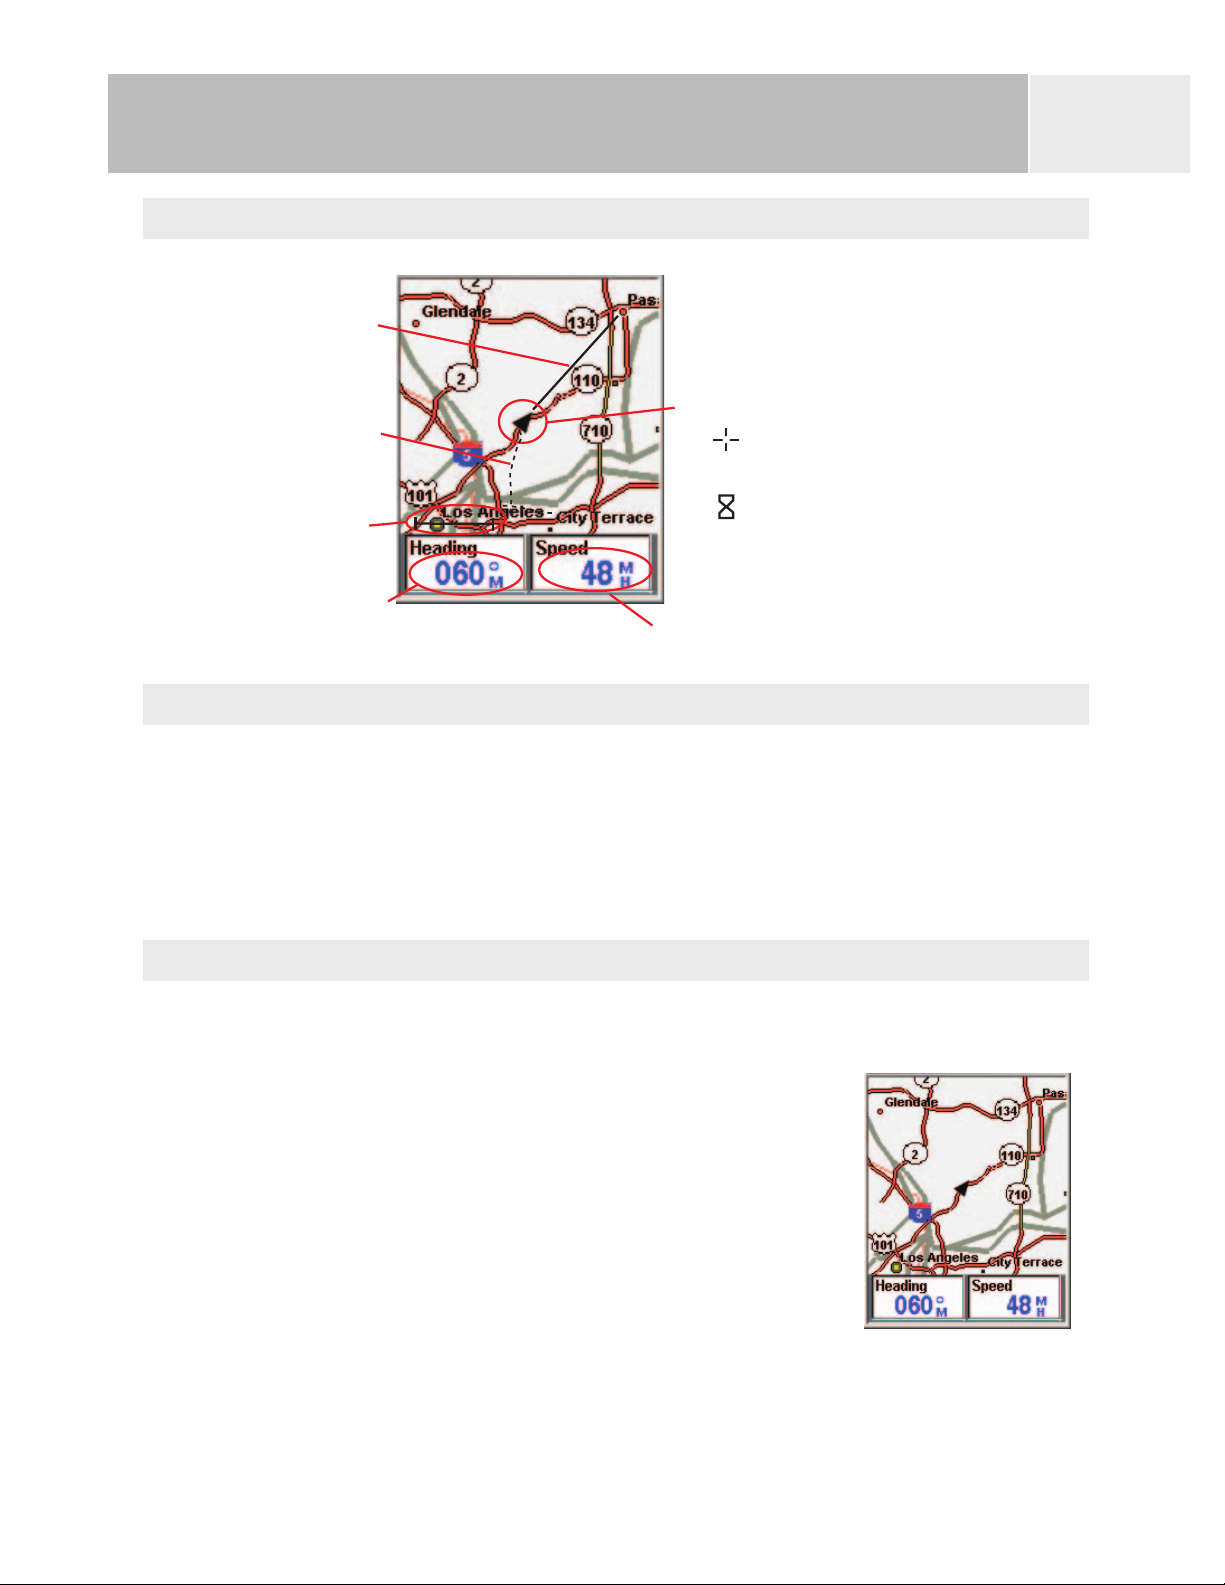
Navigation Screens
Map Scale
Data Field 1
Data Field 2
Position Cursor
Pan Cursor (used when
in Cursor Mode)
Hourglass (used when position
is unknown and eXplorist is
trying to compute the
position)
Track Indicator
Route
Marker
Map Screen Overview
Changing Map Scale
16
Press the Zoom In or the Zoom Out buttons to change how much of the map is
displayed on the screen. The map scale indicator in the bottom left corner of the map
indicates the relative distance between the two end-points of the scale. The scale can
be changed from 1700 mi (2700 km) to 100 ft (35.0 m).
Tip: Press and hold the Zoom In or the Zoom Out buttons to rapidly step through
the map scales.
Map Screen Modes
The Map screen has two modes that it can be in: position or cursor. In the Position
mode the Map screen displays your position, indicated by the arrow icon in the center
of the map. The arrow not only displays your position but also,
when moving, will point in the direction you are heading.
The Position mode is the default mode for the
Whenever you enter the
mode.
Map screen it will be in the Position
Map screen.
The Map scr
Position Mode
een in the

Navigation Screens
In the Cursor mode, you have a cursor icon displayed that you can use
to pan around the map. The information displayed at the bottom of
the screen provides you with the heading and distance of the cursor
from your present position. In the Cursor mode you can:
• scroll around the map, checking available information for areas
on the map not displayed around your present position
• create a POI for the position indicated by the cursor
• create a GOTO route to the position indicated by the cursor
location
• get detailed information about POIs or map objects found at the
cursor location
These options will be explained in the section of this manual on creating POIs and GOTO
routes.
The Map screen in the
Cursor Mode
17
To enter the Cursor mode, use the
joystick is moved, a crosshair cursor is displayed and the bottom of the screen changes to
provide information about the cursor position.
To exit the cursor mode, press the
to the Position mode, with your present position displayed in the center of the screen.
Showing or Hiding Map Information
The information at the bottom of the Map screen provides you with information that can be
used to assist you in navigating to your destination. However, you may want to display more
of the map and may not need this information. The eXplorist gives you the capability to
turn this information on or off.
1. While viewing the
2. With Hide Map Info or Show Map Info highlighted, press ENTER.
Map screen, press MENU.
Arrow joystick to move the cursor. As soon as the
ESC button. When pressed, the Map screen is returned
The Map screen with map
information shown
The Map scr
mation hidden
infor
een with map
Navigation Screens
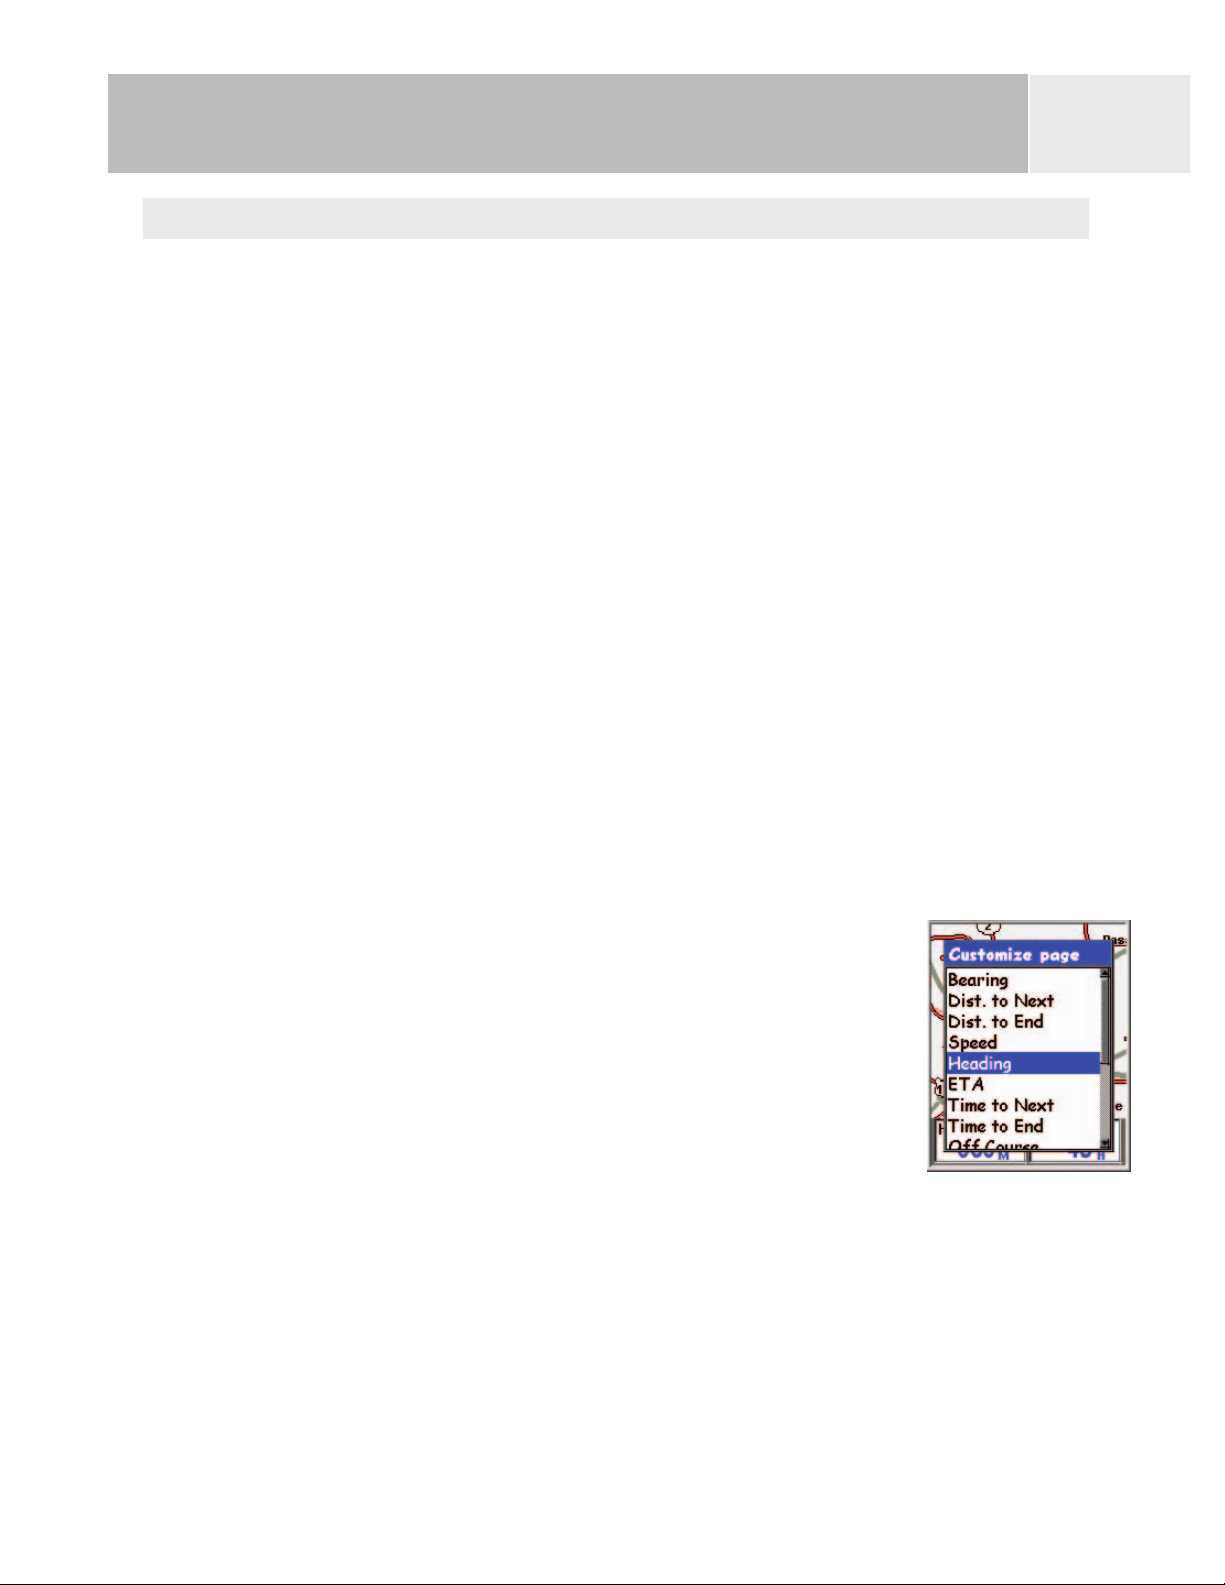
Customizing the Map Information
The information displayed at the bottom of the screen can be customized to change what is
shown in the two map information fields. You can select from:
• Bearing
• Distance to Next (Next leg in multi-leg routes)
• Distance to End
• Speed [default]
• Heading [default]
• ETA (Estimated Time of Arrival)
• Time to Next (Next leg in multi-leg routes)
• Time to End
• Off Course
• Direction
• Elevation
18
• Time
• Date
• Accuracy
• Avg. Speed
• Max. Speed
To customize the map information:
1. While viewing the
2. Use the
3. Press ENTER.
4. Use the
5. Press
6. The title bar for one of the fields is highlighted. Use the
Arrow joystick to highlight the title bar for the field you want
to customize.
7. Press
8. Highlight the information you want displayed from the list.
Arrow joystick to highlight Customize page.
Arrow joystick to highlight Customize Fields.
ENTER.
ENTER.
Map screen, press MENU.
9. Press
10. The highlight will automatically jump to the other field. Go back to step 5 to
change the information displayed for this field.
11. When the information to be displayed is chosen, press
function.
ENTER.
ESC to exit the customize

Navigation Screens
Displaying Street Information
You can choose to display information about the street you are on instead of displaying the
two data fields at the bottom of the display.
To display street information:
19
1. While viewing the
2. Use the Arrow joystick to highlight Customize page.
3. Press
4. Use the
5. Press
Changing the Map Orientation
The default orientation for the Map screen is North Up. This means that the top of the
display represents true north. This orientation can be changed so that the top of the display
is more useful to you. You can choose from:
• North Up [default]. This orientates the top of the map display to represent true north.
• Course Up. In course up, the top of the map displays the direction to your destination.
(When there is not an active route, the top of the display indicates true north.)
• Track Up. In track up, the top of the map display
changes to reflect your heading. (If you are not
moving, the top of the display indicates true north.)
Note: In Course Up and Track Up, a north indicator is
displayed in the upper right corner of the display. This
arrow points in the direction of true north.
ENTER.
Arrow joystick to highlight Street info.
ENTER.
Map screen, press MENU.
To change the map orientation:
1. While viewing the
2. Use the
3. Press
4. Use the Arrow joystick to highlight the Orientation field.
5. Press ENTER.
6. Use the
7. Press
8. Press NAV to return to the Map screen.
Arrow joystick to highlight Map Setup.
ENTER.
Arrow joystick to highlight North Up, Course Up or Track Up.
ENTER.
Map screen, press MENU.

Navigation Screens
Changing the Primary Usage
The Map screen can be changed to be primarily used on land (default) or marine.
When in land usage, land areas are displayed as white areas on the display and water is
displayed as blue.
The opposite is true when the map is set for marine usage. (Water is light blue and land
areas are displayed as yellow.)
This is provided as an option to provide you with the ability to view the text and map details
more easily, depending on where you are navigating.
To change the primary usage:
20
1. While viewing the
2. Use the
3. Press
4. Use the
5. Press
6. Use the
7. Press
8. Press NAV to return to the Map screen.
Arrow joystick to highlight Map Setup.
ENTER.
Arrow joystick to highlight the Primary Usage field.
ENTER.
Arrow joystick to highlight Marine or Land.
ENTER.
Map screen, press MENU.

Navigation Screens
Changing the Map Detail
The Map screen can be modified to show varying levels of map detail. This can be useful
while viewing very dense areas of the map where some of the fine details may not be needed
and clutter the display.
To change the map detail:
21
1. While viewing the
2. Use the
3. Press
4. Use the Arrow joystick to highlight the Detail field.
5. Press
6. Use the Arrow joystick to highlight Lowest, Low, Medium, High or Highest.
7. Press
8. Press NAV to return to the Map screen.
Changing the Track Recording Intervals
As you move, your eXplorist is recording your journey (track). You can select how often the
track points are recorded. In Auto mode, the eXplorist doesn’t save track points when you
are traveling in a straight line and only a few as you make turns. This saves memory and
provides a track log that, while slightly jagged, is suitable for most applications. In Detailed
Auto mode, the eXplorist does the same as in Auto mode, but the frequency of track points
saved is increased, especially during turns. While this uses more memory, it provides a very
accurate log of your travels. The other options are fixed interval track points. This instructs
your eXplorist to record a track point at the interval you specify.
Arrow joystick to highlight Map Setup.
ENTER.
ENTER.
ENTER.
Map screen, press MENU.
To change the track recoding intervals:
1. While viewing the
2. Use the
3. Press
4. Use the Arrow joystick to highlight the Track Mode field.
5. Press
6. Use the
distance intervals.
7. Press
8. Press NAV to return to the Map screen.
Arrow joystick to highlight Map Setup.
ENTER.
ENTER.
Arrow joystick to highlight Off, Auto, Auto Detailed or any of the fixed
ENTER.
Map screen, press MENU.

Navigation Screens
Customizing the Display
You can select what items are displayed on the Map screen. This can reduce clutter and/or
emphasis those items you are interested in.
To customize the display:
22
1. While viewing the
2. Use the
3. Press
4. Push the
5. Push the
off.
6. Press
Mark All toggles all of the map items on, while Clear All toggles all of the map
items off. When an item has a check mark next to it, it will be displayed on the
Map screen.
7. Press
Arrow joystick to highlight Map Setup.
ENTER.
Arrow joystick left or right to highlight the Display tab.
Arrow joystick up or down to highlight the item you want to toggle on or
ENTER.
NAV to return to the Map screen when you have the desired settings.
Map screen, press MENU.
Navigation Screens
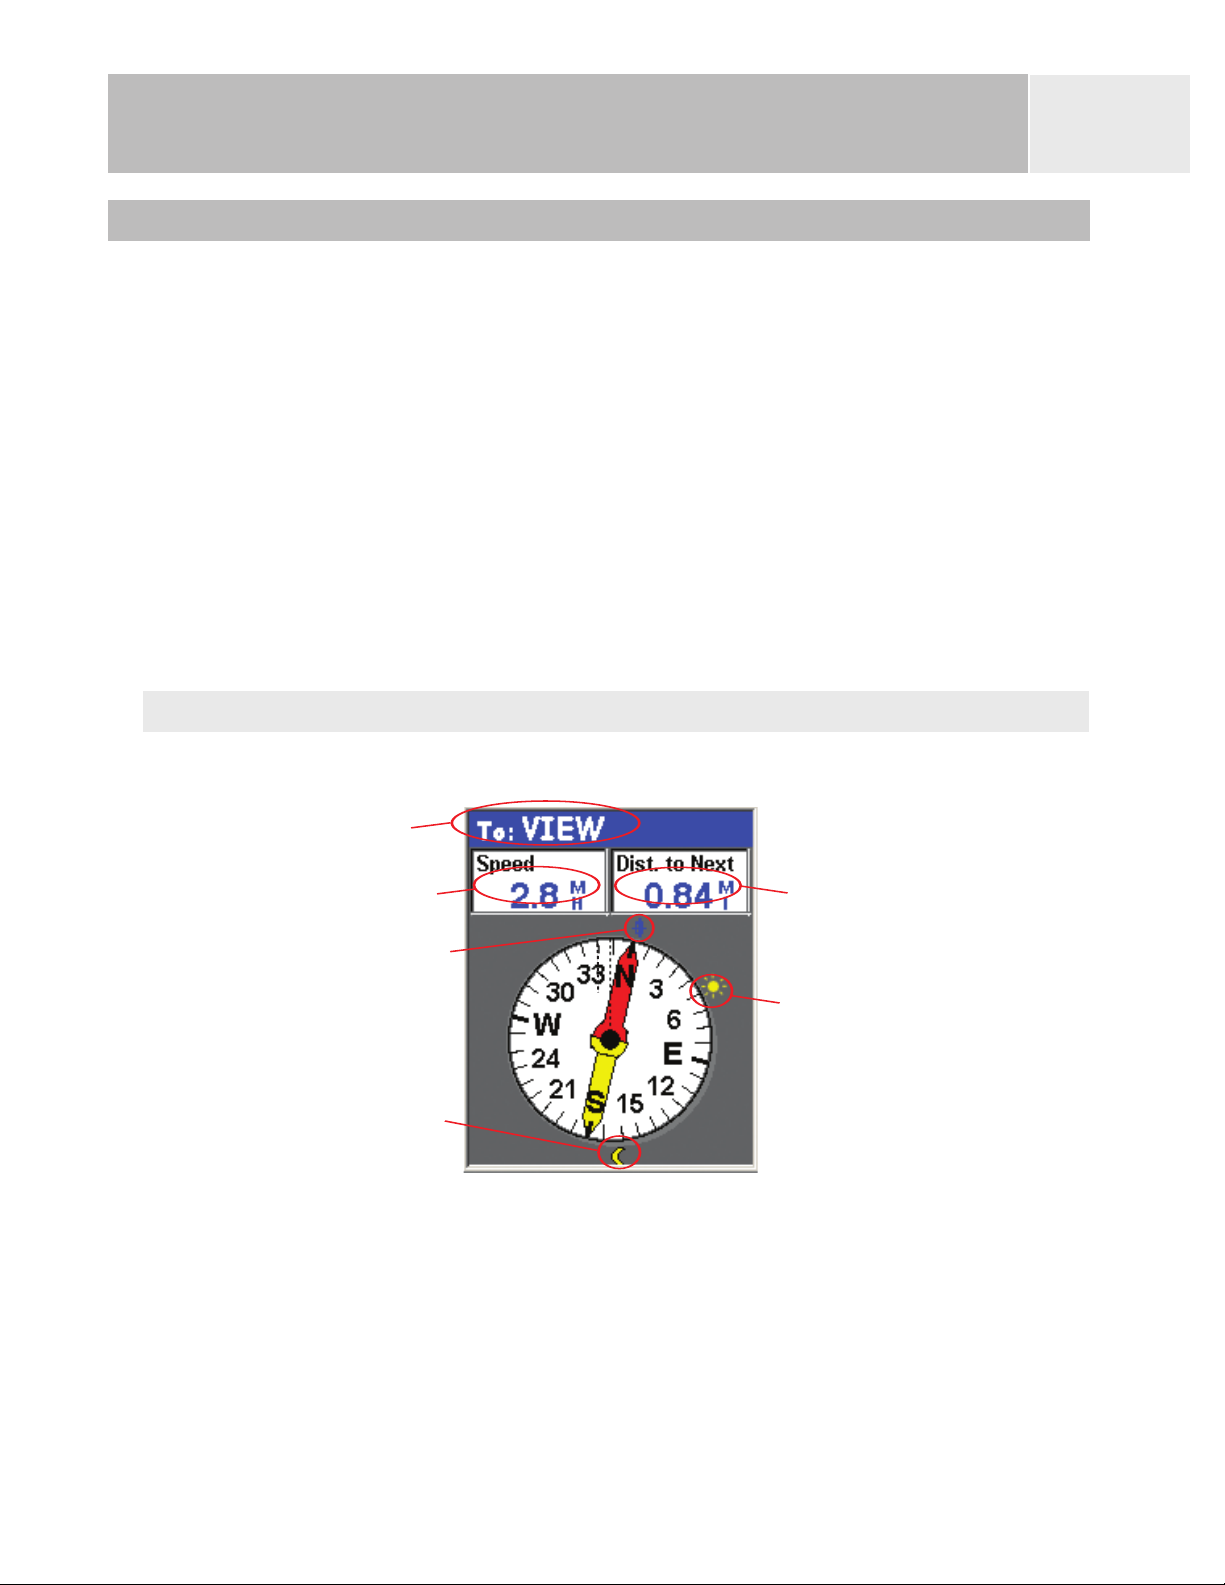
Destination
Data Field 1 Data Field 2
Destination Icon
Sun Locator Icon
Moon Locator
Icon
Compass Screen
The Compass screen provides an easy-to-use graphical compass that should be familiar to
most GPS users.
23
Highlights of the
• With an active route, the top of the
destination.
• Press
of the screen.
• When there is no active route, the graphical compass performs like a standard compass,
indicating to your heading as referenced to true north. (Note: You must be moving at
least 0.5 mph for the compass to display heading information.)
• With an active route, the compass graphically displays an icon representing your
destination. The compass arrow points in the direction you are heading when you are
moving.
Compass Screen Overview
MENU and select Customize page to change the information displayed at the top
Compass screen:
Compass screen displays the name of the
The top of the screen (the header bar) displays the name of the destination if you have an
active route. Without an active route, the destination name is blank.
Also, two navigation information fields (customizable) are displayed.
When there is no active route, the graphical compass indicates the direction you are
travelling. (When you are not moving, the compass points to the last computed heading.)
When there is an active route, an icon representing the destination is displayed outside the
compass diameter, with the compass arrow pointing to the icon. The top of the compass will
indicate your direction of travel. When the compass arrow points to the top of the compass,
you are moving in the direction of your destination.
 Loading...