


trademarks of MiTAC International Corp. |
respective owner. |
eXplorist are registered |
are the property of their |
MAGELLAN and |
All other brands |
MagellanTR5
Trail and Street GPS Navigator
User Manual
TR5/TN7551SGLUC
The Official GPS of
Jeep Jamboree USA
M A G E L L A N G P S . C O M

Safety. |
2 |
IMPORTANT SAFETY WARNINGS
The Magellan TR5 is an off-road vehicle navigation tool designed to assist you in driving on off-road routes as well as across municipal streets. Please check with your state or local law enforcement for applicable regulations regarding mounting to the windshield. The driver should enter data or program the Magellan device only when the vehicle is stopped. Only a vehicle passenger should enter data or program the device while the vehicle is moving. It is your responsibility to comply with all traffic laws. Every attempt is made to ensure that the database is accurate. However, roadways, points of interest (POIs), and business and service locations may change over time. Keep the device safe from extreme temperature conditions. For example, do not leave it exposed to direct sunlight for an extended period of time. The minimum operating temperature is 14ºF (-10ºC), and the maximum operating temperature is 140°F (60°C). Mount the device in your vehicle, whether using the windshield mount or other mount or accessories, so that the device does not obstruct the driver’s view of the road, interfere with the operation of the vehicle’s safety devices, such as airbags, or present a hazard to occupants of the vehicle should the device become dislodged while driving. Comply with all local, state, and federal laws before mounting the device in your vehicle. You assume the risks associated with damage to your vehicle or vehicle occupants as the result of your choices in mounting the device. The battery is rechargeable and should not be removed. Should the battery need to be replaced, please contact Magellan Technical Support at 877-255-4161, or go to trxsupport.magellangps.com.
Charging the Magellan eXplorist TR5
An AC adapter and vehicle power adapter are included with your TR5. Use ONLY the car charger approved for/supplied with your TR5. Use of another type of car charger could result in fire or electric shock. For safety reasons, the battery in your TR5 will stop charging when the ambient temperature is less than 32°F (0°C) or more than 113°F (45°C). The TR5 requires approximately 4 hours of charging through the vehicle power adapter or AC adapter to obtain a full battery charge. Charge your TR5 battery initially for at least 2 hours. Estimated usage of the TR5 on battery power is approximately 1 hour. Note: Use a 3.5V-5V 2A charger should you need to replace your adapter.
FCC RF Radiation Exposure Statement
1.This Transmitter must not be co-located or operating in conjunction with any other antenna or transmitter.
2.This equipment complies with FCC RF radiation exposure limits set forth for an uncontrolled environment. This equipment should be installed and operated with a minimum distance of 20 centimeters between the radiator and your body.
Wi-Fi 5G Band 1 is for indoor use only.
Canada, Industry Canada (IC) Notices
This device complies with Industry Canada licence-exempt RSS standard(s). Operation is subject to the following two conditions: (1) this device may not cause interference, and (2) this device must accept any interference, including interference that may cause undesired operation of the device.
© 2017 MiTAC International Corporation. The Magellan logo and Magellan are registered trademarks of MiTAC International Corporation, and OneTouch is a trademark of MiTAC International Corporation and are used under license by MiTAC Digital Corporation. All rights reserved. All other trademarks and registered trademarks are property of their respective owners. All other products and brand names are trademarks of their respective holders. No part of this user manual may be reproduced or transmitted in any form or by any means, electronic or mechanical, including photocopying and recording, for any purpose other than the purchaser’s personal use, without the prior written permission of MiTAC International Corporation. The information provided in this document is correct at the time that it is created. MiTAC International Corporation assumes no responsibility or liability for any errors or inaccuracies that may appear in the contents of this User Manual.
Magellan Take-Back Program
Magellan’s Take-Back Program provides a way for customers to recycle certain Magellan equipment. This program accepts all Magellan GPS models. Visit magellanGPS.com for more information.
Magellan |
TR5 |
Tested To Comply With
FCC Standards
FOR HOME OR OFFICE USE

Table of Contents. |
3 |
TR5 Overview............................................................................................................ |
5 |
TR5 Hardware................................................................................................................................................................ |
6 |
TR5 Software................................................................................................................................................................. |
7 |
Getting Started.......................................................................................................... |
8 |
Language and Wi-Fi settings......................................................................................................................................... |
8 |
Create Your TRX Account and Register Your TR5........................................................................................................... |
9 |
Update Software............................................................................................................................................................ |
10 |
Update Maps.................................................................................................................................................................. |
11 |
Mount the TR5 in Your Vehicle....................................................................................................................................... |
12 |
Power/Charging............................................................................................................................................................ |
13 |
Create Your Vehicle Profile............................................................................................................................................ |
14 |
Link to Social Media...................................................................................................................................................... |
15 |
Riding with TR5......................................................................................................... |
16 |
Use Street Navigation.................................................................................................................................................... |
16 |
Tracking........................................................................................................................................................................ |
17 |
Change Map Options...................................................................................................................................................... |
18 |
Mark Waypoints............................................................................................................................................................. |
19 |
Social Post..................................................................................................................................................................... |
21 |
Backtrack...................................................................................................................................................................... |
22 |
Finish (Save) Your Track................................................................................................................................................ |
22 |
Use the Journal............................................................................................................................................................. |
24 |
Create A New Trip......................................................................................................................................................... |
24 |
Delete A Trip.................................................................................................................................................................. |
25 |
Exploring with TR5.................................................................................................... |
26 |
Search For Map Content................................................................................................................................................ |
26 |
View and Save Searched Items...................................................................................................................................... |
28 |
Use Satellite Imagery.................................................................................................................................................... |
28 |
Purchase a DigitalGlobe Subscription........................................................................................................................... |
29 |
Save Satellite Imagery from the Map Screen................................................................................................................ |
30 |
Save Satellite Imagery Automatically............................................................................................................................ |
30 |
Import GPX Files........................................................................................................................................................... |
31 |
Export Tracks As GPX Files........................................................................................................................................... |
32 |

Table of Contents. |
4 |
TRX Trailhead............................................................................................................ |
33 |
Use TRX Trailhead......................................................................................................................................................... |
33 |
Sign In to TRX Trailhead................................................................................................................................................ |
34 |
Wish List and Log.......................................................................................................................................................... |
36 |
Search for Trails, Tracks, Trips, OHV Attractions, and POIs........................................................................................... |
38 |
Save To Your Wish List................................................................................................................................................... |
41 |
Report Issues................................................................................................................................................................ |
41 |
Create a Route............................................................................................................................................................... |
42 |
Connect to Social Media................................................................................................................................................ |
43 |
Upload GPX Files........................................................................................................................................................... |
43 |
Add a New Trip.............................................................................................................................................................. |
44 |
TRX Glossary............................................................................................................. |
45 |
Warranty................................................................................................................... |
47 |
Technical Support...................................................................................................... |
49 |
TR5 Overview |
5 |
The Magellan TR5 Trail and Street GPS Navigator is an offand on-road navigation system purpose-built to navigate you seamlessly on trails, streets, highways, and everything in between.
The TR5 includes the largest database of off-road trails in the U.S., with over 100,000 preloaded OHV trails.
The TR5 gives you access to a growing database of user-generated tracks, allowing you and thousands of other off-roaders to upload custom tracks, waypoints, detailed terrain info, and up-to-date trail conditions for the TRX community to see.
The TR5 is interconnected with an ecosystem of TRX products, including:
•TRX Trailhead, an online planning and sharing tool at www.TRXTrailhead.com.
•TRX Support, a site for troubleshooting, technical support, and feedback at trxsupport.magellangps.com.
•TRX companion mobile apps for iOS and Android
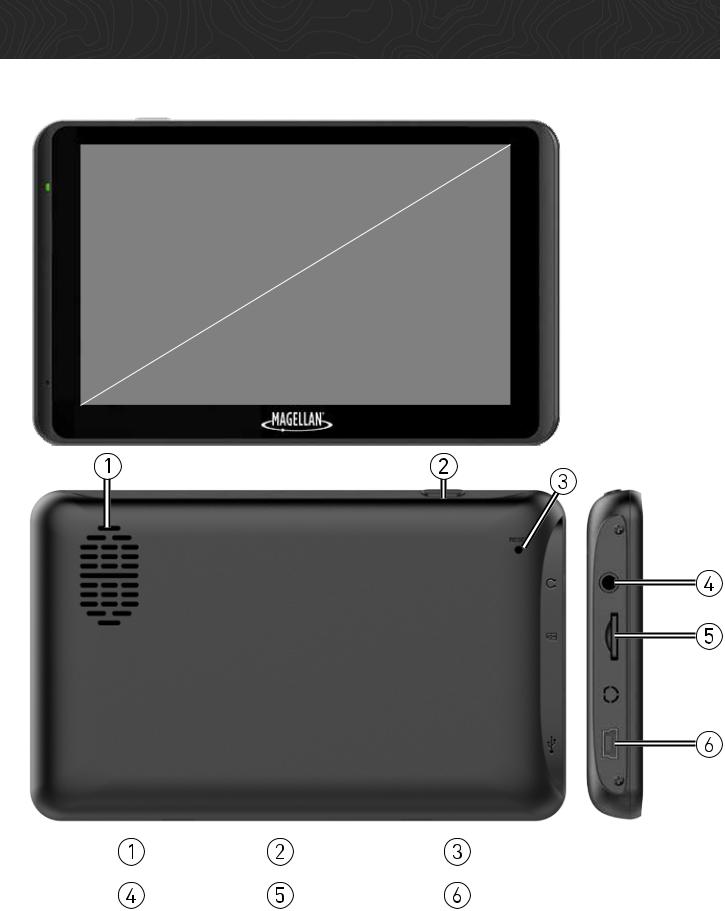
TR5 Hardware |
6 |
5” |
480 |
|
|
x |
|
800 |
|
Speaker |
Power Button |
Reset Button |
AUX Out |
microSD Slot |
USB Power Input1 |
1 Your device requires additional power to function at optimal levels. For best performance, use the included power adapters, which are specially rated for your device.
TR5 Software |
7 |
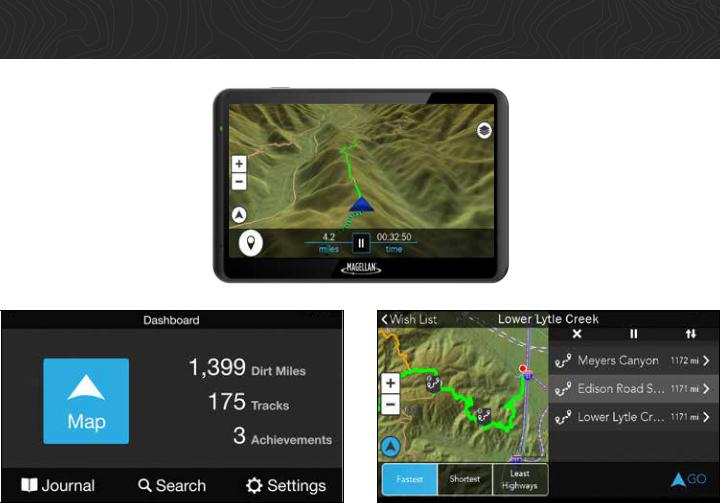
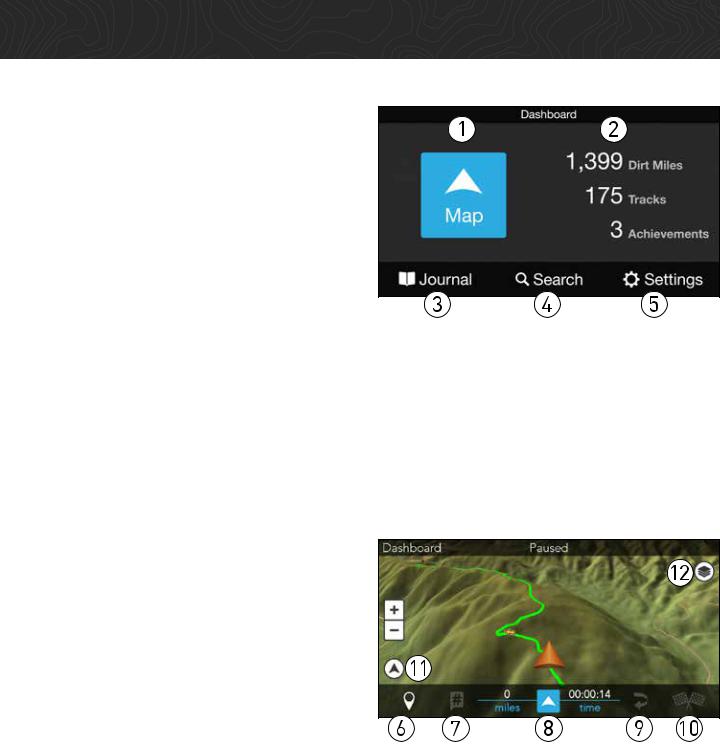
Dashboard Screen
1.Map: Tap to open Map screen.
2.Dirt Miles traveled, Tracks recorded, and Achievements earned displayed here.
3.Journal: Contains track Log and Wish List of saved trails.
4. Search: Search for Trails, Tracks, POIs, etc.
5.Settings: Edit account, vehicle profiles, connectivity, etc.
Map Screen
6. Waypoint: Mark Waypoints while driving or recording a Track.
7.Social Post: Share your adventures
with a Tweet.
8.Start/Pause: Pause tracking or resume tracking.
9.Backtrack: Follow active Track back to starting point.
10.Finish: Save Track with details and commentary.
11.Orientation: Toggle View to North Up or Track Up.
12.Map Options:1 View and modify map display settings.
Getting Started |
8 |
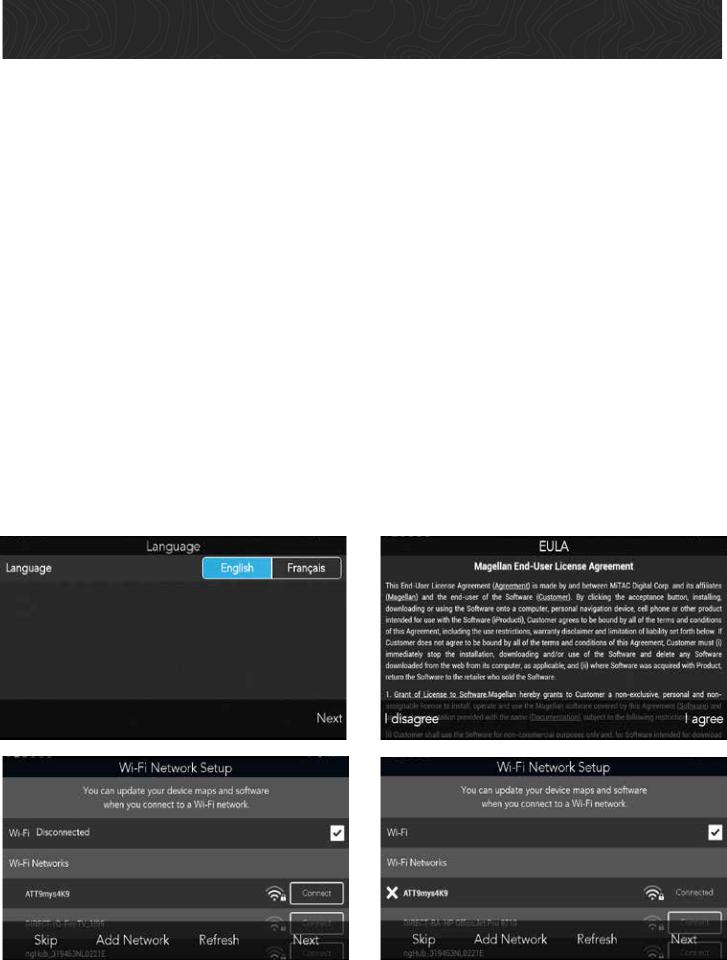
Account Creation & Registration.
1. Select Language.
Set your device language to English or French > tap Next.
2. Read and Agree to End-User License Agreement (EULA).
Read the EULA > tap I agree to continue or I disagree to delay setup.
Note: You cannot proceed with setup until you’ve read and agreed to the EULA.
3. Connect to Wi-Fi.
1.Tap on a Wi-Fi network from the list > enter your network password (if applicable) >
2.Tap Connect. Once your device is connected to Wi-Fi, tap Next.
Don’t see your Wi-Fi network on the list? Tap Refresh until your device recognizes your network, or tap Add Network to configure Wi-Fi settings and add your network to the list.
Getting Started |
9 |
Account Creation & Registration.
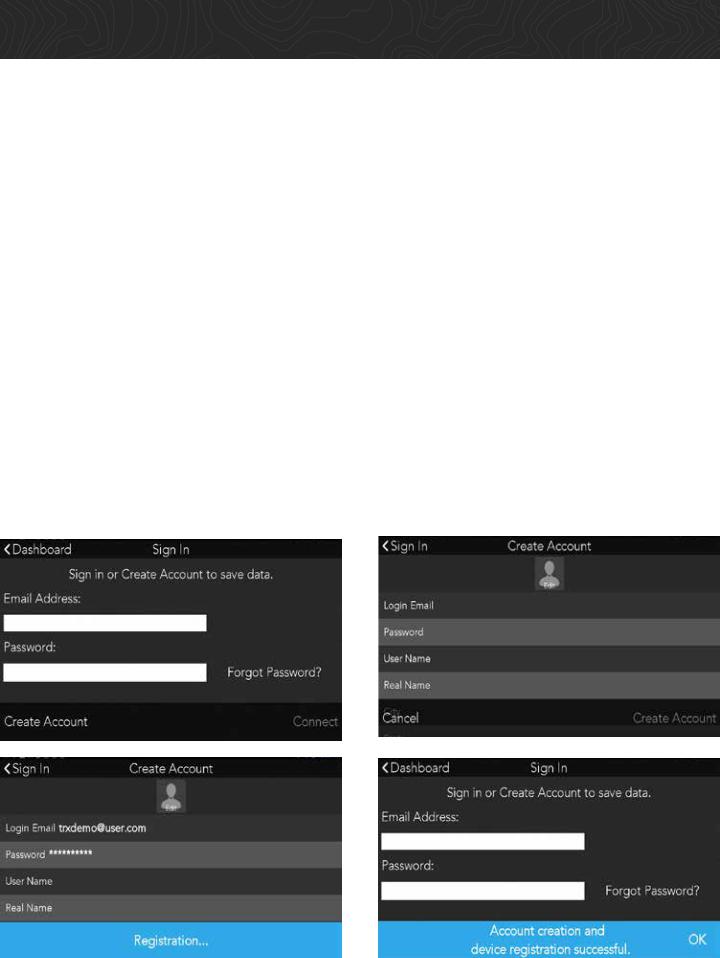
4. Create Your TRX Account and Register Your Device.
You must create a TRX account to save data to your device or sync with TRX Trailhead. Not having a TRX account can result in lost data.
IMPORTANT: If you already have a Magellan GPS email address and password, use those account credentials to create your TRX account.
1.When you reach the Sign In screen, enter an existing TRX account email address and password OR tap Create Account if you haven’t yet created a TRX account.
2.Enter your account details. Use an existing MagellanGPS.com account if you have one.
3.Tap Create Account to finish creating your TRX account. Your device will also be registered to that account.
A MagellanGPS.com account will also be created if you’re new to Magellan and you’re registering an email address for the first time.
Getting Started |
10 |
Account Creation & Registration.
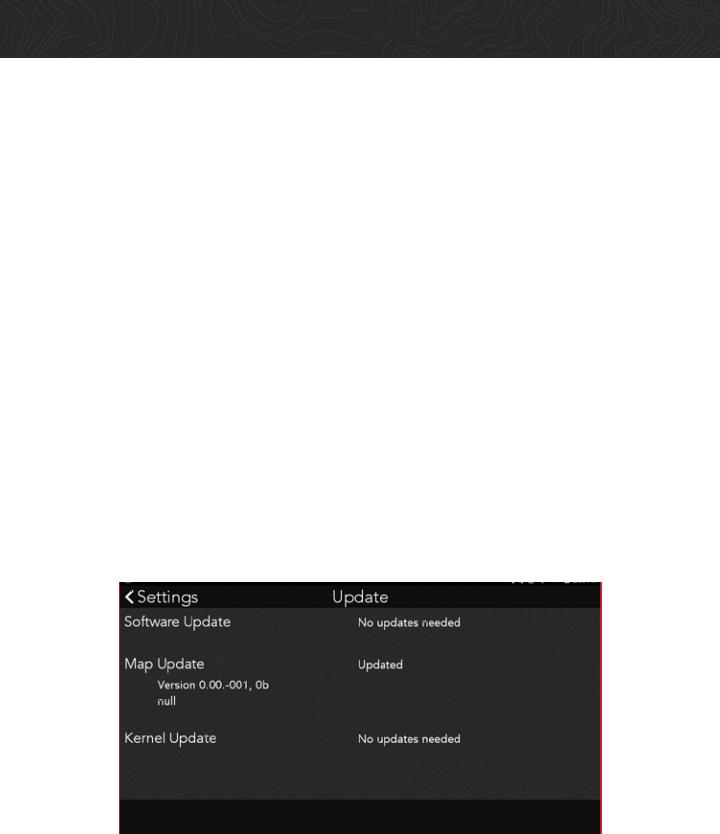
5. Update Software.
If any software updates are available when you purchase your device, you will be prompted to install the latest update. To update your software:
1.When you reach the Updates screen, tap Software Update > tap Download.
2.Wait a few minutes for the update to finish downloading > tap Install.
3.When you see a notification asking you if you want to install an update to the existing application, Tap Install. Make sure that the NEW tab is selected, NOT the ALL tab. This option may erase any existing TRX user data.
4.Wait a few minutes for the software update to finish installing > tap Open.
5.When you see a notification that says “Magellan TRX needs to download resources”, tap Start download Make sure Download over Wi-Fi only is checked.
Wait a few minutes for the update to finish downloading. You’ll see a notification that says “Software update complete” once the new software has been installed.
Getting Started |
11 |
Account Creation & Registration.
6. Update Maps.
Note: Make sure that you download the latest software version before downloading new map packages. Visit trxsupport.magellangps.com for a list of latest software versions.
To update your maps:
1.On the Updates screen, tap Map Update.
2.Tap Update. Wait for the update to download. The map update is installed to your device automatically once all the files have been downloaded.
3.Tap Restart to restart the TRX app and complete the map update.
Note: Map packages can be large (approximately 500MB-1GB) and take some time to download depending on your Wi-Fi network speed. File and Size information will update on your screen as the map files are downloaded.
Getting Started |
12 |
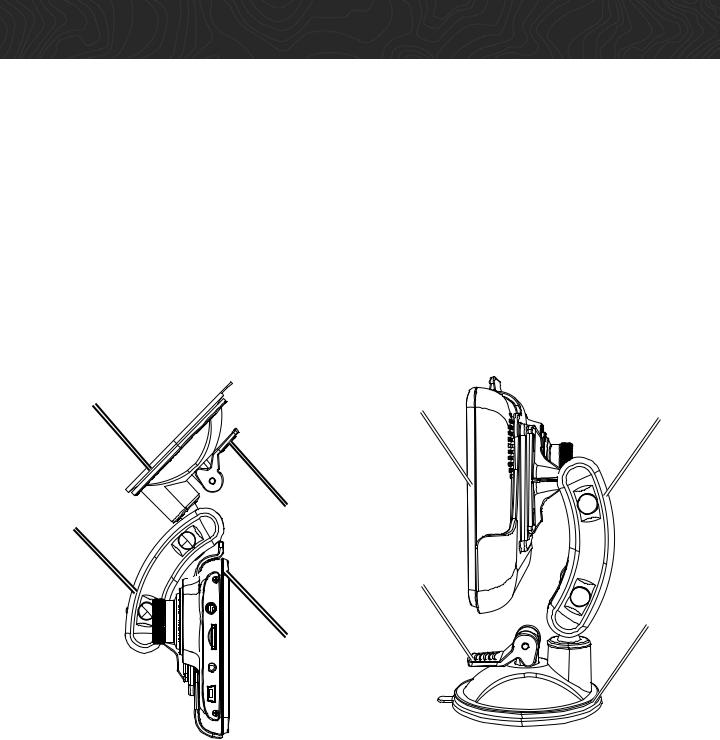
Mount the Device.
Attach your device to the included cradle and mount and use suction cup base to adhere your device to your vehicle’s windshield or dashboard.
For best image quality, mount your device as follows:
WARNING: Observe local laws and regulations regarding proper mounting of devices.
Windshield |
|
Dashboard |
|
Affix to |
Tilt device up |
|
|
away from |
Move arm |
||
windshield. |
|||
mount arm. |
|||
|
upright. |
||
|
|
Move arm away
from suction cup. Push lever down to lock.
Push lever down to lock.
Affix to dashboard.
Tilt device up towards mount arm.
Getting Started |
13 |
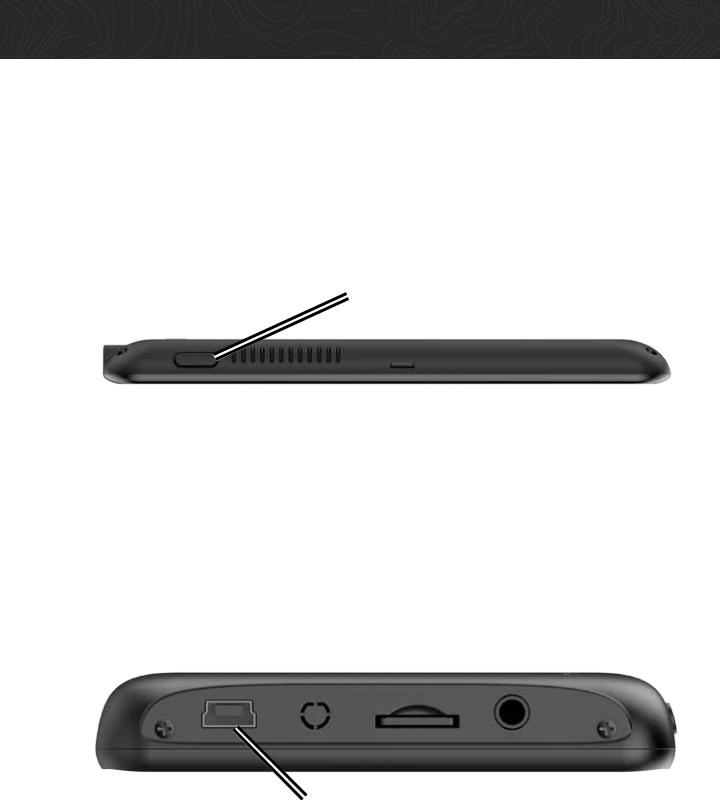
1. Power On.
Press and hold the Power button on the top of your device. Within seconds, you’ll see the Magellan logo, and your device will boot up.
Press and hold.
2. Charge the Device.
Using the included AC Adapter or Vehicle
Power Adapter (VPA):
1.Insert AC adapter into wall outlet or insert VPA plug into vehicle power outlet.
2.Insert mini-USB connector end of AC adapter or VPA into the left side of the device.
Insert mini-USB cable here.
Note: Your device may take several hours to reach a full charge.
Getting Started |
14 |
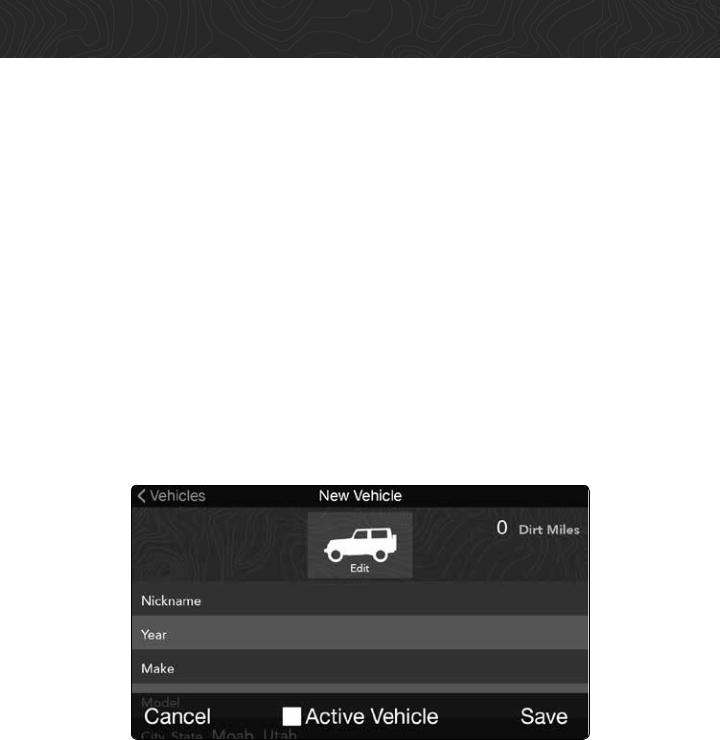
Now that you’ve got the TR5 basics, customize your profile before you hit the trail.
Create Your Vehicle Profile.
Create a customized Vehicle Profile. You can create a separate vehicle profile for your OHV vehicles and tow rigs.
1.Tap  from the Dashboard > tap
  .
.
2.Tap  > tap
> tap  >
>  .
.
3.Enter vehicle information: Nickname, Year, Make, Model, and City and State.
4.Tap  if this will be your primary vehicle.
5.Tap  to add a picture of your vehicle from your device (optional) > tap
  .
.
 Tip: Tap
  >
>  from the Vehicles page to add other vehicles.
The first vehicle you add is automatically designated as your Active Vehicle. To select a different Active Vehicle:
1.Tap  from the Dashboard > tap
  .
.
2.Tap  > tap on the vehicle you wish to assign as your Active Vehicle.
3.Tap  > Select
  when you see the prompt
  to confirm the change, or
  to stop the change.
Getting Started |
15 |
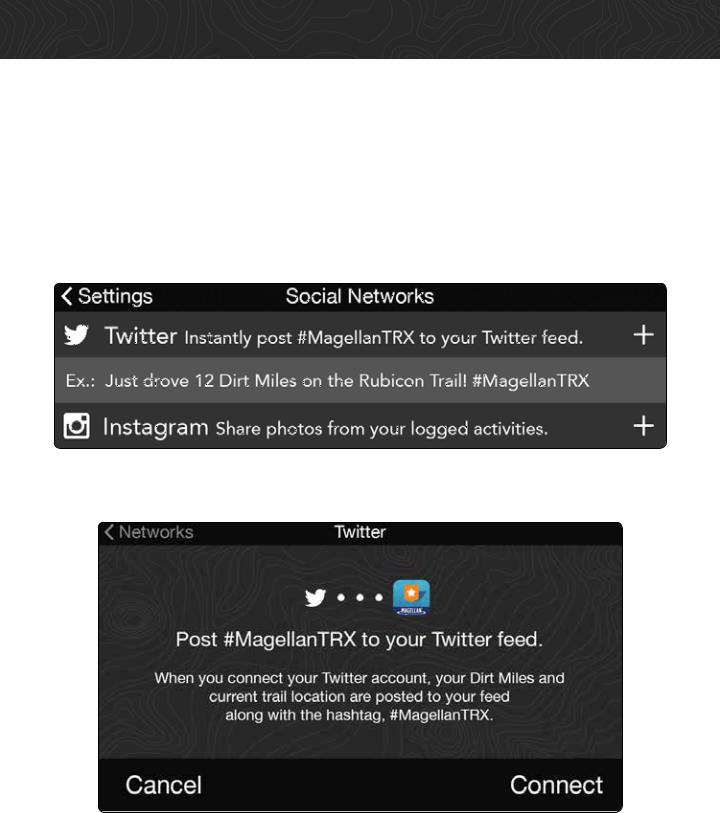
Link to Social Media.
Link your Twitter and Instagram accounts to your TRX Account to Tweet your Dirt Miles and share off-roading photos while tracking using the Social Post ( ) button.
Link Your Twitter Account
To link your TR5 to your Twitter account:
1. Tap  from the Dashboard > tap
  .
.
2. Tap  next to the Twitter option > tap
  .
.
3. Enter account details > tap  > tap
> tap  to finish linking to Twitter.
Link Your Instagram Account
To link your TR5 to your Instagram account, tap  next to the Instagram option and repeat the steps for linking your Twitter account.
 Loading...