


User Manual
MAP 330/MAP 330M
This User Manual provides the instructions for using the Magellan MAP 330 and the Magellan MAP 330M GPS receivers. Any reference to the MAP 330 in this User Manual applies to both receivers. Those areas that apply only to the MAP 330M will be noted.

WARNINGS
FOR SAFETY REASONS, THE DRIVER SHOULD NOT USE THIS DEVICE IN A VEHICLE
WHILE IN MOTION TO ASSIST THE DRIVER TO NAVIGATE.
Please do not try and change any settings on the MAP 330 while driving. Come to a complete stop or have your passenger make any changes. Taking your eyes off the road is dangerous and can result in an accident in which you or others could be injured.
USE GOOD JUDGEMENT
This product is an excellent navigation aid, but does not replace the need for careful orienteering and good judgement. Never rely solely on one device for navigating.
USE CARE
The Global Positioning System (GPS) is operated by the U.S. Government, which is solely responsible for the accuracy and maintenance of GPS.
The accuracy of position fixes can be affected by the periodic adjustments to GPS satellites made by the U.S. Government and is subject to change in accordance with the Department of Defense civil GPS user policy and the Federal Radionavigation Plan. Accuracy can also be affected by poor satellite geometry.
USE PROPER ACCESSORIES
Use only Magellan cables and antennas; the use of non-Magellan cables and antennas may severely degrade performance or damage the receiver, and will void the warranty.
LICENSE AGREEMENT
Magellan grants you, the purchaser, the right to use the software supplied in and with MAGELLAN GPS products (the "SOFTWARE") in the normal operation of the equipment. You may make copies only for your own personal use and for use within your organization.
The SOFTWARE is the property of MAGELLAN and/or its suppliers and is protected by United States copyright laws and international treaty provisions; therefore, you must treat this SOFTWARE like any other copyright material.
You may not use, copy, modify, reverse engineer or transfer this SOFTWARE except as expressly provided in this license. All rights not expressly granted are reserved by MAGELLAN and/or its suppliers.
** *
No part of this handbook may be reproduced or transmitted in any form or by any means, electronic or mechanical, including photocopying and recording, for any purpose other than the purchaser's personal use without the prior written permission of Magellan Corporation.
© 2000 by Magellan Corporation. All rights reserved.
Magellan™, MAP 330™, MAP 330M™ and MapSend™ are trademarks of Magellan Corporation.
630800 A |
SW Rev.: 1.20+ |

MAGELLAN CORPORATION LIMITED WARRANTY
All Magellan GPS receivers are navigation aids, and are not intended to replace other methods of navigation. Purchaser is advised to perform careful position charting and use good judgment. READ THE USER GUIDE CAREFULLY BEFORE USING THE PRODUCT.
1. MAGELLAN CORPORATION’S WARRANTY
Magellan Corporation warrants their GPS receivers and accessories to be free of defects in material and workmanship for a period of one year from the date of original purchase. THIS WARRANTY APPLIES ONLY TO THE ORIGINAL PURCHASER OF THIS PRODUCT.
In the event of a defect, Magellan Corporation will, at its option, repair or replace the product with no charge to the purchaser for parts or labor. The repaired or replaced product will be warranted for ninety (90) days from the date of return shipment, or for the balance of the original warranty, whichever is longer.
2.PURCHASER’S REMEDY
PURCHASER’S EXCLUSIVE REMEDY UNDER THIS WRITTEN WARRANTY OR ANY IMPLIED WARRANTY SHALL BE LIMITED TO THE REPAIR OR REPLACEMENT, AT MAGELLAN CORPORATION’S OPTION, OF ANY DEFECTIVE PART OF THE RECEIVER OR ACCESSORIES WHICH ARE COVERED BY THIS WARRANTY. REPAIRS UNDER THIS WARRANTY SHALL ONLY BE MADE AT AN AUTHORIZED MAGELLAN SERVICE CENTER. ANY REPAIRS BY A SERVICE CENTER NOT AUTHORIZED BY MAGELLAN CORPORATION WILL VOID THIS WARRANTY.
3.PURCHASER’S DUTIES
To obtain service, the purchaser must obtain a Return Materials Authorization (RMA) number from Magellan Corporation (800-707-7845 - rma@magellangps.com) prior to shipping. If under warranty, the purchaser must return the receiver or
accessories postpaid with a copy of the original sales receipt, purchaser’s return address and the RMA number clearly printed on the outside of the package to:
MAGELLAN AUTHORIZED SERVICE CENTERS
MAGELLAN CORPORATION WILL NOT BE RESPONSIBLE FOR ANY LOSSES OR DAMAGE TO THE PRODUCT INCURRED WHILE THE PRODUCT IS IN TRANSIT OR IS BEING SHIPPED FOR REPAIR. INSURANCE IS RECOMMENDED. MAGELLAN SUGGESTS USING A TRACKABLE SHIPPING METHOD SUCH AS UPS OR FEDEX WHEN RETURNING A PRODUCT FOR SERVICE.
4. LIMITATION OF IMPLIED WARRANTIES
Except as set forth in item 1 above, all other expressed or implied warranties, including those of fitness for any particular purpose or merchantability, are hereby disclaimed.
Some states do not allow limitations on how long an implied warranty lasts, so the above limitation may not apply to you.
5.EXCLUSIONS
The following are excluded from the warranty coverage.
•INSTALLATION
•BATTERIES
•FINISHES
•DEFECTS RESULTING FROM INSTALLATION
•ANY DAMAGE DUE TO ACCIDENT, RESULTING FROM INACCURATE SATELLITE TRANSMISSIONS. INACCURATE TRANSMISSIONS CAN OCCUR DUE TO CHANGES IN THE POSITION, HEALTH OR GEOMETRY OF A SATELLITE.
•ANY DAMAGE DUE TO SHIPPING, MISUSE, ABUSE, NEGLIGENCE, TAMPERING, OR IMPROPER USE.

•SERVICING PERFORMED OR ATTEMPTED BY ANYONE OTHER THAN AN AUTHORIZED MAGELLAN SERVICE CENTER.
•MODIFICATIONS TO THE RECEIVER WHICH MAY BE REQUIRED DUE TO ANY CHANGE IN THE GLOBAL POSITIONING SYSTEM (GPS). (Note: All Magellan GPS receivers use GPS to obtain position, velocity and time information. GPS is operated by the U.S. Government, which is solely responsible for its accuracy and maintenance. Certain conditions can cause inaccuracies which could require modifications to the receiver. Examples of such conditions include but are not limited to changes in the GPS transmission. SUCH MODIFICATIONS ARE NOT COVERED BY THIS WARRANTY.)
OPENING OF THIS PRODUCT BY ANYONE OTHER THAN AN AUTHORIZED MAGELLAN SERVICE CENTER WILL VOID THIS WARRANTY.
6. EXCLUSION OF INCIDENTAL OR CONSEQUENTIAL DAMAGES
MAGELLAN CORPORATION SHALL NOT BE LIABLE TO PURCHASER OR ANY OTHER PERSON FOR ANY INCIDENTAL OR CONSEQUENTIAL DAMAGES WHATSOEVER, INCLUDING BUT NOT LIMITED TO LOST PROFITS, DAMAGES RESULTING FROM DELAY OR LOSS OF USE, LOSS OF OR DAMAGES ARISING OUT OF BREACH OF THIS WARRANTY OR ANY IMPLIED WARRANTY EVEN THOUGH CAUSED BY NEGLIGENCE OR OTHER FAULT. MAGELLAN CORPORATION SHALL NOT BE LIABLE TO THE PURCHASER OR ANY OTHER PERSON FOR ANY INCIDENTAL OR CONSEQUENTIAL DAMAGES WHATSOEVER ARISING OUT OF THE NEGLIGENT USAGE OF THE PRODUCT.
IN NO EVENT WILL MAGELLAN CORPORATION BE RESPONSIBLE FOR SUCH DAMAGES, EVEN IF MAGELLAN CORPORATION HAS BEEN ADVISED OF THE POSSIBILITY OF SUCH DAMAGES.
Some states do not allow the exclusion or limitation of incidental or consequential damages, so the above limitation or exclusion may not apply to you.
7.COMPLETE AGREEMENT
This written warranty is the complete, final and exclusive agreement between Magellan Corporation and the purchaser with respect to the quality of performance of the goods and any and all warranties and representations. THIS WARRANTY SETS FORTH ALL OF MAGELLAN CORPORATION’S RESPONSIBILITIES REGARDING THIS PRODUCT.
This warranty gives you specific legal rights and you may also have other rights which vary from state to state.
8. FOR PURCHASER’S OUTSIDE OF THE UNITED STATES
THIS WARRANTY GIVES YOU SPECIFIC RIGHTS. YOU MAY HAVE OTHER RIGHTS WHICH VARY FROM PROVINCE TO PROVINCE AND CERTAIN LIMITATIONS CONTAINED IN THIS WARRANTY MAY NOT APPLY TO YOU.
If you purchased this product outside of the United States, this limited warranty is governed by the laws of the State of California and shall benefit Magellan Corporation, its successors and assigns.
- - -
For further information concerning this limited warranty, please call or write:
Magellan Corporation, 960 Overland Court,
San Dimas, California, U.S.A. 91773
Phone: (909) 394-5000
Fax: (909) 394-7050

Introduction |
|
About This User Manual ......................................................................... |
1 |
Setting Up the MAP 330 |
|
Installing the Batteries ............................................................................. |
3 |
Connecting the Wrist Strap ..................................................................... |
4 |
Initialization for First Time Use .............................................................. |
5 |
Turn the MAP 330 On .................................................................................. |
5 |
Enter Your Approximate Position ................................................................... |
6 |
Basic Operation |
|
MAP 330 GPS Receiver .......................................................................... |
9 |
Turning Power On/Off ................................................................................ |
10 |
Turning the Backlight On/Off ..................................................................... |
11 |
Adjusting the Contrast ................................................................................. |
11 |
Getting a Position Fix .................................................................................. |
12 |
Navigational Screens ............................................................................. |
12 |
Map Screen .................................................................................................. |
12 |
Compass Screen ........................................................................................... |
13 |
Large Data Screen ........................................................................................ |
13 |
Position Screens ........................................................................................... |
13 |
Accessing the Navigation Screens .......................................................... |
14 |
Saving a Waypoint ................................................................................ |
15 |
Using GOTO Routes ............................................................................ |
18 |
Creating a GOTO Route ............................................................................. |
18 |
Navigating on a GOTO Route .................................................................... |
21 |
Magellan MAP 330 GPS Receiver |
i |

Reference |
|
Power/Backlight/Contrast ..................................................................... |
23 |
Turn the MAP 330 On ................................................................................ |
23 |
Turn the MAP 330 Off ................................................................................ |
23 |
Using the Display Backlight ......................................................................... |
23 |
Adjusting the Display Contrast .................................................................... |
24 |
Navigational Screens ............................................................................. |
24 |
Selecting NAV Screens ................................................................................. |
24 |
Returning to Last Viewed NAV Screen ........................................................ |
24 |
Map Screen ........................................................................................... |
24 |
Setting the Map Detail ................................................................................. |
27 |
Map Screen Legend ..................................................................................... |
27 |
Turning On/Off Display Waypoints ............................................................ |
28 |
City Definition ............................................................................................ |
28 |
Turning Nav Info On/Off ............................................................................ |
28 |
Selecting Street Information or Data Fields for Nav Information ................. |
29 |
Customizing the Data Fields ........................................................................ |
29 |
Data Field Options Definitions .................................................................... |
30 |
Changing the Map Orientation ................................................................... |
31 |
Track History ............................................................................................... |
31 |
Turning On/Off Map Track View ................................................................ |
31 |
Selecting Track Mode ................................................................................... |
31 |
Clearing Track ............................................................................................. |
32 |
Selecting Land or Marine Use ...................................................................... |
32 |
Compass Screen .................................................................................... |
33 |
Customizing the Data Fields ........................................................................ |
34 |
Large Data Screen ................................................................................. |
34 |
Customizing the Data Fields ........................................................................ |
35 |
Position Screen ...................................................................................... |
35 |
Selecting the Position Screen ........................................................................ |
35 |
Resetting the Trip Odometer ........................................................................ |
35 |
Customizing the Data Fields ........................................................................ |
37 |
GPS Status Messages .................................................................................... |
37 |
ii |
Magellan MAP 330 GPS Receiver |

Satellite Status Screen ............................................................................ |
38 |
Waypoints / Database ........................................................................... |
39 |
Accessing Waypoints in the Database ........................................................... |
39 |
Selecting Waypoints from the Nearest List ................................................... |
39 |
Selecting Waypoints from the Alphabetical List ........................................... |
39 |
Selecting Waypoints Nearest to the Cursor ................................................... |
40 |
Saving Present Position as a Waypoint .......................................................... |
41 |
Creating New Waypoint Manually ............................................................... |
41 |
Creating New Waypoint with Map Cursor .................................................. |
41 |
Deleting a User Waypoint ............................................................................ |
42 |
Editing a User Waypoint .............................................................................. |
42 |
Viewing a Map Object on the Map .............................................................. |
43 |
Viewing a User Waypoint on the Map ......................................................... |
43 |
Saving a Map Object as a User Waypoint ..................................................... |
43 |
Searching for a Street Address ...................................................................... |
44 |
Routes ................................................................................................... |
45 |
Creating a GOTO Route ............................................................................. |
45 |
Creating a Backtrack Route .......................................................................... |
45 |
Creating a Multileg Route ............................................................................ |
46 |
Activating/Deactivating a Route .................................................................. |
48 |
Viewing a Route .......................................................................................... |
48 |
Editing a Route ............................................................................................ |
48 |
Inserting a Leg ......................................................................................... |
49 |
Deleting a Leg ......................................................................................... |
49 |
Replacing a Leg ........................................................................................ |
49 |
Appending a Leg ...................................................................................... |
50 |
Appending a Newly Created Waypoint to a Route ....................................... |
50 |
Reversing a Route ........................................................................................ |
50 |
Deleting a Route .......................................................................................... |
50 |
Viewing a Route on the Map Screen ............................................................ |
51 |
Creating a Route using Track History .......................................................... |
51 |
Magellan MAP 330 GPS Receiver |
iii |

Setup .................................................................................................... |
51 |
Initializing the MAP 330 ............................................................................. |
51 |
Turning the NAV Screens On/Off ............................................................... |
52 |
Selecting the Coordinate System .................................................................. |
52 |
Selecting a Map Datum ............................................................................... |
53 |
Selecting the Elevation Mode ....................................................................... |
53 |
Selecting the Time Format ........................................................................... |
53 |
Selecting NAV Units .................................................................................... |
54 |
Selecting the North Reference ...................................................................... |
54 |
Setting the Backlight Timer ......................................................................... |
54 |
Turning the Beeper On/Off ......................................................................... |
55 |
Selecting NMEA Message ............................................................................ |
55 |
Selecting the Baud Rate ............................................................................... |
55 |
Clearing Memory .................................................................................. |
56 |
Clearing Track History ................................................................................. |
56 |
Clearing Wpts/Routes .................................................................................. |
56 |
Clearing All Routes ...................................................................................... |
56 |
Resetting MAP 330 to Factory Defaults ....................................................... |
56 |
Clearing All Memory in the MAP 330 ......................................................... |
56 |
Sun/Moon Display ................................................................................ |
57 |
Accessing the Sun/Moon Screen ................................................................... |
57 |
Changing the Sun/Moon Date ..................................................................... |
57 |
Changing the Sun/Moon Position ................................................................ |
57 |
Fish/Hunt Times Display ...................................................................... |
58 |
Accessing the Fish/Hunt Screen ................................................................... |
58 |
Changing the Fish/Hunt Date ..................................................................... |
58 |
Changing the Fish/Hunt Position ................................................................ |
58 |
MAP 330 Alarms .................................................................................. |
59 |
Setting the Arrival Alarm ............................................................................. |
59 |
Setting the Anchor Alarm ............................................................................ |
59 |
Setting the XTE Alarm ................................................................................ |
59 |
Setting the GPS Fix Alarm ........................................................................... |
59 |
iv |
Magellan MAP 330 GPS Receiver |
Using the Simulator .............................................................................. |
60 |
Turning on the Simulator - Auto Mode ....................................................... |
60 |
Turning on the Simulator - User Mode ........................................................ |
60 |
Turning the Simulator Off ........................................................................... |
60 |
Help ...................................................................................................... |
61 |
About... ................................................................................................. |
61 |
Frequently Asked Questions |
|
General ................................................................................................. |
62 |
Waypoints/Database ............................................................................. |
63 |
Navigation Screens ................................................................................ |
64 |
Routes ................................................................................................... |
64 |
Alarms .................................................................................................. |
64 |
Output Data ......................................................................................... |
65 |
Appendix |
|
Troubleshooting .................................................................................... |
66 |
Waypoint Icons ..................................................................................... |
67 |
Features of the MAP 330M ................................................................... |
68 |
Contacting Magellan ............................................................................. |
69 |
Specifications ........................................................................................ |
70 |
Accessories ............................................................................................ |
71 |
MapSend Streets™ ............................................................................... |
72 |
Connecting to External Devices ............................................................ |
73 |
Glossary ................................................................................................ |
75 |
Index ..................................................................................................... |
78 |
Magellan MAP 330 GPS Receiver |
v |

vi |
Magellan MAP 330 GPS Receiver |
IntroductionI i
Welcome and congratulations on your purchase of the Magellan MAP 330 GPS receiver. The MAP 330 has all the features that a sailor, fisherman, hiker, hunter, or any person involved with outdoor recreational activities has come to expect from a Magellan GPS receiver. In addition to these features, the MAP 330 offers the ability to display your location on detailed city maps providing you with a complete navigation tool that will last you for years to come.
The MAP 330M has all the features of the MAP 330, and has navaids (fixed navaids, buoys, lighthouses and marinas) preloaded into the receiver’s database.
Magellan has been a leader in the hand-held GPS market since introducing the world’s first commercial, hand-held GPS receiver in 1989. Since that time Magellan has continued to equip the outdoorsman and consumer markets with navigational receivers, all the way from the first GPS receiver for under $100 to automotive receivers with turn-by-turn routing capabilities.
Before you begin, make sure that your package includes all of the items listed on the side panel of the box. If any of these items are missing or damaged, please contact Magellan Corporation at (866) 737-8604 for replacement items.
This User Manual is divided into six chapters; Introduction, Setting Up the MAP 330, Basic Operation, Reference Guide, Frequently Asked Questions, and Appendix. Each of these chapters will be explained briefly so you can tell which ones are right for you. A glossary and index are provided after the Appendix as well.
Setting Up the MAP 330: This chapter will show you how to prepare the MAP 330 for use. Instructions will include how to install the batteries, how to connect the wrist strap and how to initialize the MAP 330.
Basic Operation: This chapter provides you with step-by-step instructions for using the basic functions of the MAP 330. This chapter will explain getting a position fix, viewing the Map screen, saving a waypoint and using a GOTO. Knowing these four basic steps will enable you to use the MAP 330 for most things you will want to do.
Magellan MAP 330 GPS Receiver |
1 |

Introduction
Reference Guide: Here you will find step-by-step instructions for all of the features found in the MAP 330. This chapter is set up in a way that you can quickly and easily find the feature you are looking for.
Frequently Asked Questions: This chapter is aimed at answering some of the more basic questions that you may have about your MAP 330, the global positioning system (GPS) and using the MAP 330 to its fullest. Experienced GPS users will probably not find any new information in this chapter but new GPS users may find many of their questions answered here.
Appendix: Sections containing information about connecting your MAP 330 to external devices, accessories, troubleshooting and specifications can be found in the Appendix.
Glossary: A glossary is provided explaining some of the terms and abbreviations found in the MAP 330 and this manual that may not be familiar to all users.
It’s time to begin using your MAP 330. Don’t be overwhelmed with the size of the manual as we have tried to give enough information for the beginning user as well as provide the experienced users with the specifications and features that they are looking for.
The most important thing to us is to be sure that you are completely satisfied with your MAP 330 and the accompanying documentation. If you have any ideas, suggestions or even a complaint, please pass them along to us through our web site (www.magellangps.com) or by mail.
2 |
Magellan MAP 330 GPS Receiver |
Settingi Up the MAP 330
Setting up the MAP 330 is a simple three-step process: installing the batteries, attaching the wrist strap and initializing the MAP 330.
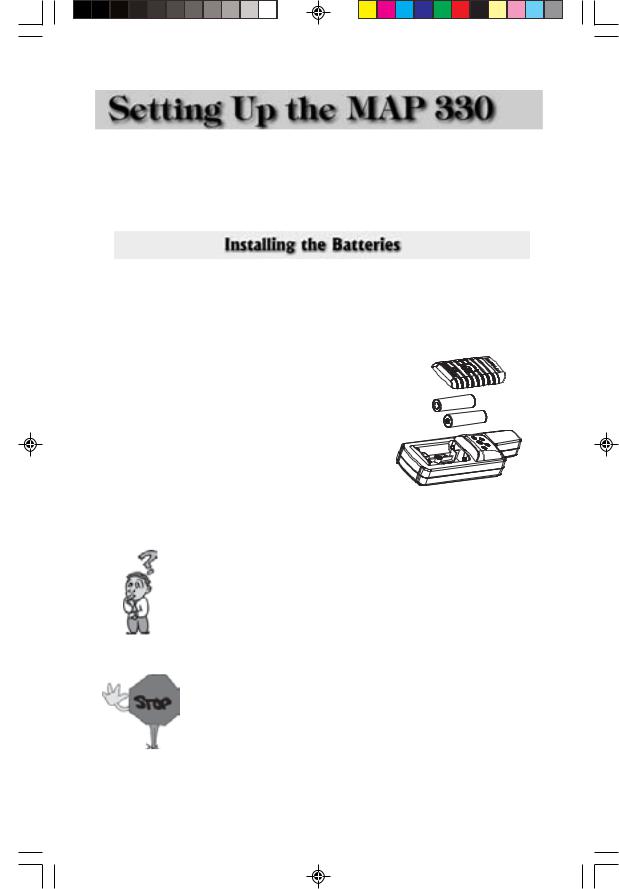
The MAP 330 uses two AA batteries that are installed from the back through the battery cover. You can expect to get up to 10 hours of usage on two AA batteries with the backlight turned off.
To remove the battery cover, turn the ring of the battery door screw counterclockwise until the battery cover can be removed. Insert the new batteries as shown, making sure that the batteries are installed with the correct polarity.
Replace the cover and tighten the battery door screw by turning it clockwise until the battery door is securely in place. Avoid overtightening the battery door screw.
-+
+-
How much time do I have to replace the batteries? Any waypoints or routes you have created are stored in permanent memory and should not be lost for months with the batteries removed. Present position and time data is not stored in permanent memory but will be held in memory for at least two hours without batteries installed.
Always turn the MAP 330 off before removing the batteries or turning off external power. Failure to do so can cause loss or corruption of data.
Magellan MAP 330 GPS Receiver |
3 |
Setting Up the MAP 330
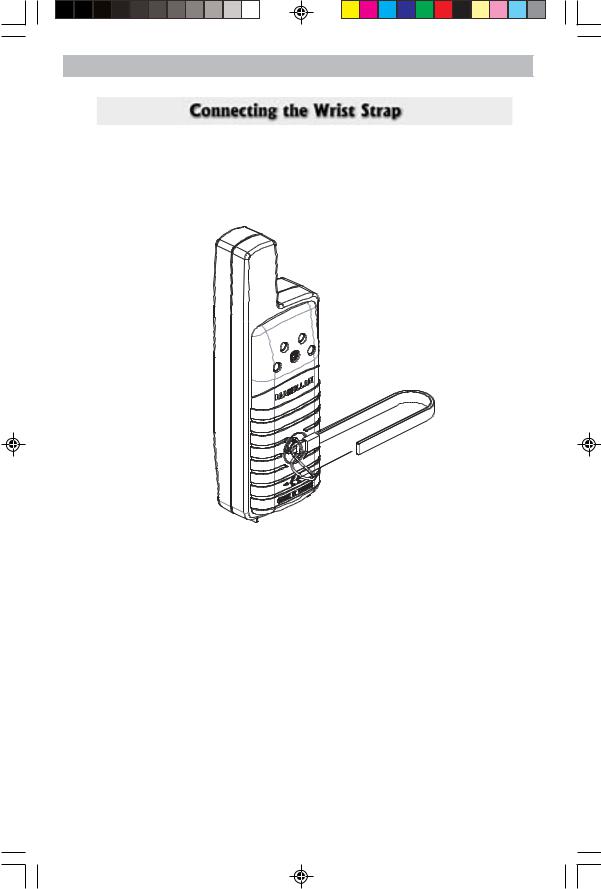
The wrist strap attaches to the ring on the screw for the battery door cover. The picture below shows how the wrist strap should be attached.
4 |
Magellan MAP 330 GPS Receiver |
Settingi Up the MAP 330
The final step in setting up the MAP 330 is to initialize the receiver for firsttime use. This will help your MAP 330 begin computing your position in the fastest manner possible.
The reason for initialization is to speed up the process for computing the first position fix when the MAP 330 has no last position computed in memory (i.e., when the MAP 330 is brand new or memory has been cleared). This gives the MAP 330 an approximate indication of where it is located so it can use its satellite almanac (stored in permanent memory) to estimate what satellites are overhead and which ones it should be looking for.
Follow these instructions to initialize the MAP 330.
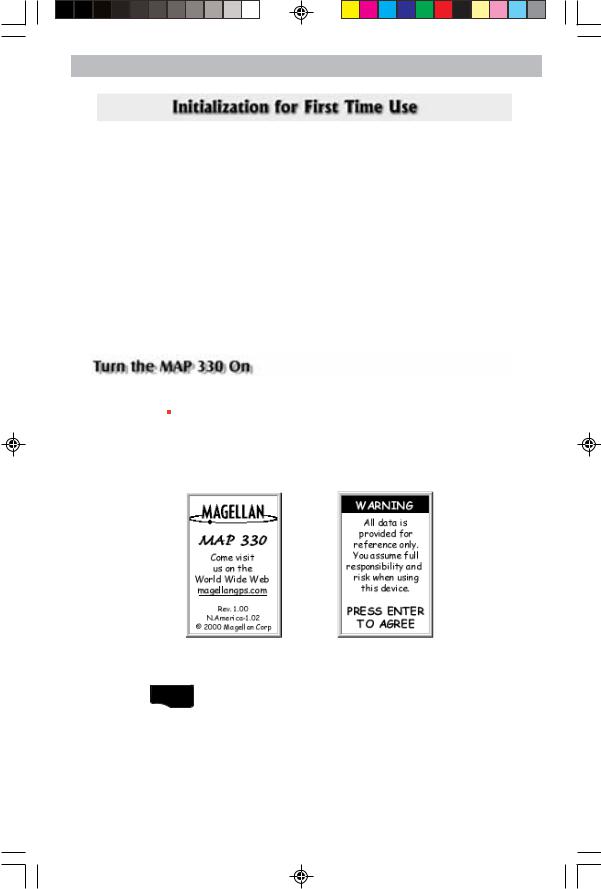
Press 
The MAP 330 turns on and displays the start-up screen and a warning screen.
Start-up Screen Warning Screen
Press ENTER (You have 10 seconds to press ENTER or the MAP 330 will shut off.)
Magellan MAP 330 GPS Receiver |
5 |
Setting Up the MAP 330
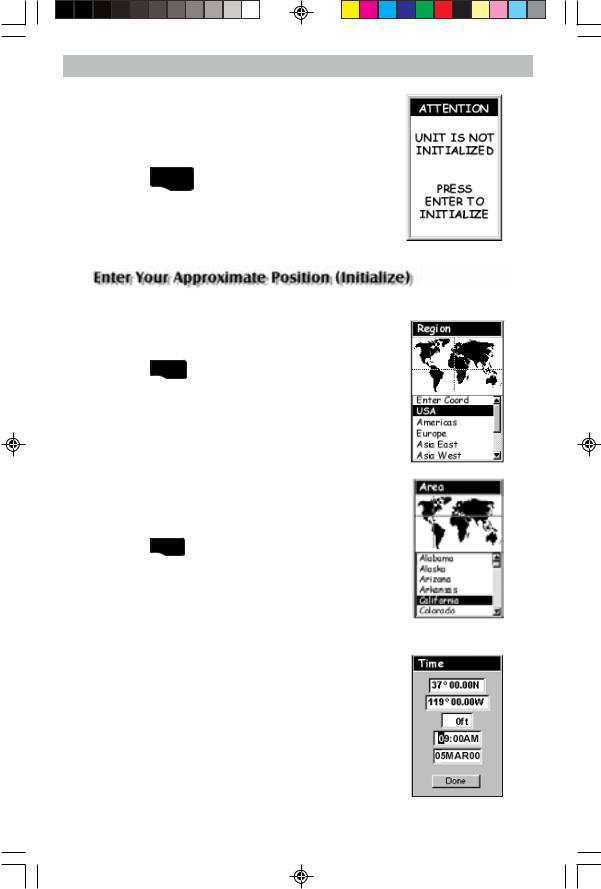
The MAP 330 displays a message box indicating that the receiver needs to be initialized.
Press ENTER
Use the  to highlight your general region.
Press ENTER
Use the  to highlight your area.
Press ENTER .
The cursor appears in the time field, waiting for you to input your local time. Set your local time using the arrow keys. Be sure that you set the AM/PM indicator.
Note: After the MAP 330 starts to pick up signals from any satellite, it will automatically update the time using the satellite’s atomic clock.
6 |
Magellan MAP 330 GPS Receiver |
Settingi Up the MAP 330
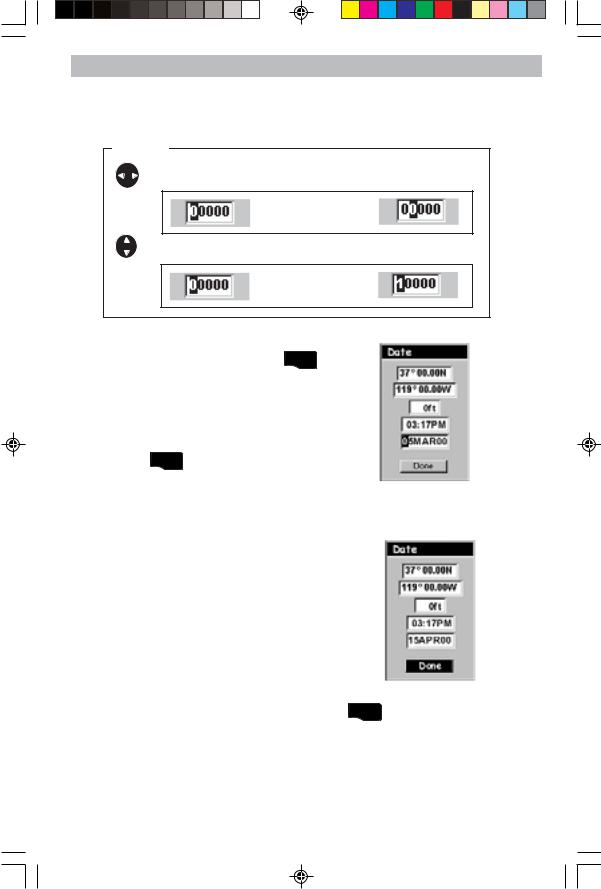
To use the arrow keys to edit a field, follow the simple diagram below.
Editing |
moves the cursor block left or right. |
Pressing right arrow |
results in: |
increments the value up or down. |
Pressing up arrow |
results in: |
When the time is correct, press ENTER .
The last piece of information needed is the date. Using the arrow keys, enter the present date.
Press ENTER .
All the information that the MAP 330 needs to speed up the process of computing its first fix has been entered and the Done button is highlighted.
To complete the initialization process, press ENTER .
Magellan MAP 330 GPS Receiver |
7 |

Setting Up the MAP 330
The Sat Status screen is displayed and the MAP 330 is now ready to be used. At this point you can begin using the MAP 330 beginning with the Basic Operation described in the next chapter or you can turn the MAP 330 off.
To turn the MAP 330 off, press  .
.
8 |
Magellan MAP 330 GPS Receiver |
Basicic Operationi
For many of you this will be your first introduction into using a GPS receiver as a navigational tool. With all of the features and functions provided with the MAP 330, it may seem a bit intimidating at first. Don’t worry. There are only a few things you need to know to use the MAP 330. They will be discussed here in detail. Other features and functions can be found in the Reference Section of this manual.
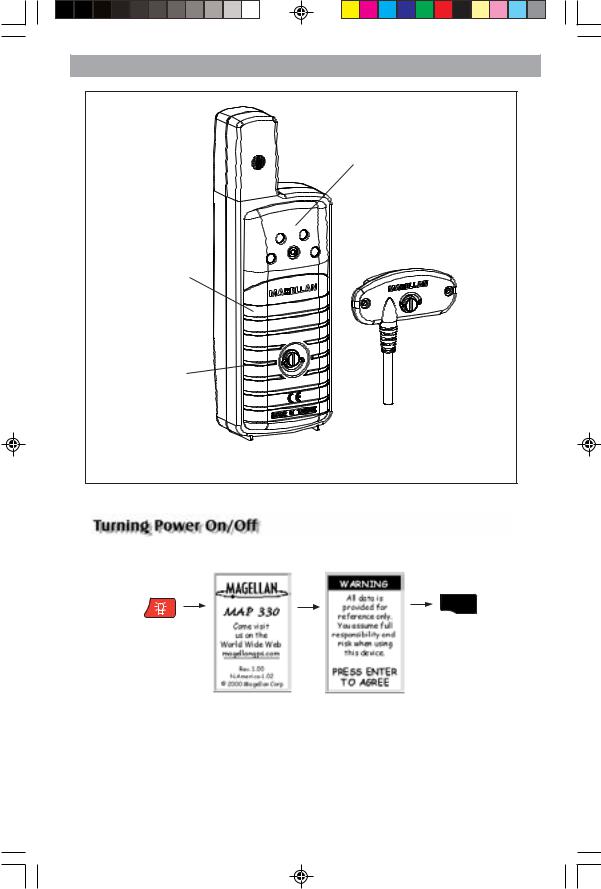
Quadrifilar Antenna
IN - Zooms in the display of the Map screen. (Press once to zoom one level, press and hold to quickly move through the zoom levels.)
ESC- Cancels the operation of the last button pressed. Also scrolls through the NAV screens in reverse order.
NAV - Accesses the various navigation screens.
MARK/GOTO - MARK is used to create a waypoint. GOTO is used to create a direct route to any waypoint stored in memory.
MAP 330
OUT - Zooms out the display of the Map screen. (Press once to zoom one level, press and hold to quickly move through the zoom levels.)
ENTER - Confirms data entries or menu selections.
MENU - Accesses menus for displayed screens. Also provides access to waypoint, route and setup functions.
Power/Light- Turns the MAP 330 on/off. Also used to turn the display backlight on/off.
Magellan MAP 330 GPS Receiver |
9 |
Basic Operation
Pressure Relief
Vent
Battery Cover
Battery Cover
Screw and Wrist
Strap Ring
External Connections -
Provides connection to external power and data handling devices.
Power/Data Cable (purchased separately) - Allows access to the external connector for the MAP 330. See the section on Accessories for description of available cables.
Tuning the MAP 330 On
Press |
Press |
|
|
|
ENTER |
[You have 10 seconds to press ENTER accepting the displayed warning or the MAP 330 will shut off.]
Start-up Screen |
Warning Screen |
displayed |
displayed |
The last navigation screen you were viewing will be displayed. If the last navigation screen view was the Map screen, the last zoom scale setting will be used.
10 |
Magellan MAP 330 GPS Receiver |
Basicic Operationi
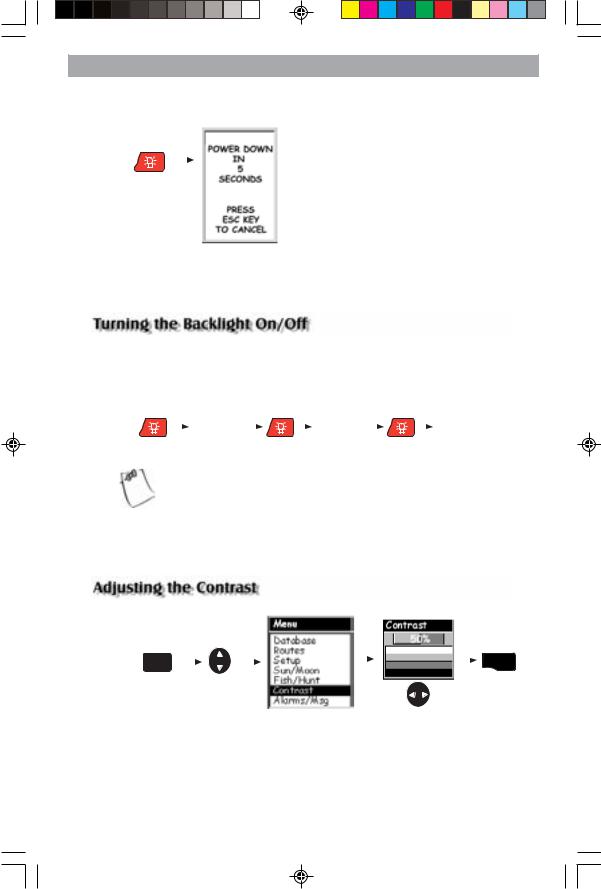
Turning the MAP 330 Off
Press |
|
Pressing the |
|
|
ON/OFF button |
|
|
again will turn off |
|
|
the MAP 330 |
|
|
immediately. |
|
|
Pressing ESC |
|
|
key will cancel the |
|
|
power down |
|
|
sequence. |
Shutdown Screen
displayed
The display backlight can be set to one of three levels (low, high or off).
Press & |
|
Press & |
|
Press & |
||||||
hold for 2 |
|
hold for 2 |
|
hold for 2 |
||||||
seconds |
|
seconds |
|
seconds |
||||||
|
|
Display |
|
|
|
Display |
|
|
|
Display |
|
|
backlight |
|
|
|
backlight |
|
|
|
backlight |
|
|
illuminates |
|
|
|
illuminates |
|
|
|
turns off |
|
|
(low) |
|
|
|
(high) |
|
|
|
|
The backlight causes severe drain on the batteries in the MAP 330. To prevent accidently turning the backlight on and leaving it on, the MAP 330 will turn the backlight off when there has been no button presses for 4 minutes. Pressing any button will turn the backlight
back on in this instance. You can change the time delay for the backlight in Setup. (See the Setup section in the Reference chapter.)
From any screen press
MENU |
|
|
|
|
|
|
|
ENTER |
Use up/down |
|
|||||||
|
|
|
|
|
|
|||
|
|
arrows to |
|
|
|
|
|
|
|
|
highlight |
The menu display |
|
Use left/right |
|||
|
|
Contrast |
|
|||||
|
|
|
|
may differ slightly |
|
arrows to adjust |
||
|
|
|
|
depending upon |
|
the contrast. |
||
|
|
|
|
which screen it was |
|
|
|
|
|
|
|
|
accessed from. |
|
|
|
|
Magellan MAP 330 GPS Receiver |
11 |
Basic Operation
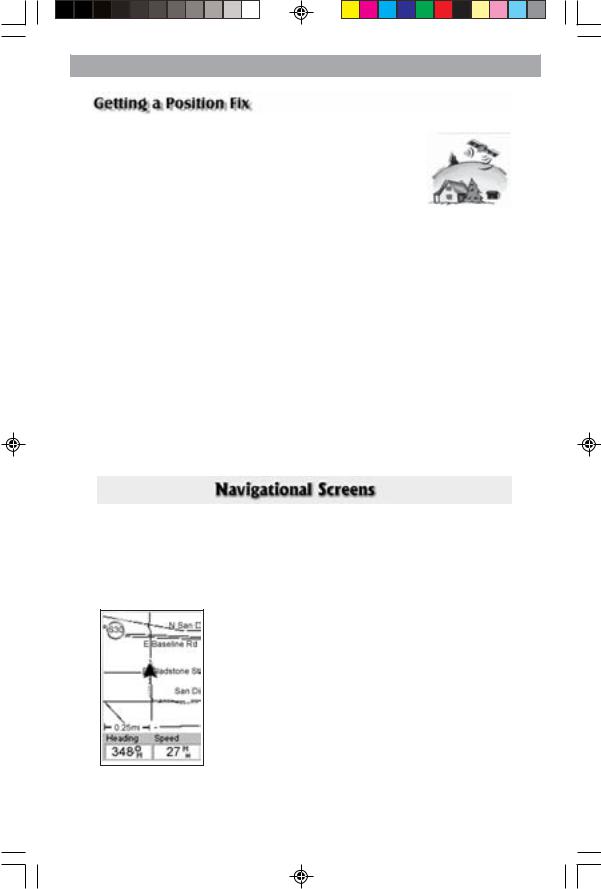
Because the MAP 330 attains information it needs from satellites orbiting the earth, the antenna needs to have a relatively unobstructed view of the sky. This allows the MAP 330 to choose from all satellites currently available.
If the view of the sky is poor, (large cliffs or buildings, heavy foliage or other obstructions) the satellite signals can be blocked and the receiver may take longer to compute a position fix.
You can observe the signal strength and the satellites being used on the Satellite Status screen (described in the next section).
Holding the MAP 330. The receiver is designed to fit comfortably in your hand. Hold the MAP 330 in the palm of your hand with the antenna pointing towards the sky.
The MAP 330 has five navigation screens: Map screen, Compass screen, Large Data screen, Position screen and Sat Status screen. They will be described briefly here. More detailed information on the different screens can be found in the Reference chapter.
Map Screen . The Map screen has two modes, position or cursor. In the position mode, your present position is indicated by the large arrow icon in the center of the display. If you are moving, the arrow will point in the direction that you are heading. At the bottom of the screen is the scale for the map displayed and two data fields that can be customized, or turned off, depending upon your needs.
12 |
Magellan MAP 330 GPS Receiver |
Basicic Operationi
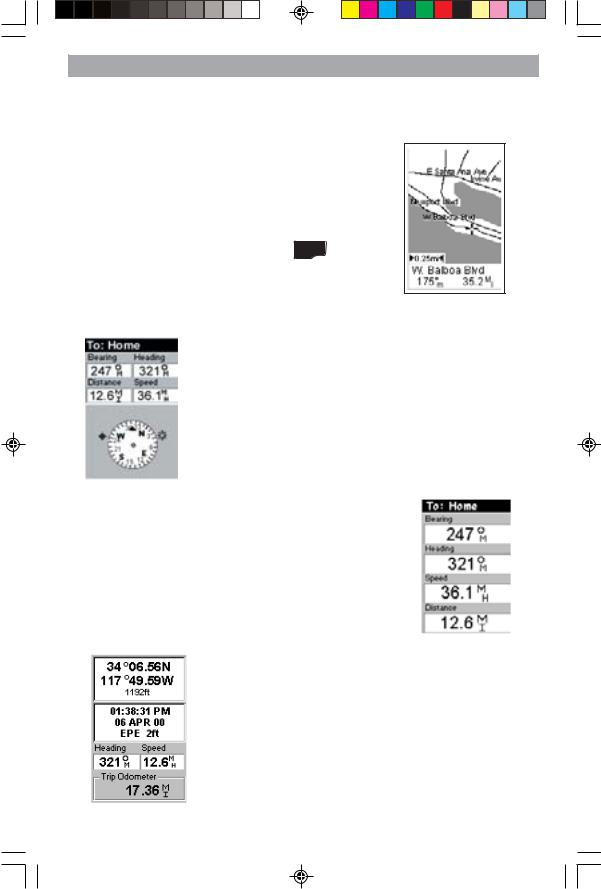
In the Cursor Mode, you are provided with a cursor that can be moved on the map. At the bottom of the display is the information for the position of the cursor relative to your present position. Also any points
of interest that the cursor is over will be shown.
To access the Cursor Mode, press any arrow on the keypad. A crosshair appears that can be moved with the arrow keys.
To return to the Position Mode, press ESC . The cursor will disappear and the present position icon will appear centered on the map.
Compass Screen. This is a handy screen to have at your fingertips while you are navigating. It is totally customizable to display the information that is useful to you. The lower portion of the Compass screen not only displays your heading in a graphical manner, but also displays the relationship of the sun, moon and your destination (if navigating on a route) to your heading.
Large Data Screen. The Large Data screen is similar to the Compass screen but here the compass has been removed to allow for large display of the navigation data. Ideal for when you have your MAP 330 mounted on the dashboard of a boat using the optional swivel mounting bracket. Even from a distance the information can be read with ease.
Position Screens. The Position screens 1 and 2 display your present position using the coordinate systems that you have selected in Setup. This screen shows all of the basic position, time and satellite information. In addition current navigation information is shown on the bottom half of the screen.
Magellan MAP 330 GPS Receiver |
13 |
Basic Operation
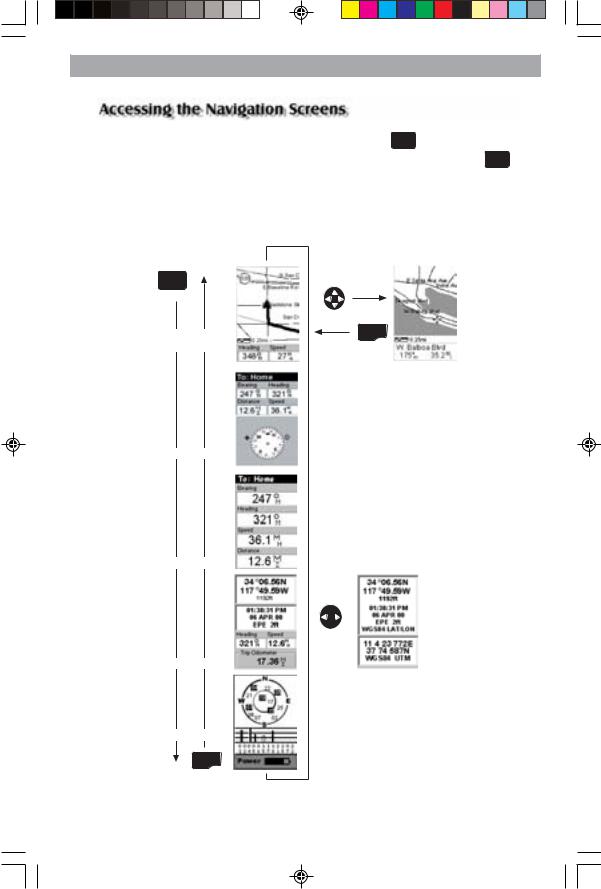
From any screen other than a navigation screen, pressing NAV returns you to the last navigation screen viewed. Note that if you are inputting data, pressing NAV will return you to the last navigation screen but your inputs will not be saved.
While viewing any navigation screen, you can maneuver through the other screens following the sequence below.
NAV
Map Screen |
ESC |
(Position Mode) |
|
Map Screen
(Cursor Mode)
Compass Screen
Lg. Data Screen
Position 1 Screen
Position 2 Screen
Sat Status Screen
ESC
14 |
Magellan MAP 330 GPS Receiver |

Basicic Operationi
A waypoint is a point on a map that you can name and save in the MAP 330. They are primarily used for creating routes. Whether the route is a simple GOTO or a more complex multileg route, it needs stored waypoints to use as its starting and destination point.
Saving a Waypoint with a Receiver-Generated Name
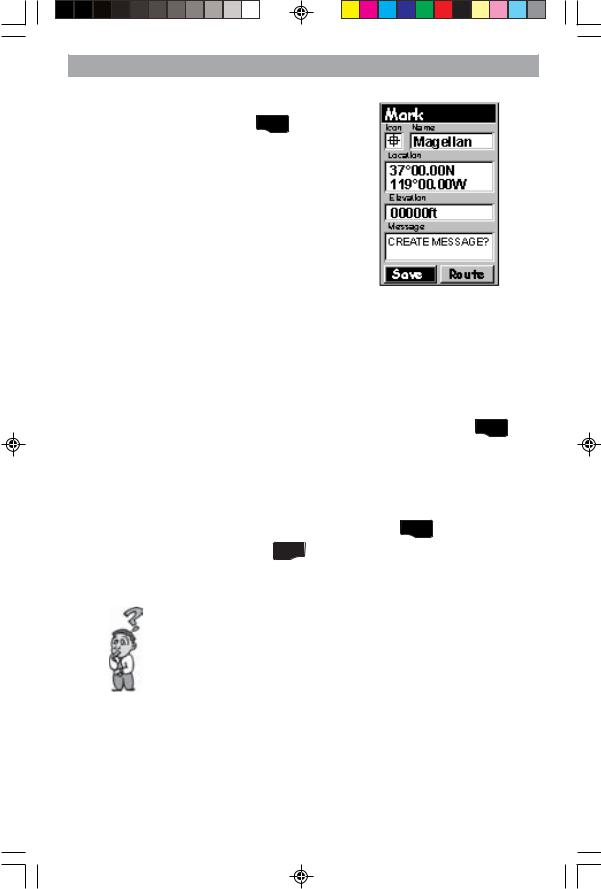
From any screen, press and hold MARK for 2
seconds and the Mark screen is displayed.
The “Save” button is highlighted and you can
press ENTER to save the waypoint using the default name and icon.
You can later go back and edit any of the waypoint information through the Database Menu or you can change the information now following the guidelines below. (See Waypoints in the Reference chapter.)
Saving a Waypoint with a User-Input Icon and Name
From any screen, press and hold MARK for 2 seconds. Use the UP/DOWN arrows and notice that the highlight moves from field to field and then back to “Save.”
Highlight the Icon field using the UP/DOWN arrows. Press ENTER .
Magellan MAP 330 GPS Receiver |
15 |
Basic Operation
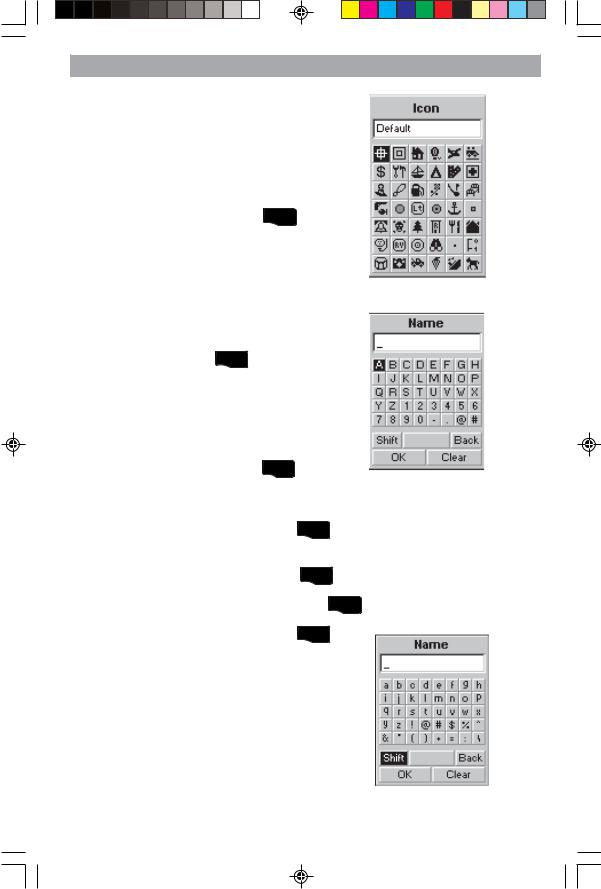
The Icon Select window is displayed. Use the arrow keypad to move from one icon to another with the name of the icon displayed at the top. As a reference tool, all of the icons and their names are listed in the Reference Chapter. When you have highlighted the icon you want to use, press ENTER .
The cursor is now highlighting the Waypoint Name field. With the Name field highlighted, press ENTER . The input keyboard is displayed. The very top of the keyboard window shows you what field you are changing, in this case the Name field.
You can now use the arrow keypad to select the character you wish to enter.. With the
character highlighted press ENTER and the
character is appended to the name you are entering and displayed in the field above the keys. (Waypoint names can be up to 8 characters in length.)
Highlighting “Back” and pressing ENTER erases the last character you entered.
Highlighting “Clear” and pressing ENTER clears the entire name.
Highlighting the space bar and pressing ENTER adds a space.
Highlighting “Shift” and pressing ENTER displays the lower case letters and some additional punctuation marks.
16 |
Magellan MAP 330 GPS Receiver |
Basicic Operationi
When you have the name the way you want it, highlight “OK” and press ENTER . You are returned to the Mark screen with the new name displayed.
Entering a Message
Any waypoint can have a message assigned to it. This comes in handy in further identifying the waypoint. If this was a waypoint for a friend’s house or business, you could add a phone number or any other information that you find useful.
Use the UP/DOWN arrows to highlight the Message field and press ENTER .
The keyboard window is displayed the same as when the Name was changed. Only this time the top of the window says “Message” and the field you are typing into is larger to accommodate more characters. You can have up to 30 characters in the message field.
To accept the new message, highlight “OK” and press ENTER . To leave the message the way it was, press ESC at any time.
Is there a limit to the number of waypoints I can store in the MAP 330? Yes, the MAP 330 will store up to 500 user waypoints in memory. However, the MAP 330 will only allow messages to be created for 200 waypoints. If you should ever get that many and need to input more, you will have to delete ones that you no longer need to make room.
Magellan MAP 330 GPS Receiver |
17 |
 Loading...