


 Loading...
MG5000
MG5050
SP5500
SP6000
SP7000
User Guide
We hope this product performs to your complete satisfaction. Should you have any questions or comments, please visit www.paradox.com and send us your comments.

User Settings |
|
|
|
4-Digit Codes N 6-Digit Codes N |
|
||
For security reasons, write only the user’s name and not his or her access code. |
|
||||||
User # and Name |
Partition |
Byp |
Stay |
Force |
Arm |
PGM |
Duress |
|
1 or 2 |
|
|
|
Only |
Only |
|
001: Master______________________ |
________ |
N |
N |
N |
N |
N |
Duress: Y N N |
002: Master 1____________________ |
________ |
N |
N |
N |
N |
N |
Duress: Y N N |
003: Master 2____________________ |
________ |
N |
N |
N |
N |
N |
Duress: Y N N |
004:____________________________ |
________ |
N |
N |
N |
N |
N |
Duress: Y N N |
005:____________________________ |
________ |
N |
N |
N |
N |
N |
Duress: Y N N |
006:____________________________ |
________ |
N |
N |
N |
N |
N |
Duress: Y N N |
007:____________________________ |
________ |
N |
N |
N |
N |
N |
Duress: Y N N |
008:____________________________ |
________ |
N |
N |
N |
N |
N |
Duress: Y N N |
009:____________________________ |
________ |
N |
N |
N |
N |
N |
Duress: Y N N |
010:____________________________ |
________ |
N |
N |
N |
N |
N |
Duress: Y N N |
011:____________________________ |
________ |
N |
N |
N |
N |
N |
Duress: Y N N |
012:____________________________ |
________ |
N |
N |
N |
N |
N |
Duress: Y N N |
013:____________________________ |
________ |
N |
N |
N |
N |
N |
Duress: Y N N |
014:____________________________ |
________ |
N |
N |
N |
N |
N |
Duress: Y N N |
015:____________________________ |
________ |
N |
N |
N |
N |
N |
Duress: Y N N |
016:____________________________ |
________ |
N |
N |
N |
N |
N |
Duress: Y N N |
017:____________________________ |
________ |
N |
N |
N |
N |
N |
Duress: Y N N |
018:____________________________ |
________ |
N |
N |
N |
N |
N |
Duress: Y N N |
019:____________________________ |
________ |
N |
N |
N |
N |
N |
Duress: Y N N |
020:____________________________ |
________ |
N |
N |
N |
N |
N |
Duress: Y N N |
021:____________________________ |
________ |
N |
N |
N |
N |
N |
Duress: Y N N |
022:____________________________ |
________ |
N |
N |
N |
N |
N |
Duress: Y N N |
023:____________________________ |
________ |
N |
N |
N |
N |
N |
Duress: Y N N |
024:____________________________ |
________ |
N |
N |
N |
N |
N |
Duress: Y N N |
025:____________________________ |
________ |
N |
N |
N |
N |
N |
Duress: Y N N |
026:____________________________ |
________ |
N |
N |
N |
N |
N |
Duress: Y N N |
027:____________________________ |
________ |
N |
N |
N |
N |
N |
Duress: Y N N |
028:____________________________ |
________ |
N |
N |
N |
N |
N |
Duress: Y N N |
029:____________________________ |
________ |
N |
N |
N |
N |
N |
Duress: Y N N |
030:____________________________ |
________ |
N |
N |
N |
N |
N |
Duress: Y N N |
031:____________________________ |
________ |
N |
N |
N |
N |
N |
Duress: Y N N |
032:____________________________ |
________ |
N |
N |
N |
N |
N |
Duress: Y N N |

Master Quick Menus
User
Step |
Action |
Details |
1 |
[ ] + [MASTER CODE] |
The [ ] key will flash. LED/key on = programmed user. |
|
|
[PARTITION MASTER CODE] may also be used. |
2 |
[USER NUMBER] |
MG10LEDV/H = 1 digit: 1 to 0(10) |
|
|
MG32I / MG32LRF/ MG32LED / MG32LCD = 2 digits: 01 to 32 |
3 |
[CODE] |
Enter 4- or 6-digit code. |
4 |
[CONFIRM CODE] |
Re-enter 4- or 6-digit code. |
5 |
[LEARN REMOTE] / [ENTER] |
Press a button on the designated remote or [ENTER] to skip. Goes to the next available |
|
|
user, or if partitioned, go to step 6. |
6 |
[1] and/or [2] + [ENTER] |
Assign the user to one or both partitions and press [ENTER]. By default, users are |
|
|
assigned to partition 1. Goes to next available user. |
Delays
Step |
Action |
Details |
1 |
[ ] + [MASTER CODE] |
The [ ] key will flash. [PARTITION MASTER CODE] may also be used. |
2[TBL]
3[1] = Entry Delay 1 (sec.)
[2]= Entry Delay 2 (sec.)
[3]= Exit Delay (sec.)
[4]= Bell Cut-Off (min.)
4 [000] to [255] Enter a value between 000 and 255 (000 = default value).
Time and Date
Step |
Action |
Details |
1 |
[ ] + [MASTER CODE] |
The [ ] key will flash. [PARTITION MASTER CODE] may also be used. |
2[TBL]
3[5]
4 |
[HH:MM] |
Enter time. If HH = 13 or more, skip to step 6. |
5 |
[TIME FORMAT] |
Enter time format ([1] = 24hr; [2] = AM; [3] = PM). |
6 |
[YYYY/MM/DD] |
Enter date. |
Communicate with WinLoad
Step |
Action |
Details |
1 |
[ ] + [MASTER CODE] |
The [ ] key will flash. [PARTITION MASTER CODE] may also be used. |
2[MEM]
3[1] = Start communication [2] = Cancel communication

Communicator
Step Action
1[ ] + [MASTER CODE]
2[MEM]
3[3] = Personal Phone #1
[4]= Personal Phone #2
[5]= Personal Phone #3
[6]= Personal Phone #4
[7]= Personal Phone #5
[8]= Pager #
4[PHONE #] + [ENTER]
5[MESSAGE] + [ENTER]
Test Report
Step Action
1[ ] + [MASTER CODE]
2[MEM]
3[9]
Details
The [ ] key will flash. [PARTITION MASTER CODE] may also be used.
Enter phone # (up to 32 digits) and press [ENTER]. Goes to next phone #, or go to step 5 if [8] = Pager # was selected.
Step 5 for Pager # only. Enter pager message and press [ENTER].
Details
The [ ] key will flash. [PARTITION MASTER CODE] may also be used.
Send a test report to the monitoring station.
Auto Arm
Step |
Action |
Details |
1 |
[ ] + [MASTER CODE] |
The [ ] key will flash. [PARTITION MASTER CODE] may also be used. |
2[BYP]
3[1] = Auto arm (partition 1) [2] = Auto arm (partition 2)
4[HH:MM]
5[1] = Regular arm
[2]= Sleep arm
[3]= Stay arm
Enter time (24Hr clock).
Erase Lost Remote Controls
Step |
Action |
Details |
1 |
[ ] + [MASTER CODE] |
The [ ] key will flash. [PARTITION MASTER CODE] may also be used. |
2[BYP]
3[3]
4[ALL REMOTES] + [ENTER] Press a button on all remotes. Press [ENTER].
5Press and hold [SLEEP] (3sec) Press and hold [SLEEP] to erase all lost remotes.
System Options
Step Action
1[ ] + [MASTER CODE]
2[BYP]
3[4] = Regular arm
[5]= Sleep arm
[6]= Stay arm
Details
The [ ] key will flash. [PARTITION MASTER CODE] may also be used.
Toggle to have the siren squawk on arm/disarm with keypad. Toggle to have the siren squawk on arm/disarm with remote. Toggle to have no exit delay when arming with remote.

Table of Contents
User Settings ..................................................... |
0 |
Master Quick Menus.......................................... |
1 |
Table of Contents .............................................. |
3 |
Basic Operations ............................................... |
4 |
Overview............................................................ |
7 |
To Turn On/Off StayD Mode.............................. |
7 |
To Change Arm Mode ....................................... |
7 |
Advanced StayD Settings .................................. |
7 |
StayD Mode ....................................................... |
8 |
Programming Access Codes ............................. |
8 |
Regular Arming.................................................. |
9 |
Sleep Arming ..................................................... |
9 |
Stay Arming ....................................................... |
9 |
Arming & Disarming......................................... |
10 |
One-Touch Arming .......................................... |
10 |
Auto-Arming..................................................... |
10 |
Disarming & Deactivating an Alarm ................. |
11 |
Manual Bypass Programming.......................... |
11 |
System Features.............................................. |
12 |
Display Mode (MG32LRF only) ....................... |
12 |
Alarm Display .................................................. |
12 |
Fire Alarms ...................................................... |
12 |
Panic Alarms ................................................... |
12 |
Programming Chime Zones............................. |
13 |
Keypad Muting................................................. |
13 |
Keypad Backlight............................................. |
13 |
PGM Keys (Programmable Outputs)............... |
14 |
Power Save Mode (MG32LRF only)................ |
14 |
Trouble Display................................................ |
14 |
Quick Function Keys........................................ |
15 |
Testing & Maintenance.................................... |
15 |
Advanced Features.......................................... |
16 |
System Checklist ............................................. |
16 |
Magellan / Spectra SP |
3 |
Overview |
1 |
Thank you for selecting a security system from Paradox Security Systems Ltd. This advanced technology security system provides you with reliable security protection and powerful features that anyone can use without memorizing complex and confusing codes. The system consists of the control panel, one or more keypad modules, various input devices (e.g. motion detectors, door contacts, etc.) and various output devices (e.g. bells, sirens, lights, etc.).
The elegant and user-friendly MG32LCD, MG32I, MG32LRF, MG32LED and MG10LEDV/H keypad modules allow you to easily access your security system's functions and provide you with an easy-to-understand display of your security system's alarm and operational status. All of the actions performed in your security system will be executed and displayed through the keypad. Therefore, before using your security system, we highly recommend that you read this manual carefully and have your installer explain basic system operation to you.
Basic Operations
Auditory Feedback
When you enter information on the keypad, it will guide you with beep tones that communicate acceptance or rejection of your entries. You should be familiar with these two keypad beep tones:
Confirmation Beep: When an operation (e.g. arming/disarming) is successfully entered on the keypad or when the system switches to a new status/mode, the keypad produces an intermittent beep tone (“BEEP-BEEP-BEEP-BEEP”).
Rejection Beep: When the system reverts to its previous status or when an operation is incorrectly entered on the keypad, it will emit a continuous beep tone (“BEEEEEEEEP”).
Visual Feedback
Keypad Indicator Lights: All keypads include coloured lights which convey the current status of your system. The state of each light represents a specific condition in your system.
NOTE: Many of the features in your system must be enabled by the installer. If the feature is not programmed, the keypad will emit a rejection beep and the action will be cancelled. Refer to the System Checklist on page 16 for details.
Overview of the Keypads
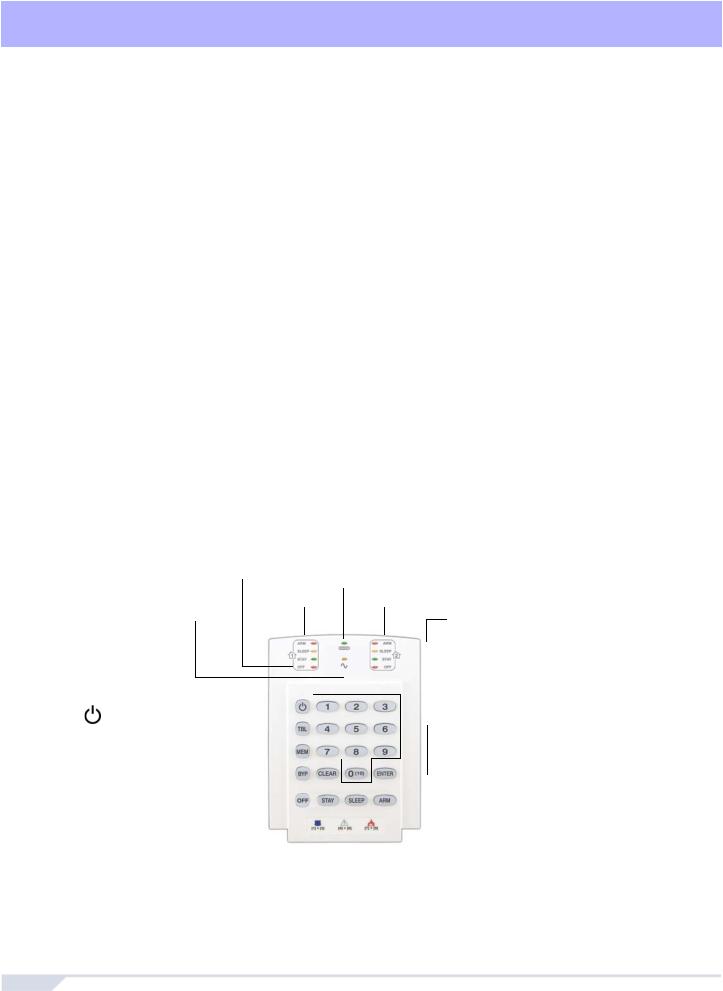
The numbers and keys of the keypad’s screen communicate your system’s status.
Figure 1: MG10LEDV — 10-zone LED Keypad Module
Off Light (red):
On = Disarmed
Off =System armed
AC Light
On = Power on
Off = Power off
=Press once + [MASTER CODE] for Quick Menu Programming)
[TBL] Trouble display On = Trouble(s) occurring
[MEM] Alarm memory display On = Alarm(s) occurred
[BYP] Bypass programming On = Zone(s) bypassed
On = StayD Enabled (see page 7)
Partition 1 Status |
Partition 2 Status |
|
|
|
Arm (red), Sleep (yel), Stay (grn): |
||
|
On |
= Partition armed |
|
|
Off |
= Partition disarmed |
|
|
Flash |
= Exit Delay |
|
|
Fast Flash* = Exit Delay (final 10 sec.) |
||
|
Fast Flash* = Partition in alarm |
||
|
* Audible Indicators: |
||
|
Continuous beep= Alarm |
||
|
Variable beep = Fire alarm |
||
|
Intermittent beep= Beginning of exit delay |
||
|
Fast beep |
= Final 10 sec. of exit delay |
|
 Zone Display:
The keypad [1] to [0(10)] correspond to zones 1 to 10 respectively
Key Lit: Open or entry delay Key Flash: In alarm
4 |
User Guide |
Loading...