

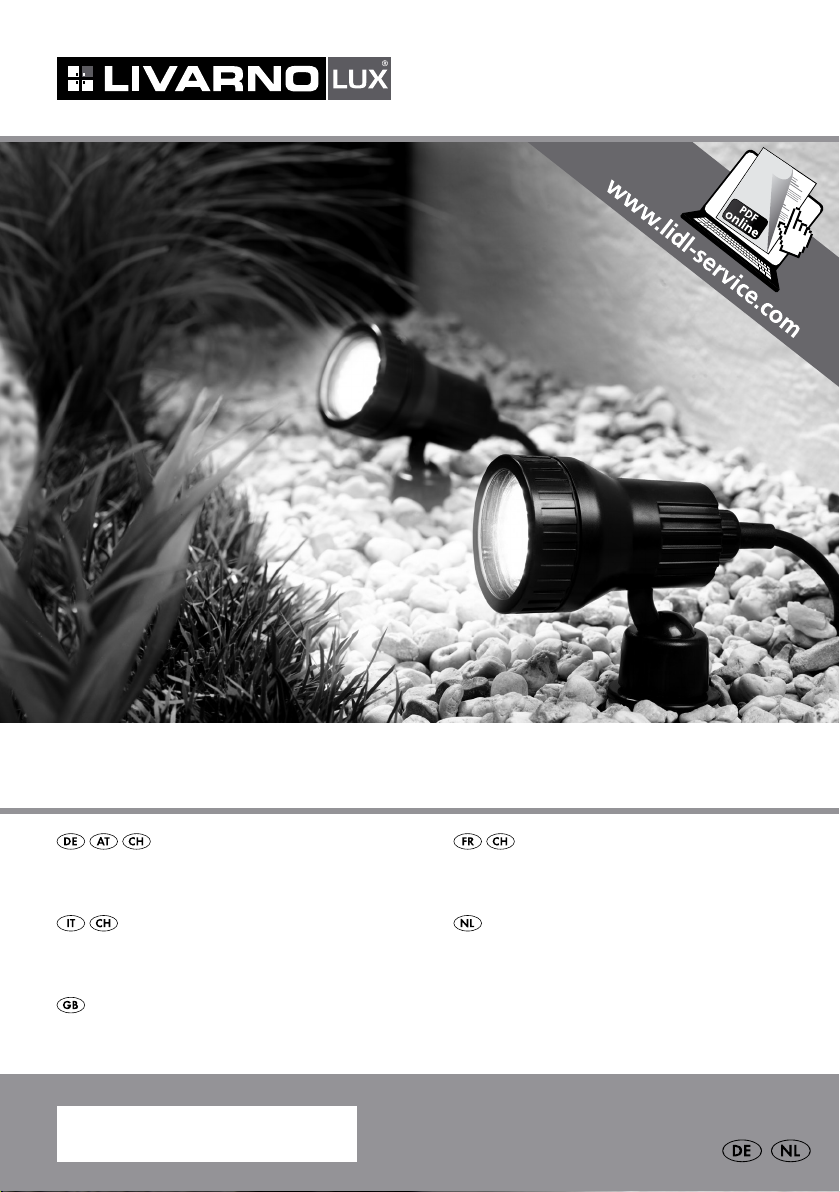
Page 1
LED-GartEnstrahLEr
LED-GartEnstrahLEr
Bedienungs- und Sicherheitshinweise
Faro Da GiarDino a LED
Indicazioni per l’uso e per la sicurezza
LED GarDEn LiGhts
Operation and Safety Notes
IAN 79397
EcLairaGE DE jarDin à LED
Instructions d‘utilisation et consignes de sécurité
LED-tuinstraLEr
Bedienings- en veiligheidsinstructies
Page 2
Klappen Sie vor dem Lesen die Seite mit den Abbildungen aus und machen Sie sich anschließend mit allen
Funktionen des Gerätes vertraut.
Avant de lire le mode d‘emploi, ouvrez la page contenant les illustrations et familiarisez-vous ensuite avec
toutes les fonctions de l‘appareil.
Prima di leggere aprire la pagina con le immagini e prendere confidenza con le diverse funzioni
dell’apparecchio.
Vouw vóór het lezen de pagina met de afbeeldingen open en maak u vertrouwd met alle functies van het
apparaat.
Before reading, unfold the page containing the illustrations and familiarise yourself with all functions of the
device.
DE / AT / CH Bedienungs- und Sicherheitshinweise Seite 5
FR / CH Instructions d‘utilisation et consignes de sécurité Page 11
IT / CH Indicazioni per l’uso e per la sicurezza Pagina 17
NL Bedienings- en veiligheidsinstructies Pagina 23
GB Operation and Safety Notes Page 29
Page 3
A
2
1
5
4
B c
1
3
6
7
1
3
10
8
9
11
Page 4

Inhaltsverzeichnis
Einleitung
Bestimmungsgemäße Verwendung ..................................................................................................................Seite 6
Teilebeschreibung .............................................................................................................................................Seite 6
Technische Daten ..............................................................................................................................................Seite 6
Lieferumfang ......................................................................................................................................................Seite 6
Sicherheitshinweise ..............................................................................................................................Seite 6
Sicherheitshinweise zur Montage ............................................................................................Seite 7
Vorbereitung
Benötigtes Werkzeug und Material .................................................................................................................Seite 8
Gartenleuchte an der Wand / Decke montieren ............................................................................................Seite 8
Gartenleuchte mit Erdspieß montieren ............................................................................................................Seite 8
Farbfilter einsetzen ............................................................................................................................................Seite 8
Spots ausrichten ................................................................................................................................................Seite 8
Inbetriebnahme .......................................................................................................................................Seite 8
LED-Lampe wechseln ...........................................................................................................................Seite 9
Reinigung und Pflege ..........................................................................................................................Seite 9
Entsorgung ...................................................................................................................................................Seite 9
Garantie und Service
Garantie ............................................................................................................................................................Seite 9
Serviceadresse ..................................................................................................................................................Seite 10
Konformitätserklärung .......................................................................................................................................Seite 10
Hersteller ............................................................................................................................................................Seite 10
5 DE/AT/CH
Page 5
Einleitung / Sicherheitshinweise
LED-Gartenstrahler
Einleitung
Wir beglückwünschen Sie zum Kauf Ihres
neuen Gerätes. Sie haben sich damit für
ein hochwertiges Produkt entschieden.
Bitte lesen Sie diese Bedienungsanleitung vollständig
und sorgfältig durch. Diese Anleitung gehört zu
diesem Produkt und enthält wichtige Hinweise zur
Inbetriebnahme und Handhabung. Beachten Sie
immer alle Sicherheitshinweise. Prüfen Sie vor der
Inbetriebnahme, ob die korrekte Spannung vorhanden ist und ob alle Teile richtig montiert sind. Sollten
Sie Fragen haben oder unsicher in Bezug auf die
Handhabung des Gerätes sein, setzen Sie sich bitte
mit Ihrem Händler oder der Servicestelle in Verbindung. Bewahren Sie diese Anleitung bitte sorgfältig
auf und geben Sie sie ggf. an Dritte weiter.
Bestimmungsgemäße
Verwendung
Das Produkt ist für den Innen- und Außenbereich
zur dekorativen Beleuchtung geeignet. Das Produkt
ist nur für den Einsatz in privaten Haushalten und
nicht für den kommerziellen Gebrauch vorgesehen.
Teilebeschreibung
1
Spot
2
Schraube
3
Überwurfmutter
4
Wandhalterung
5
Dübel (ø 6 mm)
6
LED-Lampe
7
Saugnapf
8
Farbfilter (blau / grün / orange / gelb)
9
Lampenabdeckung
10
Erdspieß
11
Netzstecker
Technische Daten
Modell: 3077-025L
Betriebsspannung: 230 V~, 50 Hz, 2 x max. 3 W
Leuchtmittel: 2 x LED-Lampe, GU10 2,3W
(im Lieferumfang enthalten)
Schutzklasse: II /
Schutzart: IP44 (spritzwassergeschützt)
Lieferumfang
Kontrollieren Sie unmittelbar nach dem Auspacken
immer den Lieferumfang auf Vollständigkeit sowie
den einwandfreien Zustand des Gerätes.
1 LED-Gartenleuchte (2er-Set)
4 Schrauben
2 Wandhalterungen
4 Dübel
2 LED-Lampen, GU 10, 2,3 W
1 Saugnapf
8 Farbfilter
2 Erdspieße
1 Bedienungs- und Sicherheitshinweise
Sicherheitshinweise
Bei Schäden, die durch Nichtbeachtung dieser
Bedienungsanleitung verursacht werden, erlischt
der Garantieanspruch! Für Folgeschäden wird keine
Haftung übernommen! Bei Sach- oder Personenschäden, die durch unsachgemäße Handhabung
oder Nichtbeachtung der Sicherheitshinweise verursacht werden, wird keine Haftung übernommen!
LEBENS- UND
UNFALLGEFAHR FÜR KLEINKINDER UND KINDER! Lassen
Sie Kinder niemals unbeaufsichtigt mit dem Verpackungsmaterial. Es besteht Erstickungsgefahr
durch Verpackungsmaterial. Kinder unterschätzen
häufig die Gefahren. Halten Sie Kinder stets
vom Produkt fern.
Kinder oder Personen, denen es an Wissen
oder Erfahrung im Umgang mit dem Gerät
6 DE/AT/CH
Page 6
Sicherheitshinweise / Sicherheitshinweise zur Montage
mangelt, oder die in ihren körperlichen, sensorischen oder geistigen Fähigkeiten eingeschränkt
sind, dürfen das Gerät nicht ohne Aufsicht oder
Anleitung durch eine für ihre Sicherheit verantwortliche Person benutzen. Kinder müssen
beaufsichtigt werden, damit sie nicht mit dem
Gerät spielen.
VERMEIDEN SIE LEBENSGEFAHR
DURCH
Vergewissern Sie sich vor der Benutzung, dass
die vorhandene Netzspannung mit der benötigten
Betriebsspannung des Gerätes übereinstimmt
(230 V∼).
Überprüfen Sie vor jedem Netzanschluss das
Produkt auf etwaige Beschädigungen.
Benutzen Sie das Produkt niemals, wenn Sie
irgendwelche Beschädigungen feststellen.
Die Anschlussleitung kann nicht repariert werden.
Falls die Leitung beschädigt ist, muss das Produkt entsorgt werden.
Öffnen Sie niemals eines der elektrischen Betriebs-
mittel oder stecken irgendwelche Gegenstände
in dieselben.
Schützen Sie das Produkt vor scharfen Kanten,
mechanischen Belastungen und heißen Oberflächen.
Ziehen Sie immer den Netzstecker vor der
Montage, Demontage oder Reinigung aus der
Steckdose.
Berühren Sie niemals den Netzstecker oder die
Gartenleuchte mit nassen Händen.
VORSICHT! ÜBERHITZUNGSGEFAHR!
Betreiben Sie die Gartenleuchte nicht in der
Verpackung oder wenn das Kabel um die
Gartenleuchte gewickelt ist.
Verwenden Sie die Leuchte nur mit dem mitge-
lieferten Zubehör. Ansonsten erlöschen jegliche
Gewähleistungsansprüche.
Bei längerer Nichtnutzung (z. B. Urlaub) trennen
Sie die Gartenleuchte vom Stromnetz.
Halten Sie das Produkt von Teichen und anderen
Wasserreservoirs fern. Installieren Sie die Gartenleuchte mindestens 2 m von Wasserbehältern
entfernt. Meiden Sie Plätze, welche nach starken
Regenfällen überflutet werden können.
ELEKTRISCHEN SCHLAG!
Verwenden Sie die Gartenleuchte im Außenbe-
reich nur an einer Steckdose, welche mittels eines
Fehlerstromschutzschalters (FI oder RCD) mit
einem maximalen Fehlerstrom von 30 mA
gesichert ist.
Diese Gartenleuchte ist spritzwassergeschützt
(IP44). Diese Schutzart bleibt nur erhalten, wenn
die verwendete Steckdose mindestens diese
Schutzart erfüllt.
Stellen Sie sicher, dass das Kabel der Garten-
leuchte nicht durch Bereiche geführt wird, in
welchen Rasenmäher, Trimmer, Scheren oder
ähnliche schneidende Werkzeuge verwendet
werden könnten.
Ziehen Sie nicht am Kabel der Gartenleuchte
und stellen Sie sicher, dass es so verlegt ist,
dass niemand darüber laufen oder stolpern
könnte.
Wenn Sie Fragen zum Produkt haben oder sich
nicht sicher sind, fragen Sie einen Elektrofachbetrieb um Rat.
Sicherheitshinweise
zur Montage
VORSICHT! STROMSCHLAG-
GEFAHR! Vergewissern Sie sich,
dass Sie nicht auf Strom-, Gas- oder
Wasserleitungen stoßen, wenn Sie bohren.
Prüfen Sie ggf. mit einem Leitungssucher, bevor
Sie bohren.
Befestigen Sie keine zusätzlichen Gegenstände
an der Gartenleuchte.
Vermeiden Sie ein übermäßiges Biegen der
Zuleitung. Dies kann zur Beschädigung der
Zuleitung führen.
Vermeiden Sie eine übermäßige Erwärmung
der Gartenleuchte.
VORSICHT! Verwenden Sie nur LED-Leucht-
mittel mit einem GU 10-Sockel und einer
maximalen Leistung von 3 Watt.
7 DE/AT/CH
Page 7
Vorbereitung / Inbetriebnahme
Vorbereitung
Benötigtes Werkzeug und
Material
Die genannten Werkzeuge und Materialien sind nicht
im Lieferumfang enthalten. Es handelt sich hierbei
um unverbindliche Angaben und Werte zur Orientierung. Die Beschaffenheit des Materials richtet sich
nach den individuellen Gegebenheiten vor Ort.
– Bleistift / Markierwerkzeug
– Kreuzschlitzschraubendreher
– Bohrmaschine
– Bohrer (ø 6 mm)
– Hammer
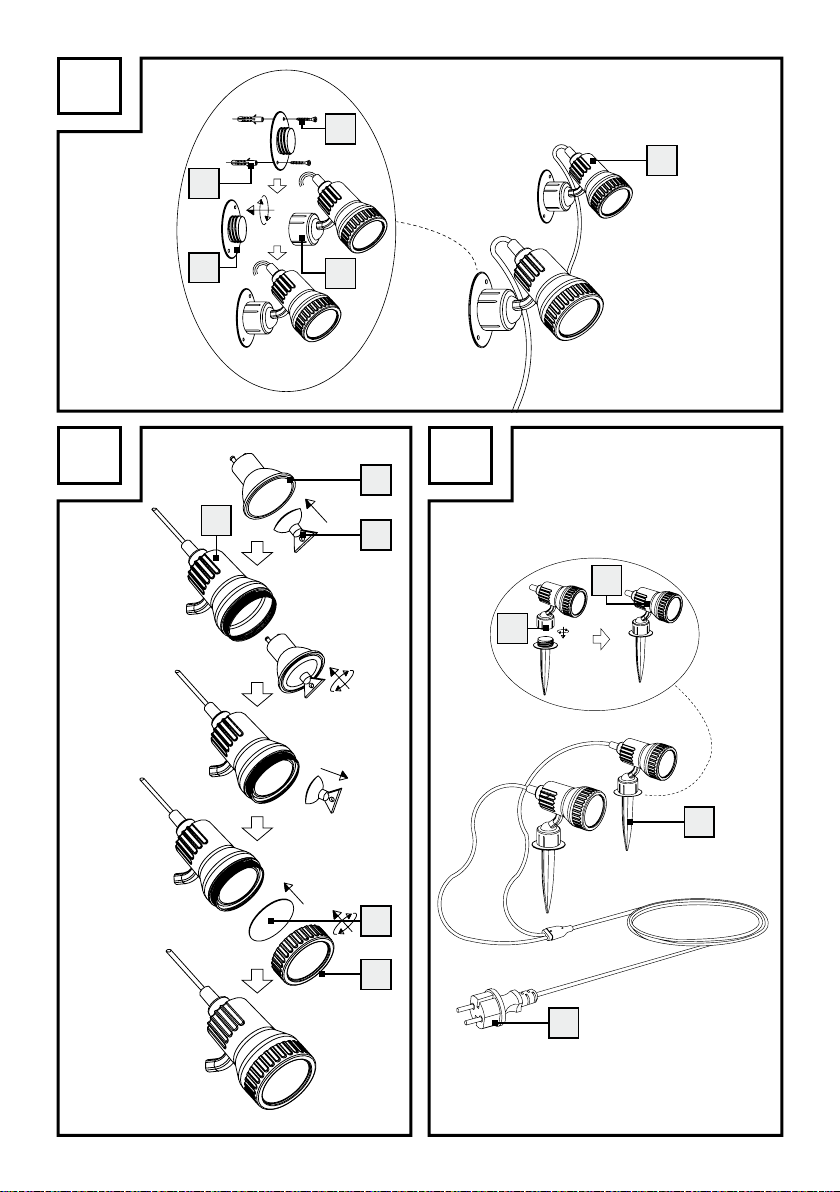
Gartenleuchte an der Wand /
Decke montieren (Abb. A)
Hinweis: Für die Montage benötigen Sie eine
Bohrmaschine.
VORSICHT! VERLETZUNGSGEFAHR!
Ziehen Sie die Bedienungsanleitung Ihrer Bohrmaschine hinzu.
Hinweis: Das Produkt kann auf allen normal
entflammbaren Oberflächen verwendet werden.
Markieren Sie die Bohrlöcher an der Wand /
Decke mittels der Löcher in der Wandhalterung
4
.
Bohren Sie nun die Befestigungslöcher
(ø ca. 6 mm, Tiefe ca. 40 mm).
VORSICHT! Achten Sie darauf, dass Sie die in
der Wand / Decke liegenden Zu leitung en nic ht
beschädigen.
Führen Sie die Dübel 5 in die Bohrlöcher ein.
Nehmen Sie, falls nötig, einen Hammer zur
Hilfe.
Befestigen Sie die Wandhalterungen an der
Oberfläche mittels der Schrauben
Befestigen Sie die Spots 1 auf der Wand-
halterung, indem Sie die Überwurfmutter
im Uhrzeigersinn auf die Wandhalterung
schrauben.
Überprüfen Sie den richtigen Sitz.
2
.
3
Gartenleuchte mit Erdspieß
montieren (Abb. C)
Befestigen Sie die Spots 1 auf den Erdspießen
10
, indem Sie die Überwurfmutter 3 im Uhr-
zeigersinn auf die Erdspieße aufschrauben.
Farbfilter einsetzen (Abb. B)
Öffnen Sie die Spots 1, indem Sie die Lampen-
abdeckung
Hinweis: Die LED-Lampe
installiert.
Setzen Sie den gewünschten Farbfilter 8 in
die Lampenabdeckung
Sie die raue Seite der Farbfilter Richtung LEDLampe.
Schließen Sie die Spots, indem Sie die Lampen-
abdeckung
Ihre Leuchte ist nun betriebsbereit.
9
gegen den Uhrzeigersinn drehen.
6
ist bereits vor-
9
ein und platzieren
9
im Uhrzeigersinn drehen.
Spots ausrichten
VORSICHT! VERBRENNUNGS-
GEFAHR! Verändern Sie die Aus-
richtung der Spots
Leuchte ausgeschaltet und vollständig abgekühlt ist.
Hinweis: Lösen Sie die Überwurfmutter
da sonst die Spots nicht bewegt werden können.
Drehen Sie die einzelnen Spots in die gewünschte
Richtung.
Kippen Sie die einzelnen Spots in den gewünschten
Winkel.
Überprüfen Sie anschließend den festen Sitz der
Spots. Falls nötig, ziehen Sie die Überwurfmutter
etwas nach.
1
nur, wenn die
3
Inbetriebnahme
Stecken Sie den Netzstecker 11 in die Steck-
dose, um die Leuchte einzuschalten.
,
8 DE/AT/CH
Page 8
... / LED-Lampe wechseln / Reinigung und Pflege / Entsorgung / Garantie und Service
Ziehen Sie den Netzstecker aus der Steckdose,
um die Leuchte auszuschalten.
LED-Lampe wechseln (Abb. B)
Hinweis: Beim Auswechseln der LED-Lampen
kann der Farbfilter
nur lose eingesetzt ist.
Öffnen Sie die Spots 1, indem Sie die Lampen-
abdeckung
Zum Wechseln der LED-Lampen verwenden Sie
den beiliegenden Saugnapf
den Saugnapf hierzu auf die Frontscheibe der
LED-Lampe.
Entfernen Sie die LED-Lampen, indem Sie diese
um ¼-Drehung gegen den Uhrzeigersinn drehen.
Stecken Sie die neuen LED-Lampen mittels des
Saugnapfes vorsichtig in die Fassung und drehen
Sie diese um ¼-Drehung im Uhrzeigersinn.
Überprüfen Sie den richtigen Sitz.
Entfernen Sie den Saugnapf, indem Sie leicht
am seitlichen Nippel des Saugnapfes ziehen.
Schließen Sie die Spots, indem Sie die Lampen-
abdeckung
8
verloren gehen, weil dieser
9
gegen den Uhrzeigersinn drehen.
7
. Drücken Sie
9
im Uhrzeigersinn drehen.
Reinigung und Pflege
VORSICHT! STROMSCHLAGGEFAHR!
Ziehen Sie zuerst den Netzstecker aus der Steckdose.
VORSICHT! STROMSCHLAGGEFAHR!
Aus Gründen der elektrischen Sicherheit darf die
Leuchte niemals mit Wasser oder anderen Flüssigkeiten gereinigt oder gar in Wasser getaucht werden.
Verwenden Sie keine Lösungsmittel, Benzin o.ä.
Ansonsten besteht die Gefahr der Sachbeschädigung.
Verwenden Sie zur Reinigung nur ein trockenes
fusselfreies Tuch.
Q
Entsorgung
Die Verpackung und das Verpackungsmaterial
bestehen ausschließlich aus umweltfreundlichen
Materialien. Sie können in den örtlichen Recyclingbehältern entsorgt werden.
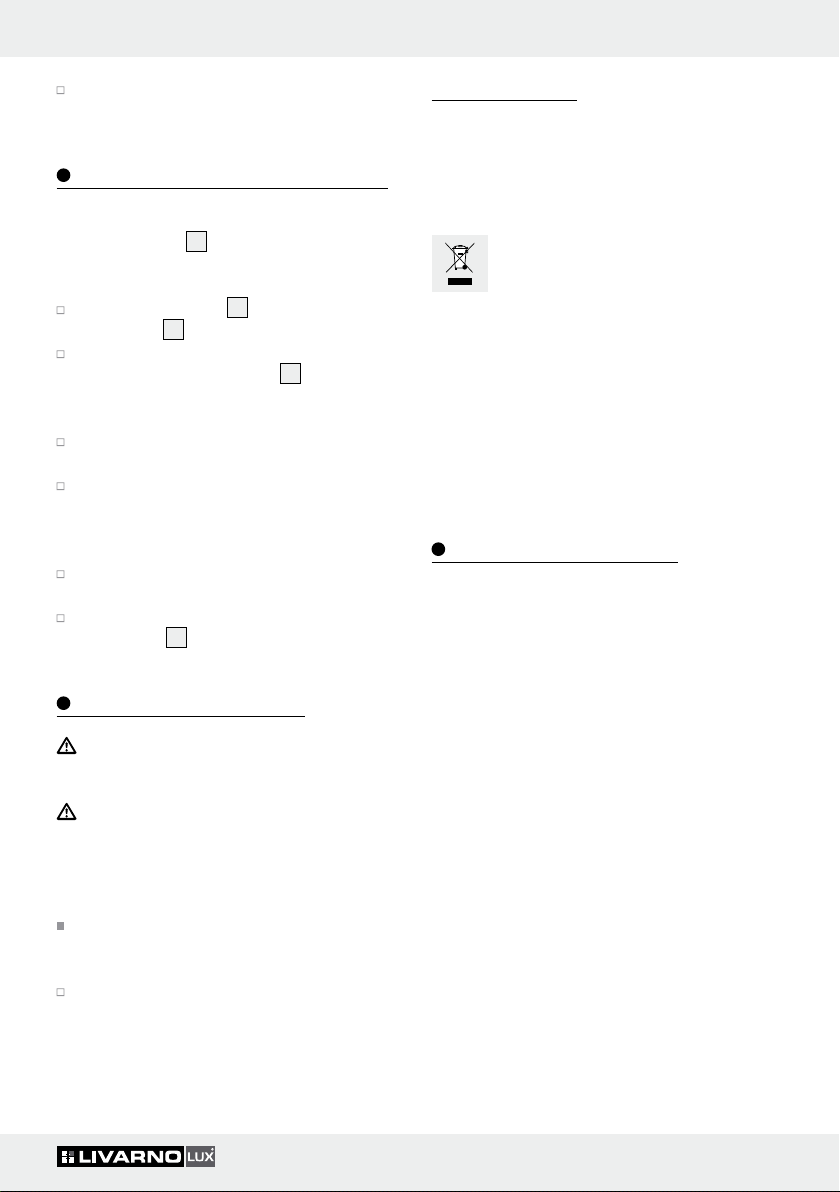
Das Symbol der durchgestrichenen Ab-
falltonne auf Rädern bedeutet, dass das
Produkt in der Europäischen Union einer
getrennten Müllsammlung zugeführt werden muss.
Dies gilt für das Produkt und alle mit diesem Symbol
gekennzeichneten Zubehörteile. Gekennzeichnete
Produkte dürfen nicht über den normalen Hausmüll
entsorgt werden, sondern müssen an einer Annahmestelle für das Recycling von elektrischen und elektronischen Geräten abgegeben werden. Recycling hilft,
den Verbrauch von Rohstoffen zu reduzieren und
die Umwelt zu entlasten.
Garantie und Service
Q
Garantie
Sie erhalten zum Zeitpunkt des Kaufs auf dieses
Gerät 36 Monate Garantie.
Das Gerät wurde sorgfältig produziert und einer
genauen Qualitätskontrolle unterzogen.
Innerhalb der Garantiezeit beheben wir kostenlos
alle Material- oder Herstellerfehler. Sollten sich
dennoch während der Garantiezeit Mängel herausstellen, senden Sie das Gerät bitte an die aufgeführte Service-Adresse unter Angabe folgender
Artikelnummer: 3077-025L.
Von der Garantie ausgeschlossen sind Schäden
durch nicht sachgemäße Handhabung, Nichtbeachtung der Bedienungsanleitung oder Eingriff
durch nicht autorisierte Personen sowie Verschleißteile (wie z.B. Leuchtmittel).
Durch die Garantieleistung wird die Garantiezeit
weder verlängert noch erneuert.
9 DE/AT/CH
Page 9

Garantie und Service
Q
Serviceadresse
Briloner Leuchten GmbH
Im Kissen 2, D-59929 Brilon, Deutschland
Tel.: 02961/ 9712-0
Fax: 02961 / 9712-199
E-Mail: Info@briloner.de
IAN 79397
Bitte halten Sie für alle Anfragen den Kassenbon
und die Artikelnummer (z. B. IAN 12345) als
Nachweis für den Kauf bereit.
Q
Konformitätserklärung
Dieses Produkt erfüllt die Anforderungen der
geltenden europäischen und nationalen Richtlinien
(Elektromagnetische Verträglichkeit 2004 / 108 / EC,
Niederspannungsrichtlinie 2006 / 95 / EC). Die
Konformität wurde nachgewiesen. Entsprechende
Erklärungen und Unterlagen sind beim Hersteller
hinterlegt.
Hersteller
Briloner Leuchten GmbH
Im Kissen 2
59929 Brilon
Deutschland
10 DE/AT/CH
Page 10

Table des matières
Introduction
Utilisation conforme ..........................................................................................................................................Page 12
Descriptif des pièces .........................................................................................................................................Page 12
Caractéristiques techniques ..............................................................................................................................Page 12
Contenu de la livraison .....................................................................................................................................Page 12
Consignes de sécurité .........................................................................................................................Page 12
Consignes de sécurité pour le montage ..............................................................................Page 13
Préparation
Outils et matériel nécessaires ...........................................................................................................................Page 14
Montage de la lampe de jardin sur le mur / plafond .....................................................................................Page 14
Montage de la lampe de jardin sur le piquet .................................................................................................Page 14
Mise en place des filtres de couleur ................................................................................................................Page 14
Orientation des spots ........................................................................................................................................Page 14
Mise en service .........................................................................................................................................Page 14
Remplacement de la lampe à LED ............................................................................................Page 15
Nettoyage et entretien ......................................................................................................................Page 15
Mise au rebut .............................................................................................................................................Page 15
Garantie et service après-vente
Garantie ............................................................................................................................................................Page 15
Adresse du service après-vente ........................................................................................................................Page 15
Déclaration de conformité ................................................................................................................................Page 16
Fabricant ............................................................................................................................................................Page 16
11 FR/CH
Page 11
Introduction / Consignes de sécurité
Eclairage de jardin à LED
Introduction
Félicitations pour l´achat de ce nouvel
appareil! Vous avez opté pour un produit
de grande qualité. Veuillez lire ce mode
d‘emploi intégralement et attentivement. Ce mode
d‘emploi accompagne ce produit et contient des
instructions essentielles pour la mise en service et la
manipulation. Respectez toujours les consignes de
sécurité. Avant la mise en service, vérifiez si la tension
est correcte et si toutes les pièces sont correctement
montées. Si vous avez des questions ou des doutes
concernant la manipulation de l‘appareil, veuillez
contacter votre revendeur ou le service après-vente.
Veuillez conserver soigneusement ce mode d‘emploi
et le remettre aux autres utilisateurs le cas échéant.
Utilisation conforme
Ce produit est adapté à un usage à l‘intérieur et à
l‘extérieur comme éclairage décoratif. Le produit
est uniquement prévu pour un usage domestique et
non pour un usage commercial.
Caractéristiques techniques
Modèle: 3077 - 025L
Tension de service: 230V∼, 50Hz,
2 xmax.3W
Ampoule: 2xlampes à LED, GU10
2,3W (non fournie)
Classe de protection: II /
Type de protection: IP44 (protégé contre les
projections d’eau)
Contenu de la livraison
Contrôlez toujours immédiatement après le déballage que le contenu de la livraison est complet et
que l’appareil se trouve en parfait état.
1 lampe de jardin à LED (set de 2)
4 vis
2 fixations murales
4 chevilles
2 lampes à LED, GU 10, 2,3W
1 ventouse
8 filtres de couleur
2 piquets
1 mode d‘emploi et des instructions de sécurité
Descriptif des pièces
1
Spot
2
Vis
3
Écrou-raccord
4
Support mural
5
Cheville (ø6 mm)
6
Lampe à LED
7
Ventouse
8
Filtre de couleur (bleu / vert / orange / jaune)
9
Couvercle de la lampe
10
Piquet
11
Fiche secteur
12 FR/CH
Consignes de sécurité
Les droits de recours en garantie sont annulés en
cas de dommages résultant du non-respect du
présent mode d’emploi! Le fabricant décline toute
responsabilité pour les dommages indirects! De
même, toute responsabilité est déclinée pour les
dommages matériels ou corporels causés par une
manipulation incorrecte ou le non-respect des
consignes de sécurité!
DE MORT ET RISQUE D‘ACCIDENT POUR LES ENFANTS ET
LES ENFANTS EN BAS ÂGE! Ne laissez
jamais les enfants manipuler sans surveillance
le matériel d‘emballage. Risque d’étouffement
par le matériel d’emballage. Les enfants sous-esti-
DANGER
Page 12

Consignes de sécurité / Consignes de sécurité pour le montage
ment souvent les risques et dangers. Tenez
toujours les enfants à l´écart du produit.
Il est interdit aux enfants ou personnes manquant
de connaissances ou d‘expérience quant à la
manipulation de l‘appareil, ou aux facultés
physiques, sensorielles ou mentales limitées,
d‘utiliser l‘appareil sans surveillance ou sans
les instructions d‘une personne responsable de
leur sécurité. Les enfants doivent être surveillés
pour qu‘ils ne jouent pas avec l‘appareil.
ÉVITEZ LES RISQUES MORTELS
PAR ÉLECTROCUTION!
Avant l‘utilisation, vérifiez que la tension secteur
corresponde à la tension de service requise de
l‘appareil (230V∼).
Avant chaque branchement sur le secteur,
contrôlez le bon état du produit.
N‘utilisez jamais le produit si vous détectez le
moindre endommagement.
Le câble de raccordement ne peut pas être
réparé! Si le câble est endommagé, il faut
mettre le produit au rebut.
N‘ouvrez jamais les composants électriques,
n‘y insérez jamais d‘objets quels qu‘ils soient.
Protégez le produit contre les arêtes coupantes,
les sollicitations mécaniques et les surfaces
chaudes.
Débranchez toujours la fiche secteur de la prise
de courant avant le montage, le démontage ou
le nettoyage.
Ne touchez jamais la fiche secteur ou la lampe
de jardin avec les mains humides ou mouillées.
ATTENTION! RISQUE DE SURCHAUFFE!
N‘utilisez jamais la lampe de jardin dans l‘emballage ou lorsque le câble est enroulé autour
de la lampe de jardin.
Utilisez la lampe uniquement avec les accessoires
fournis. Tous droits de garantie sont annulés dans
le cas contraire.
En cas de non-utilisation prolongée (par exemple
vacances), débranchez la lampe de jardin.
Tenez le produit à l‘écart de tous plans d‘eau
et autres réservoirs d‘eau. Installez la lampe de
jardin à au moins 2m de tout conteneur d‘eau.
Évitez les endroits pouvant être inondés après
une forte pluie.
En plein air, utilisez uniquement la lampe de
jardin si elle est branchée sur une prise de
courant équipée d‘un interrupteur de protection
contre les courants de court-circuit (FI ou RCD)
avec courant de court-circuit maximum de 30mA.
Cette lampe de jardin est protégée contre les
projections de liquides (IP44). Cet indice de
protection est uniquement assuré si la prise de
courant utilisée est au moins conforme à cet
indice de protection.
Vérifiez que le câble de la lampe de jardin n‘est
pas posé là où une tondeuse à gazon, une tondeuse, des ciseaux ou d‘autres outils coupants
sont susceptibles d‘être utilisés.
Ne tirez pas sur le câble de la lampe de jardin
et vérifiez qu’il est posé de manière à ce que
personne ne puisse marcher ou trébucher dessus.
Si vous avez des questions ou des doutes
concernant le produit, renseignez-vous auprès
d‘un électricien.
Consignes de sécurité
pour le montage
ATTENTION! RISQUE D’ÉLEC-
TROCUTION! Lorsque vous percez
des trous dans le mur, assurez-vous de
ne pas percer de lignes électriques, conduites
de gaz et d’eau. Le cas échéant, utilisez un
détecteur avant de percer.
Ne fixez pas d’autres objets sur la lampe de
jardin.
Évitez de trop courber le câble d‘alimentation.
Sinon, vous risqueriez de l‘endommager.
Évitez toute surchauffe de la lampe de jardin.
ATTENTION! Utilisez uniquement des LED
avec un culot GU 10 et une puissance maximale
de 3watts.
13 FR/CH
Page 13

Préparation / Mise en service
Préparation
Outils et matériel nécessaires
Les outils et matériels indiqués ne sont pas compris
dans le contenu de la livraison. Il s‘agit là de données et de valeurs indicatives vous permettant de
vous orienter. Les caractéristiques du matériel dépendent des conditions spécifiques sur place.
– Crayon / outil marqueur
– Tournevis cruciforme
– Perceuse
– Foret (ø6mm)
– Marteau
Montage de la lampe de jardin
sur le mur / plafond (fig.A)
Remarque: une perceuse est requise pour le
montage.
ATTENTION! RISQUE DE BLESSURES!
Consultez le mode d’emploi de votre perceuse.
Remarque: le produit peut être utilisé sur toutes
les surfaces normalement inflammables.
Montage de la lampe de jardin
sur le piquet (fig.C)
Fixez les spots 1 sur les piquets 10 en vissant
l‘écrou-raccord
piquets.
3
dans le sens horaire sur les
Mise en place des filtres de
couleur (fig.B)
Ouvrez les spots 1 en tournant le couvercle
de la lampe
Remarque: la lampe à LED
préinstallée.
Insérez le filtre de couleur souhaité 8 dans le
couvercle de la lampe
rugueuse du filtre de couleur vers la lampe à
LED.
Fermez les spots en tournant le couvercle de la
lampe
Votre lampe est alors prête à être utilisée.
9
dans le sens anti-horaire.
9
9
dans le sens horaire.
6
est déjà
et tournez la face
Orientation des spots
Repérez les trous de perçage sur le mur /
plafond à l‘aide des trous du support mural
Percez à présent les trous de fixation (ø env.
6mm, profondeur env. 40mm).
ATTENTION! Veillez à ne pas endommager
les lignes électriques et conduites d‘alimentation
se trouvant dans le mur / le plafond.
Insérez les chevilles 5 dans les trous de per-
çage. Si nécessaire, aidez-vous d‘un marteau.
Fixez les supports muraux à la surface à l‘aide
2
de vis
Fixez les spots 1 sur le support mural en vis-
sant l‘écrou-raccord
sur le support mural.
Contrôlez la bonne fixation.
14 FR/CH
.
3
dans le sens horaire
ATTENTION! RISQUE DE BRÛ-
4
.
est éteinte et qu‘elle a complètement refroidi.
Remarque: desserrez l‘écrou-raccord
sinon vous ne pourrez pas bouger les spots.
Tournez les spots un à un pour les orienter
dans la direction souhaitée.
Pivotez les spots un à un dans l‘angle souhaité.
Vérifiez que les spots soient bien fixés. Si né-
cessaire, serrez un peu plus l‘écrou-raccord.
LURES! Ne modifiez l‘orientation
des spots
1
que lorsque la lampe
Mise en service
Branchez la fiche secteur 11 sur la prise pour
allumer la lampe.
Débranchez la fiche secteur de la prise pour
éteindre la lampe.
3
,
Page 14

Remplacement de... / Nettoyage et entretien / Mise au rebut / Garantie et service ...
Remplacement de la
lampe à LED (fig.B)
Remarque: lors du remplacement de la lampe à
LED, le filtre de couleur
est inséré sans fixation.
Ouvrez les spots 1 en tournant le couvercle
de la lampe
Pour le remplacement des lampes à LED, utilisez
la ventouse fournie
ventouse sur la vitre avant de la lampe à LED.
Retirer les lampes à LED en tournant celles-ci
d‘un quart de tour dans le sens anti-horaire.
Insérez prudemment les nouvelles lampes à
LED à l‘aide de la ventouse dans la douille et
tournez-les d‘un quart de tour dans le sens
horaire.
Contrôlez la bonne fixation.
Retirez la ventouse en tirant légèrement sur le
nipple latéral de la ventouse.
Fermez les spots en tournant le couvercle de la
9
lampe
dans le sens horaire.
8
peut se perdre car celui-ci
9
dans le sens anti-horaire.
7
. À cet effet, appuyez la
Nettoyage et entretien
ATTENTION! RISQUE D’ÉLECTROCU-
TION! Commencez toujours par débrancher la
fiche secteur de la prise de courant.
ATTENTION! RISQUE D’ÉLECTROCU-
TION! Pour des raisons de sécurité électrique, il
est interdit de nettoyer la lampe à l‘eau ou avec
d‘autres liquides ou encore de la plonger dans de
l‘eau.
N‘utilisez aucun solvant, essence ou produits
similaires. Sinon, il existe un risque de dégâts
matériels.
Utilisez uniquement un chiffon sec non pelu-
cheux pour le nettoyage.
Mise au rebut
L‘emballage et le matériel d’emballage se composent
exclusivement de matériaux non polluants. Ils
peuvent être éliminés dans les conteneurs de
recyclage locaux.
Le symbole représentant une poubelle
barrée sur roues signifie qu‘au sein de
l’Union Européenne, ce produit doit être
mis au rebut séparément. Ceci est valable pour le
produit et pour tous les accessoires marqués de ce
symbole. Les produits ainsi signalés ne doivent pas
être mis au rebut dans les ordures ménagères mais
dans un centre de collecte pour le recyclage des
appareils électriques et électroniques. Le recyclage
aide à réduire la consommation en matières premières et à préserver l’environnement.
Garantie et service après-vente
Garantie
Vous bénéficiez d’une garantie de 36 mois à partir
de la date d’achat de l’appareil.
Cet appareil a été fabriqué avec soin et soumis à
un contrôle qualité minutieux.
Pendant la durée de la garantie, nous réparons
gratuitement tous les défauts de matériaux ou de
fabrication. Si toutefois vous constatez des défauts
pendant la durée de la garantie, veuillez envoyer
l‘article à l‘adresse S.A.V. indiquée en mentionnant
le numéro d‘article suivant: 3077-025L.
La garantie exclut les dommages dus à une manipulation incorrecte, au non-respect des instructions
du mode d’emploi ou à une intervention par une
personne non autorisée, ainsi que les pièces d’usure
(par ex. ampoule).
La durée de garantie n’est aucunement prolongée
ou renouvelée par une prestation de garantie.
Adresse du service après-vente
Briloner Leuchten GmbH
Im Kissen 2, D-59929 Brilon, Allemagne
Tél.: +49 (0) 2961/ 9712-0
Fax: +49 (0) 2961 / 9712-199
E-Mail: Info@briloner.de
15 FR/CH
Page 15

Garantie et service après-vente
IAN 79397
Veuillez conserver le ticket de caisse et le numéro
de référence de l’article (par ex. IAN 12345) au
titre de preuves d’achat pour toute demande.
Déclaration de conformité
Ce produit est conforme aux exigences des directives
européennes et nationales applicables (compatibilité électromagnétique 2004 / 108 / CE, directive
basse tension 2006 / 95 / CE). La conformité a été
attestée. Les déclarations et documents respectifs
sont en possession du fabricant.
Fabricant
Briloner Leuchten GmbH
Im Kissen 2
D-59929 Brilon
Allemagne
16 FR/CH
Page 16

Indice
Introduzione
Destinazione d’uso ........................................................................................................................................ Pagina 18
Descrizione dei componenti ......................................................................................................................... Pagina 18
Dati tecnici ..................................................................................................................................................... Pagina 18
Contenuto della confezione ......................................................................................................................... Pagina 18
Avvertenze di sicurezza ............................................................................................................... Pagina 18
Indicazioni di sicurezza relative al montaggio ......................................................... Pagina 19
Preparazione
Attrezzi e materiali necessari ....................................................................................................................... Pagina 20
Montaggio della lampada da giardino alla parete / al soffitto ................................................................ Pagina 20
Montaggio della lampada da giardino con picchetto ............................................................................... Pagina 20
Inserimento dei filtri cromatici ....................................................................................................................... Pagina 20
Allineamento dei faretti ................................................................................................................................. Pagina 20
Azionamento .......................................................................................................................................... Pagina 20
Sostituzione della lampada LED ............................................................................................ Pagina 21
Pulizia e cura .......................................................................................................................................... Pagina 21
Smaltimento ............................................................................................................................................ Pagina 21
Garanzia e assistenza
Garanzia ....................................................................................................................................................... Pagina 21
Indirizzo servizio clienti ................................................................................................................................ Pagina 21
Dichiarazione di conformità ......................................................................................................................... Pagina 22
Produttore ...................................................................................................................................................... Pagina 22
17 IT/CH
Page 17

Introduzione / Avvertenze di sicurezza
Faro da giardino a LED
Introduzione
Ci congratuliamo con Voi per l‘acquisto
del Vostro nuovo apparecchio. Acquistando
questo articolo avete scelto un prodotto
di alta qualità. Si prega di leggere questo manuale
d’uso per intero e con cura. Questo manuale appartiene al prodotto e contiene importanti annotazioni
per la messa in funzione e la sua manipolazione.
Osservare sempre tutte le avvertenze di sicurezza.
Controllate, prima della messa in funzione, se la
tensione di rete è corretta e se tutti i componenti sono
stati montati correttamente. In caso di domande
oppure di dubbi sulla manipolazione dell’apparecchio, potete contattare il vostro venditore oppure
l‘assistenza clienti. Conservare con cura questo
manuale e consegnarlo eventualmente a terzi.
Destinazione d’uso
Il prodotto è idoneo all‘illuminazione decorativa in
ambienti interni ed esterni. Il prodotto è destinato
all‘utilizzo privato e non all‘uso commerciale-professionale.
Dati tecnici
Modello: 3077-025L
Tensione di esercizio: 230 V∼, 50 Hz, 2 x
max. 3 W
Lampadina: 2 x lampadina LED, GU10
Classe di protezione: II /
Tipo di protezione: IP44 (resistente agli
2,3W (inclusa)
spruzzi d’acqua)
Contenuto della confezione
Dopo il disimballaggio, controllare subito l‘integrità
e le condizioni perfette dei componenti.
1 lampada da giardino a LED (set da 2 pz.)
4 viti
2 supporti a parete
4 tasselli
2 lampade a LED, GU 10, 2,3 W
1 ventosa
8 filtri cromatici
2 picchetti
1 avvertenze d‘uso e di sicurezza
Avvertenze di sicurezza
Descrizione dei componenti
1
Faretto
2
Vite
3
Dado a risvolto
4
Supporto a parete
5
Tassello (ø 6 mm)
6
Lampada LED
7
Ventosa
8
Filtro cromatico (blu / verde / arancione / giallo)
9
Coperchio della lampada
10
Picchetto da terra
11
Spina di collegamento alla presa di corrente
18 IT/CH
In caso di danni causati dalla non osservanza di
questo manuale d‘uso, il diritto di garanzia decade!
Si esclude ogni garanzia per danni derivati! Altresì
si esclude la garanzia in caso di danni a persone o
cose, causati dall‘uso non corretto oppure dall‘inosservanza delle avvertenze di sicurezza!
PERICOLO
DI MORTE E DI INCIDENTI PER
BAMBINI E INFANTI! Non lasciare
mai i bambini incustoditi con il materiale per
imballaggio. Sussiste un pericolo di soffocamento
a causa di tale materiale. Spesso, i bambini
sottovalutano i pericoli. Tenere i bambini sempre
a dovuta distanza dal prodotto.
Le persone, inclusi i bambini, che a causa delle
loro capacità fisiche, sensoriali o mentali o a
Page 18

Avvertenze di sicurezza / Indicazioni di sicurezza relative al montaggio
causa della loro inesperienza o mancata conoscenza non sono in grado di usare l’apparecchio
in sicurezza, non possono usare il dispositivo
senza assistenza o supervisione da parte di
una persona responsabile. I bambini devono
essere sorvegliati, in modo che non giochino
con l‘apparecchio.
EVITARE IL PERICOLO DI MORTE
PER FOLGORAZIONE!
Prima dell‘uso, assicurarsi che l‘alimentazione
sia adeguata alla tensione d‘esercizio dell‘apparecchio (230 V ∼).
Prima di ogni collegamento alla rete elettrica
controllare il prodotto per verificare l’eventuale
presenza di danni.
Non utilizzare mai il prodotto se questo è
danneggiato.
Il cavo di alimentazione non può essere ripa-
rato. Se il cavo dovesse essere danneggiato, il
prodotto deve essere smaltito.
Non aprire mai l‘impianto elettrico e non
inserirvi mai alcun oggetto.
Proteggere il prodotto da spigoli aguzzi,
sollecitazioni meccaniche e superfici calde.
Staccare l‘alimentatore dalla presa prima del
montaggio, dello smontaggio e della pulizia.
Non toccare mai la spina elettrica o la lampada
da giardino con le mani bagnate.
ATTENZIONE! PERICOLO DI SURRI-
SCALDAMENTO! Non far funzionare la
lampada da giardino nella confezione oppure
se il cavo è avvolto intorno alla lampada da
giardino.
Utilizzare la lampada solamente con gli acces-
sori forniti. In caso contrario decade qualsiasi
diritto di garanzia.
In caso di inutilizzo prolungato (p.e. durante le
vacanze) scollegare la lampada da giardino
dalla rete elettrica.
Tenere lontano il prodotto da stagni o da altri
bacini idrici. Installare la lampada da giardino
ad una distanza di almeno 2 m da recipienti di
acqua. Evitare i punti che possono essere allagati dopo intense precipitazioni.
Collegare la lampada da giardino in ambienti
esterni solamente ad una presa elettrica protetta
tramite un interruttore di protezione (FI o RCD)
con una corrente di guasto massima di 30 mA.
Questa lampada da giardino è protetta contro
spruzzi d‘acqua (IP44). Questo tipo di protezione rimane inalterato solamente se la presa
di corrente utilizzata è conforme almeno a tale
tipo di protezione.
Assicurarsi che il cavo della lampada da giar-
dino non venga fatto passare in zone in cui
potrebbero venire usati apparecchi quali
tagliaerba a lama, tagliaerba a filo, cesoie o
strumenti simili.
Non tirare il cavo della lampada da giardino
ed assicurarsi che il caso sia posato in maniera
tale che nessuno vi possa passare sopra o vi
possa inciampare.
In caso di quesiti riguardo al prodotto o in
caso di dubbi, rivolgersi ad un elettricista.
Indicazioni di sicurezza
relative al montaggio
ATTENZIONE! PERICOLO DI
FOLGORAZIONE! Assicurarsi di
non danneggiare tubazioni o linee
di corrente, di gas o di acqua al momento di
eseguire i fori. Se necessario, prima di eseguire i
fori verificare l‘eventuale presenza di tali condutture con un apposito dispositivo di rilevazione.
Non fissare nessun oggetto supplementare alla
lampada da giardino.
Evitare di piegare eccessivamente il cavo di ali-
mentazione. Ciò potrebbe danneggiare il cavo
di alimentazione.
Evitare un eccessivo riscaldamento della
lampada da giardino.
ATTENZIONE! Utilizzare esclusivamente
lampadine LED con una presa GU 10 ed una
potenza massima di 3 Watt.
19 IT/CH
Page 19

Preparazione / Azionamento
Preparazione
Attrezzi e materiali necessari
Gli attrezzi e materiali indicati non sono inclusi nella
fornitura. Si tratta di indicazioni non vincolanti e valori per il vostro orientamento. Il tipo di materiale
dipende dalle condizioni individuali in loco.
– Matita / mezzo per la marcatura
– Cacciavite a croce
– Perforatrice
– Punta per trapano (ø 6 mm)
– Martello
Montaggio della lampada
da giardino alla parete / al
soffitto (fig. A)
Nota: Per il montaggio, è necessario utilizzare un
trapano.
ATTENZIONE! PERICOLO DI LESIONE!
Consultare le istruzioni d’uso del trapano.
Nota: il prodotto può essere utilizzato su tutte le
superfici caratterizzate da un grado di infiammabilità normale.
Contrassegnare i punti di foratura sulla parete/
sul soffitto facendo riferimento ai fori del supporto a parete
Eseguire ora i fori di fissaggio (ø ca. 6 mm,
profondità ca. 40 mm).
ATTENZIONE! Fare attenzione a non dan-
neggiare le linee di alimentazione poste nella
parete / nel soffitto.
Inserire i tasselli 5 nei fori. Se necessario,
utilizzare un martello.
Fissare i supporti a parete alla superficie per
mezzo delle viti
Fissare i faretti 1 al supporto a parete, avvi-
tando i dadi a risvolto
supporto a parete.
Verificare che siano correttamente in sede.
4
.
2
.
3
in senso orario sul
Montaggio della lampada da
giardino con picchetto (fig. C)
Fissare i faretti 1 sui picchetti 10, avvitando i
dadi a risvolto
3
in senso orario sui picchetti.
Inserimento dei filtri
cromatici (fig. B)
Aprire i faretti 1 ruotando il coperchio della
lampada
Nota: La lampada LED
Inserite il filtro cromatico 8 desiderato nella
copertura della lampada
lato ruvido del filtro cromatico in direzione
della lampada LED.
Chiudete i faretti ruotando la copertura della
lampada
La lampada acquistata è ora pronta per essere
utilizzata.
9
in senso antiorario.
9
in senso orario.
6
è preinstallata.
9
e posizionare il
Allineamento dei faretti
ATTENZIONE! PERICOLO DI
BRUCIA TURE! Modificate l‘orien-
tamento dei faretti
la lampada è spenta e se è completamente
raffreddata.
Nota: Allentare il dado a risvolto
altrimenti i faretti non possono essere mossi.
Ruotare i singoli faretti nella direzione deside-
rata.
Inclinare i faretti con l‘angolazione desiderata.
Controllare poi che i faretti siano saldamente
in sede. Se necessario, stringere il dado a
risvolto ancora un po‘.
1
solamente se
3
, in quanto
Azionamento
Per accendere la lampada, infilare la spina
elettrica
Per spegnere la lampada, estrarre la spina
elettrica dalla presa elettrica.
11
nella presa elettrica.
20 IT/CH
Page 20

Sostituzione della ... / Pulizia e cura / Smaltimento / Garanzia e assistenza
Sostituzione della lampada
LED (fig. B)
Nota: durante la sostituzione delle lampade LED
è possibile che il filtro cromatico
quanto esso è inserito solo in maniera non fissa.
Aprire i faretti 1 ruotando il coperchio della
lampada
Per poter sostituire le lampade LED, usare la
ventosa
ventosa sul vetro della lampada LED.
Rimuovere le lampade LED ruotandole di ¼ di
giro in senso antiorario.
Inserire le nuove lampade LED per mezzo della
ventosa e con premura nel portalampada e ruotarle di ¼ di giro in senso orario.
Verificare che siano correttamente in sede.
Rimuovere la ventosa tirando leggermente alla
protuberanza laterale della ventosa.
Chiudere i faretti, ruotando il coperchio della
lampada
9
in senso antiorario.
7
fornita. A tale scopo, premere la
9
in senso orario.
8
vada perso, in
Pulizia e cura
ATTENZIONE! PERICOLO DI FOLGORA-
ZIONE! Estrarre prima la spina elettrica dalla
presa della corrente.
ATTENZIONE! PERICOLO DI FOLGORA-
ZIONE! Per ragioni di sicurezza, la lampada non
deve mai essere pulita con acqua o altri liquidi e
tanto meno può essere immersa in acqua.
Non usare solventi, benzina o simili, altrimenti
vi è pericolo di danni materiali.
Per la pulizia, usare solo un panno asciutto che
non lascia peli.
Il simbolo del bidone della spazzatura
su ruote barrato significa che nell’Unione
Europea il prodotto deve essere smaltito
attraverso una raccolta differenziata di rifiuti. Ciò
vale per il prodotto nonché per tutti i componenti
contrassegnati con questo simbolo. I prodotti contrassegnati in questo modo non devono essere
smaltiti attraverso la normale raccolta di rifiuti
domestici, ma consegnati in un punto di raccolta
speciale per il riciclaggio di apparecchi elettrici ed
elettronici. Il riciclaggio aiuta a ridurre il consumo
di materie prime e a non contaminare l’ambiente
naturale.
Garanzia e assistenza
Garanzia
L’acquirente acquisisce il diritto alla garanzia per
36 mesi a partire dalla data di acquisto dell’apparecchio.
L‘apparecchio è stato prodotto con cura ed è stato
sottoposto ad un preciso controllo di qualità.
All’interno del periodo di garanzia tutti i vizi di
materiale e di produzione vengono eliminati gratuitamente. Qualora tuttavia, nel corso del periodo di
garanzia dovessero manifestarsi eventuali vizi, si
prega di inviare l’apparecchio all’indirizzo del Centro
di Assistenza indicato, specificando il seguente
numero di articolo: 3077 / 025L.
Sono esclusi dalla garanzia danni per uso non
appropriato, mancata osservanza delle istruzioni
d‘uso o intervento da parte di persone non autorizzate come lo sono anche le parti di consumo (come
p.e. le lampadine).
Un eventuale intervento in base al diritto di garanzia
non prolunga né fa riavviare il tempo di garanzia.
Smaltimento
L’imballaggio ed il materiale di avvolgimento è
composto da materiali ecologici. Esso può essere
smaltito nei contenitori di riciclaggio locali.
Indirizzo servizio clienti
Briloner Leuchten GmbH
Im Kissen 2, D-59929 Brilon, Germania
Tel.: +49 (0) 2961/ 9712-0
Fax: +49 (0) 2961 / 9712-199
E-Mail: Info@briloner.de
21 IT/CH
Page 21

Garanzia e assistenza
IAN 79397
Per tutte le richieste si prega di conservare lo scontrino ed il numero di articolo (p.e. IAN 12345) a
prova dell‘avvenuto acquisto.
Dichiarazione di conformità
Questo prodotto è conforme ai requisiti di cui alle
direttive europee e nazionali (compatibilità elettromagnetica CE 2004 / 108 , direttiva sulla bassa
tensione CE 2006 / 95 ). La conformità è stata
comprovata. Le relative dichiarazioni e la documentazione in merito sono depositate presso il produttore.
Produttore
Briloner Leuchten GmbH
Im Kissen 2
D-59929 Brilon
Germania
22 IT/CH
Page 22

Inhoudsopgave
Inleiding
Correct gebruik ............................................................................................................................................. Pagina 24
Beschrijving van de onderdelen ................................................................................................................... Pagina 24
Technische gegevens .................................................................................................................................... Pagina 24
Inhoud van de levering ................................................................................................................................. Pagina 24
Veiligheidsinstructies ...................................................................................................................... Pagina 24
Veiligheidsinstructies voor de montage ......................................................................... Pagina 25
Voorbereiding
Benodigde werktuigen en materiaal ............................................................................................................ Pagina 25
Tuinlamp op de muur / aan het plafond monteren ..................................................................................... Pagina 26
Tuinlamp met grondpen monteren ............................................................................................................... Pagina 26
Kleurfilter plaatsen ........................................................................................................................................ Pagina 26
Spots instellen ................................................................................................................................................ Pagina 26
Ingebruikname .................................................................................................................................... Pagina 26
LED-lamp vervangen........................................................................................................................ Pagina 26
Reiniging en onderhoud ............................................................................................................... Pagina 27
Verwijdering .......................................................................................................................................... Pagina 27
Garantie en service
Garantie ........................................................................................................................................................ Pagina 27
Serviceadres .................................................................................................................................................. Pagina 27
Conformiteitsverklaring ................................................................................................................................. Pagina 28
Fabrikant ........................................................................................................................................................ Pagina 28
23 NL
Page 23

Inleiding / Veiligheidsinstructies
LED-tuinstraler
Inleiding
Hartelijk gefeliciteerd met de aankoop
van uw nieuwe apparaat. U hebt voor
een hoogwaardig product gekozen. Lees
deze gebruiksaanwijzing en de veiligheidsinstructies
volledig en zorgvuldig door. Deze gebruiksaanwijzing hoort bij dit product en bevat belangrijke aanwijzingen voor de ingebruikname en de bediening.
Neem de veiligheidsinstructies altijd in acht. Controleer vóór de ingebruikname of de juiste spanning
beschikbaar is en of alle onderdelen goed gemonteerd zijn. Wanneer u vragen hebt of onzeker bent
in verband met de bediening van het apparaat,
kunt u contact opnemen met uw leverancier of met
het servicepunt. Bewaar deze handleiding op een
veilige plaats en geef hem evt. aan derden door.
Correct gebruik
Het product is geschikt voor binnen en buiten als
decoratieve verlichting. Het product is alleen bedoeld
voor gebruik in privé-huishoudens en niet voor commerciële doeleinden.
Technische gegevens
Model: 3077-025L
Voedingsspanning: 230 V∼, 50 Hz, 2 x max.
3 W
Verlichting: 2 x LED-lamp, GU10 2,3W
(bij de levering inbegrepen)
Beschermingsklasse: II /
Beschermingsgraad: IP44 (tegen spatwater
beschermd)
Inhoud van de levering
Controleer de levering altijd direct na het uitpakken
op volledigheid en de optimale staat van het product.
1 LED-tuinlamp (set van 2)
4 schroeven
2 wandhouders
4 pluggen
2 LED-lampen, GU 10, 2,3 W
1 zuignap
8 kleurfilter
2 grondpennen
1 bedienings- en veiligheidsinstructies
Veiligheidsinstructies
Beschrijving van de
onderdelen
1
Spot
2
Schroef
3
Wartelmoer
4
Wandhouder
5
Plug (ø 6 mm)
6
LED-lamp
7
Zuignap
8
Kleurfilter (blauw / groen / oranje / geel)
9
Lampafdekking
10
Grondpen
11
Stekker
24 NL
Bij beschadigingen die worden veroorzaakt door
het niet inachtnemen van deze gebruiksaanwijzing
vervalt de garantie! Wij zijn niet aansprakelijk voor
gevolgschade! Bij materiële schade of persoonlijk
letsel die worden veroorzaakt door onjuist gebruik
of het niet in acht nemen van de veiligheidsinstructies zijn wij niet aansprakelijk!
LEVENSGEVAAR EN GEVAAR
VOOR ONGEVALLEN VOOR
KLEUTERS EN KINDEREN! Laat kinderen
nooit zonder toezicht bij het verpakkingsmateriaal.
Er bestaat gevaar voor verstikking door verpakkingsmateriaal. Kinderen onderschatten vaak
de gevaren. Houd kinderen altijd uit de buurt
van het product.
Page 24

Veiligheidsinstructies / Veiligheidsinstructies voor de montage / Voorbereiding
Kinderen of personen met onvoldoende kennis
over en ervaring in de omgang met het apparaat of met beperkte lichamelijke, sensorische
of geestelijke vermogens mogen het apparaat
niet zonder toezicht of voorafgaande instructie
door een voor hun veiligheid verantwoordelijke
persoon gebruiken. Kinderen moeten onder
toezicht staan, zodat ze niet met het apparaat
kunnen spelen.
LEVENSGEVAAR DOOR
ELEKTRISCHE SCHOK!
Controleer vóór het gebruik, of de bestaande
netspanning overeenkomt met de vereiste
bedrijfsspanning van het product (230 V~).
Controleer het product altijd op eventuele
beschadigingen voordat u het aan de stroom
aansluit.
Gebruik het artikel niet wanneer u enige
beschadiging hebt geconstateerd.
De aansluitkabel kan niet worden gerepareerd.
Indien de kabel is beschadigd, moet het product
worden verwijderd.
Open nooit één van de elektrische bedrijfsmid-
delen en steek er géén voorwerpen in.
Bescherm het product tegen scherpe randen,
mechanische belastingen en hete oppervlakken.
Trek voor de montage, demontage of reiniging
altijd eerst de stekker uit de wandcontactdoos.
Raak nooit de stekker of de tuinlamp aan met
natte handen.
VOORZICHTIG! GEVAAR VOOR OVER-
VERHITTING! Gebruik de tuinlamp niet in de
verpakking of wanneer de kabel om de tuinlamp
is gewikkeld.
Gebruik de lamp alleen met de meegeleverde
toebehoren. Anders vervalt de aanspraak op
garantie.
Onderbreek de stroomtoevoer naar het product
als u dit gedurende een langere periode niet
gebruikt (bijv. vakantie).
Houd het product uit de buurt van vijvers en
andere waterreservoirs. Installeer de tuinlamp
op minimaal 2 m afstand van waterreservoirs.
Vermijd plaatsen die na sterke regen kunnen
overstromen.
Sluit de tuinlamp buitenshuis alleen aan op een
contactdoos die door middel van een aardlekschakelaar (FI of RCD) met een maximale kortsluitstroom van 30 mA beveiligd is.
Deze tuinlamp is spatwaterdicht (IP44). Deze
beschermingsgraad blijft alleen behouden als
het gebruikte stopcontact minimaal voldoet
aan deze beschermingsgraad.
Zorg ervoor dat de kabel van de tuinlamp niet
op plaatsen wordt gelegd waar grasmaaiers,
trimmers, scharen of dergelijke snijdende gereedschappen zouden kunnen worden gebruikt.
Trek niet aan de kabel van de tuinlamp en zorg
ervoor dat deze zodanig gelegd is dat niemand
erover zou kunnen lopen of struikelen.
Indien u vragen over het product hebt of onze-
ker bent dan kunt u een elektricien raadplegen.
Veiligheidsinstructies
voor de montage
VOORZICHTIG! GEVAAR
VOOR ELEKTRISCHE SCHOK!
Zorg ervoor dat u niet op stroom-,
gas- of waterleidingen stoot wanneer u boort.
Controleer de wand eventueel met een leidingzoeker voordat u gaat boren.
Bevestig geen extra objecten aan de tuinlamp.
Vermijd overmatig verbuigen van de voedings-
kabel. Dit kan beschadiging van de kabel tot
gevolg hebben.
Voorkom een overmatige opwarming van de
tuinlamp.
VOORZICHTIG! Gebruik alleen LED-lampen
met een GU 10-sokkel en een maximaal vermogen van 3 watt.
Voorbereiding
Benodigde werktuigen
en materiaal
De genoemde werktuigen en materialen worden
niet meegeleverd. Het gaat hierbij om niet-verbindelijke informatie en waarden ter oriëntatie. De
25 NL
Page 25

Voorbereiding / Ingebruikname / LED-lamp vervangen
hoedanigheid van het materiaal is afhankelijk van
de individuele omstandigheden ter plekke.
– Potlood / markeerstift
– Kruiskopschroevendraaier
– Boormachine
– Boor (ø 6 mm)
– Hamer
Tuinlamp op de muur / aan het
plafond monteren (afb. A)
Opmerking: voor de montage hebt u een boor-
machine nodig.
VOORZICHTIG! GEVAAR VOOR LETSEL!
Raadpleeg de gebruiksaanwijzing van uw boormachine.
Opmerking: het product kan op alle normaal
ontvlambare oppervlakken bevestigd worden.
Markeer de boorgaten op de muur / het
plafond met de gaten in de wandhouder
Boor nu de bevestigingsgaten (ø ca. 6 mm,
diepte ca. 40 mm).
VOORZICHTIG! Let op dat u de in de wand /
het plafond liggende stroomkabels niet beschadigen.
Plaats de pluggen 5 in de boorgaten. Gebruik
indien nodig een hamer als hulpmiddel.
Bevestig de wandhouders met de schroeven 2
aan het oppervlak.
Bevestig de spots 1 op de wandhouder door
de wartelmoer
te schroeven.
Controleer op de juiste montage.
3
rechtsom op de wandhouder
4
.
Tuinlamp met grondpen
monteren (afb. C)
Kleurfilter plaatsen (afb. B)
Open de spots 1 door de lampafdekking 9
linksom te draaien.
Opmerking: de LED-lamp
leerd.
Plaats de gewenste kleurfilter 8 op de lamp-
afdekking
kleurfilter richting de LED-lamp.
Sluit de spots door de lampafdekking 9
rechtsom te draaien.
Uw lamp is nu gereed voor gebruik.
9
en plaats de ruwe kant van de
6
is al geïnstal-
Spots instellen
VOORZICHTIG! GEVAAR
VOOR BRANDWONDEN! Ver-
ander de richting van de spots
alleen bij uitgeschakelde en volledig afgekoelde
lampkop.
Opmerking: maak de wartelmoer
omdat anders de spots niet kunnen worden
bewogen.
Draai de afzonderlijke spots in de gewenste
richting.
Zet de afzonderlijke spots in de gewenste hoek.
Controleer aansluitend of de spots goed vast-
zitten. Trek indien nodig de wartelmoer nog
verder aan.
3
los
Ingebruikname
Steek de netsteker 11 in de contactdoos om
de lamp in te schakelen.
Trek de netsteker uit de contactdoos om de
lamp uit te schakelen.
1
Bevestig de spots 1 op de grondpennen 10
door de wartelmoer
pen te schroeven.
26 NL
3
rechtsom op de grond-
LED-lamp vervangen (afb. B)
Opmerking: bij het vervangen van de LED-lam-
pen kan de kleurfilter
deze losjes wordt gebruikt.
8
verloren gaan omdat
Page 26

LED-lamp vervangen / Reiniging en onderhoud / Verwijdering / Garantie en service
Open de spots 1 door de lampafdekking 9
linksom te draaien.
Gebruik de meegeleverde zuignap 7 om de
LED-lampen gemakkelijk te vervangen. Druk de
zuignap hiervoor op de voorkant van de LEDlamp.
Verwijder de LED-lamp door deze een kwart-
slag tegen de klok in te draaien.
Steek de LED-lamp met de zuignap voorzichtig
in de houder en verdraai deze een kwartslag
rechtsom.
Controleer op de juiste montage.
Verwijder de zuignap door iets aan de nippel
aan de zijkant te trekken.
Sluit de spots door de lampafdekking 9
rechtsom te draaien.
Reiniging en onderhoud
VOORZICHTIG! GEVAAR VOOR ELEK-
TRISCHE SCHOK! Trek eerst de netsteker uit de
contactdoos.
VOORZICHTIG! GEVAAR VOOR ELEK-
TRISCHE SCHOK! Op basis van de elektrische
veiligheid mag de verlichting nooit met water of
andere vloeistoffen worden gereinigd of in zijn
geheel in water worden gedompeld.
Gebruik geen oplosmiddel, benzine e.d. Er
bestaat gevaar voor materiële schade.
Gebruik voor de reiniging alleen een droge,
pluisvrije doek.
gekenmerkte toebehoren. Gekenmerkte producten
mogen niet via het normale huisvuil worden verwijderd maar moeten bij een inzamelpunt voor de recycling van elektrische en elektronische apparaten
worden afgegeven. Recycling helpt het verbruik
van grondstoffen te verminderen en het milieu te
ontlasten.
Garantie en service
Garantie
Op dit product verlenen wij 36 maanden garantie
vanaf koopdatum.
Het apparaat werd zorgvuldig vervaardigd en aan
een nauwkeurige kwaliteitscontrole onderworpen.
Binnen de garantieperiode herstellen wij kosteloos
alle materiaal- of productiefouten. Indien tijdens de
garantieperiode gebreken worden vastgesteld, kunt
u het product naar het onderstaande serviceadres
sturen met vermelding van het volgende artikelnummer: 3077 / 025L.
Beschadigingen door ondeskundig gebruik, negeren
van de handleiding of ingrepen door niet-geautoriseerde personen zijn van de garantieverlening
uitgesloten. Dit geldt eveneens voor slijtende delen
(zoals bijv. gloeilampen).
Door de garantieservice wordt de garantieperiode
noch verlengd noch vernieuwd.
Serviceadres
Verwijdering
De verpakking en het verpakkingsmateriaal zijn
uitsluitend vervaardigd van milieuvriendelijk materiaal. Deze kunnen in de lokale recyclingcontainers
worden afgevoerd.
Het symbool van de doorgestreepte
afvalbak op wielen betekent dat het pro-
duct binnen de Europese Unie van het
huisafval gescheiden moet worden afgevoerd. Dit
geldt voor het product en alle met dit symbool
Briloner Leuchten GmbH
Im Kissen 2, 59929 Brilon, Duitsland
Tel.: 00492961/ 9712-0
Fax: 00492961 / 9712-199
E-mail: Info@briloner.de
IAN 79397
Houd alstublieft de kassabon en het artikelnummer
(bijv. IAN 12345) voor alle aanvragen als bewijs
voor de koop gereed.
27 NL
Page 27

Garantie en service
Conformiteitsverklaring
Dit product voldoet aan de eisen van de geldende
Europese en nationale richtlijnen (elektromagnetische
compatibiliteit 2004 / 108 / EG, laagspanningsrichtlijn 2006 / 95 / EG). De conformiteit is aangetoond. Desbetreffende verklaringen liggen ter inzage
bij de fabrikant.
Fabrikant
Briloner Leuchten GmbH
Im Kissen 2
D-59929 Brilon
Duitsland
28 NL
Page 28

Table of contents
Introduction
Intended use ......................................................................................................................................................Page 30
Parts description ................................................................................................................................................Page 30
Technical Data ..................................................................................................................................................Page 30
Scope of delivery ..............................................................................................................................................Page 30
Safety notes ................................................................................................................................................Page 30
Safety advice for installation .......................................................................................................Page 31
Preparation
Required tools and material .............................................................................................................................Page 31
Mounting garden light on the wall / ceiling ....................................................................................................Page 32
Mounting garden light with ground stake .......................................................................................................Page 32
Inserting colour filter..........................................................................................................................................Page 32
Directing the spotlights ......................................................................................................................................Page 32
Start-up ...........................................................................................................................................................Page 32
Changing the LED light bulb ...........................................................................................................Page 32
Cleaning and Care .................................................................................................................................Page 33
Disposal ..........................................................................................................................................................Page 33
Warranty and Service
Warranty ...........................................................................................................................................................Page 33
Service address .................................................................................................................................................Page 33
Declaration of conformity .................................................................................................................................Page 33
Manufacturer .....................................................................................................................................................Page 33
29 GB
Page 29

Introduction / Safety notes
LED Garden Lights
Introduction
Congratulations on your new product.
You have selected a high quality product.
Please be sure to carefully read the complete operating instructions. These instructions are
part of the product and contain important information
on setup and handling. Always follow all safety
instructions. Before using this product for the first
time, verify the correct voltage and that all parts
are properly installed. Should you have any questions or you are unsure about operating the product,
please contact the dealer or service centre. Please
keep these instructions in a safe place and pass
them on to third parties as applicable.
Intended use
This product is suitable for indoor and outdoor use
as decorative lighting. This product is intended for
use in private, domestic environments only and not
for commercial purposes.
Technical Data
Model: 3077-025L
Operating voltage: 230 V ∼, 50 Hz, 2 x max. 3 W
Light source: 2 x LED light bulbs, GU10,
2.3 W (included in the delivery)
Protection class: II /
Protection type: IP44 (splash-proof)
Scope of delivery
Immediately after unpacking, verify the parts are
complete and that the device is in proper condition.
1 LED garden light (2-bulb set)
4 Screws
2 Wall brackets
4 Dowels
2 LED light bulbs, GU10, 2.3 W
1 Suction cup
8 Colour filters
2 Ground stakes
1 Operating and safety instructions
Safety notes
Parts description
1
Spotlight
2
Screw
3
Union nut
4
Wall bracket
5
Dowel (ø 6 mm)
6
LED light bulb
7
Suction cup
8
Colour filter (blue / green / orange / yellow)
9
Lamp cover
10
Ground stake
11
Mains plug
30 GB
Damage due to failure to comply with these operating instructions will invalidate the guarantee! We
assume no liability for consequential damage! We
assume no liability for material damage or personal
injury due to improper handling or failure to comply
with the safety instructions!
DANGER TO
LIFE AND RISK OF ACCIDENTS
FOR INFANTS AND CHILDREN!
Never leave children unattended with the packaging material. The packaging material represents a danger of suffocation. Children frequently
underestimate the dangers. Please keep children
away from the product at all times.
Children or persons lacking knowledge or
experience in handling the device, or who have
limited physical, sensory or mental abilities, must
not use the device without supervision or
Page 30

Safety notes / Safety advice for installation / Preparation
instruction by a person responsible for their
safety. Children must be supervised at all times
to prevent them from playing with the device.
AVOID DANGER TO LIFE DUE TO
AN ELECTRIC SHOCK!
Before using the product, ensure that the availa-
ble mains voltage corresponds with the required
operating voltage for the device (230 V∼).
Always check the product for damage before
connecting it to the power supply.
Never use the product if it is damaged in any
way.
The connection cable can not be repaired. If
the cable is damaged the appliance should be
disposed of.
Never open any part of the electrical equip-
ment or insert any objects into it.
Protect the product from sharp edges, mechanical
loads and hot surfaces.
Always unplug the mains plug from the socket
before installation, dismantling or cleaning.
Never touch the mains plug or garden light
with wet hands.
CAUTION! RISK OF OVERHEATING! Do
not operate the garden light in the packaging
or if the cable is wrapped around the garden
light.
Only use the light with the accessories which
were delivered with it. Otherwise any warranty
claims will be invalidated.
During long periods of non-use (e.g. holiday),
disconnect the garden light from the power
supply.
Keep the product away from ponds and other
bodies of water. Install the garden light at least
2 m away from water containers. Avoid locations
where flooding could occur after heavy rain.
Only use the garden light outdoors with an
electrical socket, which is fuse protected by a
residual-current circuit breaker (FI or RCD) with
a maximum residual current of 30 mA.
This garden light is splashproof (IP44). This
protection class will only be maintained, if the
electrical socket used also complies with at
least this protection class.
Ensure that the cable of the garden light is not
laid out through areas,in which lawn mowers,
trimmers, shears or similar cutting tools could
be used.
Never pull on the cable of the garden light and
make sure it is routed in such a way that no one
could walk or trip over it.
If you have any questions about the product or
are unsure about any of its aspects, please seek
the advice of an electrical equipment specialist.
Safety advice for installation
CAUTION! RISK OF ELECTRIC
SHOCK! Make sure that you do
not hit electricity, gas or water supply lines when you are drilling. Check with a
cable detector before drilling if necessary.
Do not attach any other objects to the garden
light.
Avoid excessive bending of the power supply
cable. This can lead to damage of the power
supply cable.
Avoid excessive heating of the garden light.
CAUTION! Only use LED light bulbs with a
GU10 fitting and a maximum output of 3 watt.
Preparation
Required tools and material
The tools and materials cited are not included in
the scope of delivery. This information and these
values are non-binding and are provided for guide
purposes only. The nature of the material is determined by the individual local conditions.
– Pencil / marking tool
– Cross-tip screwdriver
– Electric drill
– Drill (ø 6 mm)
– Hammer
31 GB
Page 31

Preparation / Start-up / Changing the LED light bulb
Mounting garden light on the
wall / ceiling (Fig. A)
Note: you will need an electric drill for the instal-
lation.
CAUTION! DANGER OF INJURY! Please
refer to the operating instructions of your electric drill.
Note: The product can be used on all surfaces officially classified as being of normal flammability.
Mark the drill holes on the wall / ceiling using
the holes of the wall brackets
Now drill the fixing holes (Ø approx. 6 mm,
depth approx. 40 mm).
CAUTION! Make sure that you do not
damage any supply lines in the wall / ceiling.
Insert the dowels 5 into the drill holes. Use a
hammer if necessary to help.
Fasten the wall brackets to the surface with the
2
screws
Fasten the spotlights 1 onto the wall brackets
by screwing the union nuts
the wall brackets.
Check for correct fitting.
.
4
.
3
clockwise onto
Mounting garden light with
ground stake (Fig. C)
Fasten the spotlights 1 onto the ground stakes
10
by screwing the union nuts 3 clockwise
onto the ground stakes.
Inserting colour filter (Fig. B)
Open the spotlights 1 by turning the lamp
9
cover
Note: the LED light bulb
pre-installed.
Insert the desired colour filter 8 in the lamp
cover
colour filter in the direction of the LED light bulb.
Close the spotlights by turning the lamp cover
Your light is now ready to use.
anticlockwise.
9
and position the rough side of the
9
clockwise.
6
has already been
Directing the spotlights
CAUTION! DANGER OF BURN
INJURIES! Only change the posi-
tioning of the spotlights
the light is switched off and has cooled down
completely.
Note: Release the union nut
wise the spotlights can not be moved.
Turn the individual spotlights in the desired
direction.
Tilt the individual spotlights to the desired angle.
Check afterwards that the spotlight are firmly
in place. Tighten up the union nut slightly if necessary.
1
when
3
, since other-
Start-up
Insert the mains plug 11 into the electrical
socket to switch on the light.
Pull the mains plug from the electrical socket to
switch off the light.
Changing the LED light
bulb (Fig. B)
Note: When changing the LED light bulbs, the
colour filter
inserted loosely.
Open the spotlights 1 by turning the lamp
Use the enclosed suction cup 7 to change the
Remove the LED light bulb by turning this anti-
Insert the new LED light bulb carefully into the
Check for correct fitting.
Remove the suction cup by gently pulling on
Close the spotlights by turning the lamp cover
8
can become lost, since this is only
9
cover
LED light bulbs. To do this, press the suction
cup onto the front face of the LED light bulb.
clockwise through a ¼ of a turn.
holder using the suction cup and turn this clockwise by a ¼-of a turn.
the side nipple of the suction cup.
9
clockwise.
anticlockwise.
32 GB
Page 32

Cleaning and Care / Disposal / Warranty and Service
Cleaning and Care
CAUTION! RISK OF ELECTRIC SHOCK!
First unplug the plug from the mains socket.
CAUTION! RISK OF ELECTRIC SHOCK!
For reasons of electrical safety, never clean the light
with water or other fluids, or immerse it in water.
Do not use any solvents, petrol etc. Otherwise
the product may be damaged.
Use a dry fluff-free cloth when you are cleaning.
Disposal
The package and packaging materials consist
entirely of environmentally friendly materials. They
can be disposed of at your local recycling facility.
The symbol of the wheelie bin with the
line through it means that, in the European
Union, the product has to be disposed
of in a separate refuse collection. This applies to the
product and to all components bearing this symbol.
Do not dispose of products bearing this symbol in
your normal household waste, but instead they must
be taken for recycling to a collection site for electrical
and electronic appliances. Recycling helps to reduce
the consumption of raw materials and protects the
environment.
Wearing parts (such as bulbs) and damage caused
by improper handling, non-observance of the operating instructions or unauthorised interference with
the appliance are excluded from the warranty.
The performance of services under the warranty
does not extend or renew the warranty period.
Service address
Briloner Leuchten GmbH
Im Kissen 2, D-59929 Brilon, Germany
Tel.: +49 (0) 2961/9712-0
Fax: +49 (0) 29 61 / 97 12 - 1 99
E-mail: Info@briloner.de
IAN 79397
When inquiring about your product, please have
your receipt and product number (e.g. IAN
12345) ready as your proof of purchase.
Declaration of conformity
This product conforms to the requirements of the
applicable European and national directives (Electromagnetic Compatibility 2004 / 108 / EC, Low
Voltage Directive 2006 / 95 / EC). Conformity has
been demonstrated. The relevant declarations and
documents are held by the manufacturer.
Warranty and Service
Warranty
You receive a 36 month warranty on this product,
valid from the date of purchase.
The appliance has been carefully produced under
strict quality control.
Within the warranty period we shall rectify without
charge all material and manufacturing defects. In
the event of a defect arising during the warranty
period, please send the appliance to the listed
Service Centre address, making reference to the
following article number: 3077 - 025L.
Manufacturer
Briloner Leuchten GmbH
Im Kissen 2
D-59929 Brilon
Germany
33 GB
Page 33

34
Page 34

35
Page 35

36
Page 36

BRILONER LEUCHTEN GMBH
Im Kissen 2
59929 Brilon (Germany)
© by ORFGEN Marketing
Stand der Informationen · Version des informations · Versione
delle informazioni · Stand van de informatie · Last Information
Update: 11 / 2012 · Ident.-No.: 3077-025L112012-1
IAN 79397
 Loading...