


LED FATHER & CHILD LAMP
LED FATHER & CHILD LAMP
Assembly and safety advice
LED-DECKENFLUTER
Montage- und Sicherheitshinweise
IAN 91148
LED STOJACÍ LAMPA
Pokyny k montáži a bezpečnostní pokyny

Before reading, unfold the page containing the illustrations and familiarise yourself with all functions of the
device.
Před čtením si otevřete stranu s obrázky a potom se seznamte se všemi funkcemi přístroje.
Klappen Sie vor dem Lesen die Seite mit den Abbildungen aus und machen Sie sich anschließend mit allen
Funktionen des Gerätes vertraut.
GB Operation and Safety Notes Page 5
CZ Pokyny pro obsluhu a bezpečnostní pokyny Strana 9
DE / AT / CH Bedienungs- und Sicherheitshinweise Seite 13

1251-022L 1250-022L
1
32
4
5
A
7
6
B
7
8
8
6
9

C
10
11
D
12
14
13
E
G
I
F
H
15
16
J
17
Introduction
LED Father & Child lamp
Introduction
Congratulations on your new product.
You have selected a high quality prod-
uct. Please be sure to carefully read the
complete operating instructions. Fold out the page
with the illustrations. These instructions are part of
the product and contain important information on
setup and handling. Always follow all safety instructions. Before using this product for the first time verify
the correct voltage and that all parts are properly
installed. Should you have any questions or you are
unsure about operating the product, please contact
the dealer or service centre. Please keep these instructions in a safe place and pass them on third parties
as applicable.
Intended use
This luminaire is only suitable for indoor use, in dry
and enclosed rooms. This product is intended for
private household use only.
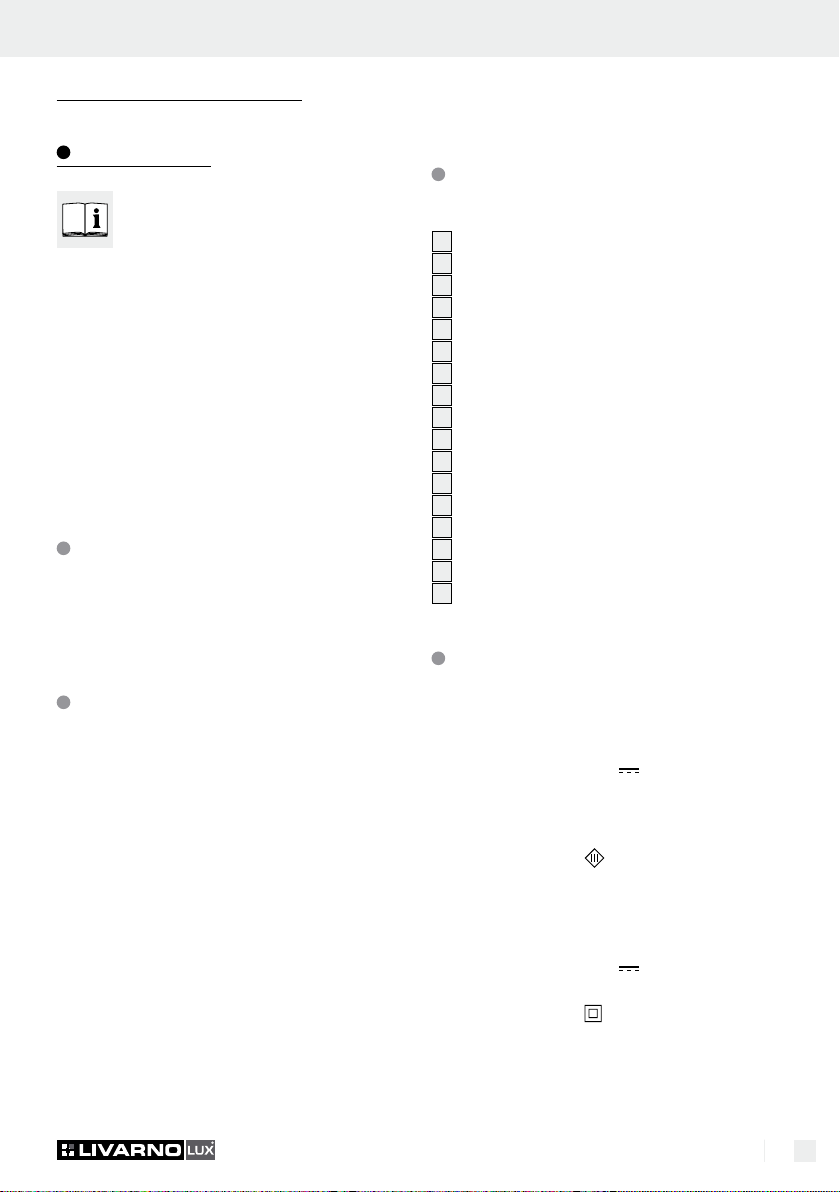
1 Reflector (reading lamp)
1 Set of operating instructions
Parts description
1250-022L + 1251-022L
1
Lamp glass (ceiling floodlight)
2
Flexible arm
3
ON / OFF switch (reading lamp)
4
Lamp glass (reading lamp)
5
ON / OFF rotary switch (ceiling floodlight)
6
Stand
7
Stand tube
8
Plain washer
9
Transportation lock
10
Cable ties
11
Mounting plate
12
Tool
13
Serrated washers
14
Nuts
15
Felt cover
16
Plug-in mains adapter
17
Height adjustor
Technical Data
Scope of delivery
Check immediately after unpacking that the parts are
complete and that the product is in proper condition.
1 LED ceiling floodlight,
model 1250-022L or 1251-022L
1 Base
1 Plug-in mains adapter
1 Mounting plate
2 Serrated washers
2 Nuts
1 Installation tool
1 Cable ties
1 Felt cover
1 Transportation lock
2 Plain washers
1 Reflector (ceiling floodlight)
Model no.: 1250-022L (rectangular) or
1251-022L (round)
Lamp
Voltage: 12 V
Illuminant: ceiling floodlight approx.
20.3 W, reading lamp
approx 5.9 W
Protection category:
Plug-in mains
Type: TGSP1203A
200–240 V∼ 50 / 60Hz /
12 V
, 3 A
You are distracted or feel unwell.
Protection category:
5 GB
Safety advice
Prevent fire and
injury hazards
Damage due to failure to comply with these operating instructions will invalidate the guarantee! We
assume no liability for consequential damage! We
assume no liability for material damage or personal
injury due to improper handling or failure to comply
with the safety instructions!
Avoid the risk of fatal injury
from electric shock
Check the light for damage every time before
you use it. Never use the light if it shows any
signs of damage.
CAUTION! A damaged light means danger of
death from electric shock! In the event of damage,
repairs or other problems with the light please
contact the service centre or a qualified electrician.
For the prevention of hazards, a damaged flexible
lead of this lamp may only be exchanged by the
manufacturer, his service representative or by an
equally qualified specialist!
Ensure before use that the available mains voltage
is the same as the voltage required for operating
the lamp (200–240 V∼).
Ensure that the light does not come into contact
with water or other liquids under any circumstances.
This lamp is only suitable for use in living areas
(not damp rooms) and may only be used in accordance with its design.
This lamp may only be used with the plug-in
adapter included in the delivery.
Never open any of the components of the elec-
trical equipment or insert any objects into the
same components. This will pose a risk of fatal
injury from electric shock.
CAUTION! RISK OF INJURY! Check every
illuminant for damage immediately upon unpacking. Do not install the light if the illuminants
are defective. In this case contact the service
centre for a replacement.
CAUTION! DANGER OF BURN INJURIES!
Ensure that the light has been switched off and
has cooled before touching it, to avoid burn injuries. Lamps develop intense heat in the area
of the lamp head
Do not allow any objects to cover the light.
Excessive heat can result in a fire.
Never leave the light operating unattended.
Do not leave the light or packaging material ly-
ing unattended. Plastic film or bags, plastic parts
etc. can turn into dangerous toys for children.
The type of LED illuminant included is not suitable
for dimmer or electronic switches
This product does not contain any parts that can
be serviced by the user. The LED illuminant cannot
be exchanged.
Safe working
Install the light so that it is protected from mois-
ture and dirt.
Carefully prepare the installation and allow suf-
ficient time. Organise all parts and any necessary
additional tools or materials before starting so
they are easy to reach.
Always be attentive when working! Always pay
attention to what you are doing and act with
common sense. Never install the light if you are
having difficulty concentrating or do not feel
well.
6 GB

Start-up Safety advice
Start-up
Mounting the light
Position the washers 8 on the stand tubes 7
(see fig. A).
Remove the transportation lock 9 between
the two stand tubes
Remove the protective foil from the decorative
layer and put it on the metal layer of the base
(Side protection foil, front side)
Carefully lead the cable through the
hole in the base
pre-assembled cable tie
away.
Insert the stand tubes of the standing lamp 7
into the into the pre-mounted holes in the base
6
. Ensure that the cable duct is pointing towards the rear of the lamp (see fig. A) (front
side - position dimmer switch, back side - cable
outlet).
Draw the cable tie 10 through the holes of the
mounting plate
Push the mounting plate 11 onto the stand tubes
7
. Ensure that the curvature of the mounting
11
plate
cable tie
is pointing outwards. Ensure that the
10
is pointing to the power cable side.
Place the serrated lock washers 13 at the un-
derside of the base
Route the power cables through the nuts 14.
Ensure that you first route the round plug-in
connector through the nut
rectangular plug-in connector.
Using the open spanner 12, tighten the nuts 14
in a clockwise direction onto the stand tubes
to fix the standing lamp to the base
(see fig. D).
Now join the small rectangular plug-in connectors
together leading from the two stand tubes
Connect the round plug-in connectors with the
power cable of the base (see fig. E).
Put the cable in the notch provided in the
6
base
.
Fix the cable with cable ties 10. Ensure that the
cables lie in the designated recess in the base
and cannot be squeezed (see fig. F).
7
(see fig. B).
6
. Please be aware that the
10
may not be thrown
11
(see fig. C).
6
onto the stand tubes 7.
14
and then the small
6
6
7
7
.
6
Adhere the felt cover 15 to the base 6
(see fig. G).
Connect the mains cable of the base 6 with
the mains plug-in adaptor
16
(see fig. H).
Plug the mains plug into a socket that has been
professionally installed.
Your light is now ready for operation.
.
Switching the lamp on / off
Switch the ceiling floodlight on or off by turning
the ON / OFF rotary switch
5
to the left
(see fig. I).
Use the ON / OFF switch 3 to switch the read-
ing lamp on and off.
Dimming the ceiling floodlight
Dim the light of the ceiling floodlight by turning
the ON / OFF rotary switch
5
to the right.
Note: The light is always set at the lowest
dimming level when it is switched on.
Adjusting the lamp (see fig. J)
Loosen the height adjustment screw 17 and set
the required height for the ceiling floodlight.
You can adjust the height of the ceiling floodlight
between 1.10 m and 1.80 m.
Re-tighten the height adjustment screw 17 in or-
der to fix the ceiling floodlight at the required
height.
Bend the flexible arm 2 of the reading lamp
in the required direction.
Do not rotate the flexible arm 2 of the reading
lamp completely. Otherwise the mains cable
inside the lamp could be damaged.
The up-light is hinged and pivoted. Tilt the up-
light to the desired angle.
7 GB

Maintenance and Cleaning
DANGER OF ELECTRIC SHOCK! First remove
the mains plug from the socket.
CAUTION! DANGER OF BURN INJURIES!
Allow the lamp to cool down completely
DANGER OF ELECTRIC SHOCK! For elec-
trical safety, never clean the light with water or
other fluids, or immerse it in water.
Do not use solvents, benzene or similar sub-
stances. They could damage the light.
Only use a dry, lint-free cloth for cleaning.
service centre for guarantee claims. This is the only
way to return your product free of charge.
Service address
Briloner Leuchten GmbH
Im Kissen 2, 59929 Brilon, Germany
Phone.: +49 2961 / 9712-0
Fax: +49 2961 / 9712-199
E-mail: Info@briloner.de
IAN 91148
Disposal
The package and packaging materials
consist entirely of environmentally
friendly materials. They can be disposed
of at your local recycling facility.
The symbol of the wheelie bin with the
line through it means that, in the European
Union, the product has to be disposed
of in a separate refuse collection. This applies to
the product and to all components bearing this symbol. Do not dispose of products bearing this symbol
in your normal household waste, but instead they
must be taken for recycling to a collection site for
electrical and electronic appliances. Recycling helps
to reduce the consumption of raw materials and
protects the environment.
Guarantee and Service
Warranty Declaration
This product has a 3 year guarantee from the date
of purchase extended only to the original buyer,
not transferable. Please keep your receipt as proof
of purchase. The warranty only applies to material
or manufacturing defects. It does not cover wear
items or damage caused by improper use. Any
modifications will void the guarantee. This warranty
does not limit your legal rights. Please phone the
For all inquiries about your product, please have
your receipt and the article number (e.g. IAN
12345) ready as your proof of purchase.
Declaration of conformity
This product fulfils the requirements of the applicable
European and national directives (Electromagnetic
Compatibility 2004/108/EC, Low Voltage Directive
2006/95/EC, Ecodesign Directive 2009/125/
EC, RoHS Directive 2011/65/EU). Conformity has
been demonstrated. The relevant declarations and
documents are held by the manufacturer.
Manufacturer
Briloner Leuchten GmbH
Im Kissen 2
59929 Brilon
Germany
8 GB

ÚvodMaintenance and Cleaning / Disposal / Guarantee and Service
LED stojací lampa
Úvod
Blahopřejeme Vám ke koupi tohoto nového
výrobku. Rozhodli jste se pro vysoce kva-
litní výrobek. Přečtěte si laskavě kompletně
a pečlivě tento návod k obsluze. Rozevřete stránku
sobrázky. Tento návod je součástí tohoto výrobku
a obsahuje důležité informace ouvedení zařízení
do provozu a kzacházení sním. Řiďte se vždy bezpečnostními pokyny. Před uvedením do provozu
zkontrolujte, jestli je kdispozici správné napětí a
jestli jsou všechny díly správně namontované. Jestliže máte ještě otázky nebo jste si nejistí při ovládání
přístroje, kontaktujte vašeho prodejce nebo servis.
Návod pečlivě uschovejte a případně jej předejte
třetí osobě.
Používání v souladu s určením
Svítidlo je určeno výhradně pro provoz ve vnitřních
prostorách, vsuchých a uzavřených místnostech.
Tento přístroj je určen pouze pro soukromé použití.
1 reflektor (světlo na čtení)
1 návod kobsluze
Popis dílů
1250-022L + 1251-022L
1
Sklo lampy (svítidlo kosvětlování stropu)
2
Pružné rameno
3
Spínač ZAP / VYP (svítidlo ke čtení)
4
Sklo lampy (svítidlo ke čtení)
5
Otočný spínač ZAP / VYP
(svítidlo kosvětlování stropu)
6
Podstavec
7
Trubka stojanu
8
Podložka
9
Přepravní pojistka
10
Kabelová spojka
11
Montážní deska
12
Nástroj
13
Zoubkované podložky
14
Matice
15
Plstěný kryt
16
Síťový adaptér do zástrčky
17
Nastavení výšky
Obsah dodávky
Bezprostředně po vybavení vždy zkontrolujte úplnost
rozsahu dodávky a bezvadný stav zařízení.
1 LED svítidlo kosvětlování stropu,
model 1250-022L, resp. 1251-022L
1 podstavec
1 zástrčkový síťový adaptér
1 montážní deska
2 zoubkované podložky
2matice
1 montážní nástroj
1 kabelová spojka
1plstěný kryt
1přepravní pojistka
2 podložky
1reflektor (svítidlo kosvětlování stropu)
Technické údaje
Model č.: 1250-022L (obdélníkový),
resp. 1251-022L (kulatý)
Svítidlo
Napětí: 12V
Žárovky: svítidlo kosvětlování stropu
cca 20,3 W, svítidlo ke čtení
cca 5,9 W
Ochranná třída:
Síťový adaptér
Typ: TGSP1203A
200–240 V∼ 50 / 60 Hz /
12 V
, 3 A
Ochranná třída:
9 CZ

Bezpečnostní upozornění
Vyvarujte se nebezpečí požáru
a poranění
Při škodách způsobených nedodržením tohoto návodu k obsluze zaniká záruka! Za následné škody
se neručí! Za věcné nebo osobní škody, způsobené
neodborným zacházením nebo nerespektováním bezpečnostních pokynů, se neručí!
Zabraňte ohrožení života v
důsledku zásahu elektrickým
proudem
Před každým použitím svítidlo zkontrolujte zhle-
diska případných poškození. Nikdy nepoužívejte
svítidlo, pokud jste zjistili, že je poškozené.
POZOR! Poškozené svítidlo znamená ohrožení
života úrazem elektrickým proudem. Při poškozeních, opravách nebo jiných problémech se
obraťte na servisní místo nebo na kvalifikovaného
elektrikáře.
Za účelem zabránění ohrožení smí poškozené
vnější pružné vedení tohoto svítidla vyměňovat
výhradně výrobce, jeho servisní zástupce nebo
srovnatelný odborník!
Před použitím se ujistěte, že dané síťové napětí
souhlasí s potřebným provozním napětím svítidla
(200–240 V ~).
Bezpodmínečně zabraňte kontaktu svítidla
svodou nebo jinými kapalinami.
Toto svítidlo je určeno pouze kpoužití vobyt-
ných prostorách (nikoliv ve vlhkých prostorách)
a smí se používat pouze vsouladu spříslušným
typem konstrukce.
Toto svítidlo se smí používat pouze ve spojení
sdodaným síťovým adaptérem do zástrčky.
Nikdy neotvírejte žádný z elektrických dílů vý-
robku, ani do nich nestrkejte žádné předměty.
Takové zásahy znamenají nebezpečí ohrožení
života elektrickým proudem.
POZOR! NEBEZPEČÍ ZRANĚNÍ! Bezpro-
středně po vybalení přezkoušejte každý svíticí
prostředek zhlediska poškození. Svítidlo nemontujte s defektními svíticími prostředky. Vtakovém
případě se obraťte na servis kvůli výměně.
POZOR! NEBEZPEČÍ POPÁLENÍ! Před do-
tykem se svítidlem zajistěte, aby bylo vypnuté a
ochladlé, aby se zabránilo popáleninám. Svíticí
prostředky vyvinou voblasti hlavy lampy silné
horko.
Nezakrývejte svítidlo předměty. Nadměrný vývin
tepla může vést ke vzniku požáru.
Svítidlo nenechávejte v provozu bez dohledu.
Nenechávejte ležet svítidlo nebo obalový materiál
bez dohledu. Plastové fólie / pytlíky, umělohmotné
díly atd. by mohly být pro děti nebezpečnou
hračkou.
Zabudovaný svíticí prostředek LED není vhodný
pro externí tlumiče světla a elektronické spínače.
Tento výrobek neobsahuje žádné díly, u nichž by
spotřebitel musel provádět údržbu. Svíticí pro-
středky LED nelze vyměňovat.
Tak postupujete správně
Montujte svítidlo tak, aby bylo chráněné před
vlhkostí a znečištěním.
Montáž nejdříve pečlivě připravte, udělejte si
na ní čas. Připravte si předtím přehledně všechny
jednotlivé díly a navíc potřebné nástroje nebo
materiál.
Buďte vždy pozorní! Dbejte vždy na to, co dě-
láte, a postupujte vždy srozumem. Nikdy nemon-
tujte svítidlo, nejste-li koncentrovaní nebo necítíte-li
se dobře.
Uvedení do provozu
10 CZ
Montáž svítidla
Nasaďte podložky 8 na trubky stojanu 7
(viz obr. A).

Uvedení do provozu / Údržba a čištěníBezpečnostní upozornění / Uvedení do provozu
Odstraňte přepravní pojistku 9 mezi oběma
trubkami stojanu
7
(viz obr. B).
Odstraňte krycí folii dekoračního potahu a
položte kovový kryt na podstavec
6
. (Strana
krycí folie přední strana)
Protáhněte opatrně kabel otvory v podstavci 6.
Prosíme, dbejte na to, že se nesmí předmontovaný vázací pásek
10
odstranit.
Nastrčte stojanové trubky světla 7 do před-
montovaných otvorů na podstavci
6
. Dávejte
pozor, aby vedení kabelu ukazovalo směrem k
zadní straně světla (viz obr. A) (přední strana spínač tlumení světla; zadní strana - výstup kabelu).
Protáhněte kabelovou spojku 10 otvory vmon-
tážní desce
11
(viz obr. C).
Nastrčte montážní desku 11 na trubky stojanu
7
. Dbejte na to, aby klenutí montážní desky 11
směřovalo směrem ven. Dbejte na to, aby kabelová spojka
10
směřovala na stranu přívodu.
Nasaďte zoubkované podložky 13 na spodní
straně podstavce
6
trubky stojanu 7.
Protáhněte přívody maticemi 14. Nezapomeňte
14
maticí
nejprve protáhnout kulatý konektor a
nakonec malý, obdélníkový konektor.
Našroubujte matice 14 pomocí rozvidleného
12
klíče
ve směru chodu hodinových ručiček
na trubky stojanu
podstavci
7
, aby se stojací lampa na
6
zafixovala (viz obr. D).
Nyní spojte malé obdélníkové konektory, které
vedou zobou trubek stojanu
7
.
Spojte kulatý konektor spřívodem podstavce
(viz obr. E).
Zaveďte přívodní kabel do příslušného vybrání
v podstavci
6
.
Zafixujte kabely pomocí kabelové spojky 10.
Dbejte na to, aby kabely ležely vurčené drážce
vpodstavci
6
a nemohly se zmáčknout
(viz obr. F).
Nalepte plstěný kryt 15 na podstavec 6
(viz obr. G).
Spojte přívod podstavce 6 se síťovým adap-
térem se zástrčkou
16
(viz obr. H).
Zastrčte síťovou zástrčku do předpisově instalo-
vané zásuvky.
Vaše svítidlo je připraveno k provozu.
Zapínání / vypínání svítidla
Zapněte, popř. vypněte svítidlo kosvětlování
stropu otočením otočného spínače ZAP / VYP
doleva (viz obr. I).
Zapněte, popř. vypněte svítidlo ke čtení prostřed-
nictvím spínače ZAP / VYP
3
.
Stmívání svítidla kosvětlování
stropu
Stmívejte svítidlo kosvětlování stropu otáčením
otočného spínače ZAP/VYP
5
doprava.
Upozornění: Při zapnutí je automaticky
nastaven nejmenší stupeň stmívání.
Nastavení svítidla (viz obr. J)
Povolte šroub pro nastavování výšky 17 a na-
stavte požadovanou výšku svítidla pro osvětlování stropu.
Upozornění: Můžete nastavit výšku svítidla
pro osvětlování stropu vrozmezí od 1,10m do
1,80m.
Opět utáhněte šrou pro nastavování výšky 17,
abyste svítidlo pro osvětlování stropu zafixovali
vpožadované výšce.
Ohněte pružné rameno 2 svítidla ke čtení do
požadované polohy.
Neotáčejte pružným ramenem 2 svítidla ke
čtení úplně kolem dokola. Jinak se může poškodit síťový vodič uvnitř svítidla.
Těleso osvětlující strop je otočné a výkyvné.
Nastavte osvětlení stropu do požadované úhlu.
Údržba a čištění
NEBEZPEČÍ ZÁSAHU ELEKTRICKÝM
PROUDEM! Vytáhněte nejprve síťovou zástrčku
ze zásuvky.
POZOR! NEBEZPEČÍ POPÁLENÍ! Nechejte
svítidlo nejprve úplně vychladnout.
NEBEZPEČÍ ZÁSAHU ELEKTRICKÝM
PROUDEM! Zdůvodu elektrické bezpečnosti
5
11 CZ

Údržba a čištění / Likvidace / Záruka a servis
se svítidlo nikdy nesmí čistit vodou nebo jinými
kapalinami či se dokonce ponořovat do vody.
Nepoužívejte na čištění rozpouštědla, benzín
nebo podobné látky, světlo můžete poškodit.
K čištění používejte jen suchou utěrku nepouš-
tějící vlákna.
Likvidace
Obal a obalový materiál se skládají výhradně zekologických materiálů. Lze je
zlikvidovat vmístních kontejnerech na tříděný odpad.
Symbol přeškrtnuté nádoby na odpad
na kolečkách znamená, že výrobek musí
být v Evropské unii předán do sběrny tříděného odpadu. Toto platí pro výrobek a pro veškeré
příslušenství označené tímto symbolem. Označené
výrobky se nesmí likvidovat vběžném domovním
odpadu, ale musí se odevzdat ve sběrně pro recyklaci elektrických a elektronických zařízení. Recyklace
pomůže zredukovat spotřebu surovin a odlehčit životní prostředí.
Adresa servisu
Briloner Leuchten GmbH
Im Kissen 2, 59929 Brilon, Německo
Tel.: +49 2961 / 9712-0
Fax: +49 2961 / 9712-199
E-mail: Info@briloner.de
IAN 91148
Pro všechny požadavky si připravte pokladní blok
a číslo výrobku (např. IAN 12345) jako doklad o
nákupu.
Prohlášení oshodě
Tento výrobek splňuje požadavky platných evropských a národních směrnic (Elektromagnetická
snášenlivost 2004 / 108 / EC, Směrnice pro nízkonapěťová zapojení 2006 / 95 / EC, Směrnice pro
ekologický design 2009 / 125 / EG, směrnice
RoHS 2011 / 65 / EU). Shoda byla prokázána.
Příslušná prohlášení a dokumentace jsou uloženy
uvýrobce.
Záruka a servis
Prohlášení k záruce
Záruka 3 roky ode dne zakoupení platí jen pro prvního kupujícího, je nepřenosná. Prosíme uschovejte
si pokladní stvrzenku jako doklad o zakoupení. Záruka platí jen pro vady materiálu nebo chyby z výroby, nevtahuje se na díly podléhající opotřebení
nebo na škody vzniklé neodborným používáním.
Cizím zásahem do výrobku zaniká záruka. Vaše
práva vyplývající ze zákona touto zárukou nejsou
omezena. V případě, že chcete uplatnit záruku, obraťte se telefonicky na náš servis. Jen tak je možné
zajistit bezplatné zaslání vašeho zařízení do servisu.
12 CZ
Výrobce
Briloner Leuchten GmbH
Im Kissen 2
59929 Brilon
Německo

LED-Deckenfluter
Einleitung
Wir beglückwünschen Sie zum Kauf Ihres
neuen Gerätes. Sie haben sich damit für
ein hochwertiges Produkt entschieden.
Bitte lesen Sie diese Bedienungsanleitung vollständig
und sorgfältig durch. Klappen Sie die Seite mit den
Abbildungen aus. Diese Anleitung gehört zu diesem
Produkt und enthält wichtige Hinweise zur Inbetriebnahme und Handhabung. Beachten Sie immer alle
Sicherheitshinweise. Prüfen Sie vor der Inbetriebnahme, ob die korrekte Spannung vorhanden ist
und ob alle Teile richtig montiert sind. Sollten Sie
Fragen haben oder unsicher in Bezug auf die Handhabung des Gerätes sein, setzen Sie sich bitte mit
Ihrem Händler oder der Servicestelle in Verbindung.
Bewahren Sie diese Anleitung bitte sorgfältig auf
und geben Sie sie ggf. an Dritte weiter.
Bestimmungsgemäße
Verwendung
Diese Leuchte ist ausschließlich für den Betrieb im
Innenbereich, in trockenen und geschlossenen Räumen geeignet. Dieses Gerät ist nur für den Einsatz
in privaten Haushalten vorgesehen.
1 Transportsicherung
2 Unterlegscheiben
1 Reflektor (Deckenfluter)
1 Reflektor (Leseleuchte)
1 Bedienungsanleitung
Teilebeschreibung
1250-022L + 1251-022L
1
Lampenglas (Deckenfluter)
2
Flexarm
3
EIN- / AUS-Schalter (Leseleuchte)
4
Lampenglas (Leseleuchte)
5
EIN- / AUS-Drehschalter (Deckenfluter)
6
Standfuß
7
Standrohr
8
Unterlegscheibe
9
Transportsicherung
10
Kabelbinder
11
Montageplatte
12
Werkzeug
13
Fächerscheiben
14
Muttern
15
Filzabdeckung
16
Steckernetzteil
17
Höhen-Verstellung
Technische Daten
Lieferumfang
Kontrollieren Sie unmittelbar nach dem Auspacken
immer den Lieferumfang auf Vollständigkeit sowie
den einwandfreien Zustand des Gerätes.
1 LED-Fluter, Modell 1250-022L bzw. 1251-022L
1 Standfuß
1 Steckernetzteil
1 Montageplatte
2 Fächerscheiben
2 Muttern
1 Montagewerkzeug
1 Kabelbinder
1 Filzabdeckung
Modell-Nr.: 1250-022L (rechteckig)
bzw. 1251-022L (rund)
Leuchte
Spannung: 12 V
Leuchtmittel: Deckenfluter ca. 20,3 W
Leseleuchte ca. 5,9 W
Schutzklasse:
Steckernetzteil
Typ: TGSP1203A
200–240 V∼ 50 / 60 Hz /
12 V
, 3 A
Schutzklasse:
13 DE/AT/CH

Sicherheitshinweise
Vermeiden Sie Brand- und
Verletzungsgefahr
Bei Schäden, die durch Nichtbeachtung dieser Bedienungsanleitung verursacht werden, erlischt der
Garantieanspruch! Für Folgeschäden wird keine
Haftung übernommen! Bei Sach- oder Personenschäden, die durch unsachgemäße Handhabung
oder Nichtbeachtung der Sicherheitshinweise verursacht werden, wird keine Haftung übernommen!
Vermeiden Sie Lebensgefahr
durch elektrischen Schlag
Überprüfen Sie vor jedem Gebrauch die Leuchte
auf etwaige Beschädigungen. Benutzen Sie
Ihre Leuchte niemals, wenn Sie irgendwelche
Beschädigungen feststellen.
VORSICHT! Eine beschädigte Leuchte bedeu-
tet Lebensgefahr durch elektrischen Schlag.
Wenden Sie sich bei Beschädigungen, Reparaturen oder anderen Problemen an der Leuchte
an die Servicestelle oder eine Elektrofachkraft.
Zur Vermeidung von Gefährdungen darf die
beschädigte äußere flexible Leitung dieser
Leuchte ausschließlich vom Hersteller, seinem
Servicevertreter oder einer vergleichbaren
Fachkraft ausgetauscht werden!
Vergewissern Sie sich vor der Benutzung, dass
die vorhandene Netzspannung mit der benötigten Betriebsspannung der Leuchte übereinstimmt (200–240 V∼).
Vermeiden Sie unbedingt die Berührung der
Leuchte mit Wasser oder anderen Flüssigkeiten.
Diese Leuchte ist nur zur Verwendung im
Wohnbereich geeignet (nicht für Feuchträume)
und darf nur ihrer Bauart entsprechend verwendet
werden.
Diese Leuchte darf nur mit dem mitgelieferten
Steckernetzteil verwendet werden.
Öffnen Sie niemals eines der elektrischen Be-
triebsmittel oder stecken irgendwelche Gegenstände in dieselben. Derartige Eingriffe bedeuten
Lebensgefahr durch elektrischen Schlag.
VORSICHT! VERLETZUNGSGEFAHR!
Überprüfen Sie unmittelbar nach dem Auspacken
jedes Leuchtmittel auf Beschädigungen. Montieren Sie die Leuchte nicht mit defekten Leuchtmitteln. Setzen Sie sich in diesem Fall für Ersatz
mit der Servicestelle in Verbindung.
VORSICHT! VERBRENNUNGSGEFAHR!
Stellen Sie sicher, dass die Leuchte ausgeschaltet und abgekühlt ist, bevor Sie diese berühren,
um Verbrennungen zu vermeiden. Leuchtmittel
entwickeln im Bereich des Lampenkopfes eine
starke Hitze
Decken Sie die Leuchte nicht mit Gegenständen
ab. Eine übermäßige Wärmeentwicklung kann
zu Brandentwicklung führen.
Lassen Sie die Leuchte im Betrieb nicht unbe-
aufsichtigt.
Lassen Sie die Leuchte oder Verpackungsmate-
rial nicht achtlos liegen. Plastikfolien / -tüten,
Kunststoffteile etc. könnten für Kinder zu einem
gefährlichen Spielzeug werden.
Das verbaute LED Leuchtmittel ist nicht geeignet
für externe Dimmer und elektronische Schalter
Dieser Artikel enthält keine Teile, die vom Ver-
braucher gewartet werden können. Die LED
Leuchtmittel können nicht ausgetauscht werden.
So verhalten Sie sich richtig
Montieren Sie die Leuchte so, dass sie vor
Feuchtigkeit und Verschmutzung geschützt ist.
Bereiten Sie die Montage sorgfältig vor und
nehmen Sie sich ausreichend Zeit. Legen Sie
alle Einzelteile und zusätzlich benötigtes Werkzeug oder Material vorher übersichtlich und
griffbereit zurecht.
Seien Sie stets aufmerksam! Achten Sie immer
darauf was Sie tun und gehen Sie stets mit Vernunft vor. Montieren Sie die Leuchte in keinem
Fall, wenn Sie unkonzentriert sind oder sich unwohl fühlen.
14 DE/AT/CH

Inbetriebnahme
Inbetriebnahme
Leuchte montieren
Setzen Sie die Unterlegscheiben 8 auf die
Standrohre
Entfernen Sie die Transportsicherung 9 zwischen
den beiden Standrohren
Entfernen Sie die Schutzfolie der Dekorations-
auflage und legen Sie die Metallauflage auf
den Standfuß
Führen Sie die Kabel vorsichtig durch die
Löcher des Standfußes
dass der vormontierte Kabelbinder
entfernt werden darf.
Stecken Sie die Standrohre der Stehleuchte 7
in die vormontierten Löcher des Standfußes
Achten Sie darauf, dass die Kabelführung zur
Rückseite der Leuchte zeigt (s. Abb. A) (Vorderseite – Position Dimmerschalter; Rückseite –
Kabelausgang).
Ziehen Sie den Kabelbinder 10 durch die
Löcher der Montageplatte
Schieben Sie die Montageplatte 11 auf die
Standrohre
der Montageplatte
zeigt. Achten Sie darauf, dass der Kabelbinder
10
zur Seite der Zuleitung zeigt.
Setzen Sie die Fächerscheiben 13 an der Unter-
seite des Standfußes
Führen Sie die Zuleitungen durch die Muttern
14
. Beachten Sie, dass Sie zuerst die runde
Steckverbindung durch die Mutter
und anschließend die kleine, rechteckige Steckverbindung.
Drehen Sie die Muttern 14 mittels Gabelschlüssel
12
im Uhrzeigersinn auf die Standrohre 7 um
die Stehleuchte am Standfuß
(s. Abb. D).
Verbinden Sie nun die kleinen, rechteckigen
Steckverbindungen miteinander, die aus den
beiden Standrohren
Verbinden Sie die runde Steckverbindung mit
der Zuleitung des Standfußes (s. Abb. E).
Legen Sie die Zuleitung in die vorgesehene
Aussparung im Standfuß
Fixieren Sie die Kabel mittels Kabelbinder 10. Achten
Sie dabei darauf, dass die Kabel in der dafür
7
(s. Abb. A).
7
(s. Abb. B).
6
. (Seite Schutzfolie Vorderseite)
6
. Bitte beachten Sie,
10
nicht
11
(s. Abb. C).
7
. Beachten Sie, dass die Wölbung
11
dabei nach außen
6
auf die Standrohre 7.
14
führen
6
zu fixieren
7
führen.
6
.
6
vorgesehenen Aussparung im Standfuß
und nicht gequetscht werden können (s. Abb. F).
Kleben Sie die Filzabdeckung 15 auf den
Standfuß
6
(s. Abb. G).
Verbinden Sie die Zuleitung des Standfußes 6
mit dem Steckernetzteil
16
(s. Abb. H).
Stecken Sie den Netzstecker in eine vorschrifts-
mäßig installierte Steckdose.
Ihre Leuchte ist betriebsbereit.
Leucht e ein- / ausschalten
Schalten Sie den Deckenfluter ein bzw. aus, in-
dem Sie den EIN- / AUS-Drehschalter
.
links drehen (s. Abb. I).
Schalten Sie die Leseleuchte mittels EIN- / AUS-
Schalter
3
ein bzw. aus.
Deckenfluter dimmen
Dimmen Sie das Licht des Deckenfluters, indem Sie
den EIN- / AUS-Drehschalter 5 nach rechts drehen
Hinweis: Beim Einschalten ist automatisch die
kleinste Dimmstufe eingestellt.
Leuchte ausrichten (s. Abb. J)
Lösen Sie die Schraube der Höhen-Verstellung
17
und stellen Sie die gewünschte Höhe des
Deckenfluters ein.
Hinweis: Sie können den Deckenfluter in einer
Höhe zwischen 1,10 m und 1,80 m einstellen.
Ziehen Sie die Schraube der Höhen-Verstellung
17
wieder an, um den Deckenfluter in der ge-
wünschten Höhe zu fixieren.
Biegen Sie den Flexarm 2 der Leseleuchte in
die gewünschte Position.
Drehen Sie den Flexarm 2 der Leseleuchte
nicht vollständig um sich selbst. Andernfalls
kann die Netzleitung im inneren der Leuchte
beschädigt werden.
Der Deckenfluter ist dreh- und schwenkbar. Kip-
pen Sie den Deckenfluter in den gewünschten
Winkel.
6
liegen
5
nach
.
15 DE/AT/CH

Wartung und Reinigung / Entsorgung / Garantie und Service
Wartung und Reinigung
STROMSCHLAGGEFAHR! Ziehen Sie den
Netzstecker zuerst aus der Steckdose.
VORSICHT! VERBRENNUNGSGEFAHR!
Lassen Sie die Leuchte zunächst vollständig abkühlen
STROMSCHLAGGEFAHR! Aus Gründen der
elektrischen Sicherheit darf die Leuchte niemals
mit Wasser oder anderen Flüssigkeiten gereinigt
oder gar in Wasser getaucht werden.
Benutzen Sie keine Lösungsmittel, Benzin o.ä.
Die Leuchte würde hierbei Schaden nehmen.
Verwenden Sie zur Reinigung nur ein trockenes,
fusselfreies Tuch.
Entsorgung
Die Verpackung und das Verpackungsmaterial bestehen ausschließlich aus umweltfreundlichen Materialien. Sie können
in den örtlichen Recyclingbehältern entsorgt werden.
Das Symbol der durchgestrichenen Abfalltonne auf Rädern bedeutet, dass das
Produkt in der Europäischen Union einer
getrennten Müllsammlung zugeführt werden muss.
Dies gilt für das Produkt und alle mit diesem Symbol gekennzeichneten Zubehörteile. Gekennzeichnete Produkte dürfen nicht über den normalen
Hausmüll entsorgt werden, sondern müssen an einer Annahmestelle für das Recycling von elektrischen und elektronischen Geräten abgegeben
werden. Recycling hilft, den Verbrauch von Rohstoffen zu reduzieren und die Umwelt zu entlasten.
Fabrikationsfehler, nicht aber für Verschleißteile oder
für Beschädigungen durch unsachgemäßen Gebrauch. Die Garantie erlischt bei Fremdeingriff. Ihre
gesetzlichen Rechte werden durch diese Garantie
nicht eingeschränkt. Im Garantiefall mit der Servicestelle telefonisch in Verbindung setzen. Nur so kann
eine kostenlose Einsendung Ihres Geräts gewährleistet werden.
Serviceadresse
Briloner Leuchten GmbH
Im Kissen 2, 59929 Brilon, Deutschland
Tel.: 02961 / 9712-0
Fax: 02961 / 9712-199
E-Mail: Info@briloner.de
IAN 91148
Bitte halten Sie für alle Anfragen den Kassenbon
und die Artikelnummer (z. B. IAN 12345) als
Nachweis für den Kauf bereit.
Konformitätserklärung
Dieses Produkt erfüllt die Anforderungen der geltenden
europäischen und nationalen Richtlinien (Elektromagnetische Verträglichkeit 2004 / 108 / EC ,
Niederspannungsrichtlinie 2006 / 95 / EC, Ökodesign Richlinie 2009 / 125 / EG, RoHS-Richtlinie
2011 / 65 / EU). Die Konformität wurde nachgewiesen. Entsprechende Erklärungen und Unterlagen
sind beim Hersteller hinterlegt.
Hersteller
Garantie und Service
Garantieerklärung
3 Jahre Garantie ab Kaufdatum auf dieses Gerät,
gilt nur gegenüber dem Ersteinkäufer, nicht übertragbar. Bitte Kassenbon als Nachweis aufbewahren. Die Garantieleistung gilt nur für Material- oder
16 DE/AT/CH
Briloner Leuchten GmbH
Im Kissen 2
59929 Brilon
Deutschland

Briloner Leuchten GmbH
Im Kissen 2
D-59929 Brilon
Last Information Update · Stav informací
Stand der Informationen: 08 / 2013
Ident.-No.: 1250-022L/1251-022L082013-CZ
IAN 91148
4
 Loading...