

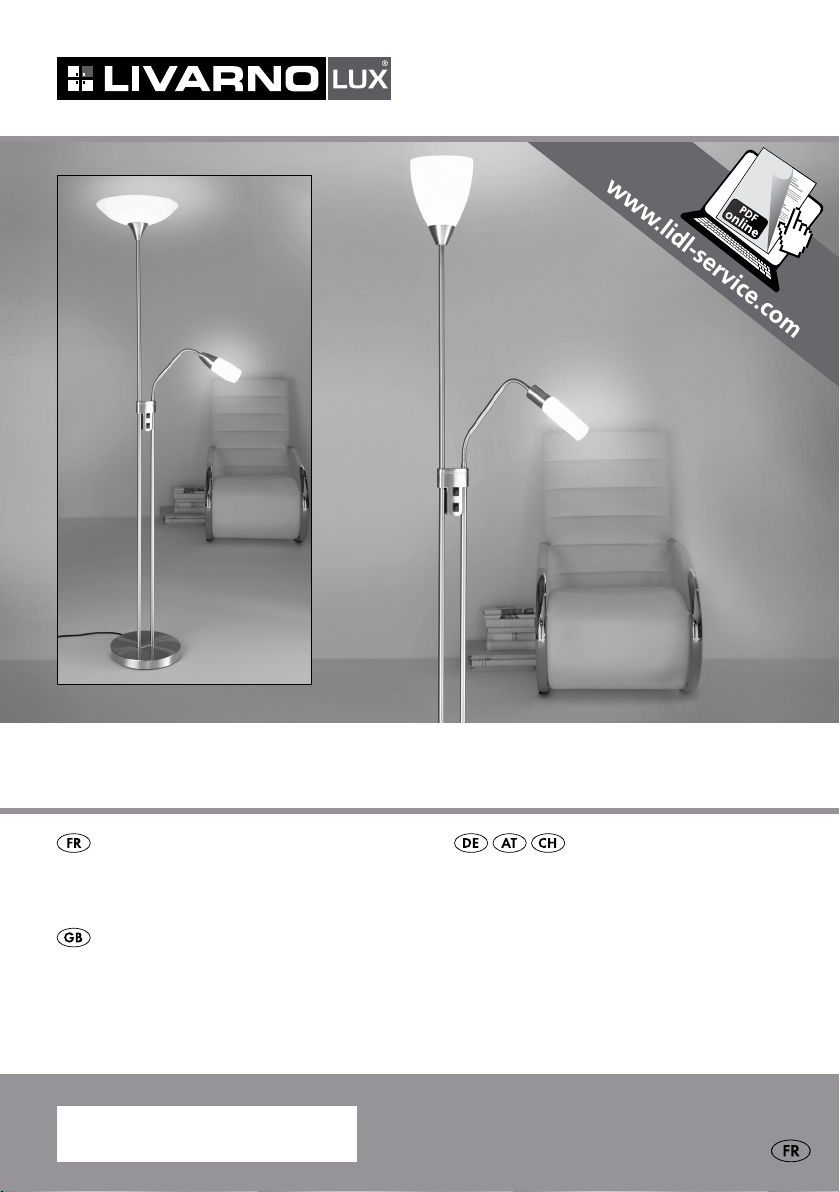
LAMPADAIRE
LAMPADAIRE
Instructions d‘utilisation et consignes de sécurité
ENERGY-SAVING FATHER &
CHILD FLOOR LAMP
Operation and Safety Notes
IAN 74184
ENERGIESPAR-DECKENFLUTER
Bedienungs- und Sicherheitshinweise
Avant de lire le mode d‘emploi, ouvrez la page contenant les illustrations et familiarisez-vous ensuite avec
toutes les fonctions de l‘appareil.
Klappen Sie vor dem Lesen die Seite mit den Abbildungen aus und machen Sie sich anschließend mit allen
Funktionen des Gerätes vertraut.
Before reading, unfold the page containing the illustrations and familiarise yourself with all functions of the
device.
FR Instructions d‘utilisation et consignes de sécurité Page 5
DE / AT / CH Bedienungs- und Sicherheitshinweise Seite 11
GB Operation and Safety Notes Page 17
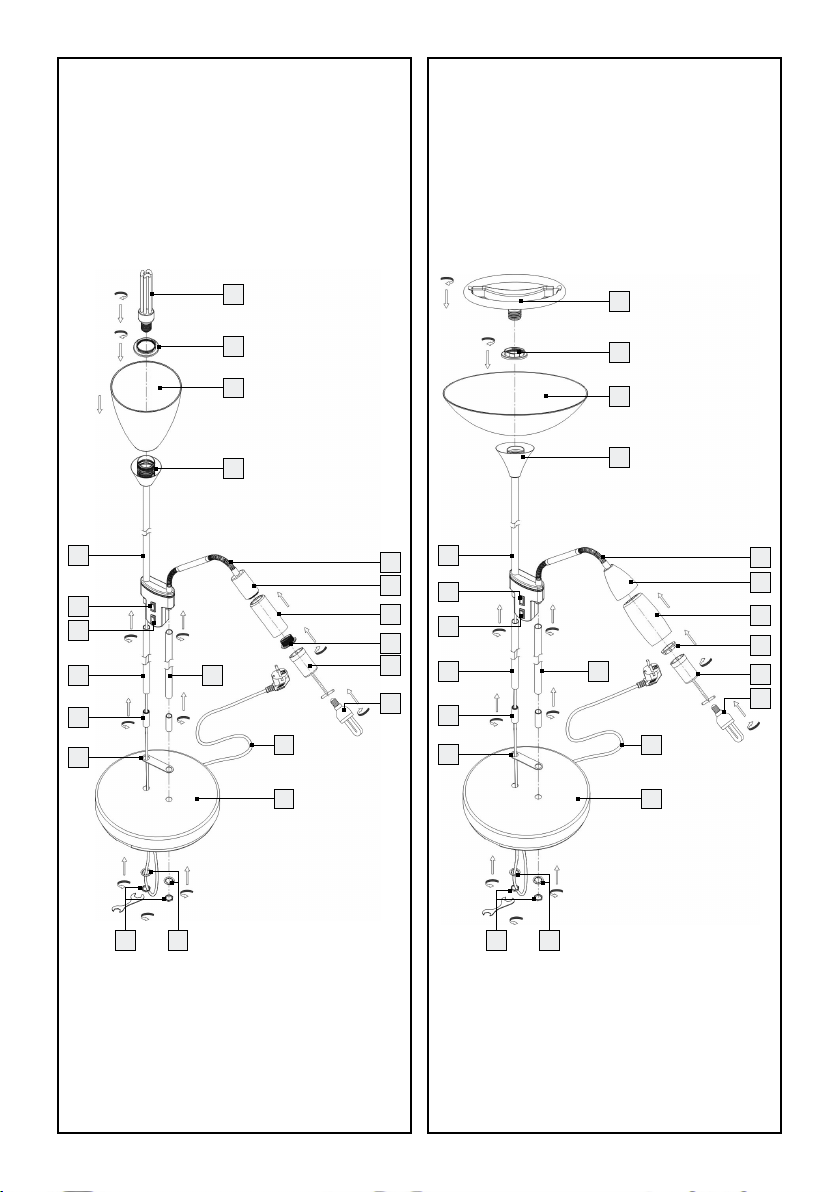
1241/022L 1242/022L
1
2
3
4
21
20
19
18
17
16
10
12
13
21
5
6
20
7
19
8
9
18
11
17
16
1
2
3
4
5
6
7
8
10
12
13
9
11
1515 14 14


Table des matières
Introduction
Utilisation conforme ............................................................................................................................Page 6
Fourniture ............................................................................................................................................. Page 6
Description des pièces et éléments .................................................................................................... Page 6
Données techniques ............................................................................................................................ Page 6
Sécurité
Consignes de sécurité ......................................................................................................................... Page 7
Mise en service
Montage de la lampe ......................................................................................................................... Page 8
Mise en marche / coupure de la lampe ............................................................................................Page 8
Orientation de la lampe .....................................................................................................................Page 8
Remplacement des ampoules ............................................................................................................. Page 8
Maintenance et nettoyage ............................................................................................... Page 9
Mise au rebut ............................................................................................................................... Page 9
Garantie et service après-vente
Déclaration de garantie .....................................................................................................................Page 9
Adresse du service après-vente .......................................................................................................... Page 9
Déclaration de conformité .................................................................................................................. Page 9
Fabricant .............................................................................................................................................. Page 10
5 FR
Lampadaire
Description des
pièces et éléments
Introduction
Félicitations pour l’acquisition de votre
nouvel appareil ! Vous avez opté pour
un produit de grande qualité. Veuillez
lire ce mode d‘emploi intégralement et attentivement.
Ouvrez la page contenant les illustrations. Le manuel
accompagne ce produit et contient des instructions
essentielles pour la mise en service et la manipulation.
Toujours respecter les consignes de sécurité. Avant
l‘installation, vérifiez si la tension est correcte et si
toutes les pièces sont correctement montées. Si vous
avez des questions ou des doutes concernant la
manipulation de l‘appareil, veuillez contacter votre
revendeur ou le S.A.V. Veuillez conserver soigneusement ce manuel et le remettre aux autres utilisateurs.
Utilisation conforme
Cette lampe est exclusivement conçue pour un usage
intérieur, dans des locaux secs et fermés. Cet appareil
est uniquement destiné à un usage domestique.
Fourniture
1241 / 022L + 1242 / 022L
1
Ampoule (vasque)
2
Anneau fileté (vasque)
3
Verre de lampe (vasque)
4
Douille (vasque)
5
Tube flexible
6
Douille (lampe de lecture)
7
Verre de lampe (lampe de lecture)
8
Anneau fileté (lampe de lecture)
9
Outil
10
Tube (lampe de lecture)
11
Ampoule (lampe de lecture)
12
Cordon secteur avec prise
13
Pied
14
Rondelles spéciales éventail
15
Ecrous
16
Fixation des tubes
17
Tiges filetées (fixation des tubes)
18
Tube (vasque)
19
Commutateur MARCHE / ARRET
(lampe de lecture)
20
Commutateur MARCHE / ARRET (vasque)
21
Tube supérieur
Données techniques
Immédiatement après le déballage, veuillez toujours
contrôler que la fourniture est au complet et que
l‘appareil se trouve en parfait état.
1 lampadaire, modèle 1241 / 022L ou 1242 / 022L
2 verres de lampe
1 ampoule économie d’énergie, 9 W, E14
1 ampoule économie d’énergie, 22 W, E27
2 anneaux filetés
1 outil
1 tube (lampe de lecture)
1 tube (lampadaire à éclairage indirect)
2 tiges filetées (fixation des tubes)
1 fixation des tubes
2 rondelles spéciales éventail
2 écrous
1 clé à fourche
1 mode d’emploi
6 FR
Modèle n°: 1241 / 022L ou 1242 / 022L
Tension de service: 230–240 V ∼, 50 Hz
Ampoule: ampoule économie d’énergie:
230–240 V ∼, E14, 9 W; E27,
22 W (fournie)
ou
230–240 V ∼, E14, 25 W;
E27, 60 W (non fournie)
Puissance nominale
maximale: 1 x 25 W (lampe de lecture)
1 x 60 W (vasque)
Classe de
protection:
SécuritéIntroduction
Sécurité
Consignes de sécurité
Les dommages causés par le non respect des
instructions de ce mode d‘emploi sont exclus de la
garantie ! Le fabricant décline toute responsabilité
pour les dommages indirects ! De même, toute
responsabilité est déclinée pour les dommages
matériels ou personnels causés par une manipulation
incorrecte ou le non respect des consignes de sécurité !
Prévention de risques mortels
par électrocution
Vérifier le bon état de la lampe avant chaque
usage. Ne jamais utiliser la lampe si vous
détectez le moindre endommagement.
ATTENTION ! Une lampe endommagée
représente un danger mortel d’électrocution.
En cas d‘endommagements, de réparations ou
d‘autres problèmes, veuillez contacter la filiale
S.A.V. ou un électricien.
Pour éviter les risques, ne remplacer le cordon
extérieur flexible endommagé de cette lampe
que par l’intermédiaire du fabricant, de son
représentant SAV ou par un spécialiste
comparable.
Avant l’utilisation, vérifiez que la tension secteur
corresponde à la tension de service requise de
la lampe (230–240 V ∼).
Absolument éviter tout contact de la lampe
avec de l‘eau ou d‘autres liquides.
Ne jamais ouvrir les composants électriques,
ni insérer des objets quelconques dans ceux-ci.
Ce type d‘intervention représente un danger
mortel d‘électrocution.
Prévention de risque
d‘incendies et de blessures
ATTENTION ! RISQUE DE BLESSURES !
Après avoir sorti l’ampoule de l’emballage,
contrôlez immédiatement qu’elle ne soit pas
endommagée. Ne montez jamais la lampe
avec des ampoules endommagées. Veuillez
dans ce cas contacter la filiale de service pour
une pièce de rechange.
ATTENTION ! RISQUE DE BRÛLURE !
Afin d‘éviter toutes brûlures, vérifiez que la
lampe est éteinte et suffisamment froide avant
de la manipuler. L‘ampoule dégage une forte
chaleur dans la tête de la lampe.
dégagement de chaleur excessif peut provoquer
un incendie.
Immédiatement remplacer toute ampoule
défectueuse par une neuve. Avant de remplacer
l’ampoule, débrancher la lampe de la prise
électrique.
Ne pas recouvrir la lampe par des objets quel-
conques. Un dégagement de chaleur excessif
peut provoquer un incendie.
Ne pas laisser la lampe allumée sans surveillance.
Ne pas laisser la lampe ou le matériel d‘em-
ballage traîner négligemment. Les films et les
sachets en plastique, les éléments en matières
synthétiques, etc. peuvent devenir des jouets
dangereux dans les mains des enfants.
Utilisez uniquement des ampoules économie
d’énergie 230–240 Volt ∼ de culot E14 et
d’une puissance maximale de 9 watts pour
la lampe de lecture. Utilisez uniquement des
ampoules économie d’énergie 230–240 Volt ∼
de culot E27 et d’une puissance maximale de
22 watts pour la vasque.
ou
Utilisez uniquement des ampoules économie
d’énergie 230–240 Volt ∼ de culot E14 et
d’une puissance maximale de 25 watts pour
la lampe de lecture. Utilisez uniquement des
ampoules économie d’énergie 230–240 Volt ∼
de culot E27 et d’une puissance maximale de
60 watts pour la vasque.
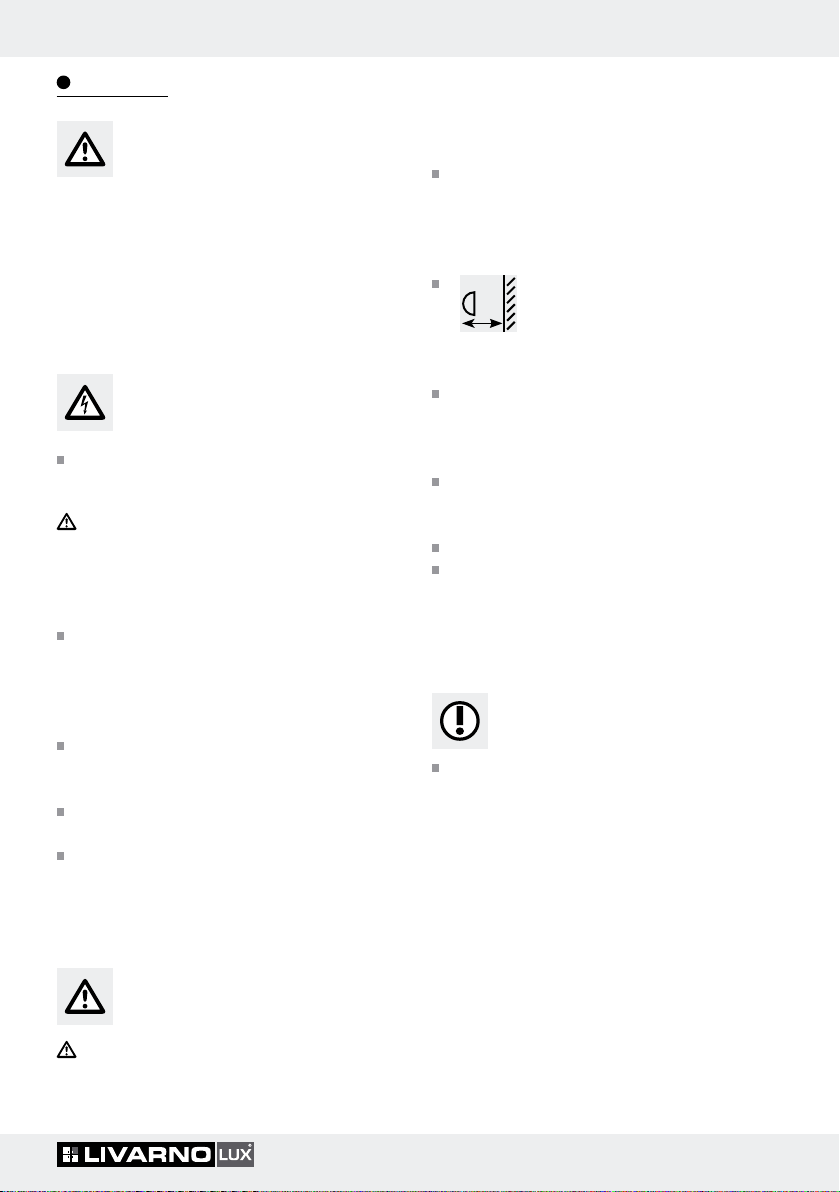
RISQUE D’INCENDIE ! La lampe
0,5 m
doit être montée à une distance d’au
moins 0,5 m des objets illuminés. Un
Pour travailler en toute sécurité
7 FR

Montez la lampe de telle sorte qu’elle soit
protégée de l’humidité et de la saleté.
Préparez soigneusement le montage et prenez
votre temps. Placez à portée de la main de
manière rangée l’ensemble des pièces et les
outils ou le matériel nécessaires supplémentaires.
Toujours être vigilant ! Toujours travailler
concentré et procéder avec prudence. Ne
jamais effectuer le montage de la lampe si
vous n‘êtes pas concentré ou vous sentez mal.
Mise en service
Montage de la lampe
Remarque : Veiller à visser les tige filetées
au maximum pour assurer la bonne stabilité de
la lampe.
Glissez les verres de lampe 3, 7 sur les
douilles
filetés
4, 6
. Fixez-les à l’aide des anneaux
2, 8
et de l’outil 9.
Remarque : Pour la mise en place des am-
poules, utilisez un chiffon sec ne peluchant pas.
Vissez les ampoules 1, 11 dans les douilles
4, 6
dans le sens des aiguilles d’une montre.
Branchez la prise 12 dans une prise de courant
installée dans les règles de l’art.
Votre lampe est prête à être utilisée.
17
Remarque : Vous devez vous faire aider d’une
autre personne pour le montage.
Remarque : Le montage est identique pour les
deux modèles (1241 / 022L et 1242 / 022L).
Avant le montage, enlever les deux bagues en
plastique noires à l’extrémité de la tige
18
pour permettre le vissage des éléments.
Vissez tout d’abord le tube 18 dans le tube
supérieur
21
, dans le sens des aiguilles d’une
montre. Ce faisant, veillez à ce que le cordon
passant par les tubes
18, 21
ne soit pas coincé.
Vissez ensuite le tube 10 dans le tube flexible 5,
dans le sens des aiguilles d’une montre.
Vissez les deux tiges filetées 17 dans les tubes
10, 18
, dans le sens des aiguilles d’une montre,
et faites glisser la fixation des tubes
tiges filetées
17
.
16
sur les
Emboîtez le lampadaire avec les tiges filetées 17
dans les orifices aménagés dans le pied
13
Placer les rondelles à éventail 14 sur la face
inférieure du pied
Tourner les écrous
13
sur les tiges filetées 17.
15
à l’aide d’une clé à
fourche dans le sens des aiguilles d’une montre
sur les tiges filetées
pied au pied
Remarque : Veiller à maintenir la tige
et les tiges filetées
15
écrous
.
17
pour fixer la lampe sur
13
.
17
lors du serrage des
10, 18
Mise en marche / coupure
de la lampe
Allumez et éteignez la vasque à l’aide du
commutateur MARCHE / ARRET
Allumez et éteignez la lampe de lecture à
l’aide du commutateur MARCHE / ARRET
Orientation de la lampe
Pliez dans la position voulue le tube flexible 5
de la lampe de lecture.
Remplacement des ampoules
RISQUE D’ELECTRO-
CUTION! Débranchez tout d’abord la prise
.
ATTENTION! RISQUE DE BRULURES!
Laissez tout d’abord la lampe refroidir complètement.
Dévissez l’ampoule 1, 11 défectueuse de la
4, 6
douille
, dans le sens contraire des
aiguilles d’une montre.
Vissez dans la douille une ampoule neuve,
dans le sens des aiguilles d’une montre.
Remarque : Utilisez uniquement des ampoules
économie d’énergie 230–240 Volt ∼ de culot
E14 et d’une puissance maximale de 9 watts
pour la lampe de lecture. Utilisez uniquement des
20
.
19
.
12
.
8 FR

… / Maintenance et nettoyage / Mise au rebut / Garantie et service après-venteSécurité / Mise en service
ampoules économie d’énergie 230–240 Volt ∼
de culot E27 et d’une puissance maximale de
22 watts pour la vasque.
ou
Utilisez uniquement des ampoules économie
d’énergie 230–240 Volt ∼ de culot E14 et
d’une puissance maximale de 25 watts pour
la lampe de lecture. Utilisez uniquement des
ampoules économie d’énergie 230–240 Volt ∼
de culot E27 et d’une puissance maximale de
60 watts pour la vasque.
Maintenance et nettoyage
RISQUE D’ELECTRO-
CUTION! Débranchez tout d’abord la prise
ATTENTION! RISQUE DE BRULURES!
Laissez tout d’abord la lampe refroidir complètement.
RISQUE D’ELECTRO-
CUTION! Pour des raisons relevant de la sécurité
électrique, ne jamais nettoyer la lampe à l’eau ou
avec d’autres liquides, ni la plonger dans l’eau.
Ne pas utiliser de solvants, essence ou autres.
Ceci endommage la lampe.
Pour le nettoyage, utilisez uniquement un chiffon
sec ne bourrant pas.
12
.
Mise au rebut
L’emballage et les matériaux d’emballage se composent exclusivement de
matières recyclables. Vous pouvez les
mettre au rebut dans les conteneurs de
recyclage locaux.
électroniques. Le recyclage aide à réduire la
consommation en matières premières et à préserver
l’environnement.
Garantie et service
après-vente
Déclaration de garantie
3 ans de garantie à partir de la date d‘achat pour
cet appareil, uniquement valables pour le premier
acheteur, non transférables. Conservez le ticket de
caisse en tant que justificatif. La prestation de garantie couvre uniquement les vices matériels ou de
fabrication, mais pas les pièces d‘usures, ni les endommagements dus à un usage incorrect. La garantie est annulée en cas d‘intervention externe.
Cette garantie ne constitue pas une restriction de
vos droits légaux. Si vous voulez faire fonctionner
votre garantie, veuillez contacter le S.A.V. par téléphone. Il est autrement impossible d‘assurer l‘envoi
gratuit de votre appareil.
Adresse du service après-vente
Briloner Leuchten GmbH
Im Kissen 2, 59929 Brilon, Allemagne
Tél. : +49 (0) 29 61 / 97 12 - 0
Fax : +49 (0) 29 61 / 97 12 - 199
Courriel : Info@briloner.de
Numéro de service gratuit
Tél. : 00800 / 27456637
IAN 74184
Le symbole de poubelle rayé sur les roues
signifie que dans l’Union Européenne, ce
produit doit être mis au rebut séparément.
Ceci s’applique au produit ainsi qu’à tous les
accessoires portant ce symbole. Les produits ainsi
signalés ne doivent pas être mis au rebut dans les
ordures ménagères, mais dans un centre de collecte
pour le recyclage des appareils électriques et
Veuillez conserver le ticket de caisse et le numéro
de référence de l’article (par ex. IAN 12345) afin
de les produire à titre de preuves d’achat pour
toute demande.
9 FR

Garantie et service après-vente
Déclaration de conformité
Ce produit est conforme aux exigences des
directives européennes et nationales applicables
(compatibilité électromagnétique 2004 / 108 / EC,
directive basse tension 2006 / 95 / EC). La conformité
a été attestée. Les déclarations et documents respectifs
sont en possession du fabricant.
Fabricant
Briloner Leuchten GmbH
Im Kissen 2
59929 Brilon
Allemagne
10 FR

Einleitung
Bestimmungsgemäße Verwendung .................................................................................................... Seite 12
Lieferumfang ........................................................................................................................................ Seite 12
Teilebeschreibung ............................................................................................................................... Seite 12
Technische Daten ................................................................................................................................ Seite 12
Sicherheit
Sicherheitshinweise ............................................................................................................................. Seite 13
Inbetriebnahme
Leuchte montieren ...............................................................................................................................Seite 14
Leuchte ein- / ausschalten ...................................................................................................................Seite 14
Leuchte ausrichten ............................................................................................................................... Seite 14
Leuchtmittel wechseln .......................................................................................................................... Seite 14
Wartung und Reinigung ..................................................................................................... Seite 15
Entsorgung ..................................................................................................................................... Seite 15
Garantie und Service
Garantieerklärung ............................................................................................................................... Seite 15
Serviceadresse ....................................................................................................................................Seite 15
Konformitätserklärung ......................................................................................................................... Seite 16
Hersteller .............................................................................................................................................. Seite 16
11 DE/AT/CH

Energiespar-Deckenfluter
Einleitung
Wir beglückwünschen Sie zum Kauf Ihres
neuen Gerätes. Sie haben sich damit für
ein hochwertiges Produkt entschieden.
Bitte lesen Sie diese Bedienungsanleitung vollständig
und sorgfältig durch. Klappen Sie die Seite mit den
Abbildungen aus. Diese Anleitung gehört zu diesem
Produkt und enthält wichtige Hinweise zur Inbetriebnahme und Handhabung. Beachten Sie immer alle
Sicherheitshinweise. Prüfen Sie vor der Inbetriebnahme,
ob die korrekte Spannung vorhanden ist und ob alle
Teile richtig montiert sind. Sollten Sie Fragen haben
oder unsicher in Bezug auf die Handhabung des
Gerätes sein, setzen Sie sich bitte mit Ihrem Händler
oder der Servicestelle in Verbindung. Bewahren Sie
diese Anleitung bitte sorgfältig auf und geben Sie
sie ggf. an Dritte weiter.
Bestimmungsgemäße
Verwendung
Diese Leuchte ist ausschließlich für den Betrieb
im Innenbereich, in trockenen und geschlossenen
Räumen geeignet. Dieses Gerät ist nur für den
Einsatz in privaten Haushalten vorgesehen.
Lieferumfang
2 Gewindestangen (Standrohrhalterung)
1 Standrohrhalterung
2 Fächerscheiben
2 Muttern
1 Gabelschlüssel
1 Bedienungsanleitung
Teilebeschreibung
1241 / 022L + 1242 / 022L
1
Leuchtmittel (Deckenfluter)
2
Schraubring (Deckenfluter)
3
Lampenglas (Deckenfluter)
4
Fassung (Deckenfluter)
5
Flexarm
6
Fassung (Leseleuchte)
7
Lampenglas (Leseleuchte)
8
Schraubring (Leseleuchte)
9
Werkzeug
10
Standrohr (Leseleuchte)
11
Leuchtmittel (Leseleuchte)
12
Netzanschlusskabel mit Netzstecker
13
Standfuß
14
Fächerscheiben
15
Muttern
16
Standrohrhalterung
17
Gewindestange (Standrohrhalterung)
18
Standrohr (Deckenfluter)
19
EIN- / AUS-Schalter (Leseleuchte)
20
EIN- / AUS-Schalter (Deckenfluter)
21
Oberes Standrohr
Kontrollieren Sie unmittelbar nach dem Auspacken
immer den Lieferumfang auf Vollständigkeit sowie
den einwandfreien Zustand des Gerätes.
1 Energiespar-Deckenfluter, Modell 1241 / 022L
bzw. 1242 / 022L
2 Lampengläser
1 Energiespar-Leuchtmittel, 9 W, E14
1 Energiespar-Leuchtmittel, 22 W, E27
2 Schraubringe
1 Werkzeug
1 Standrohr (Leseleuchte)
1 Standrohr (Deckenfluter)
12 DE/AT/CH
Technische Daten
Modell-Nr.: 1241 / 022L bzw. 1242 / 022L
Betriebsspannung: 230–2 40 V ∼, 50 H z
Leuchtmittel: Energiespar-Leuchtmittel:
230–240 V ∼, E14, 9 W; E27,
22 W (im Lieferumfang enthalten)
oder
230–240 V ∼, E14, 25 W; E27,
60 W (nicht im Lieferumfang
enthalten)

Einleitung / SicherheitEinleitung
Nennleistung
maximal: 1 x 25 W (Leseleuchte)
1 x 60 W (Deckenfluter)
Schutzklasse:
Sicherheit
Sicherheitshinweise
Bei Schäden, die durch Nichtbeachtung dieser
Bedienungsanleitung verursacht werden, erlischt der
Garantieanspruch! Für Folgeschäden wird keine
Haftung übernommen! Bei Sach- oder Personenschäden, die durch unsachgemäße Handhabung
oder Nichtbeachtung der Sicherheitshinweise verursacht werden, wird keine Haftung übernommen!
Vermeiden Sie Lebensgefahr
durch elektrischen Schlag
Überprüfen Sie vor jedem Gebrauch die Leuchte
auf etwaige Beschädigungen. Benutzen Sie
Ihre Leuchte niemals, wenn Sie irgendwelche
Beschädigungen feststellen.
VORSICHT! Eine beschädigte Leuchte bedeutet
Lebensgefahr durch elektrischen Schlag. Wenden
Sie sich bei Beschädigungen, Reparaturen oder
anderen Problemen an der Leuchte an die
Servicestelle oder eine Elektrofachkraft.
Zur Vermeidung von Gefährdungen darf die
beschädigte äußere flexible Leitung dieser
Leuchte ausschließlich vom Hersteller, seinem
Servicevertreter oder einer vergleichbaren
Fachkraft ausgetauscht werden!
Vergewissern Sie sich vor der Benutzung, dass die
vorhandene Netzspannung mit der benötigten
Betriebsspannung der Leuchte übereinstimmt
(230–240 V ∼).
Vermeiden Sie unbedingt die Berührung der
Leuchte mit Wasser oder anderen Flüssigkeiten.
Öffnen Sie niemals eines der elektrischen
Betriebsmittel oder stecken irgendwelche
Gegenstände in dieselben. Derartige Eingriffe
bedeuten Lebensgefahr durch elektrischen Schlag.
Vermeiden Sie Brand- und
Verletzungsgefahr
VORSICHT! VERLETZUNGSGEFAHR!
Überprüfen Sie unmittelbar nach dem Auspacken
jedes Leuchtmittel auf Beschädigungen. Montieren
Sie die Leuchte nicht mit defekten Leuchtmitteln.
Setzen Sie sich in diesem Fall für Ersatz mit der
Servicestelle in Verbindung.
VORSICHT! VERBRENNUNGSGEFAHR!
Stellen Sie sicher, dass die Leuchte ausgeschaltet
und abgekühlt ist, bevor Sie diese berühren,
um Verbrennungen zu vermeiden. Leuchtmittel
entwickeln im Bereich des Lampenkopfes eine
starke Hitze.
Materialien. Eine übermäßige Wärmeentwicklung
kann zu Brandentwicklung führen.
Ersetzen Sie defekte Leuchtmittel sofort durch
neue. Entfernen Sie vor dem Leuchtmittelwechsel
die Leuchte aus der Steckdose.
Decken Sie die Leuchte nicht mit Gegenständen
ab. Eine übermäßige Wärmeentwicklung kann
zu Brandentwicklung führen.
Lassen Sie die Leuchte im Betrieb nicht unbe-
aufsichtigt.
Lassen Sie die Leuchte oder Verpackungsmaterial
nicht achtlos liegen. Plastikfolien / -tüten, Kunststoffteile etc. könnten für Kinder zu einem
gefährlichen Spielzeug werden.
Verwenden Sie nur 230–240 Volt ∼ Energiespar-
Leuchtmittel mit einem E14 Sockel und einer
Höchstleistung von 9 Watt für die Leseleuchte.
Verwenden Sie nur 230–240 Volt ∼ EnergiesparLeuchtmittel mit einem E27 Sockel und einer
Höchstleistung von 22 Watt für den Deckenfluter.
oder
Verwenden Sie nur 230–240 Volt ∼ Leuchtmittel
mit einem E14 Sockel und einer Höchstleistung
von 25 Watt für die Leseleuchte. Verwenden
Sie nur 230–240 Volt ∼ Leuchtmittel mit einem
BRANDGEFAHR! Montieren Sie
0,5 m
die Leuchte mit einer Entfernung von
mindestens 0,5 m zu angestrahlten
So verhalten Sie sich richtig
13 DE/AT/CH

E27 Sockel und einer Höchstleistung von
60 Watt für den Deckenfluter.
Montieren Sie die Leuchte so, dass sie vor
Feuchtigkeit und Verschmutzung geschützt ist.
Bereiten Sie die Montage sorgfältig vor und
nehmen Sie sich ausreichend Zeit. Legen Sie alle
Einzelteile und zusätzlich benötigtes Werkzeug
oder Material vorher übersichtlich und griffbereit
zurecht.
Seien Sie stets aufmerksam! Achten Sie immer
darauf was Sie tun und gehen Sie stets mit
Vernunft vor. Montieren Sie die Leuchte in
keinem Fall, wenn Sie unkonzentriert sind oder
sich unwohl fühlen.
Inbetriebnahme
Leuchte montieren
Hinweis: Für die Montage benötigen Sie eine
zweite Person.
Hinweis: Die Montage ist bei beiden Modellen
(1241 / 022L bzw. 1242 / 022L) identisch.
Entfernen Sie vor der Montage die beiden
schwarzen Kunststoffringe am Ende des
Standrohres
Verschraubung der Bauteile zu ermöglichen.
Drehen Sie zunächst das Standrohr 18 im
Uhrzeigersinn in das obere Standrohr
Achten Sie darauf, dass die Netzleitung, die
durch die Standrohre
eingeklemmt wird.
Drehen Sie dann das Standrohr 10 im Uhrzeiger-
sinn in den Flexarm
Drehen Sie die beiden Gewindestangen 17 im
Uhrzeigersinn in die Standrohre
schieben Sie die Standrohrhalterung
die Gewindestangen
Stecken Sie die Stehleuchte mit den Gewinde-
stangen
Standfußes
Setzen Sie die Fächerscheiben 14 an der
Unterseite des Standfußes
stangen
Gabelschlüssel im Uhrzeigersinn auf die
18
, um eine entsprechende
21
18, 21
führt, dabei nicht
5
.
10, 18
16
17
.
17
in die vormontierten Löcher des
13
.
13
auf die Gewinde-
17
. Drehen Sie die Muttern 15 mittels
.
und
auf
Gewindestangen 17, um die Stehleuchte am
Standfuß
13
zu fixieren.
Hinweis: Achten Sie darauf, dass Sie die
Standrohre
beim Festziehen der Muttern
10, 18
und Gewindestangen 17
15
festhalten.
Hinweis: Achten Sie darauf, dass die Gewinde-
17
stangen
so weit wie möglich eingedreht
werden, um einen sicheren Stand der Leuchte
zu gewährleisten.
Schieben Sie die Lampengläser 3, 7 über
die Fassungen
Schraubringen
4, 6
. Fixieren Sie diese mittels
2, 8
und Werkzeug 9.
Hinweis: Verwenden Sie zum Einsetzen der
Leuchtmittel ein trockenes, fusselfreies Tuch.
Drehen Sie die Leuchtmittel 1, 11 im Uhrzeiger-
sinn in die Fassungen
4, 6
ein.
Stecken Sie den Netzstecker 12 in eine vor-
schriftsmäßig installierte Steckdose.
Ihre Leuchte ist betriebsbereit.
Leuchte ein- / ausschalten
Schalten Sie den Deckenfluter mittels EIN- /
AUS-Schalter
20
ein bzw. aus.
Schalten Sie die Leseleuchte mittels EIN- / AUS-
Schalter
19
ein bzw. aus.
Leuchte ausrichten
Biegen Sie die Flexarme 5 der Leseleuchte in
die gewünschte Position.
Leuchtmittel wechseln
STROMSCHLAGGEFAHR!
Ziehen Sie den Netzstecker
Steckdose.
VORSICHT! VERBRENNUNGSGEFAHR!
Lassen Sie die Leuchte zunächst vollständig abkühlen.
Drehen Sie ein defektes Leuchtmittel 1, 11
gegen den Uhrzeigersinn aus der Fassung 4, 6.
12
zuerst aus der
14 DE/AT/CH

Inbetriebnahme / Wartung und Reinigung / Entsorgung / Garantie und Service Sicherheit / Inbetriebnahme
Drehen Sie ein neues Leuchtmittel im Uhrzeiger-
sinn in die Fassung.
Hinweis: Verwenden Sie nur 230–240 Volt ∼
Energiespar-Leuchtmittel mit einem E14 Sockel
und einer Höchstleistung von 9 Watt für die
Leseleuchte. Verwenden Sie nur 230–240 Volt ∼
Energiespar-Leuchtmittel mit einem E27 Sockel
und einer Höchstleistung von 22 Watt für den
Deckenfluter.
oder
Verwenden Sie nur 230–240 Volt ∼ Leuchtmittel
mit einem E14 Sockel und einer Höchstleistung
von 25 Watt für die Leseleuchte. Verwenden
Sie nur 230–240 Volt ∼ Leuchtmittel mit einem
E27 Sockel und einer Höchstleistung von
60 Watt für den Deckenfluter.
Wartung und Reinigung
STROMSCHLAGGEFAHR!
Ziehen Sie den Netzstecker
Steckdose.
VORSICHT! VERBRENNUNGSGEFAHR!
Lassen Sie die Leuchte zunächst vollständig abkühlen.
Aus Gründen der elektrischen Sicherheit darf die
Leuchte niemals mit Wasser oder anderen Flüssigkeiten gereinigt oder gar in Wasser getaucht werden.
Benutzen Sie keine Lösungsmittel, Benzin o.ä.
Die Leuchte würde hierbei Schaden nehmen.
Verwenden Sie zur Reinigung nur ein trockenes,
fusselfreies Tuch.
12
zuerst aus der
STROMSCHLAGGEFAHR!
Entsorgung
Die Verpackung und das Verpackungsmaterial bestehen ausschließlich aus
umweltfreundlichen Materialien. Sie können in den örtlichen Recyclingbehältern
entsorgt werden.
Das Symbol der durchgestrichenen
Abfalltonne auf Rädern bedeutet, dass
das Produkt in der Europäischen Union
einer getrennten Müllsammlung zugeführt werden
muss. Dies gilt für das Produkt und alle mit diesem
Symbol gekennzeichneten Zubehörteile. Gekennzeichnete Produkte dürfen nicht über den normalen
Hausmüll entsorgt werden, sondern müssen an einer
Annahmestelle für das Recycling von elektrischen
und elektronischen Geräten abgegeben werden.
Recycling hilft, den Verbrauch von Rohstoffen zu
reduzieren und die Umwelt zu entlasten.
Garantie und Service
Garantieerklärung
3 Jahre Garantie ab Kaufdatum auf dieses Gerät,
gilt nur gegenüber dem Ersteinkäufer, nicht übertragbar. Bitte Kassenbon als Nachweis aufbewahren. Die Garantieleistung gilt nur für Material- oder
Fabri kationsfehler, nicht aber für Verschleißteile
oder für Beschädigungen durch unsachgemäßen
Gebrauch. Die Garantie erlischt bei Fremdeingriff.
Ihre gesetzlichen Rechte werden durch diese Garantie nicht eingeschränkt. Im Garantiefall mit der
Servicestelle telefonisch in Verbindung setzen. Nur
so kann eine kostenlose Einsendung Ihres Geräts
gewährleistet werden.
Serviceadresse
Briloner Leuchten GmbH
Im Kissen 2, 59929 Brilon, Deutschland
Tel.: 02961 / 9712-0
Fax: 02961 / 9712-199
E-Mail: Info@briloner.de
IAN 74184
Bitte halten Sie für alle Anfragen den Kassenbon
und die Artikelnummer (z. B. IAN 12345) als
Nachweis für den Kauf bereit.
15 DE/AT/CH

Garantie und Service
Konformitätserklärung
Dieses Produkt erfüllt die Anforderungen der
geltenden europäischen und nationalen Richtlinien
(Elektromagnetische Verträglichkeit 2004 / 108 / EC,
Niederspannungsrichtlinie 2006 / 95 / EC). Die
Konformität wurde nachgewiesen. Entsprechende
Erklärungen und Unterlagen sind beim Hersteller
hinterlegt.
Hersteller
Briloner Leuchten GmbH
Im Kissen 2
59929 Brilon
Deutschland
16 DE/AT/CH

Table of contents
Introduction
Proper use ............................................................................................................................................ Page 18
Included items .....................................................................................................................................Page 18
Description of parts and features ....................................................................................................... Page 18
Technical data ..................................................................................................................................... Page 18
Safety
Safety advice ....................................................................................................................................... Page 19
Preparing the product for use
Assembling the lamp ........................................................................................................................... Page 20
Switching the lamp on / off .................................................................................................................Page 20
Directing the lamp ............................................................................................................................... Page 20
Replacing a bulb ................................................................................................................................. Page 20
Care and cleaning .................................................................................................................... Page 20
Disposal ............................................................................................................................................ Page 21
Warranty and Service
Warranty Declaration ......................................................................................................................... Page 21
Service address ................................................................................................................................... Page 21
Declaration of Conformity .................................................................................................................. Page 21
Manufacturer ....................................................................................................................................... Page 21
17 GB

Introduction
Energy-Saving Father &
Child Floor Lamp
Introduction
We congratulate you on the purchase of
your new device. You have chosen a
high
quality product. Please read carefully
and completely through these operating instructions.
Fold out the page with the illustrations. These instructions form part of the product and contain important
information about bringing the product into use and
its handling. Always observe all the safety advice.
Check that the correct mains voltage is available and
that all the parts have been properly assembled
before bringing into use. Should you have any
questions or be uncertain as to how to operate the
device, please get in touch with your dealer or service point. Please keep these instructions in a safe
place and hand them on to a third party if neces
sary.
Proper use
This light is suitable only for interior use, in dry and
enclosed spaces. This lamp is intended for use only
in a domestic environment.
Included items
2 Nuts
1 Open spanner
1 Operating instructions
Description of parts
and features
1241 / 022L + 1242 / 022L
1
Bulb (uplight)
2
Threaded ring (uplight)
3
Lamp glass (uplight)
4
Fitting (socket) (uplight)
5
Flexible arm
6
Fitting (socket) (reading lamp)
7
Lamp glass (reading lamp)
8
Threaded ring (reading lamp)
9
Tool
10
Support tube (reading lamp)
11
Bulb (reading lamp)
12
Mains lead with mains plug
13
Base
14
Serrated lock washers
15
Nuts
16
Support tube mount
17
Threaded rods (support tube mount)
18
Support tube (uplight)
19
ON / OFF switch (reading lamp)
20
ON / OFF switch (uplight)
21
Upper support tube
Check that all the items and accessories are present and that the lamp is in perfect condition
immediately after unpacking.
1 Floor lamp, Model 1241 / 022L or 1242 / 022L
2 Lamp glasses
1 Energy-saving bulb, 9 W, E 14
1 Energy-saving bulb, 22 W, E 27
2 Threaded rings
1 Tool
1 Support tube (reading lamp)
1 Support tube (uplight)
2 Threaded rods (support tube mount)
1 Support tube mount
2 Serrated lock washers
18 GB
Technical data
Model No.: 1241 / 022L or 1242 / 022L
Operating voltage: 230–240 V ∼, 50 Hz
Bulbs: Energy-saving bulbs:
230–240 V ∼, E14, 9 W;
E27, 22 W (included)
or
230–240 V ∼, E14, 25 W;
E27, 60 W (not included)
Rated max. power: 1 x 25 W (reading lamp)
1 x 60 W (uplight)
Protection class:

Safety
Safety
Safety advice
The right to claim under the guarantee shall be
rendered invalid in respect of damage caused by
the non-observance of these operating instructions!
No liability is accepted for consequent damage!
No liability is accepted for damage to property
or persons caused by improper handling or nonobservance of the safety advice!
To avoid danger to
life from electric shock
Every time before connecting the lamp the mains,
check it and the mains lead for damage. Never
use your light if you find it is damaged in any way.
CAUTION! A damaged light bulb means your
life is at risk from electric shock. If there is any
damage, repairs to be carried out or other
problems related to the light bulb, please contact
the service centre or a qualified electrician.
In order to prevent hazards, if the outer flexible
cable of this lamp becomes damaged it may
only be replaced by the manufacturer, a service
representative of the manufacturer or a similar
specialist!
Before assembly, ensure that the mains voltage
available corresponds to the operating voltage
necessary of the light (230–240 V ∼).
Never let the lamp come into contact with water
or other liquids.
Never open or insert anything into electrical
fittings or equipment. Doing this sort of thing can
lead to a serious danger to life from electric shock.
To avoid danger
of fire and injury
CAUTION! RISK OF INJURY! Check bulbs
for damage immediately after unpacking. Do
not fit defective bulbs into the light. If they are,
contact the service point for a replacement.
CAUTION! RISK OF INJURY FROM
BURNS! Ensure the lamp has been switched
off and allowed to cool before you touch it. In
this way you will avoid the danger of burns.
Bulbs give off a lot of heat around the top of
the lamp.
from the development of too much heat.
Immediately replace the faulty light bulb with
a new one. Remove the lamp from the socket
before changing the light bulb.
Do not allow any objects to cover the lamp.
Fire can result from the development of too
much heat.
Never leave the lamp operating unattended.
Do not allow the lamp or the packaging materials
to lie around unattended. Plastic film or bags,
Styrofoam etc. can turn into dangerous toys for
children.
Use only 230–240 volt ∼ energy-saving bulbs
with an E14 fitting and a maximum power
output of 9 watts for the reading lamp. Use only
230–240 volt ∼ energy-saving bulbs with an
E27 fitting and a maximum power output of
22 watts for the uplight.
or
Use only 230–240 volt ∼ bulbs with an E14
fitting and a maximum power output of 25 watts
for the reading lamp. Use only 230–240 volt ∼
bulbs with an E27 fitting and a maximum power
output of 60 watts for the uplight.
Install the light so that it is protected from
moisture and dirt.
Prepare carefully before assembly and allow
yourself enough time. Lay out all the individual
components and additional tools or materials
required so that you can see and reach them.
Remain alert at all times and always watch what
you are doing. Always proceed with caution
and do not assemble the lamp if you cannot
concentrate or feel unwell.
RISK OF FIRE! Install the light
0.5 m
so that it is at least 0.5 m from any
illuminated materials. Fire can result
Working safely
19 GB

Preparing the product for use / Care and cleaning
Preparing the product for use
Assembling the lamp
Note: You will require a second person to help
with the assembly of the product.
Note: Assembly is identical for both models
(1241 / 022L or 1242 / 022L).
Before installation, remove the two black plastic
18, 21
13
on to the
15
18
to allow
.
13
.
.
17
are
rings on the end of the support tube
the components to be screwed together properly.
First screw the support tube 18 clockwise into
the upper support tube
21
. Ensure that the
mains lead does not become trapped when it
is fed through the support tubes
Then screw the support tube 10 clockwise into
the flexible arm
5
.
Screw the two threaded rods 17 clockwise into
the support tubes
tube mount
10, 18
and push the support
16
on to the threaded rods 17.
Insert the floor lamp with the threaded rods 17
into the preformed holes in the base
Place the serrated lock washers 14 at the
underside of the support tube
threaded rods
tighten the nuts
17
rods
17
. Using the open spanner,
15
clockwise on to the threaded
to fix the floor lamp to the base 13.
Note: Ensure that you hold the support tubes
10, 18
and threaded rods 17 firmly in place
when you are tightening the nuts
Note: Ensure that the threaded rods
screwed in as far as possible so that the lamp
is stable when standing up.
Push the lamp glasses 3, 7 over the fittings
4, 6
. Fix the lamp glasses in place with the
threaded rings
2, 8
using the tool 9.
Note: Use a dry, fluff-free cloth for inserting
the bulbs.
Screw the bulbs 1, 11 clockwise into the
4, 6
fittings
.
Insert the mains plug 12 into a properly
installed socket.
Your lamp is now ready for operation.
Switching the lamp on / off
Use the ON / OFF switch 20 to switch the
uplight on or off.
Use the ON / OFF switch 19 to switch the
reading lamp on or off.
Directing the lamp
Bend the flexible arm 5 to bring the reading
lamp into the desired position.
Replacing a bulb
RISK OF ELECTRIC SHOCK!
First pull the mains plug
12
out of the mains socket.
CAUTION! RISK OF BURNS! First allow the
lamp to cool completely.
Unscrew the defective bulb 1, 11 anticlockwise
out of the fitting
4, 6
.
Then screw a new bulb clockwise into the fitting.
Note: Use only 230–240 volt ∼ energy-saving
bulbs with an E14 fitting and a maximum power
output of 9 watts for the reading lamp. Use
only 230–240 volt ∼ energy-saving bulbs with
an E27 fitting and a maximum power output of
22 watts for the uplight.
or
Use only 230–240 volt ∼ bulbs with an E14
fitting and a maximum power output of 25 watts
for the reading lamp. Use only 230–240 volt ∼
bulbs with an E27 fitting and a maximum power
output of 60 watts for the uplight.
Care and cleaning
RISK OF ELECTRIC SHOCK!
First pull the mains plug
CAUTION! RISK OF BURNS! First allow the
lamp to cool completely.
For electrical safety reasons, never clean the lamp
with water or other fluids nor immerse it in water.
12
out of the mains socket.
RISK OF ELECTRIC SHOCK!
20 GB

Care and cleaning / Disposal / Warranty and Service
Do not use any solvents, petrol or similar. This
would cause damage to the light.
Always use a dry, fluff-free cloth for cleaning.
Disposal
The packaging and ancillary packing
consist entirely of environmentally-friendly
materials. They can be disposed of at
your local recycling facility.
The symbol of the wheelie bin with the line
through it means that, in the European
Union, the product has to be disposed
of in a separate refuse collection. This applies to the
product and to all components bearing this symbol.
Products marked in this way may not be disposed
of along with normal domestic waste but have to
be handed in at a recycling collection point for
electrical and electronic appliances. Recycling helps
to reduce the consumption of raw materials and to
ease the burden on the environment.
Warranty and Service
Service address
Briloner Leuchten GmbH
Im Kissen 2, 59929 Brilon, Germany
Tel.: +49 (0) 29 61 / 97 12–0
Fax: +49 (0) 29 61 / 97 12–1 99
E-mail: Info@briloner.de
IAN 74184
Please have your receipt and the product number
(e.g. IAN 12345) available for all queries as proof
of purchase.
Declaration of Conformity
This product fulfils the requirements of the
applicable European and national directives
(Electromagnetic Compatibility 2004 / 108 / EC,
Low Voltage Directive 2006 / 95 / EC). Conformity
has been demonstrated. The relevant declarations
and documents are held by the manufacturer.
Manufacturer
Warranty Declaration
This product has a 3-year warranty from the date
of purchase; the warranty is only valid for the original purchaser and is not transferable. Please keep
your receipt as proof of purchase. The warranty
applies to material or manufacturing defects only. It
does not cover wear parts or damage caused by
improper use. The guarantee lapses in cases of unauthorized tampering. Your statutory rights are not
restricted in any way by this warranty. Please contact the service centre by telephone. In the event of
any claims under the warranty. This is the only way
to ensure that your instrument can be returned free
of charge.
Briloner Leuchten GmbH
Im Kissen 2
59929 Brilon
Germany
21 GB

22 22

Briloner Leuchten GmbH
Im Kissen 2
59929 Brilon (Germany)
© by ORFGEN Marketing
Version des informations · Stand der Informationen
Last Information Update: 04 / 2012
Ident.-No.: 1241/022L + 1242/022L042012-2
IAN 74184
 Loading...