


Sipura SPA-3000
Simplified Users Guide
Version 1.1e
A Step by Step Introduction
Written by Jason
from
JMG Technology
http://www.jmgtechnology.com.au

Section 1 – Getting Started
When you receive your SPA-3000 it should contains the following items:
1.SPA-3000
2.Power supply
3.Phone cable
4.Network cable
5.Quickstart guide
Old Version (Sipura) |
New Version (Linksys) |
*** There is no difference between the Old Sipura SPA-3000 and the new Linksys SPA-3000 apart from the case. All firmware and internals are the same.
Setting up the hardware:
Step 1: Connect the power cable to your SPA-3000
Step 2: Connect the network cable from your SPA-3000 to your DHCP enabled modem/router Step 3: Connect an analogue phone to the “Phone” port in the SPA-3000.
Step 4: Turn the power on
Step 5: Pick up the phone and dial **** (You should hear a voice saying Sipura Configuration Menu) Step 6: Dial 110# (Write down the IP address that is returned)
Step 7: Connect your PSTN line to the “Line” port of the SPA-3000.
At this stage, you can choose whether to upgrade the firmware. The latest version of the SPA-3000 firmware at the time of writing this document is 3.1.10.
To upgrade the firmware see Appendix D.

Section 2 – Configuring the SPA-3000 via the Web Interface
Once you have the IP address of your SPA-3000 you can access the web interface by opening a web browser and typing the following in the Address :
http://<IP Address of SPA-3000>
For example: http://192.168.1.10
You should now see the Sipura SPA-3000 Phone Adapter Configuration screen. Now you will need to log into the unit as Administrator and change the view to advanced. See images below.
Click on “Admin Login”
Click on “advanced”
Note: You can also go directly to the admin/advanced section by typing
http://192.168.1.10/admin/advanced

Section 3 – Regional Settings
Click on the “Regional” tab.
The following changes are optional, however they will make your SPA-3000 sound more Australian. Under the Call Progress Tones and Distinctive Ring Patterns headings change:
Dial tone: |
400@-19,425@-19,450@-19;10(*/0/1+2+3) |
Busy Tone: |
425@-19;10(.375/.375/1) |
Reorder Tone: |
425@-19, 425@-29;60(.375/.375/1,.375/.375/2) |
Ring Back Tone: |
400@-19,425@-19,450@-19;*(.4/.2/1+2+3,.4/2/1+2+3) |
MWI Dial Tone: |
400@-19,425@-19,450@-19;2(.1/.1/1+2);10(*/0/1+2) |
Ring1 Cadence: |
60(.4/.2,.4/2) |
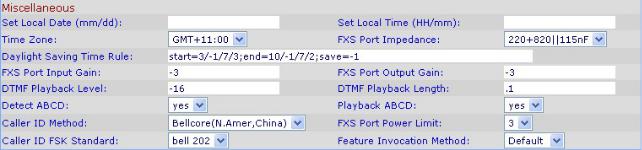
The following changes are required under the Miscellaneous heading :
FXS Port Impedance: 220+820||115nF
If you would like to configure the Time and Daylight savings, see Appendix F. This is completely optional.
Section 4 – Line 1 Settings
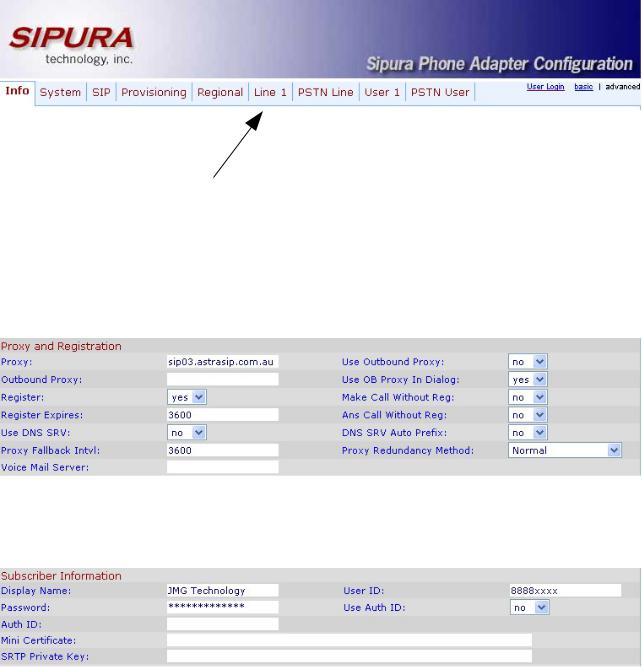
Click on the “Line 1” tab.
The first thing that needs to be changed is under the Proxy and Registration heading. Here you will need to enter the proxy and registration information given to you by your VoIP provider.
The following image shows the setup for Astratel.
The second thing that needs to be configured is under the Subscriber Information heading. Here you will need to enter your user id and password for given to you from your VoIP provider.
For some VoIP providers you will also have to enter the Auth ID and set Use Auth ID to
yes.
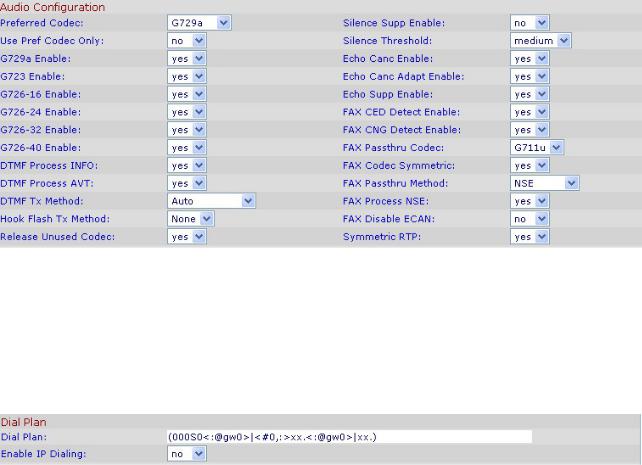
The next thing that needs to be altered is under the Audio Configuration heading. The following change is required.
Preferred Codec: G729a
The final item that requires changing is under the Dial Plan heading. The dial plan will vary from provider to provider. The dial plan show below is an example only, and may require alteration depending on which VoIP provider you subscribe to. See Appendix A for a detailed description of how dial plans work.
Dial Plan: (000S0<:@gw0>|<#0,:>xx.<:@gw0>|xx.)

Section 5 – PSTN Line Settings
Click on the “PSTN Line” tab.
The first thing that needs to be changed is under the PSTN Disconnect Detection heading. The following change is required:
Disconnect Tone: 425@-30,425@-30;1(.375/.375/1+2)
Some users have reported that the disconnect tone for Optus is slightly different than the above disconnect tone. If you are using Optus and are having problems, it is recommended that you try the following code:
Optus Disconnect Tone: 425@-30,425@-30;10(.375/.375/1+2)
The next thing that needs to be changed is under the International Control heading. The following changes are required:
FXO Port Impedance: |
220+820||120nF |
PSTN To SPA Gain: |
3 |
On-Hook Speed: |
26ms (Australia) |
 Loading...