


Instant EtherFast© Series
EtherFast 10/100
PrintServers
Use this User Guide to install the following Linksys products:
•EtherFast 10/100 2-Port Switched PrintServer (EFSP42)
•EtherFast 10/100 3-Port Print Server (EPSX3)
•EtherFast 10/100 1-Port Print Server (PPSX1)
User Guide
COPYRIGHT & TRADEMARKS
Copyright © 2000 Linksys, All Rights Reserved. Instant EtherFast 10/100 PrintServer is a registered trademark of Linksys. Microsoft, Windows, and the Windows logo are registered trademarks of Microsoft Corporation. All other trademarks and brand names are the property of their respective proprietors.
LIMITED WARRANTY
Linksys guarantees that every EtherFast 10/100 PrintServer is free from physical defects in material and workmanship under normal use for three (3) year from the date of purchase. If the product proves defective during this warranty period, call Linksys Customer Support in order to obtain a Return Authorization number. BE SURE TO HAVE YOUR PROOF OF PURCHASE ON HAND WHEN CALLING. RETURN REQUESTS CANNOT BE PROCESSED WITHOUT PROOF OF PURCHASE. When returning a product, mark the Return Authorization number clearly on the outside of the package and include your original proof of purchase.
IN NO EVENT SHALL LINKSYS’ LIABILITY EXCEED THE PRICE PAID FOR THE PRODUCT FROM DIRECT, INDIRECT, SPECIAL, INCIDENTAL, OR CONSEQUENTIAL DAMAGES RESULTING FROM THE USE OF THE PRODUCT, ITS ACCOMPANYING SOFTWARE, OR ITS DOCUMENTATION. Linksys makes no warranty or representation, expressed, implied, or statutory, with respect to its products or the contents or use of this documentation and all accompanying software, and specifically disclaims its quality, performance, merchantability, or fitness for any particular purpose. Linksys reserves the right to revise or update its products, software, or documentation without obligation to notify any individual or entity. Please direct all inquiries to:
Linksys P.O. Box 18558, Irvine, CA 92623
FCC STATEMENT
The EtherFast 10/100 PrintServer has been tested and found to comply with the limits for a Class A digital device, pursuant to Part 15 of the FCC Rules. These limits are designed to provide reasonable protection against harmful interference in a residential installation. This equipment generates, uses, and can radiate radio frequency energy and, if not installed and used according to the instructions, may cause harmful interference to radio communications. However, there is no guarantee that interference will not occur in a particular installation. If this equipment does cause harmful interference to radio or television reception, which is found by turning the equipment off and on, the user is encouraged to try to correct the interference by one or more of the following measures:
•Reorient or relocate the receiving antenna
•Increase the separation between the equipment or device
•Connect the equipment to an outlet other than the receiver’s
•Consult a dealer or an experienced radio/TV technician for assistance
002

Instant EtherFast® Series
Table of Contents
Introduction |
1 |
Your New EtherFast 10/100 PrintServer |
1 |
PrintServer Package Contents |
2 |
Getting to Know the Etherfast 10/100 PrintServers |
2 |
The 1 and 3-Port PrintServers |
5 |
The 2-Port Switched PrintServer |
8 |
PrintServer Hardware Installation |
10 |
Part I- Windows Driver Setup (for 98, 95, and NT 4.0) |
13 |
Part IIWindows 98 & 95 Port Configuration |
18 |
Part IIWindows NT 4.0 Port Configuration |
23 |
NetWare Driver Setup |
29 |
Pure IP NetWare 5.x Setup |
31 |
IPX Printing in NetWare 5.x, 4.x, 3.x |
35 |
Bi-Admin: PrintServer Management |
37 |
Installing Bi-Admin |
37 |
Starting Bi-Admin |
38 |
Using Bi-Admin |
39 |
Troubleshooting |
44 |
Appendix |
57 |
DHCP Support |
57 |
Setting Up the TCP/IP and IPX Protocols |
58 |
Types of Cabling |
62 |
Parallel Pin Assignments |
64 |
Manual NetWare 5.x and 4.x in Windows with IPX |
65 |
NetWare 5.x and 4.x with Windows |
70 |
NetWare 4.x with DOS |
74 |
NetWare 3.x Setup |
80 |
Using Windows NT 4.0 LPR Port |
84 |
Tips on Using the 10/100 2-Port Switched PrintServer |
85 |
Specifications |
90 |
Environmental Specifications |
90 |
Customer Support |
91 |
EtherFast 10/100 PrintServers
Introduction
Your New EtherFast 10/100 PrintServer
Congratulations on your purchase of the Linksys EtherFast 10/100 PrintServer, the fastest and easiest way to network your printers. Now you can sharing your printing resources without tying up your workstation performance with pending print jobs.
Linksys is also introducing its new line of hybrid PrintServers, with the first PrintServer ever to offer four integrated 10/100 Switched Ports, giving your network the combined power of a switch and print server in one! The EtherFast 10/100 2-Port Switched PrintServer (EFSP42) features two highspeed printer ports and four extra full duplex, 10/100 autosensing switched ports, allowing you to connect up to two printers and four PCs (or other network devices) without the hassles of adding more hardware. This Switched PrintServer serves as an ideal network backbone, providing dedicated bandwidth and the simplest way to expand and organize your departmental, small office, or home office networks.
Your PrintServer comes with an easy-to-use software management suite that runs seamlessly with all Windows operating systems. Fully compatible with standard laser, bubble jet, ink jet, and dot matrix printers, the PrintServer also supports your bidirectional printers. Direct Memory Access (DMA) technology, a 256KB buffer, and automatic collision control all result in your PrintServer handling print jobs up to 50% faster than regular print serverseven complex graphics and layout jobs.
1
Instant EtherFast® Series
PrintServer Package Contents
Check to see that your Linksys product contains all of the items listed below. If any items are missing, contact your Linksys dealer.
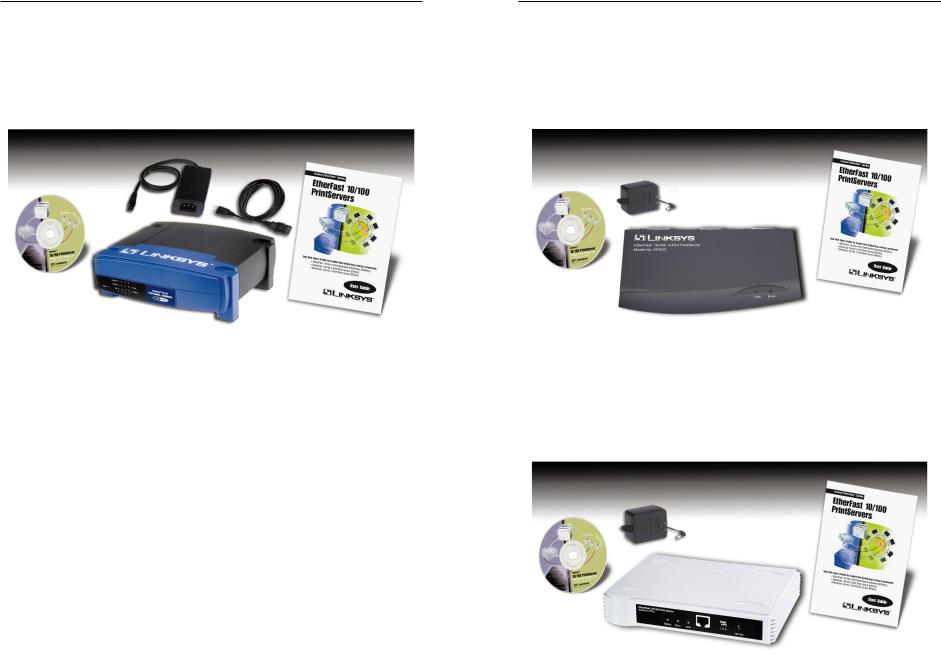
EtherFast 10/100 2-Port Switched PrintServer (EFSP42)
•One Linksys EtherFast 10/100 2-Port Switched PrintServer
•One Setup and Utility CD
•One Power Adapter and One Power Cord
•One User Guide and Registration Card
EtherFast 10/100 PrintServers
EtherFast 10/100 3-Port PrintServer (EPSX3)
•One Linksys EtherFast 10/100 3-Port PrintServer
•One Setup and Utility CD
•One Power Cord
•One User Guide and Registration Card
EtherFast 10/100 1-Port PrintServer (PPSX1)
•One Linksys EtherFast 10/100 1-Port PrintServer
•One Setup and Utility CD
•One Power Cord
•One User Guide and Registration Card
2 |
3 |
Instant EtherFast® Series
Etherfast 10/100 PrintServer Features
•Bidirectional 1, 2, and 3-Port PrintServers Serve Both 10BaseT and 100BaseTX Network Hardware
•Simultaneously Supports Multiple Print Jobs
•Runs with Virtually All Laser, Ink Jet, Bubble Jet, Color, and Dot Matrix Printers
•All PrintServer Ports Support Parallel and Bidirectional Printers
•Stand-Alone Unit - No Dedicated PrintServer PC Required
•Easy-to-Use Management Utility
•Compatible with Both Half and Full Duplex Networks
•On-Board DMA Controller Chip Supports Turbo Printing Speeds
•256KB RAM Buffer for Faster Graphics
•512KB Flash Memory for Future Upgrades
•Automatic Data Collision Control & Polarity Correction
•Free Technical Support & Software Upgrades
•3-Year Limited Warranty
Additional Features for the 2-Port Switched PrintServer
•4 Full-Duplex, Dedicated-Bandwidth 10/100 Switched Ports
•10/100 Autosensing Lets You Integrate Both 10Mbps and 100Mbps Devices
•Uplinks Easily to Other Switches and Hubs for Hasslefree Expansion
•Advanced Store-and-Forward Packet Switching
•Runs Up to a Blazing 200Mbps in Full Duplex Mode
•Independently Switched Ports Protects Your PCs From Downed Segments
EtherFast 10/100 PrintServers
Getting to Know the EtherFast 10/100 Printservers
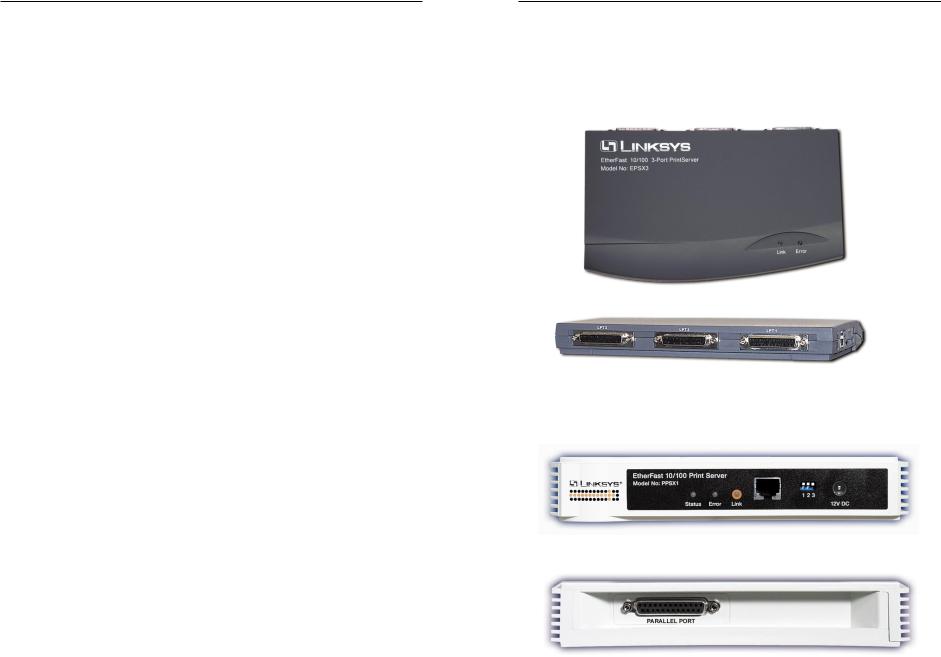
• The EtherFast 10/100 3-Port PrintServer (EPSX3)
Top View
Back View
• The EtherFast 10/100 1-Port PrintServer (PPSX1)
Front View
Back View
4 |
5 |

Instant EtherFast® Series
Your 1 and 3-Port Printserver LEDs
Following are the LEDs on the front of your PrintServer. The guide below tells you what each LED means. Not all PrintServer models will have all the LEDs.
Power |
The Power LED lights up green when the PrintServer is |
|
powered on. |
Link |
The Link LED lights up green when a successful connec- |
|
tion is made between the PrintServer and your network |
|
through the PrintServer’s Uplink Port. This LED is labeled |
|
as Link/Act on the 2-Port model. |
Status |
The Status LED lights up green when the PrintServer runs |
|
a self-diagnostic test while booting up. It turns off when the |
|
diagnosis is successfully completed. If this LED stays on |
|
too long, see page 44 for Troubleshooting. |
Error |
The Error LED lights up red when there is a problem with |
|
the PrintServer or it is writing information to the |
|
PrintServer. When assigning an IP address, this LED will |
|
also light up for a few seconds. |
EtherFast 10/100 PrintServers
Dip Switches Settings (1 and 3-Port Models Only)
There are three small, white dip switches on the PrintServer that you can use to set your PrintServer to auto-detect or manually set your network speeds. These switches are on the left edge of the 3-Port PrintServer (EPSX3) and on the front of the 1-Port PrintServer (PPSX1). A switch set in the down position is ON. In the up position, the dip switch is OFF. Set your dip switches as follows:
Dip Switch 1: This dip switch controls the Auto-Negotiation Mode, which enables the PrintServer to automatically detect the speed (10Mbps or 100Mbps), polarity, and duplex of your network cabling. If Dip Switch 1 is OFF in the up position, Dip Switches 2 and 3 are automatically disabled.
Dip Switch 2: This dip switch controls the PrintServer’s speed. For 100Mbps data transfer, set this dip switch OFF in the up position. For 10Mbps transfer, set the switch ON in the down position. When Dip Switch 1 is OFF, Dip Switch 2 is disabled.
Dip Switch 3: This dip switch controls the duplex mode of data transfer. When this switch is set ON in the down position, data transfer runs in half duplex mode. When this switch is set on OFF in the up position, data transfer runs in full duplex mode. When Dip Switch 1 is OFF, Switch 3 is disabled.
Note: The 2-Port Switched PrintServer (EFSP42) does not have any dip switches.
6 |
7 |
Instant EtherFast® Series
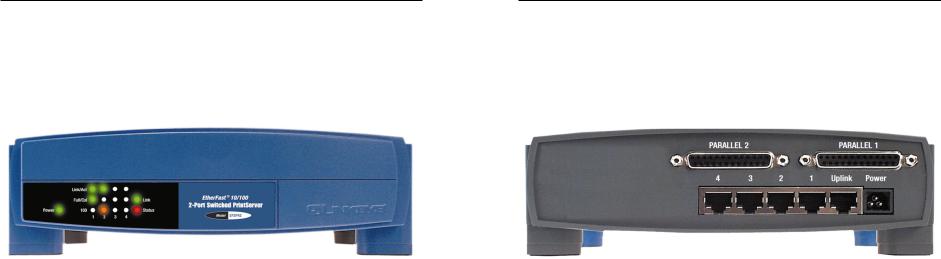
Getting to Know the 10/100 2-Port Switched PrintServer (EFSP42)
The Front Panel LEDs (EFSP42)
The 10/100 2-Port Switched PrintServer LEDs
These 3 LEDs apply to the 2-Port Switched PrintServer only (EFSP42).
Link/Act |
The Link/Act LED lights up a solid green when the |
|
PrintServer is successfully connected to a device through |
|
that port. If this LED is flickering green, the PrintServer is |
|
actively sending or receiving data through that port. |
Full/Col |
The Full/Col LED lights up solid green when a successful |
|
full duplexconnection is made through that port. When this |
|
Full/Col LED is off, then the data is transmitting in half |
|
duplex mode. If the green LED flickers, that connection is |
|
experiencing collisions. Infrequent collisions are normal. If |
|
the switch seems to experience excessive collisions, verify |
|
that your network cabling is securely crimped and installed |
|
correctly. If this LED flickers too often, see page 44 for |
|
Troubleshooting. |
100The 100 LED lights up orange when a successful 100Mbps connection is made through that port. When the 100 LED is off, then the data transfer rate is 10Mbps.
EtherFast 10/100 PrintServers
The Rear Panel Ports
The 10/100 2-Port Switched PrintServer Ports
Power Port |
This port on the back of your unit connects your |
|
Switch’s AC Power cord. |
Parallel 1, Parallel 2 |
These two Parallel (LPT) Ports connect to your |
|
printers. |
Uplink Port |
The Uplink Port, which is shared with Port 1, con- |
|
nects to a standard RJ-45 port on another switch, |
|
hub, or router to expand your network. |
Ports 1 to 4 |
These four ethernet RJ-45 Ports connect to your |
|
network devices, such as PCs, other print servers, |
|
remote hard drives, and any other networkable |
|
device. Use Cat 5 UTP cabling with these ports. |
8 |
9 |

Linksys Instant EtherFast® Series
PrintServer Hardware Installation
Overview
The following instructions will get your PrintServer hardware installed and powered on your network.
Before starting your physical installation, be sure to find the PrintServer’s Default Name and Node Address first. The information may be hard to access after the PrintServer is completely installed in your network and surrounded by wires and computers.
Finding the PrintServer’s Default Name
On the back or bottom of your PrintServer, there is a white bar code sticker with a SC number printed on it (example: SC123456). This number is the PrintServer’s Default Name, which you’ll use in the PrintServer driver installation. Since it is written in hexadecimal form, the SC number may include letters as well as numbers. Write it in the box below for future reference.
Finding the PrintServer’s Node Address
To find the node address of the PrintServer, add 00C002 to your PrintServer’s Default Name. The resulting combined number is your PrintServer’s Node Address. Write it in the box below for future reference.
(example: 00C002123456).
For example, if your PrintServer’s Default Name is SC123456, then your PrintServer’s Node Address is 00C002123456.
PrintServer Default Name: ___________________________________
PrintServer Node Address: 00C002_____________________________
EtherFast 10/100 PrintServers
Connecting Your PrintServer to your Network
Connecting the Power
The PrintServer does not have an ON/OFF power switch. Whenever its AC power adapter is plugged into a power supply, your PrintServer is powered on. The PrintServer can be powered on before, during, or after your network.
Only use the power adapter packaged with the PrintServer. Using a different power adapter could damage your PrintServer.
1.Plug the power adapter into your PrintServer’s Power Port (on the back of the unit). If you have a Switched PrintServer (EFSP42 only), connect the its power cord to the power adapter, which is larger than the cord, and then plug the power cord into the Switched PrintServer.
2.Plug the power adapter into the wall. The PrintServer’s Power LED should light up green.
Connecting Your Printserver to Your Network
If you have a 1 or 3-Port PrintServer (PPSX1 or EPSX3), connect your PrintServer with a Cat 5 UTP cable from the RJ-45 port to a standard port on your switch or hub. If you have a 2-Port Switched PrintServer, complete steps 1 through 4 below.
1.After powering on the PrintServer, plug one end of a Category 5 UTP cable into the PrintServer’s Uplink Port (EFSP42 only).
2.Connect the other end of the cable into a networked hub or switch. The distance between your Printserver and the second device should not exceed 328 feet (100 meters).
3.The Link and Status LEDs will both become active. If the Link LED does not light up or the Status LED stays on for a long time, see page 44 for Troubleshooting.
4.You can network other computers or peripherals through the PrintServer’s Switched RJ-45 Ports 1 through 4 (EFSP42 only) at any time. When the PrintServer is powered on, the Switched Ports are always active and will accept new network connections.
11
Instant EtherFast® Series
Connecting Printer(s) to Your PrintServer
1.Connect your printer(s) to one of the PrintServer’s parallel (LPT) ports with your printer cable. Some printers, especially bidirectional models, may require special shielded cabling. Consult your printer’s user guide for cabling specifications.
2.Power on your printer(s).
Your PrintServer hardware installation is now complete, and you are now ready to install your PrintServer software.
•If you are running Windows 98, 95 or NT 4.0, go to page 13.
•If you are running NetWare, go to page 29.
EtherFast 10/100 PrintServers
Part I - Windows Driver Setup
Overview
This section installs the Printserver driver on your Windows 98, 95, or NT computers to give them PrintServer printing abilities. The PrintServer is fully compatible with Windows 98, 95, and NT 4.0 environments.
At this point, you must have:
•the PrintServer hardware installed on your network. If not, see page 11.
•TCP/IP installed on each of your computers. If not, see page 58.
•IPX installed on each of your computers. If not, see page 58.
•an IP address assigned to each of the computers on your network. If not, see page 58.
This setup should be completed on the network administrator’s computer before all other users’ computers on the network. The IP address for your PrintServer will be assigned in this first installation on the network administrator’s computer only, which takes three extra steps.
It is assumed that your CD-ROM drive’s letter name is designated as D. If your CD drive is named another letter, replace all instances of D with the appropriate letter.
If you need to install the PrintServer driver on computers without a CD-ROM drive, you can create a setup disk by copying the contents of D:\Driver\Win9xNT onto a floppy disk.
Note: To set up DHCP on the PrintServer, install Bi-Admin first (see page 37), then install DHCP (see page 57), then proceed to install the Printer Driver.
12 |
13 |
Instant EtherFast® Series
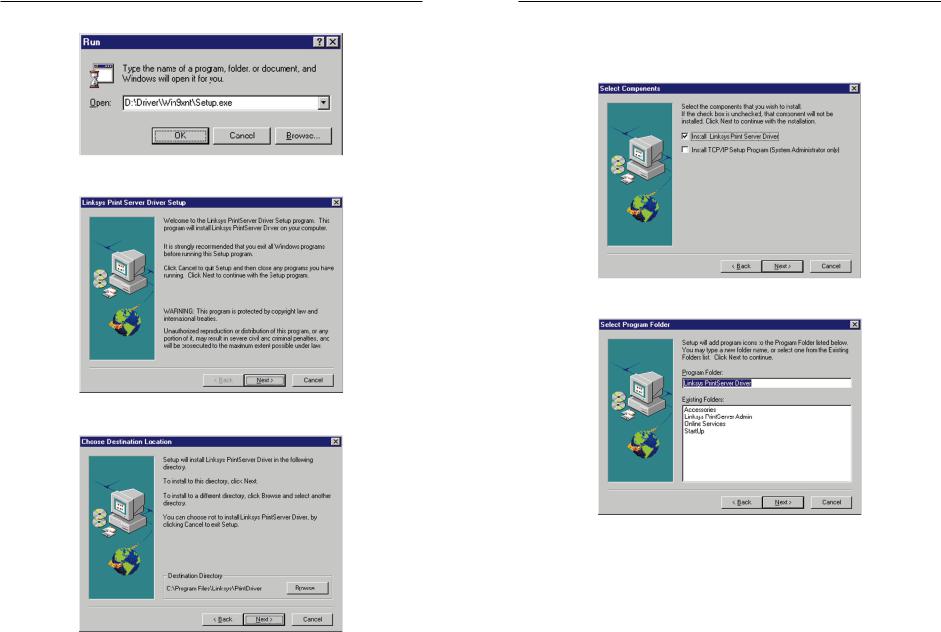
1. Click on Start, Run, and enter D:\Driver\Win9xnt\Setup.exe. Click OK.
2. The Install Wizard window appears. Click Next.
3. Click Next to accept the Destination Directory default, shown below.
EtherFast 10/100 PrintServers
4.The Select Components window appears. If your computer is the network administrator’s computer, check Install TCP/IP Setup Program (System Administrator only). Otherwise, select the default, Install Linksys PrintServer Driver. Click Next.
5. Accept the default Program Folder. Click Next.
14 |
15 |
Instant EtherFast® Series
The window below will appear as the files are copied to your computer.
6.Before the file copy finishes, the Configure PrintServer window will pop up again as a pre-test. Click Cancel to complete the file copy. To check for your successful file copy, click on Start, Programs, Linksys PrintServer Driver, and check to see that TCPIP Setup is on its subfolder.
If you are setting up the network administrator’s computer, finish steps 7 to 10. Otherwise, if you are simply installing this on a network user’s computer, skip steps 7 to 9 and proceed to step 10 to finish this section.
EtherFast 10/100 PrintServers
7.On the network administrator computer only, click Start, Programs,
Linksys PrintServer Driver, and TCPIP Setup to set up your PrintServer’s IP address.
8.In the Device Name field, enter the PrintServer’s 8-digit Default Name written on page 10 and the white barcode sticker on your unit. The example settings below for the PrintServer Settings and the Network Administrator Computer Settings show how the settings have been set for the picture in step 7. If you are not sure what settings to use, see your network administrator.
Printserver Settings
Device Name: SCA71107
IP Address: 10.0.0.2
Subnet Mask: 255.255.255.0
Gateway: 0.0.0.0 (optional)
Network Administrator Computer Settings
IP address: 10.0.0.1
Subnet Mask: 255.255.255.0
9.When you are finished entering the values for the IP address, Gateway address (optional), and the Subnet Mask, click Set Device.
10.If you are configuring a...
•Windows 98/95 computer, go to page 18 to finish your PrintServer Setup.
•Windows NT 4.0 computer, go to page 23 to finish your PrintServer Setup.
16 |
17 |
Instant EtherFast® Series
Part II - Windows 98 and 95
Port Configuration
Overview
This section configures your Windows 98 or 95 computers to give them printing abilities to the PrintServer.
At this point, you must have:
•the PrintServer hardware installed on your network. If not, see page 10.
•TCP/IP installed on each of your computers. If not, see page 58.
•IPX installed on each of your computers. If not, see page 58.
•your PrintServer and each of the computers on your network assigned to an IP address. If not, see page 58.
If you do not complete the above first, your installation will not be complete.
It is assumed that your CD-ROM drive’s letter name is designated as D. If your CD drive is named another letter, replace all instances of D with the appropriate letter.
If you need to install the PrintServer driver on computers without a CD-ROM drive, you can create a setup disk by copying the contents of D:\Driver\Win9xNT onto a floppy disk.
EtherFast 10/100 PrintServers
Installing the Printer Driver for Each Printer
After installing TCP/IP, install the Windows printer driver for each printer(s) attached to the PrintServer.
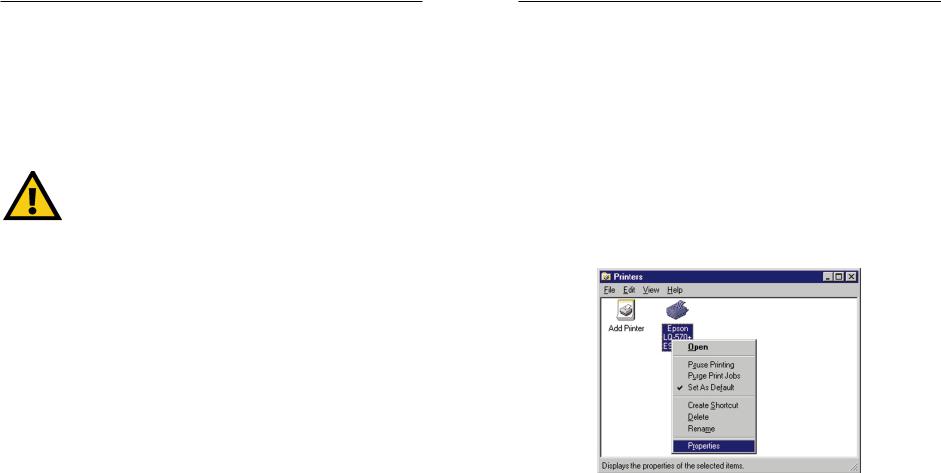
1.Click on Start, Settings, and Printers.
2.If no printers are installed, install the printer driver(s) per the directions from the printer’s manufacturer, as if the printer is a “local” printer attached directly to the PC.
3.After the printer driver has been installed, click on Start, Settings, and Printers. Locate the printer you want to attach to the PrintServer, which appears as an icon in the Printers folder, and right-click on it.
4.Click on Properties.
18 |
19 |

Instant EtherFast® Series
5.When the Properties window appears, choose the Details tab. Click on the Add Port button.
The Add Port window will appear, shown below.
7.In the Add Port window, select Other and then PrintServer under the listed ports to add.
EtherFast 10/100 PrintServers
8. Click OK. The Configure PrintServer window appears, shown below.
9.Enter the IP address or the Default Name of the PrintServer in the Device Name field. If you are not sure what the number is, click on Browse and choose from the list that appears, or see page 10.
It may take a few seconds for the list to appear. If you have multiple PrintServers on your network, be sure to pick the correct name.
10. Click on the Select Device Port button.
20 |
21 |
Instant EtherFast® Series
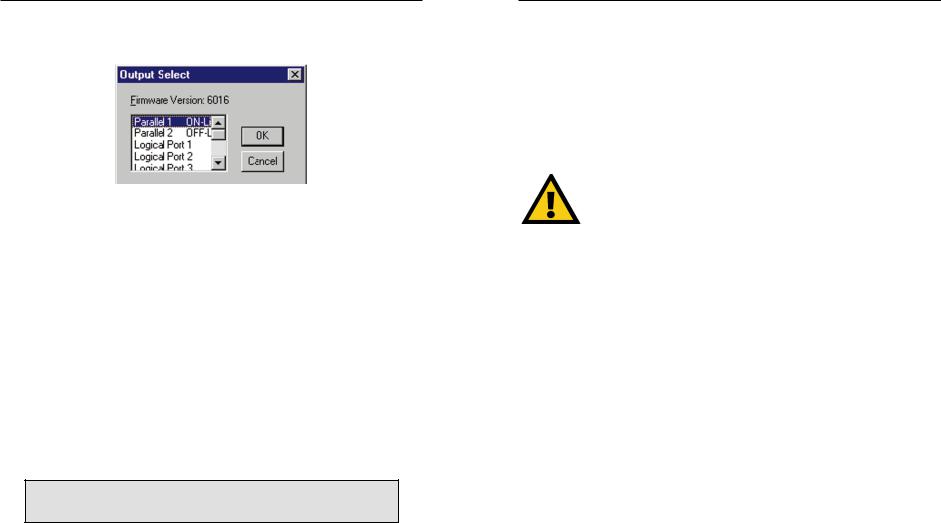
11.If you are using PrintServer with more than one parallel port, choose the PrintServer parallel (LPT) port connected to the newly installed printer.
12.In the Configure PrintServer window, set the Retry interval, which determines how many seconds Windows waits before attempting to send a print job again if the PrintServer was busy.
13.If you want each print job to be identified with the user’s name, enable the banner. If you need postscripting printing for the banner, select the PostScript option. Be sure to enter the workgroup or username you want to appear on the banner.
14.When you finish, click OK. When the Printer Properties window reappears, click Apply, then select the General tab. Click on Print Test Page. If the page prints, click OK in the Properties window and close all opened windows. Your PrintServer installation is now complete, and you can print as you do normally.
To change the PrintServer’s internal setup or configuration, see page 37.
Note: For 3-Port PrintServers (EPSX3) and 2-Port Switched PrintServers (EFSP42), you must add a port each time you add a printer to your PrintServer and each time you add an additional PrintServer to your network.
EtherFast 10/100 PrintServers
Part IIWindows NT Port
Configuration
Your PrintServer is fully compatible with Windows NT 4.0 environments. This section will show you how to set up each port you use on the PrintServer so all the computers on your networks can print from the PrintServer.
At this point, you must have:
•TCP/IP installed on each of your computers. If not, see page 58.
•IPX installed on each of your computers. If not, see page 58.
•have an IP address for the PrintServer and each computer on the network.
•Logged on as an NT Adminstrator.
If you do not complete the above first, your installation will not be complete.
It is assumed that your CD-ROM drive’s letter name is designated as D. If your CD drive is named another letter, replace all instances of D with the appropriate letter.
22 |
23 |
Instant EtherFast® Series
Installing the NT Printer Driver
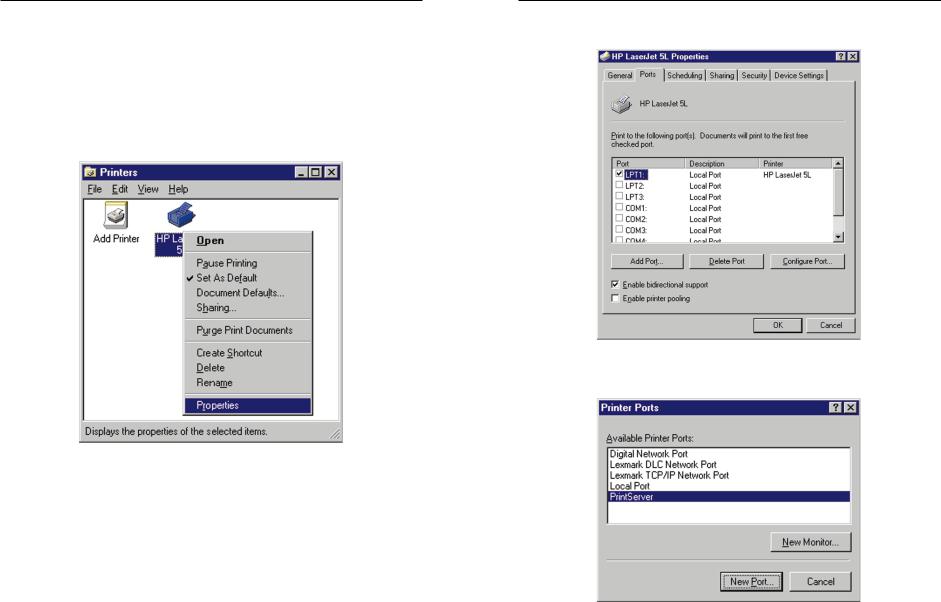
1.Click on Start, Settings, and Printers.
2.Install the printer driver per the directions from the printer’s manufacturer, if you haven’t already.
3.After the printer driver is installed, click on the printer to be configured, then right-click to select Properties.
EtherFast 10/100 PrintServers
4.When the Properties window with the name of your printer appears, click on Ports and then Add Port.
5.The Printer Ports window appears listing Available Printer Ports. Select PrintServer and click on New Port.
6. Click on Browse to search for your PrintServer.
24 |
25 |
 Loading...