


 Loading...
|
® |
|
A Division of Cisco Systems, Inc. |
|
|
2,4802GHz.11g Wireless-G |
User Guide |
|
|
ADSL Gateway |
|
WIRELESS |
with SRX200 |
|
|
|
|
Model No. WAG54GX2 (EU) |
|
|

Wireless-G ADSL Gateway with SRX200
Copyright and Trademarks
Specifications are subject to change without notice. Linksys is a registered trademark or trademark of Cisco Systems, Inc. and/or its affiliates in the U.S. and certain other countries. Copyright © 2005 Cisco Systems, Inc. All rights reserved. Other brands and product names are trademarks or registered trademarks of their respective holders.
How to Use this Guide
Your Guide to the Wireless-G ADSL Gateway with SRX200 has been designed to make understanding networking with the Gateway easier than ever. Look for the following items when reading this User Guide:
This checkmark means there is a Note of interest and is something you should pay special attention to while using the Gateway.
This exclamation point means there is a Caution or Warning and is something that could damage your property or the Gateway.
This question mark provides you with a reminder about something you might need to do while using the Gateway.
In addition to these symbols, there are definitions for technical terms that are presented like this:
word: definition.
Also, each figure (diagram, screenshot, or other image) is provided with a figure number and description, like
this:
Figure 0-1: Sample Figure Description
Figure numbers and descriptions can also be found in the “List of Figures” section in the “Table of Contents”.
WAG54GX2-EU-UG-50811NC JL
Wireless-G ADSL Gateway with SRX200
Table of Contents
Chapter 1: Introduction |
1 |
Welcome |
1 |
What’s in this User Guide? |
2 |
Chapter 2: Planning Your Network |
4 |
The Gateway’s Functions |
4 |
IP Addresses |
4 |
Chapter 3: Getting to Know the Wireless-G ADSL Gateway with SRX200 |
6 |
Ports and Reset Button on Side Panel |
6 |
LEDs on Side Panel |
7 |
Chapter 4: Connecting the Wireless-G ADSL Gateway with SRX200 |
8 |
Overview |
8 |
Wired Connection to a Computer |
9 |
Wireless Connection to a Computer |
10 |
Chapter 5: Setting up the Wireless-G ADSL Gateway with SRX200 |
11 |
Overview |
11 |
Using the Setup Wizard |
11 |
Chapter 6: Configuring the Wireless-G ADSL Gateway with SRX200 |
24 |
Overview |
24 |
How to Access the Web-based Utility |
26 |
The Setup Tab |
26 |
The Wireless Tab |
35 |
The Security Tab |
42 |
The Access Restrictions Tab |
49 |
The Applications and Gaming Tab |
51 |
The Administration Tab |
58 |
The Status Tab |
63 |
Appendix A: Troubleshooting |
67 |
Common Problems and Solutions |
67 |
Frequently Asked Questions |
75 |
Appendix B: Wireless Security |
82 |
Security Precautions |
82 |
Security Threats Facing Wireless Networks |
82 |
Wireless-G ADSL Gateway with SRX200
Appendix C: Finding the MAC Address and IP Address for Your |
|
Ethernet Adapter |
85 |
Windows 98 or Me Instructions |
85 |
Windows 2000 or XP Instructions |
86 |
Appendix D: Upgrading Firmware |
87 |
Appendix E: Glossary |
88 |
Appendix F: Specifications |
95 |
Appendix G: Warranty Information |
97 |
Appendix H: Regulatory Information |
98 |
Appendix I: Contact Information |
105 |
Wireless-G ADSL Gateway with SRX200
List of Figures
Figure 2-1: Network |
4 |
Figure 3-1: Ports and Reset Button on Side Panel |
6 |
Figure 3-2: LEDs on Side Panel |
7 |
Figure 4-1: Connect the ADSL Line |
9 |
Figure 4-2: Connect a PC |
9 |
Figure 4-3: Connect the Power |
9 |
Figure 4-4: Connect the ADSL Line |
10 |
Figure 4-5: Connect the Power |
10 |
Figure 5-1: Setup Wizard’s Welcome - Language Selection Screen |
11 |
Figure 5-2: Setup Wizard’s Welcome - Start Wizard Screen |
11 |
Figure 5-3: Setup Wizard’s License Agreement Screen |
12 |
Figure 5-4: Setup Wizard’s Disconnect the Modem from the PC and ADSL Wall Jack Screen |
12 |
Figure 5-5: Setup Wizard’s Connect the Gateway to the ADSL Wall Jack Screen |
13 |
Figure 5-6: Setup Wizard’s Connect a Network Cable to a PC Screen |
13 |
Figure 5-7: Setup Wizard’s Connect the Network Cable to the Gateway Screen |
14 |
Figure 5-8: Setup Wizard’s Power on the Gateway Screen |
14 |
Figure 5-9: Setup Wizard’s Check the Gateway’s Status Screen |
15 |
Figure 5-10: Setup Wizard’s Select Your Country Screen |
15 |
Figure 5-11: Setup Wizard’s Select Your Internet Service Provider Screen (UK) |
16 |
Figure 5-12: Setup Wizard’s Configure DSL - 1483 Bridged Screen |
16 |
Figure 5-13: Setup Wizard’s Configure DSL - 1483 Routed Screen |
17 |
Figure 5-14: Setup Wizard’s Configure DSL - PPPoA Screen |
17 |
Figure 5-15: Setup Wizard’s Configure DSL - PPPoE Screen |
18 |
Figure 5-16: Setup Wizard’s Set the Gateway’s Password Screen |
18 |
Figure 5-17: Setup Wizard’s Wireless Settings Screen |
19 |
Figure 5-18: Setup Wizard’s Configure Wireless Security Settings Screen |
19 |
Figure 5-19: Setup Wizard’s Wireless Security - WPA Personal Screen |
20 |
Figure 5-20: Setup Wizard’s Wireless Security - WPA2 Personal Screen |
20 |
Figure 5-21: Setup Wizard’s Wireless Security - WPA2 Mixed Mode Screen |
21 |
Figure 5-22: Setup Wizard’s Wireless Security - WEP (64-Bit) Screen |
21 |
Figure 5-23: Setup Wizard’s Wireless Security - WEP (128-Bit) Screen |
22 |
Figure 5-24: Setup Wizard’s Confirm New Settings Screen |
22 |
Wireless-G ADSL Gateway with SRX200 |
|
Figure 5-25: Setup Wizard’s Safe Surfing Screen |
23 |
Figure 5-26: Setup Wizard’s Congratulations Screen |
23 |
Figure 6-1: Login Screen |
26 |
Figure 6-2: Basic Setup |
26 |
Figure 6-3: RFC 1483 Bridged |
27 |
Figure 6-4: RFC 1483 Routed |
28 |
Figure 6-5: IPoA |
28 |
Figure 6-6: RFC 2516 PPPoE |
29 |
Figure 6-7: RFC 2364 PPPoA |
29 |
Figure 6-8: Bridged Mode Only |
30 |
Figure 6-9: Optional Settings |
30 |
Figure 6-10: DDNS - DynDNS.org |
32 |
Figure 6-11: DDNS - TZO.com |
32 |
Figure 6-12: Advanced Routing |
33 |
Figure 6-13: Routing Table |
34 |
Figure 6-14: Basic Wireless Settings |
35 |
Figure 6-15: Wireless Security - WPA-Personal |
36 |
Figure 6-16: Wireless Security - WPA2-Personal |
36 |
Figure 6-17: Wireless Security - WPA2-Mixed |
37 |
Figure 6-18: Wireless Security - WPA Enterprise |
37 |
Figure 6-19: Wireless Security - WPA2 Enterprise |
38 |
Figure 6-20: Wireless Security - WEP |
38 |
Figure 6-21: Wireless Access |
39 |
Figure 6-22: MAC Address Filter List |
39 |
Figure 6-23: Wireless Client MAC List |
39 |
Figure 6-24: Advanced Wireless Settings |
40 |
Figure 6-25: Firewall |
42 |
Figure 6-26: VPN Passthrough |
43 |
Figure 6-27: VPN |
44 |
Figure 6-28: VPN Settings Summary |
44 |
Figure 6-29: Key Exchange Method - Auto (IKE) |
45 |
Figure 6-30: Key Exchange Method - Manual |
46 |
Figure 6-31: VPN Log |
46 |
Figure 6-32: Advanced VPN Tunnel Setup |
47 |
Wireless-G ADSL Gateway with SRX200 |
|
Figure 6-33: Internet Access Policy |
49 |
Figure 6-34: Internet Policy Summary |
49 |
Figure 6-35: List of PCs |
50 |
Figure 6-36: Single Port Forwarding |
51 |
Figure 6-37: Port Range Forwarding |
52 |
Figure 6-38: Port Triggering |
53 |
Figure 6-39: DMZ |
54 |
Figure 6-40: QoS |
55 |
Figure 6-41: QoS - Online Game |
56 |
Figure 6-42: QoS - MSN Messenger |
56 |
Figure 6-43: QoS - Voice Device |
56 |
Figure 6-44: QoS - Add a New Application (Port Range) |
56 |
Figure 6-45: QoS - Add a New Application (MAC Address) |
57 |
Figure 6-46: Management |
58 |
Figure 6-47: Allowed IP - IP Range |
58 |
Figure 6-48: Reporting |
60 |
Figure 6-49: System Log |
60 |
Figure 6-50: Diagnostics |
61 |
Figure 6-51: Backup&Restore |
61 |
Figure 6-52: Factory Defaults |
62 |
Figure 6-53: Firmware Upgrade |
62 |
Figure 6-54: Gateway |
63 |
Figure 6-55: Local Network |
64 |
Figure 6-56: DHCP Active IP Table |
64 |
Figure 6-57: ARP/RARP Table |
64 |
Figure 6-58: Wireless |
65 |
Figure 6-59: Networked Computers |
65 |
Figure 6-60: DSL Connection |
66 |
Figure C-1: IP Configuration Screen |
85 |
Figure C-2: MAC Address/Adapter Address |
85 |
Figure C-3: MAC Address/Physical Address |
86 |
Figure D-1: Firmware Upgrade |
87 |
Wireless-G ADSL Gateway with SRX200
Chapter 1: Introduction
Welcome
Thank you for choosing the Wireless-G ADSL Gateway with SRX200. This Gateway will provide your computers with a high-speed Internet connection as well as resources, including files and printers.
How does the Gateway do all of this? By connecting the Internet, as well as your computers and peripherals, to the Gateway, then the Gateway can direct and control communications for your network. Plus, since the Gateway is wireless, Internet access can be shared over the wireless broadcast as well as the wired network.
The Wireless-G ADSL Gateway with SRX200 combines smart antenna technology with standards-based, Wireless-G (802.11g) networking. By overlaying the signals of two Wireless-G compatible radios, the “Multiple In, Multiple Out” (MIMO) technology effectively doubles the data rate. Unlike ordinary wireless networking technologies that are confused by signal reflections, MIMO actually uses these reflections to increase the range and reduce “dead spots” in the wireless coverage area. The robust signal travels farther, maintaining wireless connections up to two times farther than standard Wireless-G. And the farther away you are, the more advantage you get—the higher data rate and reflection-friendly technology can yield up to six times more throughput than Wireless-G in some situations. The Gateway avoids interference by dynamically switching to the clearest channel available. Even your standard Wireless-G and -B equipment will work better when communicating with SRXenabled devices.
To protect your data and privacy, WPA encryption provides greater wireless security opportunities while the whole network is protected through a Stateful Packet Inspection (SPI) firewall and NAT technology. In addition, you can safeguard your family with parental control features such as Internet access restrictions and keyword blocking.
These security features, as well as the Gateway’s other settings, are accessed through the easy-to-use, browserbased utility.
But what does all of this mean?
Networks are useful tools for sharing Internet access and computer resources. You can access one printer from different computers and access data located on another computer’s hard drive. Networks are even used for playing multiplayer video games. So, networks not only are useful in homes and offices, but also can be fun.
PCs on a wired network create a LAN, or Local Area Network. They are connected with Ethernet cables, which is why the network is called “wired”. PCs equipped with wireless cards or adapters can communicate without cumbersome cables. By sharing the same wireless settings, within their transmission radius, they form a wireless network. This is sometimes called a WLAN, or Wireless Local Area Network. Since the Gateway has wireless capabilities, it can bridge your wired and wireless networks, letting them communicate with each other.
Chapter 1: Introduction
802.11b: an IEEE wireless networking standard that specifies a maximum data transfer rate of 11Mbps and an operating frequency of 2.4GHz.
802.11g: an IEEE wireless networking standard that specifies a maximum data transfer rate of 54Mbps, an operating frequency of 2.4GHz, and backward compatibility with 802.11b devices.
wpa (wi-fi protected access): a wireless security protocol using TKIP (Temporal Key Integrity Protocol) encryption, which can be used in conjunction with a RADIUS server.
spi (stateful packet inspection) firewall: a technology that inspects incoming packets of information before allowing them to enter the network.
firewall: Security measures that protect the resources of a local network from intruders.
nat (network address translation): NAT technology translates IP addresses of a local area network to a different IP address for the Internet.
network: a series of computers or devices connected for the purpose of data sharing, storage, and/or transmission between users
lan (local area network): The computers and networking products that make up the network in your home or office.
1
Welcome
Wireless-G ADSL Gateway with SRX200
With your networks all connected, wired, wireless, and the Internet, you can now share files and Internet access—and even play games. All the while, the Wireless-G ADSL Gateway with SRX200 protects your networks from unauthorized and unwelcome users.
Linksys recommends using the Setup CD-ROM for first-time installation of the Gateway. If you do not wish to run the Setup Wizard on the Setup CD-ROM, then use the instructions in this Guide to help you connect the Gateway, set it up, and configure it to bridge your different networks. These instructions should be all you need to get the most out of the Wireless-G ADSL Gateway with SRX200.
What’s in this User Guide?
This user guide covers the steps for setting up and using the Wireless-G ADSL Gateway with SRX200.
•Chapter 1: Introduction
This chapter describes applications of the Wireless-G ADSL Gateway with SRX200 and this User Guide.
•Chapter 2: Planning Your Network
This chapter describes the basics of networking.
•Chapter 3: Getting to Know the Wireless-G ADSL Gateway with SRX200 This chapter describes the physical features of the Gateway.
•Chapter 4: Connecting the Wireless-G ADSL Gateway with SRX200
This chapter instructs you on how to connect the Gateway to your network.
•Chapter 5: Setting up the Wireless-G ADSL Gateway with SRX200
This chapter explains how to set up the Gateway using its Setup Wizard.
•Chapter 6: Configuring the Wireless-G ADSL Gateway with SRX200
This chapter explains how to configure the Gateway’s settings using its Web-based Utility.
•Appendix A: Troubleshooting
This appendix describes some problems and solutions, as well as frequently asked questions, regarding installation and use of the Wireless-G ADSL Gateway with SRX200.
•Appendix B: Wireless Security
This appendix explains the risks of wireless networking and some solutions to reduce the risks.
•Appendix C: Finding the MAC Address and IP Address for your Ethernet Adapter.
This appendix describes how to find the MAC address for your computer’s Ethernet adapter so you can use the MAC filtering and/or MAC address cloning feature of the Gateway.
Chapter 1: Introduction |
2 |
What’s in this User Guide?
Wireless-G ADSL Gateway with SRX200
•Appendix D: Upgrading Firmware
This appendix instructs you on how to upgrade the firmware on the Gateway if you should need to do so.
•Appendix E: Glossary
This appendix gives a brief glossary of terms frequently used in networking.
•Appendix F: Specifications
This appendix provides the technical specifications for the Gateway.
•Appendix G: Warranty Information
This appendix supplies the warranty information for the Gateway.
•Appendix H: Regulatory Information
This appendix supplies the regulatory information regarding the Gateway.
•Appendix I: Contact Information
This appendix provides contact information for a variety of Linksys resources, including Technical Support.
Chapter 1: Introduction |
3 |
What’s in this User Guide?
Wireless-G ADSL Gateway with SRX200
Chapter 2: Planning Your Network
The Gateway’s Functions
A Gateway is a network device that connects two networks together.
In this instance, the Gateway connects your Local Area Network (LAN), or the group of computers in your home or office, to the Internet. The Gateway processes and regulates the data that travels between these two networks.
The Gateway’s NAT feature protects your network of computers so users on the public, Internet side cannot “see” your computers. This is how your network remains private. The Gateway protects your network by inspecting every packet coming in through the Internet port before delivery to the appropriate computer on your network. The Gateway inspects Internet port services like the web server, ftp server, or other Internet applications, and, if allowed, it will forward the packet to the appropriate computer on the LAN side.
Remember that the Gateway’s ports connect to two sides. The LAN ports connect to the LAN, and the ADSL port connects to the Internet. The LAN ports transmit data at 10/100Mbps.
IP Addresses
What’s an IP Address?
IP stands for Internet Protocol. Every device on an IP-based network, including computers, print servers, and Gateways, requires an IP address to identify its “location,” or address, on the network. This applies to both the Internet and LAN connections. There are two ways of assigning an IP address to your network devices. You can assign static IP addresses or use the Gateway to assign IP addresses dynamically.
Static IP Addresses
A static IP address is a fixed IP address that you assign manually to a computer or other device on the network. Since a static IP address remains valid until you disable it, static IP addressing ensures that the device assigned it will always have that same IP address until you change it. Static IP addresses must be unique and are commonly used with network devices such as server computers or print servers.
Chapter 2: Planning Your Network
Figure 2-1: Network
ip (internet protocol): a protocol used to send data over a network
NOTE: Since the Gateway is a device that connects two networks, it needs two IP addresses—one for the LAN, and one for the Internet. In this User Guide, you’ll see references to the “Internet IP address” and the “LAN IP address.”
Since the Gateway uses NAT technology, the only IP address that can be seen from the Internet for your network is the Gateway’s Internet IP address.
However, even this Internet IP address can be blocked, so that the Gateway and network seem invisible to the Internet—see the Security - Firewall tab in “Chapter 6: Configuring the Wireless-G ADSL Gateway with SRX200.”
4
The Gateway’s Functions
Wireless-G ADSL Gateway with SRX200
Since you use the Gateway to share your DSL Internet connection, contact your ISP to find out if they have assigned a static IP address to your account. If so, you will need that static IP address when configuring the Gateway. You can get that information from your ISP.
Dynamic IP Addresses
A dynamic IP address is automatically assigned to a device on the network, such as computers and print servers. These IP addresses are called “dynamic” because they are only temporarily assigned to the computer or device. After a certain time period, they expire and may change. If a computer logs onto the network (or the Internet) and its dynamic IP address has expired, the DHCP server will automatically assign it a new dynamic IP address.
DHCP (Dynamic Host Configuration Protocol) Servers
Computers and other network devices using dynamic IP addressing are assigned a new IP address by a DHCP server. The computer or network device obtaining an IP address is called the DHCP client. DHCP frees you from having to assign IP addresses manually every time a new user is added to your network.
A DHCP server can either be a designated computer on the network or another network device, such as the
Gateway. By default, the Gateway’s DHCP Server function is enabled.
If you already have a DHCP server running on your network, you must disable one of the two DHCP servers. If you run more than one DHCP server on your network, you will experience network errors, such as conflicting IP addresses. To disable DHCP on the Gateway, see the DHCP section in “Chapter 6: Configuring the Wireless-G ADSL Gateway with SRX200.”
Chapter 2: Planning Your Network |
5 |
IP Addresses

Wireless-G ADSL Gateway with SRX200
Chapter 3: Getting to Know the Wireless-G ADSL Gateway with SRX200
Ports and Reset Button on Side Panel
The Gateway’s ports and Reset button are located on a side panel.
Figure 3-1: Ports and Reset Button on Side Panel
Line |
The Line port connects to the ADSL line. |
Ethernet (1-4) The Ethernet ports connect to your computers and other network devices.
Reset Button There are two ways to reset the Gateway's factory defaults. Either press the Reset Button, for approximately five seconds, or restore the defaults from the Factory Defaults screen of the Administration tab in the Gateway’s Web-based Utility.
Power |
The Power port is where you will connect the power adapter. |
IMPORTANT: Resetting the Gateway to factory defaults will erase all of your settings (including Internet connection, wireless, and other settings) and replace them with the factory defaults. Do not reset the Gateway if you want to retain these settings.
Chapter 3: Getting to Know the Wireless-G ADSL Gateway with SRX200 |
6 |
Ports and Reset Button on Side Panel

Wireless-G ADSL Gateway with SRX200
LEDs on Side Panel
The Gateway's LEDs, which indicate network activity, are located on the other side panel.
|
Figure 3-2: LEDs on Side Panel |
(POWER) button |
When you want to power the Gateway on or off, push this button. |
POWER |
Green. The POWER LED lights up when the Gateway is powered on. |
WIRELESS |
Green. The WIRELESS LED lights up whenever there is a successful wireless connection. If |
|
the LED is flashing, the Gateway is actively sending or receiving data to or from one of the |
|
devices on the network. |
ETHERNET (1-4) |
Green. The ETHERNET LED serves two purposes. If the LED is continuously lit, the Gateway |
|
is successfully connected to a device through the Ethernet port. If the LED is flashing, it is an |
|
indication of any network activity. |
DSL |
Green. The DSL LED lights up whenever there is a successful DSL connection. The LED |
|
flashes while the Gateway is establishing the ADSL connection. |
INTERNET |
Green. The INTERNET LED lights up green when an Internet connection to the Internet |
|
Service Provider (ISP) is established. The INTERNET LED lights up red when the connection |
|
to the ISP fails. |
Chapter 3: Getting to Know the Wireless-G ADSL Gateway with SRX200 |
7 |
LEDs on Side Panel
Wireless-G ADSL Gateway with SRX200
Chapter 4: Connecting the Wireless-G ADSL Gateway with SRX200
Overview
The installation technician from your ISP should have left the setup information for the modem with you after installing your broadband connection. If not, you can call your ISP to request that data.
After you have the setup information you need for your specific type of Internet connection, you can begin installation and setup of the Gateway.
If you want to use a computer with an Ethernet adapter to configure the Gateway, continue to “Wired Connection to a Computer.” If you want to use a computer with a wireless adapter to configure the Gateway, continue to “Wireless Connection to a Computer.”
Chapter 4: Connecting the Wireless-G ADSL Gateway with SRX200 |
8 |
Overview
Wireless-G ADSL Gateway with SRX200
Wired Connection to a Computer
1.Make sure that all of your network’s hardware is powered off, including the Gateway and all computers.
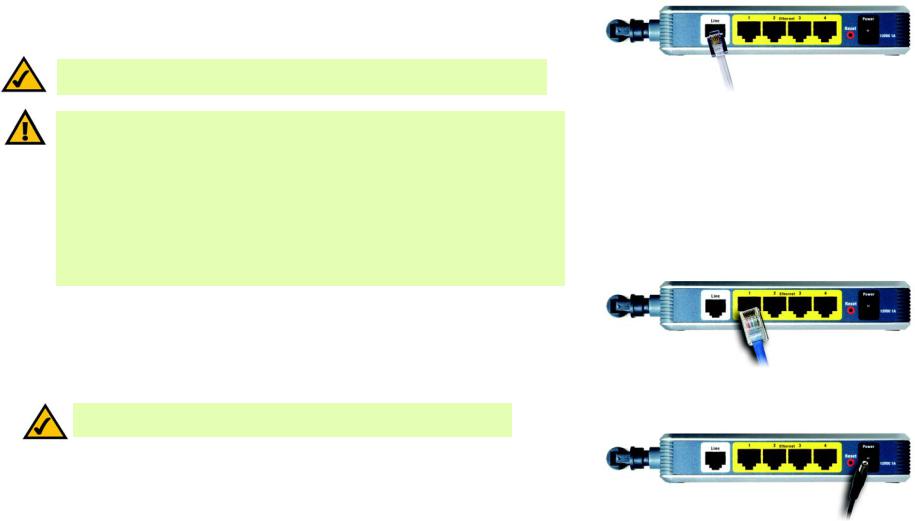
2.Connect a phone cable from the Line port on the Gateway’s side panel to the wall jack of the ADSL line. A small device called a microfilter (not included) may be necessary between each phone and wall jack to prevent interference. Contact your ISP if you have any questions.
NOTE: A small device called a microfilter (not included) may be necessary between each phone and wall jack to prevent interference. Contact your ISP if you have any questions.
IMPORTANT: For countries that have phone jacks with RJ-11 connectors, make sure to only place the microfilters between the phone and the wall jack and not between the Gateway and the wall jack or your ADSL will not connect.
For countries that do not have phone jacks with RJ-11 connectors (e.g. France, Sweden, Switzerland, United Kingdom, etc.), except for ISDN users, the microfilter has to be used between the Gateway and the wall jack, because the microfilter will have the RJ-11 connector.
Annex B users (E1 and DE versions of the Gateway) must use the included network cable to connect the Gateway to the wall jack or NTBA device. If you require splitters or special jacks, please contact your service provider.
3.Connect one end of an Ethernet network cable to one of the Ethernet ports (labeled 1-4) on the back of the Gateway, and the other end to an Ethernet port on a computer.
Repeat this step to connect more computers, a switch, or other network devices to the Gateway.
4.Connect the power adapter to the Gateway’s Power port, and then plug the power adapter into a power outlet.
NOTE: You should always plug the Gateway’s power adapter into a power strip with surge protection.
The Power LED on the front panel will light up green as soon as the power adapter is connected properly. The Power LED will flash for a few seconds, and then it will be solidly lit when the self-test is complete. If the LED flashes for one minute or longer, see “Appendix A: Troubleshooting.”
5. Power on one of your computers that is connected to the Gateway.
Go to “Chapter 5: Setting up the Wireless-G ADSL Gateway with SRX200.”
Chapter 4: Connecting the Wireless-G ADSL Gateway with SRX200
Figure 4-1: Connect the ADSL Line
Figure 4-2: Connect a PC
Figure 4-3: Connect the Power
9
Wired Connection to a Computer

Wireless-G ADSL Gateway with SRX200
Wireless Connection to a Computer
If you want to use a wireless connection to access the Gateway, follow these instructions:
1.Make sure that all of your network’s hardware is powered off, including the Gateway and all computers.
2.Connect a phone cable from the Line port on the Gateway’s back panel to the wall jack of the ADSL line. A small device called a microfilter (not included) may be necessary between each phone and wall jack to prevent interference. Contact your ISP if you have any questions.
NOTE: A small device called a microfilter (not included) may be necessary between each phone and wall jack to prevent interference. Contact your ISP if you have any questions.
IMPORTANT: For countries that have phone jacks with RJ-11 connectors, make sure you only place the microfilters between the phone and the wall jack and not between the Gateway and the wall jack or your ADSL will not connect.
For countries that do not have phone jacks with RJ-11 connectors (e.g. France, Sweden, Switzerland, United Kingdom, etc.), except for ISDN users, the microfilter has to be used between the Gateway and the wall jack, because the microfilter will have the RJ-11 connector.
Annex B users (E1 and DE versions of the Gateway) must use the included network cable to connect the Gateway to the wall jack or NTBA device. If you require splitters or special jacks, please contact your service provider.
3. Connect the power adapter to the Power port, and then plug the power adapter into a power outlet.
NOTE: You should always plug the Gateway’s power adapter into a power strip with surge protection.
The Power LED on the front panel will light up green as soon as the power adapter is connected properly. The Power LED will flash for a few seconds, and then it will be solidly lit when the self-test is complete. If the LED flashes for one minute or longer, see “Appendix A: Troubleshooting.”
4.Power on one of the computers on your wireless network(s).
5.For initial access to the Gateway through a wireless connection, make sure the computer’s wireless adapter has its SSID set to linksys (the Gateway’s default setting), and its wireless security is disabled. After you have accessed the Gateway, you can change the Gateway and this computer’s adapter settings to match your usual network settings.
Go to “Chapter 5: Setting up the Wireless-G ADSL Gateway with SRX200.”
Chapter 4: Connecting the Wireless-G ADSL Gateway with SRX200
Figure 4-4: Connect the ADSL Line
Figure 4-5: Connect the Power
NOTE: You should always change the SSID from its default, linksys, and enable wireless security.
10
Wireless Connection to a Computer

Wireless-G ADSL Gateway with SRX200
Chapter 5: Setting up the Wireless-G ADSL Gateway with SRX200
Overview
The Wireless-G ADSL Gateway with SRX200 Setup Wizard will guide you through the installation procedure. It will go through the instructions for configuring the Gateway’s network and wireless settings.
Using the Setup Wizard
1.Insert the Setup Wizard CD-ROM into your CD-ROM drive. The Setup Wizard should run automatically, and the Welcome screen should appear. If it does not, click the Start button and choose Run. In the field that appears, enter D:\setup.exe (if “D” is the letter of your CD-ROM drive).
2.The Setup Wizard will automatically detect the language setting of your PC; if it does not, select one of the available languages from the Language drop-down menu. On the initial Welcome screen, click the Next button if you want to proceed with the Setup Wizard using the current language. If you want to use a different language, select the appropriate language, and then click the Next button.
3.On the following Welcome screen, click the Click Here to Start button. These are your other choices:
Norton Internet Security - Click the Norton Internet Security button to install the Norton Internet Security software program.
Figure 5-1: Setup Wizard’s Welcome - Language
Selection Screen
User Guide - Click the User Guide button to open the PDF file of this User Guide.
Exit - Click the Exit button to exit the Setup Wizard.
Figure 5-2: Setup Wizard’s Welcome - Start
Wizard Screen
Chapter 5: Setting up the Wireless-G ADSL Gateway with SRX200 |
11 |
Overview

Wireless-G ADSL Gateway with SRX200
4.After reading the License Agreement, click the Next button if you accept, or click the Exit button to end the installation. Click the Back button go back to the previous screen.
Figure 5-3: Setup Wizard’s License Agreement Screen
5.The Setup Wizard will ask you to disconnect your broadband modem from your PC and the ADSL wall jack. After you have done so, click the Next button.
Figure 5-4: Setup Wizard’s Disconnect the Modem from the PC and ADSL Wall Jack Screen
Chapter 5: Setting up the Wireless-G ADSL Gateway with SRX200 |
12 |
Using the Setup Wizard
Wireless-G ADSL Gateway with SRX200
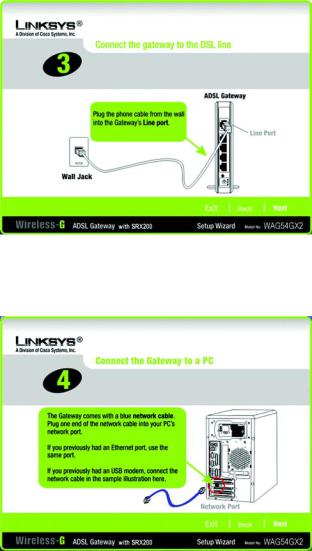
6.The Setup Wizard will ask you to connect the Gateway to the ADSL wall jack. After you have done so, click the Next button.
Figure 5-5: Setup Wizard’s Connect the Gateway to the
ADSL Wall Jack Screen
7.The Setup Wizard will ask you to connect a network cable to your PC. After you have done so, click the Next button.
Figure 5-6: Setup Wizard’s Connect a Network Cable to a
PC Screen
Chapter 5: Setting up the Wireless-G ADSL Gateway with SRX200 |
13 |
Using the Setup Wizard
Wireless-G ADSL Gateway with SRX200
8.The Setup Wizard will ask you to connect the other end of the network cable to the Gateway. Then you can also connect additional PCs to the Gateway.
After you have done so, click the Next button.
9. The Setup Wizard will ask you to power on the Gateway. After you have done so, click the Next button.
Chapter 5: Setting up the Wireless-G ADSL Gateway with SRX200
Figure 5-7: Setup Wizard’s Connect the Network Cable to the Gateway Screen
Figure 5-8: Setup Wizard’s Power on the
Gateway Screen
14
Using the Setup Wizard

Wireless-G ADSL Gateway with SRX200
10.Make sure the Gateway’s Power, DSL, and numbered LEDs (depending on the number of PCs connected) are lit on its front panel. After you have done so, click the Next button.
Figure 5-9: Setup Wizard’s Check the Gateway’s
Status Screen
11.You will be asked where you reside. Select the appropriate country from the drop-down menu. Then click the Next button.
NOTE: If your country is not listed, then use the Gateway’s Web-based Utility to configure your settings. Refer to “Chapter 6: Configuring the Wireless-G ADSL Gateway with SRX200” for instructions.
Figure 5-10: Setup Wizard’s Select Your Country Screen
Chapter 5: Setting up the Wireless-G ADSL Gateway with SRX200 |
15 |
Using the Setup Wizard
Wireless-G ADSL Gateway with SRX200
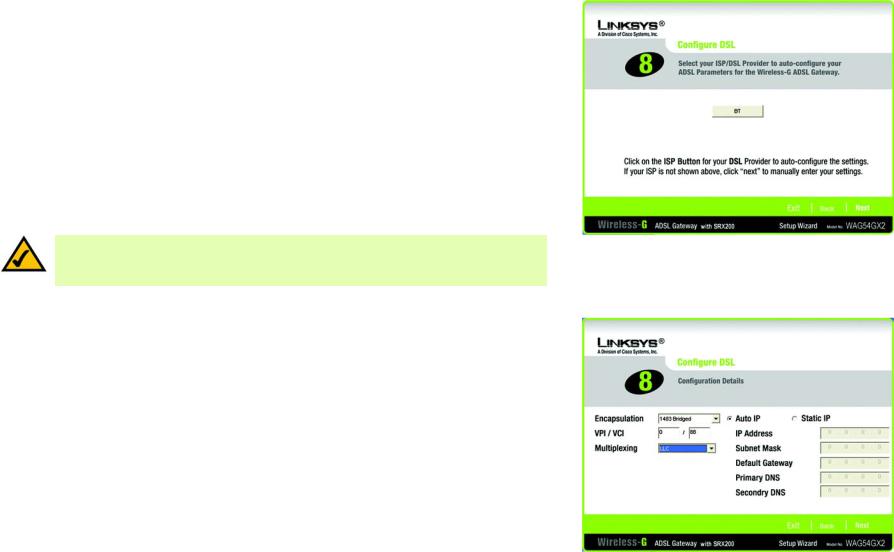
12.The Internet Service Providers (ISPs) for your country will be listed. (The on-screen options will vary depending on which country you selected on the previous screen.) Click the button for your ISP.
If your ISP is not listed, click the Next button to manually enter your settings.
13.If applicable, the Setup Wizard will automatically detect the Encapsulation type you use: 1483 Bridged, 1483 Routed, PPPoA, or PPPoE. To manually enter your settings, select your Encapsulation type: 1483 Bridged,
1483 Routed, PPPoA, or PPPoE.
NOTE: If your Encapsulation type is IPoA or Bridged Mode Only, you will have to use the Gateway’s Web-based Utility to configure it. Refer to “Chapter 6: Configuring the Wireless-G ADSL Gateway with SRX200” for instructions.
Proceed to the appropriate section for your Encapsulation type.
1483 Bridged
If you selected your ISP, then the Setup Wizard will automatically select the Encapsulation, VPI, VCI, and Multiplexing settings. Then select the appropriate IP setting for your DSL connection.
If you need to manually enter your settings, use this screen.
VPI/VCI - If you need to manually enter your settings, enter the VPI (Virtual Path Identifier) and VCI (Virtual Channel Identifier) settings provided by your ISP.
Multiplexing - If you need to manually enter your settings, select LLC or VC, depending on your ISP.
Auto IP - If you are using a dynamic IP address, then click the Auto IP radio button.
Static IP - If you are using a static IP address, then click the Static IP radio button. Complete the IP Address,
Subnet Mask, Default Gateway, Primary DNS (Domain Name System), and Secondary DNS fields. (You need to enter at least one DNS server IP address.)
Click the Next button to continue or the Back button to return to the previous screen.
Chapter 5: Setting up the Wireless-G ADSL Gateway with SRX200
Figure 5-11: Setup Wizard’s Select Your Internet Service
Provider Screen (UK)
Figure 5-12: Setup Wizard’s Configure DSL -
1483 Bridged Screen
16
Using the Setup Wizard

Wireless-G ADSL Gateway with SRX200
1483 Routed
If you selected your ISP, then the Setup Wizard will automatically select the Encapsulation, VPI, VCI, and Multiplexing settings. Then enter the appropriate IP settings for your DSL connection.
If you need to manually enter your settings, use this screen.
VPI/VCI - If you need to manually enter your settings, enter the VPI (Virtual Path Identifier) and VCI (Virtual Channel Identifier) settings provided by your ISP.
Multiplexing - If you need to manually enter your settings, select LLC or VC, depending on your ISP.
Static IP - Complete the IP Address, Subnet Mask, Default Gateway, Primary DNS (Domain Name System), and Secondary DNS fields. (You need to enter at least one DNS server IP address.)
Click the Next button to continue or the Back button to return to the previous screen.
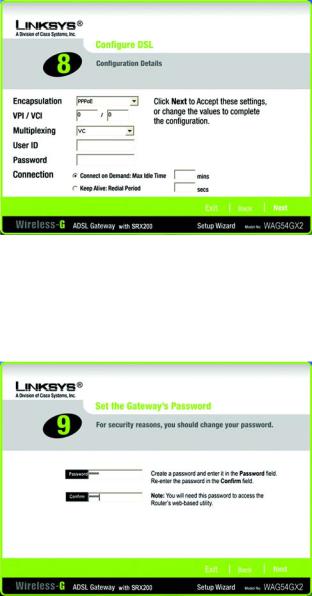
PPPoA
If you selected your ISP, then the Setup Wizard will automatically select the Encapsulation, VPI, VCI, and Multiplexing settings. Then enter the User ID and Password for your DSL connection.
If you need to manually enter your settings, use this screen.
VPI/VCI - If you need to manually enter your settings, enter the VPI (Virtual Path Identifier) and VCI (Virtual Channel Identifier) settings provided by your ISP.
Multiplexing - If you need to manually enter your settings, select LLC or VC, depending on your ISP.
User ID and Password - Enter the User ID and Password provided by your ISP.
Connection - Select Keep Alive if you always want to be connected to your ISP, or select Connect on Demand if you are charged for the time that you are connected to your ISP.
Keep Alive - For this option, the Gateway will keep the Internet connection active. In the Redial Period field, specify how often you want the Gateway to check the Internet connection (the default is 5 minutes).
Connect on Demand - If you select this option, the Gateway will terminate your Internet access after all online applications have been closed for a specified period of time, which you can specify in the Max Idle Time field (the default is 30 seconds).
Click the Next button to continue or the Back button to return to the previous screen.
Chapter 5: Setting up the Wireless-G ADSL Gateway with SRX200
Figure 5-13: Setup Wizard’s Configure DSL -
1483 Routed Screen
Figure 5-14: Setup Wizard’s Configure DSL -
PPPoA Screen
17
Using the Setup Wizard
Wireless-G ADSL Gateway with SRX200
PPPoE
If you selected your ISP, then the Setup Wizard will automatically select the Encapsulation, VPI, VCI, and Multiplexing settings. Then enter the User ID and Password for your DSL connection.
If you need to manually enter your settings, use this screen.
VPI/VCI - If you need to manually enter your settings, enter the VPI (Virtual Path Identifier) and VCI (Virtual Channel Identifier) settings provided by your ISP.
Multiplexing - If you need to manually enter your settings, select LLC or VC, depending on your ISP.
User ID and Password - Enter the User ID and Password provided by your ISP.
Connection - Select Keep Alive if you always want to be connected to your ISP, or select Connect on Demand if you are charged for the time that you are connected to your ISP.
Keep Alive - For this option, the Gateway will keep the Internet connection active. In the Redial Period field, specify how often you want the Gateway to check the Internet connection (the default is 5 minutes).
Connect on Demand - If you select this option, the Gateway will terminate your Internet access after all online applications have been closed for a specified period of time, which you can specify in the Max Idle Time field (the default is 30 seconds).
Click the Next button to continue or the Back button to return to the previous screen.
14.The Gateway provides a Web-based Utility you can use for configuring the Gateway from any networked PC. Access to the Utility is protected by a password.
Password - The default password is admin. Change it to a password of your choice.
Confirm - Enter the password again in the Confirm field.
Click the Next button to continue or the Back button to return to the previous screen.
Chapter 5: Setting up the Wireless-G ADSL Gateway with SRX200
Figure 5-15: Setup Wizard’s Configure DSL -
PPPoE Screen
Figure 5-16: Setup Wizard’s Set the Gateway’s
Password Screen
18
Using the Setup Wizard

Wireless-G ADSL Gateway with SRX200
15. The Setup Wizard will ask you to enter the settings for your wireless network.
SSID - In the SSID field, enter the name of your wireless network. The SSID must be identical for all devices in the network. The default setting is linksys (all lowercase).
NOTE: An SSID is the network name shared by all devices in a wireless network. Your network’s SSID should be unique to your network and identical for all devices within the network.
Channel - Select the operating channel for your wireless network. All of your wireless devices will use this channel to communicate.
Network Mode - From the Network Mode drop-down menu, select the wireless standards running on your network. If you have both 802.11g and 802.11b devices in your network, keep the default setting, Mixed. If you have only 802.11g devices, select G-Only. If you have only 802.11b devices, select B-Only. If you want to disable your wireless network, select Disable.
Device Name - Enter a name for the Gateway in the Device Name field.
Click the Next button to continue or the Back button to return to the previous screen.
16.Select the method of security you want to use: WPA Personal, WPA2 Personal, WPA2 Mixed Mode, WEP (64-Bit), or WEP (128-Bit). WPA stands for Wi-Fi Protected Access, and WEP stands for Wired Equivalent Privacy. WPA is a stronger security method than WEP, and WPA2 is a stronger version of WPA. Proceed to the appropriate section for your security method.
If you do not want to use any wireless security method, select Disabled and then click the Next button. Proceed to step 17.
NOTE: If you want to use WPA Enterprise or WPA2 Enterprise security, select Disabled and then click the Next button. After you have finished the Setup Wizard, use the Gateway’s Web-based Utility to configure your wireless security settings. Refer to “Chapter 6: Configuring the Wireless-G ADSL Gateway with SRX200” for instructions.
Figure 5-17: Setup Wizard’s Wireless Settings Screen
wpa (wi-fi protected access): a wireless security protocol using TKIP (Temporal Key Integrity Protocol) encryption, which can be used in conjunction with a RADIUS server.
wep (wired equivalent privacy): a method of encrypting network data transmitted on a wireless network for greater security.
|
Figure 5-18: Setup Wizard’s Configure Wireless Security |
|
Settings Screen |
Chapter 5: Setting up the Wireless-G ADSL Gateway with SRX200 |
19 |
Using the Setup Wizard

Wireless-G ADSL Gateway with SRX200
WPA Personal
Encryption - Select the type of algorithm you want to use, TKIP or AES.
Passphrase - Enter a Passphrase, also called a pre-shared key, of 8 to 63 characters. The longer and more complex your Passphrase is, the more secure your network will be.
Click the Next button to continue or the Back button to return to the previous screen.
WPA2 Personal
Encryption - AES is automatically selected for WPA2 Personal mode.
Passphrase - Enter a Passphrase, also called a pre-shared key, of 8 to 63 characters. The longer and more complex your Passphrase is, the more secure your network will be.
Click the Next button to continue or the Back button to return to the previous screen.
Chapter 5: Setting up the Wireless-G ADSL Gateway with SRX200
encryption: encoding data transmitted in a network.
Figure 5-19: Setup Wizard’s Wireless Security -
WPA Personal Screen
Figure 5-20: Setup Wizard’s Wireless Security -
WPA2 Personal Screen
20
Using the Setup Wizard

Wireless-G ADSL Gateway with SRX200
WPA2 Mixed Mode
Encryption - TKIP + AES is automatically selected so both methods can be used.
Passphrase - Enter a Passphrase, also called a pre-shared key, of 8 to 63 characters. The longer and more complex your Passphrase is, the more secure your network will be.
Click the Next button to continue or the Back button to return to the previous screen.
Figure 5-21: Setup Wizard’s Wireless Security -
WPA2 Mixed Mode Screen
WEP (64-Bit)
Enter a passphrase or WEP key.
Passphrase - Enter a passphrase in the Passphrase field, so a WEP key is automatically generated. The passphrase is case-sensitive and should not be longer than 16 alphanumeric characters. It must match the passphrase of your other wireless network devices and is compatible with Linksys wireless products only. (If you have any non-Linksys wireless products, enter the WEP key manually on those products.)
Key 1 - The WEP key you enter must match the WEP key of your wireless network. For 64-bit encryption, enter exactly 10 hexadecimal characters. Valid hexadecimal characters are “0” to “9” and “A” to “F”.
Click the Next button to continue or the Back button to return to the previous screen.
Figure 5-22: Setup Wizard’s Wireless Security -
WEP (64-Bit) Screen
Chapter 5: Setting up the Wireless-G ADSL Gateway with SRX200 |
21 |
Using the Setup Wizard

Wireless-G ADSL Gateway with SRX200
WEP (128-Bit)
Enter a passphrase or WEP key.
Passphrase - Enter a passphrase in the Passphrase field, so a WEP key is automatically generated. The passphrase is case-sensitive and should not be longer than 16 alphanumeric characters. It must match the passphrase of your other wireless network devices and is compatible with Linksys wireless products only. (If you have any non-Linksys wireless products, enter the WEP key manually on those products.)
Key 1 - The WEP key you enter must match the WEP key of your wireless network. For 128-bit encryption, enter exactly 26 hexadecimal characters. Valid hexadecimal characters are “0” to “9” and “A” to “F”.
Click the Next button to continue or the Back button to return to the previous screen.
Figure 5-23: Setup Wizard’s Wireless Security -
WEP (128-Bit) Screen
17.The Setup Wizard will ask you to review your settings before it saves them. Click the Yes button if you are satisfied with your settings, or click the No button if you do not want to save your new settings.
Figure 5-24: Setup Wizard’s Confirm New Settings Screen
Chapter 5: Setting up the Wireless-G ADSL Gateway with SRX200 |
22 |
Using the Setup Wizard
Wireless-G ADSL Gateway with SRX200
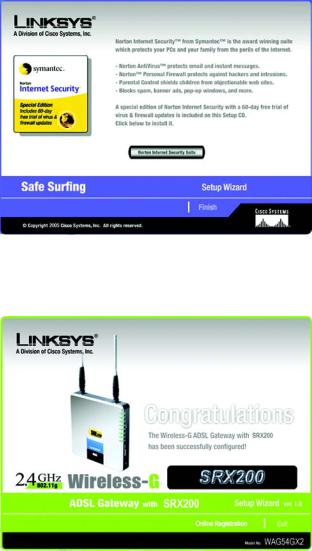
18.After the settings have been saved, the Safe Surfing screen will appear. Click the Norton Internet Security Suite button to install the special edition of Norton Internet Security on your computer, or click the Finish button to complete the Setup Wizard.
Figure 5-25: Setup Wizard’s Safe Surfing Screen
19.The Congratulations screen will appear. Click the Online Registration button to register the Gateway, or click the Exit button to exit the Setup Wizard.
Congratulations! The installation of the Wireless-G ADSL Gateway with SRX200 is complete.
If you want to make advanced configuration changes, proceed to “Chapter 6: Configuring the Wireless-G
ADSL Gateway with SRX200.”
Figure 5-26: Setup Wizard’s Congratulations Screen
Chapter 5: Setting up the Wireless-G ADSL Gateway with SRX200 |
23 |
Using the Setup Wizard
Loading...