


 Loading...
USER GUIDE
Wireless-G Ethernet Bridge
Model: WET54G (EU)
About This Guide
About This Guide
Icon Descriptions
While reading through the User Guide you may see various icons that call attention to specific items. Below is a description of these icons:
NOTE: This check mark indicates that there is a note of interest and is something that you should pay special attention to while using the product.
WARNING: This exclamation point indicates that there is a caution or warning and it is something that could damage your property or product.
WEB: This globe icon indicates a noteworthy website address or e-mail address.
Online Resources
Website addresses in this document are listed without http:// in front of the address because most current web browsers do not require it. If you use an older web browser, you may have to add http:// in front of the web address.
Resource |
Website |
|
|
Linksys |
www.linksys.com |
|
|
Linksys International |
www.linksys.com/international |
|
|
Glossary |
www.linksys.com/glossary |
|
|
Network Security |
www.linksys.com/security |
|
|
Copyright and Trademarks
Linksys, Cisco and the Cisco Logo are registered trademarks or trademarks of Cisco Systems, Inc. and/or its affiliates in the U.S. and certain other countries. Copyright © 2008 Cisco Systems, Inc. All rights reserved. Other brands and product names are trademarks or registered trademarks of their respective holders.
Wireless-G Ethernet Bridge |
i |

Table of Contents
Chapter 1: Product Overview |
|
1 |
Front Panel |
|
1 |
Back Panel . . . . . . . . . . . . . . . . . . . . . . . . . . . . . . . . |
. |
. 1 |
Chapter 2: Wireless Security Checklist |
|
2 |
General Network Security Guidelines |
|
2 |
Additional Security Tips . . . . . . . . . . . . . . . . . . . . . . . . . . |
. |
. 2 |
Chapter 3: Configuration using the Web-based Utility |
|
3 |
How to Access the Web-Based Utility . . . . . . . . . . . . . . . . . . . . |
. . |
3 |
Setup Tab . . . . . . . . . . . . . . . . . . . . . . . . . . . . . . . . |
. |
. 3 |
Password Tab . . . . . . . . . . . . . . . . . . . . . . . . . . . . . . |
. . |
7 |
Advanced Settings Tab . . . . . . . . . . . . . . . . . . . . . . . . . . |
. . |
8 |
Status Tab . . . . . . . . . . . . . . . . . . . . . . . . . . . . . . . . |
. |
. 9 |
Help Tab . . . . . . . . . . . . . . . . . . . . . . . . . . . . . . . . |
. . |
9 |
Appendix A: Troubleshooting |
|
11 |
Appendix B: Specifications |
|
12 |
Appendix C: Warranty Information |
|
13 |
Limited Warranty |
|
13 |
Appendix D: Regulatory Information |
|
15 |
FCC Statement . . . . . . . . . . . . . . . . . . . . . . . . . . . . . . |
. |
15 |
Safety Notices |
|
15 |
Industry Canada Statement . . . . . . . . . . . . . . . . . . . . . . . . |
. . |
15 |
Avis d’Industrie Canada |
|
15 |
Wireless Disclaimer . . . . . . . . . . . . . . . . . . . . . . . . . . . . |
. |
16 |
Avis de non-responsabilité concernant les appareils sans fil . . . . . . . . . . |
. . |
16 |
Declaration of Conformity with Regard to EU Directive 1999/5/EC (R&TTE Directive) |
. |
17 |
Wireless Equipment (Wireless-N/G/A/B Products) . . . . . . . . . . . . . . . |
. |
.18 |
CE Marking . . . . . . . . . . . . . . . . . . . . . . . . . . . . . . . |
. |
.18 |
National Restrictions . . . . . . . . . . . . . . . . . . . . . . . . . . . |
. |
.18 |
Product Usage Restrictions . . . . . . . . . . . . . . . . . . . . . . . . |
. . |
19 |
Technical Documents on www.linksys.com/international . . . . . . . . . . . . |
. |
19 |
User Information for Consumer Products Covered by EU Directive 2002/96/EC on Waste |
||
Electric and Electronic Equipment (WEEE) |
|
20 |
Appendix E: Software License Agreement |
|
24 |
Software in Linksys Products . . . . . . . . . . . . . . . . . . . . . . . . |
. |
24 |
Software Licenses . . . . . . . . . . . . . . . . . . . . . . . . . . . . |
. . |
24 |
Wireless-G Ethernet Bridge |
ii |
Chapter 1
Product Overview
Chapter 1:
Product Overview
Thank you for choosing theWireless-G Ethernet Bridge.The versatile Wireless-G Ethernet Bridge can make any wired Ethernet-equipped device a part of your wireless network. At home, use the Bridge to connect game consoles, settop boxes, or computers to your Wireless-G network and its shared high-speed Internet connection. In the office, convert your Ethernet-wired printer, camera, notebook or desktop into a wireless networked device.
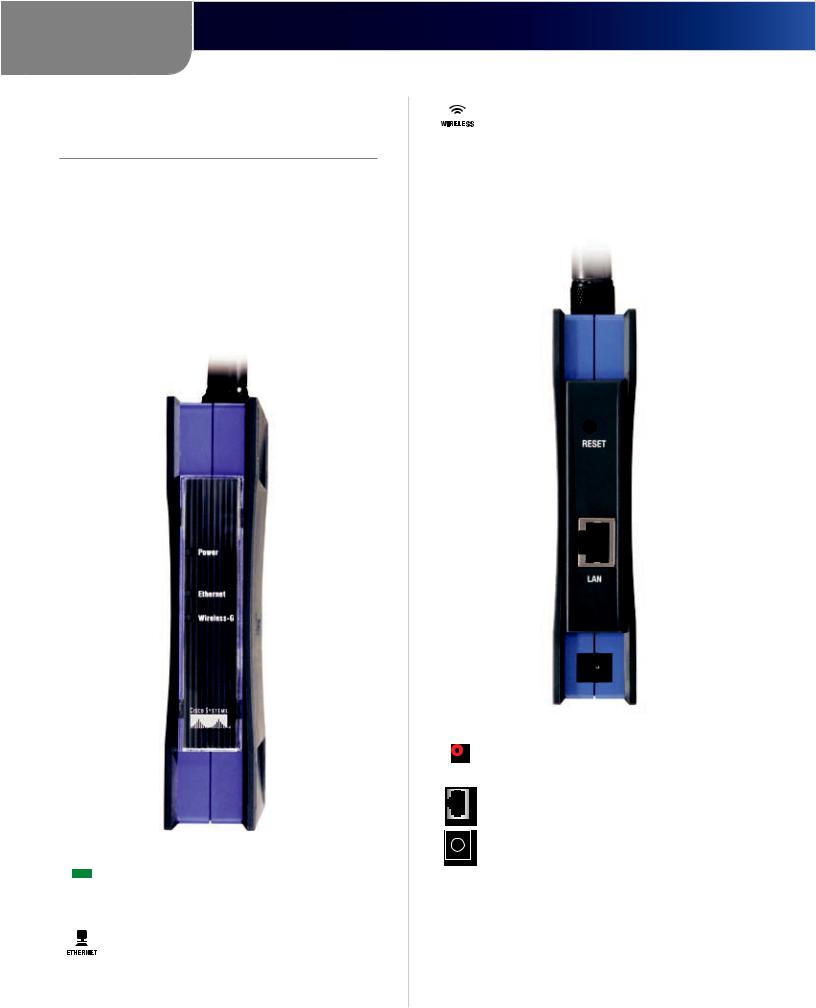
Front Panel
Power (Green) This LED lights up when the Bridge is powered on. The LED flashes while the Bridge is booting up and performing a self-test, and remains lit after the self-test has ended.
Ethernet (Green) This LED will be lit steadily when the Bridge is connected to the wired network. The LED will flash when there is wired network traffic.
Wireless-G (Green) This LED will be lit steadily when the Bridge is connected to the wireless network. The LED will flash when there is wireless network traffic.
Back Panel
Reset When pressed, the Reset button resets the Bridge to its factory default settings.
LAN The LAN port is where you will connect the Ethernet network cable.
Power The Power port is where you will connect the power adapter.
NOTE: If you reset the Wireless-G Ethernet Bridge, you will erase all of your settings (WEP encryption, wireless settings, etc.) and replace them with the factory defaults. Do not reset the Wireless-G Ethernet Bridge if you want to retain these settings.
Wireless-G Ethernet Bridge |
1 |

Chapter 2
Wireless Security Checklist
Chapter 2:
Wireless Security Checklist
Wireless networks are convenient and easy to install, so homes with high-speed Internet access are adopting them at a rapid pace. Because wireless networking operates by sending information over radio waves, it can be more vulnerable to intruders than a traditional wired network. Like signals from your cellular or cordless phones, signals from your wireless network can also be intercepted. Since you cannot physically prevent someone from connecting to your wireless network, you need to take some additional steps to keep your network secure.
1.Change the default wireless network name or SSID
Wireless devices have a default wireless network name or Service Set Identifier (SSID) set by the factory. This is the name of your wireless network, and can be up to 32 characters in length. Linksys wireless products use linksys as the default wireless network name. You should change the wireless network name to something unique to distinguish your wireless network from other wireless networks that may exist around you, but do not use personal information (such as your Social Security number) because this information may be available for anyone to see when browsing for wireless networks.
 2. Change the default password
For wireless products such as access points, routers, and gateways, you will be asked for a password when you want to change their settings. These devices have a default password set by the factory. The Linksys default password is admin. Hackers know these defaults and may try to use them to access your wireless device and change your network settings. To thwart any unauthorized changes, customize the device’s password so it will be hard to guess.
 3. Enable MAC address filtering
Linksys routers and gateways give you the ability to enable Media Access Control (MAC) address filtering. The MAC address is a unique series of numbers and letters assigned to every networking device. With MAC address filtering enabled, wireless network access is provided solely for wireless devices with specific MAC addresses. For example, you can specify the MAC address of each computer in your home so that only those computers can access your wireless network.
 4. Enable encryption
Encryption protects data transmitted over a wireless network. Wi-Fi Protected Access (WPA/WPA2) and Wired Equivalency Privacy (WEP) offer different levels of security for wireless communication.
A network encrypted with WPA/WPA2 is more secure than a network encrypted with WEP, because WPA/WPA2 uses dynamic key encryption. To protect the information as it passes over the airwaves, you should enable the highest level of encryption supported by your network equipment.
WEP is an older encryption standard and may be the only option available on some older devices that do not support WPA.
General Network Security Guidelines
Wireless network security is useless if the underlying network is not secure.
•• Password protect all computers on the network and individually password protect sensitive files.
•• Change passwords on a regular basis.
•• Install anti-virus software and personal firewall software.
•• Disable file sharing (peer-to-peer). Some applications may open file sharing without your consent and/or knowledge.
Additional Security Tips
•• Keep wireless routers, access points, or gateways away from exterior walls and windows.
•• Turn wireless routers, access points, or gateways off when they are not being used (at night, during vacations).
•• Usestrongpassphrasesthatareatleasteightcharacters in length. Combine letters and numbers to avoid using standard words that can be found in the dictionary.
WEB: For more information on wireless security, visit www.linksys.com/security
Wireless-G Ethernet Bridge |
2 |
Chapter 3
Configuration using the Web-based Utility
Chapter 3: Configuration using the Web-based Utility
The Bridge is designed to function properly after you configure it using the Setup Wizard. However, if you would like to change these basic settings or make advanced configuration changes, use your web browser and the Wireless-G Ethernet Bridge Web-based Utility. This chapter explains how to use the Utility.
How to Access the Web-Based Utility
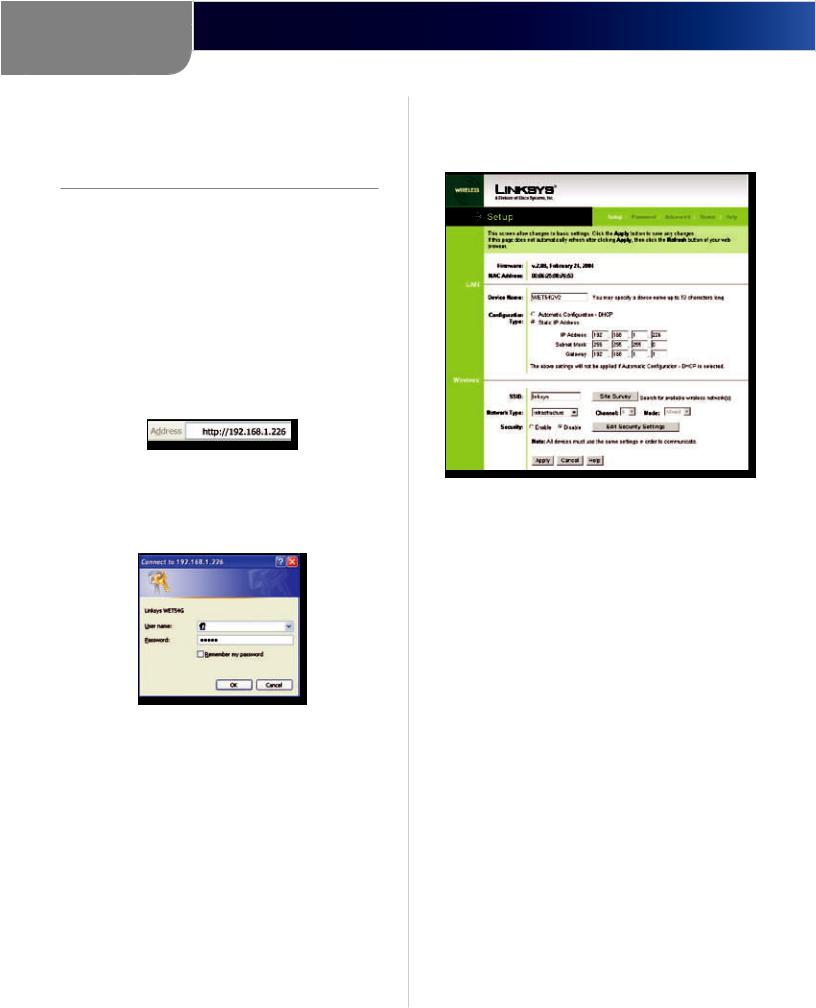
1.Open your web browser, and enter the IP address of the Wireless-G Ethernet Bridge (the default is 192.168.1.226) in the browser’s Address field. Then press Enter.
Internet Explorer Address Bar
2.The Password screen will appear. In lowercase letters, enter the default password, admin, in the Password field. Click OK. You can set a new password on the Password screen later.
Password Screen
3.The utility’s Setup screen will appear. The Utility provides a convenient, web-browser-based way to alter the Bridge’s settings. It offers five main tabs
•• Setup - Enables you to configure the IP address and wireless settings.
•• Password - Allows you to change the password or reset all settings to factory defaults.
•• Advanced - Lets you change the advanced wireless settings and clone a MAC address onto the Bridge.
•• Status - Displays the Bridge’s current settings.
•• Help - Provides explanations of various configuration settings and links to online technical support resources. You can also upgrade the Bridge’s firmware using the Help screen.
Setup Tab
The Setup screen lets you configure the wired and wireless network settings for the Bridge.
Setup
Firmware The version number of the Bridge’s firmware is displayed here. Firmware should be upgraded ONLY if you experience problems with the Bridge. Firmware updates are posted at www.linksys.com.
MAC Address The Bridge’s MAC address is displayed here.
LAN
Device Name You may assign any name to the Bridge. Unique, memorable names are helpful, especially if you are using multiple bridges on the same wireless network.
Configuration Type If the Bridge will obtain an IP address automatically from a DHCP server, such as a router, then select Automatic Configuration-DHCP. If you are assigning the Bridge a static IP address, then select Static IP Address, and enter an IP Address, Subnet Mask, and Gateway address in the IP Address, Subnet Mask, and
Gateway fields.
Wireless
SSID The SSID is the network name shared among all devices in a wireless network. The SSID must be identical for all devices in the wireless network. It is case-sensitive and must not exceed 32 alphanumeric characters (A-Z, a-z, 0-9; do not use spaces). Make sure this setting is the same for all devices in your wireless network. For added security, Linksys recommends that you change the default SSID (linksys) to a name of your choice.
Wireless-G Ethernet Bridge |
3 |
Chapter 3
Configuration using the Web-based Utility
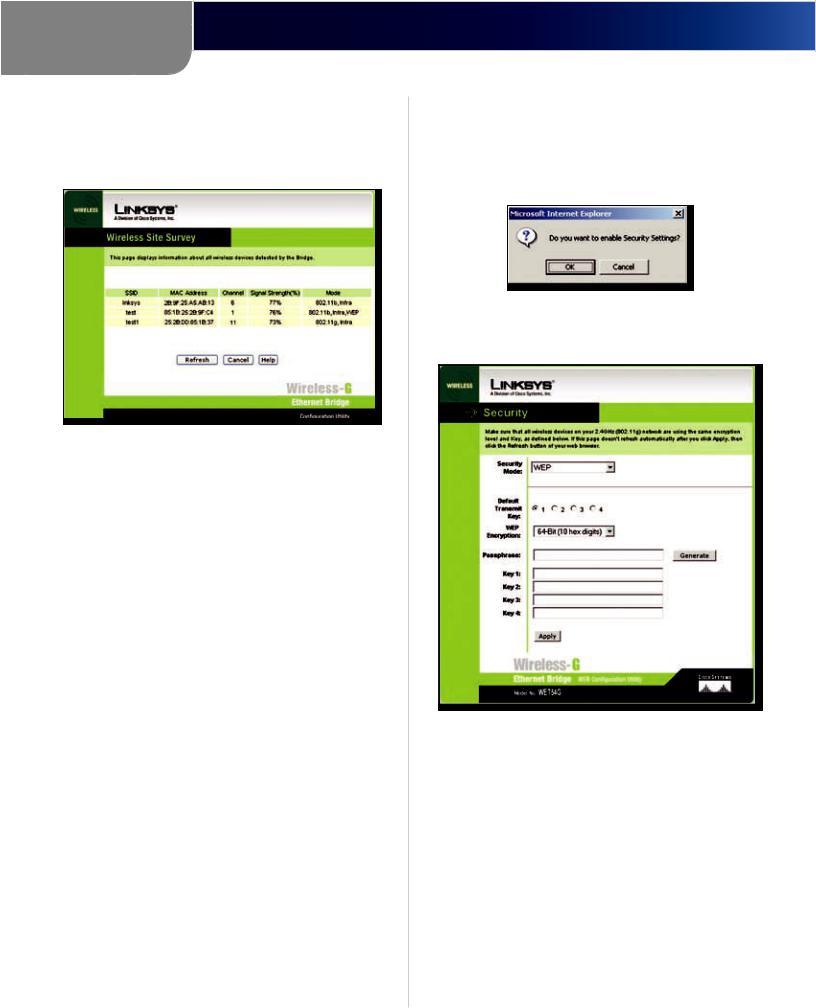
SiteSurvey To search for available wireless networks, click Site Survey. The Wireless Site Survey screen will appear. This screen shows all the wireless networks detected by the Bridge and their general information. You can use this screen to connect to one of these networks.
Wireless Site Survey
For each wireless network detected, the following information is displayed:
•• SSID The network name. To join a wireless network, click its SSID.
•• MAC Address The MAC address of the network’s access point.
•• Channel The channel setting.
•• Signal Strength (%) The percentage of wireless signal strength.
•• Mode The type of wireless standard, network mode, and status of WEP encryption.
Click Refresh to obtain the most up-to-date data. Click Cancel to close this screen. Click Help for additional onscreen information.
Network Type Choose a wireless operating mode for the Bridge. Keep the default setting, Infrastructure, if you want your wireless-equipped device to communicate with computers and other devices on your wired network using a wireless access point. Select Ad-Hoc if you want multiple wireless-equipped devices to communicate directly with each other.
If you chose Ad-Hoc mode, then select the correct operating channel for your network from the Channel drop-down menu. This should match the channel setting of the other devices in your wireless network.
Select the appropriate network mode from the Mode drop-down menu. Keep the default, Mixed, if you have Wireless-G (802.11g) and Wireless-B (802.11b) devices in your network. Select G-Only if you have only Wireless-G devices in your network
Security To enable security, select Enable, then click
Edit Security Settings. To disable security, select Disable. If you have not enabled security before clicking Edit Security Settings, you will be asked if you want to enable security settings; click OK to edit the security settings, or click Cancel to cancel.
Enable Security Settings
If you click Edit Security Settings, the Security screen will appear.
Security
From the Security Mode drop-down menu, select one of the four wireless security modes supported by the Bridge:
•• WPA (Wi-Fi Protected Access) Pre-Shared Key
•• WPA RADIUS
•• RADIUS (Remote Authentication Dial-In User Service)
•• WEP (Wired Equivalent Privacy)
WPA is a security standard stronger than WEP encryption. The four security modes are briefly discussed here. For detailed instructions on configuring wireless security for the Bridge, refer to the “Wireless Security” chapter.
Wireless-G Ethernet Bridge |
4 |

Chapter 3
Configuration using the Web-based Utility
WEP
Use the WEP screen to configure the WEP encryption for the Bridge.
Security > WEP
Select a Default Transmit Key (choose which Key to use), and a level of WEP Encryption, 64 bits (10 hex digits) or
128 bits (26 hex digits). Then either generate a WEP Key using a Passphrase or enter the WEP key manually.
Default Transmit Key Select which WEP key (1-4) will be used when the Bridge sends data. Make sure the other wireless-equipped devices are using the same key.
WEP Encryption In order to use WEP encryption, select
64-Bit (10 hex digits) or 128-Bit (26 hex digits) from the drop-down menu.
Passphrase Instead of manually entering WEP keys, you can enter a Passphrase. This Passphrase is used to generate one or more WEP keys. It is case-sensitive and should not be longer than 16 alphanumeric characters. (The Passphrase function is compatible with Linksys wireless products only. If you want to communicate with non-Linksys wireless products, you will need to enter your WEP key manually on the non-Linksys wireless products.) After you enter the Passphrase, click Generate to create WEP key(s).
Keys 1-4 If you are not using a Passphrase, then you can enter one or more WEP keys manually.
In each key field, manually enter a set of values. (Do not leave a key field blank, and do not enter all zeroes. These are not valid key values.) If you are using 64-bit WEP encryption, then each key must consist of exactly 10 hexadecimal characters in length. If you are using 128-bit
WEP encryption, then each key must consist of exactly 26 hexadecimal characters in length. Valid hexadecimal characters are “0”-“9” and “A”-“F”.
Click Apply to save your changes. If your page does not automatically refresh itself, then click Refresh on your web browser.
WPA Pre-Shared Key
WPA gives you TKIP for the encryption method.
Security > WPA Pre-Shared Key
WPA Shared Key Enter a WPA Shared Key of 8-32 characters. This is a key shared between the Bridge and the server.
View Log Click View Log to display the Log Table screen. This screen displays a log of the authentication process.
Log Table
Click Refresh to refresh the Log Table screen. Click Close to return to the the WPA Pre-Shared Key screen.
Click Apply to save your changes. If your page does not automatically refresh itself, then click Refresh on your web browser.
Wireless-G Ethernet Bridge |
5 |
Chapter 3
Configuration using the Web-based Utility
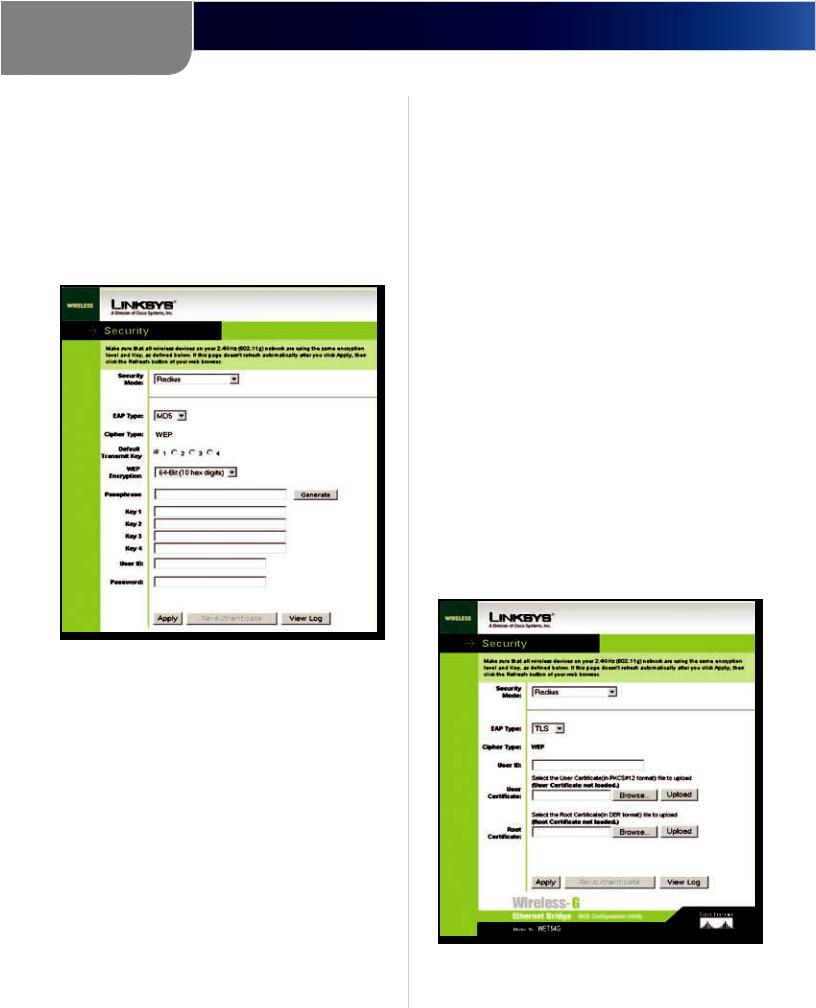
RADIUS
This option features WEP used in coordination with a RADIUS server. (This should only be used when a RADIUS server is connected to the Router.) It offers three authentication methods: MD5, TLS, and TTLS.
EAP Type Select the authentication method: MD5, TLS, or TTLS. The appropriate screen appears depending on the selection. The screens are described below.
MD5
Security > RADIUS-MD5
Select a Default Key (choose which Key to use), and a level of WEP encryption, 64 bits 10 hex digits or 128 bits 26 hex digits. Then either generate a WEP key using a Passphrase or enter the WEP key manually.
Default Transmit Key Select which WEP key (1-4) will be used when the Bridge sends data. Make sure that the receiving device (wireless client) is using the same key.
WEP Encryption An acronym for Wired Equivalent Privacy, WEP is an encryption method used to protect your wireless data communications. WEP uses 64-bit or 128-bit keys to provide access control to your network and encryption security for every data transmission. To decode data transmissions, all devices in a network must use an identical WEP key. Higher encryption levels offer higher levels of security, but due to the complexity of the encryption, they may decrease network performance. Select 64 bits (10 hex digits) or 128 bits (26 hex digits).
Passphrase Instead of manually entering WEP keys, you can enter a passphrase. This passphrase is used to generate one or more WEP keys. It is case-sensitive and
should not be longer than 32 alphanumeric characters. (This Passphrase function is compatible with Linksys wireless products only and cannot be used with Windows XP Zero Configuration. If you want to communicate with non-Linksys wireless products or Windows XP Zero Configuration, make a note of the WEP key generated in the Key 1 field, and enter it manually in the wireless client.) After you enter the Passphrase, click Generate to create WEP keys.
Keys 1-4 WEP keys enable you to create an encryption scheme for wireless network transmissions. If you are not using a Passphrase, then manually enter a set of values. (Do not leave a key field blank, and do not enter all zeroes; they are not valid key values.) If you are using 64-bit WEP encryption, the key must be exactly 10 hexadecimal characters in length. If you are using 128-bit WEP encryption, the key must be exactly 26 hexadecimal characters in length. Valid hexadecimal characters are “0”- “9” and “A”-“F”.
User ID and Password A user identification and password are required for your security. Enter the ID in the User ID field, then the password in the Password field.
Click Apply to save your changes. If your page does not automatically refresh itself, then click Refresh on your web browser. Click View Log to view a log.
TLS
TLS is a mutual authentication method that uses digital certificates.
Security > RADIUS-TLS
Enter the Login name of your wireless network in the User ID field. Enter the User Certificate and Root Certificate in
Wireless-G Ethernet Bridge |
6 |
Chapter 3
Configuration using the Web-based Utility
the fields or click Browse to browse for it, then upload it.
User ID Your User ID is the Login name of your wireless network. Enter the Login name of your wireless network in the User ID field.
User Certificate Enter the user certificate you have installed to authenticate you on your wireless network or click the Browse button to browse for it. Click the Upload button to upload the certificate.
Root Certificate Enter the root certificate you have installed to authenticate you on your wireless network or click the Browse button to browse for it. Click the Upload button to upload the certificate.
Click Apply to save your changes. If your page does not automatically refresh itself, then click Refresh on your web browser. Click View Log to view a log.
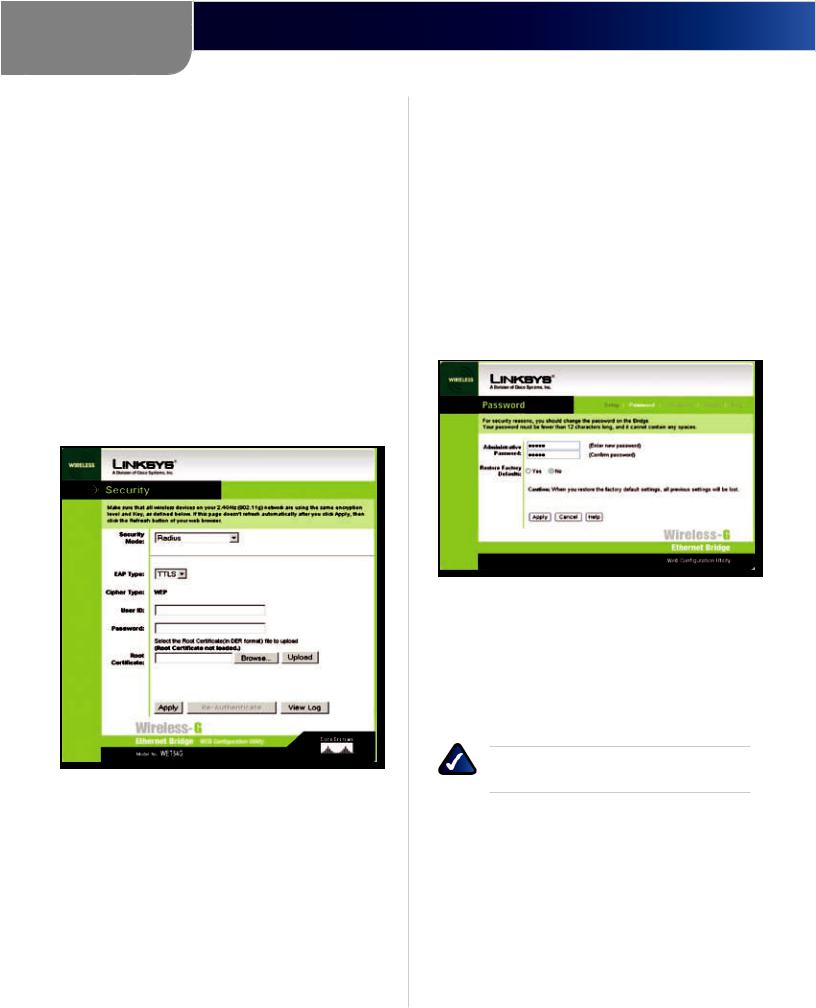
TTLS
TTLS is a mutual authentication method that uses digital certificates.
Security > RADIUS-TTLS
Enter the Login name of your wireless network in the User ID field and the password in the Password field. Enter the Root Certificate in the field or click Browse to browse for it, then upload it.
EAP Type The authentication method that your network uses. Select TTLS from the drop-down menu.
User ID Your User ID is the Login name of your wireless network. Enter the Login name of your wireless network in the User ID field.
Password This is the password used for your wireless network. Enter the password in the Password field.
Root Certificate Enter the root certificate you have installed to authenticate you on your wireless network or click Browse to browse for it. Click Upload to upload the certificate.
Click Apply to save your changes. If your page does not automatically refresh itself, then click Refresh on your web browser. Click View Log to view a log.
To save your changes, click Apply. Click Cancel to cancel your changes. Click Help for additional on-screen information.
Password Tab
The Password screen lets you change the Bridge’s Password and restore the factory default settings.
Password
Administrative Password It is strongly recommended that you change the factory default password of the Bridge from admin to a new password that you create. All users who try to access the Bridge’s Web-based Utility will be prompted for the Bridge’s Password. The new Password must not exceed 12 characters in length and must not include any spaces. Enter the new Password a second time to confirm it.
NOTE: Any settings you have saved will be lost if the default settings are restored.
Restore Factory Defaults Click Yes to reset all configuration settings to their default values. If you do not want to restore the factory defaults, then keep the default setting, No.
To save your changes, click Apply. Click Cancel to cancel your changes. Click Help for additional on-screen information.
Wireless-G Ethernet Bridge |
7 |
Chapter 3
Configuration using the Web-based Utility
Advanced Settings Tab
Use the Advanced Settings screen to customize advanced wireless settings and clone a MAC address onto the Bridge.
Advanced Settings
Wireless
Transmission Rate The default setting is Auto. The range is from 1 to 54Mbps.The rate of data transmission should be set depending on the speed of your wireless network. You can select from a range of transmission speeds, or you can keep the default setting, Auto, to have the Bridge automatically use the fastest possible data rate and enable the Auto-Fallback feature. Auto-Fallback will negotiate the best possible connection speed between the Bridge and another wireless-equipped device.
Authentication Type The default setting is Auto. The choices are Auto, Open, and Shared. This setting allows the Bridge to authenticate communication with the wireless devices in your network. With the Shared key setting, all wireless devices must have the same WEP keys so that the Bridge and the client can authenticate each other and start transmitting data. With the Open system setting, any device can join a network without performing any security check. Using the Auto setting, the Bridge will automatically detect whether a wireless device uses shared key or open system authentication, and then it will transmit data using the appropriate authentication type.
RTS Threshold This value should remain at its default setting of 2347. The range is 0-2347 bytes. Should you encounterinconsistentdataflow,onlyminormodifications are recommended. If a network packet is smaller than the preset RTS threshold size, the RTS/CTS mechanism will
not be enabled. The Router sends Request to Send (RTS) frames to a particular receiving station and negotiates the sending of a data frame. After receiving an RTS, the wireless station responds with a Clear to Send (CTS) frame to acknowledge the right to begin transmission.
Fragmentation Threshold This value should remain at its default setting of 2346. The range is 256-2346 bytes. It specifies the maximum size for a packet before data is fragmented into multiple packets. If you experience a high packet error rate, you may slightly increase the Fragmentation Threshold. Setting the Fragmentation Thresholdtoolowmayresultinpoornetworkperformance. Only minor modifications of this value are recommended.
MAC Address
Cloning Mode You can clone the MAC address of any network device onto the Bridge. To disable MAC address cloning, keep the default setting, Disable. To use the MAC cloning feature, select Enable.
If you have enabled MAC cloning, then select Auto if you want to clone the MAC address of the device currently connected to the Bridge’s LAN port.The Bridge will actively scan for a new MAC address to be cloned whenever you disconnect and re-connect the Bridge through its LAN port. Select Manual if you want to specify a MAC address in the Enter MAC Address field. This is useful when the Bridge is connected to multiple devices through a switch or a hub.
Click Apply to save your changes. If your page does not automatically refresh itself, then click Refresh on your web browser. Click Cancel to cancel your changes. Click Help for additional on-screen information.
Wireless-G Ethernet Bridge |
8 |
Chapter 3
Configuration using the Web-based Utility
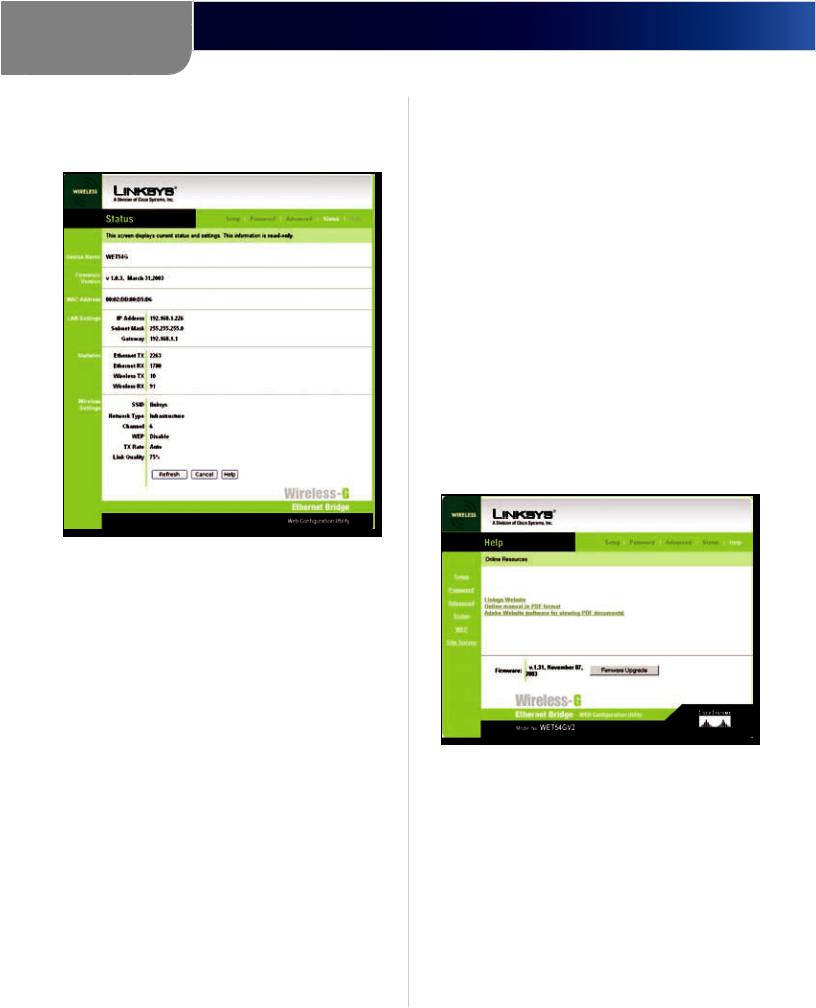
Status Tab
The Status screen displays the Bridge’s current status and settings. All information is read-only.
Status
Device Name The name you have assigned to the Bridge is displayed here.
Firmware Version The version number of the Bridge’s firmware is displayed here. Firmware updates are posted at www.linksys.com. Firmware should be upgraded ONLY if you experience problems with the Bridge. To upgrade the Bridge’s firmware, use the Help screen.
MAC Address The MAC Address of the Bridge is displayed here.
LAN Settings
IP Address The Bridge’s IP Address is displayed here.
Subnet Mask The Bridge’s Subnet Mask is displayed here.
Gateway The Gateway address for the Bridge is displayed here.
Statistics
Ethernet TX The number of packets transmitted to the Ethernet network is displayed here.
Ethernet RX The number of packets received from the Ethernet network is displayed here.
Wireless TX The number of packets transmitted to the wireless network is displayed here.
Wireless RX The number of packets received from the wireless network is displayed here.
Wireless Settings
SSID The Bridge’s SSID is displayed here.
Network Type The Bridge’s mode is displayed here. Channel The Bridge’s channel setting is displayed here.
Security The status of the Bridge’s security is displayed here.
TX Rate The Bridge’s transmission rate is displayed here.
Link Quality The quality of the Bridge’s connection is displayed here.
Click Refresh to obtain the most up-to-date settings and statistics. Click Help for additional on-screen information.
Help Tab
The Help screen offers links to all of the help information for the Web-based Utility’s screens and the Bridge’s online technical support resources (all information is read-only). You can also upgrade the Bridge’s firmware.
Help
Linksys Website Click the link to visit Linksys’s website, www.linksys.com.
Online manual in PDF format Click the link to view this User Guide on-screen. It is in Adobe Acrobat Portable Document File (.pdf) format, so you will need the free Adobe Acrobat Reader to view the pdf. If you do not have the Reader, click the Adobe Website link to download it.
Adobe Website (software for viewing PDF documents) If you need to download the Adobe Acrobat Reader to view the User Guide pdf, then click the this link.
Firmware Upgrade The version number of the Bridge’s firmware is displayed here. Firmware updates are posted
Wireless-G Ethernet Bridge |
9 |
Loading...