


 Loading...
Linksys SPA9x2 Phone
Administration Guide
BUSINESS SERIES
Version 5.2
ADMINISTRATION GUIDE |
SPA922, SPA932, SPA942, SPA962 |
||||
|
|
|
|
|
|
|
|
|
|
|
|
|
|
|
|
|
|
|
|
|
|
|
|
|
|
|
|
|
|

Table of Contents
Chapter 1: Introducing Linksys SPA9x2 Phones |
. . . . . . . . . . . . 1 |
Read Me First |
1 |
Finding Text in a PDF |
1 |
Finding Text in Multiple PDFs |
1 |
Related Documentation |
2 |
Getting Started |
3 |
Basic Phone Features |
3 |
SPS932 Sidecar Attendant for the SPA962 |
4 |
Additional Phone Features |
4 |
Features Requring SIP Support |
5 |
SPA9x2 Phone Configuration Scenarios |
6 |
SPA9000 IP PBX System |
7 |
Session Initiation Protocol and SPA9x2 Phones |
9 |
SIP Over TCP |
9 |
SIP Proxy Redundancy |
10 |
Using SPA9x2 Phones with a Firewall or Router |
10 |
Network Address Translation and SPA9x2 Phones |
11 |
Routers and Service Provider Support of NAT |
12 |
Session Border Controllers |
12 |
Simple Traversal of UDP Through NATs (STUN) |
13 |
SIP-NAT Interoperation |
13 |
Determining the Type of NAT Used on Your Router |
14 |
Using SPA9x2 Phones in a VLAN |
14 |
Chapter 2: Getting Started . . . . . . . . . . . . . . . . |
. . . . . . 16 |
Determining SPA9x2 Firmware Version |
16 |
Downloading the Firmware |
17 |
Upgrading SPA9x2 Firmware |
17 |
Using the Phone Display and Buttons |
18 |
Using the LCD Screen |
20 |
Using the Web User Interface |
20 |
Administrator and User Views |
21 |
Basic and Advanced Views |
23 |
Using the Personal Directory |
23 |
Viewing Call History |
24 |
Caller and Called Name Matching |
24 |
Web Admin Tabs |
24 |
Roadmap to Web UI Features |
25 |
Obtaining Phone Information (Info Tab) |
27 |
System and Product Information |
28 |
Product Information Notes |
28 |
Phone Status Information |
29 |
Phone Status Notes |
29 |
Understanding Lines, Calls, and Shared Call Appearances |
29 |
Understanding Extensions |
30 |
Shared Line (or Call) Appearances |
30 |
Line Key LEDs |
31 |
Extension Status Information |
31 |
Extension Status Notes |
32 |
Line and Call Status Information |
32 |
Line and Call Status Notes |
32 |
Linksys SPA9x2 Administration Guide 1

Table of Contents
Downloaded Ring Tones |
33 |
Ring Tone Notes |
33 |
For more information about downloading ring tones, see: |
33 |
What’s Next? |
33 |
Chapter 3: Setting System Features . . . . . . . . . . . |
. . . . . . 35 |
Setting Security Features |
35 |
SIP Initial INVITE and MWI Challenge |
35 |
SIP Over TLS |
35 |
SRTP and Securing Calls |
36 |
Ensuring Voice Quality |
37 |
Supported Codecs |
37 |
Bandwidth Requirements |
38 |
Factors Affecting Voice Quality |
39 |
Setting System Features |
40 |
Setting System Configuration Information |
41 |
System Configuration Notes |
41 |
Setting Internet, IP and PPPoE Information |
42 |
DHCP and PPPoE Notes |
42 |
Setting a Static IP Address on the IP Phone |
42 |
Setting Optional Network Parameters |
43 |
Optional Network Configuration Notes |
43 |
Configuring VLAN Settings |
44 |
VLAN Settings Notes |
44 |
Chapter 4: Setting SIP Parameters . . . . . |
. . . . . . . . . . . . . 45 |
SIP Parameters |
45 |
SIP Parameter Notes |
46 |
SIP Timer Values |
48 |
SIP Timer Notes |
48 |
Response Status Code Handling |
51 |
Response Status Notes |
51 |
RTP Parameters |
51 |
RTP Notes |
51 |
SDP Payload Types |
52 |
SDP Payload Parameters |
52 |
NAT Support Parameters |
53 |
NAT Support Parameter Notes |
53 |
Linksys Key System Parameters |
53 |
Linksys Key System Notes |
54 |
Chapter 5: Provisioning Basics . . . . . . . . |
. . . . . . . . . . . . 55 |
Provisioning Capabilities |
55 |
Provisioning Configuration from Phone Keypad |
56 |
Configuration Profile |
56 |
Upgrading, Resyncing, and Rebooting Phones |
57 |
Upgrading Firmware on a Phone |
57 |
Resyncing a Phone |
58 |
Rebooting a Phone |
58 |
Redundant Provisioning Servers |
59 |
Linksys SPA9x2 Administration Guide 2

Table of Contents
Retail Provisioning |
59 |
Automatic In-House Preprovisioning |
60 |
Configuration Access Control |
60 |
Using HTTPS |
60 |
How HTTPS Works |
61 |
Server Certificates |
61 |
Client Certificates |
61 |
SPA9x2 Configuration Profiles |
62 |
Firmware Upgrade Parameters |
62 |
General Purpose Parameters |
63 |
Sample Configuration File |
63 |
Chapter 6: Setting Regional Parameters . . . . . . . . . . |
. . . . . 65 |
Advanced Scripting for Cadences, Call Progress Tones, and Ring Tones |
65 |
Call Progress Tones |
69 |
Call Progress Tones Notes |
69 |
Distinctive Ring Patterns |
69 |
Ring Pattern Notes |
70 |
Control Timer Values (sec) |
70 |
Control Timer Value Notes |
70 |
Vertical Service Activation Codes (Star Codes) |
71 |
Vertical Service Activation Code Notes |
72 |
Disabling/Deactivating Services |
75 |
Vertical Service Announcement Codes |
75 |
Vertical Service Announcement Notes |
75 |
Outbound Call Codec Selection Codes |
77 |
Outbound Call Codec Selection Notes |
77 |
Miscellaneous Parameters |
78 |
DTMF Notes |
78 |
Localizing Your SPA9x2 Phone |
79 |
Managing the Time and Date |
80 |
Configuring Daylight Savings Time |
80 |
Selecting a Language |
81 |
Creating a Dictionary Server Script |
82 |
Chapter 7: Customizing SPA9x2 Phones . . . . . |
. . . . . . . . . . 84 |
General Phone Information |
84 |
General Phone Notes |
84 |
Changing the Display Background (SPA942/962) |
86 |
Using the Photo Album Feature on the SPA962 |
86 |
Line Key Information |
87 |
Line Key Notes |
87 |
Configuring Shared Line Extension on SPA9x2 Phones |
88 |
Line Key Parameters |
88 |
Miscellaneous Line Key Notes |
88 |
Line Key LED Pattern Notes |
89 |
Supplementary Services Parameters |
90 |
Supplementary Services Notes |
90 |
Using Group Paging |
92 |
Using Call Parking |
92 |
Using Call Pick Up and Group Call Pick Up |
92 |
Linksys SPA9x2 Administration Guide 3

Table of Contents
Ring Tone Parameters |
93 |
Managing Ring Tones |
93 |
Audio Input Gain (dB) and Extension Mobility Settings |
94 |
Using Extension Mobility |
95 |
Extension Mobility Notes |
95 |
Chapter 8: Customizing SPA9x2 Extensions . . . |
. . . . . . . . . . 96 |
General, Shared Line Appearance, and NAT Settings |
96 |
General Parameter Notes |
96 |
Share Line Appearance Notes |
96 |
NAT Settings Notes |
97 |
Network Settings and SIP Settings |
98 |
Network Settings Notes |
98 |
SIP Settings Notes |
98 |
Call Feature Settings |
100 |
Call Feature Notes |
100 |
Proxy and Registration Parameters |
101 |
Configuring a SIP Proxy Server |
102 |
Subscriber Information Parameters |
103 |
Subscriber Information Notes |
103 |
Audio Configuration Parameters |
103 |
Audio Configuration Notes |
105 |
Dial Plan Parameters |
106 |
Dial Plan Notes |
107 |
Chapter 9: Customizing Users . . . . . . . . . . . . . . . . . . . |
109 |
Call Forward and Speed Dial Parameters |
109 |
Call Forward Notes |
109 |
Supplementary Services |
110 |
Supplementary Services Notes |
110 |
Setting RSS Newsfeeds on the SPA962 Phone |
110 |
Web Information Service Settings (SPA962 Only) |
111 |
Web Information Service Notes |
111 |
Traffic Information Settings |
112 |
Audio Volume Settings |
112 |
Audio Volume Notes |
112 |
Phone LCD Notes |
112 |
Phone GUI Color Settings (SPA962 Only) |
113 |
Chapter 10: Using the SPA932 Sidecar . . . . . . . . . . . . . . . |
114 |
Setting Up the SPA932 Sidecar |
115 |
Configuring the SPA9000 for the SPA932 |
116 |
Configuring the Broadsoft Server for the SPA932 |
116 |
Configuring the Asterisk Server for the SPA932 |
117 |
Configuring the SPA932 |
117 |
Unit/Key Configuration Scripts |
119 |
Completing the Configuration |
120 |
SPA932 Parameter Notes |
120 |
Monitoring the SPA932 |
121 |
Linksys SPA9x2 Administration Guide 4

Table of Contents
Chapter 11: SPA9x2 Phone Field Reference . . . . . . . . . . . . |
123 |
Info Tab |
123 |
System Information |
123 |
Product Information |
124 |
Phone Status |
124 |
Ext Status |
125 |
Line /Call Status |
126 |
Downloaded Ring Tone |
127 |
System Tab |
127 |
System Configuration |
127 |
Internet Connection Type and Static IP Settings |
128 |
PPPoE Settings |
128 |
Optional Network Configuration |
129 |
VLAN Settings |
130 |
SIP Tab |
130 |
SIP Parameters |
130 |
SIP Timer Values (sec) |
133 |
Response Status Code Handling |
134 |
RTP Parameters |
135 |
SDP Payload Types |
137 |
NAT Support Parameters |
139 |
Linksys Key System Parameters |
140 |
Provisioning Tab |
141 |
Regional Tab |
141 |
Call Progress Tones |
141 |
Distinctive Ring Patterns |
144 |
Control Timer Values (sec) |
145 |
Vertical Service Activation Codes |
145 |
Vertical Service Announcement Codes |
151 |
Outbound Call Codec Selection Codes |
151 |
Miscellaneous |
153 |
Phone Tab |
155 |
General |
156 |
Line Key |
157 |
Miscellaneous Line Key Settings |
158 |
Line Key LED Pattern |
158 |
Supplementary Services |
160 |
Ring Tone |
161 |
Auto Input Gain (dB) |
162 |
Extension Mobility |
163 |
Ext Tab |
163 |
General |
164 |
Share Line Appearance |
164 |
NAT Settings |
165 |
Network Settings |
165 |
SIP Settings |
166 |
Call Feature Settings |
169 |
Proxy and Registration |
171 |
Subscriber Information |
172 |
Audio Configuration |
173 |
Dial Plan |
175 |
Linksys SPA9x2 Administration Guide 5

Table of Contents
User Tab |
175 |
Call Forward |
176 |
Speed Dial |
176 |
Supplementary Services |
176 |
Web Information Service Settings (SPA962) |
177 |
Traffic Service Information Settings (SPA962) |
177 |
Audio Volume |
177 |
Phone GUI Menu Color Settings (SPA962 only) |
177 |
932 Tab (SPA962 only) |
178 |
General |
179 |
Unit 2 |
179 |
SPA932 Status |
180 |
Appendix A: Creating an LED Script . . . . . . . . . . . . . . . . |
181 |
LED Script |
181 |
LED Pattern |
182 |
Appendix B: Configuring a Dial Plan . . . . . . . . . . . . . . . . |
183 |
Dial Plan Digit Sequences |
183 |
Dial Plan Rules |
184 |
Dial Plan Examples |
185 |
Dial Plan Timers |
186 |
Appendix C: Contacts . . . . . . . . . . . . . . . . . . . . . . . |
188 |
Linksys SPA9x2 Administration Guide 6

1 |
Introducing Linksys SPA9x2 Phones |
Read Me First |
Introducing Linksys SPA9x2 Phones
This manual is for Linksys partners, value added resellers (VARs) and Internet service providers. Use this manual to configure Linksys 9x2 series phones and users.
NOTE: This manual assumes that your SPA9x2 phones are installed and connected to the network. If not, see ”Related Documentation” section on page 2 for installation information.
Read Me First
The PDF Find/Search tool lets you find information quickly and easily online. You can:
•Search an individual PDF
•Search multiple PDFs at once (for example, all PDFs in a specific folder or disk drive)
•Perform advanced searches
Finding Text in a PDF
By default, the Find toolbar is open. If it has been closed, choose Edit > Find.
Use Find to search for text in an open PDF.
1.Enter your search terms in the Find box on the toolbar.
2.Optionally click the arrow next to the Find text box to refine your search (such as Whole words only).
3.Press Enter. Acrobat jumps to the first instance of the search term. Pressing Enter again continues to more instances of the term.
Finding Text in Multiple PDFs
The Search window lets you search for terms in multiple PDFs. The PDFs do not need to be open. Either:
•Choose Edit > Search or
•Click the arrow next to the Find box and choose Open Full Acrobat Search. The Search window appears
In the Search window:
1.Enter the text you want to find.
2.Choose All PDF Documents in.
Linksys SPA9x2 Phone Administration Guide |
1 |

Introducing Linksys SPA9x2 Phones
Read Me First
3.From the drop-down box, choose Browse for Location.
4.Choose the location you want to search, either on your computer or on a network, then click OK.
5.If you want to specify additional search criteria, click Advanced Search Options, and choose the options you want.
6.Click Search.
For more information about the Find and Search functions, see the Adobe Acrobat online help.
Related Documentation
Refer to--and search--the following documents for additional information.
See document... |
To Learn how to... |
|
|
|
|
Linksys Voice System Installation |
For VARs and Service Providers, describes: |
|
and Configuration Guide |
• Network design considerations and site preparation |
|
|
• |
Switch configuration |
|
• Initial installation and configuration of the LVS |
|
|
|
components |
|
• SPA9000, SPA400, SPA900 series IP phones |
|
|
|
|
Linksys Voice System |
For VARs and Service Providers. describes: |
|
Administration Guide |
• |
LVS management |
|
• SPA9000 IP PBX configuration |
|
|
• SPA400 phone gateway and voice mail server |
|
|
|
configuration |
|
|
|
Linksys SPA9x2 Phone User Guide |
For VARs and end phone users, describes: |
|
|
• SPA922, SPA942, SPA962 and SPA932 sidecar |
|
|
• |
Phone set up |
|
• |
Phone features |
|
|
|
Linksys ATA Administration Guide |
For VARs, system administrators, and Service Providers, |
|
|
describes: |
|
|
• Administration and use of Linksys ATAs |
|
|
• PAP2T, SPA2102, SPA3102, SPA8000, AG310, RTP300, |
|
|
|
WRP400, and WRTP54G |
|
|
|
Linksys SPA Provisioning Guide |
For Linksys service providers: |
|
|
• Describes automated provisioning features |
|
|
• |
Requires partner login |
|
|
|
Linksys SPA9x2 Phone Administration Guide |
2 |

Introducing Linksys SPA9x2 Phones
Getting Started
For additional documents and tools related to SPA9x2 phones, see linksys.com and its partner sections. For Europe, Middle East and Africa, see linksys-voip.eu (VARs) and linksys-itsp.com (service providers).
For troubleshooting information, go to linksys.com and click on Support > Technical Support.
Getting Started
Before you can configure a SPA9x2 phone, you need to install it by connecting the phone to a network (Ethernet) port. For detailed installation information, see the Linksys SPA9x2 Phone User Guide.
To get started viewing and configuring phones, see:
•”Basic Phone Features” section on page 3
•”Additional Phone Features” section on page 4
•”SPA9x2 Phone Configuration Scenarios” section on page 6
•”SPA9000 IP PBX System” section on page 7
•”Session Initiation Protocol and SPA9x2 Phones” section on page 9
•”Using SPA9x2 Phones with a Firewall or Router” section on page 10
•”Network Address Translation and SPA9x2 Phones” section on page 11
•”Simple Traversal of UDP Through NATs (STUN)” section on page 13
•”SIP-NAT Interoperation” section on page 13
•”Using SPA9x2 Phones in a VLAN” section on page 14
Basic Phone Features
All SPA9x2 phones support:
•Power over Ethernet (PoE) (802.3af-compliant)
•Two 100 BaseT Ethernet LAN ports (one PC and one WAN)
•Quality of service (QoS)
•Phone power consumption: 6 Watts (varies)
NOTE: If you are not using a PoE switch, you can use the PA100 power supply. Phone model differences are shown in the following table:
Linksys SPA9x2 Phone Administration Guide |
3 |
Introducing Linksys SPA9x2 Phones
Additional Phone Features
SPA Model |
Voice Lines |
High-Resolution Graphical Display |
|
|
|
SPA922 |
1 |
Backlit 128 x 64 pixels with screen saver and customizable |
|
|
logo and background picture (128 x 48 pixels available for |
|
|
background picture). |
|
|
|
SPA 942 |
4 |
Backlit 128 x 64 pixels with screen saver and customizable |
|
|
logo and background picture (128 x 48 pixels available for |
|
|
background picture). |
|
|
|
SPA962 |
6 |
Color 320 x 240 pixels with screen saver and customizable |
|
|
logo and background picture (320 x 240 pixels available for |
|
|
background picture). Also provides customizable photo |
|
|
album. |
|
|
|
SPS932 Sidecar Attendant for the SPA962
The SPA932 Sidecar for the SPA962 phone has 32 LEDs/buttons for dialing, call transfer, call pick up and call monitoring. Multi-colored LEDs monitor the status of each configured voice line via busy lamp field (BLF). You can attach two sidecars to a SPA962, for 64 extensions. For more information, see Chapter 10, "Using the SPA932 Sidecar."
Additional Phone Features
For a complete list of SPA9x2 features, see the phone data sheets. Included here are some additional features:
•Media Loopback: service providers can use media loopback to measure the voice quality experienced by the end user. One device acts as the audio transmitter and receiver, while the other device acts as the audio mirror. The audio mirror transmits the audio packets received back to the transmitter for testing.
•Remote Provisioning from Phone Keypad: after the user enters the IP address of the provisioning server, the phone resynchronizes to a known path name. This feature enables service providers to have VARs install and provision Linksys phones. See Chapter 5, "Provisioning Basics."
•Extension Mobility, which lets users log in to a phone. The login configures the phone with the user’s information, including user name and caller ID.
Note: This feature is currently only integrated with Broadsoft Client Management System (CMS).
•Star codes/supplementary services
•Service announcement codes
•Codec priority order of up to three preferred codecs
•Full-duplex speakerphone:
Linksys SPA9x2 Phone Administration Guide |
4 |

Introducing Linksys SPA9x2 Phones
Additional Phone Features
–Switching of lower microphone gain to reduce saturation.
–Noise floor estimation using voice activity detection (VAD).
•Phone LCD features:
–The screen can display the header of the 18X call progress message instead of displaying “Called Party Ringing.”
–A screen saver can appear when the phone is in an idle state for a period of time.
–A customized service provider logo can be downloaded to display during boot-up.
–A customized background picture can be downloaded to display on SPA942 and SPA962 phones.
–The SPA962 can display photos in a “photo album effect” using the HTTP REFRESH feature.
•Emergency Numbers
–An administrator can enter a list of emergency numbers in the Emergency Number parameter. When one of these numbers is dialed on an IP phone, the unit disables processing of “CONF”, “HOLD”, and other similar softkeys or buttons to avoid accidentally putting the current call on hold. In addition, only the far end can terminate an emergency call. See ”Dial Plan Parameters” section on page 105.
•GUI Localization: SPA9x2 phone menus can display in languages other than English.
–Additional Character Sets Supported on Phones include Latin2 (Czech, Hungarian, Polish, Romanian, Croatian, Slovak, Slovenian, Sorbian), Cyrillic (Russian, Bulgarian, Ukrainian and others), and Latin5 (Turkish). The phones officially support the ISO- 8859-1 to 8859-16 character sets, which encompass all Eastern and Western European languages.
•CALEA Compliance : To ensure compliance with the Communications Assistance for Law Enforcement Act (CALEA) in the United States, privacy setting parameters have been modified for the SPA9x2. If a user’s privacy settings are activated, the “From” value is not changed to Anonymous. Instead, the switch equipment masks the caller ID, and the calls can be tracked as required by US government regulations.
Features Requring SIP Support
The following telephony features are provided by the different models of SPA9x2 phones. An asterisk (*) indicates that the feature requires support by the SIP server.
•Reception of Text Messages via SIP: SPA9x2 phones can display text messages according to RFC3428. The Text Message and Text Message From 3rd Party parameters enable and disable the display of messages up to 255 characters in length. When this feature is enabled, a received message appears on the phone display with the date and time. For more information, see ”Supplementary Services Notes” section on page 109.
•The SPA9x2 phones can support and display up to 50 characters for Display Name, Password, Auth ID, and User ID parameters.
Linksys SPA9x2 Phone Administration Guide |
5 |

Introducing Linksys SPA9x2 Phones
SPA9x2 Phone Configuration Scenarios
•Shared Line Appearance
–SPA922: Two call appearances
–SPA942: Four call appearances
–SPA962: Six call appearances
•Call Pick Up - Selective and Group
•Call Park and UnPark
•Music on Hold
•Intercom
•Group Paging
For a list of phone features available to the end user, see the Linksys SPA9x2 Phone User Guide.
SPA9x2 Phone Configuration Scenarios
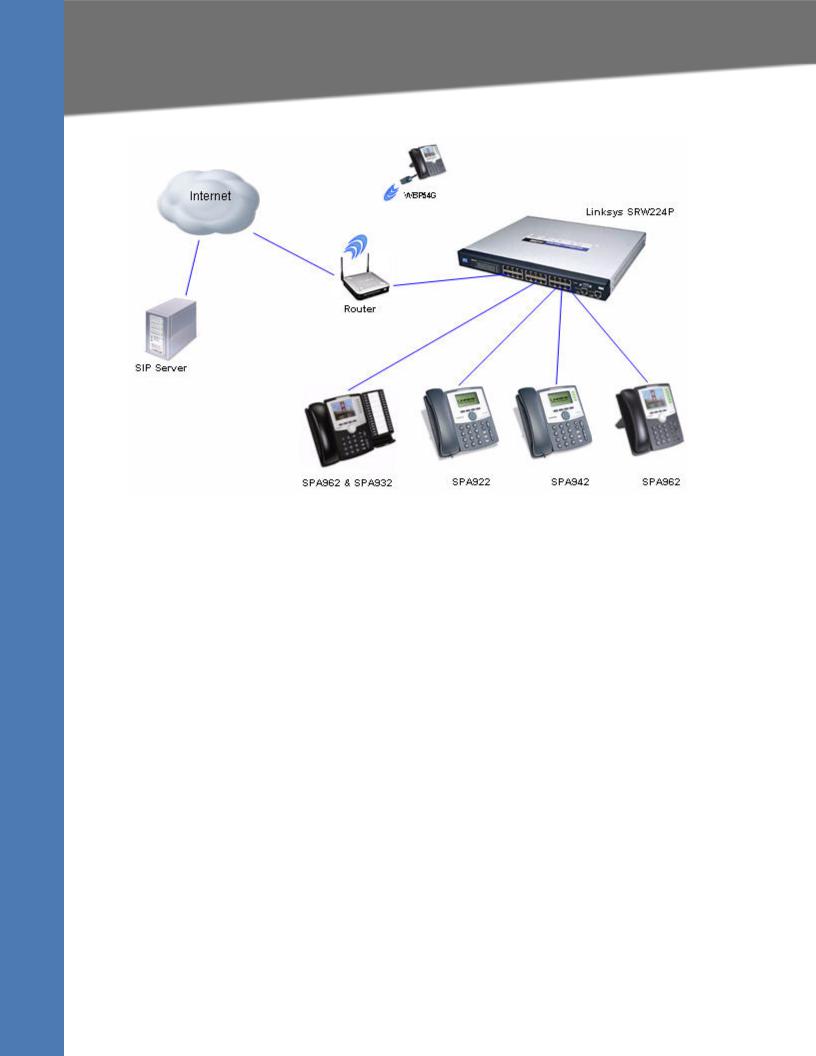
You can configure SPA9x2 phones in different ways:
•Phones connected directly to a service provider (IP Centrex)
•Phones connected to an IP PBX such as the SPA9000 Your configuration can contain:
•Optional SPA400 for voicemail and a landline connection (if using LVS/SPA9000)
•WBP54 wireless bridge for wireless networks
•Linksys ATA, such as the PAP2T (if not using SP9000)
The following diagram shows a possible configuration scenario.
Linksys SPA9x2 Phone Administration Guide |
6 |
Introducing Linksys SPA9x2 Phones
SPA9000 IP PBX System
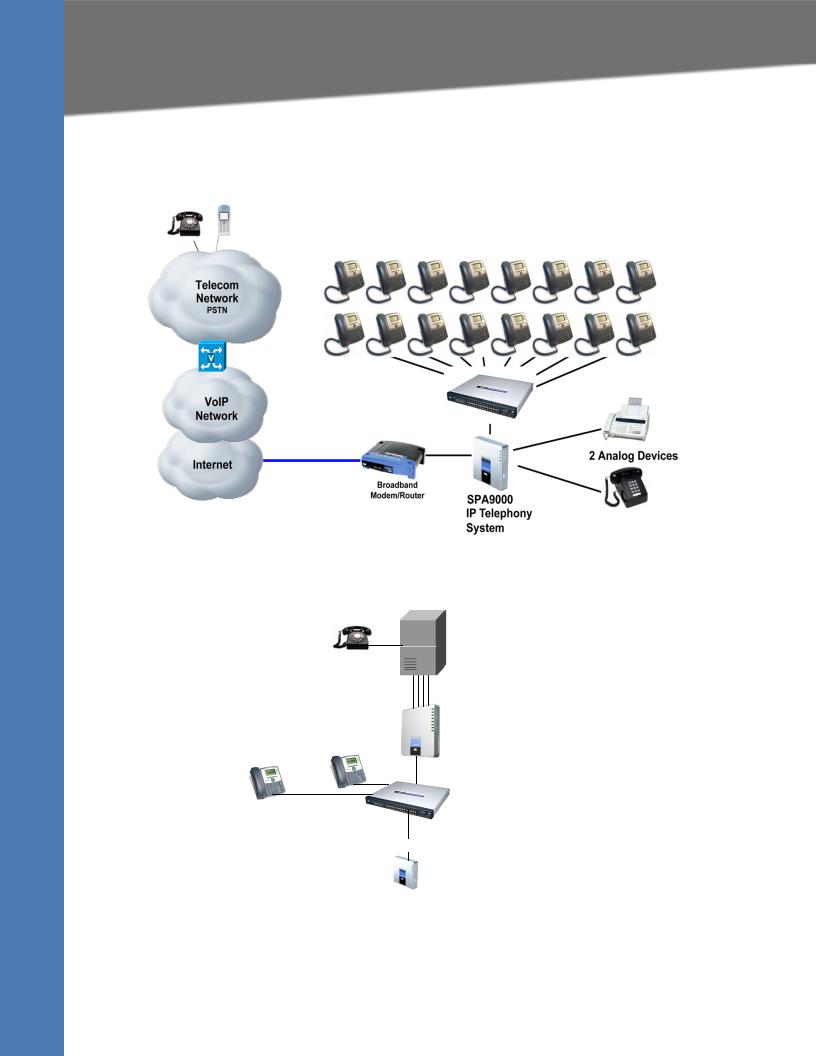
SPA9000 IP PBX System
The SPA9000 IP PBX System (VoIP side), along with the SPA400, which is Internet Telephony Gateway, provides for an analog line and voicemail. When you use SPA9x2 phones with the LVS SPA9000 IP PBX system, the following additional phone features are available:
•Auto attendant for multiple extensions
•Music on hold
•Configurable call routing
•Multiple DID numbers per VoIP line
•Call hunting (sequential, round robin, random)
•Group paging
•Call parking
•Call pick up
•Group call pick up
You can perform SPA9000 administrative tasks using an Interactive Voice Response (IVR) system, the LVS Wizard, or a built-in web server. For more information, see the Linksys Voice System Administration Guide.
Linksys SPA9x2 Phone Administration Guide |
7 |
Introducing Linksys SPA9x2 Phones
SPA9000 IP PBX System
PSTN switch
UserD
1 to 4 DID lines
SPA400
SIP-PSTN
UserB Gateway
UserA
Switch
Internet (WAN) Interface
SPA9000
SIP Proxy
Linksys SPA9x2 Phone Administration Guide |
8 |
Introducing Linksys SPA9x2 Phones
Session Initiation Protocol and SPA9x2 Phones
Session Initiation Protocol and SPA9x2 Phones
Linksys SPA9x2 phones use Session Initiation Protocol (SIP), allowing interoperation with all ITSPs supporting SIP.
SIP handles signaling and session management within a packet telephony network. Signaling allows call information to be carried across network boundaries. Session management controls the attributes of an end-to-end call.
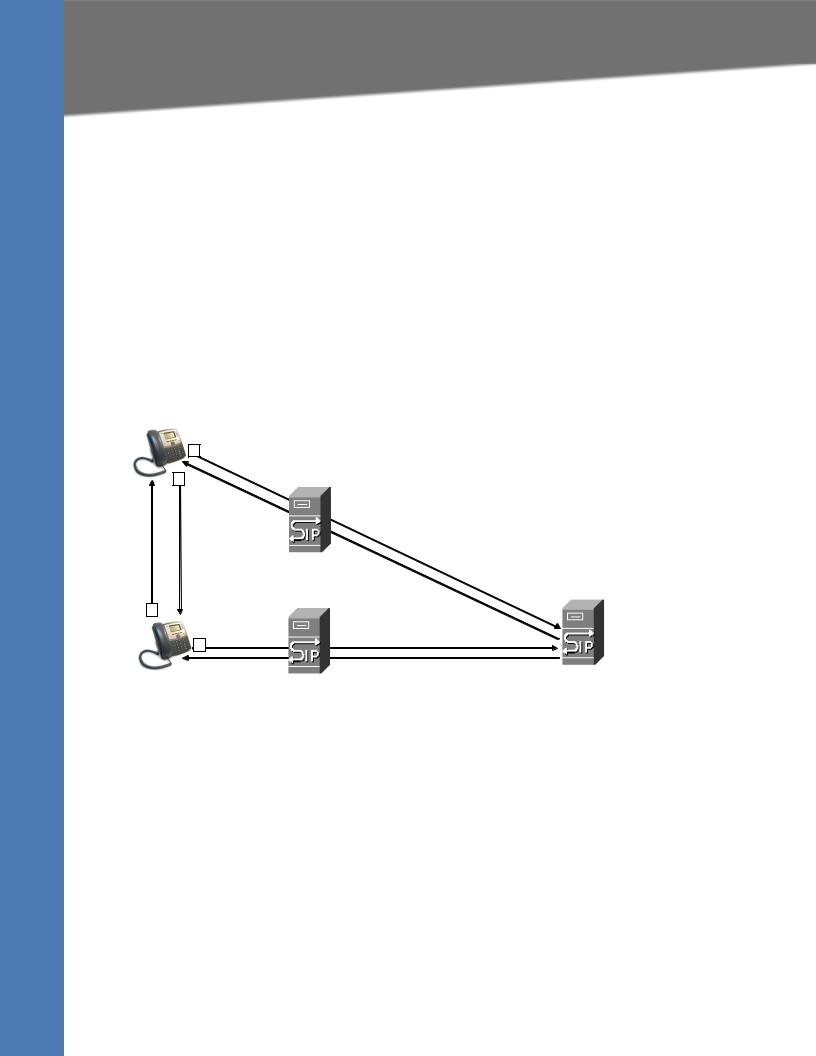
The following diagram shows a SIP request for connection to another subscriber in the network.
In typical commercial IP telephony deployments, all calls go through a SIP proxy server. The requesting phone is called the SIP user agent server (UAS), while the receiving phone is called the user agent client (UAC).
SIP UA
2
4
RTP
SIP Proxy
3
1
SIP UA
SIP message routing is dynamic. If a SIP proxy receives a request from a UAS for a connection but cannot locate the UAC, the proxy forwards the message to another SIP proxy in the network. When the UAC is located, the response is routed back to the UAS, and a direct peer-to- peer session is established between the two UAs. Voice traffic is transmitted between UAs over dynamically-assigned ports using Real-time Protocol (RTP).
The Internet protocol RTP transmits real-time data such as audio and video; it does not guarantee real-time delivery of data. RTP provides mechanisms for the sending and receiving applications to support streaming data. Typically, RTP runs on top of the UDP protocol. See ”Simple Traversal of UDP Through NATs (STUN)” section on page 13.
SIP Over TCP
To guarantee state-oriented communications, SPA9x2 phones can use TCP as the transport protocol for SIP. This protocol is “guaranteed delivery”, which assures that lost packets are retransmitted. TCP also guarantees that the SIP packages are received in the same order that they were sent.
Linksys SPA9x2 Phone Administration Guide |
9 |

Introducing Linksys SPA9x2 Phones
Using SPA9x2 Phones with a Firewall or Router
TCP overcomes the problem with UDP ports being blocked by corporate firewalls. With TCP, new ports do not need to be opened or packets dropped, because TCP is already in use for basic activities such as Internet browsing or e-commerce.
SIP Proxy Redundancy
An average SIP proxy server may handle tens of thousands of subscribers. A backup server allows an active server to be temporarily switched out for maintenance. Linksys phones support the use of backup SIP proxy servers to minimize or eliminate service disruption.
A static list of proxy servers is not always adequate. If your user agents are served by different domains, for example, you would not want to configure a static list of proxy servers for each domain into every SPA9x2 phone.
A simple way to support proxy redundancy is to configure a SIP proxy server in the SPA9x2 phone configuration profile. The DNS SRV records instruct the phones to contact a SIP proxy server in a domain named in SIP messages. The phone consults the DNS server. If configured, the DNS server returns an SRV record that contains a list of SIP proxy servers for the domain, with their host names, priority, listening ports, and so on. The SPA9x2 phone tries to contact the hosts in the order of their priority.
If the SPA9x2 currently uses a lower-priority proxy server, the phone periodically probes the higher-priority proxy and switches to the higher-priority proxy when available.
The dynamic nature of SIP message routing makes the use of a static list of proxy servers inadequate in some scenarios. In deployments where user agents are served by different domains, for instance, it would not be feasible to configure one static list of proxy servers per covered domain into every SPA9x2 phone.
One solution to this situation is through the use of DNS SRV records. SPA9x2 phones can be instructed to contact a SIP proxy server in a domain named in SIP messages. The SPA9x2 phone consults the DNS server to get a list of hosts in the given domain that provides SIP services. If an entry exists, the DNS server returns a service (SRV) record that contains a list of SIP proxy servers for the domain, with their host names, priority, listening ports, and so on. The SPA9x2 phone tries to contact the list of hosts in the order of their stated priority.
If the SPA9x2 phone is currently using a lower priority proxy server, it periodically probes the higher priority proxy to see whether it is back on line, and attempts to switch back to the higher priority proxy whenever possible.
See ”Configuring a SIP Proxy Server” section on page 101 for more information.
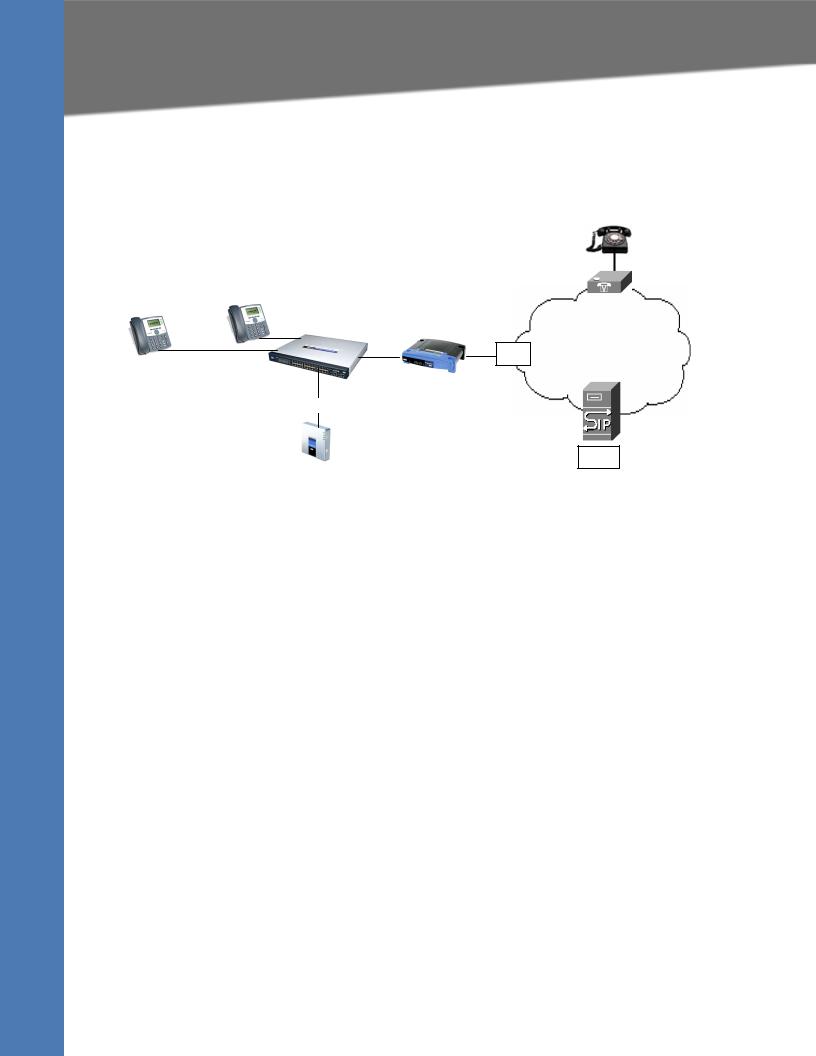
Using SPA9x2 Phones with a Firewall or Router
When using a SPA9x2 behind a firewall or router, make sure the following ports are not blocked:
•SIP ports—By default, UDP port 5060 through 5064
•RTP ports—16384 to 16482
Linksys SPA9x2 Phone Administration Guide |
10 |
Introducing Linksys SPA9x2 Phones
Network Address Translation and SPA9x2 Phones
If security is not a concern, you can disable stateful packet inspection (SPI) on your firewall (if you have it). SPI allows a firewall to be aware of a packet’s state; only recently-sent requests are allowed into the network.
UserC
UserB
UserA
Switch |
IP Router (firewall) |
Broadband modem |
ISP Internet
Internet (WAN) Interface
SPA9000
ITSP
SIP Proxy
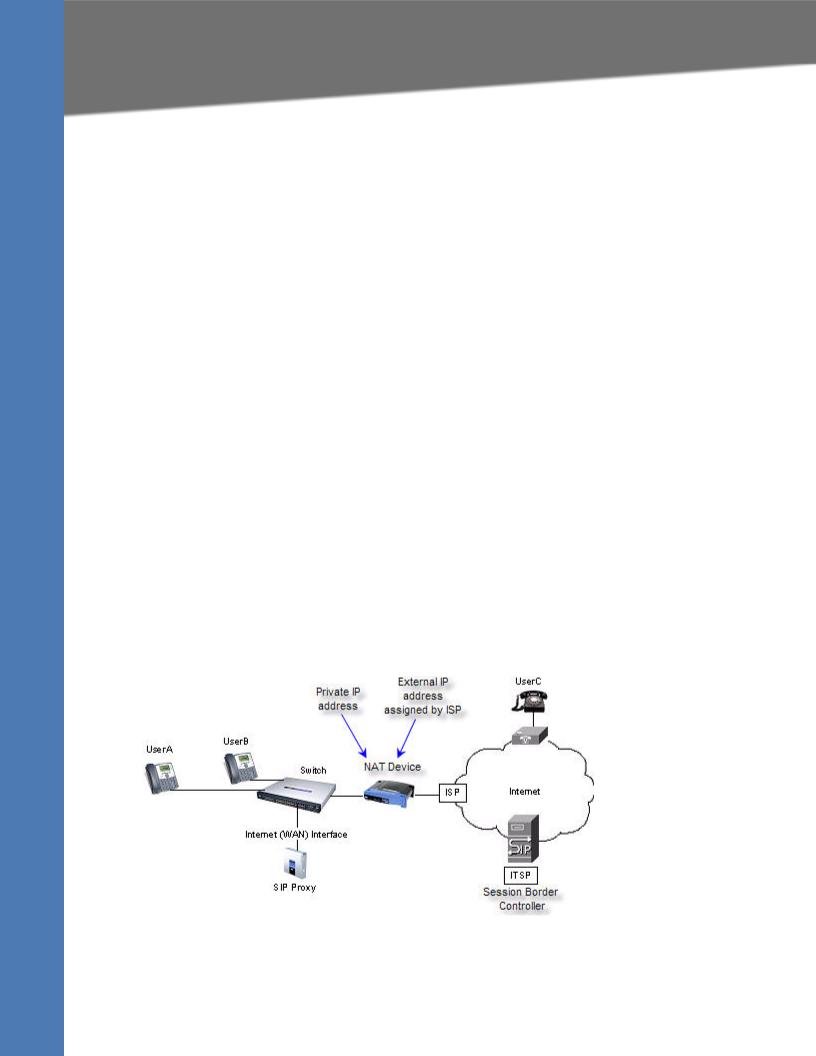
Network Address Translation and SPA9x2 Phones
In a typical application of network address translation (NAT), all devices in a subscriber network access the Internet through a router with a single public IP address. The IP address is assigned by a service provider. The IP header of the packets sent from the private network to the public network is substituted by NAT with the public IP address and a port assigned by the router. The receiver of the packets on the public network sees the packets as coming from the external address instead of the private address of the device.
You can implement NAT in three ways:
•Full cone NAT (one-to-one NAT)— All requests from the same internal IP address and port are mapped to the same external IP address and port. An external host can send a packet to the internal host by sending a packet to the mapped external address
•Restricted cone NAT—All requests from the same internal IP address and port are mapped to the same external IP address and port. Unlike a full cone NAT, an external host cannot send a packet to the internal host unless the internal host previously sent a packet to it.
•Port-restricted cone NAT (symmetric NAT)—Similar to restricted cone NAT, but the restriction includes port numbers. An external host can send a packet to a particular port on the internal host only if the internal host previously sent a user datagram protocol (UDP) packet from that port to the external host. UDP is a connectionless messaging protocol for delivery of data packets.
See the following topics:
•”Routers and Service Provider Support of NAT” section on page 12
Linksys SPA9x2 Phone Administration Guide |
11 |
Introducing Linksys SPA9x2 Phones
Network Address Translation and SPA9x2 Phones
•”Session Border Controllers” section on page 12
•”Simple Traversal of UDP Through NATs (STUN)” section on page 13
•”SIP-NAT Interoperation” section on page 13
•”Determining the Type of NAT Used on Your Router” section on page 14
Routers and Service Provider Support of NAT
NAT allows multiple devices to share the same public, routable, IP address for establishing connections over the Internet. A router forwards packets between the Internet and the internal, private network.
NAT mapping is the association between a private address and port and a public address and port . The mapping is maintained for a short period of time, varying from a few seconds to several minutes. The mapping time is extended when a source device sends a packet.
Session Border Controllers
The service provider can support NAT mapping using a session border controller. With a session border controller, you do not have to manage NAT on the SPA9x2.
If the service provider does not support session border control, use the NAT Support Parameters provided by the SPA9x2, such as:
•Outbound Proxy (see ”Proxy and Registration Parameters” section on page 100)
•STUN Server Enable (see ”NAT Support Parameters” section on page 52)
•EXT IP
Linksys SPA9x2 Phone Administration Guide |
12 |

Introducing Linksys SPA9x2 Phones
Simple Traversal of UDP Through NATs (STUN)
Simple Traversal of UDP Through NATs (STUN)
Simple Traversal of User Datagram Protocol (UDP) through Network Address Translators (NATs), or STUN, is a protocol defined by RFC 3489 that allows a client behind a NAT device to determine the:
•presence and types of NATs and firewalls between them and the public Internet
•public IP addresses allocated to them by the NAT
•port associations
STUN works with many existing NATs and allows for a wide variety of applications to work through existing NAT infrastructure.This information helps set up UDP communication between two hosts that are both behind NAT routers.
NOTE: STUN does not work with a symmetric NAT router.
To determine the type of router you have, see ”Determining the Type of NAT Used on Your Router” section on page 14.
You can get open-source STUN software at the following website:
http://www.voip-info.org/wiki-STUN > “Public STUN Servers” section.
Use any public STUN server from the link above when configuring SIP > NAT Support Parameters > STUN Server. See ”NAT Support Parameter Notes” section on page 53.
SIP-NAT Interoperation
The addresses where messages/data are sent to a SPA9x2 system are embedded in the SIP messages sent by the device. If the SPA9x2 is located behind a NAT device, its private IP address is not usable for communications with SIP devices outside the private network.
NOTE: A service provider can offer an outbound NAT-Aware proxy, which discovers the public IP address from the remote endpoint, eliminating the need to modify the SIP message from the UAC.
To communicate with a specific public peer address/port, the SPA9x2 must substitute the private address/port with the external IP address/port. The SPA9x2 performs the following:
•Discovers the NAT mappings used to communicate with the peer.
A STUN server responds to a special NAT-Mapping-Discovery request by sending back a message to the source IP address/port. The SPA9x2 can send this request when it first tries to communicate with a SIP device over the Internet. It then stores the mapping discovery results returned by the server.
•Communicates the NAT mapping information to the external SIP devices.
•If the device is a SIP Registrar, the information is carried in the Contact header that overwrites the private address/port information.
Linksys SPA9x2 Phone Administration Guide |
13 |
Introducing Linksys SPA9x2 Phones
Using SPA9x2 Phones in a VLAN
•If the device is another SIP UA, the information is carried in the Contact header and the Session Description Protocol (SDP) embedded in SIP message bodies. The VIA header in outbound SIP requests might also need to be substituted with the public address if the UAS relies on it to route back responses.
NOTE: SDP defines a text-based format for describing streaming media sessions and multicast transmissions. SDP is not a transport protocol but a method of describing the details of the transmission. For example, an SDP file contains information about the format, timing and authorship of the transmission, name and purpose of the session, any media, protocols or codec formats, the version number, contact information and broadcast times.
•Extends the discovered NAT mappings by sending keep-alive packets. Because the mapping is alive only for a short period, the SPA9x2 continues to send periodic keepalive packets through the mapping, as needed.
Determining the Type of NAT Used on Your Router
To determine the type of NAT your router uses, enable debugging on the SPA9x2:
1.Make sure you do not have firewall running on your PC that could block the syslog port (by default this is 514).
2.Log on to the phone’s web UI. For information about this, see ”Using the Web User Interface” section on page 20.
3.Click Admin Login > advanced.
4.Click the System tab, then set Debug Server to the IP address and port number of your syslog server. Note that this address and port number has to be reachable from the SPA9x2. This port number appears on the output file name. The default port number is 514.
5.Set Debug Level to 3. Do not change the value of the Syslog Server parameter.
6.To capture SIP signaling messages, click the Ext tab.
7.Set SIP Debug Option to Full. The default output is named syslog.514.log (if not port number was specified).
8.To collect information about what type of NAT your router uses click the SIP tab and scroll to NAT Support Parameters.
9.Back in the System tab, select yes in the STUN Test Enable drop-down box,
View the debug messages to determine if your network uses symmetric NAT. Look for the Warning header in REGISTER messages, for example, Warning: 399 Spa “Full Cone NAT detected.”
Using SPA9x2 Phones in a VLAN
If you use a VLAN your SPA9x2 voice packets are tagged with the VLAN ID.
Linksys SPA9x2 Phone Administration Guide |
14 |

Introducing Linksys SPA9x2 Phones
Using SPA9x2 Phones in a VLAN
If you are using a Cisco switch, Cisco discovery protocol (CDP) is enabled (this is the default). CDP is negotiation-based and determines which VLAN the SPA9x2 resides in. CDP:
•Obtains the protocol addresses of neighboring devices and also discovers the platform of those devices.
•Shows information about the interfaces your router uses.
•Is media and protocol-independent.
If you are using a VLAN without CDP , you must enter a VLAN ID for the SPA9x2. To enter VLAN settings, see ”Configuring VLAN Settings” section on page 44.
Linksys SPA9x2 Phone Administration Guide |
15 |

2 |
Getting Started |
Determining SPA9x2 Firmware Version |
Getting Started
Read this chapter to learn about:
•”Determining SPA9x2 Firmware Version” section on page 16
•”Downloading the Firmware” section on page 17
•”Upgrading SPA9x2 Firmware” section on page 17
•”Using the Phone Display and Buttons” section on page 18
•”Using the LCD Screen” section on page 20
•”Using the Web User Interface” section on page 20
•”Using the Personal Directory” section on page 23
•”Viewing Call History” section on page 24
•”Web Admin Tabs” section on page 24
•”Roadmap to Web UI Features” section on page 25
From there you can begin using the web UI to view and change phone, extension, and user information.
•”Obtaining Phone Information (Info Tab)” section on page 27
•”System and Product Information” section on page 28
•”Phone Status Information” section on page 29
•”Understanding Lines, Calls, and Shared Call Appearances” section on page 29
•”Extension Status Information” section on page 31
•”Line and Call Status Information” section on page 32
•”Downloaded Ring Tones” section on page 33
•”What’s Next?” section on page 33
Determining SPA9x2 Firmware Version
Perform the following steps to determine the phone’s current firmware version:
1.Press the Menu button on the phone.
2.Press 10, or scroll down until Product Info is highlighted and then press the select soft key.
3.Press 3 from the Product Info menu or scroll down to highlight Software Version and press the select soft key.
Linksys SPA9x2 Administration Guide |
16 |

Getting Started
Downloading the Firmware
Downloading the Firmware
To download the firmware, you need a computer with an active Internet connection. To download new firmware for a SPA9x2 phone, perform the following steps:
1. To begin, direct your browser to the following URL: http://www.linksys.com.
From the website homepage menu, select Support > Downloads.
2.Select your device from the drop-down list and click Downloads For This Product.
3.Click Firmware to go to the firmware download page.
4.Click Download to download the firmware file.
If you are using Windows XP Service Pack 2 (SP2) and Internet Explorer, a “Pop-up blocked” message might appear. If so, click the information bar and select Temporarily Allow Popups. Then click Download again.
5.Click Save in the File Download dialog box that appears.
6.In the Save As dialog box, choose a location for the file and click Save.
7.When the download is complete, if prompted, click Close.
NOTE: The name of the file depends on the firmware file of your phone.
8.If the firmware file you download is in zip format, double-click the file and extract its contents to a single folder or to the desktop.
To extract the firmware file from the archive, use a utility such as WinZip, or use the built-in decompression features of Windows XP.
After downloading and uncompressing the firmware, upgrade the phone firmware by following the steps in the following section.
Upgrading SPA9x2 Firmware
NOTE: If you are using the SPA900 Series phones with a SPA9000, see the Linksys Voice System Administration Guide for instructions to upgrade your phones using the LVS Wizard.
To upgrade a phone’s firmware:
1.After extracting the file, run the executable file to upgrade the firmware.
2.When the Firmware Upgrade warning window appears, click Continue.
3.Enter the IP address of the device in the field provided.
NOTE: For information about remotely upgrading a SPA9x2 phone, see ”Provisioning Configuration from Phone Keypad” section on page 55 and the Linksys SPA Provisioning Guide (service provider login required).
Linksys SPA9x2 Administration Guide |
17 |
Getting Started
Using the Phone Display and Buttons
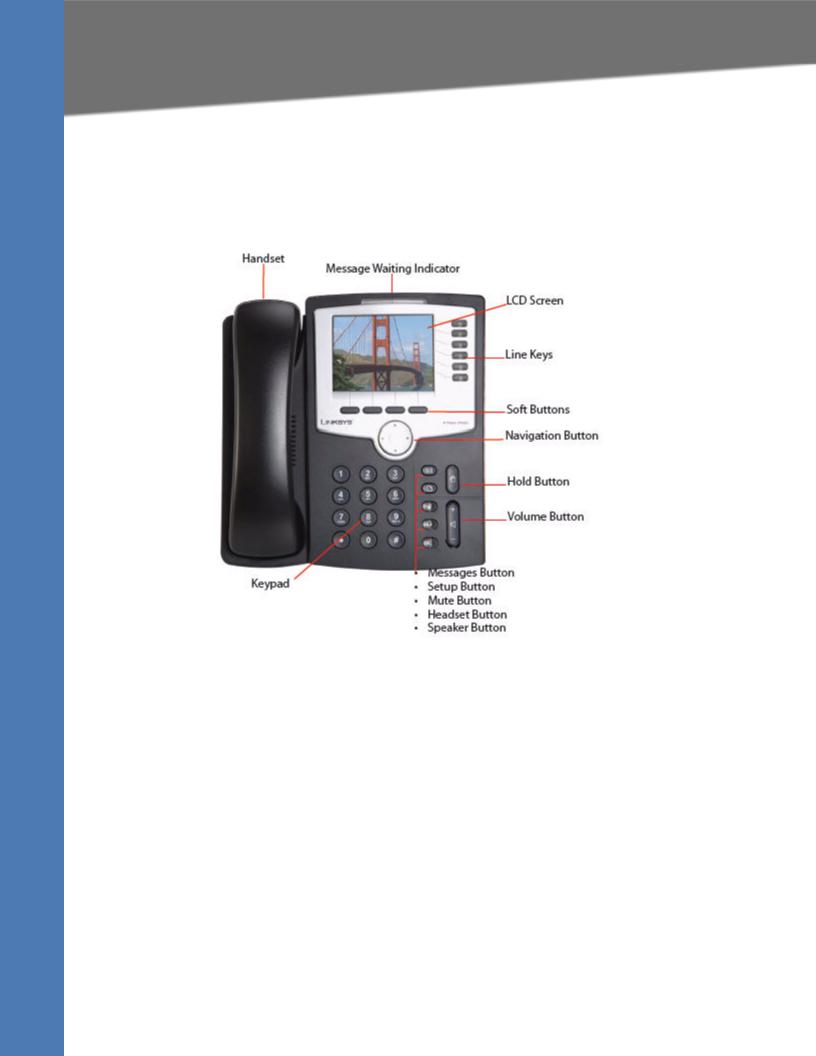
Using the Phone Display and Buttons
All SPA9x2 phones have the same basic buttons. Only the SPA922 has no line buttons, because it has only one voice line.
You can use the following graphic and table to identify buttons and features on your phone.
Linksys SPA9x2 Administration Guide |
18 |
|
|
|
|
|
Getting Started |
|
|
|
|
|
|
Using the Phone Display and Buttons |
|
|
|
|
|
|
|
|
|
Phone Feature |
Description |
|
|||
|
|
|
|
|
|
|
|
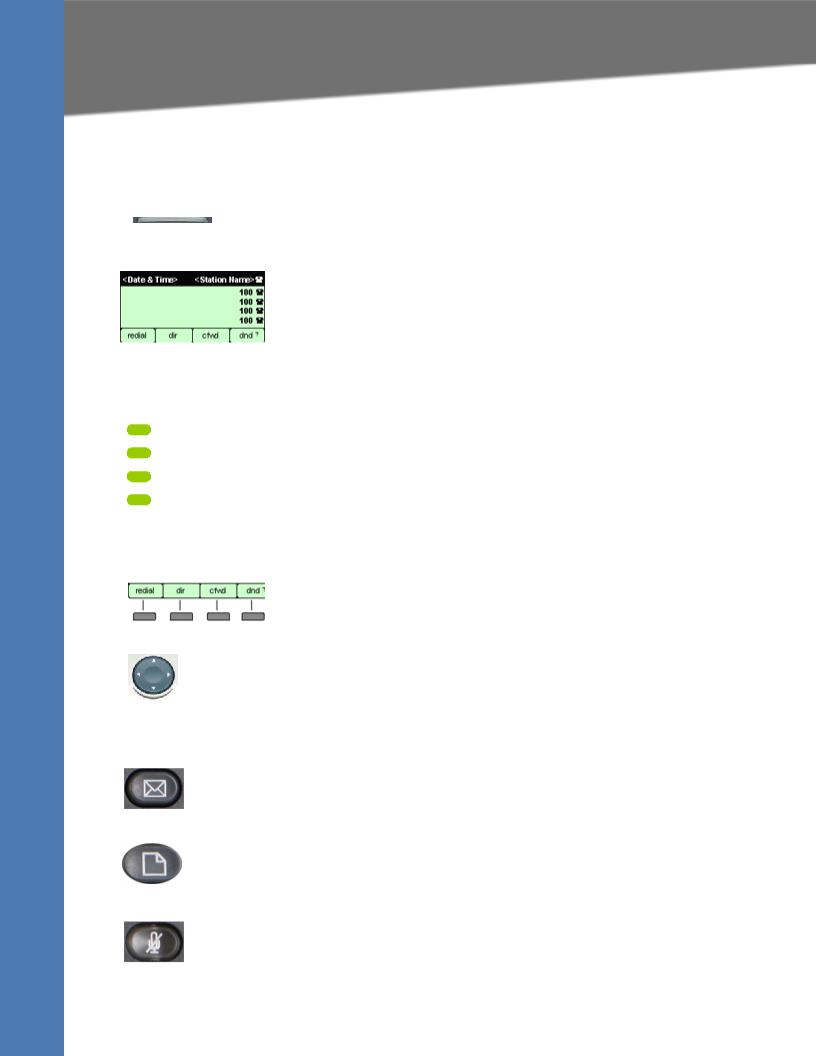
Message Waiting |
Indicates an incoming call or new voice message. Can also notify you of |
|
|||
|
Indicator |
error status. |
|
|||
|
|
|
|
• Red: new voice message |
|
|
|
|
|
|
• Flashing red: Incoming call |
|
|
|
|
|
|
|
|
|
|
LCD Screen |
Configurable to display: |
|
|||
|
|
|
|
• |
Date and time |
|
|
|
|
|
• |
Station name |
|
|
|
|
|
• |
Line extensions |
|
|
|
|
|
• |
Softkey options |
|
|
|
|
|
• Startup logo, screen saver, background photo, and photo album |
|
|
|
|
|
|
|
(SPA962) |
|
|
|
|
|
|
|
|
|
Line keys |
Indicate status of different voice lines. (Not applicable to SPA922). |
|
|||
|
|
|
|
Defaults are: |
|
|
|
|
|
|
• |
Green: idle |
|
|
|
|
|
• |
Red: |
|
|
|
|
|
|
• Steady--active/in-use |
|
|
|
|
|
|
• Blinking--on hold |
|
|
|
|
|
• |
Orange: unregistered |
|
|
|
|
|
You can configure up to 16 different line states. For more information, |
|
|
|
|
|
|
see Appendix A "Creating an LED Script". |
|
|
|
|
|
|
|
|
|
|
Softkey buttons |
Each activates a softkey option displayed on your LCD screen. |
|
|||
|
|
|
|
|
|
|
|
|
|
|
|
|
|
|
Navigation button |
Allows you to scroll through menu items and soft buttons. |
|
|||
|
|
|
|
|
|
|
|
Keypad |
Lets you dial phone numbers, enter letters, and choose menu items. |
|
|||
|
|
|
|
|
|
|
|
Messages button |
Auto-dials your voice message service (varies by service). |
|
|||
|
|
|
|
|
|
|
|
Setup button |
Lets you configure various phone features and system settings. |
|
|||
|
|
|
|
|
|
|
|
|
|
|
|
|
|
|
|
|
|
|
|
|
|
Mute button |
Toggles the microphone on or off. When the microphone is muted, the |
|
|||
|
|
|
|
button is lit. |
|
|
|
|
|
|
|
|
|
Linksys SPA9x2 Administration Guide |
19 |
|
|
|
|
|
Getting Started |
|
|
|
|
|
|
Using the LCD Screen |
|
|
|
|
|
|
|
|
|
Phone Feature |
Description |
|
|||
|
|
|
|
|
|
|
|
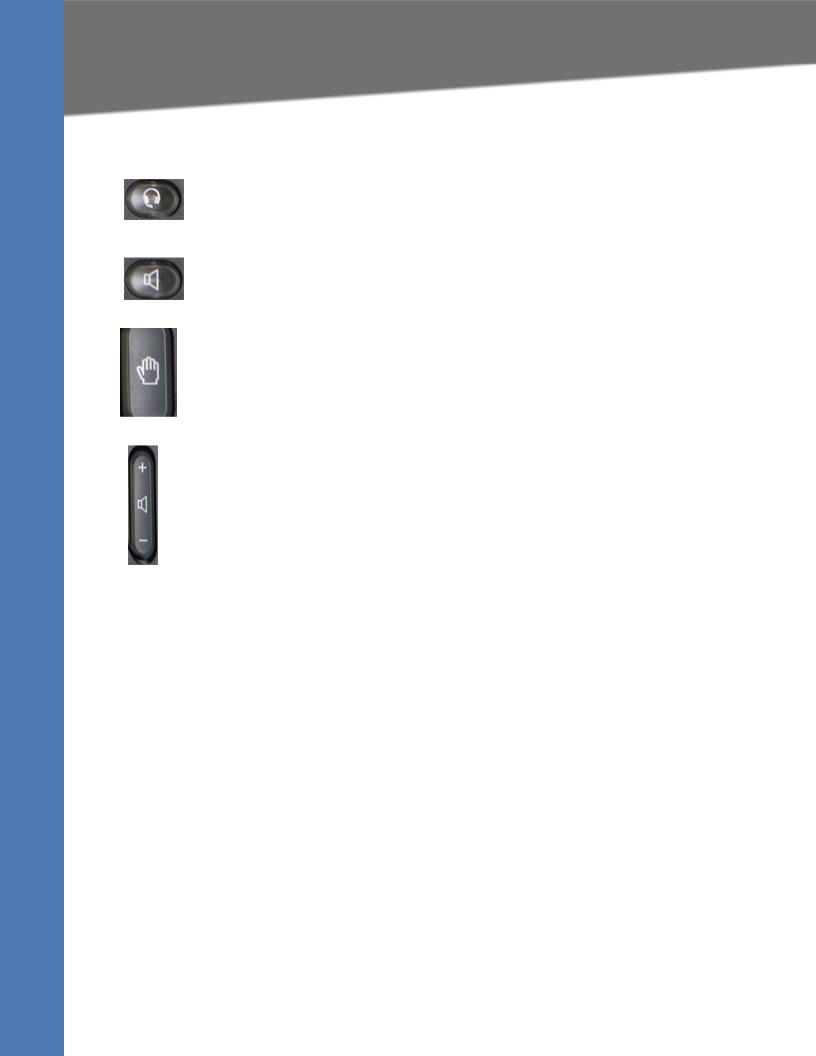
Headset button |
Toggles the headset on or off. When the headset is on, the button is lit. |
|
|||
|
|
|
|
|
|
|
|
|
|
|
|
|
|
|
|
|
|
|
|
|
|
Speaker button |
Toggles the speakerphone on or off. When the speakerphone is on, the |
|
|||
|
|
|
|
button is lit. |
|
|
|
|
|
|
|
|
|
|
Hold button |
Toggles the call on and off hold. |
|
|||
|
|
|
|
|
|
|
|
|
|
|
|
|
|
|
Volume button |
Controls volume for the: |
|
|||
|
|
|
|
• |
Handset |
|
|
|
|
|
• |
Headset |
|
|
|
|
|
• Full-duplex speaker (off-hook) |
|
|
|
|
|
|
• Ringer (on-hook) |
|
|
|
|
|
|
|
|
|
Using the LCD Screen
You can configure many settings directly from the phone.
1.Press the Setup button. The LCD shows your options.
2.Use the Navigation button to scroll up and down the list of options.
3.Choose an option by either pressing the Select softkey button or by pressing the number shown next to the option (for example, press 3 on your keypad to access Call History).
4.Change your options as needed, then press the Change or Save softkey button. To cancel any changes, press the Cancel softkey button.
As an administrator, you will use the web UI to configure phones and users.
Using the Web User Interface
To access the SPA9x2 phone administration web user interface (UI):
1.Launch a web browser on a computer that can reach the SPA9x2 phone on the network.
2.Direct the browser to the IP address of the SPA9x2 phone. To determine the IP address, either:
Linksys SPA9x2 Administration Guide |
20 |

Getting Started
Using the Web User Interface
a.Press the Setup button, then press 9 or scroll to option 9 and press Select. b. Option 2 shows the phone’s current IP address.
3.Enter the IP address in your web browser address bar. For example: http://192.168.1.8
NOTE: If you are connected to a VPN, you must first disconnect.
4.Various tabs--Info, System, Phone, User, and so on--appear based on your account privileges and current view.
5.If you make changes, use the buttons at the bottom of the screen to either:
•Submit All Changes and save them. Some saved changes cause the SPA9x2 phone to reboot.
or
•Undo All Changes button to undo your changes.
NOTE: If you have trouble accessing the web UIweb UI, perform the following steps on the SPA9x2:
1.Press the Setup button on the phone.
2.Scroll to N9 Network using Navigation button and select it.
3.Scroll to 7 Enable Web Server and make sure that it is set to Yes. If not, press the Edit soft key and press y/n soft key to set it to Yes.
4.Press OK, then press Save.
NOTE: If your service provider disabled access to the web UI, you must contact the service provider.
Administrator and User Views
Depending on whether you are a VAR or service provider, you might have different privileges. By default, the Administrator account name is admin, and the User account name is user. These account names cannot be changed.
If the service provider set an Administrator account password, you are prompted for it when you click Admin login.
NOTE: No default passwords are assigned to either the Administrator or User accounts. Only the Administrator account can assign and change passwords.
Linksys SPA9x2 Administration Guide |
21 |
Getting Started
Using the Web User Interface
The following links appear in the upper right corner:
•Admin Login/ User Login: toggles between views. The Admin view shows more configurable parameters.
•Basic/ advanced: toggles between views. The advanced view shows more configurable parameters.
•Personal Directory: lets you enter your regularly called numbers and names. You can also access your directory from the phone by pressing Setup > 1 (see ”Using the Personal Directory” section on page 23)
•Call History: shows your redial list, answered calls, and missed calls. You can also access call history from the phone by pressing Setup > 3. (see ”Viewing Call History” section on page 24)
•SPA932 Status (for SPA962 only)--displays status of SPA932 lines if you have one or two SPA932 sidecars attached to your SPA962. For more information about the SPA932, see Chapter 10, "Using the SPA932 Sidecar."
NOTE: To save changes on a web page, click Submit All Changes before switching between User and Admin Login or between basic and advanced views. Switching logins or views discards any unsubmitted changes.
Administrator Privileges
The Administrator account can modify all web profile parameters, including web parameters available to the user login. The Administrator specifies the parameters a User account can modify using the Provisioning tab of the web UI.
NOTE: Provisioning information is available only via a service provider login on linksys.com.
To directly access the Administrator account, enter:
http://phone.ip.address/admin/
If a password has been set for the Admin Login, you are prompted to enter the password. An admin can change between User Login and Admin Login. Enter passwords as needed to log in.
Admin Login Web Pages
The following tabs and web pages are available when you use the Admin Login:
•Info
Linksys SPA9x2 Administration Guide |
22 |

Getting Started
Using the Personal Directory
•System
•SIP
•Provisioning
•Regional
•Phone
•Extension (1-4 on the SPA942, 1-6 on the SPA962)
•User
•SPA932 (when configuring a SPA962; this tab appears regardless of whether a SPA932 sidecar is actually attached)
User Login Web Pages
The following tabs and web pages are available when you use the User Login:
•Info
•System
•Phone
•User
Basic and Advanced Views
These views are similar, but advanced view shows more options on each web page. To see all available options for your login, use the advanced view.
Using the Personal Directory
A directory entry consists of the following information:
•Name
•Phone number or (SIP) URL
•Ring Tone
Up to 100 entries can be stored in the SPA9x2 phone. An entry can be added or edited from the phone GUI or on the web UI. To view or edit the directory, click Personal Directory in the upper right corner of the web UI page. Alternately, you can access it from the phone selecting Setup > Directory or pressing the dir (Directory) soft button.
To add a new entry to the directory on the web UI, type the entry on the first available line. Use the following format:
n=Person’s Name;p=phonenumber;r=optional_ringtone, for example: n=Eva Lee;p=08003311345
Prepend the number with any necessary steering or outside line digits, such as 9 or 0.
Click Submit Changes to save any changes to the personal directory. The SPA9x2 reboots.
NOTE: When viewing the directory, entries that use the default ringtone do not display a value for “r.” A ringtone value of r=# indicates that a custom ring is used for that directory entry.
Linksys SPA9x2 Administration Guide |
23 |
Loading...