


 Loading...
User Guide
Linksys EA-Series

Linksys EA-Series |
Table of Contents |
Table of Contents
Product overview
EA2700/EA3500 |
1 |
Back view |
1 |
Bottom view |
1 |
EA4500 . . . . . . . . . . . . . . . . . . . . . . . . . . . . . . . . . . . . .2 |
|
Top view |
2 |
Back view |
2 |
Setting Up Your EA-Series Router
Where to find more help |
3 |
How to set up your router |
3 |
How to start Cisco Connect |
3 |
Use Cisco Connect to manage your router |
3 |
How to manually set up your router |
3 |
Advanced Configuration
How to open the browser-based utility |
4 |
Setup > Basic Setup |
5 |
Language |
5 |
Internet Setup |
5 |
Wireless > Wireless Settings |
6 |
Wireless Settings |
6 |
Wireless Security
Wireless > Wireless Security |
7 |
Personal options |
7 |
Office options |
7 |
Option settings |
7 |
Troubleshooting
How to run Cisco Connect after setup |
10 |
Your router was not successfully set up |
11 |
Get Windows XP Service Pack 3 message |
11 |
Your Internet cable is not plugged in message |
12 |
Cannot access your router message |
13 |
Device not found message |
14 |
Specifications
Linksys EA2700 |
16 |
Linksys EA3500 |
17 |
Linksys EA4500 |
18 |
i

Linksys EA-Series
Product overview
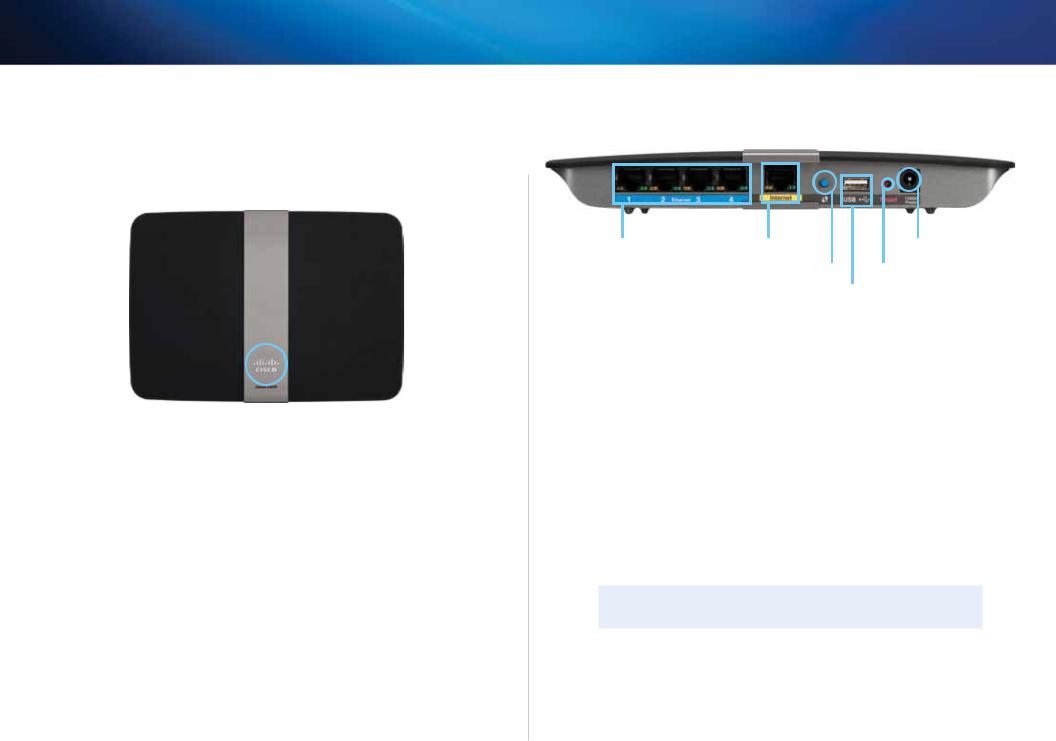
EA2700/EA3500
Back view
|
|
Power port |
USB port (EA3500 only) |
Internet port |
Power indicator |
Ethernet ports |
Wi-Fi Protected Setup button |
|
Your router’s appearance may vary
•• USB port (EA3500 only)—To easily share disk storage with other users on your network or on the Internet, connect a USB drive to this port.
•• Ethernet ports—Connect Ethernet cables (also called network cables) to these Gigabit (10/100/1000) ports, color coded blue, and to other wired Ethernet network devices on your network.
•• Internet port—Connect an Ethernet cable (also called a network or Internet cable) to this port, color coded yellow, and to your modem.
Wi-Fi Protected Setup™ button—Press this button to easily configure wireless security on Wi-Fi Protected Setup-enabled network devices. For more information, see “Wireless Security” on page 8.
Product overview
•• Power indicator—Stays on steadily while power is connected and following a successful Wi-Fi Protected Setup connection. Flashes slowly during bootup, during firmware upgrades, and during a Wi Fi Protected Setup connection. Flashes quickly when there is a Wi Fi Protected Setup error.
•• Power—Connect the included AC power adapter to this port.
Caution
Use only the adapter that came with your router.
•• Power button—Press | (on) to turn on the router.
Bottom view
Your router’s appearance may vary
•• Reset button—Press and hold this button for 5-15 seconds (until the port lights flash at the same time) to reset the router to its factory defaults. You can also restore the defaults using the browser-based utility.
1
Linksys EA-Series
EA4500
Top view
 Indicator light
•• Indicator light—Stays on steadily while power is connected and following a successful Wi-Fi Protected Setup connection. Pulses slowly during bootup, during firmware upgrades, and during a Wi Fi Protected Setup connection. Flashes quickly when there is a Wi Fi Protected Setup error.
Product overview
Back view
Ethernet ports |
Internet port |
Power port |
|
Wi-Fi Protected Setup button |
Reset button |
|
USB port |
|
•• Ethernet ports—Connect Ethernet cables (also called network cables) to these Gigabit (10/100/1000) ports, color coded blue, and to other wired Ethernet network devices on your network.
•• Internet port—Connect an Ethernet cable (also called a network or Internet cable) to this port, color coded yellow, and to your modem.
•• Wi-Fi Protected Setup™ button—Press this button to easily configure wireless security on Wi-Fi Protected Setup-enabled network devices. For more information, see “Wireless Security” on page 8.
•• USB port—To easily share disk storage with other users on your network or on the Internet, connect a USB drive to this port.
•• Reset button—Press and hold this button for 5-15 seconds (until the port lights flash at the same time) to reset the router to its factory defaults. You can also restore the defaults using the browser-based utility.
•• Power—Connect the included AC power adapter to this port.
Caution
Use only the adapter that came with your router.
•• Power button—Press | (on) to turn on the router.
2

Linksys EA-Series |
Setting Up Your EA-Series Router |
Setting Up Your EA-Series Router
Where to find more help
In addition to this User Guide, you can find help at these locations:
•• Linksys.com/support (documentation, downloads, FAQs, technical support, live chat, forums)
•• Cisco Connect help (run Cisco Connect, then click Learn More where available)
•• Browser-based utility context-sensitive help (open the utility, then click Help in the right-side column.)
How to set up your router
The easiest and fastest way to set up your router is to run the Cisco Connect setup software.
How to start Cisco Connect
When you run the setup CD, Cisco Connect (your router’s setup software) is automatically installed onto your computer. You can then use Cisco Connect to easily manage your router.
Note:
If you lose your setup CD, you can download the software from
Linksys.com/support.
To start Cisco Connect for the first time:
1.Insert the CD into your CD or DVD drive.
2.Click Set up your Linksys Router. If you do not see this:
•• For Windows, click Start, Computer, then double-click the CD drive and the Setup icon.
•• For Mac, double-click the CD icon on your desktop, then double-click the Setup icon.
3.Follow the on-screen instructions to complete your router setup.
Use Cisco Connect to manage your router
After your router has been set up and Cisco Connect has been installed, you can use Cisco Connect to easily manage many of your router’s settings such as:
•• Connect devices to your network
•• Test your Internet connection speed
•• Configure parental controls
•• Set up guest access
•• Change your router’s name and password
How to manually set up your router
After setting up the router with the setup software (located on the CD), the router will be ready for use. If you would like to change its advanced settings, or if the software does not run, use the router’s browser-based utility.You can access the utility with a web browser on a computer connected to the router. For more information on using the utility, see “How to open the browser-based utility” on page 3.
3
Linksys EA-Series |
Advanced Configuration |
Advanced Configuration
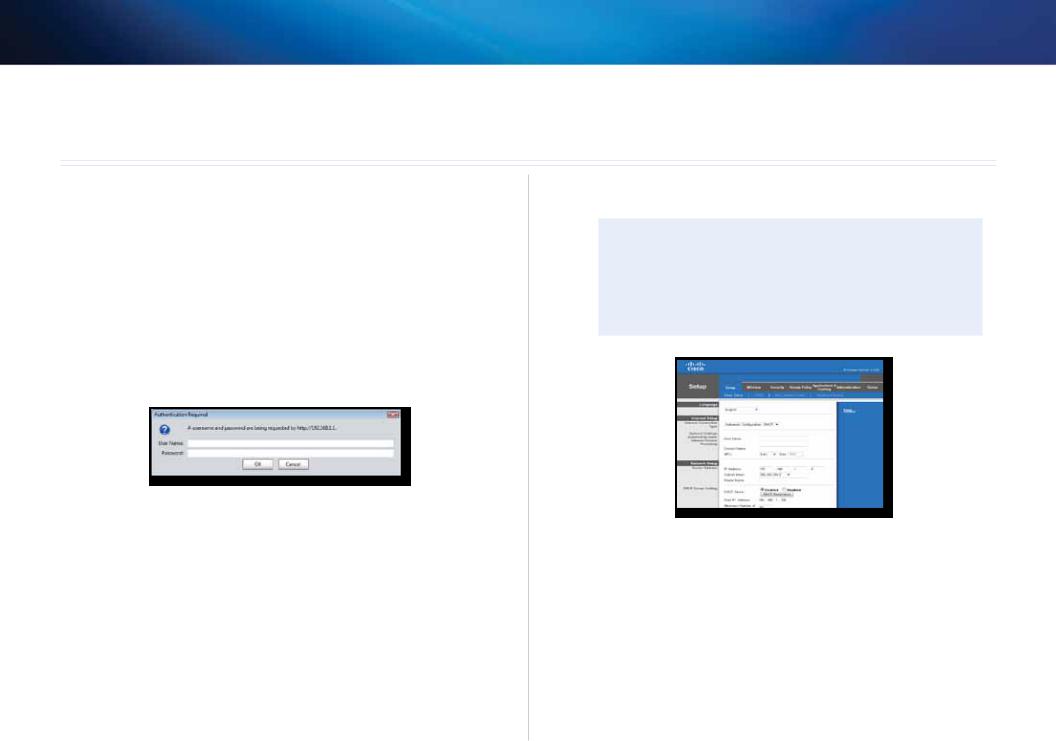
How to open the browser-based utility
To access some advanced settings, you need to open the browser-based utility.
To open the browser-based utility:
1.Run Cisco Connect, click Change under Router settings, click Advanced settings, then click OK.
– or –
Open a web browser on a computer connected to your network, then go to 192.168.1.1.
The router prompts you for a user name and password.
2.Enter the user name and password, then click OK. The utility’s main menu opens.
Tips
If you set up your router without using Cisco Connect, your router’s default username and password is admin.
If you used Cisco Connect to set up your router, you can see your router’s user name and password by running Cisco Connect, then clicking Router settings.
4
Linksys EA-Series
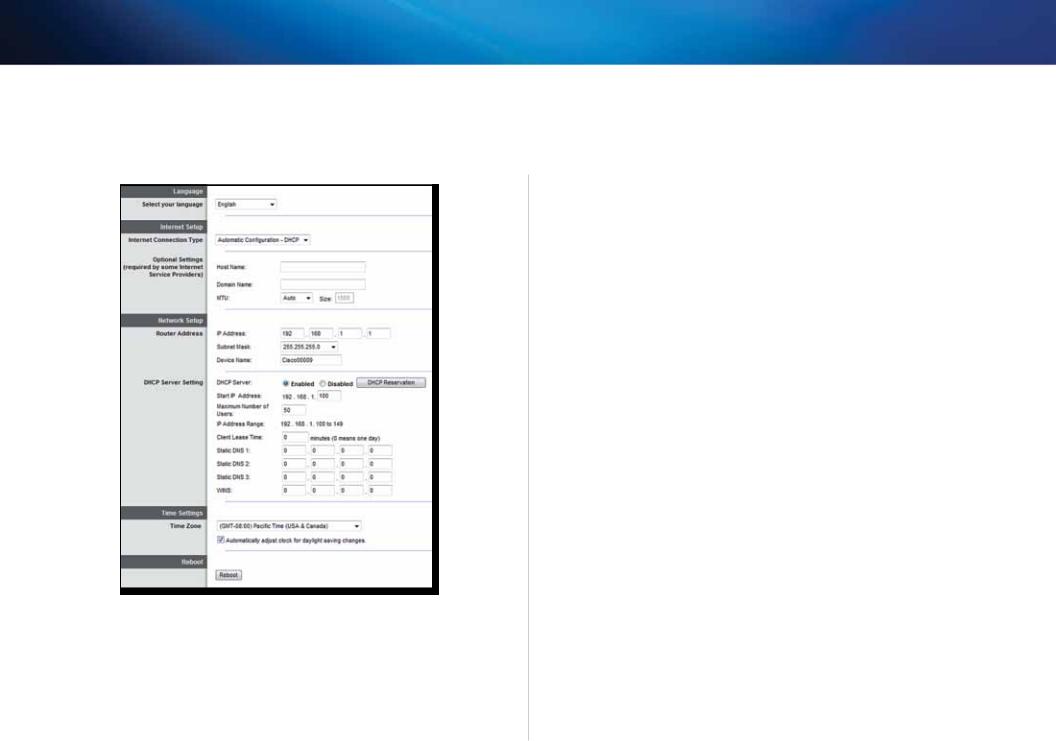
Setup > Basic Setup
The first screen that appears is the Basic Setup screen. This allows you to change the router’s general settings.
Language
Select your language To use a different language, select one from the dropdown menu. The language of the browser-based utility will change five seconds after you select another language.
Advanced Configuration
Internet Setup
The Internet Setup section configures the router to your Internet connection. Most of this information can be obtained through your Internet Service Provider (ISP).
Internet Connection Type
Select the type of Internet connection your ISP provides from the drop-down menu. The available types are:
•• Automatic Configuration - DHCP
•• Static IP
•• PPPoE
•• PPTP
•• L2TP
•• Bridge Mode
Automatic Configuration - DHCP
The default Internet Connection Type is Automatic Configuration - DHCP (Dynamic Host Configuration Protocol). Keep the default only if your ISP supports DHCP or if you connect using a dynamic IP address. (This option usually applies to cable connections.)
Static IP
If you are required to use a fixed IP address to connect to the Internet, select
Static IP.
PPPoE
If you have a DSL connection, check whether your ISP uses Point-to-Point Protocol over Ethernet (PPPoE). If so, select PPPoE.
PPTP
Point-to-Point Tunneling Protocol (PPTP) is a service that generally applies to connections in Europe. If your PPTP connection supports DHCP or a dynamic IP address, then select Obtain an IP Address Automatically. If you are required to use a fixed IP address to connect to the Internet, then select Specify an IP Address and configure the options below.
5
Linksys EA-Series
L2TP
Layer 2 Tunneling Protocol (L2TP) is a service that generally applies to connections in Israel.
Connect on Demand or Keep Alive
The Connect on Demand and Keep Alive options let you choose whether the router connects to the Internet only as needed (useful if your ISP charges for connect time), or if the router should always be connected. Select the appropriate option.
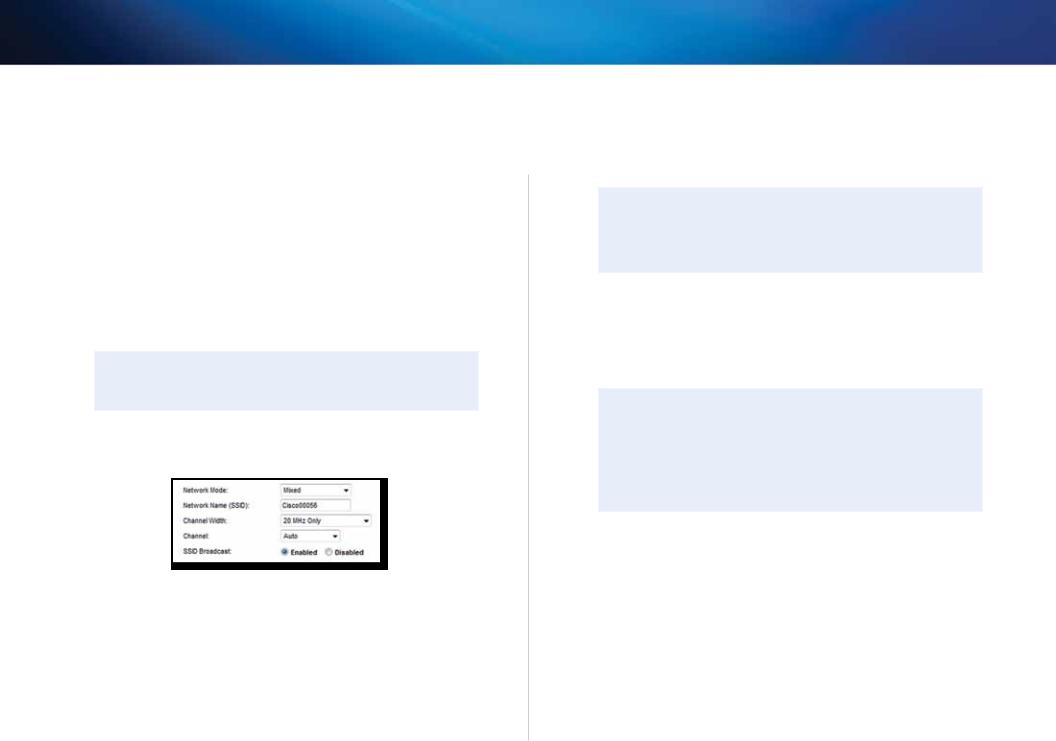
Wireless > Wireless Settings
The settings for wireless networking are set on this screen.
Note
After you set up the wireless network(s), set up the wireless security settings.
Wireless Settings
Network Mode Select the wireless standards your network will support.
•• Mixed If you have Wireless-N (2.4 GHz), Wireless-G, and Wireless-B devices in your network, keep the default, Mixed.
•• Wireless-B/G Only If you have both Wireless-B and Wireless-G (2.4 GHz) devices in your network, select Wireless-B/G Only.
•• Wireless-B Only If you have only Wireless-B devices, select Wireless-B Only.
•• Wireless-G Only If you have only Wireless-G devices, select Wireless-G Only.
Advanced Configuration
•• Wireless-N Only If you have only Wireless-N (2.4 GHz) devices, select
Wireless-N Only.
•• Disabled If you have no Wireless-B, Wireless-G, and Wireless-N (2.4 GHz) devices in your network, select Disabled.
Note
If you have a dual-band router, you can select Mixed, Wireless-A Only, Wireless-N Only, or Disabled for the 5 GHz band.
If you are not sure which mode to use, keep the default, Mixed.
Network Name (SSID) The Service Set Identifier (SSID) is the network name shared by all devices in a wireless network. It is case-sensitive and must not exceed 32 keyboard characters. The default is Cisco followed by the last 5 digits of the router’s serial number, which is found on the bottom of the router. If you used the setup software for installation, then the default Network Name is changed to an easy-to-remember name.
Note
If you restore the router’s factory default settings (by pressing the Reset button or using the Administration > Factory Defaults screen), the Network Name will return to its default value. Change the Network Name back to its original name, or you will have to
reconnect all devices on your wireless network to the new network name.
Channel Width For best performance in a network using Wireless-B, Wireless-G and Wireless-N (2.4 GHz) devices, select Auto (20 MHz or 40 MHz). For a channel width of 20 MHz, select 20 MHz only.
Channel Select the channel from the drop-down list for Wireless-B, Wireless-G, and Wireless-N (2.4 GHz) networking. If you are not sure which channel to select, then keep the default, Auto.
SSID Broadcast When wireless clients survey the local area for wireless networks to associate with, they will detect the SSID broadcast by the router. To broadcast the router’s SSID, keep the default, Enabled. If you do not want to broadcast the router’s SSID, then select Disabled.
6
Linksys EA-Series |
Wireless Security |
Wireless Security
Wireless > Wireless Security
The wireless security settings configure the security of your wireless network(s). The router supports the following wireless security options: WPA2/WPA Mixed Mode, WPA2 Personal, WPA Personal, WPA2/WPA Enterprise Mixed Mode, WPA2 Enterprise, WPA Enterprise, WEP, and RADIUS. (WPA stands for Wi-Fi Protected Access. WEP stands for Wireless Equivalent Privacy. RADIUS stands for Remote Authentication Dial-In User Service.)
Personal options
Security Option |
Strength |
|
|
WPA2 Personal |
Strongest |
||
|
|
|
|
WPA2/WPA Mixed Mode |
WPA2: Strongest |
||
WPA: Strong |
|||
|
|||
|
|
|
|
WPA Personal |
Strong |
||
|
|
|
|
WEP |
Basic |
||
|
|
|
|
Office options
The office options are available for networks that use a RADIUS server for authentication. The office options are stronger than the personal options because WPA2 or WPA provides encryption while RADIUS provides authentication.
Security Option |
Strength |
|
WPA2 Enterprise |
Strongest |
|
|
|
|
WPA2/WPA Enterprise Mixed |
WPA2: Strongest |
|
Mode |
WPA: Strong |
|
|
|
|
WPA Enterprise |
Strong |
|
|
|
|
RADIUS |
Basic |
|
|
|
|
Option settings
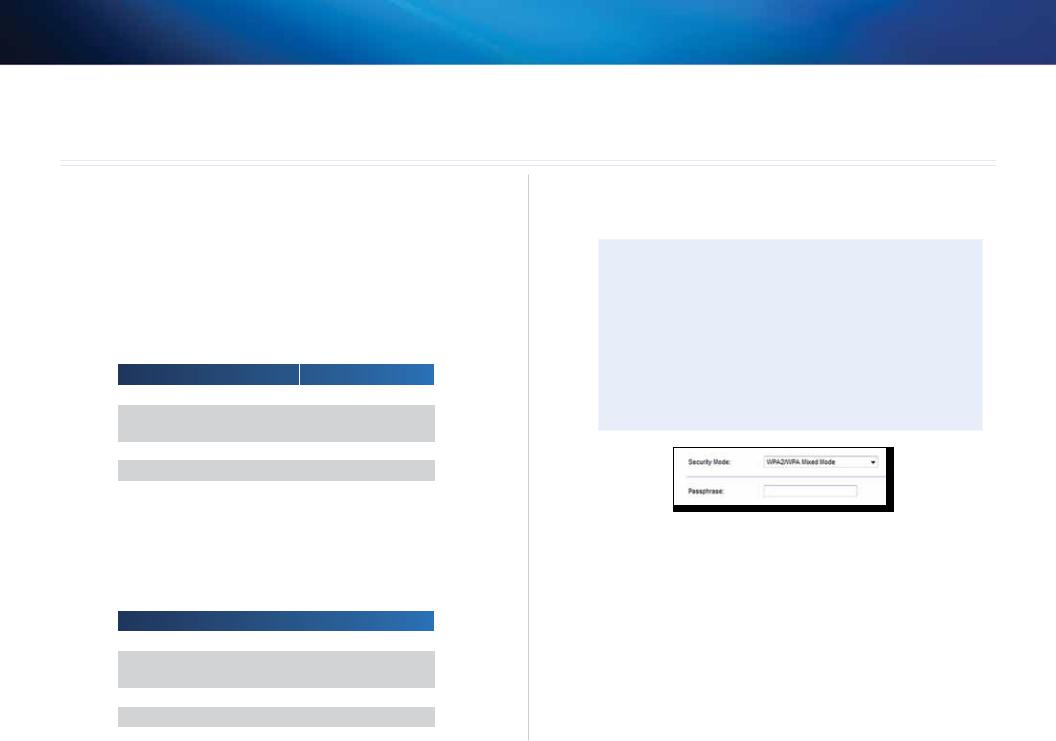
WPA2/WPA Mixed Mode, WPA2 Personal, WPA Personal
Notes
If you select WPA2/WPA Mixed Mode as your Security Mode, each device in your wireless network MUST use WPA2/WPA and the same passphrase.
If you select WPA2 Personal as your Security Mode, each device in your wireless network MUST use WPA2 Personal and the same passphrase.
If you select WPA Personal as your Security Mode, each device in your wireless network MUST use WPA Personal and the same passphrase.
Passphrase Enter a passphrase of 8-63 characters. The default is password. If you used the setup software for installation, then the default is changed to a unique passphrase, which you can find by running Cisco Connect, then clicking
Router settings.
7

Linksys EA-Series
WPA2/WPA Enterprise Mixed Mode, WPA2 Enterprise, WPA Enterprise
These option is used in coordination with a RADIUS server. (These should only be used when a RADIUS server is connected to the router.)
NoteS
If you select WPA2/WPA Enterprise Mixed Mode as your Security Mode, each device in your wireless network MUST use WPA2/WPA Enterprise and the same shared key.
If you select WPA2 Enterprise as your Security Mode, each device in your wireless network MUST use WPA2 Enterprise and the same shared key.
If you select WPA Enterprise as your Security Mode, each device in your wireless network MUST use WPA Enterprise and the same shared key.
RADIUS Server Enter the IP address of the RADIUS server.
RADIUS Port Enter the port number of the RADIUS server. The default is 1812. Shared Key Enter the key shared between the router and the server.
Wireless Security
WEP
WEP is a basic encryption method, which is not as secure as WPA.
Note:
If you select WEP as your Security Mode, each device in your wireless network MUST use WEP and the same encryption and shared key.
Encryption Select a level of WEP encryption, (40/64-bit 10 hex digits) or 104/128-bit (26 hex digits). The default is 40/64-bit (10 hex digits).
Passphrase Enter a passphrase to automatically generate WEP keys. Then click Generate.
Key 1-4 If you did not enter a passphrase, enter the WEP key(s) manually. TX Key Select a default TX (Transmit) Key to use. The default is 1.
8
Loading...