


User Manual |
|
Version 1.2 |
|
English |
|
Contents |
|
Keypad.......................................................................... |
2 |
Display .......................................................................... |
2 |
How to Use the Instrument ..................................... |
3 |
Functions ..................................................................... |
7 |
User Information ...................................................... |
11 |
Safety Instructions .................................................. |
12 |
Technical Data.......................................................... |
18 |
Message Codes........................................................ |
18 |
DISTO classic5 hand-held laser meter
Congratulations on your purchase of a DISTO.
This User Manual contains important safety directions (see section "Safety directions")
as well as instructions on use of the instrument.
Read carefully through the User Manual before you switch on the instrument.
Product identification
The identification label for your product is fitted on the front. The serial number is in the battery compartment. Enter model and serial number in your User Manual, and always refer to this information when you need to contact your agency or service centre.
Model: DISTO....................................................................
Serial no.: .........................................................................
Date of purchase: .............................................................
|
|
en |
|
Symbols used |
|
||
|
|
||
The symbols used in the User Manual have the following meanings:
WARNING:
Indicates a potentially hazardous situation or an
unintended use which, if not avoided, will result in death or serious injury.
CAUTION:
Indicates a potentially hazardous situation or an unintended use which, if not avoided, may result in minor injury and/or in appreciable material, financial and environmental damage.
) Important paragraphs which must be adhered to in practice as they enabled the product to be used in a technically correct and efficient manner.
DISTO classic5 1.2.0 en |
1 |
|
en |
|
|
|
|
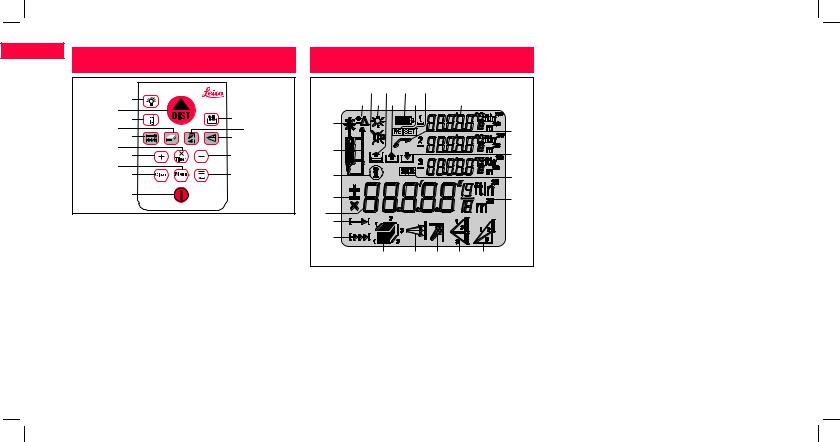
Display |
|
|
|
|
|
Keypad |
|
|
|
|
|
|
||||
|
|
1 |
|
|
|
24 22 |
20 |
18 |
|
|
|
2 |
|
|
|
25 23 21 |
19 |
17 |
|
||
|
3 |
|
15 |
|
1 |
|
|
|
|
|
|
4 |
5 |
|
13 14 |
|
|
|
|
|
16 |
|
6 |
7 |
|
12 |
|
2 |
|
|
|
15 |
|
|
|
|
|
|
|
|
|||
|
8 |
9 |
|
11 |
|
3 |
|
|
|
14 |
|
|
10 |
|
|
|
4 |
|
|
|
13 |
|
|
|
|
D5-Z1 |
|
5 |
|
|
|
|
|
|
|
|
|
6 |
|
|
|
|
|
1 |
Illumination |
9 |
Clear |
|
|
|
|
|
||
|
7 |
|
|
|
|
|||||
2 |
Measuring |
10 |
On/off key |
|
|
|
|
|
||
|
|
|
|
|
|
|||||
3 |
Meas. reference |
11 |
Equals, Enter |
|
8 |
9 |
10 |
11 |
12 |
|
4 |
Areas, Volumes |
12 |
Minus [ - ] |
1 |
Laser "on" |
|
|
|
D5-Z2 |
|
5 |
Distance measuring, |
13 |
Pythagoras functions |
|
|
|
|
|||
|
Tracking |
|
|
2 Measurement reference (front/ stand/ rear) |
||||||
6 |
Multiply [ x ]/ Timer |
14 |
min. / max. Tracking |
3 |
Information |
|
|
|
|
|
|
Release |
|
|
4 Display of the mathematical signs/operations |
||||||
7 |
Plus [ + ] |
15 |
Mermory, Stack |
5 |
Main display (e.g. measured distance) |
|
||||
8 |
Menu |
|
|
|
6 |
Distance measurement |
|
|
|
|
|
|
|
|
|
7 |
Tracking |
|
|
|
|
8Area/ Volume
9min. Tracking
10max. Tracking
11Pythagoras function
12Pythagoras function with partial height
13Units with exponents (²/ ³)
14Time symbol for time delay release
15Save constant
16Contact customer service
173 auxiliary displays (e.g. previous values)
18SET
19RESET
20Battery display
21Recall stored constant (max. 10)
22Recall last 15 values
23Illumination (on/ off)
24Beep (on/ off)
25Offset setting
Keypad |
2 |
DISTO classic5 1.2.0 en |

How to Use the Instrument
Inserting / replacing the batteries
1Depress the locking clip and slide end piece to the right.
D5-Z3 |
2 Remove battery cover. Replace batteries.  Appears on the display if battery voltage is too low.
For type of battery, refer to Technical Data.
)Fit batteries the right way round.
)Use only Alkaline batteries.
3 Push in end piece and listen for locking click sound.
DISTO Switching on/off
Briefly press.
The illumination, Battery and Beep symbols are displayed until the first key press.
The instrument can be switched off from any menu point.
) The instrument switches off automatically after 90 seconds if no key is pressed.
|
|
en |
|
Clear key |
|
||
|
|
||
The clear key resets the instrument to Normal Mode, i. e. it is set to zero (=Clear).
The clear key may be pressed before or after a measurement/ calculation.
In Menu Mode it resets to Normal Mode.
During a function (area, volume or Pythagoras) the single measurements can be deleted step by step and remeasured.
Used to exit menu settings without saving changes.
Illumination
Briefly press.
Illumination is switched on/off with a key press.
) Illumination switches off after 30 seconds if no key is pressed.
DISTO classic5 1.2.0 en |
3 |
How to Use the Instrument |

en |
Reference setting |
|
|
|
Press until desired reference setting appears. |
Possible settings
|
|
|
|
|
|
|
|
|
|
|
|
|
|
|
|
|
|
|
|
|
|
|
|
|
|
|
|
|
|
|
|
|
|
D5-Z4 |
|
front |
stand |
rear |
|
) |
At the back of the instrument is a 1/4" camera |
|||
thread for the stand. |
|
|
||
) Changes are lost when instrument is switched off.
)Basic setting: rear reference
Measuring
Distance measurement
Press and the laser is switched on, the instrument is in"Pointing Mode".
A second press starts the distance measurement.
The result is displayed immediately in the selected unit.
) With the instrument on and the laser off, it is in
"Normal Mode".
)With the laser on, it is in "Pointing Mode".
Measuring from flat planes
|
|
|
|
|
|
|
|
|
|
|
|
|
|
|
|
|
|
|
|
|
|
|
|
|
|
|
|
|
|
|
|
|
|
|
|
|
|
|
|
|
|
|
|
|
|
|
|
|
|
|
|
|
|
|
|
) |
|
|
|
D5-Z5 |
|
|
For stable measuring turn bumper 90°. |
||||||
Measuring from corners
D5-Z6 |
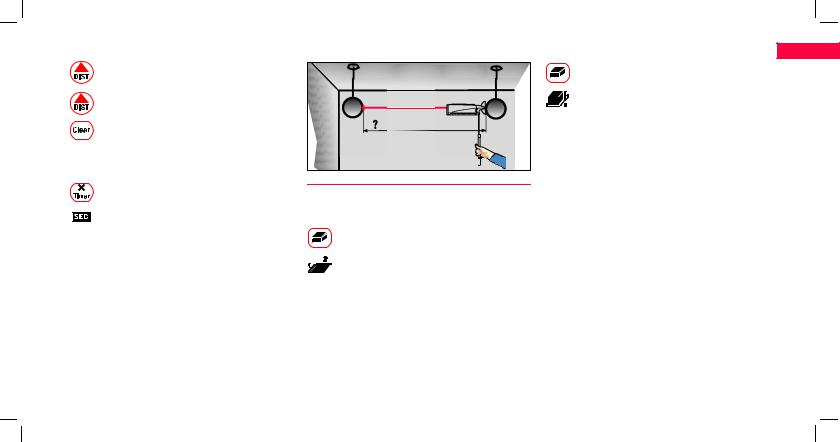
Continuous measurement (Tracking)
Press until
appears on the display.
Continuous measurement is started and the result is displayed.
Press to end Tracking Mode. Last result is shown in the display.
Example: Stake off distance
D5-Z7 |
How to Use the Instrument |
4 |
DISTO classic5 1.2.0 en |
Laser in continous operation
Press until a long "beep" is heard. Now the laser
is activated permanently.
A distance measurement is triggered each time the key is pressed.
Press to end continuous laser operation.
Time delay release
Instrument must be in Pointing Mode.
Press and hold until desired time delay has been
reached (max. 60 seconds). appears on the display.
Once the key is released, the remaining seconds (e.g. 59, 58, 57...) are displayed, until measuring.
The last 5 seconds are counted down with a "beep". After the last "beep", the measurement is made and the value displayed.
: Measuring without any key activation. |
Volume |
en |
|
Press until |
|
|
appears on the display. |
|
|
The side to be measured blinks. |
|
|
Make 3 measurements (l x w x h). |
|
|
The result and the three partial results appear on the |
|
|
display. |
|
|
D5-Z8 |
|
Calculations |
|
|
Area |
|
|
Press until |
|
|
appears on the display. |
|
|
The side to be measured blinks. |
|
|
Make 2 measurements (l x w). |
|
|
The result and the two partial results appear on the display.
DISTO classic5 1.2.0 en |
5 |
How to Use the Instrument |

|
en |
|
|
|
|
|
|
or with key [+ / -] change setting as desired. |
Call up menu point. |
|
|
Menu/ Settings |
|
|
|
|
|||
|
|
|
|
|
|
|
|
blinks on the display. |
|
|
|
|
With this menu settings on the user level are possible. The |
|
|
|
|
Confirm selection, reset to Normal Mode. |
|
|
|
|
|
|
|
|
With key [+ / -] set desired offset (=shifting reference) (e.g. |
||
|
|
|
user can configure the instrument to his/her own specific |
|
|
|
|
||
|
|
|
|
|
|
|
|||
|
|
|
|
|
|
|
|
0,015m); quick set by keeping key pressed. |
|
|
|
|
and personal needs. |
) |
"Clear Entry" may also be used (e.g. to cancel a |
||||
|
|
|
For larger steps hold additionally. |
||||||
|
|
|
|
||||||
|
|
|
|
||||||
|
|
|
|
selection). |
|
||||
|
|
Selecting units |
|
) |
Offset can be positive (add) or negative |
|
|
|
Selectable units: |
|
(reduce)! |
||
|
|
|
14’ 06’’ 1/16 = ’ ’’ 1/16 |
Confirm setting. |
||
|
|
– |
m (mm) = 0.000 m |
– |
||
|
|
– |
m (cm) = 0.00 m |
– |
in = 0.0 in |
Is displayed continuously if offset ≠ 0. |
|
|
– |
ft = 0.00 ft |
– |
in 1/16 = 0 1/16in |
|
|
D5-Z9 |
– |
ft in 1/16 = 0.00 1/16ft in |
|
|
|
1 Measure with offset (add/reduce) |
Measure with offset |
) |
Subject to set offset, the measured results are |
|||
2 |
Selecting measuring units |
|||||
3 |
Beep |
|
|
|
displayed. |
|
|
|
|
Using this function you can measure with rough size, as an |
|||
4 |
Reset |
|
|
|
||
|
|
|
example! |
|||
Calling up a menu: |
|
|
|
|||
|
|
|
Please make this a rule: After rough size measurement |
|||
|
Press until desired menu point appears or with |
|
|
|
always set the DISTO to offset 0.000: Call up function as |
|
|
key [+ / -] switch between the various menu |
|
|
|
described |
|
|
points. |
|
|
|
|
Press. |
|
Confirm selection, activate menu point. |
|
|
|
|
|
|
|
|
|
|
D5-Z10 |
Confirm function. |
|
|
|
|
|
|
|
How to Use the Instrument |
|
|
6 |
|
DISTO classic5 1.2.0 en |
|
 Loading...