


Leica DISTO™ A8
The original laser distance meter
14 12 |
11 |
13 |
15 |
|
|
|
|
|
||||||||||||||||||||||||||
1 |
|
|
|
|
|
|
|
|
|
|
|
|
|
|
|
|
|
|
|
|
|
16 |
||||||||||||
|
|
|
|
|
|
|
|
|
|
|
|
|
|
|
|
|
|
|
|
|
||||||||||||||
|
|
|
|
|
|
|
|
|
|
|
|
|
|
|
|
|
|
|||||||||||||||||
2 |
|
|
|
|
|
|
|
|
|
|
|
|
|
|
|
|
|
|
|
17 |
||||||||||||||
3 |
|
|
|
|
|
|
|
|
|
|
|
|
|
|
|
|
|
|
|
|||||||||||||||
|
|
|
|
|
|
|
|
|
|
|
|
|
|
|
|
|
|
|
||||||||||||||||
|
|
|
|
|
|
|
|
|
|
|
|
|
|
|
|
|
|
|||||||||||||||||
4 |
|
|
|
|
|
|
|
|
|
|
|
|
|
|
|
|
|
|
|
|
|
|
|
18 |
||||||||||
|
|
|
|
|
|
|
|
|
|
|
|
|
|
|
|
|
|
|
|
|
|
|
|
|
|
|
|
|
|
|
||||
|
|
|
|
|
|
|
|
|
|
|
|
|
|
|
|
|
|
|
|
|
|
|
|
|
|
|
|
|
||||||
|
|
|
|
|
|
|
|
|
|
|
|
|
|
|
|
|
|
|
|
|
|
|
|
|
|
|
|
|
|
|
|
|
|
19 |
|
|
|
|
|
|
|
|
|
|
|
|
|
|
|
|
|
|
|
|
|
|
|
|
|
|
|
|
|
|
|
|
|
|
|
|
|
|
|
5 |
|
|
|
|
|
|
|
|
|
|
|
|
|
|
|
|
|
|
|
|
|
|
|
|
||||||
|
|
|
|
|
|
|
|
|
|
|
|
|
|
|
|
|
|
|
|
|
|
|
|
|
|
|
|
|
|
|
|
|
|
|
|
|
|
|
|
|
|
|
|
|
|
|
|
|
|
|
|
|
|
|
|
|
|
|
|
|
|
|
|
|
|
|
|
|
|
6 |
20 |
|
7 |
||
|
||
8 |
21 |
|
|
||
9 |
22 |
|
|
||
10 |
23 |


User Manual
Version 1.1
English
Congratulations on your purchase of a Leica DISTO™. The safety instructions can be
found in a separate booklet, which
accompanies this user manual. The safety instructions along with the
user manual should be read carefully before initial operation.
Helpful Hint: The first and last page including the pictures should be folded out and left open, whilst reading through the manual. Letters and numbers in braces {} refer to the illustrations.
Content |
|
Start-up................................................................ |
1 |
Menu functions................................................... |
3 |
Operation............................................................. |
4 |
Measuring ............................................................ |
6 |
Functions ............................................................. |
6 |
Appendix.............................................................. |
9 |
Start-up
GB
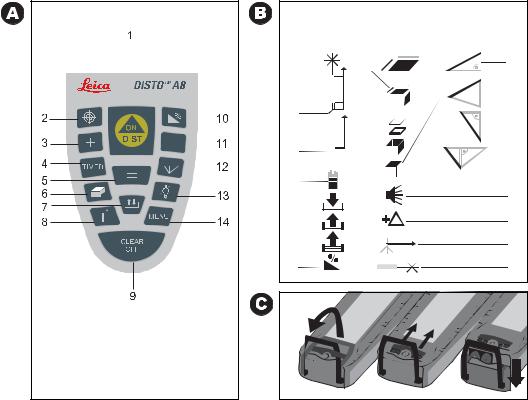
Inserting / replacing Batteries
See figure {C} - Open the positioning bracket. Remove the locking clip and slide the endpiece down. Slide the red locking mechanism to the side and open the battery compartment. Insert new or replace used batteries. Close battery cover, reinsert the endpiece and fix locking clip.
The battery symbol {B, 6} appears permanently blinking in the display when the battery voltage is too low. The batteries should be replaced as soon as possible.
•Pay attention to correct polarity.
•Use alkaline batteries.
•Batteries should be removed if the device will not be used for a long time (danger of corrosion).
When changing the batteries the settings and stack content remain unchanged.
Multifunctional Endpiece
See figure {D}
The device can be used for different measurement situations:
•For measurements from an edge open the positioning bracket until it locks in place.
See figure {E}.
•For measurements from a corner, open the positioning bracket until it locks in place, with a slight
Leica DISTO™ A8 1.1.0 gb |
1 |
Start-up |
|
|
|

|
push to the right the bracket can be turned |
GB |
further. See figure {D and F}. |
A built-in sensor automatically detects the orienta- |
|
|
tion of the positioning bracket and calculates the |
|
corresponding distances accordingly. |
Level
The integrated bubble level allows simple horizontal levelling of the instrument.
Keypad
See figure {A}:
1ON/MEASURING
2 DIGITAL VIEWFINDER
3 PLUS [+]
4TIMER
5EQUAL [=]
6 AREA/VOLUME
7STORAGE
8 MEASUREMENT REFERENCE
9 CLEAR/OFF
10TILT
11MINUS [-]
12INDIRECT MEASUREMENT (PYTHAGORAS)
13ILLUMINATION
14MENU
Display
See figure {B}
The graphics display shows clear, large symbols which enable an easy to use interface.
The display contrast can be adjusted to suit the customer's requirements and the prevailing lighting conditions.
Press the CLEAR - key {A, 9} and the MINUS - key (A, 11) at the same time; with each press a beep sounds and the display becomes one step darker.
Press the CLEAR - key {A, 9} and the Plus - key (A, 3) at the same time; with each press a beep sounds and the display becomes one step brighter.
1Laser active
2 Reference (front)
3Reference (rear)
4 Reference(corner stop)
5 Measuring with the tripod
6Battery status
7 Save constant value
8Call up constant value
9 Historical mermory, call up values
10Tilt
11Area
12Volume
13Circumference
14Wall area
15Ceiling area
16Single tilt measurement
Start-up |
2 |
Leica DISTO™ A8 1.1.0 gb |
|
|
|
 Loading...