


EN................. |
P. 1 – 10 |
FR ................. |
P. 11 – 21 |
DE................. |
P. 22 – 32 |
IT................... |
P. 33 – 43 |
NL................. |
P. 44 – 54 |
ES ................. |
P. 55 – 65 |
PT ................. |
P. 66 – 76 |
EL ................. |
P. 77 – 86 |
TR ................. |
P. 87 – 96 |
Pump espresso
EN
FR
DE
IT
NL
ES
PT
EL
B |
A |
|
|
|
D |
E |
|
G |
|
|
|
F |
|
G.1 |
|
|
J |
1 |
2 |
C |
H |
|
|
I |
|
K |
|
|
D
3.1 |
C |
|
3.2 |
3.3 |
1 |
2 |
2.1 |
|
1.2 |
2.2 |
3 |
|
1.1 |
|
8020002167 - 02
www.krups.com
TR

1
5 |
9 |
13 |
17 |
21 |
2 |
6 |
10 |
300ml |
14 |
18 |
X1 |
X2 |
22 |
- MAX - |
|
|
|
|
|
|
-MAX- |
|
|
3 |
4 |
25 |
26 |
27 |
7 |
8 |
29 |
30 |
31 |
11 |
12 |
33 |
34 |
35 |
15 |
16 |
37 |
38 |
39 |
|
20sec |
|
|
|
19 |
20 |
41 |
42 |
43 |
23 |
24 |
45 |
|
|
28 |
32 |
36 |
|
40 |
2 |
1 |
|
2 |
|
44 |

DESCRIPTION
A |
Removable water tank |
G Steam nozzle |
||
B |
Cup holder tray |
|
G1 Foam nozzle |
|
C |
On/Off button |
H Drip tray grill |
||
D |
Control panel |
I |
Drip tray |
|
E |
Filter holder head |
J |
Power cord |
|
F |
Filter head |
K Spoon-tamper |
||
|
F1 |
Filter 1 cup |
|
|
|
F2 |
Filter 2 cups |
|
|
|
DESCRIPTION |
|
|
|
|
D.1 |
Selection button |
D.3.1 Position O: preheat |
|
D.1.1 Select espresso |
D.3.2 Espresso preparation |
|
D.1.2 Select steam |
D.3.3 Steam preparation |
D.2 |
‘On’ indicator light |
|
|
D.2.1 Espresso preheat indicator light |
|
|
D.2.2 Steam preheat indicator light |
|
D.3 |
Thumb wheel |
|
TECHNICAL SPECIFICATIONS
Pump: 15 bar
Manual start/stop
Accessories: 1 and 2 cup filters, measuring spoon/tamper
Steam function
Selection button: espresso or steam
Removable tank (1.2 L capacity)
Power: 960 - 1140 W
Voltage: 220 - 240 V
Safety features: 2 thermostats and a fuse
Dimensions: 297 x 201 x 290 mm
Automatic shut down after 25 minutes
IMPORTANT!
Operating voltage: this appliance is designed to operate at 230 V alternating current only.
Type of use: this appliance is designed for DOMESTIC USE ONLY
ENGLISH
1

HELPFUL TIPS
Use of freshly roasted coffee is recommended. Contact your coffee roaster for advice. The freshness of the coffee only lasts several weeks after roasting. Good packaging can improve and prolong the flavour of the coffee. If you are unsure of the quality of the packaging, choose a recently roasted coffee.
Coffee must always be ground just before it is prepared.
What coffee should you choose?
For an aromatic coffee
Choose pure Arabica coffees or those composed mostly of Arabica coffee.
Artisan roasted coffees are preferred as they lend a better complexity and delicateness to the flavour. For a variety of flavours, try pure origin coffees.
For an intense coffee
Choose coffees blended with Robusta – not specifically 100% Arabica – or Italian-roasted coffees or specific Italian-flavoured coffees.
Keep the ground coffee in the fridge as this will lock in the flavour for longer.
Do not fill your filter holder to the brim; use the measuring spoon (1 spoon for a 50 ml cup, 2 spoons for 2 x 50 ml cups). Clean off any excess coffee from around the filter holder.
If you have not used the appliance for more than 5 days, empty and rinse the water tank.
Always make sure the appliance is switched off before removing the tank to fill it or empty it.
Always ensure the appliance is positioned on a flat and stable surface.
FIRST USE
OR IF THE MACHINE HAS NOT BEEN USED FOR A
LONG PERIOD
IMPORTANT! do not place heating elements on the appliance.
IMPORTANT! Remove the red protective cap from under the water tank.
IMPORTANT! the safety instructions are part of the appliance.
Please read them carefully before using your new appliance.
RINSING THE SYSTEMS BEFORE FIRST USE
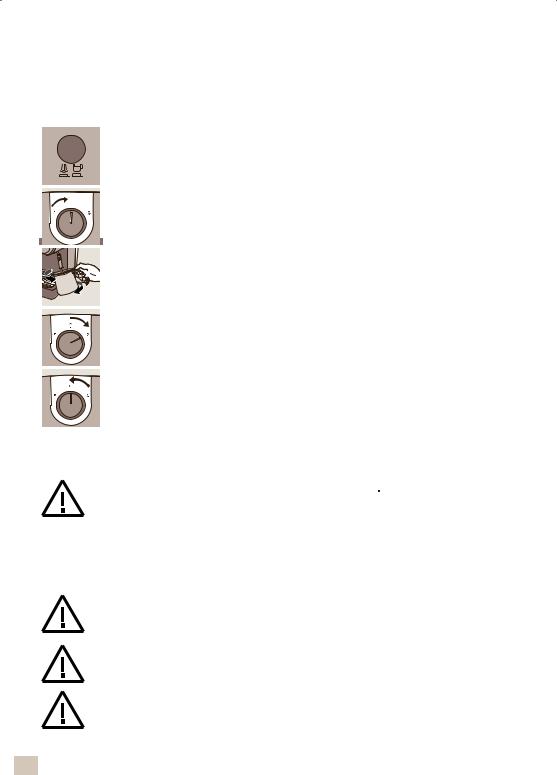
1. RINSING THE ESPRESSO SYSTEM
To ensure your first cup of coffee tastes great, we strongly recommend that you rinse the espresso machine with hot water, as instructed below:
2

Ensure you have removed the red protective cap from under the water tank (1).
– Remove the water tank (A) and fill it. The water level should not exceed the "MAX" mark |
|
|||
on the tank and should contain at least 300 ml (= equivalent to 2 large cups (2-3). Then |
|
|||
replace the water tank, ensuring that the cover is closed. (4). |
|
|||
– Plug in your machine. (5). |
|
|
||
|
ENGLISH |
|||
– Press the On button (C)(6). On the control panel (D), the "On" indicator light switches |
||||
on (D2) (7). |
|
|
|
|
– The selection button (D.1) must be set to the espresso position – (button not |
||||
depressed) |
|
(D.1.1) (8). |
|
|
|
|
|||
– Place a filter without coffee (F1) |
into the filter holder (F) (9). Slot the filter holder into |
|
||
|
||||
place (E) and turn it to the right until it stops (10). Place a receptacle under the filter |
|
|||
holder (11). |
|
|
|
|
– When the espresso preheating |
indicator light (D2.1) switches on, turn the thumb |
|
||
wheel (D.3) to the left, to espresso preparation (D.3.2) (12-13) - The flow will start after approximately ten seconds.
– Let approximately 300 ml of water trickle out (change the receptacle if necessary) (14), then turn the thumb wheel to position O (D.3.1) to stop preparation (15).
– IMPORTANT / After 25 minutes of disuse, your appliance will switch off automatically as a safeguard.
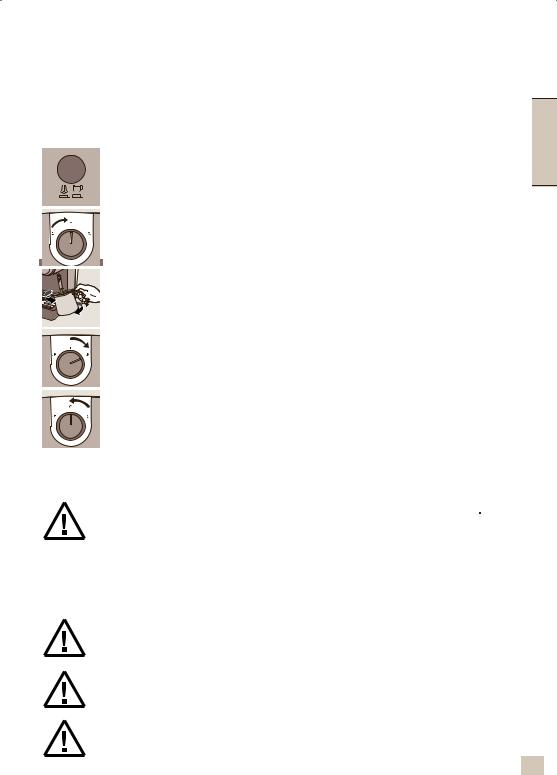
2. RINSING THE STEAM SYSTEM
Remove the water tank and fill it. The water level should not exceed the "MAX" mark on the tank and should contain at least 300 ml (= equivalent to 2 large cups). Then replace the water tank, ensuring that the cover is closed.
The selection button (D.1) must be set to the steam position (button depressed)  (D.1.2) (16)
Place the nozzle into a container filled with water (G.1) (17).
When the steam preheating indicator light (D2.2) switches on (18), turn the thumb wheel (D.3) to the right, to the steam function (D.3.3) (19).
Let the water heat for 20 seconds (20) then turn the thumb wheel to position O (D.3.1) to stop the steam (21). Return the selection button (D.1) to the espresso position (D.1.1) (26).
MAKING ESPRESSO
IMPORTANT!
If the espresso function is used for the first time, the appliance must be cleaned as described in the "FIRST USE" paragraph.
IMPORTANT! To prevent splashes of hot water, check that the filter holder has been tightened until it stops before preparing the coffee. Do not remove the filter holder while the water is flowing, as the appliance is still under pressure.
3

With ground coffee
The type of coffee you choose will determine the strength and taste of your espresso: the finer your ground coffee, the more intense your espresso will be.
Fill the water tank with tepid water and refit it on the appliance, making sure that it is correctly in place.
Plug in your machine.
For the best result, we recommend preheating the accessories beforehand (filter holder, filter and cups) by following the steps above, without adding coffee.
Turn on the appliance by pressing the On/Off button.
The "On" indicator light will switch on.
Add the ground coffee to the 1 cup filter using the measuring spoon (K) (1 spoon = 1 measure = 1 espresso) (22-23) then pack it using the tamper, turning it using a circular motion (K) (24). Once packed, the coffee measure should not exceed the MAX level (25).
For best quality, pack the coffee effectively.
Clean off any excess coffee from around the filter holder.
Ensure that the selection button is set to the espresso position  (button not depressed) (26).
Slot the filter holder into place then turn it to the right until it stops (27).
The thumb wheel, set to function O, indicates that preheating is in progress. Once preheating has finished, the espresso indicator light switches on (28).
Place a cup under the filter holder and turn the thumb wheel to the left, to the espresso position, and the coffee will start to flow (29-30).
When the cup is filled, turn the thumb wheel to position O to stop the flow (31).
Remove the cup(s).
Unlock the filter holder by turning it to the left (32) and remove it from the appliance. Do not touch the filter as it will be hot.
To empty out the coffee, invert the filter holder while holding the filter with the flap so that only the coffee falls away (33).
Wash the filter and filter holder under running water to remove the rest of the coffee (34).
To make 2 espressos, take the 2 cup filter (F.2) and add 2 measures of ground coffee.
 To change the filter in the filter holder, ensure that the filter is positioned with the slot facing the lever of the handle.
IMPORTANT / The coffee flow is stopped manually. Do not move away from the machine when it is in use.
STEAM FUNCTION
The steam will foam the coffee (for example, when making cappuccinos).
Plug in your machine.
Remove the water tank and fill it. The water level should not exceed the "MAX" mark on the tank and should contain at least 300 ml. Then replace the water tank, ensuring that the cover is closed.
Press the "On" button; the indicator light switches on.
Press the selection button to activate the steam function (button depressed) (35)  .
.
The thumb wheel, set to function O, indicates that preheating is in progress. Once preheating has finished, the steam indicator light switches on (36).
Place an empty receptacle or cup underneath the nozzle (37).
Open the nozzle system by turning the thumb wheel to the right, to the steam preparation
|
function, to run the water through the system before the steam begins. (D.3.3) (38). |
|
4 |
||
|
||
|
|

Turn the thumb wheel to program O (39). |
|
|
To make a cappuccino, fill a container with approximately 60 to 100 ml of milk. For best |
|
|
results, use a narrow and relatively small container that can be slipped under the steam |
|
|
nozzle (G) (40). For best results, the milk and container should be very cold. |
|
|
Place the nozzle into the container of milk and turn the thumb wheel to the right, to the |
|
|
ENGLISH |
||
steam position. |
||
For best results, foam the milk near the bottom of the container for approximately 10 |
||
|
||
seconds, taking care not to touch the bottom. Then slowly tilt the container and move the |
|
|
nozzle upwards until it is almost at the surface of the milk. Make sure that the nozzle does |
|
|
not leave the milk. To get a great foam, move the container in circular motions. |
|
|
To get the best foam, we recommend using pasteurised or UHT milk, and to avoid using |
|
|
non-pasteurised or skimmed milk. |
|
|
Once you have achieved the best foam, turn the thumb wheel to position O (41) |
|
|
To prevent overheating the milk, do not use the steamer for more than 45 seconds (for |
|
|
100 ml of milk). |
|
|
You can start making an espresso by following the steps detailed above. |
|
|
To prevent milk from drying inside the nozzle, please clean it after each use. To do this, |
|
|
follow the steps for foaming the milk, replacing 100 ml of milk with 60 ml of water. To avoid |
|
|
burning yourself, remove the nozzle from the foam (G.1) and wash it in clean water (42). |
|
|
Clean the steam nozzle using a damp cloth (G) (43). |
|
|
Remove the drip tray, empty it and clean it using clean water (44-45). |
|
|
Refer to the next section for manual cleaning. |
|
GOOD TO KNOW – PRACTISE AFTER USING STEAM
If you want to make an espresso after using the steam function, you need to cool down your coffee machine.
Follow the steps below:
Selection button on espresso position (button not depressed)
Make sure the knob is on position O
Immerse the steam nozzle in a container filled with 60ml of water
Turn the knob to the right: steam position for 25 seconds
Turn the knob to O position to stop the steam.
Your coffee machine is now cooled down, you can make and enjoy your espresso !
5

IMPORTANT! If you want to make a coffee after frothing milk, you shoud turn
the thumb wheel to the espresso position  and then set the selection button to the espresso position. After few seconds, the coffee indicator will turn off. Turn the thumb wheel to function O and wait until the coffee indicator lights up. During this operation, if the coffee and steam indicator lights are switched on at the same time, repeat the steps above.
IMPORTANT!
Warning! To prevent the milk from spattering, do not lift the nozzle out of the milk when using "steam" mode.
IMPORTANT!
Warning! The steam nozzle is still hot! Be careful you do not burn yourself!
IMPORTANT! After switching off the steam function, clean the nozzle immediately and carefully, as set out in the section: CLEANING AND MAINTENANCE
CLEANING AND MAINTENANCE
1. The appliance
Unplug (J) before each clean and let the appliance cool down first.
Clean the outside of the appliance with a damp sponge when you think it necessary. Regularly clean the tank, drip tray and its grill then wipe them down.
Rinse the inside of the tank regularly.
When a fine white layer appears in the tank, descale the appliance (refer to the section on descaling)
Do not use alcohol or solvent-based cleaning products.
After unplugging the appliance, regularly clean the head of the filter holder and the seal
(E) using a damp sponge.
Clean with a damp cloth only. Do not use detergent or abrasive products.
2. The filter holder
Using a damp cloth, regularly clean the filter holder housing in order to remove any residual coffee that may have collected in this area.
Do not remove the seal. Do not remove the screws from the filter and filter holder. This may only be carried out by an approved servicing centre.
To prolong the life of the filtering head seal, do not refit the filter holder if the coffee machine will not be used for an extended period of time.
3. The drip tray
If necessary, clean the drip tray (I) and its grill (H) using water and a little mild detergent (44-45). Rinse and dry.
DESCALING
Descale your appliance regularly, as indicated in sections A and B for the coffee and steam functions, as this will help prolong its lifespan. The frequency of descaling depends on the hardness of your water. Consult your water supply authority for more information.
While descaling, do not place your appliance on a marble worktop. The descaling agent could damage it.
To help you, here is a table of reference for the frequency of descaling according to water 6 hardness and how often your machine is used:

DESCALING FREQUENCY
Average no. of coffees per |
Soft water |
Hard water |
Very hard water |
week |
(<19°th) |
(19-30°th) |
(>30°th) |
|
|
|
|
Less than 7 |
Once per year |
Every 8 months |
Every 6 months |
|
|
|
|
7 - 20 |
Every 4 months |
Every 3 months |
Every 2 months |
|
|
|
|
More than 20 |
Every 3 months |
Every 2 months |
Every month |
|
|
|
|
If in doubt, descaling once per month is advised.
The coffee maker will not be repaired if:
descaling is not carried out,
there are scale deposits,
the accessories have been washed in a dishwasher, as this is not covered under the guarantee.
A. Descaling the coffee system
Unplug the appliance.
Insert the filter holder (without coffee) into the appliance and turn it to the right until it stops.
Place a receptacle with a volume greater than ½ litre under the filter holder.
Check that the thumb wheel is set to position O.
Fill the tank with a mixture comprised of 3 parts water to 1 part vinegar or citric/sulphamic acid (total volume of mixture: 500 ml)
Plug the appliance in. Turn on the appliance by pressing the On button.
Set the selection button to the espresso position. When the espresso indicator light switches on, turn the thumb wheel to the left and allow the mixture to flow through (¼ of the volume).
Stop the appliance by pressing the On/Off button and leaving the selection button set to
Espresso.
Wait 5 to 10 minutes, then repeat the process twice more.
Make sure that the tank does not fully empty (if removing, refer to the paragraph: FIRST USE).
B. Rinsing
IMPORTANT!
After descaling, rinse 2-3 times using clean water (no coffee), as described in the "FIRST USE" paragraph.
Do not forget to rinse the nozzle. The appliance is now descaled and ready for use again.
GUARANTEE
Your appliance is under guarantee; however, any connection errors, handling mistakes or use of the machine for purposes other than set out in the instructions will void the guarantee. This appliance is under guarantee for domestic use. Any other type of use will void the guarantee.
Repairs to the machine caused by a failure to descale it shall not be covered by the guarantee.
For any After-Sales or spare parts issues, please consult your retailer or an approved servicing centre.
ENGLISH
7

TROUBLESHOOTING
PROBLEMS |
POSSIBLE CAUSES |
SOLUTIONS |
The coffee is very moist. |
You have not used enough |
Add more coffee. |
|
coffee. |
|
|
|
|
The espresso flows too |
The coffee is too fine, too |
Choose slightly larger |
slowly. |
coarse or too mealy. |
coffee grounds. |
|
|
|
|
The filter holder is dirty. |
Clean your filter holder |
|
|
using the instructions in the |
|
|
section: CLEANING AND |
|
|
MAINTENANCE - B. Filter |
|
|
holder. Clean the coffee |
|
|
filter as well. |
|
|
|
|
The head of the filter holder |
When the appliance has |
|
is clogged. |
cooled, clean the grill |
|
|
through which the water |
|
|
flows using a damp sponge. |
|
|
|
|
Your machine is calcified. |
Descale your machine |
|
|
following the user |
|
|
instructions provided. |
|
|
|
|
There is too much coffee. |
Observe the maximum |
|
|
limits when filling the filter. |
|
|
|
A continuous flow of water |
Your machine is becoming |
Descale your machine |
pours from the filter holder |
calcified because the water |
immediately following the |
after making an espresso. |
is particularly hard. |
user instructions provided. |
|
|
|
|
The red cap was not |
Remove the red cap. |
|
removed. |
|
|
|
|
A continuous flow of water |
Your machine is becoming |
Descale your machine |
pours from the filter holder |
calcified because the water |
immediately following the |
after making an espresso. |
is particularly hard. |
user instructions provided. |
|
|
|
Coffee grounds are present |
The filter holder is clogged. |
Clean the filter holder using |
in the cup. |
|
hot water. |
|
|
|
|
The coffee grounds are too |
Use slightly larger coffee |
|
fine. |
grounds. |
|
|
|
|
The seal on the head of the |
Clean the filter holder |
|
filter holder is clogged. |
and the seal with a damp |
|
|
sponge. |
|
|
|
8
PROBLEMS |
POSSIBLE CAUSES |
SOLUTIONS |
The espresso is not frothy. |
The coffee grounds are too |
Use freshly ground coffee. |
|
old. |
|
|
|
|
|
The ground coffee is |
Use finer grounds. |
|
not suitable for making |
|
|
espresso. |
|
|
|
|
|
There is too little coffee in |
Add more coffee. |
|
the filter holder. |
|
|
|
|
The water tank leaks when |
The valve at the bottom |
Wash the water tank and |
it is moved. |
of the tank is dirty or |
operate the valve with your |
|
defective. |
finger, which is beneath the |
|
|
tank. |
|
|
|
|
The valve is blocked by the |
Descale your machine |
|
calcified deposits. |
following the user |
|
|
instructions provided. |
|
|
|
Water leak beneath the |
There is an internal leak. |
Check that the tank is |
appliance. |
|
positioned correctly. If |
|
|
the problem persists, do |
|
|
not use the appliance and |
|
|
consult an approved service |
|
|
centre. |
|
|
|
The pump is abnormally |
No water in the tank. |
Fill the water tank and |
noisy. |
|
restart the pump (refer to |
|
|
the section: FIRST USE). |
|
|
Avoid emptying the tank |
|
|
completely. |
|
|
|
The espresso leaks out the |
The filter holder is not |
Fit the filter holder in |
sides of the filter holder. |
positioned correctly. |
position and lock it (turn |
|
|
from left to right until it |
|
|
stops). |
|
|
|
|
|
Remove any excess coffee |
|
|
that prevents you from fully |
|
|
locking the filter holder. |
|
|
|
|
The edge of the filter holder |
Remove the excess coffee |
|
is clogged by the coffee. |
and clean the grill through |
|
|
which the water flows using |
|
|
a damp sponge. |
|
|
|
Your espresso tastes bad. |
After descaling, the rinsing |
Rinse the appliance in line |
|
cycle was not carried out |
with the user instructions |
|
correctly. |
and check the quality of the |
|
|
coffee. |
|
|
|
ENGLISH
9

PROBLEMS |
POSSIBLE CAUSES |
SOLUTIONS |
The appliance does not |
The pump is disabled due |
Fill the water tank and |
work. |
to a lack of water. |
restart the pump (refer to |
|
|
the section: FIRST USE). |
|
|
Avoid emptying the tank |
|
|
completely. |
|
|
|
|
The removable water tank |
Position the water tank |
|
is incorrectly positioned. |
correctly. |
|
|
|
|
The appliance is not |
Ensure that the appliance is |
|
connected. |
switched on. |
|
|
|
The nozzle does not work |
The foam nozzle is not |
Check that the accessory |
or produces little foam. |
correctly installed. |
is correctly mounted on |
|
|
the appliance: remove then |
|
|
re-install it on the hinged |
|
|
arm using a firm upward |
|
|
movement. |
|
|
|
|
The milk is too hot. |
Use fresh, pasteurised or |
|
|
UHT milk that has been |
|
|
recently opened. |
|
|
|
If it is not possible to determine the cause of the fault, consult an approved retailer. Never disassemble the appliance! (if the appliance is disassembled, this will void the guarantee).
ELECTRICAL OR ELECTRONIC PRODUCT END OF LIFE
Help protect the environment!
 Your product contains a number of recoverable or recyclable materials.
  Take these to a collection centre, or to an approved service centre for processing.
10

DESCRIPTION
A |
Réservoir d’eau amovible |
G Buse de vapeur |
||
B |
Plateau porte-gobelet |
|
G1 Buse de mousse |
|
C |
Bouton Marche/Arrêt |
H Grille d’égouttoir |
||
D |
Panneau de commande |
I |
Égouttoir |
|
E |
Tête du porte-filtre |
J |
Cordon d’alimentation |
|
F |
Tête de filtre |
K Cuillère-tamper |
||
|
F1 |
Filtre 1 tasse |
|
|
|
F2 |
Filtre 2 tasses |
|
|
DESCRIPTION
D.1 |
Bouton de sélection |
D.2.2 Indicateur lumineux de |
|
D.1.1 Sélectionnez espresso |
préchauffage de la vapeur |
|
D.1.2 Sélectionnez vapeur |
D.3 Molette |
D.2 |
Indicateur lumineux « On » |
D.3.1 Position O : préchauffage |
|
(« Marche ») |
D.3.2 Préparation de l’espresso |
|
D.2.1 Indicateur lumineux de |
D.3.3 Préparation de la vapeur |
|
préchauffage de l’espresso |
|
SPÉCIFICATIONS TECHNIQUES
Pompe : 15 bar
Démarrage/arrêt manuel
Accessoires : Filtres 1 et 2 tasses, cuillère mesureur/tamper
Fonction vapeur
Bouton de sélection : espresso ou vapeur
Réservoir amovible (capacité de 1,2 L)
Puissance : 960 - 1140 W
Tension secteur : 220 - 240 V
Dispositifs de sécurité : 2 thermostats et un fusible
Dimensions : 297 x 201 x 290 mm
Arrêt automatique après 25 minutes
IMPORTANT !
Tension de fonctionnement : cet appareil est conçu pour fonctionner uniquement avec un courant alternatif 230 V.
Type de fonctionnement : cet appareil est conçu pour un usage DOMESTIQUE UNIQUEMENT
FRANÇAIS
11

CONSEILS UTILES
Il est recommandé d’utiliser du café fraîchement torréfié. Contactez votre torréfacteur de café pour obtenir des conseils. La fraîcheur du café ne dure que quelques semaines après la torréfaction. Un bon emballage peut améliorer et prolonger la saveur du café. Si vous n’êtes pas sûr de la qualité de l’emballage, choisissez un café récemment torréfié.
Le café doit toujours être moulu juste avant d’être préparé.
Quel café choisir ?
Pour un café aromatique
Choisissez des cafés pur Arabica ou ceux composés principalement de café Arabica.
Les cafés torréfiés artisanaux sont préférés, car ils confèrent une meilleure complexité et délicatesse à l’arôme. Pour une variété de saveurs, essayez les cafés d’origine pure.
Pour un café intense
Choisissez des cafés mélangés avec du Robusta, et non spécifiquement 100 % Arabica, des cafés torréfiés italiens ou des cafés spécifiques aux saveurs italiennes.
Conservez le café moulu au réfrigérateur car cela conservera la saveur plus longtemps.
Ne remplissez pas votre porte-filtre à ras bord ; utilisez la cuillère-mesureur (1 cuillère pour une tasse de 50 ml, 2 cuillères pour 2 tasses de 50 ml chacune). Nettoyez tout excès de café autour du porte-filtre.
Si vous n’avez pas utilisé l’appareil pendant plus de 5 jours, videz et rincez le réservoir d’eau.
Veillez toujours à ce que l’appareil soit éteint avant d’enlever le réservoir pour le remplir ou le vider.
Veillez toujours à ce que l’appareil soit posé sur une surface stable et plane.
PREMIÈRE UTILISATION
OU SI L’APPAREIL N’A PAS ÉTÉ UTILISÉ PENDANT
UNE LONGUE PÉRIODE
IMPORTANT ! Ne placez pas d’éléments chauffants sur l’appareil.
IMPORTANT ! Enlevez le capuchon de protection rouge situé sous le réservoir d’eau.
IMPORTANT ! Les consignes de sécurité font partie de l’appareil. Veuillez les lire attentivement avant d’utiliser votre nouvel appareil.
12

RINÇAGE DES SYSTÈMES AVANT LA PREMIÈRE UTILISATION
1. RINÇAGE DU SYSTÈME ESPRESSO
Pour vous assurer que votre première tasse de café ait bon goût, nous vous recommandons fortement de rincer la machine à espresso avec de l’eau chaude, comme indiqué ci-dessous :
Assurez-vous d’avoir enlevé le capuchon de protection rouge situé sous le réservoir d’eau (1).
–Enlevez le réservoir d’eau (A) et remplissez-le. Le niveau d’eau ne doit pas dépasser la marque « MAX » située sur le réservoir et doit contenir au moins 300 ml (= l’équivalent de 2 grandes tasses (2-3). Puis replacez le réservoir d’eau en vous assurant que le couvercle est fermé. (4).
–Branchez votre machine. (5).
–Appuyez sur le bouton « marche » (C)(6). Sur le panneau de commande (D), l’indicateur lumineux « On » s’allume (D2) (7).
–Le bouton de sélection (D.1) doit être réglé sur la position espresso – (bouton non
enfoncé)  (D.1.1) (8).
–Placez un filtre sans café (F1) dans le porte-filtre (F) (9). Enclenchez le porte-filtre (E) et tournez-le vers la droite jusqu’à ce qu’il s’arrête (10). Placez un récipient sous le portefiltre (11).
–Lorsque le voyant lumineux de préchauffage de l’espresso (D2.1) s’allume, tournez la molette (D.3) vers la gauche, pour préparer l’espresso (D.3.2) (12-13) - Le débit démarre environ dix secondes après.
–Laissez environ 300 ml d’eau s’écouler (changez le récipient le cas échéant) (14), puis tournez la molette sur la position O (D.3.1) pour arrêter la préparation (15).
–IMPORTANT / Après 25 minutes d’inutilisation, votre appareil s’éteint automatiquement en guise de protection.
2.RINÇAGE DU SYSTÈME DE VAPEUR
Enlevez le réservoir d’eau et remplissez-le. Le niveau d’eau ne doit pas dépasser la marque « MAX » située sur le réservoir et doit contenir au moins 300 ml (= l’équivalent de 2 grandes tasses). Puis replacez le réservoir d’eau en vous assurant que le couvercle est fermé.
Le bouton de sélection (D.1) doit être réglé sur la position vapeur (bouton enfoncé)  (D.1.2) (16)
Placez la buse dans le récipient rempli d’eau (G.1) (17).
Lorsque l’indicateur lumineux de préchauffage de la vapeur (D2.2) s’allume (18), tournez la molette (D.3) vers la droite, vers la fonction vapeur (D.3.3) (19).
Laissez l’eau chauffer pendant 20 secondes (20) puis tournez la molette en position O (D.3.1) pour arrêter la vapeur (21). Replacez le bouton de sélection (D.1) sur la position espresso (D.1.1) (26).
FRANÇAIS
13
FAIRE UN ESPRESSO
IMPORTANT !
Si la fonction espresso est utilisée pour la première fois, l’appareil doit être nettoyé comme cela est décrit dans le paragraphe « PREMIÈRE UTILISATION ».
IMPORTANT ! Pour éviter les éclaboussures d’eau chaude, vérifiez que le porte-filtre a bien été serré jusqu’à ce qu’il s’arrête avant de préparer le café. N’enlevez pas le porte-filtre tant que l’eau coule, car l’appareil est encore sous pression.
Avec du café moulu
Le type de café que vous choisissez détermine la force et le goût de votre espresso : plus le café est finement moulu, plus votre espresso sera intense.
Remplissez le réservoir d’eau tiède et replacez-le sur l’appareil, en vous assurant qu’il est correctement en place.
Branchez votre machine.
Pour un meilleur résultat, nous recommandons de préchauffer les accessoires à l’avance (porte-filtre, filtre et tasse) en suivant les étapes ci-dessus, sans ajouter de café.
Allumez l’appareil en appuyant sur le bouton On/Off (marche/arrêt).
L’indicateur lumineux « On » s’allume.
Ajoutez le café moulu dans le filtre pour 1 tasse en utilisant la cuillère-mesureur (K) (1 cuillère = 1 mesure = 1 espresso) (22-23) puis tassez avec le tamper, en le tournant avec un mouvement circulaire (K) (24). Une fois tassée, la mesure de café ne doit pas dépasser le niveau MAX (25).
Pour une meilleure qualité, tassez le café de manière efficace.
Nettoyez tout excès de café arésent autour du porte-filtre.
Assurez-vous que le bouton de sélection est réglé en position espresso  (bouton non enfoncé) (26).
Enclenchez le porte-filtre, puis tournez-le vers la droite jusqu’à ce qu’il s’arrête (27).
La molette, réglée en position O, indique que le préchauffage est en cours. Une fois le préchauffage terminé, l’indicateur lumineux espresso s’allume (28).
Placez une tasse en dessous du porte-filtre et tournez la molette vers la gauche, en position espresso. Le café commence à couler (29-30).
Lorsque la tasse est pleine, tournez la molette en position O pour arrêter l’écoulement
(31).
Enlevez la tasse (s).
Déverrouillez le porte-filtre en tournant vers la gauche (32), puis enlevez-le de l’appareil. Ne touchez pas le filtre car il est chaud.
Pour vider le café, retournez le porte-filtre tout en tenant le filtre avec le rabat de sorte que seul le café tombe (33).
Lavez le filtre et le porte-filtre sous l’eau du robinet pour enlever le reste de café (34).
Pour faire 2 espresso, prenez le filtre pour 2 tasses (F.2) et ajoutez 2 mesures de café moulu.
 Pour changer le filtre du porte-filtre, veillez à ce que le filtre soit placé avec la fente en face du levier de la poignée.
14

IMPORTANT / L’écoulement du café est arrêté manuellement. Ne vous éloignez pas de la machine lorsqu’elle est en fonctionnement.
FONCTION VAPEUR
La vapeur fait mousser le café (par exemple, lorsque vous préparez des cappuccinos).
Branchez votre machine.
Enlevez le réservoir d’eau et remplissez-le. Le niveau d’eau ne doit pas dépasser la marque « MAX » située sur le réservoir et doit contenir au moins 300 ml. Puis replacez le réservoir d’eau en vous assurant que le couvercle est fermé.
Appuyez sur le bouton « On » ; le voyant s’allume.
Appuyez sur le bouton de sélection pour activer la fonction vapeur (bouton enfoncé)
(35) .
.
La molette, réglée en position O, indique que le préchauffage est en cours. Une fois le préchauffage terminé, l’indicateur lumineux vapeur s’allume (36).
Placez un récipient ou une tasse vide sous la buse (37).
Ouvrez le système de la buse en tournant la molette vers la droite, vers la fonction de préparation de la vapeur, pour faire passer l’eau à travers le système avant que la vapeur ne commence à sortir. (D.3.3) (38).
Tournez la molette sur le programme O (39).
Remplissez un récipient avec environ 60 à 100 ml de lait pour faire un cappuccino. Afin d’obtenir les meilleurs résultats, utilisez un récipient étroit et relativement petit qui peut être glissé sous la buse vapeur (G) (40). Pour obtenir les meilleurs résultats, le lait et le récipient doivent être très froids.
Placez la buse dans le récipient de lait et tournez la molette vers la droite en position vapeur.
Pour obtenir les meilleurs résultats, faites mousser le lait prés du fond du récipient pendant environ 10 secondes, en faisant attention de ne pas toucher le fond. Puis, inclinez légèrement le récipient et déplacez la buse vers le haut jusqu’à ce qu’elle soit presque à la surface du lait. Veillez à ce que la buse ne quitte pas le lait. Pour obtenir une excellente mousse, déplacez le récipient avec des mouvements circulaires.
Pour obtenir la meilleure mousse, nous recommandons d’utiliser du lait pasteurisé ou du lait UHT et d’éviter d’utiliser du lait non pasteurisé ou du lait écrémé.
Une fois que vous avez obtenu la meilleure mousse, tournez la molette sur la position O
Afin d’éviter de trop chauffer le lait, n’utilisez pas le dispositif de production de vapeur pendant plus de 45 secondes (pour 100 ml de lait).
Vous pouvez commencer à préparer un espresso en suivant les étapes détaillées cidessus.
Veuillez nettoyer la buse après chaque utilisation pour éviter que le lait sèche à l’intérieur de la buse. Pour cela, suivez les étapes de moussage du lait en remplaçant 100 ml de lait par 60 ml d’eau. Pour ne pas vous brûler, retirez la buse de la mousse (G.1) et nettoyezla dans de l’eau propre (42). Nettoyez la buse de vapeur à l’aide d’un chiffon humide (G)
Enlevez l’égouttoir, videz-le et nettoyez-le en utilisant de l’eau propre (44-45).
Reportez-vous à la section suivante pour le nettoyage manuel.
FRANÇAIS
15
BON À SAVOIR – MESURES À PRENDRE APRÈS L’UTILISATION DE LA FONCTION VAPEUR
Si vous voulez préparer un espresso après avoir utilisé la fonction vapeur, vous devrez refroidir votre machine à café.
Veuillez suivre les étapes ci-dessous:
Le bouton de sélection est réglée en position « espresso » (le bouton n’est pas enfoncé)
S’assurer que le bouton est réglé sur la position « O »
Plonger la buse vapeur dans un récipient rempli de 60 ml d’eau
Tourner le bouton vers la droite : position vapeur pendant 25 secondes
Tourner le bouton sur la position « O » pour arrêter la vapeur.
Votre machine à café est maintenant refroidie ; vous pouvez préparer et déguster votre espresso !
IMPORTANT ! Si vous voulez faire un café après avoir fait mousser du lait,
vous devez tourner la molette en position espresso  puis régler le bouton de sélection en position espresso. Après quelques secondes, le voyant lumineux du café s’éteint. Tournez la molette sur la fonction O et attendez jusqu’à ce que l’indicateur lumineux du café s’allume.
Pendant cette opération, si les indicateurs lumineux du café et de la vapeur sont allumés en même temps, répétez les étapes ci-dessus.
IMPORTANT !
Attention ! Pour éviter les éclaboussures de lait, ne soulevez pas la buse hors du lait en mode « vapeur ».
IMPORTANT !
Attention ! La buse de vapeur est encore chaude ! Faites attention de ne pas vous brûler !
IMPORTANT ! Après avoir éteint la fonction vapeur, nettoyez la buse immédiatement et soigneusement, comme indiqué dans la section : NETTOYAGE ET ENTRETIEN
16

NETTOYAGE ET ENTRETIEN
1. L’appareil |
|
|
Débranchez (J) avant chaque nettoyage et laissez d’abord l’appareil refroidir. |
FRANÇAIS |
|
Nettoyez l’extérieur de l’appareil avec une éponge humide lorsque vous pensez que c’est |
||
|
||
nécessaire. Nettoyez régulièrement le réservoir, l’égouttoir et sa grille, puis essuyez-les. |
|
|
Rincez régulièrement l’intérieur du réservoir. |
|
|
Lorsqu’une fine couche blanche apparaît dans le réservoir, détartrez l’appareil (reportez- |
|
|
vous à la section sur le détartrage) |
|
|
N’utilisez pas d’alcool ou de détergents à base de solvant. |
|
|
|
||
Après avoir débranché l’appareil, nettoyez régulièrement la tête du filtre et le joint (E) en |
|
|
utilisant une éponge humide. |
|
|
Nettoyez uniquement avec un chiffon humide. N’utilisez pas de détergents ou de produits |
|
|
abrasifs. |
|
|
2. Le porte-filtre |
|
|
À l’aide d’un chiffon humide, nettoyez régulièrement le boîtier du porte-filtre de sorte à |
|
|
enlever tout résidu de café qui pourrait s’être accumulé dans cette zone. |
|
|
N’enlevez pas le joint. N’enlevez pas les vis du filtre et du porte-filtre. Cela doit être |
|
|
uniquement effectué par un centre de service agréé. |
|
|
Afin de prolonger la vie du joint de la tête du filtre, ne replacez pas le porte-filtre si la |
|
|
machine à café n’est pas utilisée pendant une période prolongée. |
|
|
3. L’égouttoir |
|
Le cas échéant, nettoyez l’égouttoir (I) et sa grille (H) en utilisant de l’eau et un peu de détergent doux (44-45). Rincez et séchez.
17

DÉTARTRAGE
Détartrez régulièrement votre appareil, comme indiqué dans les sections A et B pour les fonctions café et vapeur, car cela aide à prolonger sa durée de vie. La fréquence de détartrage dépend de la dureté de votre eau. Consultez les autorités responsables de la distribution de l’eau pour plus d’informations.
Lors du détartrage, ne placez pas votre appareil sur un plan de travail en marbre. L’agent de détartrage pourrait l’endommager.
Pour vous aider, vous trouverez un tableau de référence concernant la fréquence de détartrage en fonction de la dureté de l’eau et de la fréquence d’utilisation de l’appareil :
FRÉQUENCE DE DÉTARTRAGE
Nombre moyen de cafés |
Eau douce |
Eau dure |
Eau très dure |
par semaine |
(<19°th) |
(19-30°th) |
(>30°th) |
|
|
|
|
Moins de 7 |
Une fois par an |
Tous les 8 mois |
Tous les 6 mois |
|
|
|
|
7 - 20 |
Tous les 4 mois |
Tous les 3 mois |
Tous les 2 mois |
|
|
|
|
Plus de 20 |
Tous les 3 mois |
Tous les 2 mois |
Tous les mois |
|
|
|
|
En cas de doute, un détartrage une fois par mois est conseillé.
La machine à café ne sera pas réparée si :
le détartrage n’est pas effectué,
il y a des dépôts de tartre,
les accessoires ont été lavés dans un lave-vaisselle, car la garantie cesserait de s’appliquer.
A. Détartrage du système de production du café
Débranchez l’appareil.
Enclenchez le porte-filtre (sans café) dans l’appareil et tournez-le vers la droite jusqu’à ce qu’il s’arrête.
Placez un récipient ayant un volume supérieur à ½ litre sous le porte-filtre.
Vérifiez que la molette soit réglée sur la position O.
Remplissez le réservoir avec un mélange comprenant 3 volumes d’eau pour 1 volume de vinaigre ou d’acide citrique ou sulfamique (volume total du mélange : 500 ml)
Branchez l’appareil. Allumez l’appareil en appuyant sur le bouton On (marche).
Réglez le bouton de sélection sur la position espresso. Lorsque le voyant lumineux espresso s’allume, tournez la molette vers la gauche et laissez le mélange s’écouler (¼ du volume).
Arrêtez l’appareil en appuyant sur le bouton On/Off (marche/arrêt) et laissez le bouton de sélection réglé sur Espresso.
Attendez 5 à 10 minutes, puis répétez le processus encore deux fois.
Veillez à ce que le réservoir ne se vide pas complètement (si vous le retirez, reportez-vous au paragraphe : PREMIÈRE UTILISATION).
B. Rinçage
IMPORTANT !
Après le détartrage, rincez 2 à 3 fois en utilisant de l’eau propre (pas de café), comme cela est décrit dans le paragraphe « PREMIÈRE UTILISATION ».
18
N’oubliez pas de rincer la buse. L’appareil est maintenant détartré et prêt à être utilisé à nouveau.
GARANTIE
Votre appareil est sous garantie ; cependant, toute erreur de branchement, de manipulation ou d’utilisation de la machine à des fins autres que celles décrites dans les instructions annulera la garantie.
Cet appareil est sous garantie pour un usage domestique. Tout autre type d’utilisation annule la garantie.
Les réparations de la machine causées par un défaut de détartrage ne sont pas couvertes par la garantie.
Pour tout problème après-vente ou lié à des pièces de rechange, veuillez consulter votre revendeur ou un centre de service agréé.
DÉPANNAGE
PROBLÈMES |
CAUSES POSSIBLES |
SOLUTIONS |
Le café est très |
Vous n’avez pas utilisé |
Ajouter plus de café. |
humide. |
assez de café. |
|
|
|
|
L’espresso coule trop |
Le café est trop fin, trop |
Choisissez des marcs de café |
lentement. |
grossier ou trop farineux. |
légèrement plus grossiers. |
|
|
|
|
Le porte-filtre est sale. |
Nettoyez votre porte-filtre en |
|
|
utilisant les instructions de la |
|
|
section : NETTOYAGE ET |
|
|
ENTRETIEN - B. Porte-filtre |
|
|
Nettoyez également le filtre à |
|
|
café. |
|
|
|
|
La tête du porte-filtre est |
Lorsque l’appareil a refroidi, |
|
bouchée. |
nettoyez la grille par laquelle |
|
|
l’eau s’écoule en utilisant une |
|
|
éponge humide. |
|
|
|
|
Votre machine est entartrée. |
Détartrez votre machine en |
|
|
suivant le manuel utilisateur |
|
|
fourni. |
|
|
|
|
Il y a trop de café. |
Respectez les limites maximales |
|
|
lorsque vous remplissez le filtre. |
|
|
|
De l’eau s ‘écoule en |
Votre machine commence à |
Détartrez immédiatement votre |
continu du porte-filtre |
être entartrée car l’eau est |
machine en suivant le manuel |
après avoir préparé un |
particulièrement dure. |
utilisateur fourni. |
espresso. |
|
|
|
|
|
|
Le capuchon rouge n’a pas |
Enlevez le capuchon rouge. |
|
été enlevé. |
|
|
|
|
FRANÇAIS
19

PROBLÈMES |
CAUSES POSSIBLES |
SOLUTIONS |
De l’eau s‘écoule en |
Votre machine commence à |
Détartrez immédiatement votre |
continu du porte-filtre |
être entartrée car l’eau est |
machine en suivant le manuel |
après avoir préparé un |
particulièrement dure. |
utilisateur fourni. |
espresso. |
|
|
|
|
|
Il y a du marc de café |
Le porte-filtre est bouché. |
Nettoyez votre porte-filtre en |
dans la tasse. |
|
utilisant de l’eau chaude. |
|
|
|
|
Le marc de café est trop fin. |
Choisissez des marcs de café |
|
|
légèrement plus grossiers. |
|
Le joint de la tête du porte- |
Nettoyez le porte-filtre et le joint |
|
filtre est bouché. |
avec une éponge humide. |
L’espresso ne mousse |
Le marc de café est trop |
Utilisez du café fraîchement |
pas. |
vieux. |
moulu. |
|
|
|
|
Le café moulu n’est pas |
Utilisez du marc de café plus fin. |
|
adapté pour préparer un |
|
|
espresso. |
|
|
|
|
|
Il y a trop peu de café dans |
Ajoutez plus de café. |
|
le porte-filtre. |
|
|
|
|
Le réservoir d’eau fuit |
La valve située au fond |
Nettoyez le réservoir d’eau et |
lorsqu’il est déplacé. |
du réservoir est sale ou |
faites fonctionner la valve située |
|
défectueuse. |
sous le réservoir avec votre doigt. |
|
La valve est bloquée par les |
Détartrez votre machine en |
|
dépôts de tartre. |
suivant le manuel utilisateur |
|
|
fourni. |
|
|
|
Il y a une fuite d’eau |
Il y a une fuite interne. |
Vérifiez que le réservoir est |
sous l’appareil. |
|
correctement positionné. Si le |
|
|
problème persiste, n’utilisez pas |
|
|
l’appareil et consultez un centre |
|
|
de service agréé. |
|
|
|
La pompe est |
Il n’y a pas d’eau dans les |
Remplissez le réservoir d’eau et |
anormalement |
réservoir. |
redémarrez la pompe (reportez- |
bruyante. |
|
vous à la section : PREMIÈRE |
|
|
UTILISATION). Évitez de vider |
|
|
complètement le réservoir. |
La machine à |
Le porte-filtre n’est pas |
Enclenchez le porte-filtre et |
espresso fuit sur les |
positionné correctement. |
verrouillez-le (tournez-le vers la |
côtés du porte-filtre. |
|
droite jusqu’à ce qu’il s’arrête). |
|
|
|
|
|
Enlevez tout excès de café qui |
|
|
vous empêche de verrouiller |
|
|
complètement le porte-filtre. |
|
|
|
|
Le bord du porte-filtre est |
Enlevez l’excès de café et |
|
obstrué par le café. |
nettoyez la grille par laquelle l’eau |
|
|
s’écoule en utilisant une éponge |
|
|
humide. |
|
|
|
20

PROBLÈMES |
CAUSES POSSIBLES |
SOLUTIONS |
Votre espresso a |
Après le détartrage, le cycle |
Rincez l’appareil conformément |
mauvais goût. |
de rinçage n’a pas été |
au manuel utilisateur et vérifiez la |
|
effectué correctement. |
qualité du café. |
|
|
|
L’appareil ne |
La pompe est désactivée |
Remplissez le réservoir d’eau et |
fonctionne pas. |
en raison du manque d’eau. |
redémarrez la pompe (reportez- |
|
|
vous à la section : PREMIÈRE |
|
|
UTILISATION). Évitez de vider |
|
|
complètement le réservoir. |
|
|
|
|
Le réservoir amovible |
Placez correctement le réservoir |
|
n’est pas correctement |
d’eau. |
|
positionné. |
|
|
|
|
|
L’appareil n’est pas |
Vérifiez que l’appareil est allumé. |
|
branché. |
|
|
|
|
La buse ne fonctionne |
La buse à mousse n’est |
Vérifiez que l’accessoire est |
pas ou produit peu de |
pas correctement installée. |
correctement monté sur |
mousse. |
Le lait est trop chaud. |
l’appareil : enlevez-le, réinstallez- |
|
|
le sur le bras articulé en |
|
|
effectuant un mouvement ferme |
|
|
vers le haut. |
|
|
|
|
Le lait est trop chaud. |
Utilisez du lait frais, pasteurisé ou |
|
|
UHT qui a été récemment ouvert. |
|
|
|
S’il est impossible de déterminer la cause de la panne, consultez un revendeur agréé. Ne démontez jamais l’appareil ! (Si l’appareil est démonté, cela annule la garantie).
FIN DE VIE DES PRODUITS ÉLECTRIQUES OU ÉLECTRONIQUES
Aidez-nous à protéger l'environnement !
 Votre produit contient un nombre de matériaux récupérables ou recyclables.
 Apportez-le à un centre de collecte ou à un centre de service agréé pour le traitement.
FRANÇAIS
21

PRODUKTBESCHREIBUNG
A |
Abnehmbarer Wasserbehälter |
G Dampfdüse |
|||
B |
Tassenabstellfläche |
|
G1 Aufschäumdüse |
||
C |
Ein-/Aus-Taste |
H Gitter der Abtropfschale |
|||
D |
Bedienfeld |
|
I |
Abtropfschale |
|
E |
Siebträgerkopf |
J |
Netzkabel |
||
F |
Siebkopf |
|
K Löffel/Tamper |
||
|
F1 |
Filter 1 |
Tasse |
|
|
|
F2 |
Filter 2 |
Tassen |
|
|
PRODUKTBESCHREIBUNG
D.1 |
Auswahlknopf |
D.3.1 Position O: Aufheizen |
|
D.1.1 Espresso auswählen |
D.3.2 Espresso-Zubereitung |
|
D.1.2 Dampf auswählen |
D.3.3 Zubereitung mit Dampf |
D.2 |
Betriebsanzeige |
|
|
D.2.1 Aufheizanzeige für Espresso |
|
|
D.2.1 Aufheizanzeige für Dampf |
|
D.3 |
Drehknopf |
|
TECHNISCHE DATEN
Pumpe: 15 bar
Manueller Start/Stopp
Zubehör: 1- und 2-Tassen-Siebe, Messlöffel/Tamper
Dampffunktion
Auswahlknopf: Espresso oder Dampf
Abnehmbarer Behälter (1,2 l Fassungsvermögen)
Leistung: 960 - 1.140 W
Spannung: 220 - 240 V
Sicherheitsvorrichtungen: 2 Thermostate und eine Sicherung
Maße: 297 x 201 x 290 mm
Automatische Abschaltung nach 25 Minuten
WICHTIG!
Betriebsspannung: Dieses Gerät ist nur für den Betrieb mit 230 V Wechselstrom vorgesehen.
Art des Gebrauchs: Dieses Gerät ist NUR für den PRIVATGEBRAUCH vorgesehen.
22

NÜTZLICHE TIPPS
Es wird die Verwendung von frisch geröstetem Kaffee empfohlen. Fragen Sie Ihren Kaffeeröster um Rat. Der Kaffee bleibt nur einige Wochen nach dem Rösten frisch. Eine gute Verpackung kann das Aroma des Kaffees verbessern und länger erhalten. Wenn Sie sich bezüglich der Qualität der Verpackung nicht sicher sind, wählen Sie einen kürzlich gerösteten Kaffee.
Kaffee muss immer kurz vor der Zubereitung gemahlen werden.
Welchen Kaffee sollten Sie wählen?
Für einen aromatischen Kaffeegenuss
Wählen Sie reine Arabica Kaffees oder Kaffees, die sich überwiegend aus Arabica-Kaffee zusammensetzen.
Handwerklich geröstete Kaffees sind zu bevorzugen, da sie dem Geschmack eine mehr Vielschichtigkeit und Zartheit verleihen. Probieren Sie für verschiedene Aromen sortenreine Kaffees.
Für einen intensiven Kaffeegenuss
Wählen Sie mit Robusta gemischte Kaffees – nicht ausdrücklich 100 % Arabica – oder italienisch geröstete Kaffees oder speziell italienisch aromatisierte Kaffees.
Lagern Sie den gemahlenen Kaffee im Kühlschrank. Dadurch wird das Aroma länger bewahrt.
Füllen Sie Ihren Siebträger nicht bis zum Rand; benutzen Sie den Messlöffel (ein Löffel für eine 50-ml-Tasse, zwei Löffel für zwei 50-ml-Tassen). Entfernen Sie alle Kaffeereste rund um den Siebträger.
Wenn Sie das Gerät länger als fünf Tage nicht benutzt haben, entleeren und spülen Sie den Wasserbehälter aus.
Stellen Sie stets sicher, dass das Gerät ausgeschaltet ist, bevor Sie den Behälter zum Füllen oder Entleeren herausnehmen.
Achten Sie darauf, dass das Gerät immer auf einer ebenen und festen Fläche steht.
ERSTE BENUTZUNG
ODER WENN DIE MASCHINE LÄNGERE ZEIT NICHT
BENUTZT WURDE.
DEUTSCH
WICHTIG! Legen Sie keine Heizelemente auf das Gerät
WICHTIG! Entfernen Sie die rote Schutzkappe von der Wasserbehälterunterseite.
WICHTIG: Die Sicherheitshinweise sind Teil des Geräts.
Bitte lesen Sie diese aufmerksam durch, bevor Sie Ihr neues Gerät benutzen.
23

DURCHSPÜLEN DES SYSTEMS VOR DER ERSTEN BENUTZUNG
1. DURCHSPÜLEN DES ESPRESSO-SYSTEMS
Damit Ihre erste Tasse Kaffee großartig schmeckt, empfehlen wir dringend, dass Sie die Espresso-Maschine wie nachfolgend beschrieben mit heißem Wasser spülen:
Vergewissern Sie sich, dass Sie die rote Schutzkappe von der Wasserbehälterunterseite entfernt haben.
–Entnehmen Sie den Wasserbehälter (A) und füllen Sie ihn. Der Wasserfüllstand sollte nicht die „MAX“ Markierung am Behälter überschreiten und mindestens 300 ml erreichen (entspricht zwei großen Tassen (2-3). Setzen Sie den Wasserbehälter mit geschlossenem Deckel wieder ein. (4).
–Verbinden Sie Ihr Gerät mit einer Steckdose. (5).
–Drücken Sie die Ein-/Aus-Taste (C)(6). Auf dem Bedienfeld (D) leuchtet die Betriebsanzeige (D2) (7).
–Der Auswahlknopf (D.1) muss auf die Espresso-Position gestellt sein – (Knopf nicht gedrückt)  (D.1.1) (8).
–Legen Sie ein Sieb ohne Kaffee (F1) in den Siebträger (F) (9). Schieben Sie den Siebträger an seinen Platz (E) und drehen Sie ihn nach rechts, bis er sich nicht weiter drehen lässt (10). Stellen Sie ein Gefäß unter den Siebträger (11).
–Wenn die Espresso-Aufheizanzeige (D2.1) aufleuchtet, drehen Sie den Drehknopf (D.3) nach links auf die Espresso-Zubereitung (D.3.2) (12-13) - Das Wasser beginnt nach etwa 10 Sekunden zu laufen.
–Lassen Sie etwa 300 ml Wasser herauslaufen (wechseln Sie gegebenenfalls das Gefäß) (14), stellen Sie dann den Drehknopf auf Position O (D.3.1), um das Durchlaufen zu stoppen (15).
–WICHTIG/Wenn Ihr Gerät 25 Minuten lang nicht benutzt wird, schaltet es sich aus Sicherheitsgründen automatisch aus.
2. SPÜLEN DES DAMPF-SYSTEMS
Entnehmen Sie den Wasserbehälter und füllen Sie ihn. Der Wasserfüllstand sollte nicht die „MAX“ Markierung am Behälter überschreiten und mindestens 300 ml erreichen (entspricht zwei großen Tassen). Setzen Sie den Wasserbehälter mit geschlossenem Deckel wieder ein.
Der Auswahlknopf (D.1) muss auf die Dampf-Position (Knopf gedrückt)  (D.1.2) gestellt werden (16).
Platzieren Sie die Düse in einen mit Wasser gefüllten Behälter (G.1) (17).
Wenn die Dampf-Aufheizanzeige (D2.2) aufleuchtet (18), drehen Sie den Drehknopf (D.3) nach rechts auf die Dampf-Funktion (D.3.3) (19).
Lassen Sie das Wasser für 20 Sekunden aufheizen (20), stellen Sie dann den Drehknopf auf Position O (D.3.1), um den Dampf zu stoppen (21). Stellen Sie den Drehknopf (D.1) zurück auf die Espresso-Position (D.1.1) (26).
24

ESPRESSO-ZUBEREITUNG
WICHTIG!
Wenn die Espresso-Funktion zum ersten Mal benutzt wird, muss das Gerät wie in dem Abschnitt „ERSTER GEBRAUCH“ beschrieben gereinigt werden.
WICHTIG! Um heiße Wasserspritzer zu vermeiden, prüfen Sie, ob der Siebträger festgedreht ist, bis er sich nicht weiter bewegen lässt, bevor Sie den Kaffee zubereiten. Entfernen Sie den Siebträger nicht, während das Wasser durchläuft, da das Gerät noch unter Druck steht.
Mit gemahlenem Kaffee
Die Art des Kaffees, den Sie auswählen, bestimmt die Stärke und den Geschmack Ihres Espressos: Je feiner Ihr Kaffeepulver gemahlen ist, umso intensiver wird Ihr Espresso schmecken.
Füllen Sie den Wasserbehälter mit lauwarmem Wasser und setzen Sie ihn wieder in das Gerät. Achten Sie dabei darauf, dass er korrekt platziert ist.
Verbinden Sie Ihr Gerät mit einer Steckdose.
Um das beste Ergebnis zu erzielen, empfehlen wir, das Zubehör vorher anzuwärmen (Siebträger, Sieb und Tassen), indem Sie die oben beschriebenen Schritte ohne Kaffee durchführen.
Schalten Sie das Gerät durch Drücken der Ein-/Aus-Taste ein.
Die Betriebsanzeige leuchtet auf.
Geben Sie das Kaffeepulver mithilfe des Messlöffels in das 1-Tassen-Sieb (K) (1 Löffel = 1 Maß = 1 Espresso) (22-23), pressen Sie dann das Pulver mithilfe des Tampers mit einer kreisförmigen Bewegung an (K) (24). Wenn das Pulver gepresst wurde, sollte das Kaffeemaß die MAX-Markierung nicht überschreiten (25).
Pressen Sie den Kaffee möglichst gut, um die beste Qualität zu erhalten.
Entfernen Sie alle Kaffeereste rund um den Siebträger.
Achten Sie darauf, dass der Auswahlknopf auf die Espresso-Position  (Knopf nicht gedrückt) gestellt ist (26).
Schieben Sie den Siebträger an seinen Platz, drehen Sie ihn dann nach rechts, bis er sich nicht weiter drehen lässt (27).
Der Drehknopf, auf Funktion O gestellt, zeigt an, dass das Gerät aufheizt. Sobald der Aufheizvorgang beendet ist, leuchtet die Espresso-Anzeige auf (28).
Stellen Sie eine Tasse unter den Siebträger und drehen Sie den Drehknopf nach links auf die Espresso-Position; der Kaffee beginnt nun durchzulaufen (29-30).
Wenn die Tasse gefüllt ist, stellen Sie den Drehknopf auf die Position O, um das Auslaufen des Kaffees zu stoppen (31).
Entnehmen Sie die Tasse(n).
Lösen Sie den Siebträger, indem Sie ihn nach links drehen (32) und entfernen Sie ihn von dem Gerät. Berühren Sie nicht das Sieb, da es heiß ist.
Um den Kaffee auszuschütten, drehen Sie den Siebträger um, während Sie das Sieb mit der Klappe festhalten, sodass nur der Kaffee herausfällt (33).
Waschen Sie das Sieb und den Siebträger unter laufendem Wasser ab, um die Kaffeereste zu entfernen (34).
DEUTSCH
25

Um zwei Espressos zuzubereiten, nehmen Sie das 2-Tassen-Sieb (F.2) und geben Sie zwei Maße Kaffeepulver in den Siebträger.
 Um das Sieb im Siebträger zu wechseln, achten Sie darauf, dass das Sieb mit dem Schlitz auf den Hebel des Griffs zeigend eingelegt ist.
WICHTIG / Der Kaffeefluss wird manuell gestoppt. Entfernen Sie sich nicht von dem Gerät, wenn es in Betrieb ist.
DAMPFFUNKTION
Der Dampf schäumt den Kaffee auf (zum Beispiel bei der Zubereitung von Cappuccinos).
Verbinden Sie Ihr Gerät mit einer Steckdose.
Entnehmen Sie den Wasserbehälter und füllen Sie ihn. Der Wasserfüllstand sollte nicht die „MAX“ Markierung am Behälter überschreiten und mindestens 300 ml erreichen. Setzen Sie den Wasserbehälter mit geschlossenem Deckel wieder ein.
Drücken Sie die Ein-/Aus-Taste; die Betriebsanzeige leuchtet auf.
Drücken Sie den Auswahlknopf, um die Dampf-Funktion (Knopf gedrückt) zu aktivieren (35)  .
.
Der Drehknopf, auf Funktion O gestellt, zeigt an, dass das Gerät aufheizt. Sobald das Gerät aufgeheizt ist, schaltet sich die Dampf-Anzeige ein (36).
Stellen Sie ein leeres Gefäß oder eine Tasse unter die Düse (37).
Öffnen Sie das Düsensystem, indem Sie den Drehknopf nach links auf die DampfZubereitungsfunktionstellen, um das Wasser durch das System laufen zu lassen, bevor der Dampf entweicht. (D.3.3) (38).
Stellen Sie den Drehknopf auf Programm O (39).
Um einen Cappuccino zuzubereiten, füllen Sie einen Behälter mit ca. 60 bis 100 ml Milch. Um das beste Ergebnis zu erzielen, benutzen Sie ein schmales und relativ kleines Gefäß, das unter die Dampfdüse geschoben werden kann (G) (40). Um das beste Ergebnis zu erzielen, sollten die Milch und das Gefäß sehr kalt sein.
Platzieren Sie die Düse in das Gefäß mit der Milch und drehen Sie den Drehknopf nach rechts auf die Dampf-Position.
Um das beste Ergebnis zu erzielen, schäumen Sie die Milch etwa 10 Sekunden lang nahe des Gefäßbodens auf, berühren Sie den Boden jedoch nicht. Neigen Sie das Gefäß dann langsam und bewegen Sie die Düse nach oben, bis sie fast die Oberfläche der Milch erreicht. Achten Sie darauf, dass die Düse in der Milch bleibt. Um einen erstklassigen Schaum zu erzeugen, bewegen Sie das Gefäß kreisförmig.
Für den besten Schaum empfehlen wir, pasteurisierte oder H-Milch zu verwenden. Vermeiden Sie nicht-pasteurisierte oder fettarme Milch.
Wenn Sie den optimalen Schaum erzeugt haben, stellen Sie den Drehknopf auf die Position O (41)
Benutzen Sie die Dampffunktion nicht länger als 45 Sekunden (für 100 ml Milch), um die Milch nicht zu überhitzen.
Sie können beginnen, einen Espresso zuzubereiten, indem Sie den oben beschriebenen Schritten folgen.
Um zu verhindern, dass die Milch in der Düse antrocknet, reinigen Sie diese bitte nach jedem Gebrauch. Folgen Sie hierzu den Schritten zum Aufschäumen der Milch, nehmen Sie jedoch 60 ml Wasser anstatt 100 ml Milch. Damit Sie sich nicht verbrennen, entfernen Sie die Düse aus dem Schaum (G.1) und waschen Sie diese in sauberem Wasser (42). Reinigen Sie die Dampfdüse mithilfe eines feuchten Tuches (G) (43).
Entfernen Sie die Abtropfschale, leeren und reinigen Sie diese mit sauberem Wasser (44-45).
26
Lesen Sie den nächsten Abschnitt, um mehr über die manuelle Reinigung zu erfahren.
HINWEIS ZUR BENUTZUNG NACH GEBRAUCH DER DAMPFFUNKTION
Wenn Sie nach dem Gebrauch der Dampf-Funktion einen Espresso zubereiten möchten, müssen Sie Ihre Kaffeemaschine abkühlen lassen.
Folgen Sie den nachfolgenden Schritten:
Auswahl-Taste auf Espresso-Position (Taste ist nicht gedrückt) stellen.
Der Drehknopf muss auf Position O gestellt sein.
Dampfdüse in ein Gefäß mit 60 ml Wasser tauchen.
Drehknopf nach rechts drehen: für 25 Sekunden auf die Dampf-
Position stellen.
Drehknopf auf Position O stellen, um die Dampf-Funktion zu beenden.
Ihre Kaffeemaschine ist nun abgekühlt; Sie können Ihren Espresso zubereiten und genießen!
WICHTIG! Wenn Sie nach dem Aufschäumen von Milch einen Kaffee zubereiten
möchten, sollten Sie den Drehknopf auf die Espresso-Position stellen  und dann den Auswahlknopf auf die Espresso-Position stellen. Nach einigen Sekunden schaltet sich die Espresso-Anzeige aus. Stellen Sie den Drehknopf auf die Funktion O und warten Sie, bis die Espresso-Anzeige aufleuchtet.
Wiederholen Sie während dieses Vorgangs Sie die oben stehenden Schritte, wenn die Espressound Dampf-Anzeige gleichzeitig aufleuchten, .
WICHTIG!
Warnhinweis! Heben Sie die Düse im Dampf-Modus nicht aus der Milch, um zu verhindern, dass die Milch spritzt.
WICHTIG!
Warnhinweis! Die Dampfdüse ist noch heiß! Seien Sie vorsichtig, damit Sie sich nicht verbrennen!
WICHTIG! Nachdem Sie die Dampffunktion ausgeschaltet haben, reinigen Sie sofort vorsichtig die Düse, wie beschrieben in dem Abschnitt: REINIGUNG UND WARTUNG
DEUTSCH
27

REINIGUNG UND WARTUNG
1. Das Gerät
Ziehen Sie vor jeder Reinigung den Stecker des Gerätes aus der Steckdose(J) und lassen Sie es erst abkühlen.
Reinigen Sie die Außenseite des Gerätes mit einem feuchten Schwamm, wenn dies Ihrer Meinung nach erforderlich ist. Reinigen Sie Behälter, Abtropfschale und deren Gitter regelmäßig und wischen Sie die Elemente anschließend ab.
Spülen Sie die Innenseite des Behälters regelmäßig.
Wenn sich eine dünne weiße Schicht im Behälter bildet, entkalken Sie das Gerät (siehe Abschnitt Entkalken).
Verwenden Sie keine Reinigungsprodukte auf Alkoholoder Lösungsmittelbasis.
Nachdem Sie den Stecker des Gerätes aus der Steckdose gezogen haben, reinigen Sie regelmäßig den Kopf des Siebträgers und die Dichtung (E) mit einem feuchten Schwamm.
Reinigen Sie die Elemente nur mit einem feuchten Tuch. Benutzen Sie keine Reinigungsoder Scheuermittel.
2. Der Siebträger
Reinigen Sie das Siebträgergehäuse regelmäßig mit einem feuchten Tuch, um Kaffeereste zu entfernen, die sich eventuell in diesem Bereich angesammelt haben.
Entfernen Sie nicht die Dichtung. Entfernen Sie nicht die Schrauben aus dem Sieb und Siebträger. Dies darf nur von einem zugelassenen Kundendienstcenter durchgeführt werden.
Um die Nutzungsdauer der Siebkopfdichtung zu verlängern, setzen Sie den Siebträger nicht ein, wenn die Kaffeemaschine längere Zeit nicht benutzt werden soll.
3. Die Abtropfschale
Sofern notwendig, reinigen Sie die Abtropfschale (I) und deren Gitter (H) mit Wasser und einem milden Reinigungsmittel (44-45). Spülen und trocknen Sie die Elemente ab.
ENTKALKEN
Entkalken Sie Ihr Gerät regelmäßig, wie in den Abschnitten A und B für die Kaffeeund Dampf-Funktionen beschrieben, da dies dazu beiträgt, seine Nutzungsdauer zu verlängern. Wie häufig Sie das Gerät entkalken müssen, hängt von der Härte Ihres Wassers ab. Wenden Sie sich an Ihre Versorgungsbehörde, um mehr zu erfahren.
Stellen Sie Ihr Gerät während des Entkalkens nicht auf eine Marmor-Arbeitsplatte. Das Entkalkungsmittel könnte die Fläche beschädigen.
Als Orientierungshilfe finden Sie hier eine Referenztabelle für die Häufigkeit des Entkalkens je nach Wasserhärte und der Nutzungshäufigkeit Ihrer Maschine:
ENTKALKUNGSHÄUFIGKEIT
Durchschnittliche Anzahl |
Weiches Wasser |
Hartes Wasser |
Sehr hartes |
der Kaffees pro Woche |
(<19°dh) |
(19-30°dh) |
Wasser |
|
|
|
(>30°dh) |
|
|
|
|
Weniger als 7 |
Einmal pro Jahr |
Alle 8 Monate |
Alle 6 Monate |
|
|
|
|
7 - 20 |
Alle 4 Monate |
Alle 3 Monate |
Alle 2 Monate |
|
|
|
|
Mehr als 20 |
Alle 3 Monate |
Alle 2 Monate |
Jeden Monat |
|
|
|
|
28
 Loading...