


GR-D73US

DIGITAL VIDEO CAMERA
GR-D93
Dear Customer,
Thank you for purchasing this digital
video camera. Before use, please read
the safety information and precautions
contsined in the pages 2 - 3 to ensure
safe use of this product.
ENGLISH
GETTINGSTARTED 5
GR-D73
GR-D33
Please visit our Homepage on the World Wide Web for
Digital Video Camera:
= oo-o =F._d
For Accessories:
oJ • _ O
Mini_NTS c
DIGITAL
_ III (://k:q"
The camcorder illustrations appearing in this
instruction manual are of the GR-D93.
The D.S.C. (Digital Still Camera) features
are available on GR-D93 and GR-D73.
VIDEORECORDING&
PLAYBACK11
DIGITALSTILLCAMERA
(D.S.C.) RECORDING&
PLAYBACK(GR-D93/D73
only)18
ADVANCEDFEATURES25
REFERENCES38
TERMS 54
For Customer Use:
Enter below the Model No. and Serial
No. which is located on the bottom of
the camcorder. Retain this information
for future reference.
Model NO.
Serial NO.
INSTRUCTIONS
LYTt t 96-001C
2 EN
SAFETYPRECAUTIONS
CAUTION: TO REDUCE THE RISK OF ELECTRIC SHOCK
REFER SERVICING TO QUALiFiED SERVICE PERSONNEL.
WARNING: TO PREVENT FIRE OR SHOCK HAZARD,
DO NOT EXPOSE THIS UNIT TO RAIN OR MOISTURE.
NOTES:
• The rating plate (serial number plata) and safety caution
are on the bottom and/or the back of the main unit.
• The rating information and salty caution of the AC
Adapter are on its upper and lower sides.
CAUTIONS:
• This camcorder is designed to be used with NTSC-type
color television signals. It cannot be used for playback
with a television of a different standard. However, live
recording and LCD monitadviewfioder playback are
possible anywhere.
• Use the JVC BN-V408U/V416U/V428U battery packs
and, to recharge them or supply power to the camcorder
from an AC outlet, use the provided multi-voltage AC
Adapter. (An appropriate conversion adapter may be
necessary to accommodate different designs of AC
outlets in different countries.)
Caution on Replaceable lithium battery
The battery used in this device may present a fire or
chemical burn hazard ff mistreated.
Do not recharge, disassemble, heat above t00°C (212°F)
or incinerate.
Replace battery with Panasonic (Matsushita Electric),
Sanyo, Sony or Maxelt CR2025.
Danger of explosion or Risk of fire if the battery is
incorrectly replaced.
Dispose of used battery promptly.
Keep away from children.
Do not disassemble and do not dispose of in fire.
DO NOT R EMOVE COVER (OR BACK).
NO USER_SERV_CEABLE PARTS _NStDE
The lightening flash with arrowt_ead symbol w_hJn an
equilateral triangle, is intended to ale_t the user to the
pngsence of uninsu_ated _dangeroos voltage" w_hin the
product's enclcsure that may be Of sufficient magn_ude
to const_ute a nsk of e_ect tic shock to peP_ons
The exclamation point w_hJn an equilateral triangle is
intended to alert the user to the presence of important
operating and maintenance (servicing) instrdctions in
the literature accompanying the appliance¸
amount of mercury. Disposal of these materials may be
regulated in your community due to environmental
considerations.
For disposal or recycling information please contact your
I This product has a fluorescent lamp that contains a small
local authorities, or the Elect ronics Industries Alliance:
<http:llwww.eiae.org>
When the equipment is installed in a cabinet or on a shelf,
make sure that it has sufficient space on al! sides to allow
for ventilation (t0 cm (3-t 5/t6") or more on both sides, on
top and at the rear).
Do not block the ventilation holes.
(If the ventilation holes are blocked by a newspaper, or
cloth etc. the heat may not be able to get out.)
No naked flame sources, such as lighted candles, should
be placed on the apparatus.
When discarding batteries, environmental problems must
be considered and the local rules or Iaws governing the
disposal of these batteries must be fctfowed strictly.
The apparatus sbell not be exposed to ddpping or
splashing.
Do not use this equipment in a bathroom or places with
water.
Also do not place any containers fltled with water or liquids
(such as cosmetics or medicines, ffower vases, potted
plants, cups etc.) on top of this unit.
(If water or liquid is allowed to enter this equipment, fire or
electric shock may be caused.)
Do not point the lens or the viewfinder directly into the sun.
This can cause eye injuries, as well as lead to the
malfunctioning of intamal circuitry. There is also a risk of
fire or electric shock.
CAUTIONI
The following notes concern possible physical damage to
the camcorder and to the user.
When carrying, be sure to always securely attach and use
the provided strap. Carrying or holding the camcorder by
the viewfinder and/or the LCD monitor can result in
dropping the unit, or in a malfunction.
Take care not to get your finger caught in the cassette
holder cover. Do not let children operate the camcorder, as
they are particuledy susceptible to this type of injury.
Do not use a tripod on unsteady or untevel surfaces. It
could tip over, causing serious damage to the camcorder.
CAUTIONI
Connecting cables (AedidiVideo, S-Video, etc.) to the
camcorder and leaving it on top of the TV is not
recommended, as tripping on the cables will cause the
camcorder to tall, resulting in damage.
IMPORTANTSAFTYINSTRUCTIONS
1. Read these instructions.
2. Keep these instructions.
3. Heed alI warnings.
4. Follow all instructions.
5. Do not use this apparatus near water.
6. Clean only with dry cloth.
7. Do not block any ventilation openings. Install in
accordance with the manufacturer's instructions.
8. Do not install near any heat sources such as radiators,
heat registers, stoves, or other apparatus (including
amp_iffars) that produce heat.
9. OnIy use attachments/accessories specified by the
manufacturer.
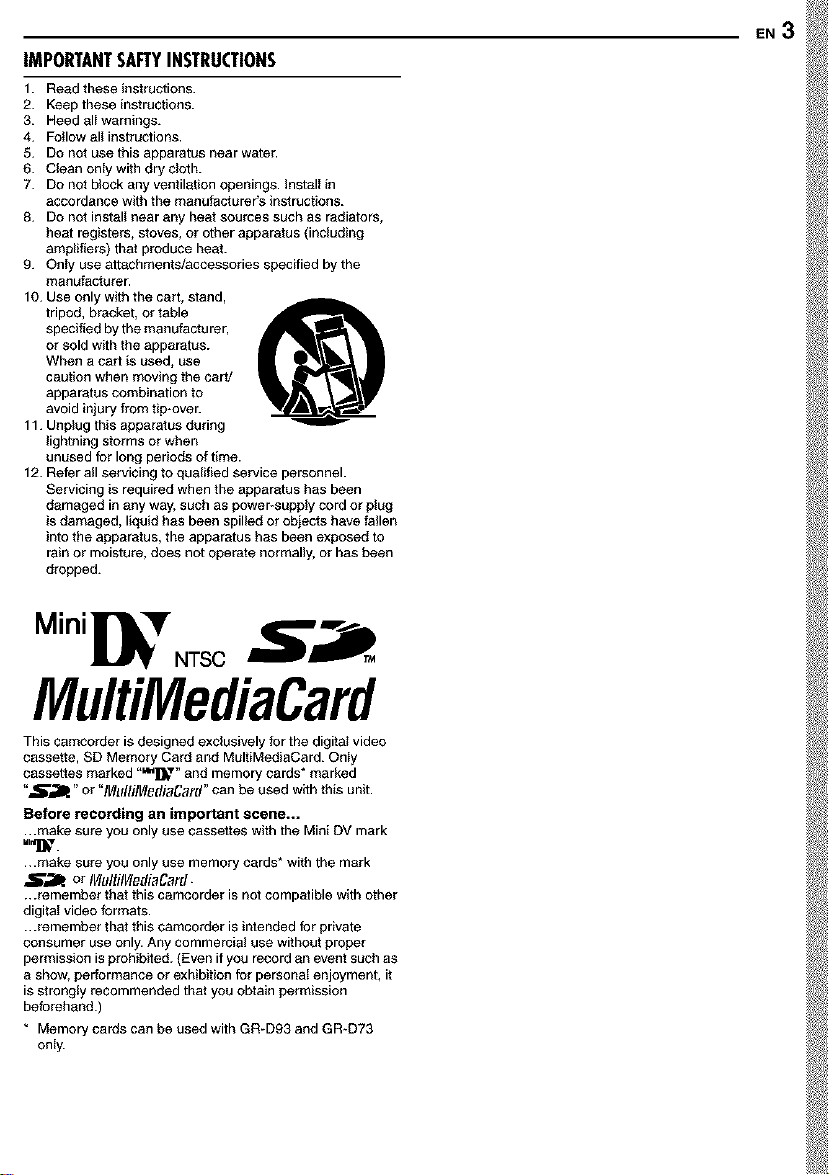
10. Use only with the cart, stand,
tripod, bracket, or table
specified by the manufacturer,
or sold with the apparatus.
When a cart is used, use
caution when moving the cart/
apparatus combination to
avoid injury from tip-over.
11. Unplug this apparatus during
lightning storms or when
unused for long periods of time.
12. Refer all servicing to qualgfad service personnel.
Servicing is required when the apparatus has been
damaged in any way, such as powePsupply cord or plug
is damaged, liquid has been spilled or objects have fallen
into the apparatus, the apparatus has been exposed to
rain or moisture, does not operate normally, or has been
dropped.
EN3
Mini NTS c
MultiMediaCard
This camcorder is designed exclusively for the digital video
cassette, SD Memory Card and MultiMediaCard. Only
cassettes marked "_D_ T" and memory cards* marked
"5_31k" or "MlfltiMediaCard" can be used with this unit.
Before recording an important scene...
...make sure you only use cassettes with the Mini DV mark
...make sure you only use memory cards* with the mark
S_ or IFhlltllVledlaCard.
...remember that this camcorder is not compatible with other
digitaI video formats.
...remember that this camcorder is intended for private
consumer use only. Any commercial use without proper
permission is prohibited. (Even if you record an event such as
a show, performance or exhibition for personaI enjoyment, it
is strong{y recommended that you obtain permission
beforehand.)
* Memory cards can be used with GR-D93 and GR-D73
only.
4 EN CONTENTS
GETTINGSTARTED S ADVANCEDFEATURES 25
ProvidedAccessories .................................................... 5
Power ............................................................................. 6
Grip Adjustment ............................................................. 7
Operation Mode ............................................................. 8
Date/Time Settings ........................................................ 8
Viewfinder Adjustment ................................................... 9
Brightness Adjustment Of The Display .......................... 9
Tripod Mounting ............................................................. 9
Loading/Unloading A Cassette .................................... 10
Loading/Unloading A Memory Card (GR-D93/73only) ,-.- 10
VIDEORECORDING..................................................... ! !
Basic Recording ........................................................... 11
LCD Monitor And Viewfinder ........................................ 12
Tape Remaining Time .................................................. 12
Zooming ....................................................................... 12
Journalistic Shooting .................................................... 13
Self Recording ............................................................. 13
Time Code ................................................................... 13
Recording From The Middle Of A Tape ....................... 13
VIDEOPLAYBACK......................................................... 14
Norma! Playback .......................................................... 14
SflII Playback ................................................................ 14
Shuttle Search ............................................................. 14
Blank Search ................................................................ 14
PlaybackUsing The Remote Control (GR-D93/73 only) .. t5
Connections To A TV Or VCR ..................................... 17
DIGITALSTILLCAMERA(D.S.C.)RECORDING&
PLAYBACK(GR-D93/D73only) 18
D.S.C.RECORDING(GR-D93/D73 only) ......................... 18
Basic Shooting (D.S.C. Snapshot) ............................... 18
Dubbing Still images Recorded On A Tape To A Memory
Card ......................................................................... 19
D.S.C.PLAYBACK(GR-D93/D73 only) ............................ 20
Normal Playback Of images ........................................ 20
Auto Playback Of images ............................................ 20
Index Playback Of Files ............................................... 20
Viewing File Information ............................................... 21
Removing On-Screen Display ...................................... 21
ADDITIONALFEATURESFORD.S.C.(GR-D93/D73 only)...22
ProtectingFiles ............................................................ 22
Deleting Files ............................................................... 22
Setting Print Information (DPOF Setting) ..................... 23
Resetting The File Name ............................................. 24
Initializing A Memory Card ........................................... 24
MENUSFORDETAILEDADJUSTMENT.............................. 25
Changing The Menu Settings ...................................... 25
Recording Menus ........................................................ 26
Playback Menus .......................................................... 28
FEATURESFORRECORDING......................................... 29
White LED Light .......................................................... 29
Night Alive ................................................................... 29
Wipe Or Fader Effects ................................................. 30
Program AE With Special Effects ................................ 30
Snapshot (For Video Recording) ................................. 31
Auto Focus .................................................................. 31
11VIDEORECORDING& PLAYBACK
Manual Focus .............................................................. 32
Exposure Control ......................................................... 32
Iris Lock ....................................................................... 32
Backlight Compensation .............................................. 33
White Balance Adjustment .......................................... 33
Manual White Balance Adjustment ............................. 33
EDITING...................................................................... 34
Dubbing To Or From A VCR ....................................... 34
Dubbing To A Video Unit Equipped With A DV Connector
(Digital Dubbing) ...................................................... 35
Connection To A PersonalComputer .......................... 36
Audio Dubbing (GR-D93/73 only) ................................ 37
Insert Editing (GR-D93/73 only) .................................. 37
REFERENCES 38
ADDITIONALINFORMATION..........................................38
TROUBLESHOOTING.....................................................40
CAUTIONS..................................................................45
USERMAINTENANCE......................................................48
SPECIFICATIONS............................................................49
INDEX..........................................................................50
TERMS 54
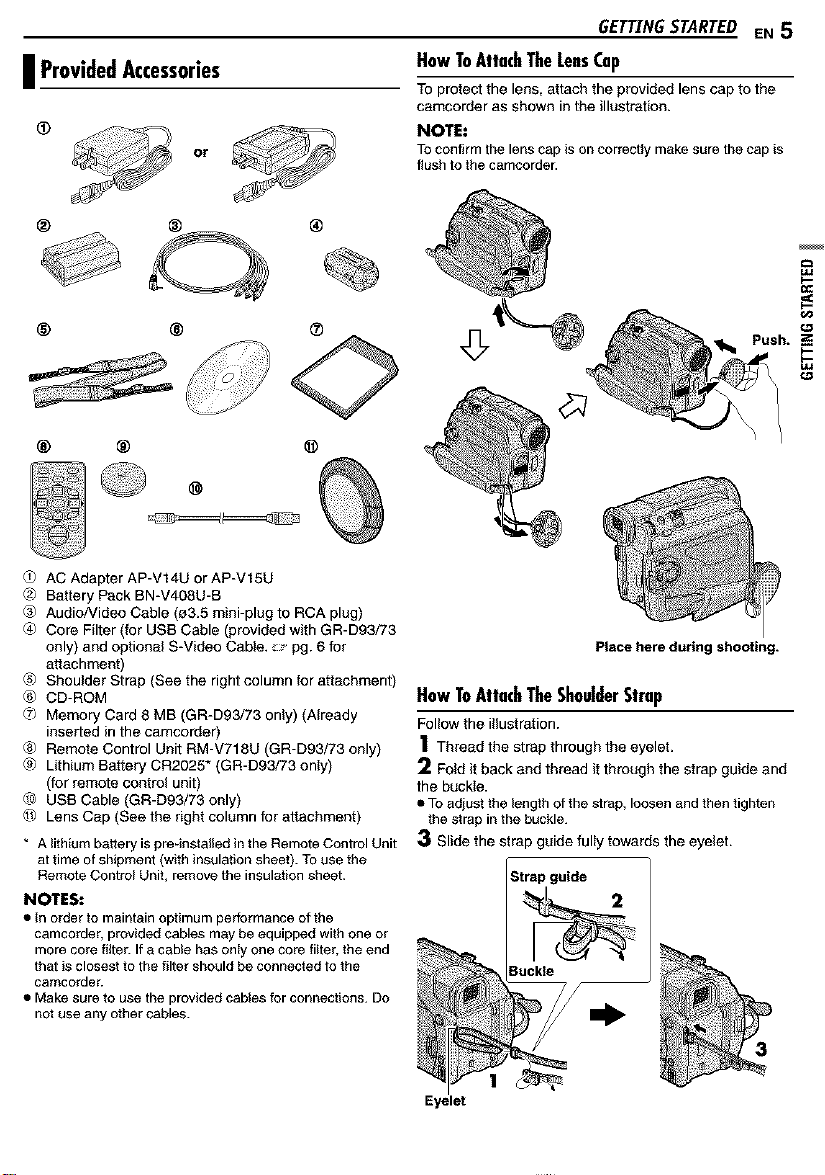
I ProvidedAccessories
or
® ®
® ®
® ® @
AC Adapter AP-V14U or AP-V15U
@>Battery Pack BN-V408U-8
® AudioNideo Cable (03.5 mini-plug to RCA plug)
® Core Filter (for US8 Cable (provided with GR-D93/73
only) and optional S-Video Cable. _" pg. 6 for
attachment)
_ Shoulder Strap (See the right column for attachment)
® CD-ROM
_7>Memory Card 8 MB (GR-D93/73 only) (Already
inserted in the carncorder)
® Remote Control Unit RM-V718U (GR-D93/73 only)
_ Lithium Battery CR2025" (GR-D93/73 on_y)
(for remote control unit)
L_ USB Cable (GR-D93/73 only)
Lens Cap (See the right column for attachment)
* A lithium battery is pre-installed in the Remote Control Unit
at time of shipme_ (with insulation sheet). To use the
Remote Control Unit, remove the insulation sheet.
NOTES:
• In order to maintain optimum performance of the
camcorder, provided cables may be equipped with one or
more core filter. If a cable has only one core fitter, the end
that is closest to the filter should be connected to the
camcorder.
• Make sure to use the provided cables for connections. Do
not use any other cables.
GETTING STARTED EN 5
HowToAttachTheLeasCap
To protect the lens, attach the provided lens cap to the
carncorder as shown in the illustration.
NOTE:
TOconfirm the lens cap is on correctly make sure thecap is
flush tothe camcorder.
Place here during shooting.
HowToAttachTheShoulderStrap
Follow the illustration.
1Thread the strap through the eyelet.
Fold it back and thread it through the strap guide and
the buckle.
• Toadiust the length of the strap, loosen and then tighten
the strap in the buckle.
Slide the strap guide fully towards the eyelet.
Strap guide
Buckle
Eyelet
6 EN GETTINGSTARTED
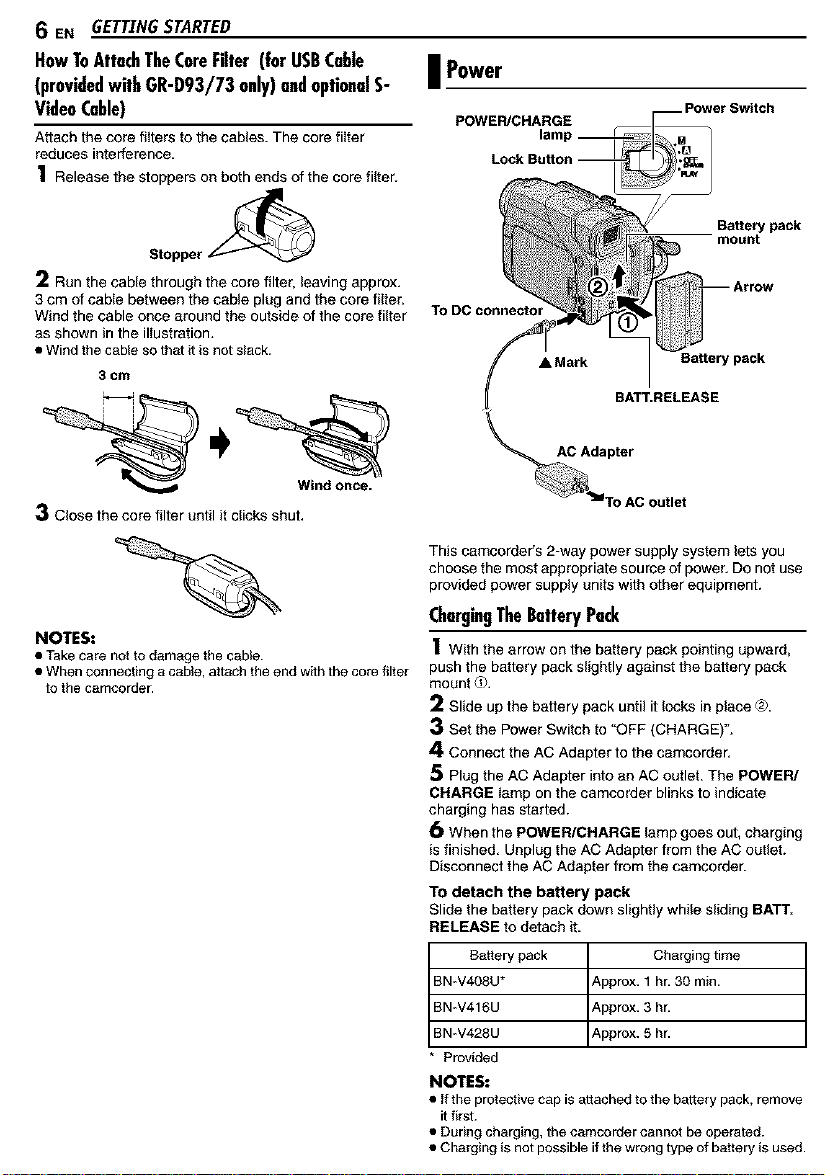
HowToAttachTheCoreFilter (forUSBCable I Power
(providedwithGR-093/73 only)andoptionalS-
VideoCable)
Attach the core fi_terstothe cables. The core fi_ter
reduces interference.
1 Release the stoppers on both ends of the core filter.
Stopper ,_
2 Run the cable through the core filter, leaving approx.
3 cm of cable between the cable plug and the core filter.
Wind the cable once around the outside of the core filter
as shown inthe illustration.
• Wind the csble so that it is not slack.
3 cm
3 Close the core filter until it clicks shut.
NOTES:
• Take care not to damage the cable.
• When connecting a cable, attach the end with the core tilter
to the csmcorder.
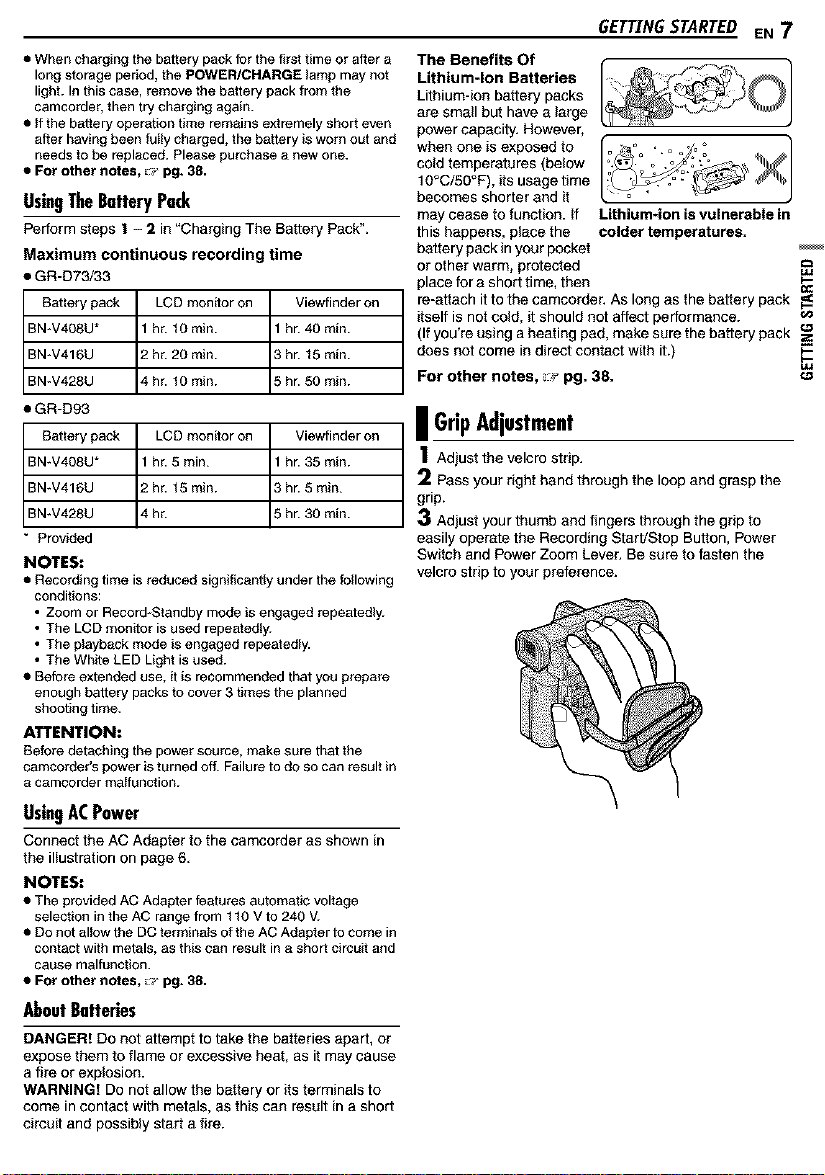
POWER/CHARGE
To DC connector
This camcorder's 2-way power supply system lets you
choose the most appropriate source of power. Do not use
provided power supply units with other equipment.
ChargingTheBatteryPack
1With the arrow on the battery pack pointing upward,
push the battery pack slightly against the battery pack
mount _.
2 Slide up the battery pack until it locks in place ®.
3 Set the Power Switch to "OFF (CHARGE)".
4 Connect the AC Adapter to the camcorder.
5 Plug the AC Adapter into an AC outlet.The POWER/
CHARGE _ampon the camcorder blinks to indicate
charging has started.
6 When the POWER/CHARGE lamp goes out, charging
is finished. Unplug the AC Adapter from the AC outlet.
Disconnect the AC Adapter from the camcorder.
To detach the battery pack
Slide the battery pack down slightly while sliding BATT.
RELEASE todetach it.
Battery pack Charging time
BN-V408U* _,pprox. 1 hr. 30 min.
BN_V416U _,pprox. 3 h_
BN_V428U _,pprox. 5 h_
* Provided
NOTES:
• If the protective cap is attached to the battery pack, remove
it first.
• During charging, the camcorder cannot be operated.
• Charging is not possible if the wrong type of battery is used.
AC Adapter
Battery pack
BATT.RELEASE
BaRery pack
mount
• When charging the battery pack for the first time or after a
long storage period, the POWER/CHARGE _amp may not
light. In this case, remove the battery pack from the
camcorder, then try charging again.
• tt the battery operation time remains extremely short even
after having been fuIly charged, the battery is worn out and
needs to be replaced. Please purchase a new one.
• For other notes, ::_ pg. 38.
UsingTheBatteryPack
Perform steps ! - 2 in "Charging The Battery Pack _.
Maximum continuous recording time
• GR-D73/33
Battery pack LCD monitor on Viewfinder on
BN-V408U* 1 hr. t 0 rain. 1 hr. 40 rain.
BN-V416U 2 hr. 20 rain. 3 hr. 15 rain.
BN-V428U 4 hr. t0 rain. 5 hr. 50 rain.
• GR-D93
Battery pack LCD monitor on Viewfinder on
BN-V408U* 1 hr. 5 rain. 1 hr. 35 rain.
BN-V416U 2 hr. 15 rain. 3 hr. 5 rain.
BN-V428U 4 hr. 5 hr. 30 rain.
* Provided
NOTES:
• Recording time is reduced significantly under the following
conditions:
• Zoom or Recor&Standby mode is engaged repeatedly.
• The LCD monitor is used repeatedly.
• The playback mode is engaged repeatedly.
• The White LED Light is used.
• Before extended use, it is recommended that you prepare
enough battery packs to cover 3 times the planned
shooting time.
ATTENTION:
Before detaching the power source, make sure that the
camcorder's power is turned offi Failure to do so can result in
a camcorder malfunction.
UsingACPower
Connect the AC Adapter to the camcorder as shown in
the illustration on page 6,
NOTES:
• The provided AC Adapter features automatic voltage
selection in the AC range from t t0 V to 240 V.
• Do not allow the DC terrainats of the AC Adapter to come in
contact with metals, as this can result in a short circuit and
cause malfunction.
• For other notes, _:_pg. 38.
AboutBatte_es
DANGER! Do not attempt to take the batteries apart, or
expose them to flame or excessive heat, as it may cause
a fire or explosion.
WARNING! Do not allow the battery or itsterminals to
come incontact with metals, as this can result in a short
circuit and possibly start a fire.
GETTINGSTARTED EN 7
The Benefits Of
Lithium-Ion Batteries
Lithium-fon battery packs
are small but have a large
powercapacity. However,
when one isexposed to
cold temperatures (below
10°C/50°F), its usage time
becomes shorter and it
may cease to function. If Lithium4on is vulnerable in
this happens, place the colder temperatures.
battery pack inyour pocket
or other warm, protected
place for a short time, then
re-attach it to the camcorder. AS long as the battery pack
itself is not cold, it should not affect performance.
(If you're using a heating pad, make sure the battery pack
does not come in direct contact with it.)
For other notes, _ pg. 38. "_
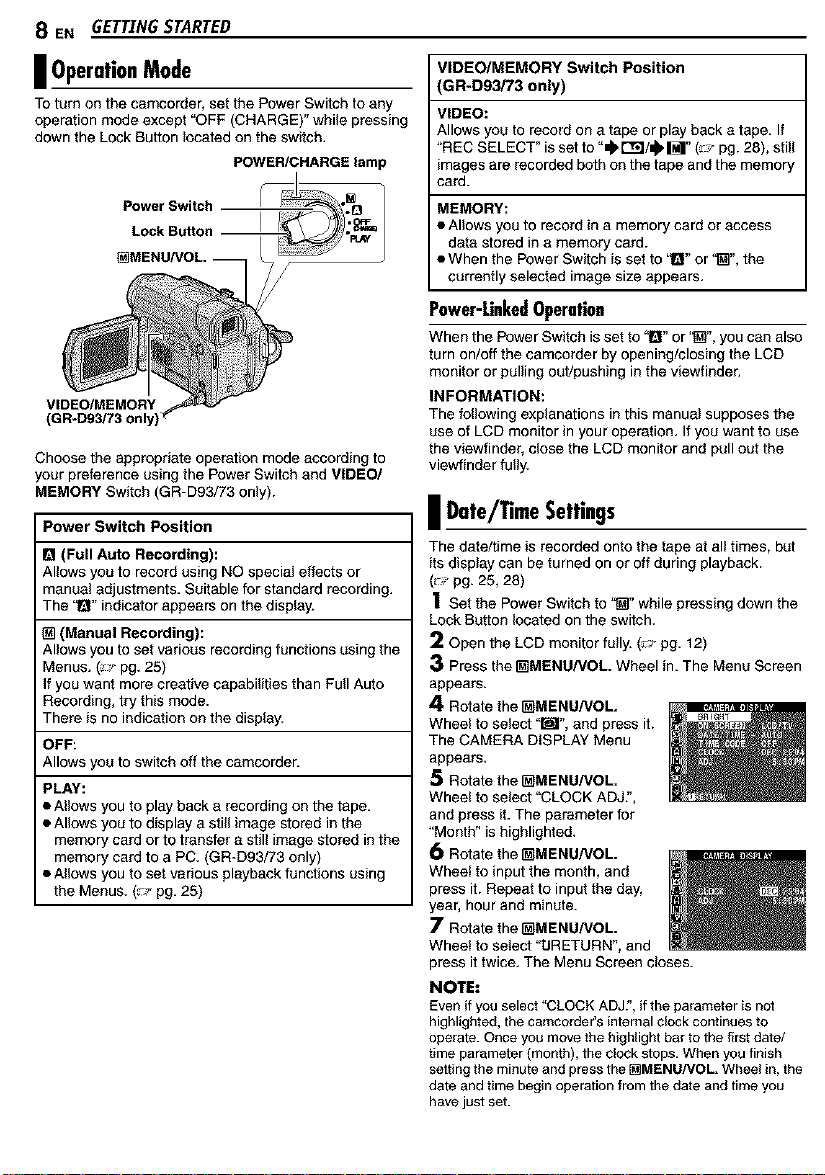
| GripAdjustment
1Adjust the velcro strip.
2 Pass your right hand through the loop and grasp the
grip.
3 Adjust your thumb and fingers through the grip to
easily operate the Recording Start/Stop Button, Power
Switch and Power Zoom Lever. Be sure to fasten the
velcro strip to your preference.
8 EN GETTINGSTARTED
I OperationMode
To turn on the camcorder, set the Power Switch to any
operationmode except "OFF (CHARGE)" while pressing
down the Lock Button located on the switch.
POWER/CHARGE lamp
Power Switch
Lock Button
VIDEO/MEMORY
Choose the appropriate operation mode according to
your preference using the Power Switch and VIDEO/
MEMORY Switch (GR-D93/73 only).
Power Switch Position
I_1(Full Auto Recording):
Allows you to record using NO special effects or
manual adjustments, Suitable for standard recording.
The "1_"indicator appears on the display.
(Manual Recording):
Allows you to set various recording functions using the
Menus. (_,,-pg. 25)
If you want more creative capabilities than Full Auto
Recording, try this mode.
There is no indication on the display.
OFF:
Allows you to switch off the camcorder.
PLAY:
• Allows you to play back a recording on the tape,
• Allows you to display a still image stored inthe
memory card or to transfer a still image stored in the
memory card to a PC. (GR-D93/73 only)
• Allows you to set various playback functions using
the Menus. (_p pg, 25)
VIDEO/MEMORY Switch Position
GR-D93i73 only)
VIDEO:
Allows you to recordon a tape orplay back a tape, If
'REC SELECT" isset to "_ t'_l/_ M" (_,J-pg. 28), still
images are recorded bothon the tape andthe memory
card.
MEMORY:
• Allows you to record in a memory card or access
data stored in a memory card.
• When the Power Switch is set to !_" or'_", the
currently selected image size appears,
Power-LinkedOperation
When the Power Switch is set to "l_" or'_", you can also
turn on/off the camcorder by opening/closing the LCD
monitor or pullingout/pushing in the viewfinder.
INFORMATION:
The following explanations in this manual supposes the
use of LCD monitor in your operation, If you want to use
the viewfinder, close the LCD monitor and pull out the
viewfinder fully.
| Date/TimeSettings
The date/time is recorded onto the tape at all times, but
its display can be turned on or off during playback.
(_p pg. 25, 28)
1 Set the Power Switch to '_" while pressing down the
Lock Button located on the switch.
2 Open the LCD monitor fully. (_J pg, 12)
3 Press the _MENU/VOL. Wheel in. The Menu Screen
appears.
4 Rotate the _MENU/VOL.
Wheel to select '_", and press it.
The CAMERA DISPLAY Menu
appears.
5 Rotate the _MENU/VOL.
Wheel to select '=CLOCK ADJ,',
and press it. The parameter for
'Month" is highlighted.
6 Rotate the _MENU/VOL.
Wheel to input the month, and
press it. Repeat to input the day,
year, hour and minute.
7 Rotate the _MENU/VOL.
Wheel to select "tJRETURN", and
press ittwice. The Menu Screen closes.
NOTE:
Even if you select "CLOCK ADJ?,if the parameteris not
highlighted,the camcorder's internal clockcontinues to
operate.Once you move the highlightbar to the firstdate/
time parameter (month), the clock stops. When you finish
settingthe minuteand press the[_MENU/VOL. Wheel in, the
date and timebegin operation from the date and time you
havejust set.
GETTINGSTARTED EN 9
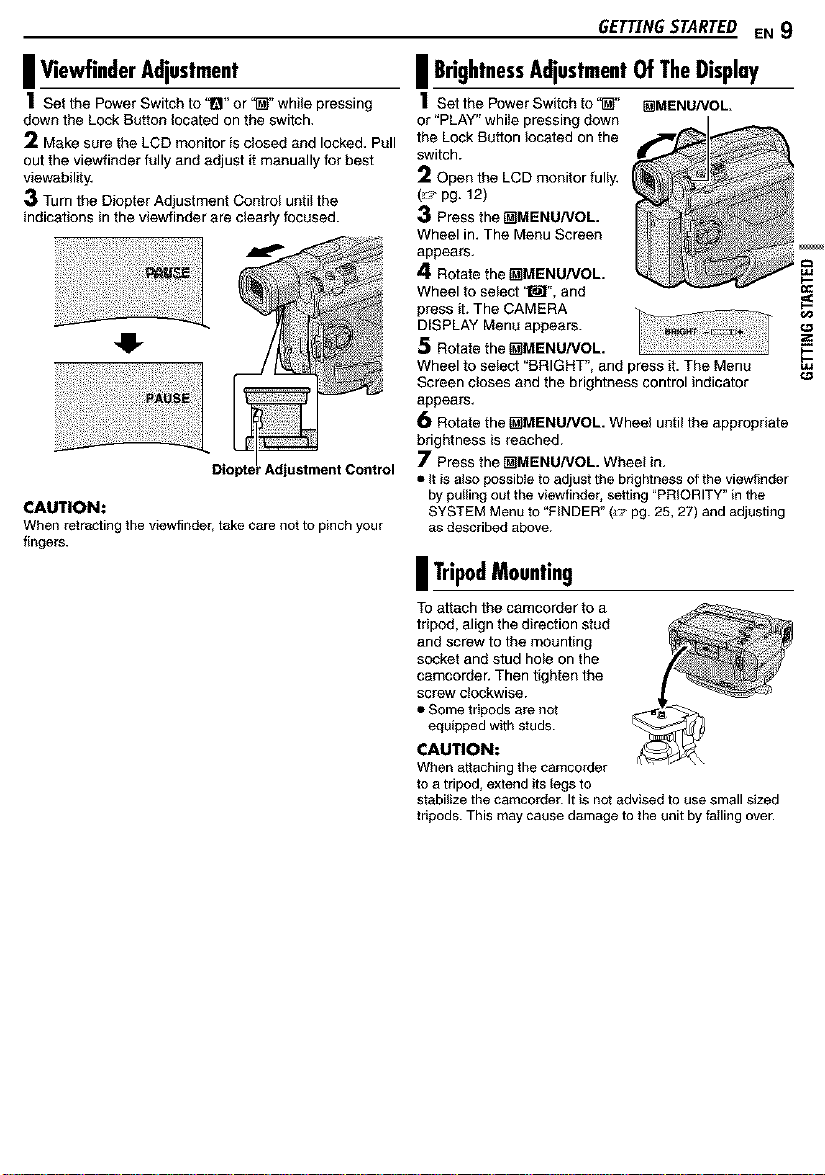
I ViewfinderAdjustment
1Set the Power Switch to 1_1"or '_' while pressing
down the Lock Button located on the switch,
2 Make sure the LCD monitor is closed and locked, Pull
out the viewfinder fully and adjust it manually for best
viewability,
3 Turn the Diopter Adjustment Control until the
indications in the viewfinder are clearly focused.
41-
' Adjustment Control
CAUTION:
When retractingthe viewfinder, take care not to pinch your
fingers.
| BrightnessAdjustmentOfTheDisplay
1setthePowerSw_fchfo"_" []MENUNOL.
or "PLAY" whffe pressing down
the Lock Button located on the
switch.
2 Open the LCD monitor fuffy,
(_,,-pg. 12)
3 Press the t_MENU/VOL
Wheel in, The Menu Screen
appears,
4 Rotate the t_MENU/VOL.
Wheel to select '_', and
press it. The CAMERA
DISPLAY Menu appears.
5 Rotate the t_MENU/VOL.
Wheel to select "BRIGHT", and press it. The Menu
Screen closes and the brightness control indicator
appears,
6 Rotate the _MENU/VOL. Wheel until the appropriate
brightness is reached.
7 Press the _MENU/VOL. Wheel in,
• It is also possibleto adjustthe brightness of the viewfinder
by pullingout the viewfinder, setting "PRIORITY" in the
SYSTEM Menu to "FINDER" (,,_'pg.25, 27) and adjusting
as described above.
| TripodMounting
To attach the camcorder to a
tripod, align the direction stud
and screw to the mounting
socket and stud hole on the
camcorder. Then tighten the
screw clockwise.
• Some tripods are not
equipped with studs.
CAUTION:
When attaching the camcorder
to a tripod, extend its legs to
stabilize the camcorder. It is not advised to use small sized
tripods. This may cause damage to the unit by failing over.
10 ENGETTINGSTARTED
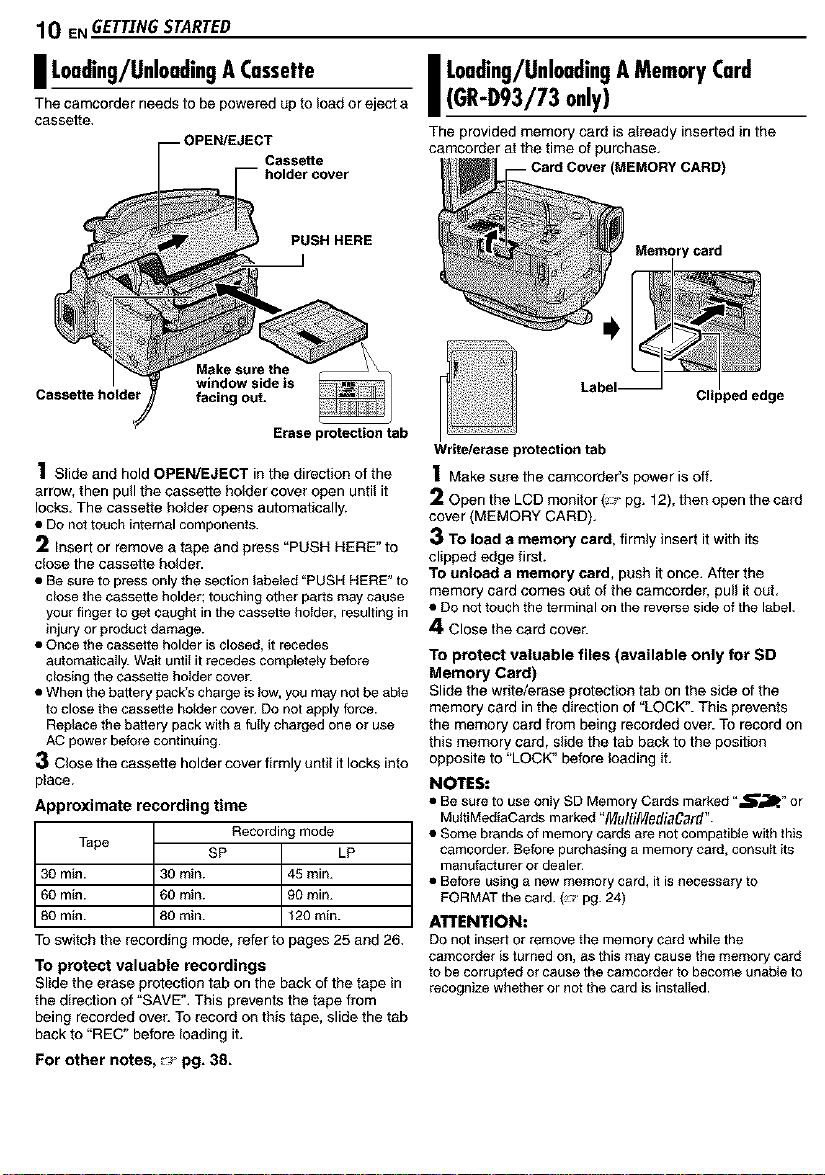
I Loading/UnloadingA Cassette
The camcorder needs to be powered upto load or eject a
cassette.
_--O PEN/EJEC_oalSd%erttcever
PUSH HERE
Make sure the
Cassette holder facing out.
window side is
Erase protection tab
1 Slide and hold OPEN/EJECT in the direction of the
arrow, then pull the cassette holder cover open until it
locks. The cassette holder opens automatically.
• Do not touch internal components.
2 Insert or remove a tape and press "PUSH HERE" to
dose the cassette holder.
• Be sure to press only the section labeled "PUSH HERE" to
cfose the cassette holder; touching other parts may cause
your finger to get caught in the cassette holder, resulting in
injury or product damage.
• else the cassette holder is closed, it recedes
automat foaIly. Wait until it recedes completely before
dosing the cassette holder cover.
• When the battery pack's charge is low, you may not be able
to close the cassette holder cover. Do not apply force.
Replace the battery pack with a folly charged one or use
AC power before continuing.
3 Close the cassette holder cover firmly until it locks into
place.
Approximate recording time
Tape
30 min.
60 min.
80 min.
30min. 45 min.
60min. 90 min.
80min. t20min.
To switch the recording mode, refer to pages 25 and 26.
To protect valuable recordings
Slide the erase protection tab on the back of the tape in
the direction of 'SAVE". This prevents the tape from
being recorded over. To record on this tape, slide the tab
back to "REC" before Iosding it.
For other notes, _ pg. 38.
Receding mode
SP LP
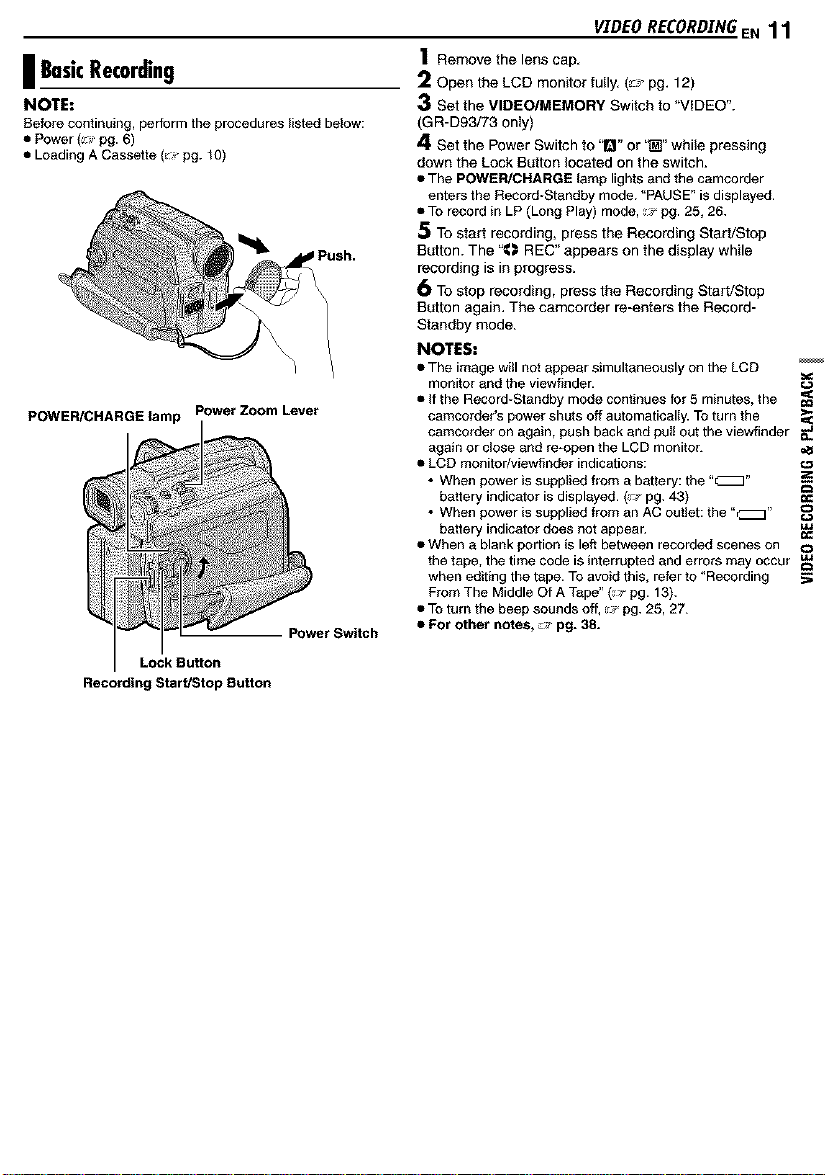
I Loading/UnloadingAMemoryCard
(GR-D93/73only)
The provided memory cam is already inserted in the
camcorder at the time of purchase.
Write/erase protection tab
1 Make sure the camcorder's power is off.
2 Open the LCD monitor (_:;_pg. 12), then open the card
cover(MEMORY CARD),
3 To load a memory card, firmly insert itwith its
cl{ppededgefirst.
To unload a memory card, push it once. After the
memory card comes out of thecamcorder, pull itout,
• Do nottouchthe terminal on the reverse side of the label.
4 Close the card cover.
To protect valuable files (available only for SD
Memory Card)
Slide the write/erase protectiontab on the side of the
memory card in the direction of "LOCK". This prevents
the memory card from being recorded over. To record on
this memory card, slide the tab back to the position
opposite to "LOCK" before Iosding it.
NOTES:
• Be sure to use onIy SD Memory Cards marked"S_lle" or
MuitiMediaCards marked "MultiMediaCard".
• Some brands of memorycards are not compatible with this
camcorder. Before purchasing a memory card, consult its
manufactureror dealer.
• Before using a new memory card, itisnecessary to
FORMATthe card.(_' pg. 24)
ATTENTION:
DOnot insert or remove the memory card while the
camcorder is turnedon, as this maycause ttle memory card
to becorrupted or cause the camcorder tobecome unable to
recognize whether or not the card isinstalled.
(MEMORY CARD)
rcard
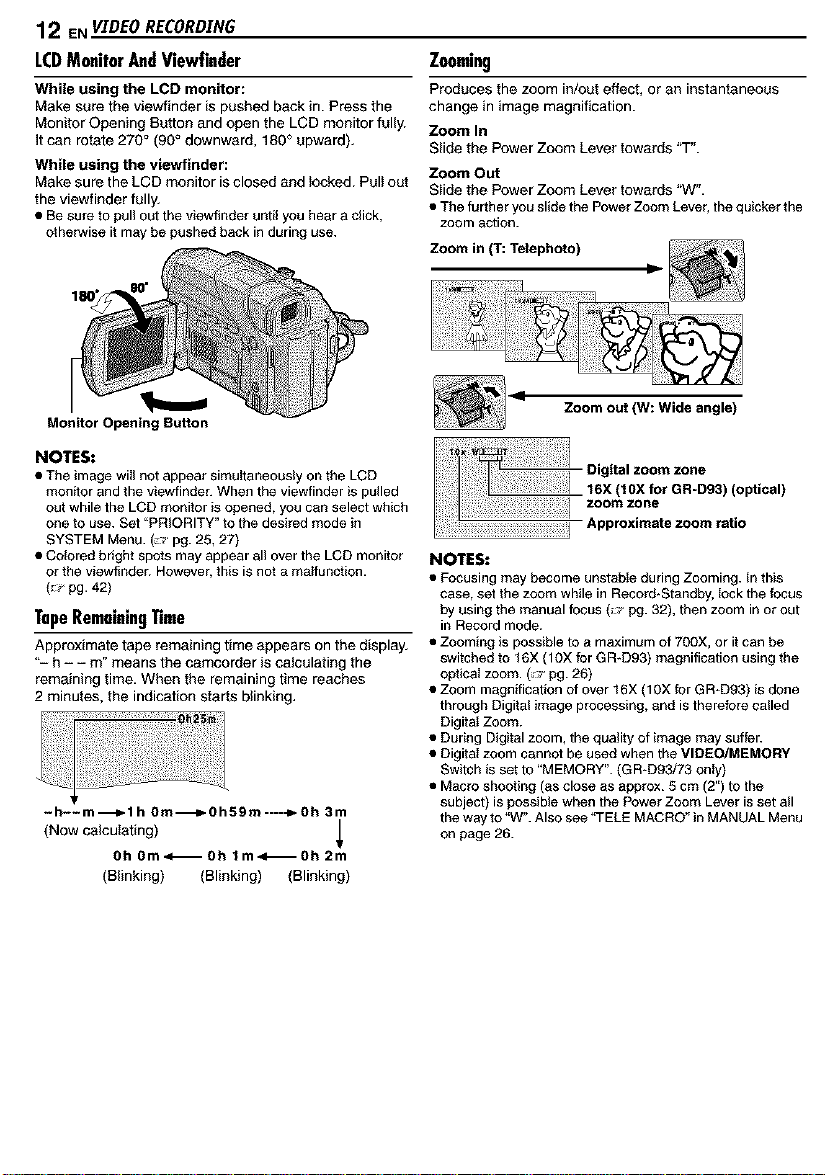
I BasicRecording
NOTE:
Before continuing, perform the procedures listed below:
• Power (!_ pg. 6)
• Leading A Cassette (_:_pg. t0)
POWER/CHARGE lamp Power Zoom Lever
Power Switch
Lock Button
Recording Start/Stop Button
VIDEO RECORD.[NGE N 11
1 Remove the lens cap.
2 Open the LCD monitor fully. (_:_ pg. 12)
3 Set the VIDEO/MEMORY Switch to "VIDEO".
(GR-D93/73 only)
4 Set the Power Switch to '1_1"or "_" while pressing
down the Lock Button located on the switch.
• The POWER/CHARGE lamp lights and the camcorder
enters the Record*Standby mode. "PAUSE" is displayed.
• To record in LP (Long Play) mode, _ pg. 25, 26.
5 To start recording, press the Recording Start/Stop
Button. The "_ REC" appears on the display while
recording is in progress.
6 To stop recording, press the Recording Start/Stop
Button again. The camcorder re-enters the Record-
Standby mode.
NOTES:
• The image witl not appear simultaneously on the LCD
monitor and the viewfinder.
• If the Record_Standby mode continues for 5 minutes, the _=_
camcorder's power shuts off automatically. To turn the
camcorder on again, push back and pul! out the viewfinder _e.
again or close and re-open the LCD monitor.
• LCD monitor/viewfinder indications: c._
• When power is supplied from a battery: the "_"
battery indicator is displayed. (_,_.pg. 43) ¢_
• When power is supplied from an AC outlet: the "_"
battery indicator does not appear.
• When a blank portion is left between recorded scenes on o
the tape, the time code is interrupted and errors may occur
when editing the tape. To avoid this, refer to "Recording ._
From The Middle Of A Tape" (_ pg. 13).
• To turn the beep sounds off, _ pg. 25, 27.
• For other notes, :.,' pg. 38.
o
12 ENVIDEORECORDING
LCDMonitorAndViewfinder
While using the LCD monitor:
Make sure the viewf{nder is pushed back in. Press the
Monitor Opening Button and open the LCD monitor fully.
It can rotate 270° (90° downward, 180° upward).
While using the viewfinder:
Make sure the LCD monitor is closed and locked. Pull out
the viewfinder fully.
• Be sure to pul) out the viewfinder until you heara click,
otherwise it may be pushed back induring use.
Monitor Opening Button
NOTES:
• The image wii) not appear simuItaneousiy on the LCD
monitor and the viewfinder. When the viewfinder is pulled
out while the LCD monitor is opened, you can select which
one to use. Set "PRIORITY" to the desired mode in
SYSTEM Menu. (_' pg. 25, 27)
• Colored bright spots may appear all over the LCD monitor
or the viewfinder. However, this is not a maffu)_ction.
(_ pg. 42)
TapeRemainingTime
Approximate tape remaining time appears on the d{splay.
"- h - - m" means the camcorder is calculating the
remaining time. When the remaining time reaches
2 minutes, the indication starts blinking.
-h--m---_l h 0m-_0h59m----_- Oh 3m
(Now cafou_ating)
Oh 0m<_0h lm41_Oh 2m
(Blinking) (Blinking) (Blinking)
Zooming
Produces the zoom in/out effect, or an instantaneous
change in image magnification.
Zoom In
Slide the Power Zoom Lever towards "T".
Zoom Out
S_ide the Power Zoom Lever towards "W".
• The further you slide the Power Zoom Lever, the quicker the
zoom action.
Zoom in (1":Telephoto)
I
Zoom out (W: Wide angle)
I 106:(mlOXfeOt GR-D93)(optical)
o0,t..oo..ooo
Approximate zoom ratio
NOTES:
• Focusing may become unstabIe during Zooming. In this
case, set the zoom wMle in Record*Standby, fock the focus
by using the manual focus (_ pg. 32), then zoom in or out
in Record mode.
• Zooming is possible to a maximum of 700X, or it can be
switched to 16X (10X for GR-D93) magnification using the
optical zoom. (,_ pg. 26)
• Zoom magnification of over 16X (10X for GR-D93) is done
through Digital image processing, and is therefore called
DigitaI Zoom.
• During Digital zoom, the quality of image may suffer.
• Digital zoom cannot be used when the VIDEO/MEMORY
Switch is set to "MEMORY". (GR-D93/73 only)
• Macro shooting (as close as approx. 5 cm (2") to the
subject) is possible when the Power Zoom Lever is set all
the way to "W". Also see _i-ELE MACRO" in MANUAL Menu
on page 26.
JournalisticShooting
In some situations, different
shooting angles may provide
more dramatic results. Hold the
camcorder in the desired position
and tilt the LCD monitor in the
most convenient direction. It can
rotate 270° (90° downward, 180°
upward).
SelfRecording
Open the LCD monitor and tilt
it upward to 180° so that it _'_
faces forward, then point the
lens toward yourself and start
recording. If Recording
TimeCode
During recording, a time code is recorded on the tape.
This code is to confirm the location of the recorded scene
on the tape during playback.
Display
* Framesarenotdisplayedduring recording.
If recording starts from a blank portion, the time code
begins counting from "00:00:00" (minute:second:frame).
If recording starts from the end of a previouslyrecorded
scene, the time code continues from the last time code
number.
If during recording a blank portionisleft partwaythrough
the tape, the time code is interrupted. When recording is
resumed, the time code starts counting up again from
"00:00:00". This means the camcorder may record the
same time codes as those existing in a previously
recorded scene. To prevent this, perform "Recording
From The Middle Of A Tape" (See the right column) in the
following cases;
• When shooting again after playingback a recorded tape.
• When powershuts offduring shooting.
• When a tape is removed andre-inserted during shooting.
• When shooting usinga partiallyrecordedtape.
• When shooting on a blank portionlocated partway through
thetape.
• When shooting again after shooting a scene then opening/
closing the cassette holdercover.
VIDEO RECORDING,EN 13
RecordingFromTheMiddleOfATape
1) Play back a tape or use Blank Search (_J'pg. 14) to
find the spot at which you want to start recording, then
engage the Still Playback mode. (_J pg. 14)
2) Set the Power Switch to '1_1"or "_" while pressing
down the Lock Button located on the switch, then start
recording.
NOTES:
• The time code cannot be reset.
• Curing fast*forwarding and rewinding,the time code
indicationdoes notmove smoothly.
• The time code is displayedonly when 'q-IME CODE" is set
to "ON". (_ pg. 27)
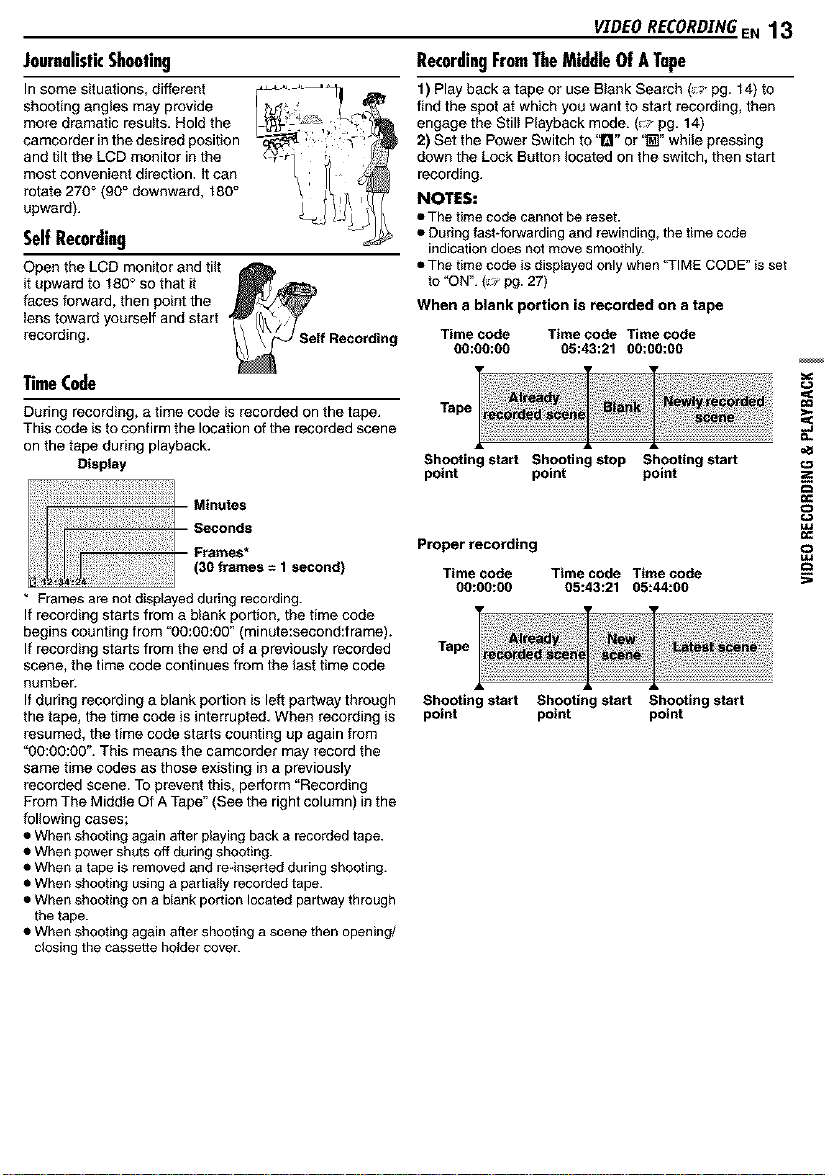
When a blank portion is recorded on a tape
Time code Time code Time code
go:go:go 05:43:21 OO:OO:OO
Tape
Shooting start Shooting stop Shooting start
point point point
Proper recording
Time code Time code Time code
00:00:00 05:43:21 05:44:00
Tape
Shooting start Shooting start Shooting start
point point point
14 EN VIDEO PLAYBACK
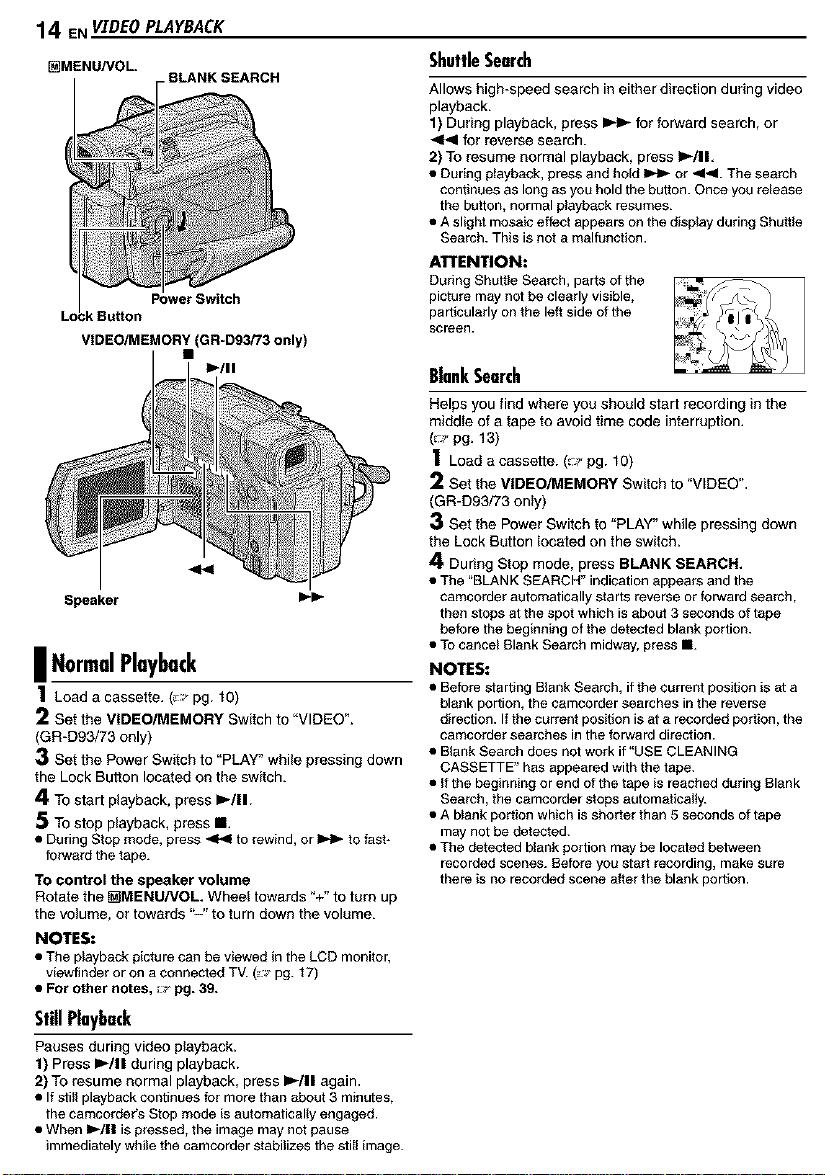
[_MENU/VOL
VIDEO/MEMORY (GR-D93/73 only)
. BLANK SEARCH
Power Switch
I_/11
| NormalPlayback
1 Load a cassette. (_:_pg. 10)
2 Set the VIDEO/MEMORY Switch to "VIDEO".
(GR-D93/73 only)
3 Set the Power Switch to "PLAY" while pressing down
the Lock Button located on the switch.
4 To start playback, press i,-/ll.
5 To stop playback, press II.
• During Stop mode, press _ to rewind, or _ to fast-
forwardthe tape.
To control the speaker volume
Rotate the _MENU/VOL Wheel towards "+" to turn up
the volume, or towards "-" to turn down the volume.
NOTES:
• The playback picture can be viewed in the LCD monitor,
viewfinder or on a connected TV. (_._'pg. 17)
• For other notes, :;_ pg. 39.
StillPlayback
Pauses during video playback.
1) Press )/11 during playback.
2) To resume normal playback, press )/11 again.
• If still playback continues for more than about 3 minutes,
the camcorder's Stop mode is automatically engaged.
• When II_/I I is pressed, the image may not pause
immediately while the camcorder stabilizes the still image.
ShutfleSearch
Allows high-speed search in either direction during video
playback.
1) During playback, press _ for forward search, or
<1<1for reverse search.
2) To resume normal playback, press l='-III.
• During playback,pressand hold _ or <1<1.The search
continues as longas you holdthe button. Onceyou release
the button, normal playback resumes.
• A slight mosaic effectappearson thedisplay during Shuttle
Search.This is not a malfunction.
ATTENTION:
During Shuttle Search, parts of the
picture may not be clearly visible,
particularly on the left side of the
screen.
BlankSearch
Helps you find where you should start recording in the
middle of a tape to avoid time code interruption.
(_p pg. 13)
1 Load a cassette. (=p pg. 10)
2 Set the VIDEO/MEMORY Switch to "VIDEO".
(GR-D93/73 only)
3 Set the Power Switch to "PLAY" while pressing down
the Lock Button located on the switch.
4 During Stop mode, press BLANK SEARCH,
• The "BLANK SEARCH" indication appears and the
camcorder automatically starts reverse or forward search,
then stops at the spot which is about 3 seconds of tape
before the beginning of the detected blank portion.
• To cancel Blank Search midway, press •.
NOTES:
• Before starting Blank Search, if the current position is at a
blank portion, the camcorder searches in the reverse
direction. If the current position is at a recorded portion, the
camcorder searches in the forward direction.
• Blank Search does not work if "USE CLEANING
CASSETTE" has appeared with the tape.
• If the beginning or end of the tape is reached during Blank
Search, the camcorder stops automatically.
• A blank portion which is shorter than 5 seconds of tape
may not be detected.
• The detected blank portion may be located between
recorded scenes. Before you start recording, make sure
there is no recorded scene after the blank portion.
PlaybackUs;rigTheRemoteControl
(GR-D93/73only)
The FuIFFun_.,_ionRamo'ie Control Unit saraoperatethis
carncorderfrom a biers,nee as well as the be,sic
operations (Playb_k, Stop, Pause, Pa_4-For,verd an_
Rewind) of your VCR. Italso makes ab_itional playb_k
functions possible. (_ pg. 16)
InstallingTheBaltery
BeamE|fe¢liveAinu
{indooruse)
VIDEOPLAYBACKEN15
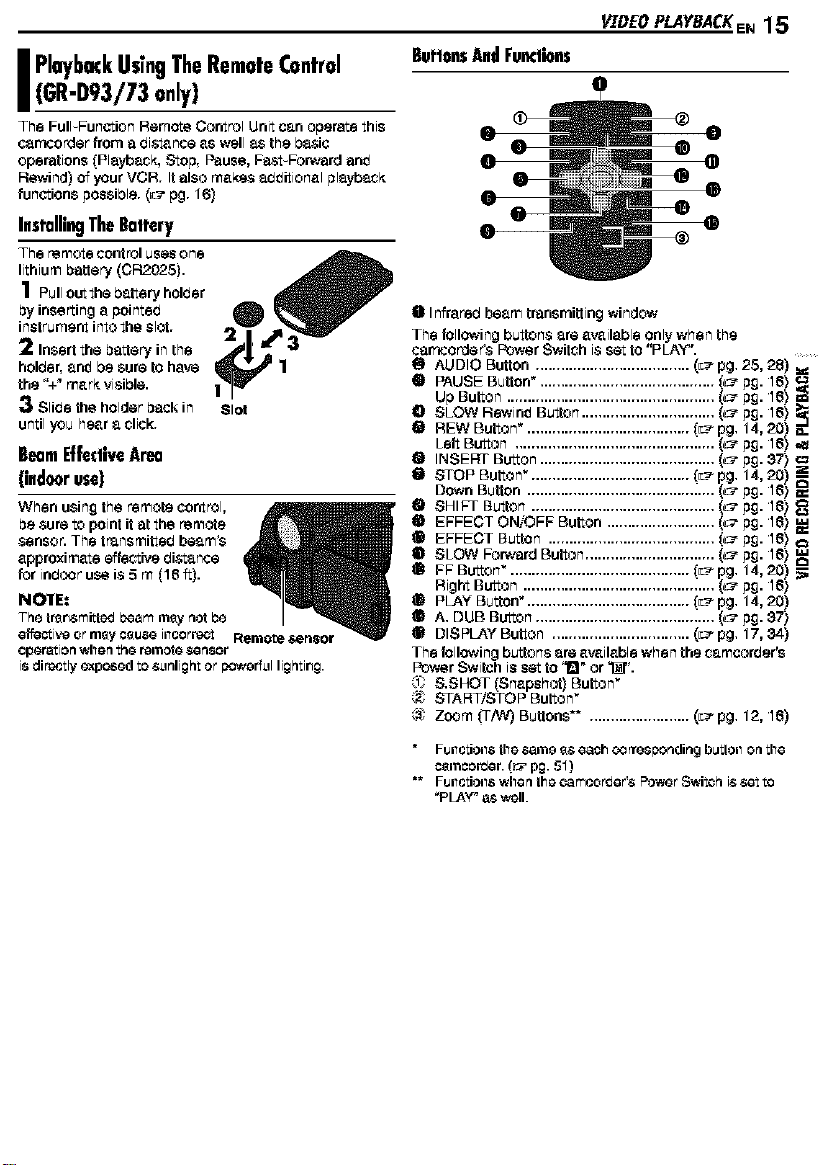
Bul'|onsAndFum|ions
e Infrared beam transmittingwindow
The followingbuttonsareavailableonlywhen the
car'_corda_PowerSwitchi$setto"PLAY".
O AUDIO Button ..................................... (L_pg. 25, 28)
• PAUSE Button*. ......................................... [_" p£. 16)
Up Button .................................................. (_" p£. 16)
O SLOW Rewind Button ................................ (_- p£. 16)
tii REWButton ....................................... _ pg. 14,20) _.
Left Button ................................................ _- p£. 16) ,,_
Q INSERT Button .......................................... (_" p£. 37)
ll} STOPButton ...................................... _ pg. 14,20) _
Down Button ............................................. _" p£. 16)
_1 SHIFT Button ............................................ (_" p£. 16)
EFFECT OWOFF Button .......................... (_" p£. 16)
EFFECT Button ........................................ [_" p£. 16)
SLOW ForWard Button ............................... (_" p£. 16)
FF Button ........................................... _ pg. 14, 20)
Right Button .............................................. _" p£. 16)
PLAY Button'. ...................................... [L_ pg. 14, 20)
A. DUB Button ...................................... _....(c_ p£. 37)
DISPLAY Button ................................. (_'_pg. 17, 34)
The followingbuttons are available when the camcorber's
Power Switch is set to '1" or _".
0 &SHOT [Snapshot) Button"
(,_ START/STOP Button
_ Zoom 0-A_/)Buttons_ ........................ (_pg. 12, 16)
• Fu_lctio_ls the same _s each _rrosponding b_tlo_l on the
cemcor_er. (_ pg. 51)
** Fu_ctio_s when the ¢amcor_er'_ Powor Switch i_ r,et to
_PLAY" as well.
16 EN v_rDEo PLAYBACK
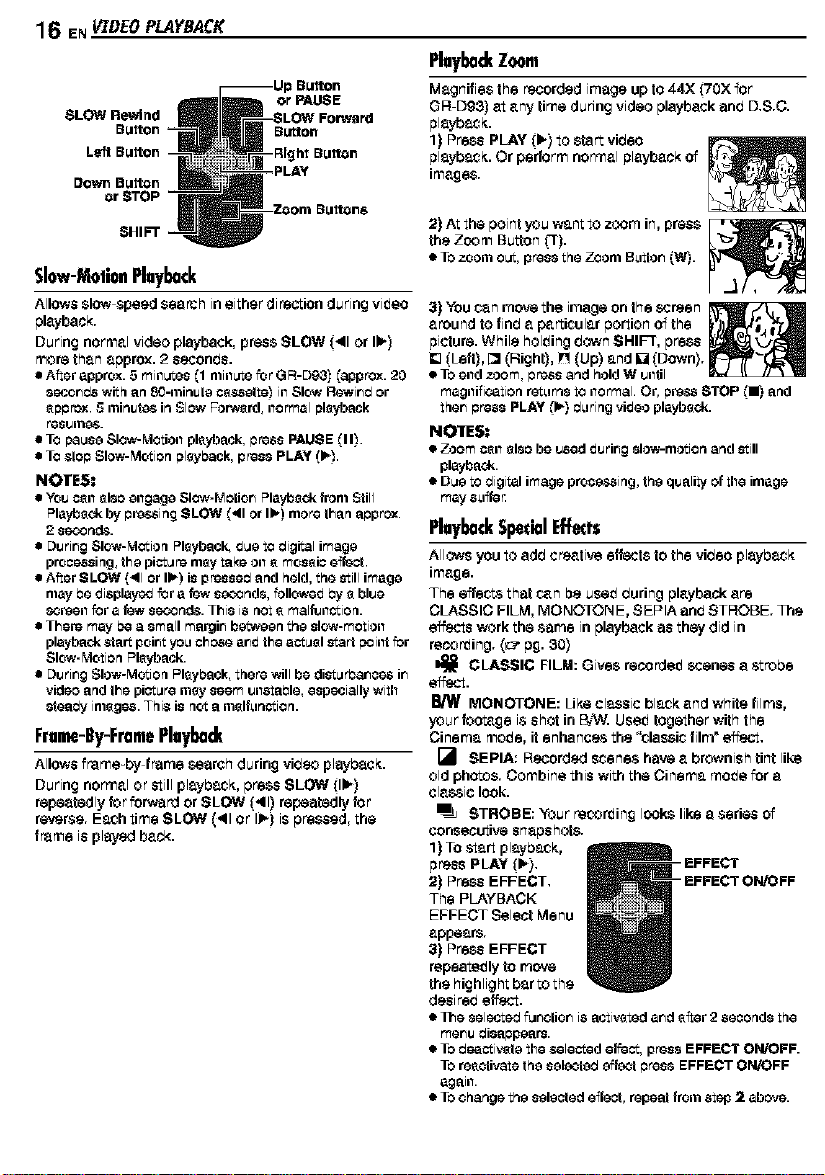
1Button
SLOW Rewind
ELaton
Left Button
DownButton
or STOP
SHIFT
Slow-MotionPlayback
Allows slow speed search in either difaction during video
playback[.
During normal video playback, press SLOW (_11or lip)
more than approx. 2 seconds.
• After approx. 5 minLtLes (1 minLtLefor G R-Dg,3) Capprox. 20
secor_ds with an 80-minute c_t.*sette_ill Slow Rewiredor
_ep rex. 5 minutes in Slow Fon_rd, nermal playback
resulTl_.
• Te pause Slew-Motion playback, press PAUSE (11).
• Te Stop Slow-Motion playback, press PLAY (1_.
NOTES:
• YOUc_ll _180 ellgage Slew- h,1ctior_ Playback from $Ull
Playback by premising SLOW ('41or lb.) more than approx.
2 se_nd8.
• Durir_g Slow=Motioq Pl_ybacl_ due to digital image
pro_ossing, the picture nl_y take oil _ mos_i_ effect.
• After SLOW (,41or I1_)is pressed and held, the still image
may Pe displayed for a few se_:_nd$, followed Py e blue
8creel1 for a _w S#n_. This is rlet 8 mal_llctiorl.
There may I_ea small martjir_ between the slow-motion
playback start poiot yo_nchose arid the actual start point for
Slow-Motion Playback.
Durir_g Slow-Motion Playback, there will be dicturPar_¢os ir_
video and the picture m_y seem unctaPle, especially with
Steady imsgos. This is not a i'llslfLlnctierl.
Frame-By-FramePlayback
Allows f_e-by f_me s_arsh during video playbasit.
During normal or _ill playbecit, press SLOW ilIPl
repeatedly for forward or SLOW (41) repeatedly for
reverse. Each time SLOW (41 or I1_) is pressed, the
frame is played back.
or PAUSE
BLrUton
-Right Button
-PLAY
2) At the point you want to zoom in, press
the Zoom Button _r).
• Tozoom eL,t, pressthe Zeom E_nttar_(W).
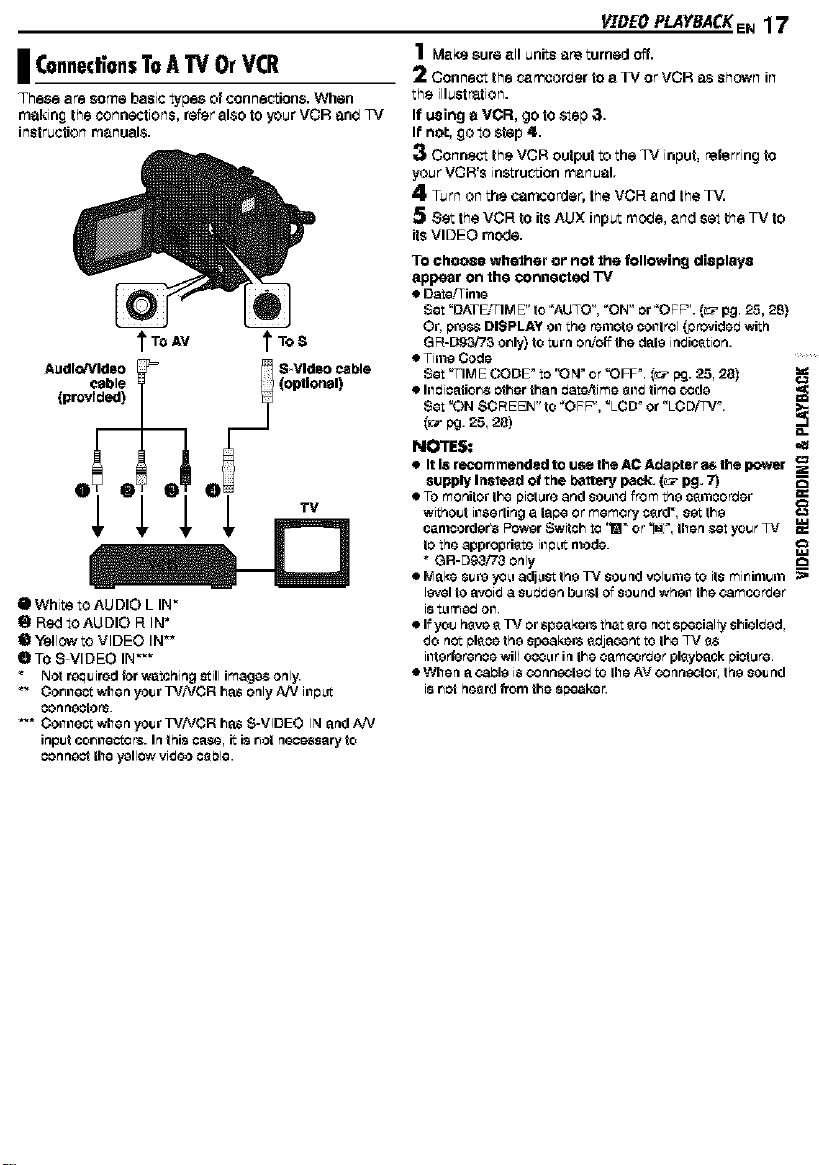
I ConnedionsTo A TV Or VCR
These are some basic types of con ne_fon& When
making the connections, rear also to your VCR an_ IV
Jnstructfon m_nual$.
Audio/Video
cable
(provided)
O White to AUDIO L IN"
g ROd toAUDIO R IN _
I1_Yellow to VIDEO IN _
OTo S VIDEO IN""
Not r_qu ired for washing still images only.
_" Cor_nest when your I_/VCR has only AN inp_it
con hectors.
"_* Collllest when your TViVCR has S-VIDEO IN and AN
input cor_nestor& In this case, it is r_ot neom;sary to
oonnect the yctlow video c_ble.
V'[BEO PLAYBACK EN 17
1 Meke sureell units ere turned off,
2 Connect the r._recorder to a TV orVCR as shown in
the illustration.
If using o VCR, go to step ;3.
It'no:, go to step 4,.
3 Connect the VCR outputto the TV input, referring to
your VOWs instructionmenuel.
4 Turn on the cerncorder,the VOR end the TV.
5 Set the VOR to its AUX input mo_e, end set the TV to
its VIDEO mode.
TO choose whelher or not the following displays
appear on the connected "IV
• Dete!Time
Set _DATEJTIM E" to _AUTO", _Or-4"or _OFP'. (_ pg. 25, 28)
Or, pres,s DISPLAY on the remote control (provided with
GR-Dg&,'73 or_ly)toturn on/off the date ipeicetion.
• Time Code
Set "TIME CODF to "ON _or "OFP. _:_ _j. 25, 28)
• Illdioatiorl$ other than dateAime 811dtime o3de
Set "ON SC REEt-4"to "OFP', "LCD _ or "LC D,rFV_.
NOTES:
• It Is recommended to use the AC AcCepter_ the power
supply Instead of the baftery pack. {_ pg. 7)
• TO monitor the picture and sound from the c_rnoorder
without inserling a lape or memory c_rd', set the
cenlcorder's P0wer Switch to 'W_ 0r "_M:_,then set y'ot_r_V
to the appropriate illp_it mode.
G R-D9,3/'/3 only c3
ol'_lakesuieyo_adj_sttheWsoundvolul'neto its mir_inlt_rn _-,
level to a_id a st_dden bu _stof SOUnd whet1 the oamcorder
i8 t_gr_ed oil.
• If you hsve 8 I_/or Speaker8 thet 8re not specially shielded,
do net F_leoethe speakers edjacer_ to the _V es
illterforenoe will ooo_grin the camoorder plsyback F_ict_re.
• When a oa_le is 03 nneoled to the AV O3nneofor, the SOUnd
i8r_ct peerd f_om the speaker.
 Loading...