


INSTRUCTIONS
MANUAL DE INSTRUCCIONES
LYT1776-001A
EN SP
DIGITAL VIDEO CAMERA VIDEOCÁMARA DIGITAL
GR-DA30U
Dear Customer,
Thank you for purchasing this digital video camera. Before use, please read the safety information and precautions contained in pages 2 – 4 to ensure safe use of this product.
Estimado cliente:
Gracias por comprar esta videocámara digital. Antes de usarla, lea la información de seguridad y las precauciones contenidas en las páginas 2 – 4 para garantizar un uso seguro de este producto.
For Customer Use:
Enter below the Model No. and Serial No. which is located on the bottom of the camcorder. Retain this information for future reference.
Model No.
Serial No.
ESPAÑOL ENGLISH
2 EN
Read This First!
•Before recording important video, be sure to make a trial recording.
Play back your trial recording to make sure the video and audio have been recorded
properly.
• We recommend cleaning your video heads before use.
If you haven’t used your camcorder for awhile, the heads may be dirty. We
recommend periodically cleaning the video heads with a cleaning cassette (optional).
•Be sure to store your cassette tapes and camcorder in the proper environment.
Video heads can become dirty more easily if your cassette tapes and camcorder are stored in a dusty area. Cassette tapes should be removed from the camcorder and stored in cassette cases. Store the camcorder in a bag or other container.
•Use SP (Standard Play) mode for important video recordings.
LP (Long Play) mode lets you record 50% more video than SP (Standard Play) mode, but you may experience mosaic-like noise during playback depending on the tape characteristics and the usage environment. So, for important recordings, we recommend using SP mode.
•For safety and reliability.
It is recommended only genuine JVC batteries and accessories are used in this camcorder.
•This product includes patented and other proprietary technology and will operate only with JVC Data Battery. Use the JVC BN-VF808U/VF815U/VF823U battery packs. Using generic non-JVC batteries can cause damage to the internal charging circuitry.
•Remember that this camcorder is not compatible with other digital video formats.
•It is recommended that you use JVC brand cassette tapes.
Your camcorder is compatible with all brands of commercially available cassette tapes complying with the MiniDV standard, but JVC brand cassette tapes are designed and optimized to maximize the performance of your camcorder.
•Remember that this camcorder is intended for private consumer use only.
Any commercial use without proper permission is prohibited. (Even if you record an event such as a show, performance or exhibition for personal enjoyment, it is strongly recommended that you obtain permission beforehand.)
•DO NOT leave the unit
-in place of over 50°C (122°F)
-in place where humidity is extremely low (below 35%) or extremely high (80%).
-in direct sunlight.
-in a closed car in summer.
-near a heater.
•The LCD monitor is made with highprecision technology. However, black spots or bright spots of light (red, green or blue) may appear constantly on the LCD monitor. These spots are not recorded on the tape. This is not due to any defect of the unit. (Effective dots: more than 99.99%)
•Do not leave the battery pack attached when the camcorder is not in use and check the unit regularly whether it is working or not.
Also read “CAUTIONS” on pages 33 – 35.
About Batteries
DANGER! Do not attempt to take the batteries apart, or expose them to fl ame or excessive heat, as it may cause a fi re or explosion. WARNING! Do not allow the battery or its terminals to come in contact with metals, as this can result in a short circuit and possibly start a fi re.
To deactivate the demonstration, set “DEMO MODE” to “OFF”. ( 19, 22)
EN 3
Safety Precautions
CAUTION
RISK OF ELECTRIC SHOCK
DO NOT OPEN
CAUTION: TO REDUCE THE RISK OF ELECTRIC SHOCK, DO NOT REMOVE COVER (OR BACK).
NO USER-SERVICEABLE PARTS INSIDE.
REFER SERVICING TO QUALIFIED SERVICE PERSONNEL.
The lightning flash with arrowhead symbol, within an equilateral triangle, is intended to alert the user to the presence of uninsulated "dangerous voltage" within the product's enclosure that may be of sufficient magnitude to constitute a risk of electric shock to persons.
The exclamation point within an equilateral triangle is intended to alert the user to the presence of important operating and maintenance (servicing) instructions in the literature accompanying the appliance.
WARNING: TO PREVENT FIRE OR SHOCK HAZARD, DO NOT EXPOSE THIS UNIT TO RAIN OR MOISTURE.
CAUTIONS:
•This camcorder is designed to be used with NTSC-type color television signals. It cannot be used for playback with a television of a different standard. However, live recording and LCD monitor playback are possible anywhere.
•This product includes patented and other proprietary technology and will operate only with JVC Data Battery. Use the JVC BN-VF808U/VF815U/VF823U battery packs and, to recharge them or to supply power to the camcorder from an AC outlet, use the provided multi-voltage AC Adapter. (An appropriate conversion adapter may be necessary to accommodate different designs of AC outlets in different countries.)
This product contains a CR Coin Cell Lithium Battery which contains Perchlorate Material - special handling may apply.
See www.dtsc.ca.gov/hazardouswaste/ perchlorate
NOTES:
•The rating plate (serial number plate) and safety caution are on the bottom and/or the back of the main unit.
•The rating information and safety caution of the AC Adapter are on its upper and lower sides.
When the equipment is installed in a cabinet or on a shelf, make sure that it has sufficient space on all sides to allow for ventilation (10 cm (3-15/16") or more on both sides, on top and at the rear).
Do not block the ventilation holes.
(If the ventilation holes are blocked by a newspaper, or cloth etc. the heat may not be able to get out.)
No naked flame sources, such as lighted candles, should be placed on the apparatus. When discarding batteries, environmental problems must be considered and the local rules or laws governing the disposal of these batteries must be followed strictly.
The apparatus shall not be exposed to dripping or splashing.
Do not use this equipment in a bathroom or places with water.
Also do not place any containers filled with water or liquids (such as cosmetics or
medicines, flower vases, potted plants, cups etc.) on top of this unit.
(If water or liquid is allowed to enter this equipment, fire or electric shock may be caused.)
ENGLISH
4 EN
Do not point the lens directly into the sun. This can cause eye injuries, as well as lead to the malfunctioning of internal circuitry. There is also a risk of fire or electric shock.
CAUTION!
The following notes concern possible physical damage to the camcorder and to the user. When carrying, be sure to always securely attach and use the provided strap. Carrying or holding the camcorder by the LCD monitor can result in dropping the unit, or in a malfunction. Take care not to get your finger caught in
the cassette holder cover. Do not let children operate the camcorder, as they are particularly susceptible to this type of injury.
Do not use a tripod on unsteady or unlevel surfaces. It could tip over, causing serious damage to the camcorder.
CAUTION!
Connecting cables (Audio/Video, S-Video, etc.) to the camcorder and leaving it on top of the TV is not recommended, as tripping on the cables will cause the camcorder to fall, resulting in damage.
WARNING:
Batteries shall not be exposed to excessive heat such as direct sunshine, fire or the like.
CAUTION:
The mains plug shall remain readily operable.
IMPORTANT SAFETY INSTRUCTIONS
1.Read these instructions.
2.Keep these instructions.
3.Heed all warnings.
4.Follow all instructions.
5.Do not use this apparatus near water.
6.Clean only with dry cloth.
7.Do not block any ventilation openings. Install in accordance with the manufacturer’s instructions.
8.Do not install near any heat sources such as radiators, heat registers, stoves, or other apparatus (including amplifi ers) that produce heat.
9.Only use attachments/accessories specified by the manufacturer.
10.Use only with the cart,
stand, tripod, bracket, or table specified by the manufacturer,
or sold with the apparatus. When a cart is used, use
caution when moving the cart/apparatus combination to avoid injury from tipover.
11.Unplug this apparatus during lightning storms or when unused for long periods of time.
12.Refer all servicing to qualifi ed service personnel. Servicing is required when the apparatus has been damaged in any way, such as power-supply cord or plug is
damaged, liquid has been spilled or objects have fallen into the apparatus, the apparatus has been exposed to rain or moisture, does not operate normally, or has been dropped.

|
|
|
|
Contents |
EN 5 |
|
|
|
|
|
|
|
|
|
Getting Started |
6 |
|
Advanced Features |
19 |
|
Accessories ....................................... |
6 |
Attach the Lens Cap.................................. |
6 |
Attach the Core Filter ................................ |
6 |
Attach the Shoulder Strap ......................... |
7 |
Grip Adjustment ........................................ |
7 |
Tripod Mounting......................................... |
7 |
Index ............................................... |
8 |
LCD Monitor Indications ....................... |
10 |
Power ............................................. |
11 |
Language Settings.............................. |
12 |
Date/Time Settings ............................. |
12 |
Brightness Adjustment Of The Display ...... |
13 |
Loading/Unloading A Cassette................ |
13 |
16:9 Wide Mode................................. |
13 |
Recording & Playback |
14 |
Basic Recording................................. |
14 |
Tape Remaining Time ............................. |
14 |
Quick Review .......................................... |
14 |
Zoom....................................................... |
15 |
Recording From The Middle Of A Tape ... |
15 |
Time Code............................................... |
15 |
Normal Playback................................ |
16 |
Still Playback........................................... |
16 |
Variable Shuttle Search........................... |
17 |
Blank Search........................................... |
17 |
Connections To A TV Or VCR .................. |
18 |
Menus for detailed adjustment......... |
19 |
Changing The Menu Settings ................. |
19 |
Recording Menus ............................... |
20 |
Playback Menus................................. |
22 |
Features for recording................... |
24 |
Manual Focus ................................... |
24 |
Exposure Control................................ |
24 |
Iris Lock .......................................... |
25 |
Backlight Compensation ....................... |
25 |
Spot Exposure Control.......................... |
25 |
White Balance Adjustment .................... |
26 |
Manual White Balance Adjustment .......... |
26 |
Wipe Or Fader Effects .......................... |
27 |
Program AE, Effects And Shutter Effects .... |
27 |
Editing ...................................... |
28 |
Dubbing To A VCR .............................. |
28 |
Dubbing To Or From A Video Unit Equipped |
|
With A DV Connector (Digital Dubbing) ..... |
29 |
Connection To A Personal Computer......... |
30 |
References |
31 |
Troubleshooting ................................. |
31 |
Cautions .......................................... |
33 |
User Maintenance .............................. |
35 |
Specifications ................................... |
36 |
Terms ............................................. |
37 |
Regarding This Manual
Control lever ( 9)
There are two kinds of operation using the control lever.
|
Operation |
To select |
|
¡ |
6 |
FOCUS |
Move the control lever up. |
¢ |
7 |
- |
Move the control lever down. |
¤ |
y |
16:9 |
Move the control lever right. |
£ |
1 |
QUICK |
Move the control lever left. |
REVIEW |
|
||
1 Move the control lever towards up/down/ |
2 Press down the control lever to select SET. |
||||
left/right to select: |
|
|
SET |
||
|
|
|
|
|
|
|
|
|
|
|
|
ENGLISH
6 EN Getting Started
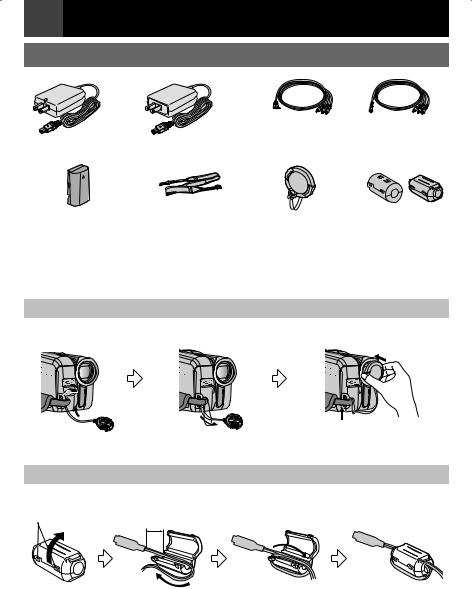
Accessories
|
or |
|
or |
|
|
|
Audio/Video Cable |
|
|
AC Adapter AP-V14U or AP-V18U |
(ø3.5 mini-plug to RCA plug) |
|||
|
|
|
||
|
|
|
A |
B |
Battery Pack |
Shoulder Strap |
Lens Cap |
Core Filter for Cables |
|
BN-VF808U |
( 7) |
|
A: Audio/Video Cable |
|
|
|
|
B: AC Adapter |
|
Note:
Make sure to use the provided cables for connections. Do not use any other cables.
Attach the Lens Cap
To protect the lens, attach the provided lens cap to the camcorder as shown in the illustration.
Place here during recording.
Attach the Core Filter
Attach the core fi lter to the cable. The core fi lter reduces interference.
Release the stopper.
3 cm
Wind once (Audio/Video Cable) Wind twice (AC Adapter)
Getting Started |
EN 7 |
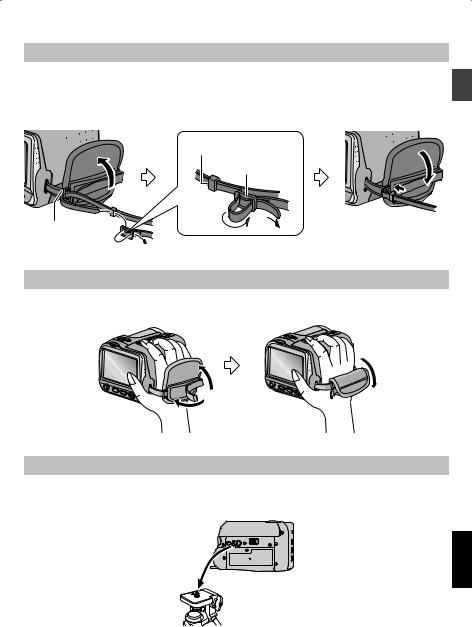
Attach the Shoulder Strap
Peel off the pad and thread the end of the strap through the eyelet.
Thread the strap through the buckle, adjust its length, and use the strap guide to fi x it in place.
Position the buckle near the eyelet and reattach the pad.
Strap Guide
Buckle
Eyelet
Grip Adjustment
Open the pad and make grip adjustments.
• Before making the adjustment, remove any security tags that may be attached to the velcro.
Tripod Mounting
To attach the camcorder to a tripod, align the direction stud and screw to the mounting socket and stud hole on the camcorder. Then tighten the screw clockwise.
• Some tripods are not equipped with studs.
BATT 
ENGLISH

8 EN Getting Started
Index
6
9
T
S


R
L
M
a
X Y 0
5 U |
7 |
|
|
|
|
|
PLAY |
|
|
OFF |
|
|
REC |
|
|
8 |
|
|
O |
W |
|
N |
|
1

DV
2 K 3 4 P |
|
Q |
|
BATT 
V Z
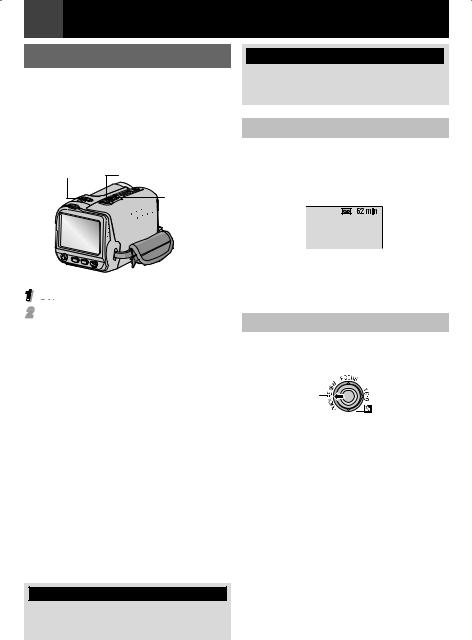
How to adjust the LCD Monitor
Slide the LCD monitor in the most convenient position. It can slide 30° (15° downward, 15° upward)
Note:
Colored bright spots may appear all over the LCD monitor. 30˚ However, this is not a malfunction.

Controls
!Control Lever
£ : Left/Rewind (3) ( 16)/Quick Review [QUICK REVIEW] ( 14)
¤ : Right/Fast-Forward (5) ( 16)/ 16:9 Wide Screen Button [16:9] ( 13)/
¡ : Up/Play/Pause (U/9) ( 16)/
Manual Focus [FOCUS] ( 24)
¢ : Down/Stop (8) ( 16)/Backlight Compensation [-] ( 25)/Spot Exposure ( 25)
Press down : SET
# Menu Button [MENU] ( 19) $ Auto Button [AUTO] ( 9)
% Data Battery Button [DATA] ( 12)
&Recording Start/Stop Button [START/STOP] ( 14)
(Zoom Lever [T/W] ( 15)/
Speaker Volume Control [VOL. +, –] ( 16)
) Power Switch [PLAY, OFF, REC]
* Lock Button
+Cassette Open/Eject Switch [OPEN/ EJECT] ( 13)
, Battery Release Button [BATT.] ( 11)
Connectors
The connector is located beneath the LCD monitor.
aDigital Video Connector [DV IN/OUT] (i.LINK*) ( 29, 30)
*i.LINK refers to the IEEE1394-1995 industry specifi cation and extensions thereof. The  logo is used for products compliant with the i.LINK standard.
The connectors are located beneath the cover. b Audio/Video Output Connector [AV] ( 18) c DC Input Connector [DC] ( 11)
Indicator
N POWER/CHARGE “ ” Lamp ( 11)
Getting Started |
EN 9 |
Other parts
O LCD Monitor ( 8)
P Shoulder Strap Eyelet ( 7)
Q Grip Strap ( 7)
R Camera Sensor
(Be careful not to cover this area, a sensor
necessary for shooting is built-in here)
S Stereo Microphone
TLens
USpeaker ( 16)
VBattery Cover ( 11)
WCassette Holder Cover ( 13)
XStud Hole ( 7)
YTripod Mounting ( 7)
ZBattery Pack Mount ( 11) a Connector Cover
Power Switch Position |
|
Set the power switch while |
0,!9 |
pressing down the lock button. |
/&& |
2%# |
|
|
|
PLAY: |
|
To play back a recording on the tape. |
|
OFF: |
|
To switch off the camcorder. |
|
REC: |
|
To perform recording on the tape. |
|
Auto/Manual Mode |
|
|
|
Press AUTO button repeatedly to switch to |
|
||
auto/manual recording mode. When manual |
|
||
mode is selected, the indicator “M” appears |
|
||
on the LCD monitor. |
|
||
Auto Mode : A |
|
||
You can record using no special effects or |
|
||
manual adjustments. |
|
||
ENGLISH |
|||
Manual Mode : M |
|||
|
|||
Recording is possible by setting various |
|
||
functions manually. |
|
||
|
|
|
|
 !54/ -!.5!,
10 EN Getting Started
LCD Monitor Indications
During Video Recording
|
|
, |
|
|
- . |
/ |
0 |
|
|
|
|
|
|
|
|||||||||||||||||||
! |
|
|
|
|
|
|
|
|
|
|
|
|
|
|
|
|
|
|
|
|
|
|
|
|
|
||||||||
|
|
|
|
|
|
|
|
|
|
16:9 |
|
LP |
|
|
|
|
– – –min |
|
|
|
|
||||||||||||
# |
|
|
M |
|
|
|
|
|
|
|
|
|
|
|
|
|
|
|
|
|
REC |
|
|
1 |
|||||||||
|
|
|
|
|
|
|
|
|
|
|
|
|
|
|
|
|
|
|
|
||||||||||||||
$ |
|
|
|
|
|
|
|
|
|
|
|
|
|
|
|
|
|
|
|
|
|
|
|
|
|
|
|
|
|||||
|
|
|
|
|
|
|
|
|
|
|
|
|
|
|
|
|
|
|
|
|
|
|
|
|
|
|
|||||||
% |
|
|
|
|
|
|
|
|
|
|
|
|
|
|
|
|
|
|
|
|
|
|
|
|
|
|
|
3 |
|
|
|
2 |
|
& |
|
|
|
|
|
|
|
|
|
|
|
|
|
|
|
|
|
|
|
|
|
|
|
|
|
|
|
WH |
|
|
3 |
||
( |
|
|
|
|
|
|
|
|
|
|
|
|
|
|
|
|
|
|
|
|
|
|
|
|
|
|
|
|
|
|
|
4 |
|
) |
|
|
|
|
|
|
|
|
|
|
|
|
|
|
|
|
|
|
|
|
|
|
|
|
|
|
|
|
|
|
|
|
5 |
|
|
|
|
|
|
|
|
|
|
|
|
|
|
|
|
|
|
|
|
|
|
|
|
|
|
|
|
|
|
|
|||
* |
|
|
|
|
SOUND |
|
|
12BIT |
|
|
|
11:13AM |
|
||||||||||||||||||||
|
|
|
|
|
|
|
|
|
|
|
|
|
|||||||||||||||||||||
|
|
|
|
|
|
|
|
|
|
|
|
|
|||||||||||||||||||||
|
|
|
|
|
|
|
|
|
|
|
|
|
|
|
|
|
|
|
|
|
|
|
|
|
|||||||||
|
|
|
|
|
15:55 |
|
|
|
|
|
|
|
|
|
|
|
|
||||||||||||||||
+ |
|
|
|
|
|
|
|
|
|
DEC. 6.2007 |
|
|
|
|
|||||||||||||||||||
|
|
|
|
|
|
|
|
|
|
|
|
|
|
|
|
|
|
|
|
|
|
|
|
|
|
|
|
|
|||||
|
|
8 |
|
7 |
|
|
|
|
6 |
|
|
|
|
|
|
|
|
|
|
||||||||||||||
! Battery Remaining Power Indicator
#Operation Mode ( 9) A : Auto Mode
M : Manual Mode
$ : Night-Alive Indicator ( 28)

 : Gain Up Mode ( 20)
% Shutter Speed ( 28)
& White Balance Indicator ( 26)
( Selected Effect Indicator ( 28)
) Selected Program AE Indicator ( 27)
*SOUND 12BIT/16BIT: Sound Mode Indicator ( 21) (Appears for approx. 5 seconds after turning on the camcorder.)
+Digital Image Stabilizer (“DIS”) ( 20) (only 
 indicator is displayed)
,Approximate Zoom Ratio ( 15)
- Zoom Indicator ( 15)
.Selected Wide Mode Indicator ( 13) (only 16:9 indicator is displayed)
/Recording Speed Mode (SP/LP) ( 21) (only LP indicator is displayed)
0 Tape Remaining Time ( 14)
1 REC : (Appears during recording.) ( 14) 2 . : Spot Exposure Control Indicator ( 25)
- : Backlight Compensation Indicator ( 25)
± : Exposure Adjustment Indicator ( 24) C : Iris Lock Indicator ( 25)
3 Selected Wipe/Fader Effect Indicator ( 27)
4 Wind Cut Indicator ( 20)
5Tape Running Indicator (Rotates while tape is running.)
6 Date/Time ( 21)
7 Manual Focus Adjustment Indicator ( 24)
8 Time Code ( 21)
During Video Playback
! # |
|
|
$ % & ( |
|
|
||||||||||||
|
|
|
|
|
|
|
|
|
|
|
|
|
|
|
|
|
|
|
|
|
|
|
|
|
|
|
|
LP |
|||||||
12 B I T |
|
|
|
|
|
|
DV IN |
|
) |
||||||||
L |
|
|
|
|
|
|
VOLUME |
|
|
|
|
|
|||||
|
|
|
|
|
|
|
|
|
|
11:13AM |
|||||||
|
|
|
|
|
|
|
|
|
|
||||||||
|
|
|
|
|
|
|
|
|
|
||||||||
|
|
|
|
|
|
|
|
|
|
|
|
||||||
20 : 21 : 25 |
|
|
DEC. 6.2007 |
||||||||||||||
|
|
|
|
|
|
|
|
|
|
|
|
|
|
|
|
|
|
, |
+ |
* |
|
|
|
||||||||||||
! Battery Remaining Power Indicator
# Sound Mode Indicator ( 23)
$ Blank Search Indicator ( 17, 23)
%Tape Speed (SP/LP) ( 23) (only LP indicator is displayed)
&Variable Search Speed Indicator: x-10, x-3, x3 and x10 ( 17)
(U : Playback
5 : Fast-Forward/Shuttle Search
3 : Rewind/Shuttle Search
9 : Pause
) DV IN : DV Input Indicator ( 29, 30)
* Date/Time ( 23)
+ VOLUME: Volume Level Indicator ( 16)
, Time Code ( 23)
Getting Started EN 11
Power
Charging The Battery Pack
1
 Set the Power Switch to “OFF” ( 9).
2Open the battery cover.
Press “w OPEN” and slide the battery cover off the camcorder in the direction as illustrated below.
3Attach the battery pack.
With the “r” (arrow) on the battery pack pointing at the correct direction, insert the battery pack until it locks in place.
•Re-attach the battery cover. (For BN-VF808U only)
r Arrow
AV
DC
4 Connect the AC adapter.
DC  connector


AC Adapter
To AC Outlet (110V to 240V)
•“ ” blinks to indicate charging has started.
•When the lamp goes out, charging is
fi nished. Unplug the AC adapter from the AC outlet and disconnect the AC adapter from the camcorder.
To detach the battery pack
Slide and hold battery release button BATT. ( 9), then remove the battery pack.
Charging/recording time (approx.)
|
Required |
Maximum |
|
Battery pack |
Continuous |
||
charging time |
Recording |
||
|
|
Time |
|
BN-VF808U |
1hr. 30 min. |
1 hr. 55 min. |
|
(Provided) |
|||
|
|
||
BN-VF815U |
2 hrs. 40 min. |
3 hrs. 45 min. |
|
BN-VF823U |
3 hrs. 50 min. |
5 hrs. 40 min. |
Notes:
•If a fully charged battery pack is attached to
the unit, “ ” lamp will blink for approx. 10 seconds before it turns off.
•Since the AC Adapter processes electricity internally, it becomes warm during use. Be sure to use it only in well-ventilated areas.
•After 5 minutes have elapsed in RecordStandby mode with the cassette inserted and no operation is performed, the camcorder will automatically turn off its power supplied from the AC adapter. In this case, the battery charge starts if the battery is attached to the camcorder.
•Please do not pull or bend the AC adapter plug and cable. This may damage the AC adapter.
Using The Battery Pack
Perform steps 2 3 in “Charging The Battery Pack”.
Notes:
• Recording time is reduced signifi cantly under the following conditions:
• Zoom or Record-Standby mode is engaged repeatedly.
• The playback mode is engaged repeatedly. |
ENGLISH |
|
|
• Before extended use, it is recommended that |
|
you prepare enough battery packs to cover 3 |
|
times the planned shooting time. |
|
Attention: |
|
Before detaching the power source, make sure |
|
that the camcorder’s power is turned off. Failure |
|
to do so can result in a camcorder malfunction. |
|
12 EN Getting Started
Data Battery System
You can check the remaining battery power and the recordable time.
1Set the Power Switch to “REC” or “PLAY”
(  9).
9).
2Press DATA, and the battery status screen appears.
BATTERY CONDITION
LEVEL
100% 
50 |
|
MAX TIME |
|
115min |
|
|
|
|
0
•Press DATA again to return to the normal screen.
•Data battery status cannot be displayed during playback or while recording is in progress.
•If “COMMUNICATION ERROR” appears instead of the battery status even though you tried to press DATA several times, there may be a problem with your battery. In such a case, consult your nearest JVC dealer.
Using AC Power
Perform step 4 in “Charging The Battery Pack” ( 11).
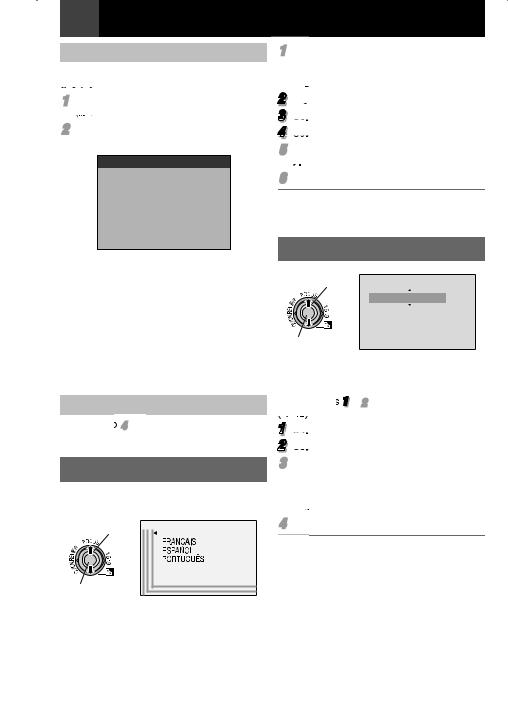
Language Settings
The language on the display can be changed ( 22).
1 Select |
|
|
|
|
|
|
LANGUAGE |
|
|
|
|
||||||
ENGLISH |
||||||||
|
|
|
|
|
|
|
2 SET
1Set the Power Switch to “REC” or “PLAY”
( 9).
•If set to “REC”, the recording mode should be set to “M” ( 9).
2 Press MENU.
3 Select “SYSTEM”, press SET or ¤.
4
 Select “LANGUAGE”, press SET or ¤.
5Select the desired language, press SET or
¤.
6Press MENU.
Press £ whenever you want to return to the previous menu screen.
Date/Time Settings
1 Select |
CLOCK ADJ. |
MONTH. DATE. YEAR 12h
JAN. 3. 2007 2 : 10 AM
2 SET
The date/time is recorded onto the tape at all times, but its display can be turned on or off ( 21, 23).
Perform steps 1 2 in “Language Settings” ( 12).
1
 Select “DISPLAY”, press SET or ¤.
2 Select “CLOCK ADJ.”, press SET or ¤.
3Select the desired date display format, press SET or ¤.
•Repeat this step to input time display format (Select from “24h” or “12h”), month, date, year, hour and minutes.
4Press MENU.
Press £ whenever you want to return to the previous menu screen/setting.
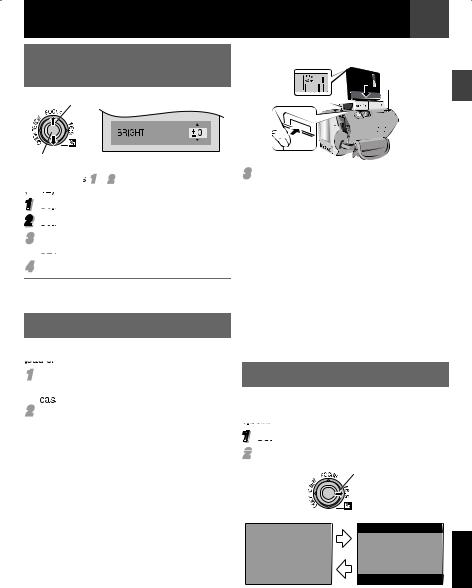
Brightness Adjustment Of
The Display
1 Select
2 SET
Perform steps 1 2 in “Language Settings” ( 12).
1
 Select “DISPLAY”, press SET or ¤.
2 Select “BRIGHT”, press SET or ¤.
3Select the appropriate brightness, press
SET or ¤.
4Press MENU.
Press £ whenever you want to return to the previous menu screen.
Loading/Unloading A Cassette
The camcorder needs to be powered up to load or eject a cassette.
1Slide and hold OPEN/EJECT in the direction of the arrow, then pull the cassette holder cover open until it locks.
2Insert or remove a tape and press “PUSH” to close cassette holder.
•Be sure to press only the section labeled “PUSH” to close the cassette holder; touching other parts may cause your
fi nger to get caught in the cassette holder, resulting in injury or product damage.
•Once the cassette holder is closed, it recedes automatically. Wait until it recedes completely before closing the cassette holder cover.
•When the battery pack’s charge is low, you may not be able to close the cassette holder cover. Do not apply force. Replace the battery pack with a fully charged one or use AC power before continuing.
Getting Started EN 13
Make sure the window side is facing out.
Erase
protection
OPEN/
EJECT
tab
Cassette holder


 Cassette
holder cover
3Close the cassette holder cover fi rmly until it locks into place.
Notes:
•If you wait a few seconds and the cassette holder does not open, close the cassette holder cover and try again. If the cassette holder still does not open, turn the camcorder off then on again.
•If the tape does not load properly, open the cassette holder cover fully and remove the cassette. A few minutes later, insert it again.
•When the camcorder is suddenly moved from a cold place to a warm environment, wait a short time before opening the cassette holder cover.
16:9 Wide Mode
You can record videos at 4:3 size and 16:9 size. By default, the camera is set to record videos at the 4:3 size.
1
 Set the Power Switch to “REC” ( 9).
2 Each press 16:9 switches the screen size.
16:9
4 : 3 |
16 : 9 |
ENGLISH |
|
Note:
If you record videos in 16:9 size, the image may appear to be slightly horizontally stretched when playing back on TV with the 4:3 screen.
( 21, 23)
14 EN Recording & Playback
Basic Recording
Before continuing, perform the procedures listed below:
•Power ( 11).
•Loading A Cassette ( 13).
•Remove the lens cap ( 6).
•Select videos at 4:3 size or 16:9 (wide) size ( 13).
Power Switch |
Recording Start/ |
|
Stop Button |
||
|
||
|
Zoom |
|
|
Lever |
1
 Set the Power Switch to “REC” ( 9).
2Press START/STOP button to start recording. “REC” appears on the display while recording is in progress. To stop recording, press START/STOP again.
Approximate recording time
Tape |
Recording mode |
||
|
|
||
SP |
LP |
||
|
|||
|
|
|
|
30 min. |
30 min. |
45 min. |
|
60 min. |
60 min. |
90 min. |
|
80 min. |
80 min. |
120 min. |
|
Notes:
•If the Record-Standby mode continues for 5 minutes and no operation is performed, the camcorder’s power shuts off automatically.
•When a blank portion is left between recorded scenes on the tape, the time code is interrupted and errors may occur when editing the tape. To avoid this, refer to “Recording From The Middle Of A Tape” ( 15).
•To record in LP (Long Play) mode, 21.
TAPE!
Appears if a tape is not loaded when the Recording Start/Stop Button is pressed while the Power Switch is set to “REC”.

 USE CLEANING CASSETTE
Appears if dirt is detected on the heads during recording. Use an optional cleaning cassette ( 2).
Tape Remaining Time
Approximate tape remaining time appears on the display. “– – – min” means the camcorder is calculating the remaining time. When
the remaining time reaches 2 minutes, the indication starts blinking.
•The time required to calculate and display the remaining tape length, and the accuracy of the calculation, may vary according to the type of tape used.
Quick Review
Enables you to check the end of the last recording.Press QUICK REVIEW during the Recording-Standby mode.
QUICK REVIEW
•Tape is rewound for about several seconds and played back automatically, then pauses in the Recording-Standby mode for the next
shot.
Notes:
•Distortion may occur at start of playback. This is normal.
•Slide the Zoom lever repeatedly to change the sound to on/off.
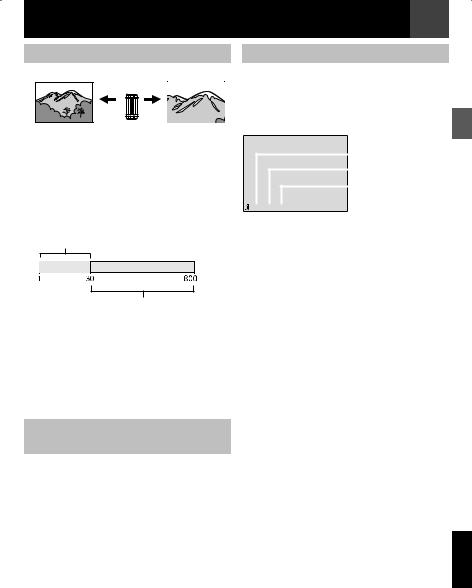
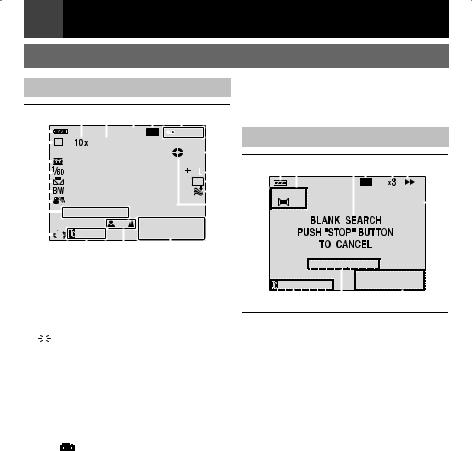
Zoom
Zoom out |
Zoom in |
7 nn6/, |
4 |
W: Wide angle |
T: Telephoto |
•You can zoom in up to 30X by using the optical zoom.
•Zoom magnifi cation over 30X is done through digital image processing, and is therefore called digital zoom. Digital zooming is possible up to 800X. Set (ZOOM) to [60X] or [800X] ( 20).
Optical zoom (up to 30X)
Digital zoom (up to 800X)
Notes:
•Macro shooting is possible as close as approx. 5 cm (2") to the subject when the zoom lever is set all the way to “W”.
•When you zoom into a subject close to the lens, the camera may automatically zoom out depending on the distance to the subject. In this case, set “TELE MACRO” to “ON” ( 20).
Recording From The Middle Of A
Tape
1Play back a tape or use Blank Search ( 17) to fi nd the spot at which you want to start recording, then engage the Still Playback mode ( 16).
2Set the Power Switch to “REC” ( 9), then start recording.
Recording & Playback EN 15
Time Code
During recording, a time code is recorded on the tape. This code is to confi rm the location of the recorded scene on the tape during playback.
Display
|
|
|
|
|
Minutes |
|
|
|
|
||
|
|
|
|
|
Seconds |
|
|
|
|
|
Frames* |
|
|
|
|
|
|
|
|
|
|
|
(30 frames = 1 |
|
|
second) |
|||
* Frames are not displayed during recording.
If recording starts from a blank portion, the time code begins counting from “00:00:00” (minute:second:frame). If recording starts from the end of a previously recorded scene, the time code continues from the last time code number. If during recording a blank portion is left partway through the tape, the time code
is interrupted. When recording is resumed, the time code starts counting up again from “00:00:00”. This means the camcorder may record the same time codes as those existing in a previously recorded scene. To prevent this, perform Recording From The Middle Of A Tape ( 15) in the following cases;
•When shooting again after playing back a recorded tape.
•When power shuts off during shooting.
•When a tape is removed and re-inserted during shooting.
•When shooting using a partially recorded tape.
•When shooting on a blank portion located partway through the tape.
•When shooting again after shooting a scene then opening/closing the cassette holder cover.
Notes:
•The time code cannot be reset.
•During fast-forwarding and rewinding, the time code indication does not move smoothly.
•The time code is displayed only when “TIME CODE” is set to “ON”. ( 23)
ENGLISH
16 EN Recording & Playback
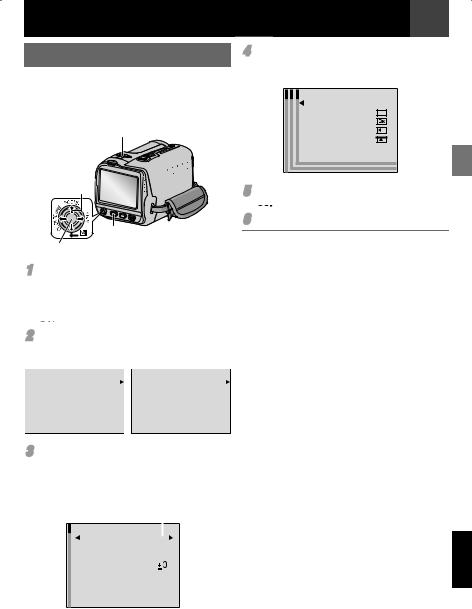
Normal Playback
– VOL.+
W T
Power Switch
SET
VOL. +/-
6
MENU
1 7 y
1
 Load a cassette ( 13).
2 Set the Power Switch to “PLAY” ( 9).
SET
•The above screen (referring to the control lever ( 5)) will be displayed for approx. 3 seconds on the LCD Monitor.
3 To start playback, press U/ 9.
4To stop playback, press 8.
•During Stop mode, press 3to rewind, or 5to fast-forward the tape.
•Press SET to display the guide operation screen.
To control the speaker volume
Slide the Zoom Lever (VOL. +/–) towards “+” to turn up the volume, or towards “–” to turn down the volume.
Notes:
•The playback picture can be viewed in the LCD monitor or on a connected TV ( 18).
•If Stop mode continues for 5 minutes when power is supplied from a battery, the camcorder shuts off automatically.
•When a cable is connected to the AV connector, the sound is not heard from the speaker.
HDV 
Appears when pictures recorded in the HDV format are detected. The pictures in the HDV format cannot be played back with this camcorder.
Still Playback
Pauses during video playback.
1Press 6 during playback.
2To resume normal playback, press 6 again.
•If still playback continues for more than about 3 minutes, the camcorder’s Stop mode is automatically engaged.
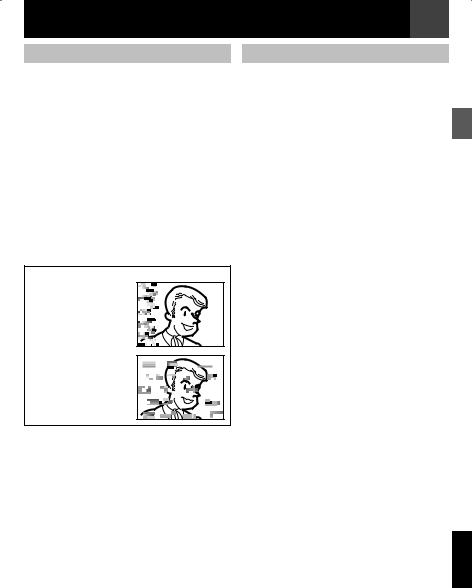
Variable Shuttle Search
Allows variable-speed search in either direction during video playback.
1 During playback, press 5 once or twice for forward search, or 3 once or twice for reverse search.
3 |
5 |
||
|
|
|
|
x-10 |
x-3 |
x3 |
x10 |
2 To resume normal playback, press U/ 9.
• During playback, press and hold 5or 3. The search continues as long as you hold the button. Once you release the button, normal playback resumes.
• A slight mosaic effect appears on the display during Shuttle Search. This is not a malfunction.
Attention:
During Shuttle Search, parts of the picture may not be clearly visible, particularly on the left side of the screen.
During Shuttle Search, parts of the picture may not be clearly visible across the screen.
Recording & Playback EN 17
Blank Search
Helps you fi nd where you should start recording in the middle of a tape to avoid time code interruption ( 15).
1Set the power switch to “PLAY” ( 9).
2Press MENU.
3Select “TAPE”, press SET or ¤.
4Select “BLANK SEARCH”, press SET or ¤.
5Select “EXECUTE”, press SET or ¤.
•The “BLANK SEARCH” indication appears and the camcorder automatically starts reverse or forward search, then stops at the spot which is about 3 seconds of tape before the beginning of the detected blank portion.
•To cancel Blank Search, press 8.
Notes:
•Before starting Blank Search, if the current position is at a blank portion, the camcorder searches in the reverse direction. If the current position is at a recorded portion, the camcorder searches in the forward direction.
•If the beginning or end of the tape is reached during Blank Search, the camcorder stops automatically.
•A blank portion which is shorter than
5 seconds of tape may not be detected.
•The detected blank portion may be located between recorded scenes. Before you start recording, make sure there is no recorded scene after the blank portion.
ENGLISH
18 EN Recording & Playback
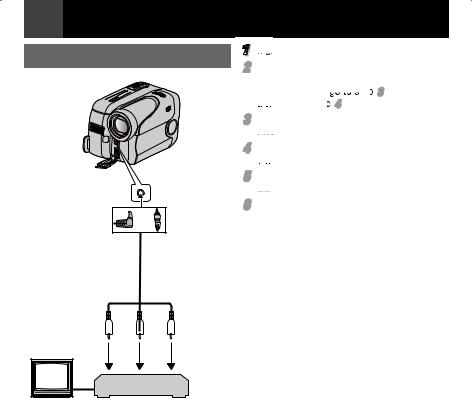
Connections To A TV Or VCR |
1 |
Make sure all units are turned off. |
|
2 |
Connect the camcorder to a TV or VCR as |
||
|
|||
|
|
shown in the illustration. |
|
|
|
If using a VCR, go to step 3 . |
|
|
|
If not, go to step 4 . |
|
|
3 |
Connect the VCR output to the TV input, |
|
|
|
referring to your VCR’s instruction manual. |
|
|
4 |
Turn on the camcorder, the VCR and the |
|
|
|
TV. |
|
To AV |
5 |
Set the VCR to its AUX input mode, and |
|
|
set the TV to its VIDEO mode. |
||
connector |
6 |
Start playback on the camcorder ( 16). |
|
|
|||
or |
|
• Please set “16:9 OUTPUT” of Playback |
|
|
Menus so that the image may suit your TV |
||
|
|
||
|
|
(16:9 TV or 4:3 TV) ( 21, 23). |
|
Audio/Video cable |
To choose whether or not the following |
||
(provided) |
displays appear on the connected TV |
||
1 2
2 3
3
TV
VCR
1 Yellow to VIDEO IN (Connect when your TV/VCR has only A/V input connectors).
2 Red to AUDIO R IN
3 White to AUDIO L IN
•Date/Time
Set “DATE/TIME” to “ON” or “OFF” ( 21).
•Time Code
Set “TIME CODE” to “ON” or “OFF” ( 21).
•On Screen
Set “ON SCREEN” to “OFF”, “LCD” or “LCD/TV” ( 21).
Notes:
•It is recommended to use the AC Adapter as the power supply instead of the battery pack. ( 11)
•To monitor the picture and sound from the camcorder without inserting a tape, set the camcorder’s Power Switch to “REC”, then set your TV to the appropriate input mode.
•Make sure you adjust the TV sound volume to its minimum level to avoid a sudden burst of sound when the camcorder is turned on.
•Conversion lens and AV Cable may not be used at the same time depending on the type of conversion lens you are using.
•It is recommended to use JVC conversion lens. Some conversion lens may not be compatible with this camcorder.
Menus for detailed adjustment EN 19
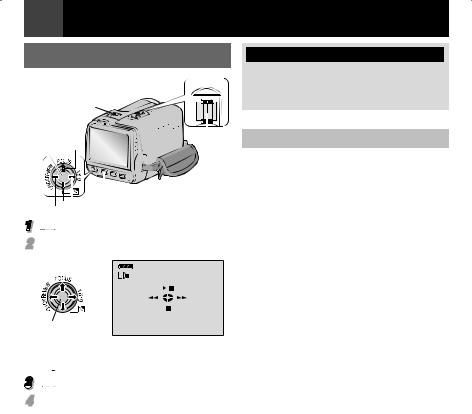
Changing The Menu Settings
This camcorder is equipped with an easy-to- use, on-screen menu system that simplifi es many of the more detailed camcorder settings ( 19 – 23).
Power Switch
1 Select
MENU
2SET
1For Video Recording Menu:
•Set the Power Switch to “REC” ( 9).
•Set the recording mode to “M” ( 9).
For Video Playback Menu:
Set the Power Switch to “PLAY” ( 9).
2 Press MENU. The Menu Screen appears.
Screen for Video |
Screen for Video |
Recording Menu |
Playback Menu |
|
|
|
|
4Select the desired selection, press SET or
¤.
Example: WIPE/FADER menu.
WIPE/FADER
OFF |
OFF |
|
WHITE |
WH |
|
BLACK
SLIDE
SCROLL
5Select the desired setting, press SET or ¤. Selection is completed.
6Press MENU. The Menu Screen closes.
•Press £ whenever you want to cancel or return to the previous menu screen.
•Repeat the procedure if you wish to set other function menus.
FUNCTION |
|
TAPE |
||||
CAMERA |
|
DISPLAY |
||||
TAPE |
|
SYSTEM |
||||
DISPLAY |
|
|
|
|
||
SYSTEM |
|
|
|
|
||
|
|
EXIT |
|
|
|
EXIT |
|
|
|
|
|
||
|
|
|
|
|
|
|
3Select the desired function, press SET or
¤.
The selected function menu appears.
Example: FUNCTION menu.
Current Setting
|
FUNCTION |
|
|
|
|
||
|
|
|
|
|
|||
|
WIPE/FADER |
W |
H |
|
|
||
|
PROGRAM AE |
OFF |
|
|
|||
|
EFFECT |
|
|
|
|
||
|
OFF |
|
|||||
|
EXPOSURE |
|
|
|
|
||
|
W.BALANCE |
|
|
|
|||
|
AUTO |
|
|||||
|
SHUTTER |
|
|
|
|
||
|
OFF |
|
|||||
|
|
|
|
||||
|
|
|
EXIT |
|
|
|
|
|
|
|
|
|
|
|
|
|
|
|
|
|
|
|
|
ENGLISH
20 EN Menus for detailed adjustment
Recording Menus
The FUNCTION and CAMERA menu settings can be changed only when the Power Switch is set to “REC”.
FUNCTION
CAMERA
Menus |
|
|
Settings: [ ] = Factory-preset |
||
WIPE/FADER |
( 27), “Wipe or Fader Effects”. |
||||
PROGRAM AE |
( 27, 28), “Program AE, Effects And Shutter Effects”. |
||||
EFFECT |
( 27, 28), “Program AE, Effects And Shutter Effects”. |
||||
EXPOSURE |
( 24), “Exposure Control”. |
||||
W. BALANCE |
( 26), “White Balance Adjustment”. |
||||
SHUTTER |
( 27, 28), “Program AE, Effects And Shutter Effects”. |
||||
ZOOM |
[30X]: When set to “30X” while using digital zoom, the zoom |
||||
|
|
|
magnifi cation will reset to 30X since digital zoom will be |
||
|
|
|
disengaged. |
||
|
60X: |
|
Allows you to use the Digital Zoom. By digitally processing |
||
|
|
|
and magnifying images, zooming is possible from 30X |
||
|
|
|
(the optical zoom limit), to a maximum of 60X digital |
||
|
|
|
magnifi cation. |
||
|
800X: Allows you to use the Digital Zoom. By digitally processing |
||||
|
|
|
and magnifying images, zooming is possible from 30X |
||
|
|
|
(the optical zoom limit), to a maximum of 800X digital |
||
|
|
|
magnifi cation. |
||
TELE MACRO |
[OFF]: Disables the function. |
||||
|
ON: |
|
When the distance to the subject is less than 1 m (3.3 ft), set |
||
|
|
|
“TELE MACRO” to “ON”. You can shoot a subject as large as |
||
|
|
|
possible at a distance of approx. 40 cm (1.4 ft). Depending |
||
|
|
|
on the zoom position, the lens may go out of focus. |
||
DIS |
OFF |
|
: Disables the function. (DIS disable icon “ ” appears.) |
||
|
[ON]: |
|
|
|
|
|
|
To compensate for unstable images caused by camera- |
|||
|
|
|
shake, particularly at high magnifi cation. |
||
Notes:
•Accurate stabilization may not be possible if hand shake is excessive, or depending on the shooting condition.
•Switch off this mode when recording with the camcorder on a tripod.
•DIS cannot be activated when “NIGHT” in “PROGRAM AE”, or “STROBE” in “EFFECT” is selected.
GAIN UP |
OFF: |
Allows you to shoot dark scenes with no picture brightness |
|
|
|
adjustment. |
|
|
[AGC]: The overall appearance may be grainy, but the image is bright. |
||
|
AUTO: The shutter speed is automatically adjusted. Shooting |
||
|
|
a subject in low or poor lighting at slow shutter speed |
|
|
|
provides a brighter image than in the AGC mode, but the |
|
|
|
subject’s movements are not smooth or natural. The overall |
|
|
|
appearance may be grainy. While the shutter speed is being |
|
|
|
automatically adjusted, “ |
” is displayed. |
WIND CUT |
[OFF]: Disengages the function. |
|
|
|
ON: |
Helps cut down on noise created by wind. The “ ” indicator |
|
|
|
appears. The quality of the sound will change. This is normal. |
|
Menus for detailed adjustment EN 21
TAPE
Menus |
|
Settings: [ ] = Factory-preset |
REC MODE |
[SP]*: |
To record in the SP (Standard Play) mode |
|
LP: |
Long Play—more economical, providing 1.5 times the |
|
|
recording time. |
|
*SP indicator does not appear on the screen. |
|
Notes:
•If the recording mode is switched, the playback picture will be blurred at the switching point.
•During playback of a tape recorded on another camcorder, blocks of noise may appear or there may be momentary pauses in the sound.
SOUND MODE |
[12BIT]: Enables video recording of stereo sound on four separate |
|
channels. (Equivalent to the 32 kHz mode of previous |
|
models). |
|
16BIT: Enables video recording of stereo sound on two separate |
|
channels. (Equivalent to the 48 kHz mode of previous |
|
models). |
The “DISPLAY” settings (except “CLOCK ADJ.”, “16:9 OUTPUT” and “BRIGHT”) are effective only for shooting.
DISPLAY
Menus |
|
|
Settings: [ ] = Factory-preset |
ON SCREEN |
LCD: |
Keeps the camcorder’s display (except the date, time and |
|
|
|
time code) from appearing on the connected TV screen. |
|
|
[LCD/TV]: Makes the camcorder’s display appear on screen when |
||
|
|
|
the camcorder is connected to a TV. |
DATE/TIME |
[OFF]: The date/time does not appear. |
||
|
ON: |
The date/time is always displayed. |
|
CLOCK ADJ. |
12, “Date/Time Settings”. |
||
TIME CODE |
[OFF]: Time code is not displayed. |
||
|
ON: |
Time code is displayed on the camcorder and on the |
|
|
|
connected TV. Frame numbers are not displayed during |
|
|
|
recording. ( 15) |
|
16:9 OUTPUT |
To enable your tv to display images in 16:9 wide mode, set the tv |
||
|
screen size correctly. |
||
|
[4:3 TV]: |
For TV with an aspect ratio of 4:3. |
|
|
16:9 TV: |
For TV with an aspect ratio of 16:9. |
|
BRIGHT |
13, “Brightness Adjustment Of The Display”. |
||
ENGLISH

22 EN Menus for detailed adjustment
The “SYSTEM” functions which are set when the Power Switch is set to “REC” are also applied when the Power Switch is set to “PLAY”.
SYSTEM
Menus |
Settings: [ ] = Factory-preset |
LANGUAGE |
[ENGLISH] / FRANCAIS / ESPAÑOL / PORTUGUÊS |
|
The language setting can be changed. ( 12) |
MELODY |
OFF: Disengages the function. |
|
[ON]: A melody sounds when any operation is performed. |
DEMO MODE |
OFF: Automatic demonstration will not take place. |
|
[ON]: Demonstrates certain functions such as Wipe/Fader and |
|
Effects, etc., and can be used to confirm how these functions |
|
operate. Demonstration starts in the following cases: |
|
• When the Menu Screen is closed after “DEMO MODE” is turned |
|
“ON”. |
|
• With “DEMO MODE” set to “ON”, if there is no operation for about |
|
3 minutes after the Power Switch is set to “REC”. |
|
• Performing any operation during the demonstration stops the |
|
demonstration temporarily. If no operation is performed for more |
|
than 3 minutes after that, the demonstration will resume. |
|
Note: |
|
If a cassette is in the camcorder, the demonstration cannot be turned on. |
CAM RESET |
[CANCEL]: Does not reset all settings to the factory-preset. |
|
EXECUTE: Resets all settings to the factory-preset. |
Playback Menus
The settings on the next page ( 23) are effective only for video playback except “REC MODE”. The parameters (except “SOUND L/R” and “NARRATION” settings) are the same as in the description on page 21.
SOUND L/R and NARRATION
During tape playback, the camcorder detects the sound mode in which the recording was made, and plays the sound back. Select the sound to accompany your playback picture.
CONTINUED ON NEXT PAGE

|
|
|
Menus for detailed adjustment |
EN 23 |
|
Menus |
|
Settings: [ ] = Factory-preset |
|
|
|
|
||
|
REC MODE |
[SP]*/LP |
||
|
|
Allows you to set the video recording mode (SP or LP) depending |
||
|
|
on your preference. It is recommended you use “REC MODE” in |
||
|
|
VIDEO Menu when using this camcorder as a recorder during |
||
|
|
dubbing. ( 28, 29) |
||
|
|
* SP indicator does not appear on the screen. |
||
|
NARRATION |
Although it is not possible to perform audio dubbing with this |
||
|
|
camcorder, you can hear sound from an audio-dubbed tape during |
||
TAPE |
|
playback using this function. |
||
|
[OFF]: Original sound is output on both “L” and “R” channels in |
|||
|
|
|||
|
|
|
stereo. |
|
|
|
ON: |
Dubbed sound is output on both “L” and “R” channels in |
|
|
|
|
stereo. |
|
|
|
MIX: |
Original and dubbed sounds are combined and output in |
|
|
|
|
stereo on both “L” and “R” channels. |
|
|
SOUND L/R |
[STEREO]: Sound is output on both “L” and “R” channels in stereo. |
||
|
|
SOUND L: Sound from the “L” channel is output. |
||
|
|
SOUND R: Sound from the “R” channel is output. |
||
|
BLANK SEARCH |
CANCEL / [EXECUTE] |
||
|
|
17, “Blank Search”. |
||
Each setting (except “OFF” in “ON SCREEN”, “DATE/TIME” and “TIME CODE”) is linked with “DISPLAY”, which appears when the Power Switch is set to “REC”.
The parameters (except “OFF” in “ON SCREEN” setting) are the same as in the description on21.
|
Menus |
Settings: [ ] = Factory-preset |
|
|
ON SCREEN |
OFF / [LCD] / LCD/TV |
|
|
|
When set to “OFF”, the camcorder’s display disappears. |
|
DISPLAY |
DATE/TIME |
[OFF] / ON |
|
CLOCK ADJ. |
12, “Date/Time Settings” |
||
|
|||
|
TIME CODE |
[OFF] / ON |
|
|
|
15, “Time Code” |
|
|
16:9 OUTPUT |
[4:3 TV] / 16:9 TV |
|
|
|
21, “16:9 OUTPUT” |
|
|
BRIGHT |
13, “Brightness Adjustment Of The Display” |
SYSTEM
Each setting (except “DEMO MODE”) is linked with “SYSTEM”, which appears when the Power Switch is set to “REC”.
The parameters are the same as in the description on 22.
ENGLISH
 Loading...