


JHD916BT
AM/FM/RBDS/WB/USB/AUX-IN/BT/SiriusXM-ReadyTM Heavy Duty Radio
Installation and Operation Manual

JHD916BT
CONTENTS |
|
Introduction .................................................................................................................................. |
1 |
Safety Information........................................................................................................................ |
2 |
Installation.................................................................................................................................... |
3 |
Wiring ........................................................................................................................................... |
3 |
Basic Operation ........................................................................................................................... |
5 |
Tuner Operation ........................................................................................................................... |
7 |
USB Operation ............................................................................................................................. |
9 |
SiriusXM Radio Operation ......................................................................................................... |
10 |
iPod® Operation ......................................................................................................................... |
14 |
Bluetooth Operation ................................................................................................................... |
15 |
Care and Maintenance............................................................................................................... |
17 |
Troubleshooting ......................................................................................................................... |
17 |
Specifications............................................................................................................................. |
18 |
ii
JHD916BT
INTRODUCTION
System Features
Features of Jensen JHD916BTmobile audio system include:
Full Dot Matrix LCD
AM/FM US/ Turkey/ Italy/ Brazil Tuner with 12 Presets (6AM, 6FM)
RBDS (Radio Broadcast Data Service) with PTY Search
SiriusXM-Ready™ (requires SiriusXM Connect Tuner SXV300V1)
USB Playback of MP3 and WMA files
Weatherband Tuner with SAME Technology
Mute
Bluetooth (Supports A2DP, AVRCP and HFP)
Loudness
Electronic Bass, Treble and Balance Controls
Output Power 9W x 2
Clock 12/24 Hour Selectable
Headphone output
2-Channel Pre-amp Line Level Outputs
2- Wire Power with Non-Volatile Memory and Clock/Time support
Auxiliary Audio Input (Front 3.5mm Stereo Jack, Rear RCA)
Compatible with JMICHFP hands free microphone (sold separately)
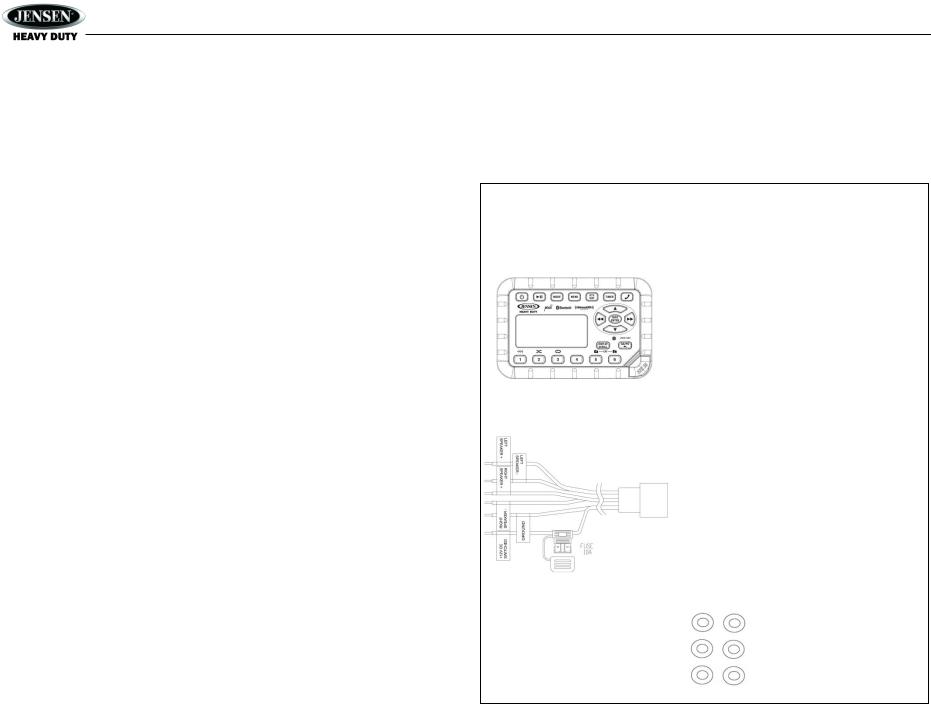
Content List
Jensen Heavy Duty Radio
Hardware Kit
Mounting Bracket
1/8” Auxiliary Cable
Quick Reference Guide
HARDWARE KIT CONTENTS
Radio
Mounting Bracket
Commander
Self-Tapping |
Self-Tapping |
Screws (3) |
Screws (2) |
Wiring Harness |
|
Machine Screws |
Machine Screws |
With Nuts (3) |
With Nuts (2) |
M4 Machine
Screws (4)
Auxiliary Input
Patch Cord
Washers
1

JHD916BT
SAFETY INFORMATION
When Driving
Keep the volume level low enough to be aware of the road and traffic conditions.
When Washing Your Vehicle
Do not expose the product to water of excessive moisture. Moisture can cause electrical shorts, fire or other damage.
When Parked
Parking in direct sunlight can produce very high temperatures inside your vehicle. Give the interior a chance to cool down before starting playback.
Use the Proper Power Supply
This product is designed to operate with a 12 volt DC negative ground battery system.
WARNING:
TO REDUCE THE RISK OF FIRE OR ELECTRIC SHOCK, DO NOT EXPOSE THIS EQUIPMENT TO RAIN OR MOISTURE.
TO REDUCE THE RISK OF FIRE OR ELECTRIC SHOCK AND ANNOYING INTERFERENCE, USE ONLY THE RECOMMENDED ACCESSORIES.
2

JHD916BT
INSTALLATION
Mounting the Bracket
Two options are provided for mounting the bracket (self-tapping screws or machine screws with nuts) to ensure a mounting option ideal for your mounting location. Avoid obstructing airflow to the rear cooling fins on the radio.
Notes: Mounting holes should be drilled to 7/32”. Before drilling the mounting holes, make sure the area behind the panel where the holes are desired is clear of wires and fuels, vacuum and or brake lines.
Mounting the Headphone Bracket
Three options are provided for mounting the bracket (self-tapping screws, machine screws with nuts or double-sided tape) to ensure a mounting option ideal for your mounting location. Alternately, the headphone can be mounted directly to the instrument panel if access to the rear of the instrument panel is available.
NOTE: Mounting holes should be drilled to 7/32”. Before drilling the mounting holes, make sure the area behind the panel where the holes are to be drilled is clear of wires and fuel, vacuum and or brake lines.
Self-Tapping |
Machine Screws |
Screws |
with Nuts |
(Hole size 7/32”) |
(Hole size 7/32”) |
Attaching the Radio
Once the bracket is securely mounted, use the four included M4 machine screws to fasten the bracket to the back of the radio. Alternatively, the radio can be mounted directly to the instrument panel if access to the rear of the instrument panel is available.
CAUTION! Do not over tighten the 4 mounting screws. Hand tighten only.
Regular
Mounting
Overhead
Mounting
Self-Tapping |
Machine Screws |
Screws |
with Nuts |
(Hole size 7/32”) |
(Hole size 7/32”) |
Double-Sided Tape
Mounting Stack
Mounting machine Screws
Bracket metal
Vehicle mounting surface
Washer
Nut
3

JHD916BT
WIRING
WARNING!
Do not connect the +12VDC ACC switched wire to the battery. This wire MUST be connected to the Accessory/Ignition wire or a +12 volts switched power source.
No. |
Color |
Description |
|
1 |
50 ohm |
BT Antenna |
|
Cable |
|||
|
|
||
2 |
Blue |
AMP Remote (+12VDC 500MA) |
|
3 |
Black |
Ground |
|
4 |
Red |
+12V DC SWITCHED |
|
5 |
Gray |
Right Speaker (+) |
|
6 |
Gray/Black |
Right Speaker (-) |
|
7 |
White |
Left Speaker (+) |
|
8 |
White/Black |
Left Speaker ( ) |
|
9 |
Black |
Mic |
|
10 |
Black |
Headphone out |
|
11 |
Black |
Aux-In |
|
12 |
Black |
Aux-In |
|
13 |
Gray |
Line-Out |
|
14 |
Gray |
Line-Out |
|
15 |
Black |
External Antenna |
|
16 |
Black |
USB Pigtail |
|
17 |
Black |
SiriusXM |
4
JHD916BT
BASIC OPERATION |
Reset |
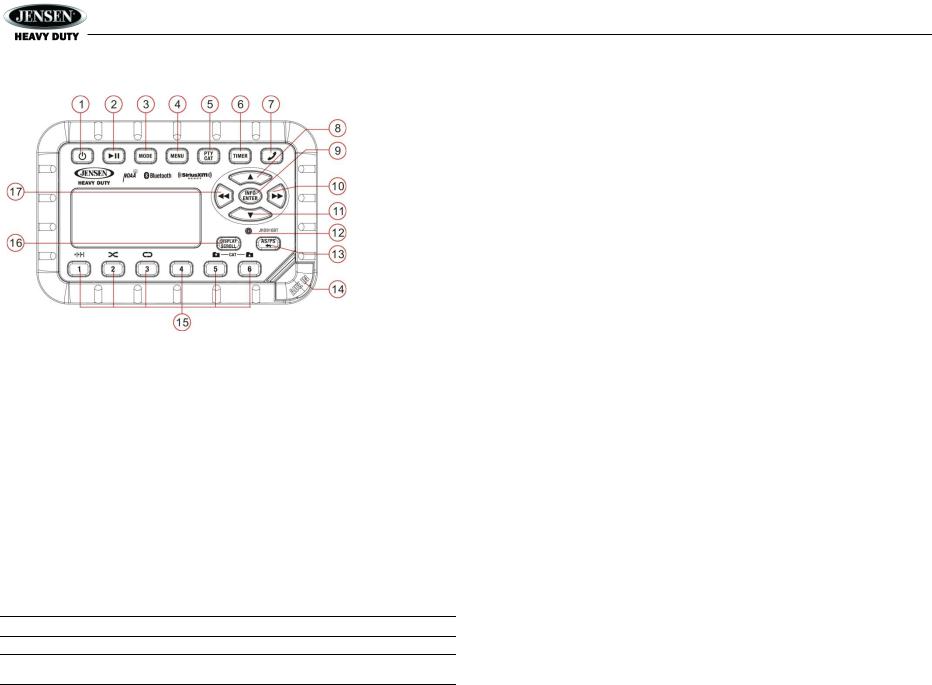
Power On/Off
Press the POWER button (1) to turn the unit on or off.
Volume Control
To increase the volume, press the ▲button (8). To decrease the volume, press the ▼ button (11).
Play/Pause/Mute
Press the ►|| button (2) on the control panel to pause or mute the audio output. Press ►|| button again to unmute or restore the audio output to the previous level.
Mode
Press the MODE button (3) to select a different mode of operation, as indicated on the display panel. Available modes include the following: FM > AM > Weather Band > Auxiliary > BT Audio > iPod/USB > SXM (SiriusXM). FM is the default source when a prior source is no longer available.
NOTE: iPod, USB or SiriusXM (SXM) mode will be skipped if the device is not installed.
NOTE: Weather Band or SiriusXM (SXM) mode will be skipped when the Region menu option is set to“Turkey / Italy / Brazil”.
The reset button (12) should be activated for the following reasons:
Initial installation of the unit when all wiring is completed
Function buttons do not operate
Error symbol on the display
Use a ball point pen or thin metal object to press the reset button. This may be necessary should the unit display an error code.
Audio Menu
Press the MENU button (4) to access the audio menu. You can navigate through the audio menu items by pressing the MENU button repeatedly. Once the desired menu item appears on the display, adjust that option by pressing the ▲ or ▼ buttons (8, 11) within 5 seconds. The unit will automatically exit the audio menu after five seconds of inactivity. The following menu items can be adjusted.
Bass Level
Use the ▲ or ▼ buttons (8, 11) to adjust the Bass level range from “-6” to “+6”.
Treble Level
Use the ▲ or ▼ buttons to adjust the Treble level range from “-6” to “+6”.
Balance
Use the ▲ or ▼ buttons to adjust the Balance between the left and right speakers from “Left 12” to “Right 12”.
System Menu
1.Press and hold the MENU button (4) for more than 2 seconds to enter the system menu.
The first menu item, “Key Beep”, will appear on the display.
2.Press the ▲ or ▼ buttons (8, 11) repeatedly to navigate the system menu.
3.Press the INFO/ENTER button (9) to select the desired item.
4.Press the INFO/ENTER button again to adjust the selected menu item.
The following items can be adjusted:
Key Beep (On / Off): Turn the audible beep On/Off (heard when functions/buttons are selected).
LCD Backlight (1-10): Adjust LCD brightness.
LCD Contrast (1-10): Adjust LCD contrast.
Tuning Region (USA / EURO): Set frequency spacing for various regions.
Loudness (On/ Off): When the volume is low, turn the LOUD ON to improve bass performance.
Power-Off Clock (Off, 1-10): Brightness setting of clock when powered off
Clock Format (12Hour / 24Hour): Select 12 or 24 hour display mode.
Set Clock (HH : MM):
Press the INFO/ENTER button (9) to view the clock set screen.
Press the ◄◄ or ►► buttons (17, 10) to move to the next digit.
5
 Loading...