


JHD40BTBRP
HEAVY DUTY AUDIO SYSTEM
Installation and Operation Manual

CONTENTS
JHD40BTBRP
Copyrights and Trademarks
Warnings and Compliance |
.............................................................................................................. 3 |
Introduction...................................................................................................................................... |
4 |
Installation ....................................................................................................................................... |
5 |
Wiring............................................................................................................................................... |
6 |
Basic Operation............................................................................................................................... |
7 |
Tuner Operation .............................................................................................................................. |
9 |
Weather Band Operation .............................................................................................................. |
10 |
MP3/WMA Operation .................................................................................................................... |
11 |
iPod® Operation............................................................................................................................. |
12 |
Bluetooth Operation ...................................................................................................................... |
13 |
Care and Maintenance.................................................................................................................. |
15 |
Troubleshooting............................................................................................................................. |
15 |
Specifications ................................................................................................................................ |
16 |
iPhone, iPod, iPod classic, iPod nano, iPod shuffle, and iPod touch are trademarks of Apple Inc., registered in the U.S. and other countries.
“Made for iPod” and “Made for iPhone” means that an electronic accessory has been designed to connect specifically to iPod or iPhone respectively, and has been certified by the developer to meet Apple performance standards. Apple is not responsible for the operation of this device or its compliance with safety and regulatory standards. Please note that the use of this accessory with iPod or iPhone may affect wireless performance.
2

JHD40BTBRP
WARNINGS AND COMPLIANCE
Important Safety Instructions
NOTE: Keep the volume level low enough to be aware of your surroundings.
NOTE: USE THE PROPER POWER SUPPLY! This product is designed to operate with a 12 volt DC negative ground battery system.
FCC Notes
WARNING! Changes or modifications to this unit not expressly approved by the party responsible for compliance could void the user’s authority to operate the equipment.
NOTE: This equipment has been tested and found to comply with the limits for a Class B digital device, pursuant to Part 15 of the FCC Rules. These limits are designed to provide reasonable protection against harmful interference in a residential installation.
This equipment generates, uses, and can radiate radio frequency energy and, if not installed and used in accordance with the instructions, may cause harmful interference to radio communications.
However, there is no guarantee that interference will not occur in a particular installation. If this equipment does cause harmful interference to radio or television reception, which can be determined by turning the equipment off and on, the user is encouraged to try to correct the interference by one or more of the following measures:
Reorient or relocate the receiving antenna.
Increase the separation between the equipment and receiver.
Connect the equipment into an outlet on a circuit different from that to which the receiver is connected.
Consult the dealer or an experienced radio/TV technician for help.
3

JHD40BTBRP
INTRODUCTION
System Features
Features of the Jensen JHD40BTBRP heavy duty audio system include:
Amber LED Backlit LCD
iPx6 Waterproof
Low Battery Alarm
AM/FM WORLD Tuner with 30 Presets (12 AM, 18 FM)
Weatherband with Weather Alert
Bluetooth (Supports A2DP and AVRCP)
USB Playback of MP3/WMA Files
Made for iPod/iPhone (USB Input)
Mute
Pre-set Equalizer - 5 settings (User > Flat > Pop > Classical > Rock)
Electronic Bass, Treble, Balance and Fader Controls
Output Power 22W x 4
Wired Remote Control Ready (Jensen Universal Handlebar Audio Control (JHDHBC); Harley-Davidson® OEM Handlebar Controls)
2-Channel Pre-amp Line Level Outputs
Auxiliary Audio Input (Rear RCA)
Content List
Jensen JHD40BTBRP Radio
Installation Opening Cutout Template
M4 x 0.7 Screws (x4)
4
|
|
|
JHD40BTBRP |
|
|
|
|
|
|
INSTALLATION |
7. |
Secure the radio to the dashboard using #6 panhead screws (not provided). |
||
|
|
|||
|
|
8. |
Replace the covers on either side of the radio. |
|
Before you Begin |
9. |
Test radio operation by referring to the operating instructions for the unit. |
||
|
|
|
||
Before you begin, always disconnect the battery negative terminal. |
Removing the Unit |
|||
|
|
|
||
Important Notes
Before final installation, test the wiring connections to make sure the unit is connected properly and the system works.
Consult with your nearest dealer if installation requires the drilling of holes or other modifications to your vehicle.
Install the unit where it does not interfere with diving and cannot injure passengers if there is a sudden or emergency stop.
Front Mount
1.Use the included template to cut the installation opening.
2.Check the dashboard opening size by sliding the radio into it. If the opening is not large enough, carefully cut or file as necessary until the radio slides into the opening. Check that there will be sufficient space behind the dashboard for the radio chassis.
3.Place the radio in front of the dashboard opening so the wiring can be brought through the opening.
4.Follow the wiring diagram carefully and make certain all connections are secure to ensure proper operation.
5.After completing the wiring connections, turn the unit on to confirm operation (vehicle accessory switch must be on). If the unit does not operate, recheck all wiring until the problem is corrected. Once proper operation is achieved, turn the accessory switch off and proceed with final mounting of the chassis.
6.Carefully slide the radio into the opening, making sure it is right-side-up.
To remove the radio after front mount installation, remove the covers, unscrew the installation screws and pull the radio out.
Reconnect Battery
When wiring is complete, reconnect the battery negative terminal.
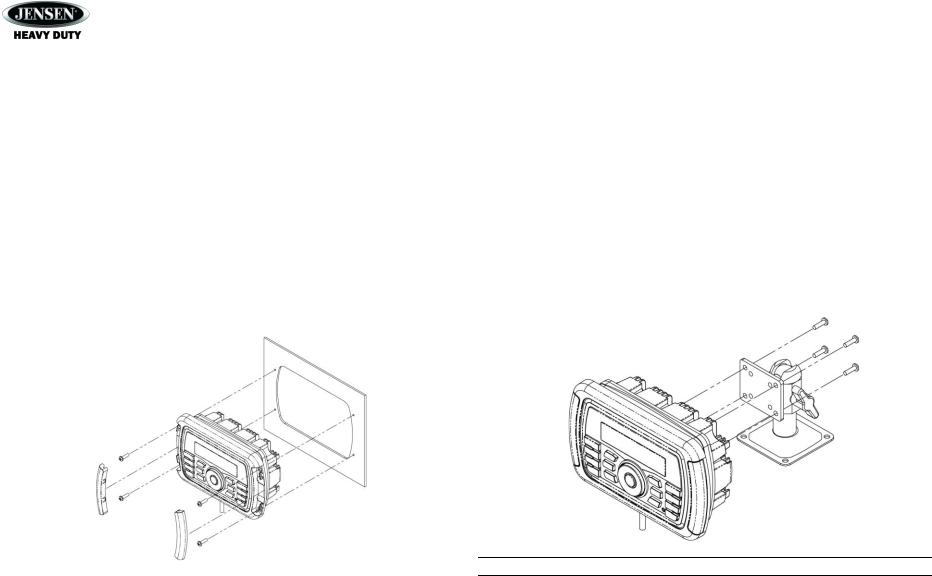
Bracket Mount
The VOSHD4MNT (sold separately) is a versatile mounting base/bracket for easy installation on most flat surfaces. Please use the included M4 screws to attach the radio to the bracket, as shown in the diagram below.
M4x.7 10mm Max
Length
NOTE: Use only the M4 x 7-10mm length screws, included.
5

JHD40BTBRP
WIRING
WIRE INSERTION VIEW
|
PIN NO. |
|
DESCRIPTION |
|
PIN NO. |
DESCRIPTION |
|
1 |
|
VOLUME + |
|
5 |
TUNE + |
|
2 |
|
VOLUME |
|
6 |
TUNE |
|
3 |
|
MUTE |
|
7 |
MODE |
|
4 |
|
GROUND |
|
8 |
GROUND |
|
|
|
WIRE CHART |
|
||
|
NO. |
|
COLOR |
DESCRIPTION |
||
|
13 |
|
50 ohm |
BLUETOOTH ANTENNA |
||
|
14 |
|
N / A |
N / A |
|
|
|
15 |
|
BLACK |
USB |
|
|
|
16 |
|
BLACK |
EXTERNAL ANT. |
||
|
17 |
|
BLACK |
AUX IN-RIGHT |
||
|
18 |
|
BLACK |
AUX IN-LEFT |
||
|
19 |
|
GRAY |
LINE OUT-RIGHT |
||
|
20 |
|
GRAY |
LINE OUT-LEFT |
||
|
|
|
12 PIN DELPHI CONNECTOR |
|||
|
NO. |
|
COLOR |
DESCRIPTION |
||
|
A |
|
BLACK |
GROUND |
|
|
|
B |
|
BLUE |
AMP REMOTE |
||
|
C |
|
GREEN |
REAR LEFT SPEAKER C |
||
|
D |
|
GREEN / BLACK |
REAR LEFT SPEAKER |
||
|
E |
|
GRAY / BLACK |
FRONT RIGHT SPEAKER |
||
|
F |
|
GRAY |
FRONT RIGHT SPEAKER + |
||
|
G |
|
VIOLET |
REAR RIGHT SPEAKER + |
||
|
H |
|
VIOLET / BLACK |
REAR RIGHT SPEAKER |
||
|
J |
|
RED |
+12V DC SWITCHED |
||
|
K |
|
WHITE |
FRONT LEFT SPEAKER + |
||
|
L |
|
WHITE / BLACK |
FRONT LEFT SPEAKER |
||
|
M |
|
N / A |
N / A |
|
|
6
 Loading...