


JHD910
Owner’s Manual
JENSEN
MUTE DISP AM/FM AUX WB TIMER
|
JENSEN |
HEAVY DUTY |
|
|
|
|
|
|
|
|
|
VOL+ |
|
|
|
|
|
TUN |
AUDIO |
TUN |
|
|
|
|
|
||
FM |
|
|
|
|
MENU |
+ |
|
|
|
|
|
VOL- |
|
|
|
|
|
SEEK |
|
SEEK |
|
AM/FM/WB RECEIVER |
JHD910 |
|
|
+ |
|
|
|
|
|
|||
1 |
2 |
3 |
4 |
5 |
6 |
|
A |
U |
X |
|
||
|
|
IN

|
JHD910 |
CONTENTS |
|
Introduction ................................................................................................................ |
1 |
Installation .................................................................................................................. |
3 |
Wiring.......................................................................................................................... |
5 |
Basic Operation.......................................................................................................... |
6 |
Tuner Operation ......................................................................................................... |
8 |
Weather Band Operation......................................................................................... |
10 |
Troubleshooting....................................................................................................... |
11 |
Specifications........................................................................................................... |
12 |
ii

JHD910
INTRODUCTION
Thank You!
Thank you for choosing a Jensen product. We hope you will find the instructions in this owner’s manual clear and easy to follow. If you take a few minutes to look through it, you’ll learn how to use all the features of your new Jensen receiver for maximum enjoyment.
Features
Features of the Jensen JHD910 mobile audio system include:
•Waterproof
•uV and Corrosion Resistant
•Electronic US/Euro AM/FM Tuner
•30 Programmable Presets (12 AM, 18 FM)
•Non-Volatile Memory for User Settings and Preset Memories
•7-Channel NOAA Weather Band
•Weather Alert
•Auxiliary Audio Input
•Headphone Output
•2-Channel Amplified Audio Output
•Backlit Controls with Selectable Illumination Color
•Daylight Readable Display
•Clock with 30-day Backup Power
•Work Timer
•Audible Beep ConfirmationTone
1

JHD910
Package Contents
•JHD910 Radio
•Radio Mounting Bracket
•Headphone Mounting Bracket
•Five (5) 10-16 x 3/4” Stainless Steel PPH Screws
•Five (5) 10-32 x 5/8” Stainless Steel PPH Screws
•Five (5) 10-32 Stainless Steel Hex Nuts
•Five (5) #10 Stainless Steel Washers
•Four (4) M4 x .7 x 8MM Stainless Steel Hex Screws with Captivated Washers
•Wiring Harness
•Auxiliary Input Patch Cord
•Owner’s Manual
JHD910 Radio
JENSEN
MUTE DISP AM/FM AUX WB TIMER
|
JENSEN |
HEAVY DUTY |
|
|
|
|
|
|
|
|
|
VOL+ |
|
|
|
|
|
TUN |
AUDIO |
TUN |
|
|
|
|
|
MENU |
+ |
|
|
|
|
|
VOL- |
|
|
|
|
|
SEEK |
|
SEEK |
|
AM/FM/WB RECEIVER |
JHD910 |
|
|
+ |
|
|
|
|
|
|||
1 |
2 |
3 |
4 |
5 |
6 |
|
|
|
X |
IN |
A |
U |
|
|
|
|
||
|
|
|
Owner’s Manual
|
|
JHD910 |
|
|
|
|
|
||
|
Owner’s Manual |
|
|
|
|
||||
|
|
JENSEN |
|
|
|
|
|
|
|
|
MUTE |
DISP |
AM/FM |
AUX |
WB |
TIMER |
|
|
|
|
JENSEN |
HEAVY DUTY |
|
|
|
|
|
|
|
FM |
|
|
|
|
|
+ |
|
|
|
|
AM/FM/WB RECEIVER |
JHD910 |
|
|
+ |
|
|
|
|
1 |
2 |
3 |
4 |
5 |
|
6 |
|
|
|
|
|
|
|
|
|
|
|
X |
IN |
|
|
|
|
|
|
A |
U |
|
|
Radio |
Headphone |
Mounting Bracket |
Mounting Bracket |
Self-Tapping |
Self-Tapping |
Screws (3) |
Screws (2) |
Washers |
|
Machine Screws |
Machine Screws |
with Nuts (3) |
with Nuts (2) |
M4 Machine |
|
Screws (4) |
Auxiliary Input |
|
Patch Cord |
Wiring Harness
2
JHD910
INSTALLATION
Mounting the Bracket
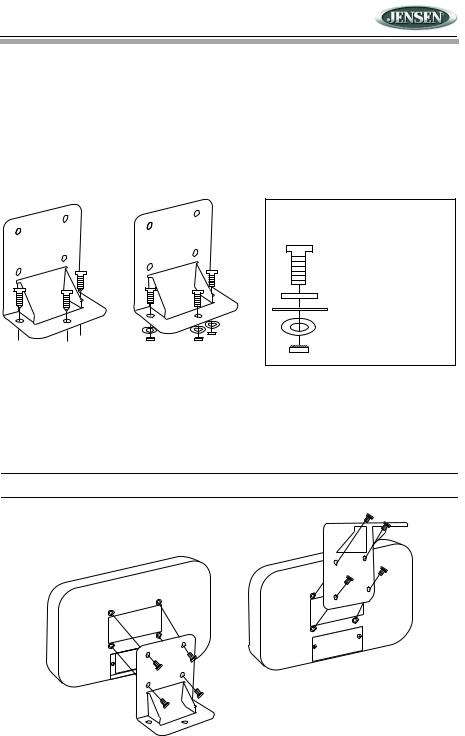
Two options are provided for mounting the bracket (self-tapping screws or machine screws with nuts) to ensure a mounting option ideal for your mounting location. Avoid obstructing airflow to the rear cooling fins on the radio.
Note: Mounting holes should be drilled to 7/32”. Before drilling the mounting holes, make sure the area behind the panel where the holes are desired is clear of wires and fuel, vacuum and or brake lines.
|
|
Mounting Stack |
|
|
Mounting machine screw |
|
|
Bracket metal |
|
|
Vehicle mounting surface |
|
|
Washer |
Self-Tapping |
Machine Screws |
Nut |
|
||
Screws |
with Nuts |
|
(Hole size 7/32") |
(Hole size 7/32") |
|
|
|
Attaching the Radio
Once the bracket is securely mounted, use the four included M4 machine screws to fasten the bracket to the back of the radio. Alternately, the radio can be mounted directly to the instrument panel if access to the rear of the instrument panel is available.
CAUTION! Do not over tighten the 4 mounting screws. Hand tighten only.
Regular
Mounting
Overhead
Mounting
3
 Loading...